This time, I introduce the features of photogrammetry and how to generate a 3d model with it for beginners to understand easily. By reading through this article, you will be able to try it by yourself.
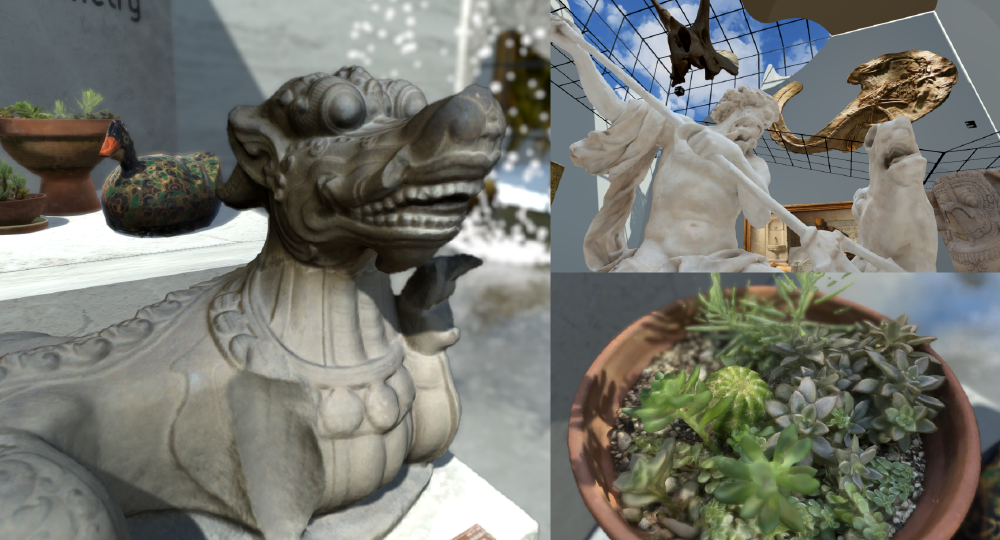
Some examples made by photogrammetry
Sample
You can taste the sample space in STYLY GALLERY. Museum of Photogrammetry
What is photogrammetry?
Photogrammetry is a technique to analyze the photos taken from various directions with a computer and generate a 3d model from them. You can create various 3D models, from a small object like a figure doll to a large object like a building or a city, by this technique. It’s used in the professional fields such as land surveying, topographical survey, historic preservation. But, it’s also used for video-game development in recent days. As PC and photogrammetry software are getting higher performance, this technology becomes a technology anyone can handle it easily.
Rocca Calascio – RAWscan by Spogna on Sketchfab
What you need for photogrammetry
Let’s prepare what you need for photogrammetry. For photogrammetry, you need a PC, camera and photogrammetry software. That’s all to start photogrammetry. Although it’s preferable to have a high-spec PC and a camera, a laptop PC and a smartphone’s camera also work sufficiently. The following table shows what you need for photogrammetry.
| What is required? | Notes | |
| PC | Any PCs on sale currently can deal with photogrammetry. | High-spec PC would finish the analysis quicker. |
| Camera | A high-spec camera like digital SLR is preferable, but a smartphone camera is sufficient enough for the analysis. | You can create 3d model with higher precision by using a high-spec camera. |
| Photogrammetry software | There are some commonly-used software, so you can choose from them. | The cheapest option of the major software is around 15000 yen. There is also a free trial version. |
The comparison of photogrammetry software
Several companies sell photogrammetry software. Each software has pros and cons, but any of them should be OK when you use photogrammetry as a hobby. If you try using photogrammetry for the first time, I recommend the free trial version of 3DF Zephyr. I selected some major photogrammetry software that are easy to use. please see below.
| price | Supported OS | Pros and cons | Link to the online sales site | |
| 3DF Zephyr | 15,380 yen ※The price would be reduced by sales event. The lowest price so far is 6,953 yen. | Windows | Its one-off price is around 15000 yen and you can export 3d model for free if you use 50 photos or less. For hobby use, 50 photos are sufficient, so I recommend this for your first try. | Steam : 3DF Zephyr |
| Reality Capture | 3,980 yen per a month ※The price would be reduced by sales event. | Windows | Compared to other photogrammetry software, it has a good reputation with the precision. It seems to support high-end functions as well. It’s available with monthly subscription only (no one-off price option is set), which would be a downside. | Steam : Reality Capture |
| Agisoft PhotoScan | 27,000 yen approx. ※You need to get an estimate from the distributor. | Windows / Mac | The good news is that it supports MacOS. It has been used in some academic studies, so it should offer sufficient precision. You need to get an estimate before the purchase. | Oak Corporation |
Download the free trial version of 3DF Zephyr
In this tutorial, I took the free trial version of 3DF Zephyr as an example. If you try using photogrammetry for the first time, I recommend you to choose the software after using this trial version of 3DF Zephyr. To download the trial version of 3DF Zephyr, access ‘Steam : 3DF Zephyr‘, and click ‘Download Demo’ (Alternatively, you can download from this site).
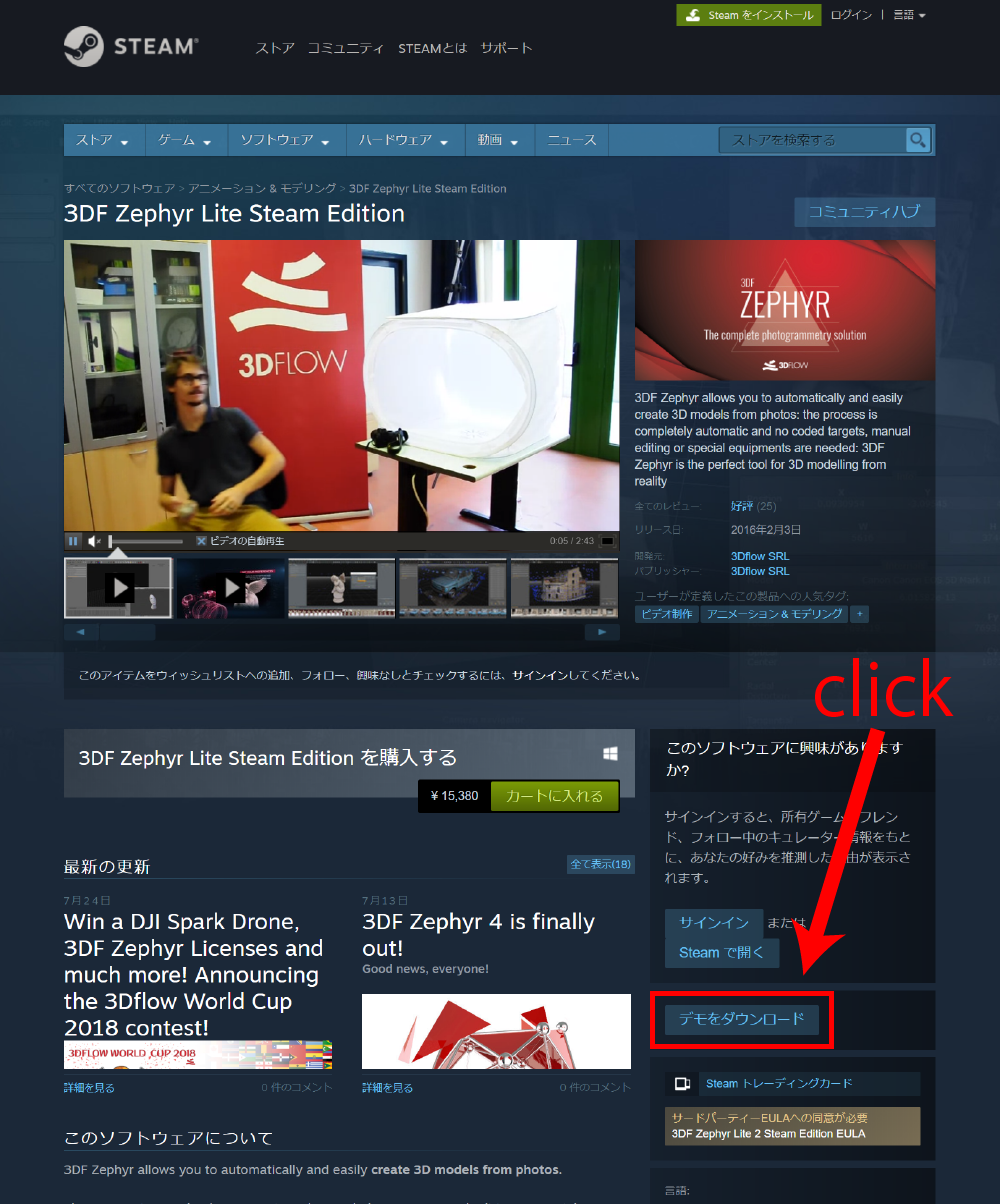
How to download the trial version of 3DF Zephyr
What object is suitable for photogrammetry?
Some objects are suitable for photogrammetry while others are not. The object with rough texture is suitable for scanning. On the other hand, smooth texture or bright surface is not suitable for scanning. In addition, a tiny object, which requires a close-up photo, or an excessively complicated shape is not suitable. In particular, it’s almost impossible to build up a decent 3d model from an object with a reflective surface such as glass, a mirror, or a moving object such as an animal. Firstly, prepare an object suitable for scanning to make a decent 3D model.
| Suitable for photogrammetry | Not suitable for photogrammetry |
| ・One with a rough texture ・One with a lot of patterns on the surface. | ・Smooth texture such as plastic, ceramic ware. ・Bright surface. ・A tiny object that requires close-up photo ・A excessively complicated shape such as tree, plant. ・A continuously-moving object such as a human, a pet. It is almost impossible to use for photogrammetry. ・Transparent material such as glass. ・Refrective surface such as a mirror. |
Taking photos
After preparing the object to scan for photogrammetry, take actual photos next. Take photos while varying the camera angle with a small step so that all surfaces of the object are covered by the photo. In this example, I limit the number of the photos because I used the trial version of 3DF Zephyr, but you can improve the precision of the 3d model by taking more photos in the case you use the full version.
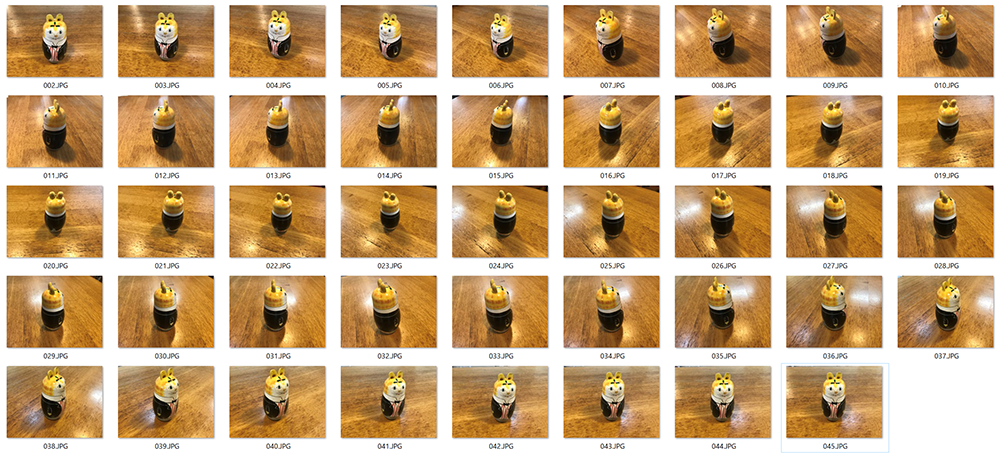
An example – how to take photos
When taking photos, please pay attention to the points shown below. ・If you place the object to scan on a base, use the base with a rough texture, which is likely to give higher precision to the 3d model, compared to placing on the base with a smooth texture. ・Pay attention to the light not to take underexposed or overexposed photos. ・Unsteady shot kills photogrammetry. Please keep calm to prevent a camera move when taking the photos.
Use photogrammetry software
Once you finished taking the photos, let’s apply photogrammetry to them. In this tutorial, I use the trial version of 3DF Zephyr.
Open a new project and compute the camera orientation
When the software is opened, drag the photos onto it at first. It opens a new project.
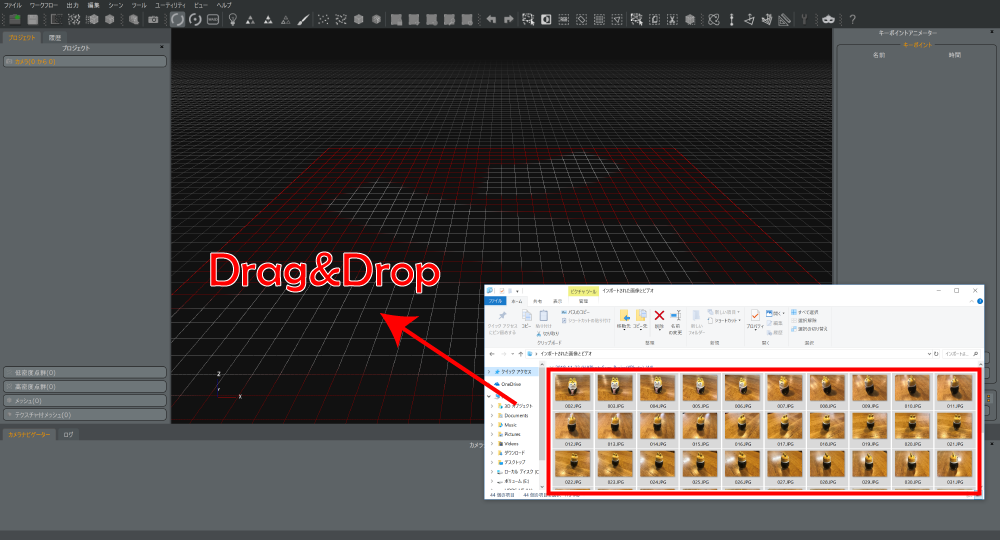
Drag the photos into the application.
When the window to create a new project is opened, go ahead by following the Project Wizard. Some steps require you to set the parameters, but you can basically leave them the default values. After finishing some steps, you are asked to set the camera direction, so select the relevant option from the drop-down list of the ‘Category’ field. Since we took the photos of a small object on a table, choose ‘Close Range’. In the last window of the Project Wizard, press the ‘Run’ button to start the computation for camera orientation. It analyzes the camera positions when the photos were taken.
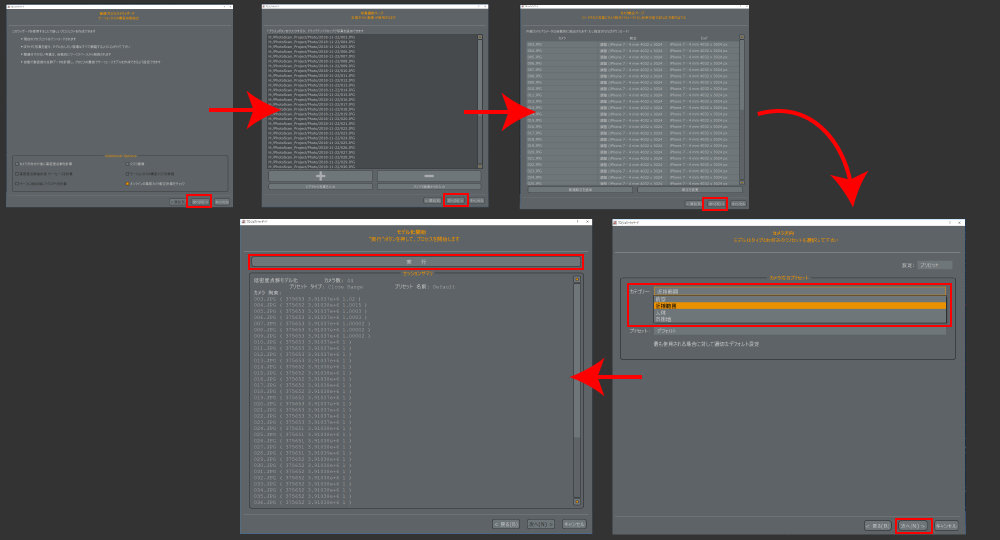
The setting for a new project
When the analysis is completed, you see the screen as shown below. Even in this state, you can see the outline of the scanned object partially.
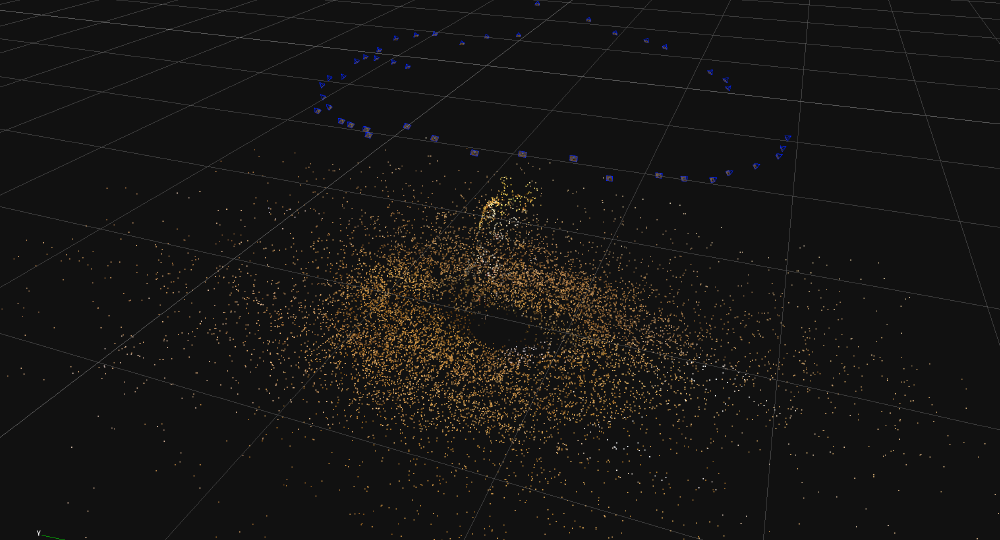
The camera positions when the photos were taken.
Resize the bounding box to the relevant size
Next, set the bounding box. The bounding box shows the range for scanning. Initially, the bounding box is set to cover a large area, so resize it to the relevant size since you just need to scan where the object is. In the toolbar, there is the ‘hide/unhide’ toggle button for the bounding box, so press it to display the bounding box. After that, by using the Edit tools for the bounding box, which you can find next to the ‘hide/unhide’ button, resize the bounding box to the relevant size.
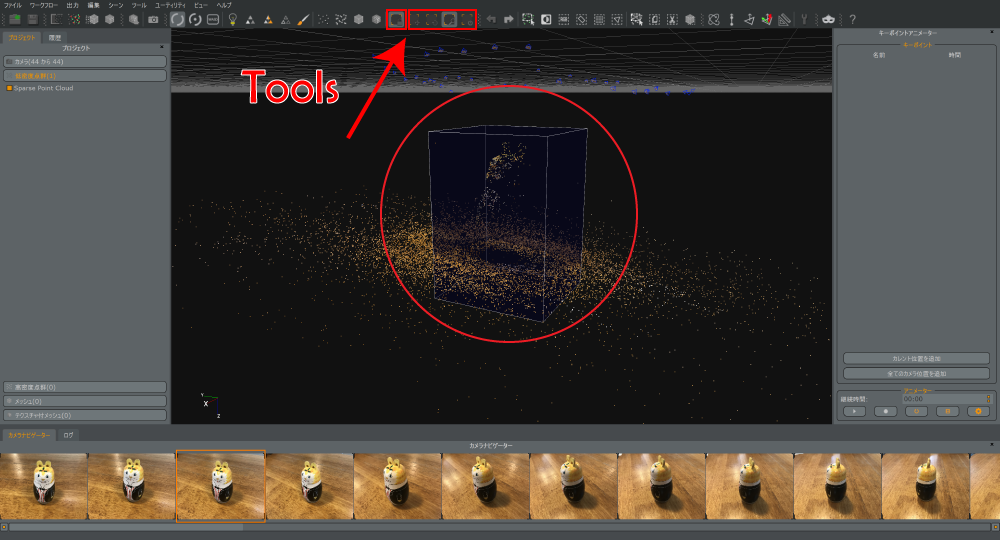
The setting for the bounding box
Create a dense point cloud
After setting the bounding box, create a dense point cloud. Press the ‘Dense Point Cloud Generation’ button in the toolbar to open the setting window. There are some parameters to set, but it’s OK to leave them the default values. Press the RUN button to start the analysis. Basically, this computation takes the longest time. Be patient. If you fed a lot of photos, it could take more than an hour.
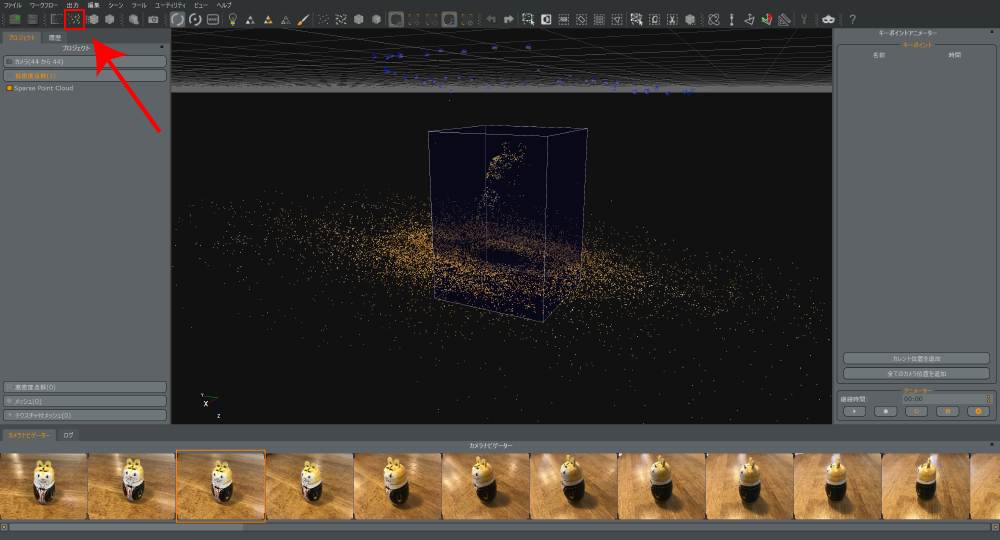
Crate a dense point cloud
Generate triangular mesh
Once the dense point cloud is created, you can see the shape of the scanned object clearly. Next, we create a triangular mesh from the dense point cloud created. Press the ‘Mesh Extraction’ button in the toolbar to open the window. There are some parameters to set, but it’s OK to leave them the default values. Press the RUN button to start the process.
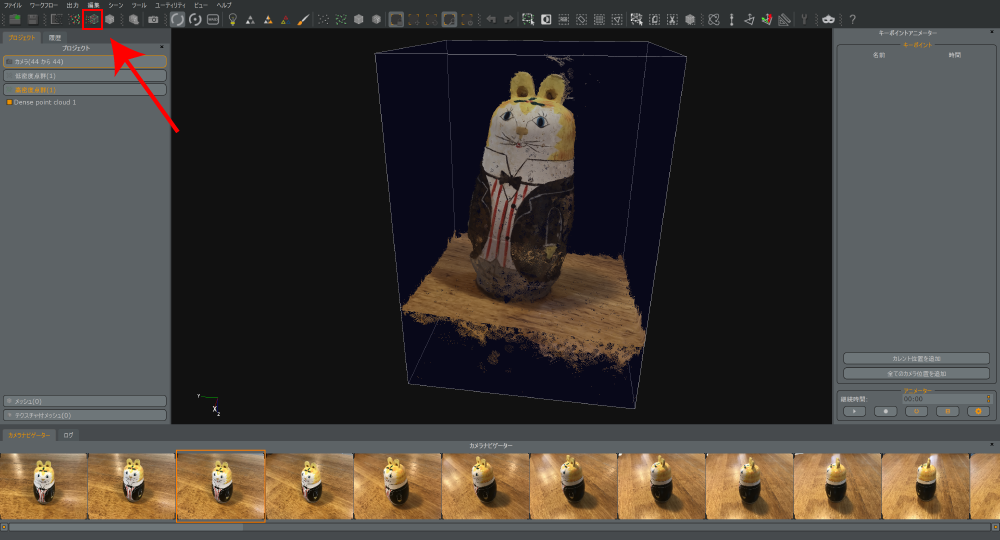
Mesh Extraction
Texture generation
This is the final step. We create a mesh with texture. Press the ‘Textured Mesh Generation’ button in the toolbar to open the setting window. In the window, set ‘Max number of textures’ to ‘1’ unless you really need to use a different value. If you set it to more than 1, the number of textures generated would increase so that the data size increases excessively. And, the same goes for ‘Max number of vertices’, so preferably limit it to 10000. In the case for VR, I recommend limiting it to 50000 although it depends on the complexity of the surface shape. When the setting is completed, press the ‘RUN’ button to start the computation.
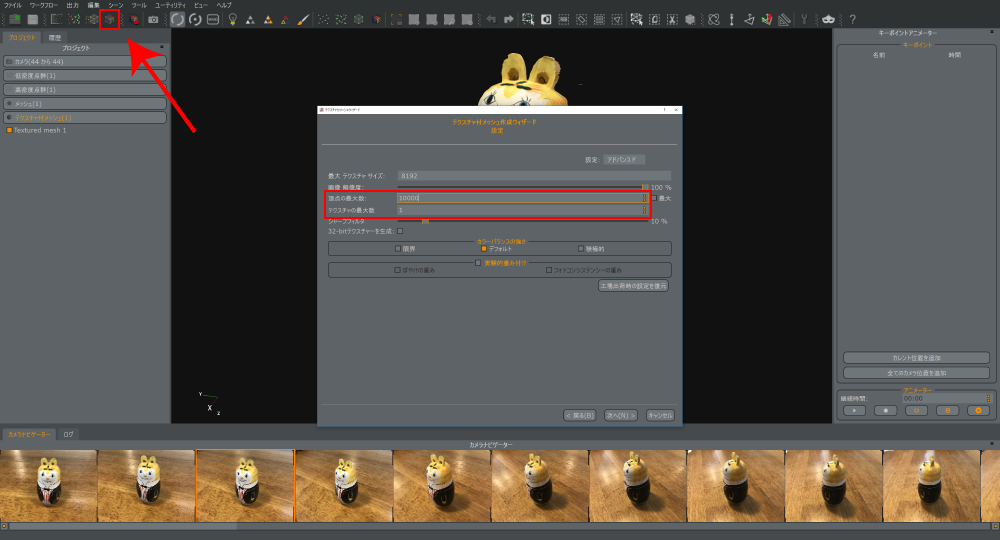
Create a textured mesh.
Once this computation is done, the 3d model is completed.
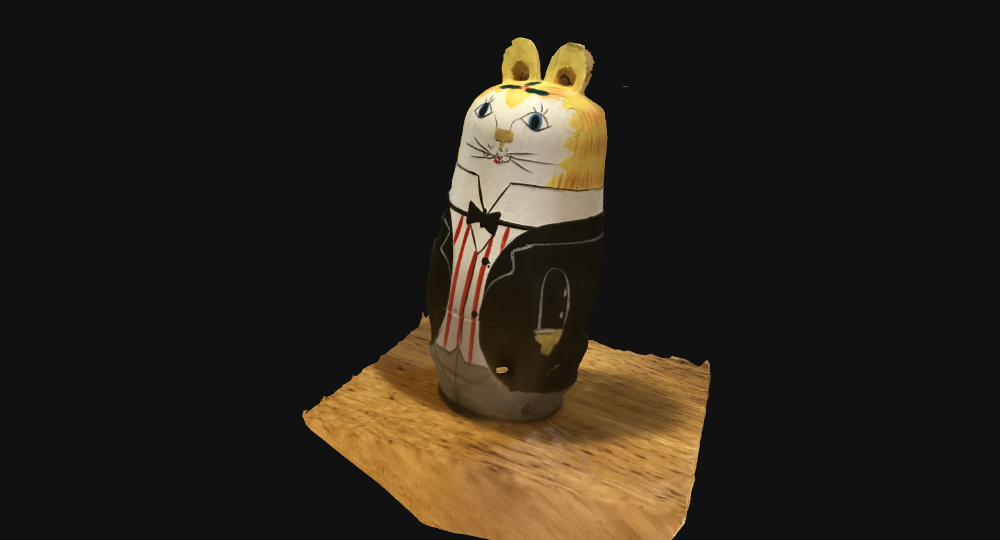
The 3d model completed
Export the 3d model created
Let’s export the 3d model completed to upload to STYLY. Press the ‘Export textured mesh’ button to open the setting window. In the window, change ‘Export format’ from ‘Upload to Sketchfab’ to ‘Obj/Mtl’. Then, check the ‘Local Rendering Reference System’ box. When the setting is completed, press the ‘Export’ button and specify where to save.
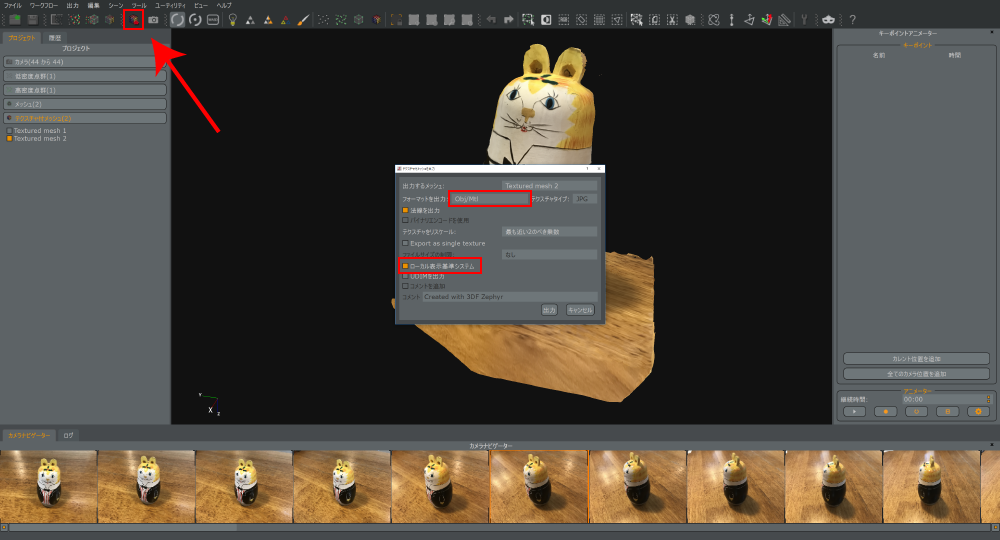
Export the 3d model
Upload to STYLY via Unity
You can upload the 3d model completed directly by STYLY’s Web Editor, but it gives a different appearance from the one on the photogrammetry software due to the difference between the shaders. If you upload it via Unity, you could change the shader. So, I recommend it for the user who really cares the appearance.
Change the shader to apply
Firstly, open Unity. Select all data files exported and drag them onto the Project window to import. Then, drag the model from the Project window to the Hierarchy window to load the 3d model into the Scene.
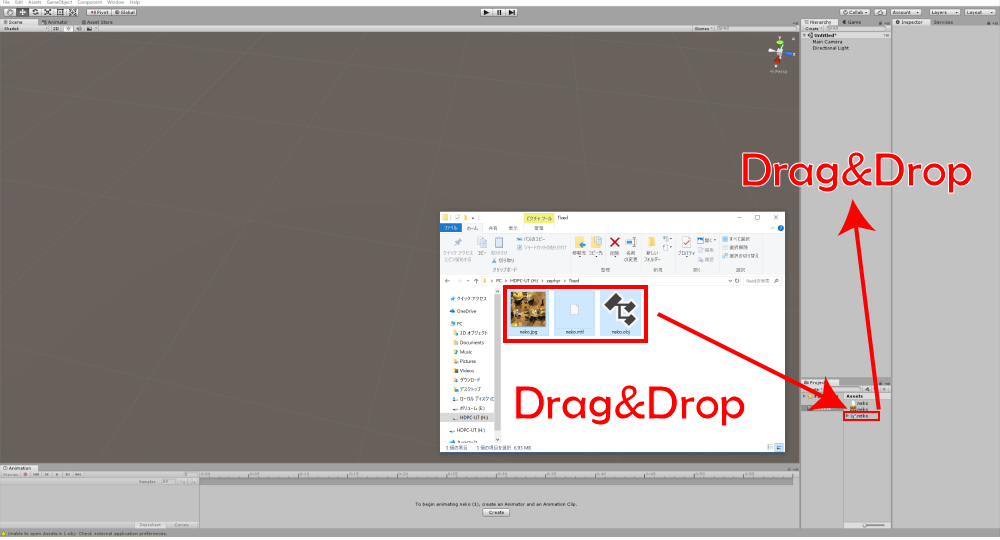
Import the model to Unity
The 3d model imported should look different from how it looked on the photogrammetry software due to the difference between the shaders. Create a material to set a proper shader. Right-click on the Project window and select Create > Material.
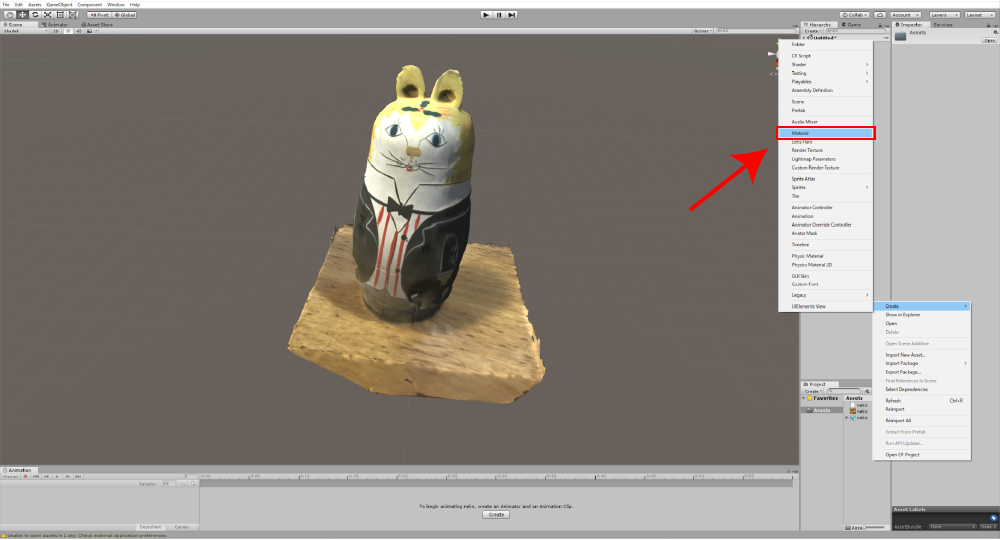
Create a material
After creating a material, drag it to the model to load. Drag the exported texture into the ‘Albedo’ field of the material. Note that the object has been duplicated to compare the two shaders in the screenshot below.
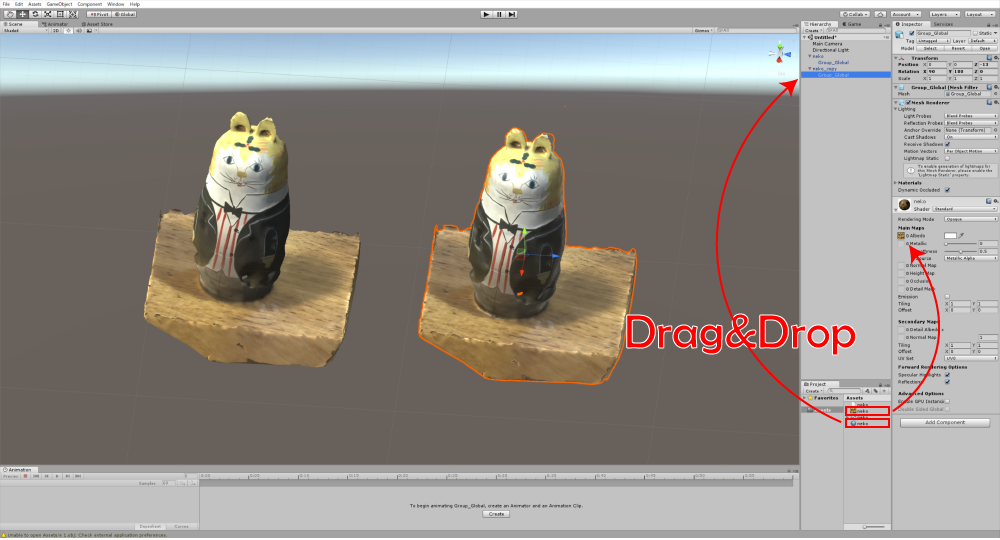
Assign the material to the model
Finally, change the shader from ‘Standard’ to ‘Unlit Texture’. It makes the appearance similar to the one on the photogrammetry software.
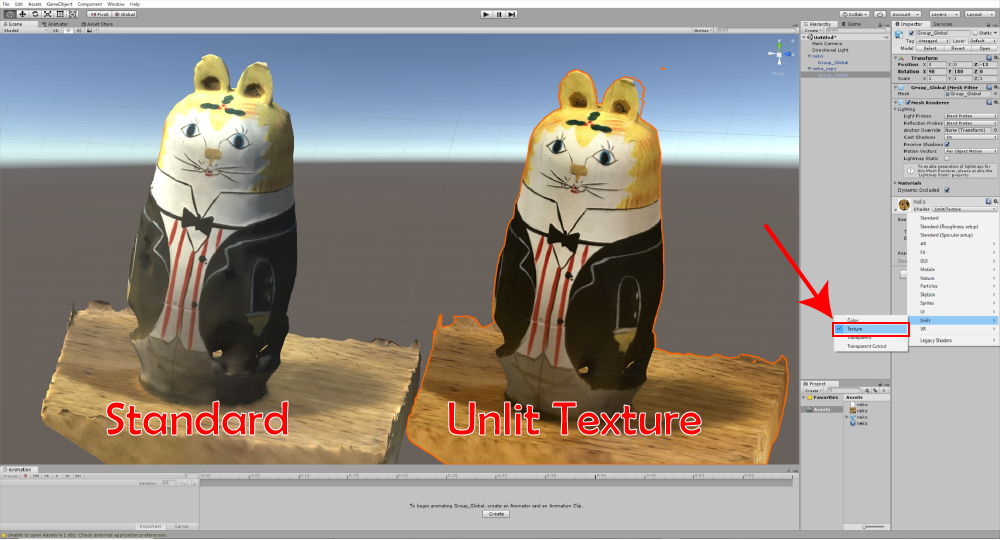
Change the shader
Upload to STYLY
All you need now is to drag the 3d model in the Scene onto the Project window to convert into a Prefab and upload it to STYLY. Please read the article below to learn how to upload assets from Unity to STYLY. Read the article You can use photogrammetry in various ways. You can use it to render your imagination, for example, clipping a street scene or scanning dishes to model the table in VR space. Please try it by yourself. It will help you to enrich your expression.