If you’ve used Unity before, you may have heard that you can use GitHub in Unity, but you may not know how to use it.
In this article, I’ll briefly introduce the GitHub functions and show you how you can implement GitHub when developing with your team using Unity.
I think this is an area where you can improve your production efficiency by getting used to Unity early on.
The more you get used to it, the more effective it will be, so by all means, start working on it as soon as possible!
Advantages of connecting GitHub and Unity
The advantages of connecting GitHub and Unity are as follows
- You will be able to edit your Unity project at any time while saving it as a version. It allows you to revert to any version when you want to revert the editing status.
- Multiple people can share the editing status and develop at the same time.
However, GitHub for Unity, which is provided by GitHub, does not have the function to share the editing status with multiple people (as of August 2021).
This article will also show you how to use a service called SourceTree, which supports collaborative development in Unity, to allow multiple people to use the same project.
This article is intended for people who
- People who have heard of GitHub, but don’t really know how to use it
- Those who have been working with Unity for a while and want to be able to handle Unity in a version-controlled manner according to the production status.
- You want to work with Unity in a team, but you don’t know how to link the team’s work in Unity.
- You want to introduce one of the easiest ways to manage Git, visualizing it in a source tree.
This article does not cover how to introduce GitHub to Unity for team development or how to upload a collaborative project to the web via GitHub.
First of all, I will cover two things: 1. to be able to manage the production status of each version, and 2. to be able to work with multiple people on a project.
Also, since the goal includes to be able to do team development, this article does not cover GitHub for Unity, which only includes version control functions.
So, let’s get started with the explanation.
What is GitHub?
Git is a kind of CUI tool (command line tool) that was created to manage the source code version, who edited what and when, and which is the latest version.
To put it simply, it is a tool that allows teams to organize their work in an easy-to-understand manner when programming together.
GitHub is a service that allows multiple people to use and publish Git tools simultaneously on the web.
I won’t be covering programming, but you can also use this system to manage the editing status of software such as Unity.
GitHub logo
What is a SourceTree?
SourceTree is a GUI that efficiently handles the operations of Git’s distributed management system tools.
A GUI is a function that allows users to work visually on the screen.
Simply put, it is a tool that can visually handle the editing status of work management tools like GitHub mentioned above in an easy-to-understand manner.
SourceTree can be integrated with Git management services other than GitHub, but this time I will explain how to integrate with GitHub, which is widely used.

SourceTree logo
Integrating GitHub and SourceTree for use with Unity
Step 1: Create a GitHub account
Create an account on GitHub’s official website above.
If you don’t have any reason to be a paid member, you can use the free membership.
(If you already have an account, you can skip Step 1.)
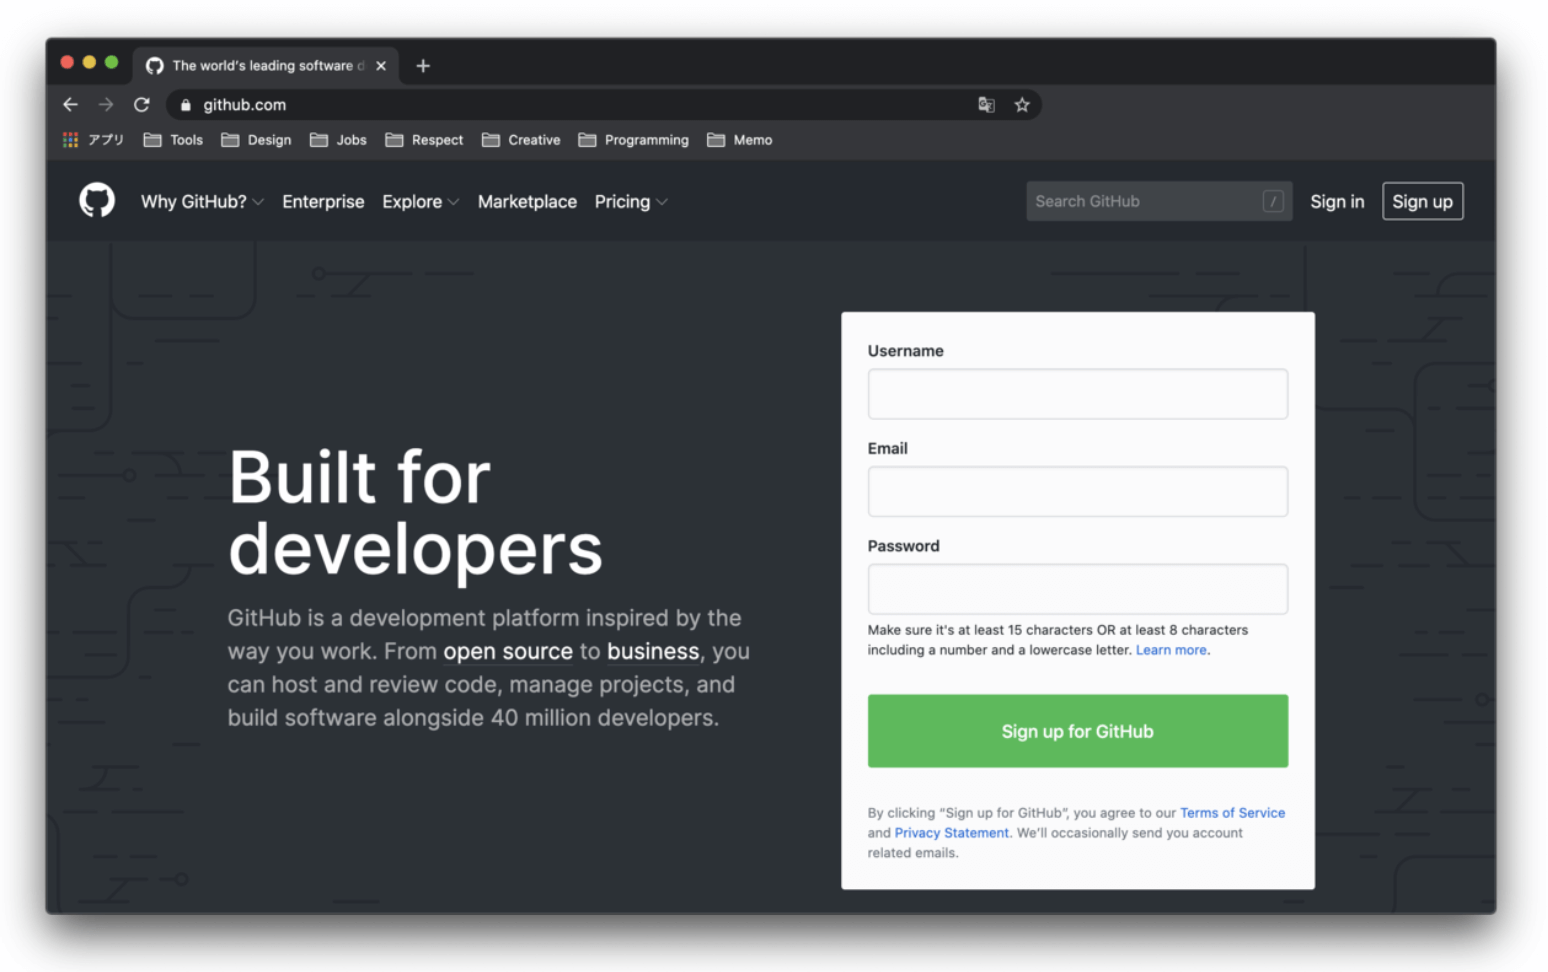
Top page of GitHub
Step 2: Create a repository on GitHub
Later, you will need to create a repository on GitHub in order to integrate Unity with GitHub.
A “repository” is a centralized place to store the information you are working on.
After signing in, you will see this screen.

The screen immediately after signing in
To create a new repository, click the green “NEW” button to the right of the repository in the upper left corner of the screen.
To set up a repository, follow the steps below.
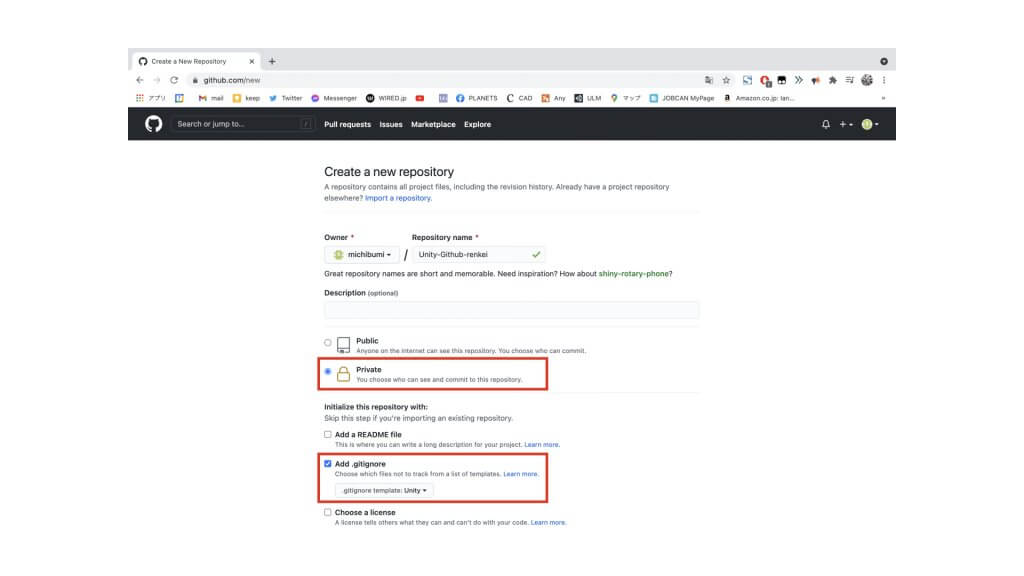
Repository settings screen
- Repository name →Enter an arbitrary name.
The name of the repository.
It should be the same as or related to your Unity project name for easy management.
- Public or Private → Change to Private
This is the public setting of the repository.
Especially when working with Unity, if you publish paid assets, it may violate the license of the assets. Therefore, Private is recommended.
You can also work with a team in Private.
- Add a README file → Unchecked
Create a resume for the file.
If you are working on a large project, you may want to handle this, but in this case, it is not checked because it can be visualized with the source tree software.
- Add .gitignore → Set to Unity
This function automatically ignores files that do not need to be managed by Unity’s GitHub.
From the .gitignore template: tab, select Unity.
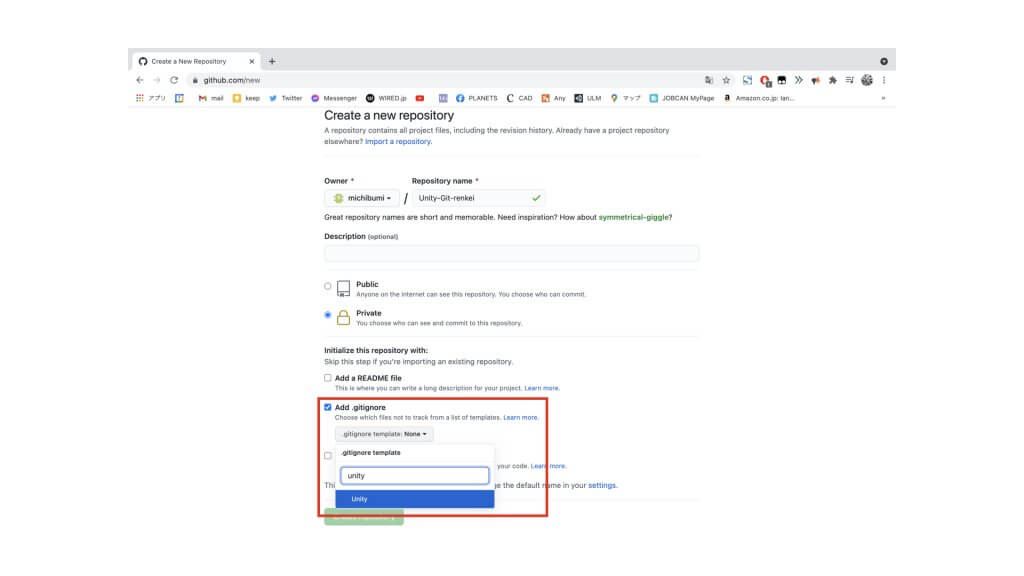
Gitignore, select unity.
Once the above settings have been made, select the green button “Create repository” at the bottom to go to the site of the repository you have created.
You could create a repository.
Note that you will need the URL that will be displayed later by selecting the green “↓Code▼” button below.
It may be less confusing if you check the location of the URL at this point.
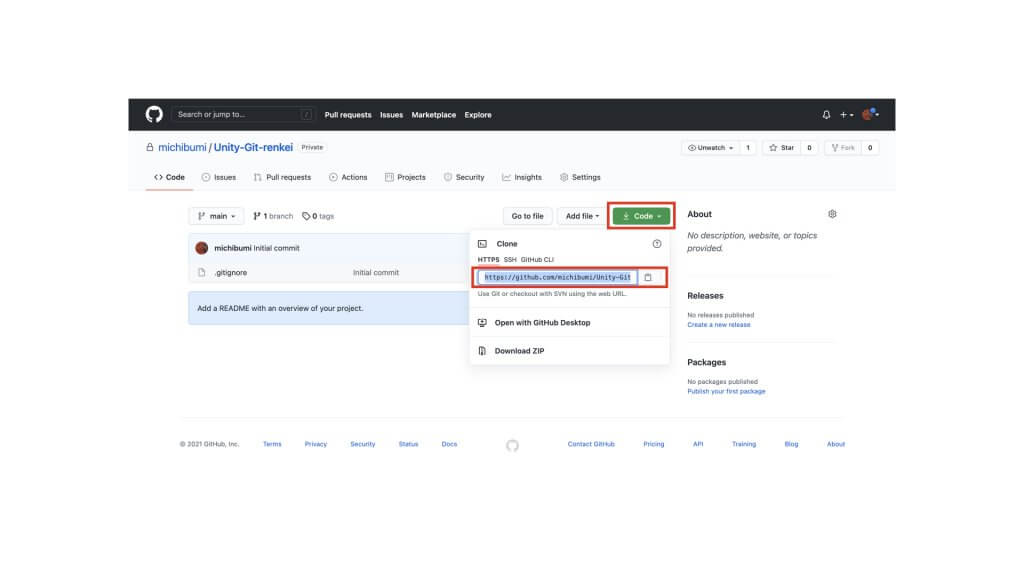
You can see the link from here
Step 3. Install SourceTree and configure it for the first time
https://www.sourcetreeapp.com/
Download SourceTree from the above site.
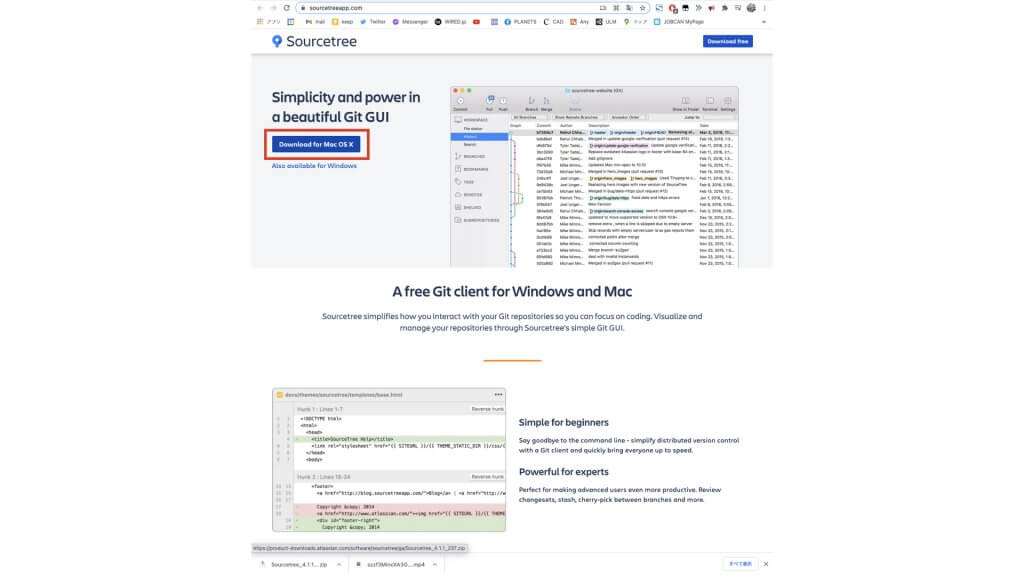
From the top of the Source Tree, select Download (Mac screen).
Click on the blue “Download for [OS name]” button, as it will automatically identify and recommend the OS, such as Mac or Windows.
Click on the blue button “Download for [OS name]” (I will use the Mac screen for this explanation)

Unzip the source tree and open the application.
The zip file will be downloaded automatically.
Open the zip file, and when the app file appears, open it.
Select “Open” for the app file, and if a window with an “Open” button appears like this, there is no problem.
Just open it.
If you get a warning on your Mac such as “Cannot open this software because SourceTree.app cannot verify that it is malicious software”, please do the following
“Go to “System Preferences > Security and Privacy > General tab” and open the tab that says “SourceTree has been blocked because we cannot verify its developer. Click the “Open As” button to the right of “SourceTree is blocked because we cannot verify the developer.
The warning will change and you should be able to select “Open”.
After installing and opening the application, you will see a screen like the one below.
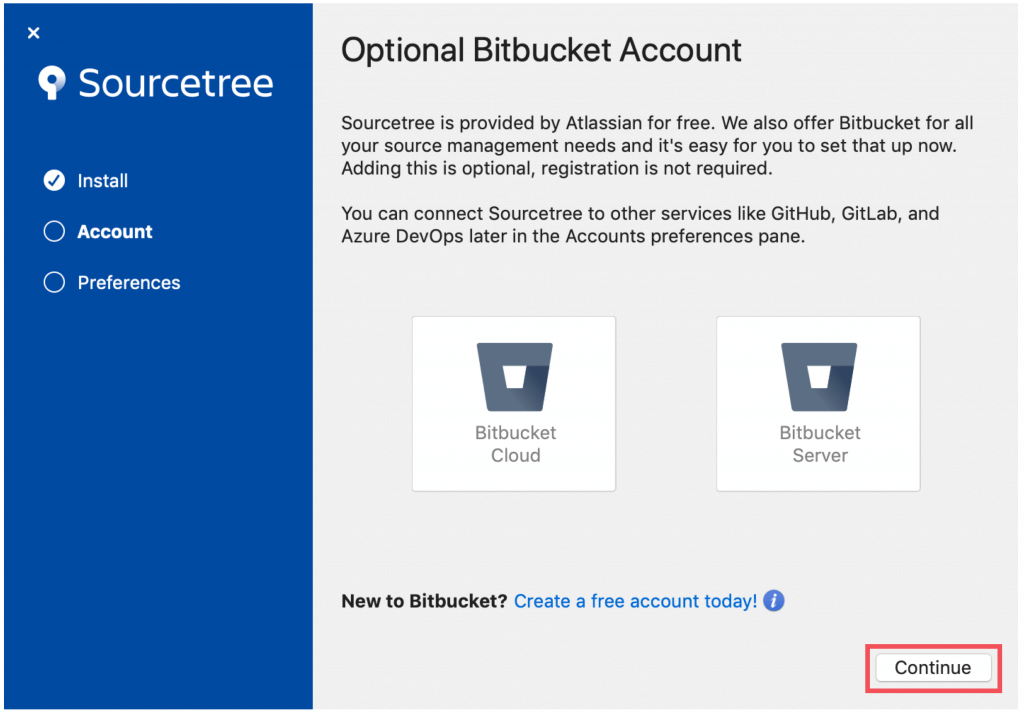
Select “Continue” at the bottom right.
You will be asked to select “Bitbucket Cloud” or “Bitbucket Server”, but if you are using GitHub, ignore it and select “Continue”.
(Bitbucket is a version control tool similar to GitHub, which is provided by Atlassian, the same company as SourceTree, but we will skip it since we will be using GitHub.
Also, if you get a page that says “Please take a moment to configure these settings before exiting.” Please take a moment to configure these settings before exiting.” Also, if you see a page that says “Please take a moment to configure these settings before exiting,” press “Finish” as it is not necessary for this setup.
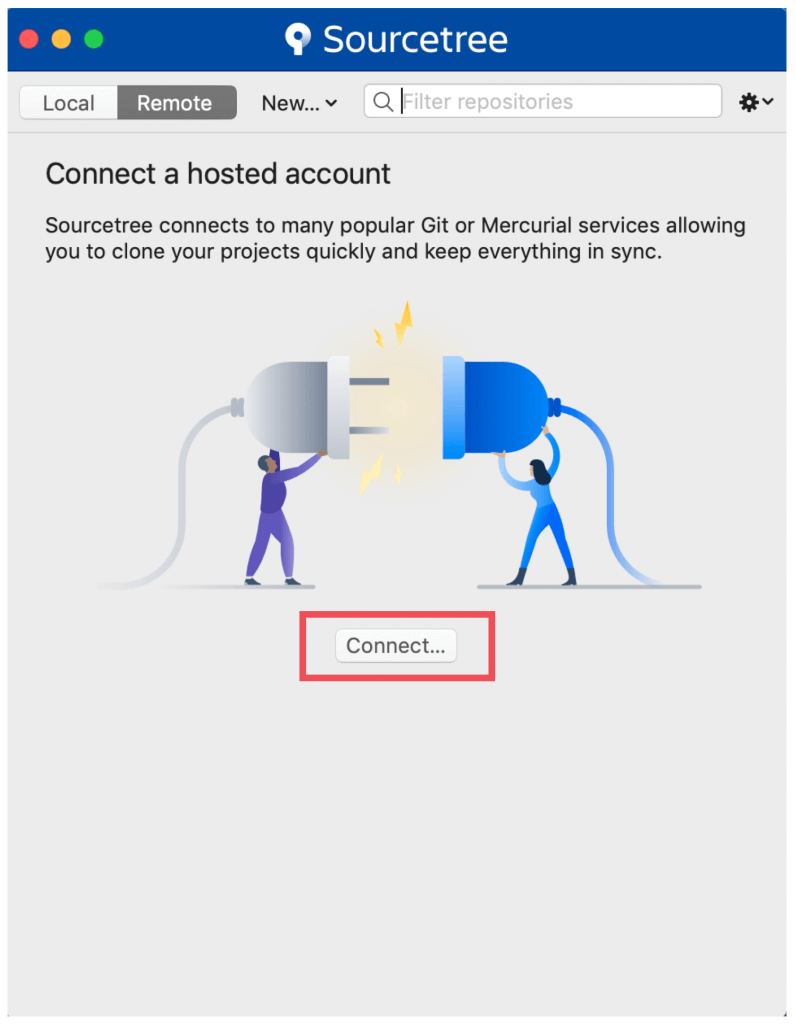
Select “Connect” in the center.
When the above screen appears, the SourceTree installation is complete.
Step 4. Set up your SourceTree account
Select the “Connected…” button in the center at the end of Step 3. button in the middle of Step 3 to open the Accounts tab, and select “Add” in the lower left corner.
If you don’t see the “Connected” button, you can open the Accounts tab by selecting “Accounts” from the gears in the upper right corner.
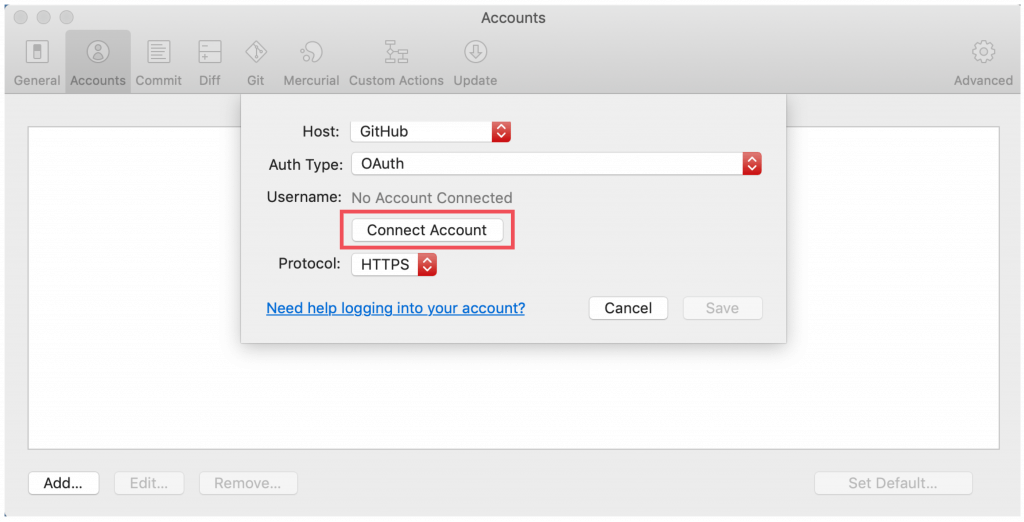
Select “Connect Account”.
Configure your account settings on the screen above.
- Host: Select “GitHub”.
- Authentication Type: Select “OAuth”.
- User Name: (See below for details)
- Protocol: Select “HTTPS”.
Select the “Connect Account” button.
When the browser opens, select “authorize atlassian”.
Depending on your default browser settings, you may need to sign in directly with your GitHub email address and password.
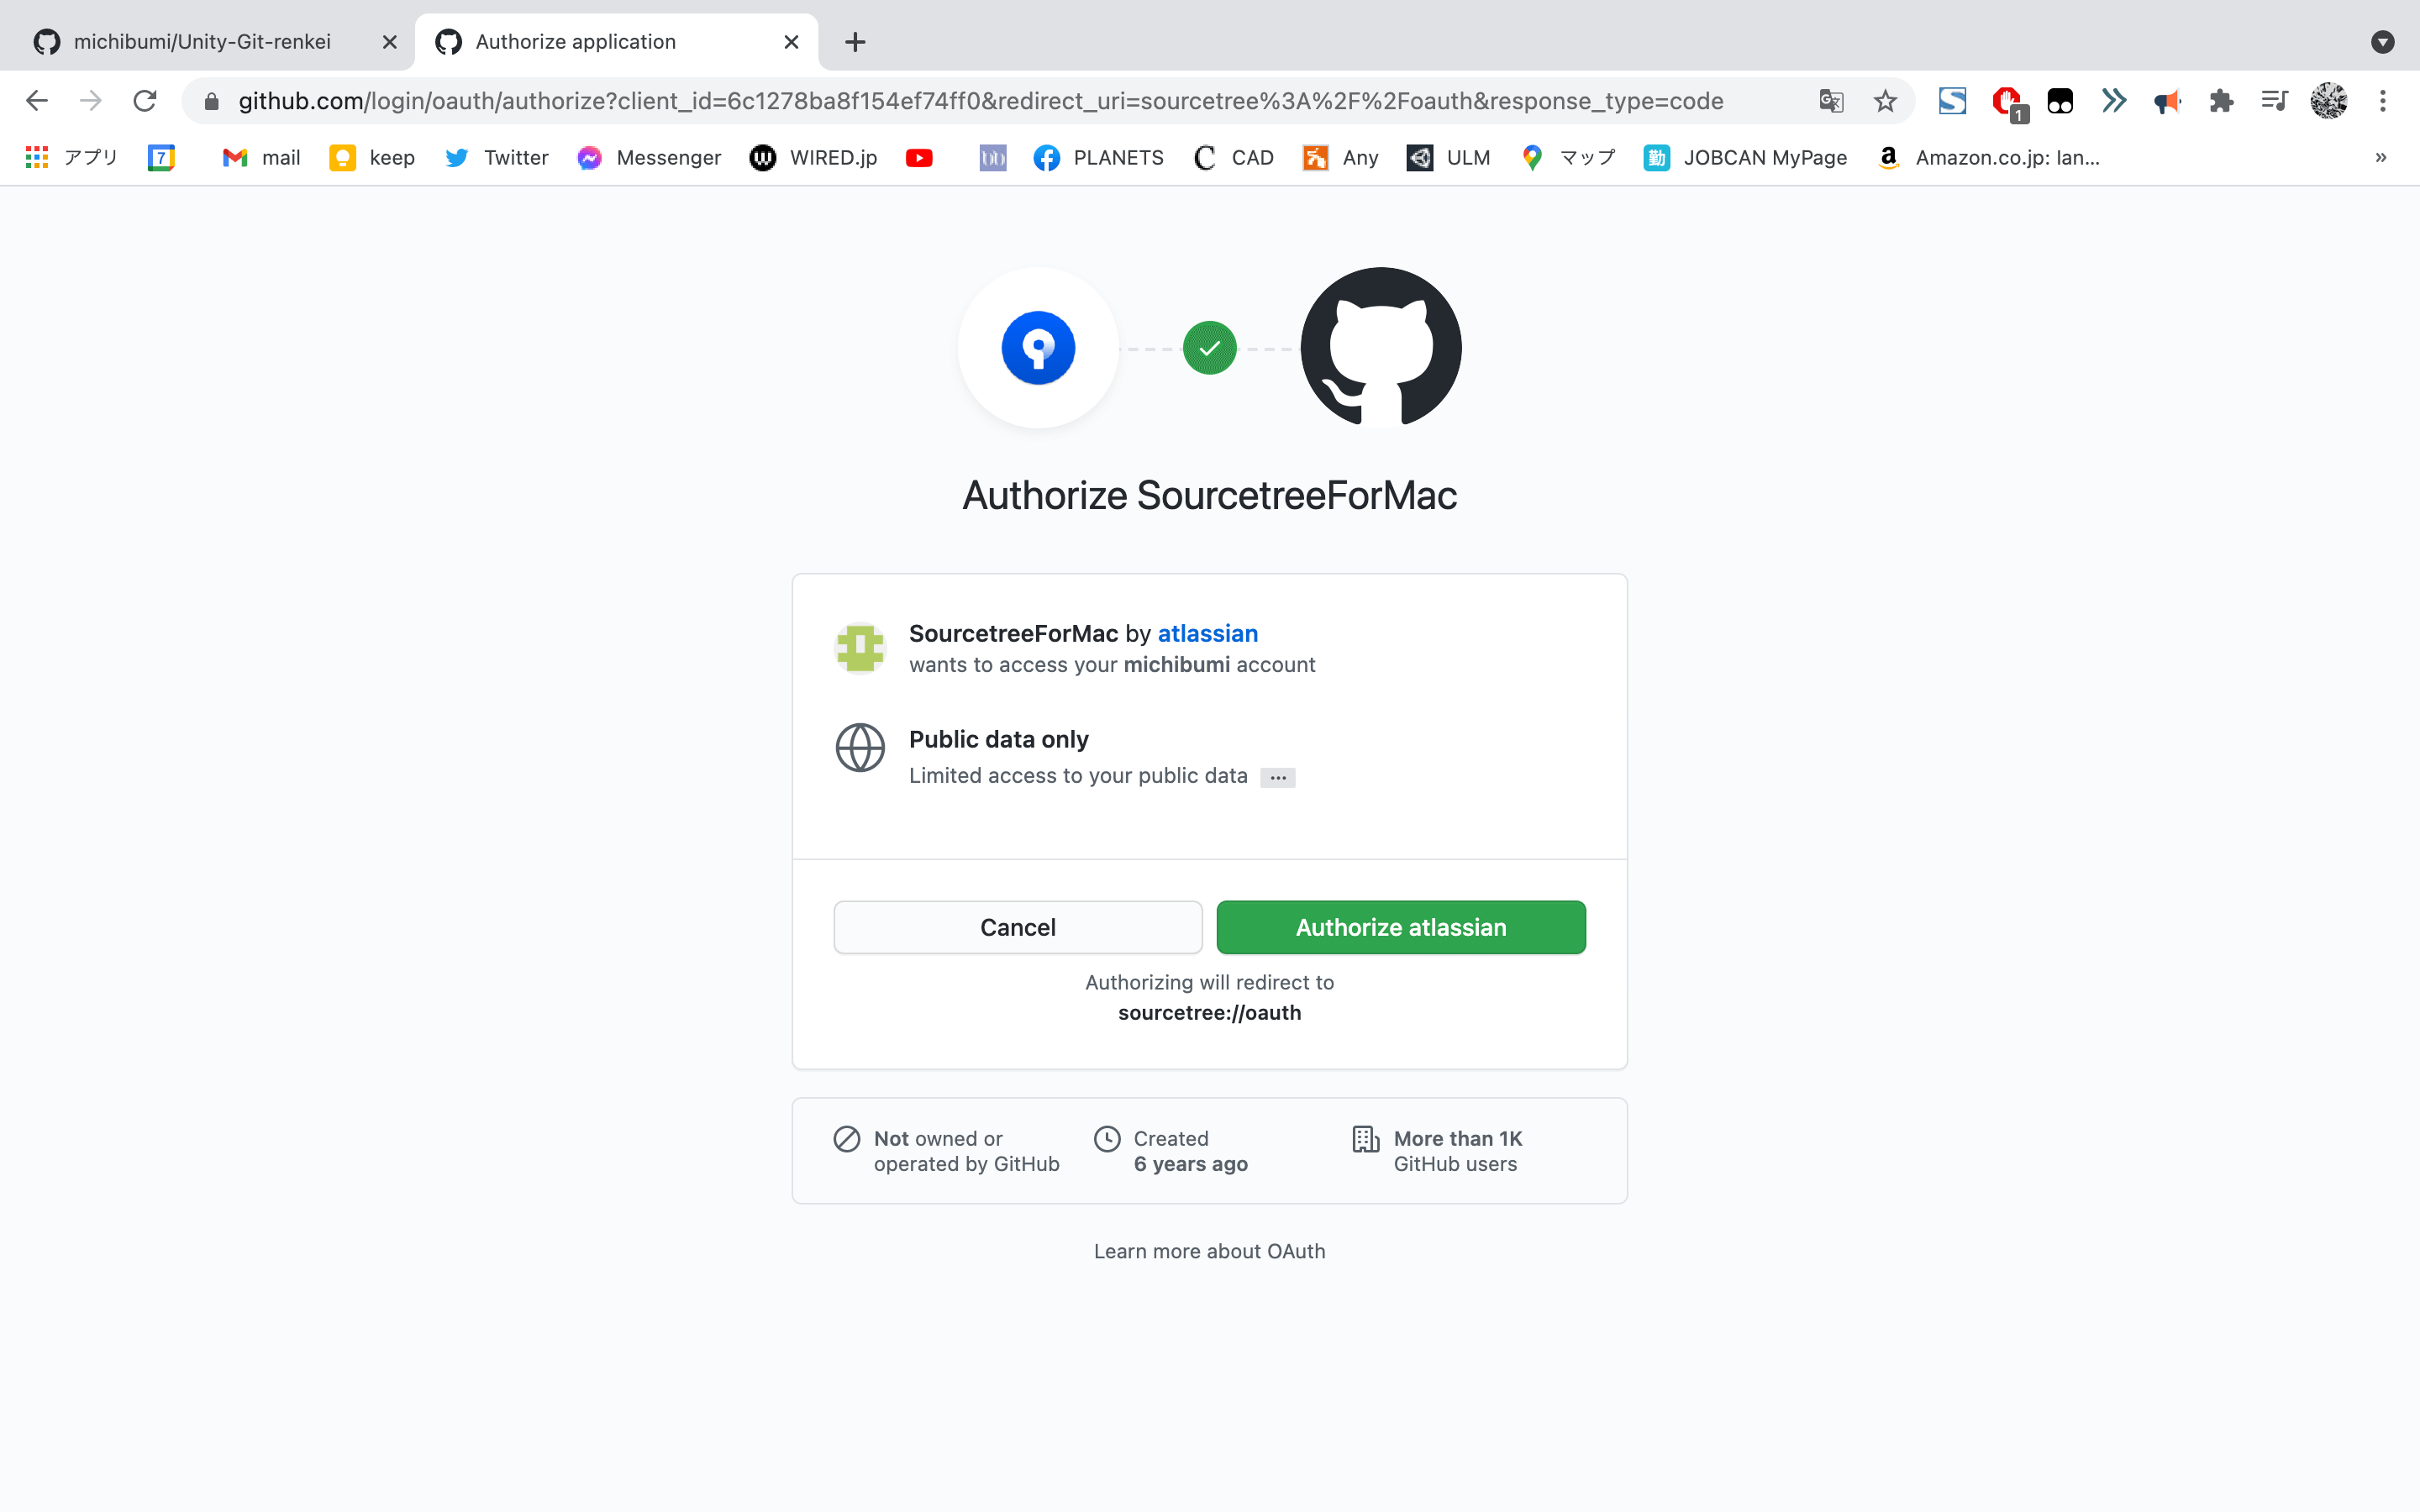
Account connection screen. Select the green “Authorize atlassian” button.
After signing in, you will see a message “Do you want to open SourceTree.app? Select “Open SourceTree.app”.
Select “Open SourceTree.app” to open SourceTree.app. Your GitHub account username will appear in the username field, and select “Save” at the bottom right to register your account information.
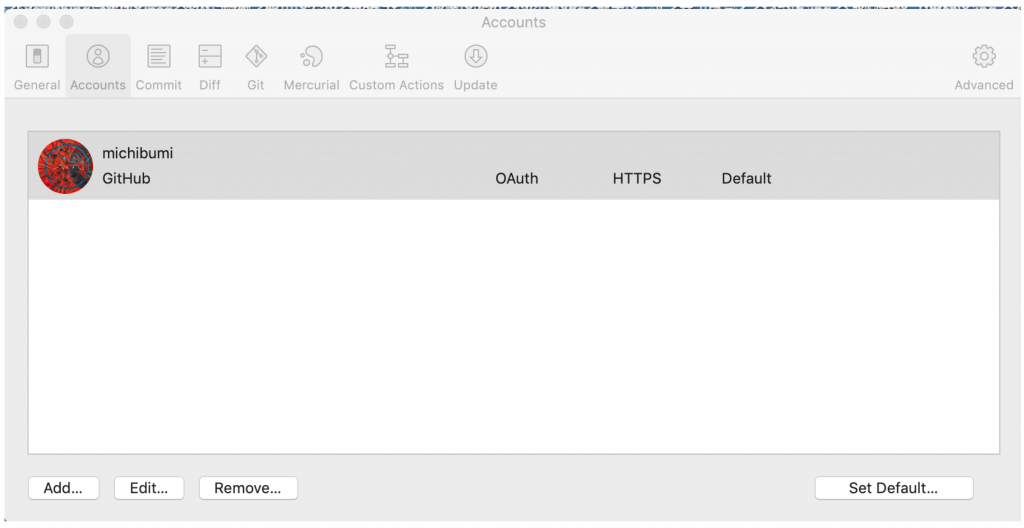
You will see that your account has been added.
Once it looks like this, you are done adding an account.
Additional information
In this section, you can also register the name that will be displayed when editing in your team, so do that as well.
Open the “General” tab, which is located to the left of the Account tab.
Full name… This name will be used to record the editing history of the data.
Step 5: Set up a local repository in SourceTree
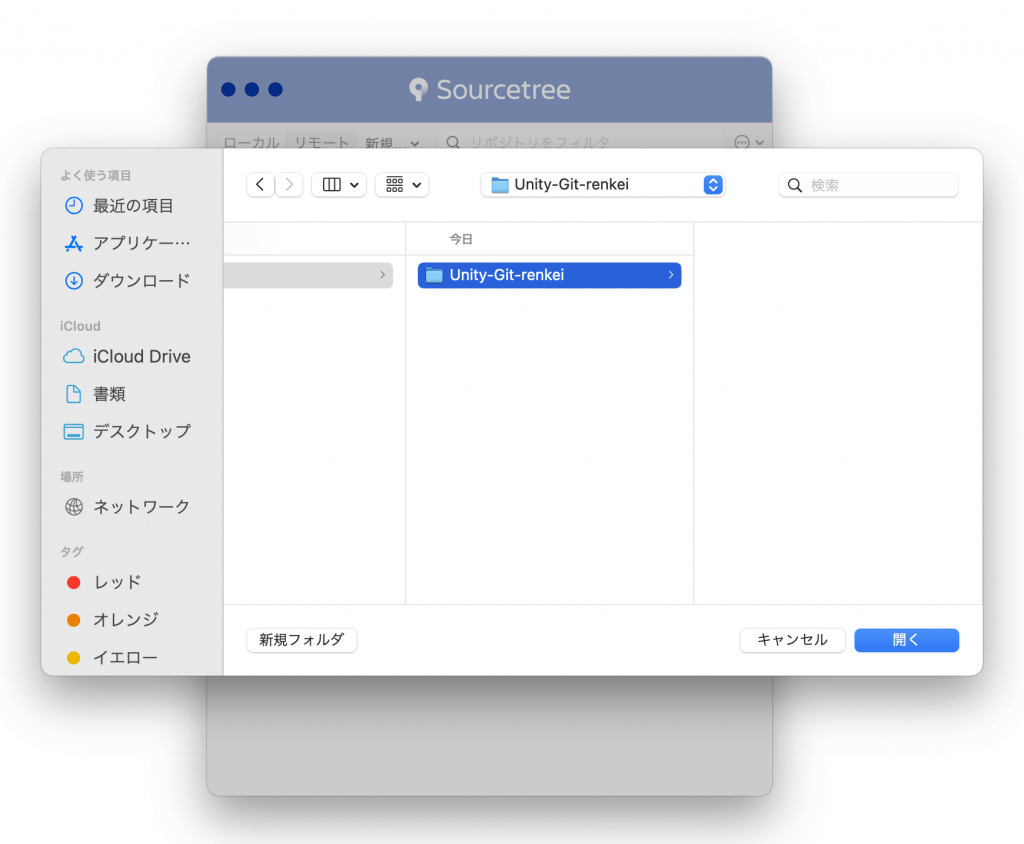
Decide the location of your local repository beforehand, and create an empty folder in that location.
*If the folder is not empty, an error will occur, so create a new folder.
Configure this folder to be the local repository.
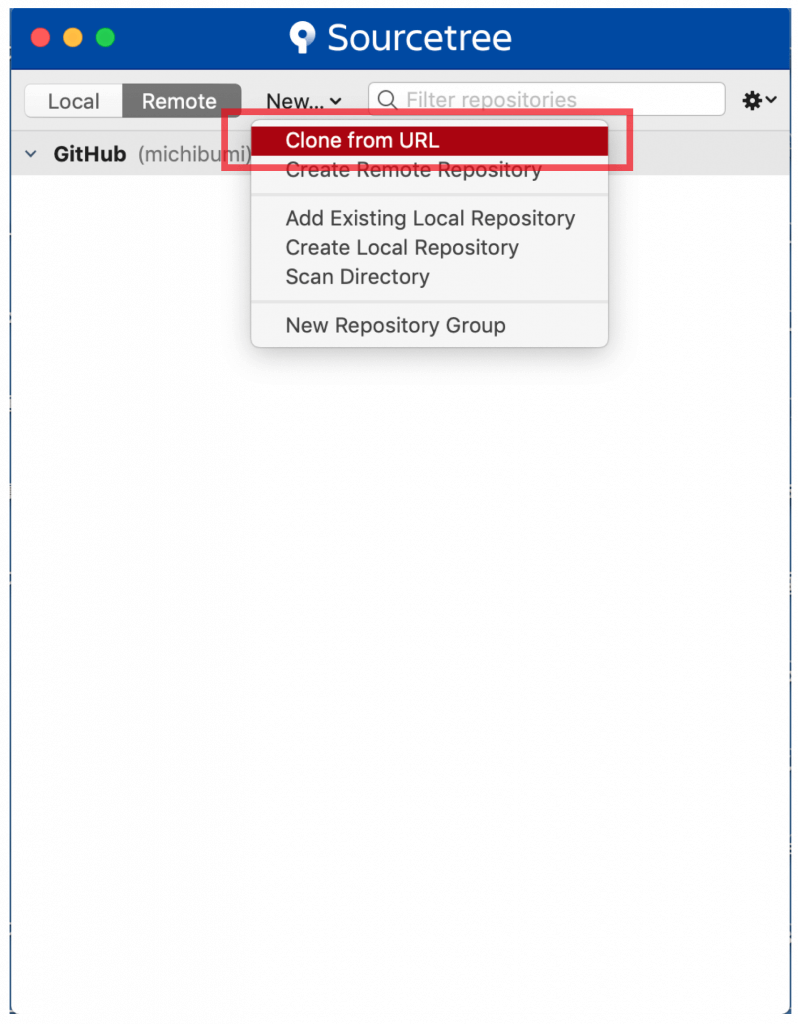
The first screen of the source tree application. Select “Clone from URL”.
Select “Clone from URL” from “New” in the above screen. (*Clone = Copy)
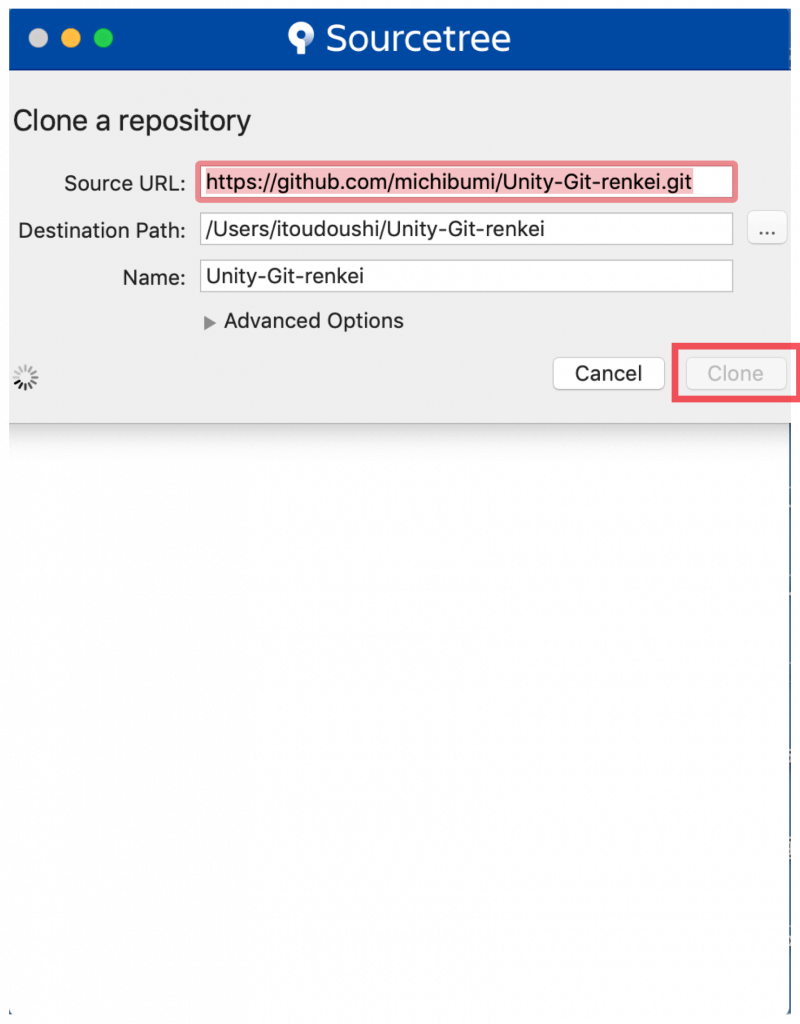
Copy and paste the URL and select “Clone”.
What you need to do here is “clone the data from the GitHub remote repository and bring it to your local repository (in your PC).
You can also set the clone destination as the location of your local repository.
- Source URL
URL of the remote repository described at the end of Step 2.
- Destination path
Path of the folder you just decided to use as the local repository destination
- Name
Name of the local repository
After entering the information, select “Clone”.
GitHub and SourceTree integration is complete.
When the above screen expands, the integration between GitHub and SourceTree is complete!
In the next Part 2, we’ll explain how to integrate SourceTree with Unity, and how to use GitHub to manage your production in Unity!
You can use STYLY FORUM to solve the problem. STYLY FORUM is a place where people can discuss a service or technical issue on STYLY, or provide bug reports on STYLY.
https://en.forum.styly.cc/support/discussions