When uploading avatars created with VRoid, etc. to STYLY, if there are no animations available on Mixamo, etc. that match your image, you need to create your own original poses and animations.
However, it is very difficult to create animations from scratch, and there are probably many cases where people give up.
The theme of this article is how to export your own motion with HMD on Unity as an animation, and how to edit the animation.
Specifically, I use SteamVR and FinalIK to capture the motion, Entum’s EasyMotionRecorder to output the animation file, and VeryAnimation to edit the animation for keyframe reduction and facial expressions.
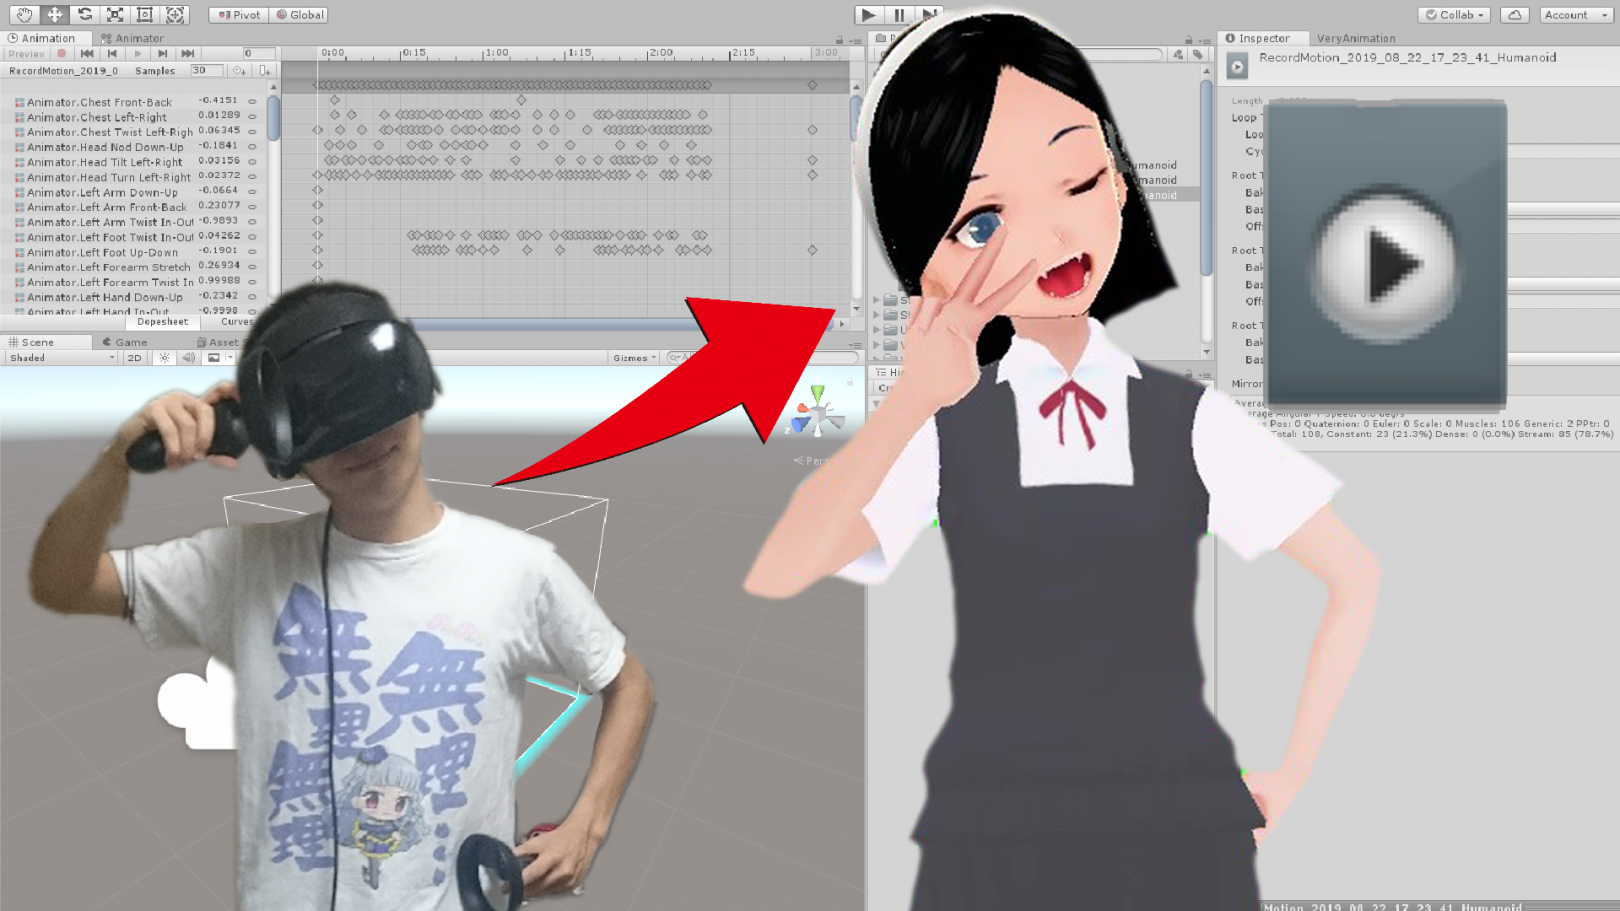
Since there is no human inside, this is just an image.
This animation is created from motion capture.

Finished image
Motion Capture
As the first step, we will do motion capture using SteamVR and FinalIk to reflect the tracker’s movement to the avatar.
The simple motion capture on Unity that we will touch on in this tutorial is carefully summarized in this article.
Required Plug-ins
You will need the following three plug-ins.
- SteamVR Plugin
- Final IK
- UniVRM
(Since we will be using avatars created with VRoid, we need to import UniVRM to handle .vrm avatars in Unity.)
SteamVR Plugin 2.3.2
The SteamVR Plugin 2.3.2 can be downloaded for free from the Asset Store.
https://assetstore.unity.com/packages/tools/integration/steamvr-plugin-32647
When you import it into a new Unity project, the following window will appear.
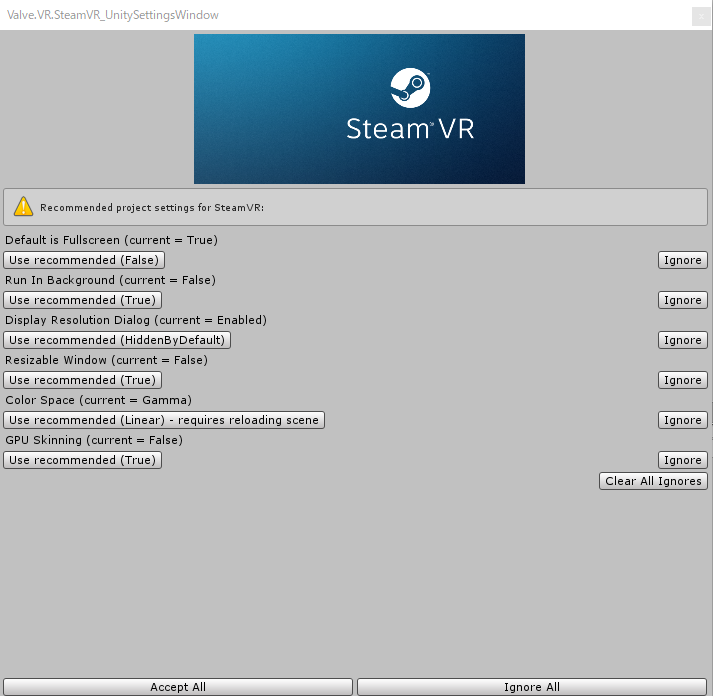
Importing the SteamVR Plugin
The project settings for SteamVR are suggested. If you select “Accept All”, it will be set automatically.
However, even after doing the above, the Splashscreen settings popup may appear several times (see reference article).
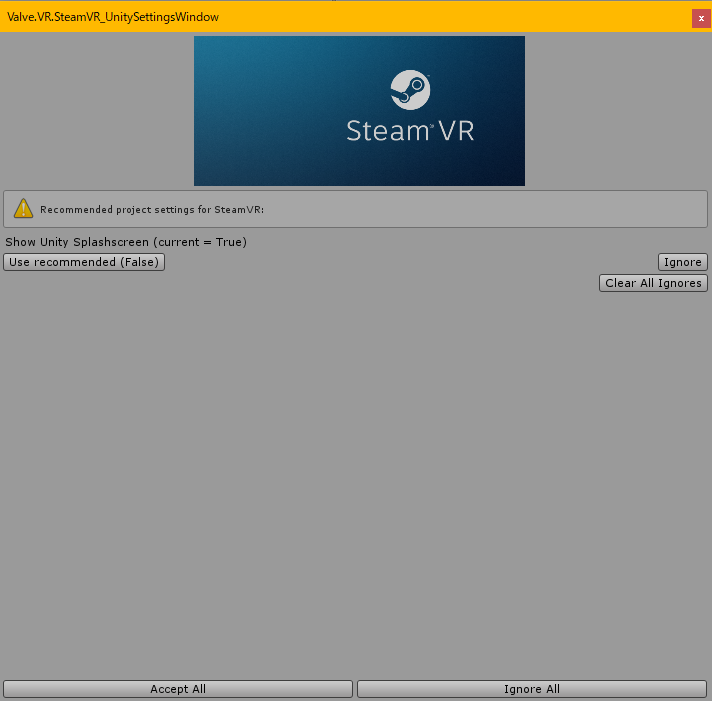
StemaVR SplashScreen Settings
The free version of Unity shows the Unity logo when the application starts, and the splashscreen setting cannot be overridden by SteamVR.
Of course, this is not a problem since you can select Accept or Ignore whenever the popup appears, but open Assets\SteamVR\Editor\SteamVR_UnitySettingsWindow.cs and click “recommended _ShowUnitySplashScreen” to true as shown in the image below.
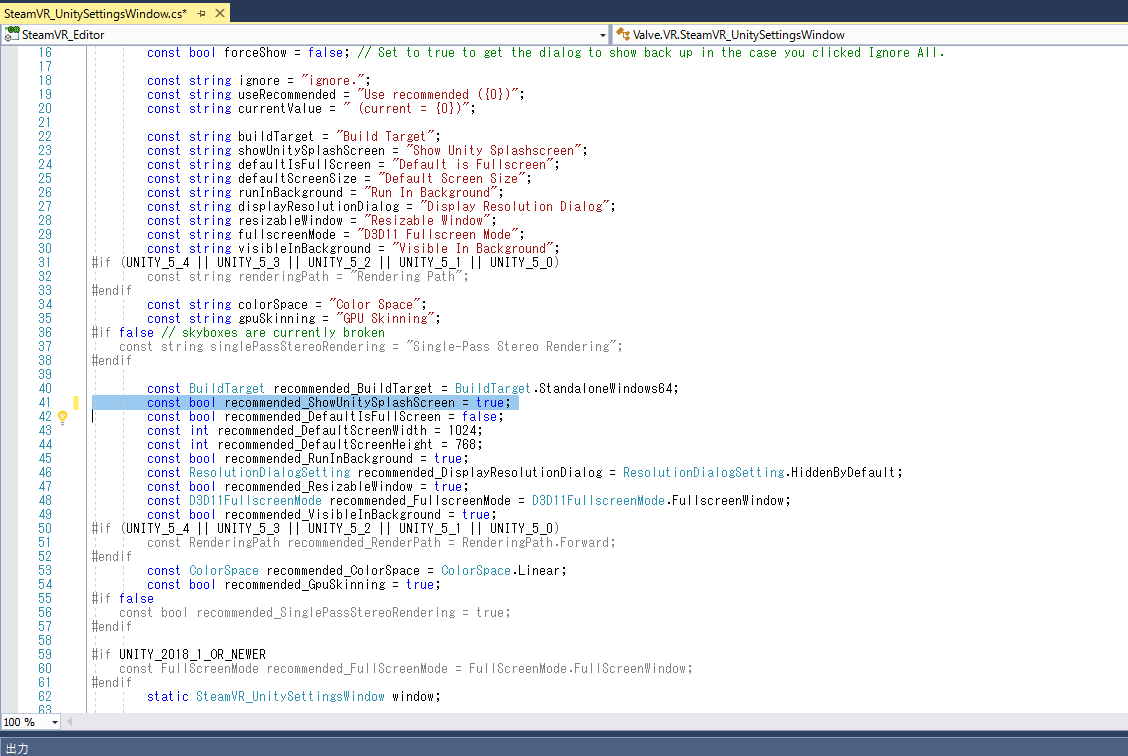
SteamVR SplashScreen Settings
Final IK 1.8
This is available at the Asset Store (regular price $90).
https://assetstore.unity.com/packages/tools/animation/final-ik-14290
You can import it into Unity just like any other asset.
UniVRM 0.53.0
You can download the unitypackage from the UniVRM release page.
https://github.com/vrm-c/UniVRM/releases
Import it into the same project.
Preparing the avatar
We will use this avatar created by VRoid.
Anyone can download it, so please feel free to use it.
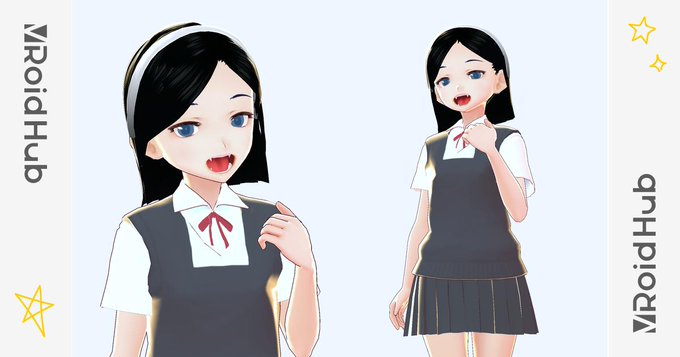
VRoidHub_Maya
https://hub.vroid.com/characters/6044318751927586117/models/4348730068391180235
Place the [CameraRig] of SteamVR
Place Assets/SteamVR/Prefabs/[CameraRig] in the scene.

Placement of CameraRig
Now once you play the scene, you will see the SteamVR Input settings window open.
Select “Save and generate” and confirm in the Project window that the “SteamVR_Input” folder has been generated under Assets, and you are ready to go.
If you play the scene again, you will be able to see the scenery of the scene from the HMD.
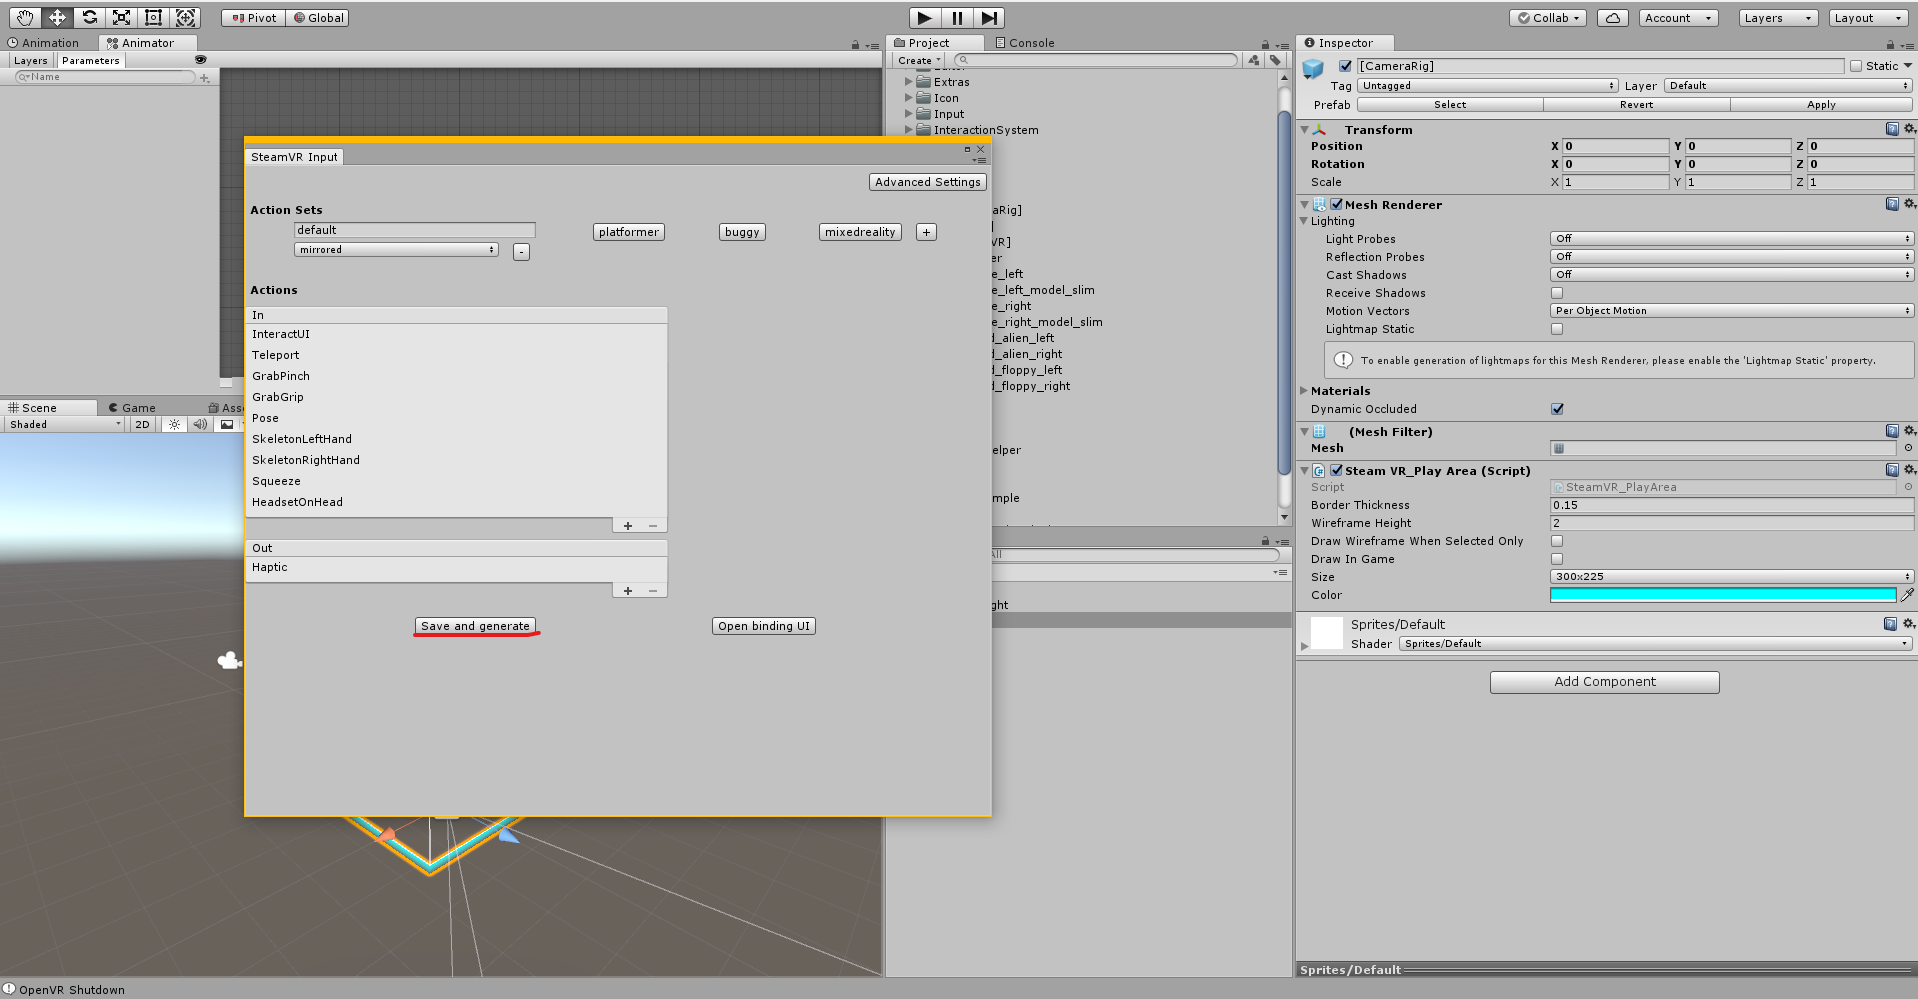
SteamVR Input Settings
Final IK Settings
Now, let’s try to move the avatar.
First, let’s create objects in [CameraRig] that will be the targets of IK.
I created game objects named “LeftHand”, “RightHand”, and “Head” from “Create Empty” respectively, as shown in the image below. When the controller is moved while the scene is playing, these objects will move in accordance with the movement.
![Create a target in [CameraRig]](https://styly.cc/wp-content/uploads/2019/09/コメント-2019-09-20-152644.png)
Create a target in [CameraRig]
The next step is to place the avatar you want to use in the scene.
If you have imported UniVRM, you should be able to import the vrm file into your project.
We placed the avatar we wanted to use in the scene by dragging and dropping it from the Project window.
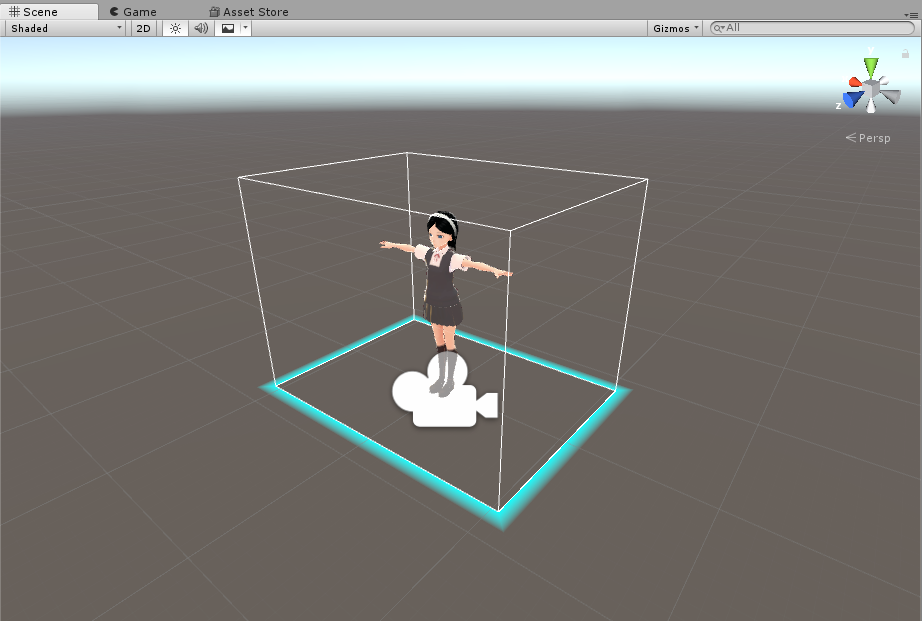
Placing the Model
Now we need to set up the Final IK so that the avatar’s hands and head will move according to the LeftHand, RightHand, and Head settings we created earlier.
Select the avatar in the Hierarchy window and add a VRIK component from the Inspector window.
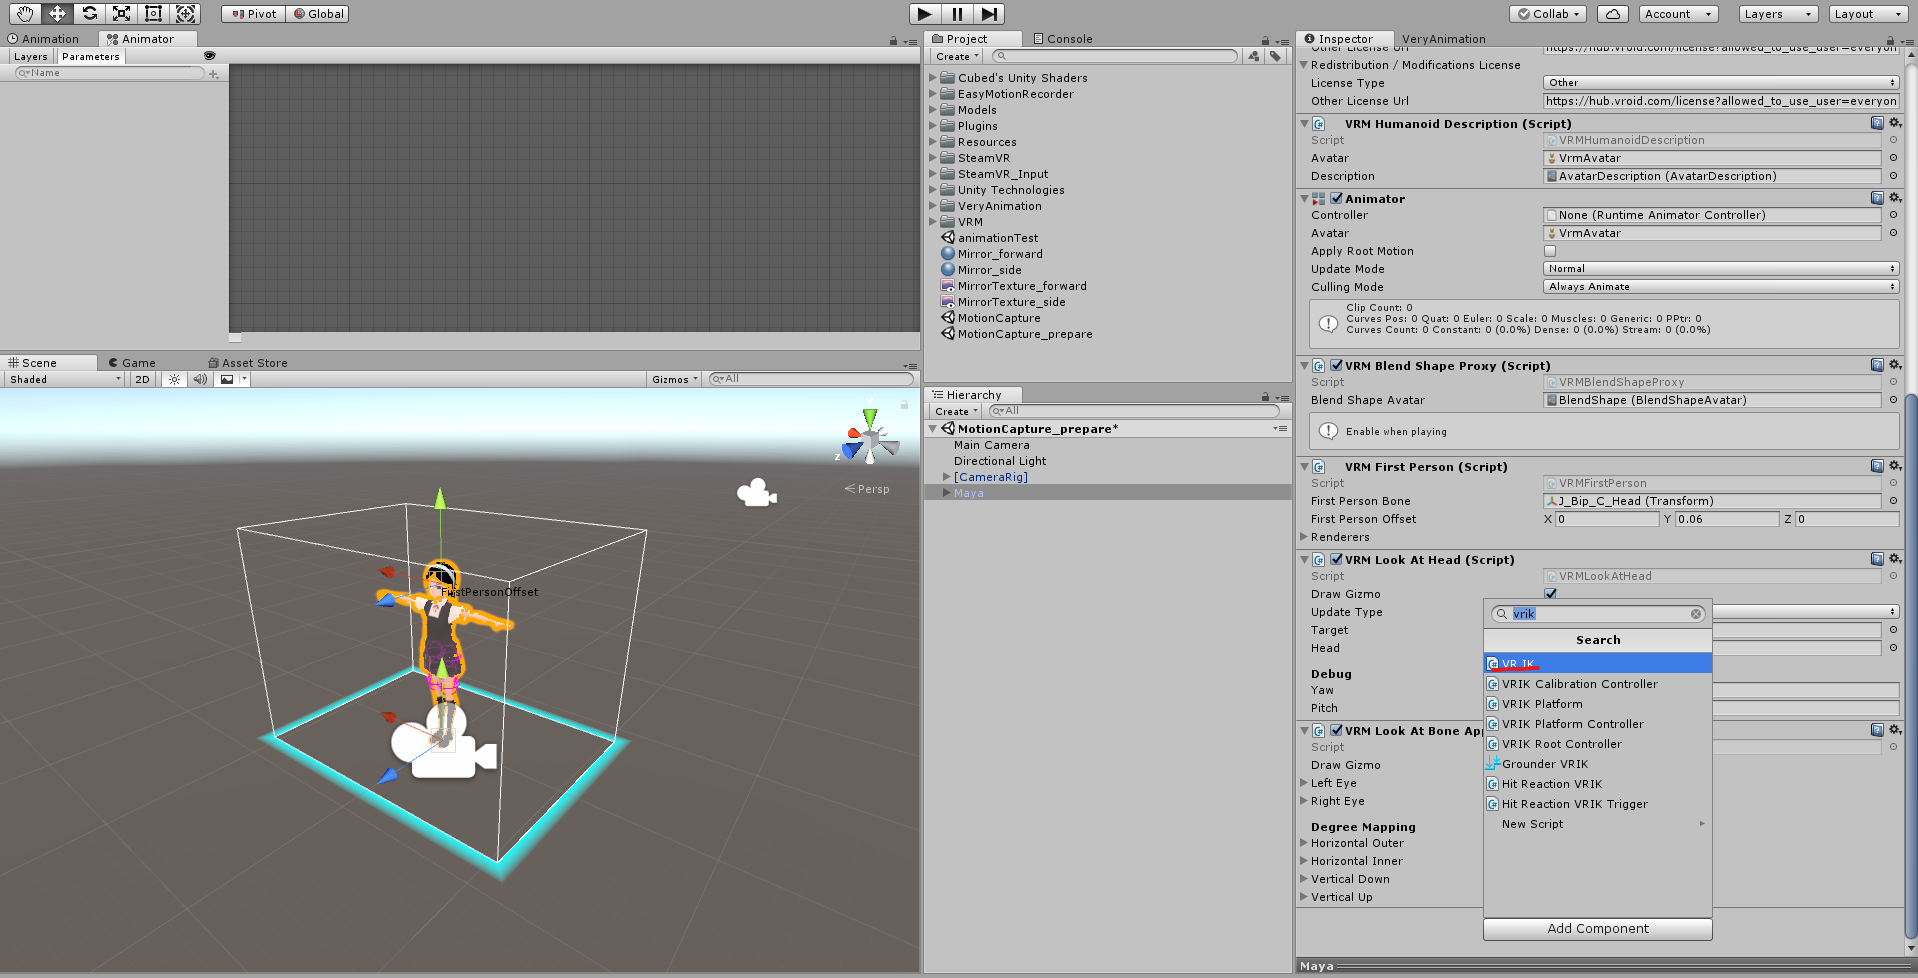
Adding a VRIK component
Open the VRIK component “Solver” and click
- Add the “Head” you created to “Spine>Head Target”.
- In “Left Arm>Target”, add the created “LeftHand”.
- Set the created “RightHand” to “Right Arm>Target”.

FinalIK Settings
If you play back the scene at this stage, you will see that the avatar’s hands and head are moving.
However, there are still many problems to be solved before we can say that the avatar is moving according to the movements of its own hands and head. The next step is to set the parameters to make the movement more natural.
Fixing various problems
The back of the face shows up in the picture
With the previous settings, the back of the avatar’s face will be drawn when you play the game, and you will not be able to see the body.
There is a way to solve this problem using the VRMFirstPerson script (see the article for reference), but for simplicity, I decided to move the Clipping Plane (near) away from Camera.
Select “[CameraRig]>Camera” from the Hierarchy window, and set the value of “Clipping Planes>near” to 0.15 in the Inspector window. When playing back the scene, the back side of the face is no longer drawn in front of the eyes.
![Move the Clipping Plane away from the camera ([CameraRig]>Camera)](https://styly.cc/wp-content/uploads/2019/09/コメント-2019-09-20-155917.png)
Move the Clipping Plane away from the camera ([CameraRig]>Camera)
Prepare a monitor to check the avatar’s movement
Before adjusting the avatar’s movements, it is a good idea to have a monitor ready so that you can see the avatar’s movements in VR.
We will place the camera so that the entire body of the avatar is included, output the video to Render Texture, and place it in the visible range to make a simple monitor.
You can create a Render Texture from the Project window as shown below.
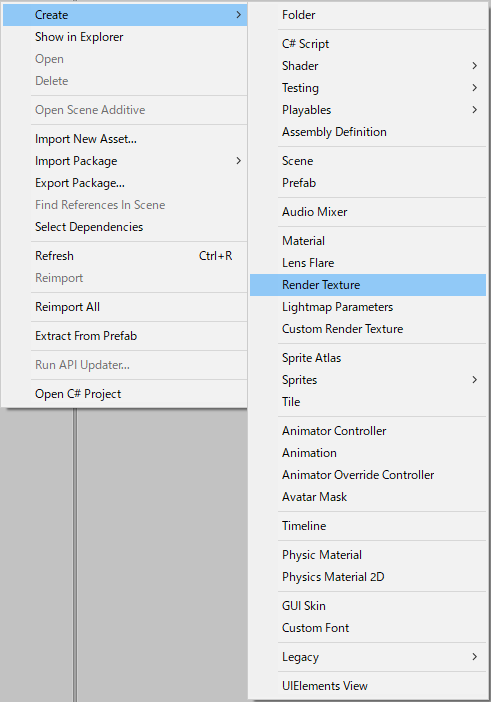
Creating a Render Texture
Place a new Camera in the scene and set the Render Texture you created as the Target Texture.
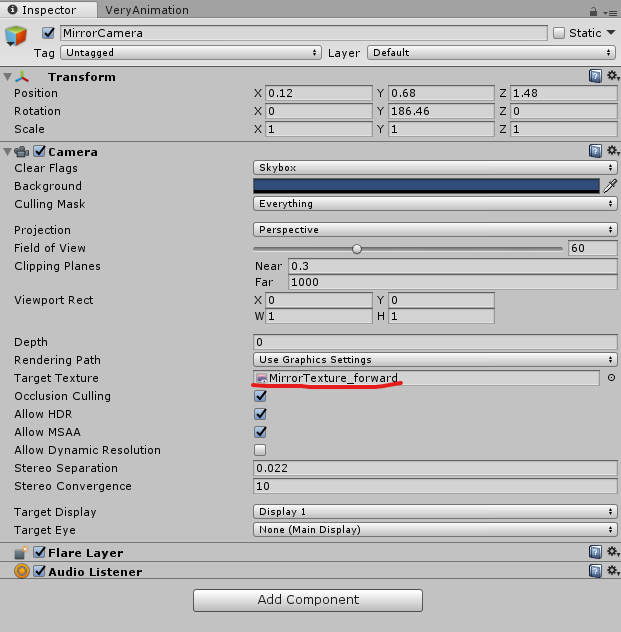
Camera Settings
The camera image can now be reflected in the texture. The next step is to create a material.
Right-click on the Project window, select “Create>Material” and name it “Mirror”.
Set the Shader to “Unlit/Texture” and apply the texture you have just created.
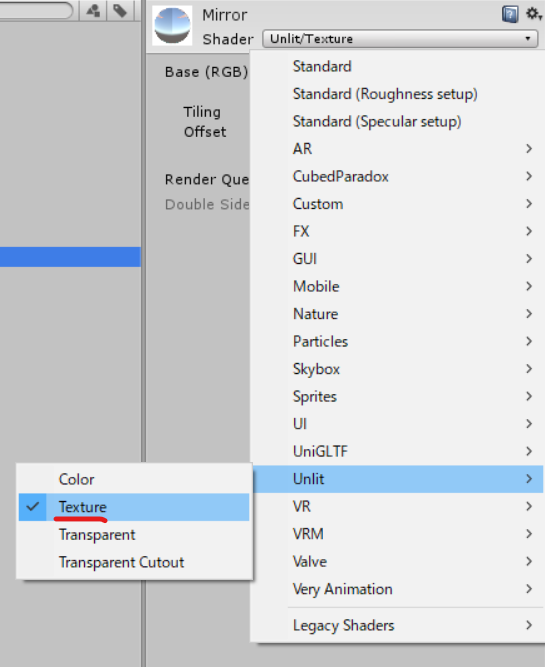
Shader Settings
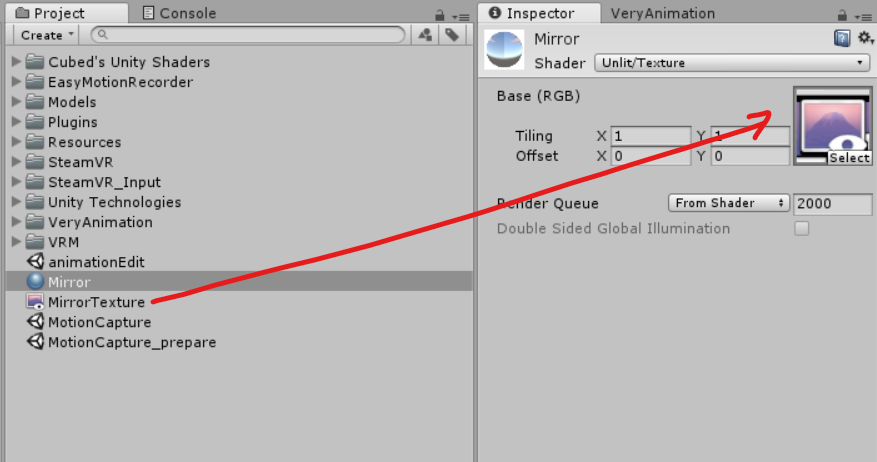
Applying the render texture
In the Hierarchy window, right click on “3D Object>Quad” and apply the texture to the board you created to create a simple monitor.
Height Difference, Hand Position, and Crotch
The next step is to fix the problems of height difference, hand position, and crotch by adjusting the parameters (see reference article).
First of all, if you feel a height difference, you can adjust it by changing the Scale of [CameraRig]. While playing back the scene, change the value to adjust. In this case, I set the following settings (height 170cm).
![[CameraRig] settings](https://styly.cc/wp-content/uploads/2019/09/コメント-2019-09-26-181240.png)
[CameraRig] settings
The misalignment of the hand position is due to the fact that Final IK’s VRIK sets the position of the wrist, while SteamVR’s controller shows the position of the tip of the controller, so it can be solved by setting the offset as shown in the following image.
!["[CameraRig]/Controller(left)/Lefthand" setting](https://styly.cc/wp-content/uploads/2019/09/コメント-2019-09-26-180325.png)
“[CameraRig]/Controller(left)/Lefthand” setting
!["[CameraRig]/Controller(right)/Righthand" setting](https://styly.cc/wp-content/uploads/2019/09/コメント-2019-09-26-180416.png)
“[CameraRig]/Controller(right)/Righthand” setting
To fix the problem of the thighs, first set the Swivel Offset of both legs to 15 from the VRIK component attached to the avatar, and then adjust the direction of the knees.

Adjusting the knee orientation
Next, we will adjust the following parameters from “Locomotion”, also a VRIK component. These parameters are related to the stride length, so you can adjust them as you like.
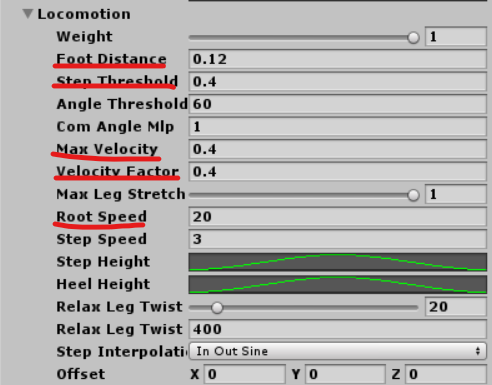
Adjusting the stride length
Adjust the stride length while watching the monitor you have just created until you are satisfied with the movement.
Exporting the animation file
Importing the Easy Motion Recorder
Easy Motion Recorder is a script that records and plays back the motion of a Humanoid character captured by VRIK or other motion capture methods in the Unity editor.
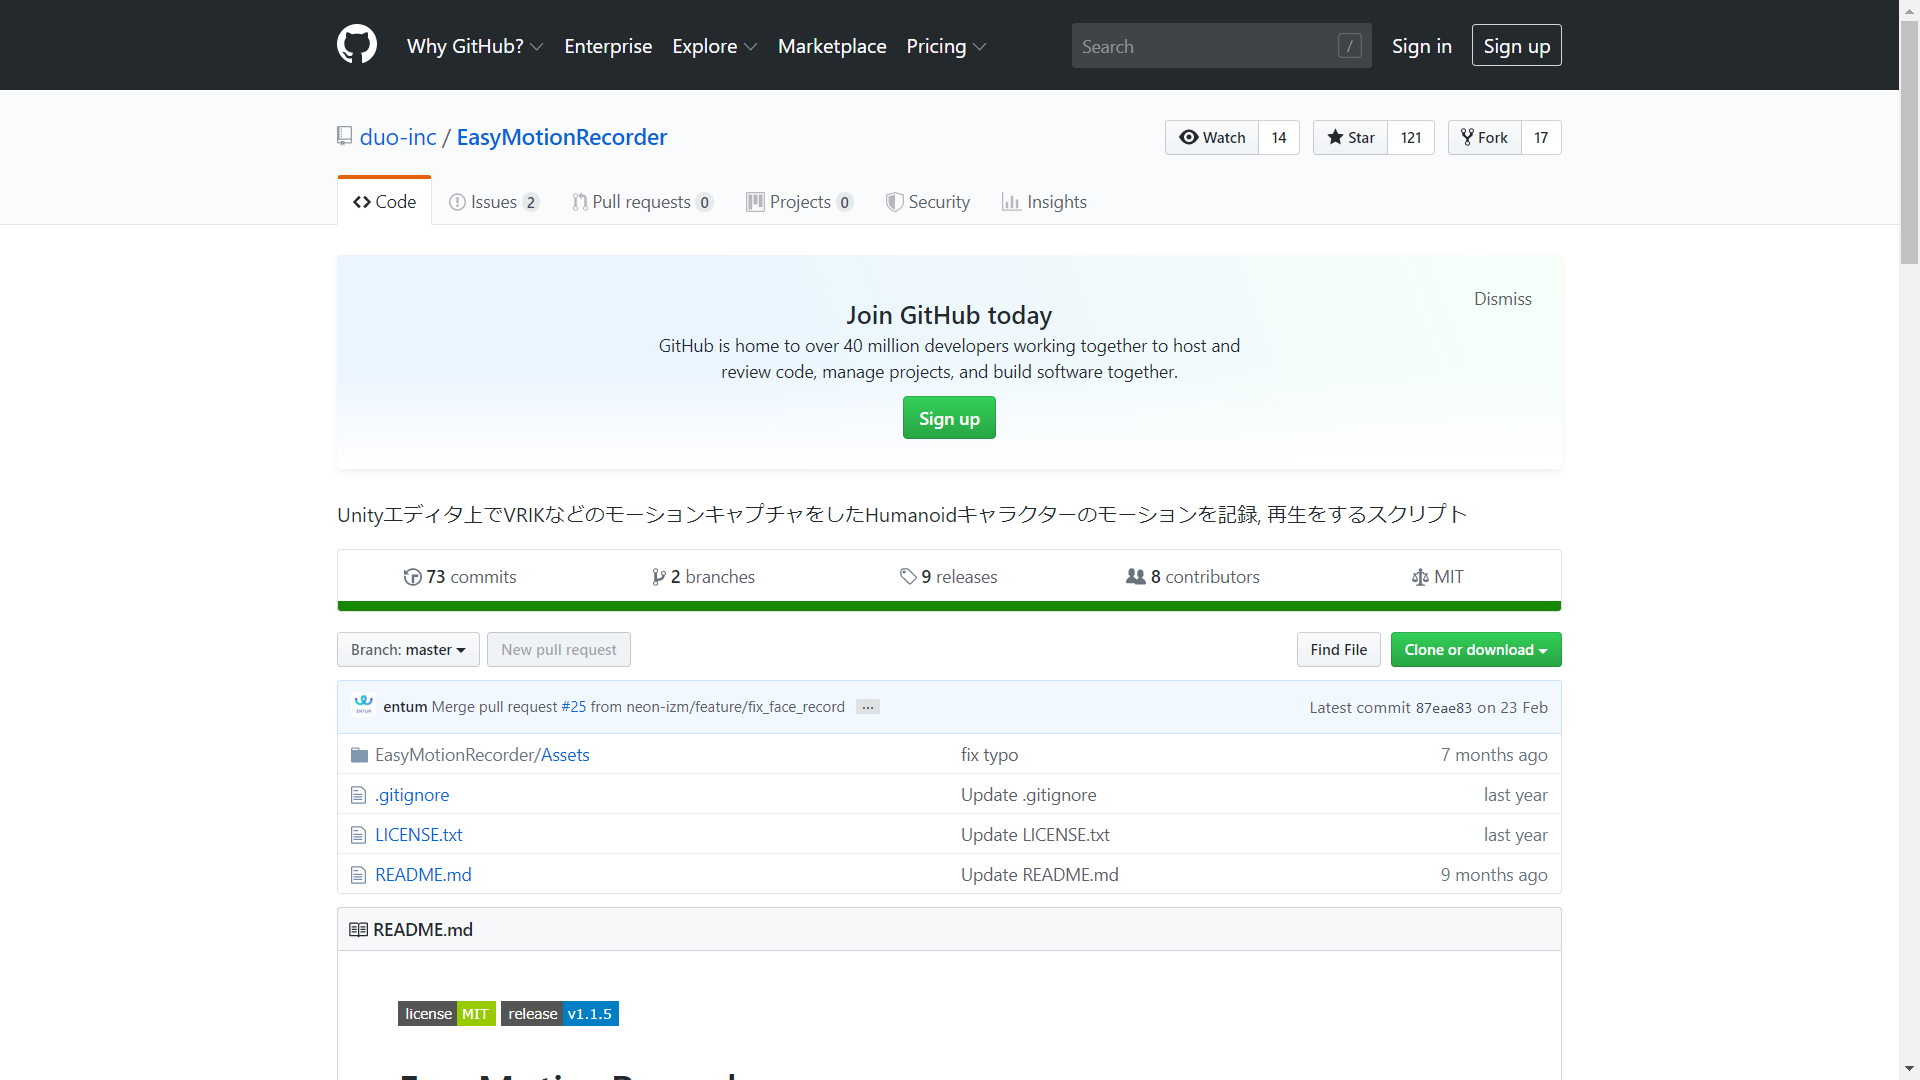
Easy Motion Recorder
Download “EasyMotionRecorder.unitypackage” from the release page and import it into your project.
Recording Motion
First, place the file “Assets/EasyMotionRecorder/Prefabs/EasyMotionRecorder.prefab” on the scene.
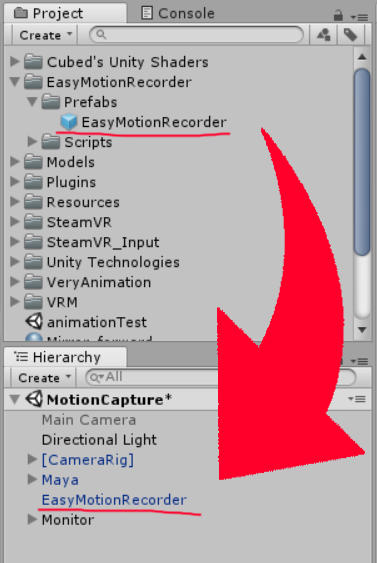
Placing the EasyMotionRecorder.prefab
Select the EasyMotionRecorder placed on the Hierarchy, and attach the character to be captured to the Animator of the “Motion Data Player” and “Motion Data Recorder” components as shown below. Attach the character to be captured to the Animator of the “Motion Data Player” and “Motion Data Recorder” components as follows.

Setting up the Easy Motion Recorder
Preparation is now complete.
Play the scene. After confirming that the avatar is moving, press the R key on the keyboard to start recording, and press the X key to finish recording and export the file.
These key assignments can be changed from the “Play Start Key” and “Play Stop Key” of the “Motion Data Recorder” component (depending on your settings, you can also specify the input from the controller using the JoyStick Button).
Exporting the animation file
If the motion has been recorded successfully, a “RecordMotion_yyyy_mm~” file will have been created in “Assets/Resources”.
Select the file where you recorded the motion from the Project window, and select “Export as Humanoid animation clips” from the Inspector window, as shown in the image below, and you will see the animation file created in “Assets/Resources”. You will see the animation file created in “Assets/Resources”.
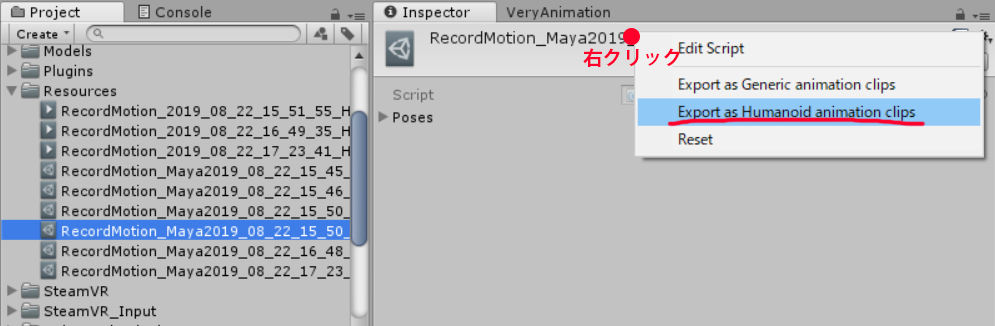
Exporting an animation file
The problem
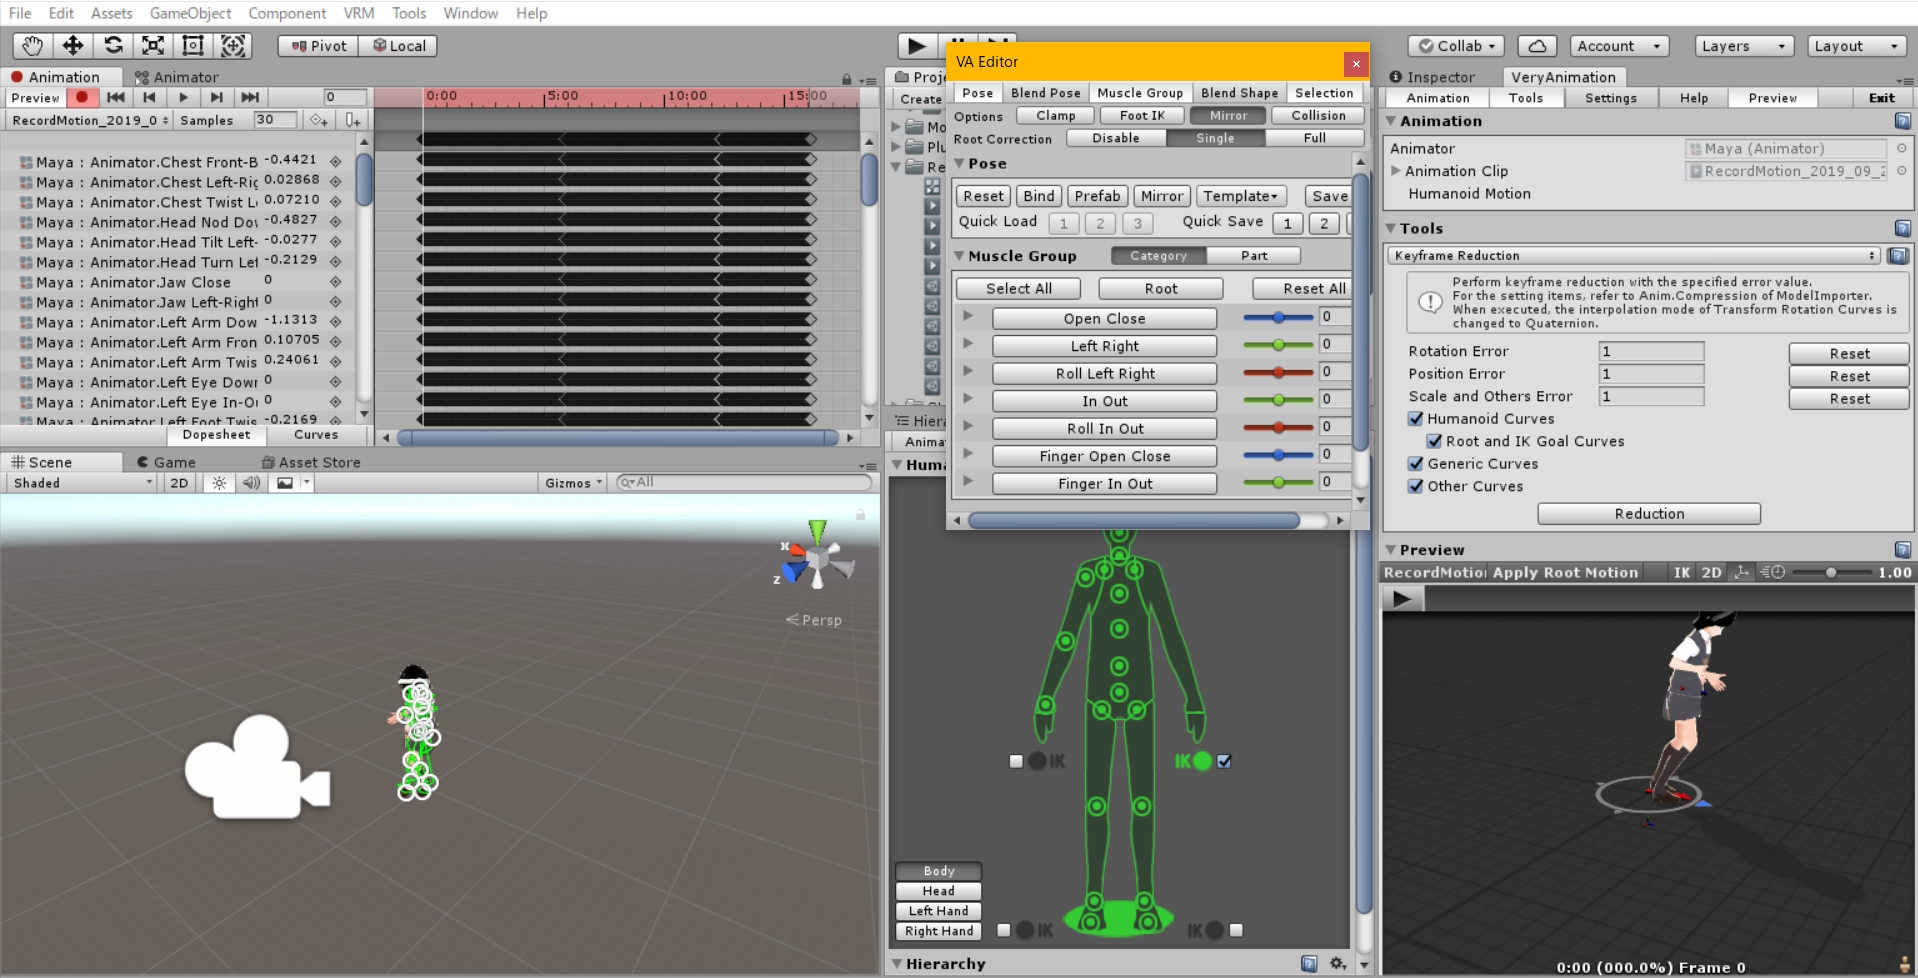
We have succeeded in creating an animation file based on our own motion, but since this is a simple motion capture, the roughness will be noticeable.
So, when I tried to cut out the desired motion, add facial expressions and finger movements, and edit it to work well by taking out the garbage, the large number of frames became a problem (see image below).
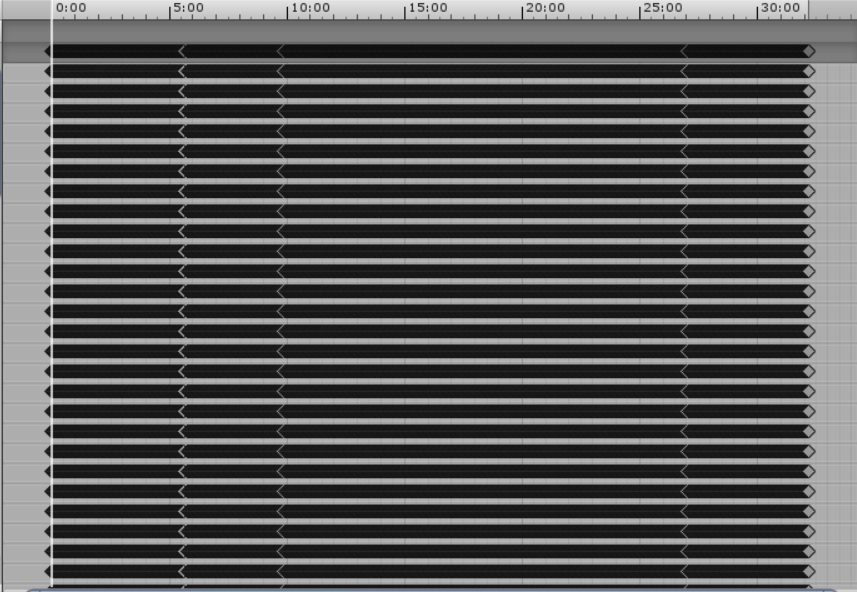
The Need for Keyframe Reduction
In the next section, we will see how to use VeryAnimation to do keyframe reduction and then edit the avatar to make it move the way you want.
Animation Reduction and Editing
Importing a VeryAnimation
In this article, we will use Very Animation for keyframe reduction and editing of Humanoid Animation.
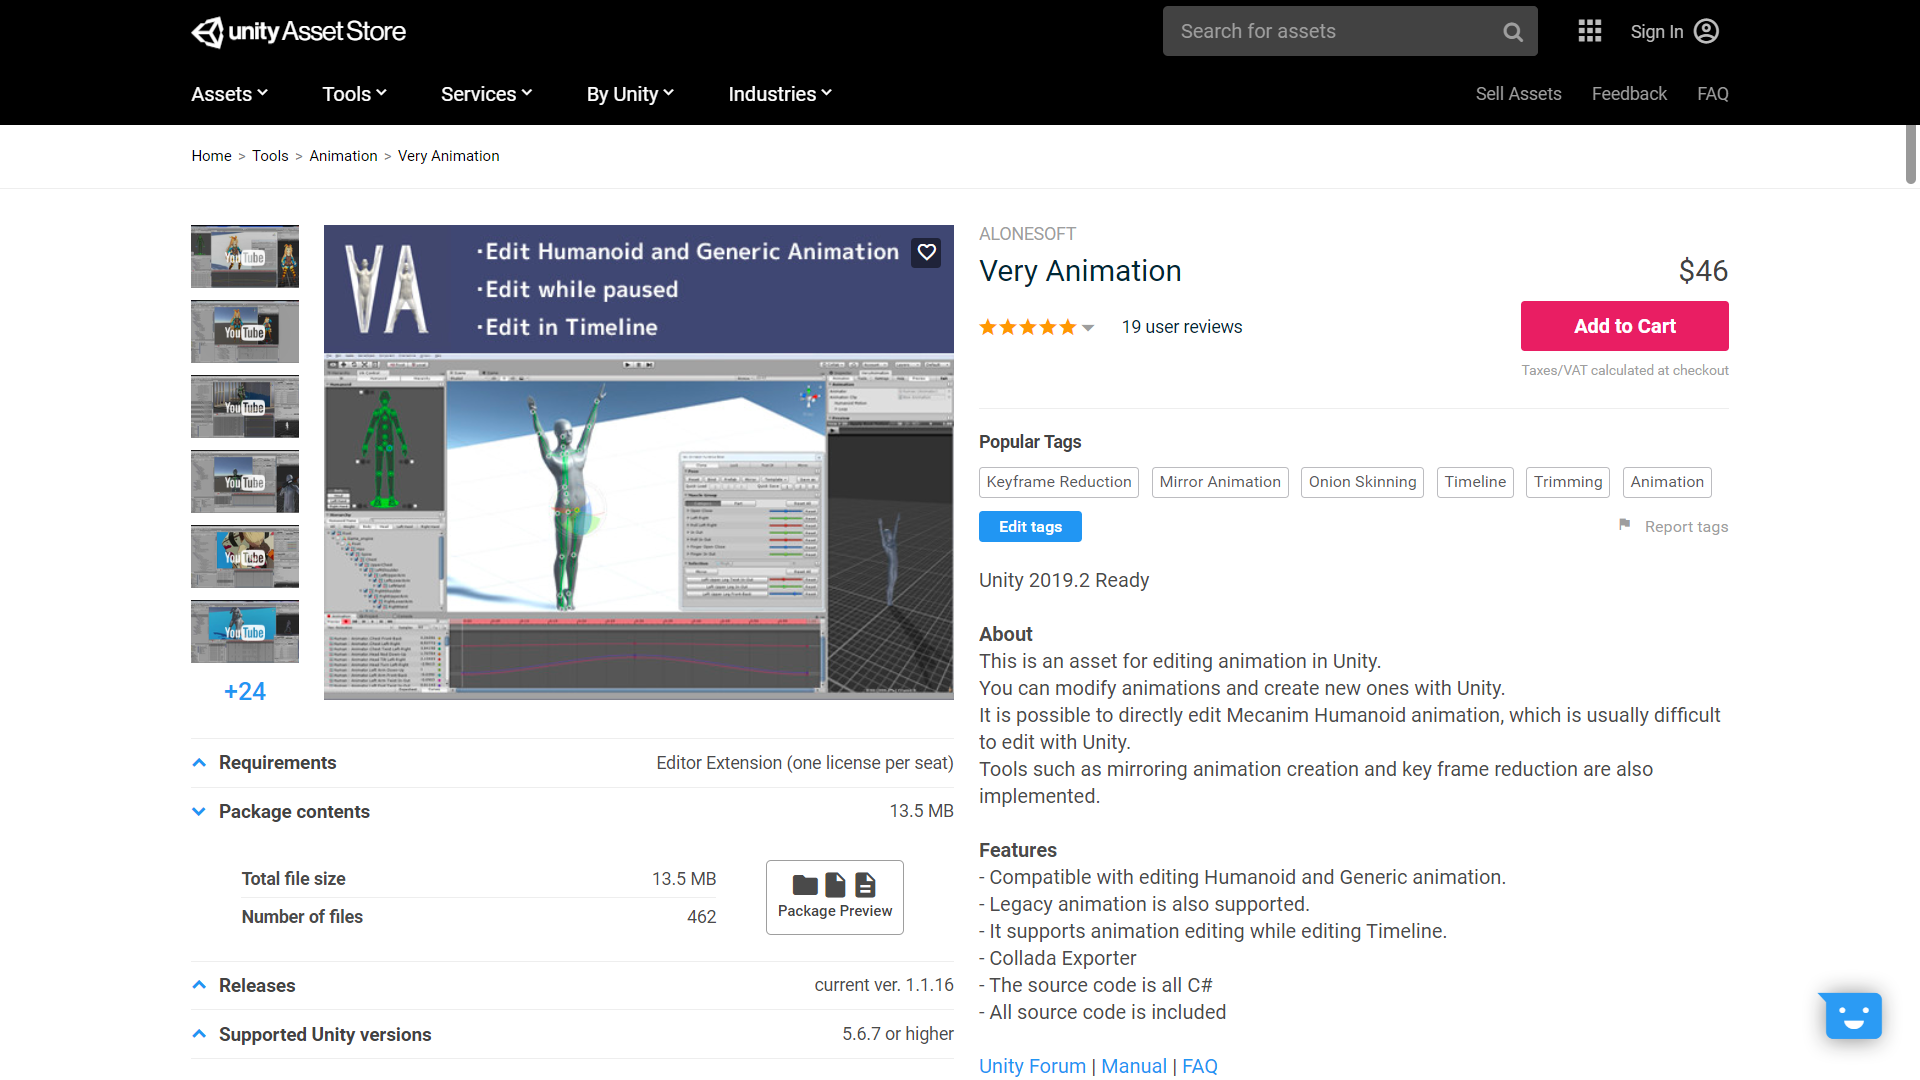
Very Animation
We will use Very Animation for keyframe reduction and editing of Humanoid animations, which can be purchased and downloaded from this page.
Preparing to use Very Animation
We have prepared a new scene for editing the animation. Here we will place the avatar we want to move and apply the animation file we created earlier.
Creating a scene for editing animation
To edit the animation in Very Animation, select the desired animation file in the Project window and set the following settings in the Inspector (check the Bake into Pose checkbox and set Based Upon “Original”).
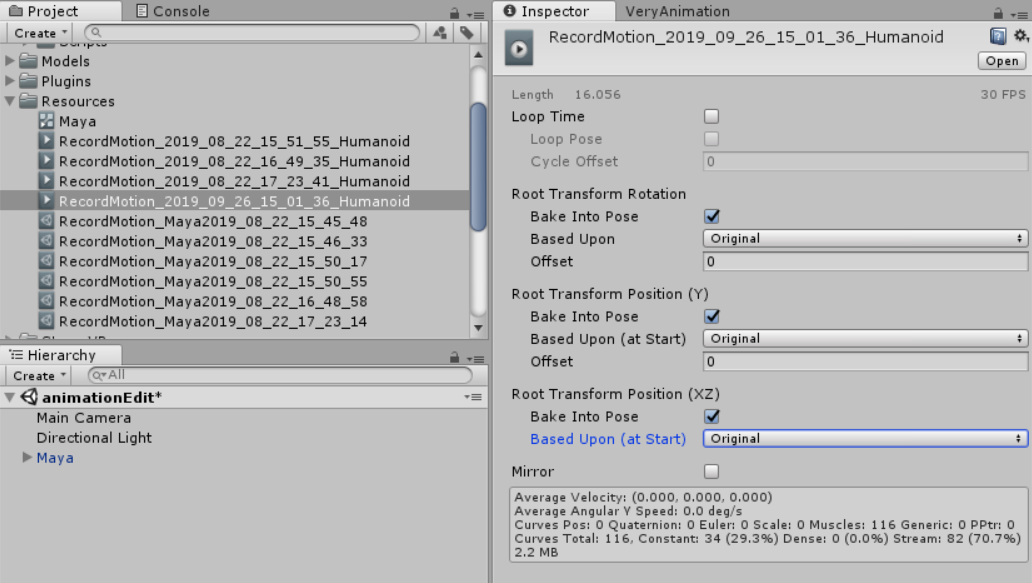
Setting up the Root Transform
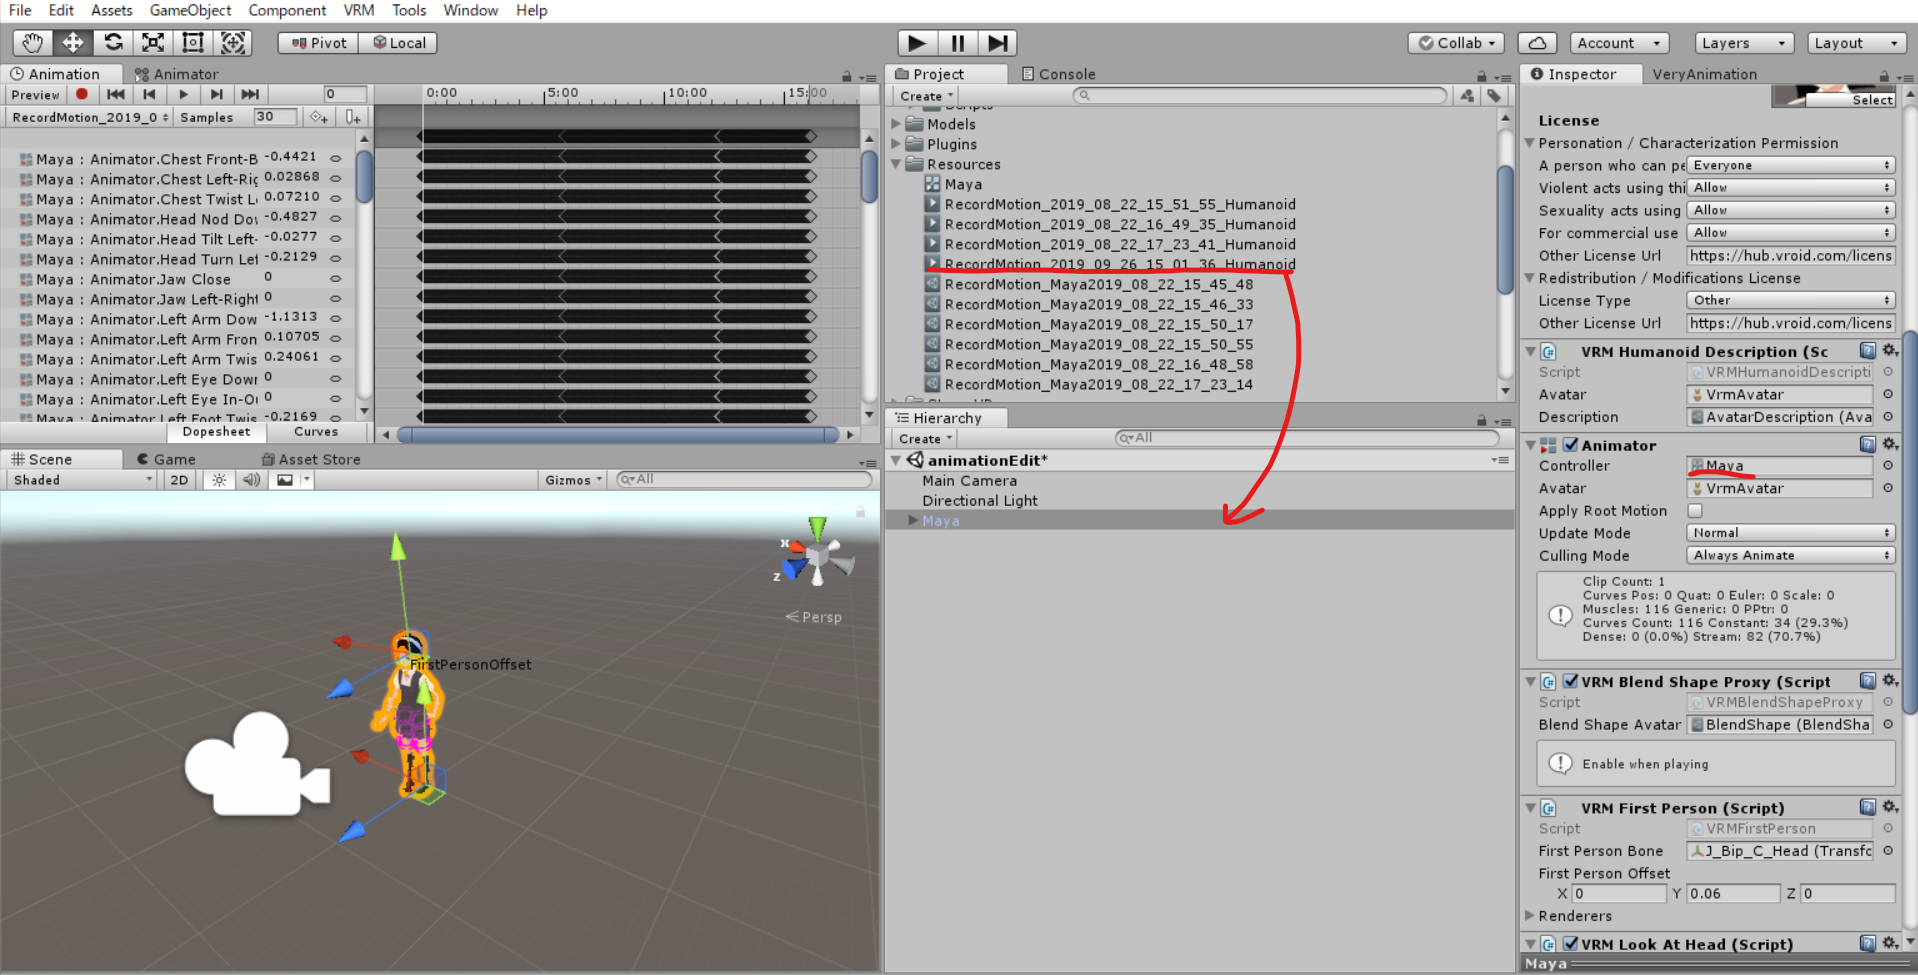
In order to use Very Animation, we will first display the Very Animation main window by clicking on “Window>Very Animation>Main” on the taskbar.

Displaying the VeryAnimation window
Next, with the avatar selected in the Hierarchy window, open the VeryAnimation main window and click “Edit Animation” to open the Very Animation editing window.

The editing window
When the screen looks like the image below, you are ready to go.
Preparing the Very Animation
Keyframe Reduction
Select “Tools” from the tabs in the main window of Very Animation, and select “Keyframe Reduction” from the pull-down menu.
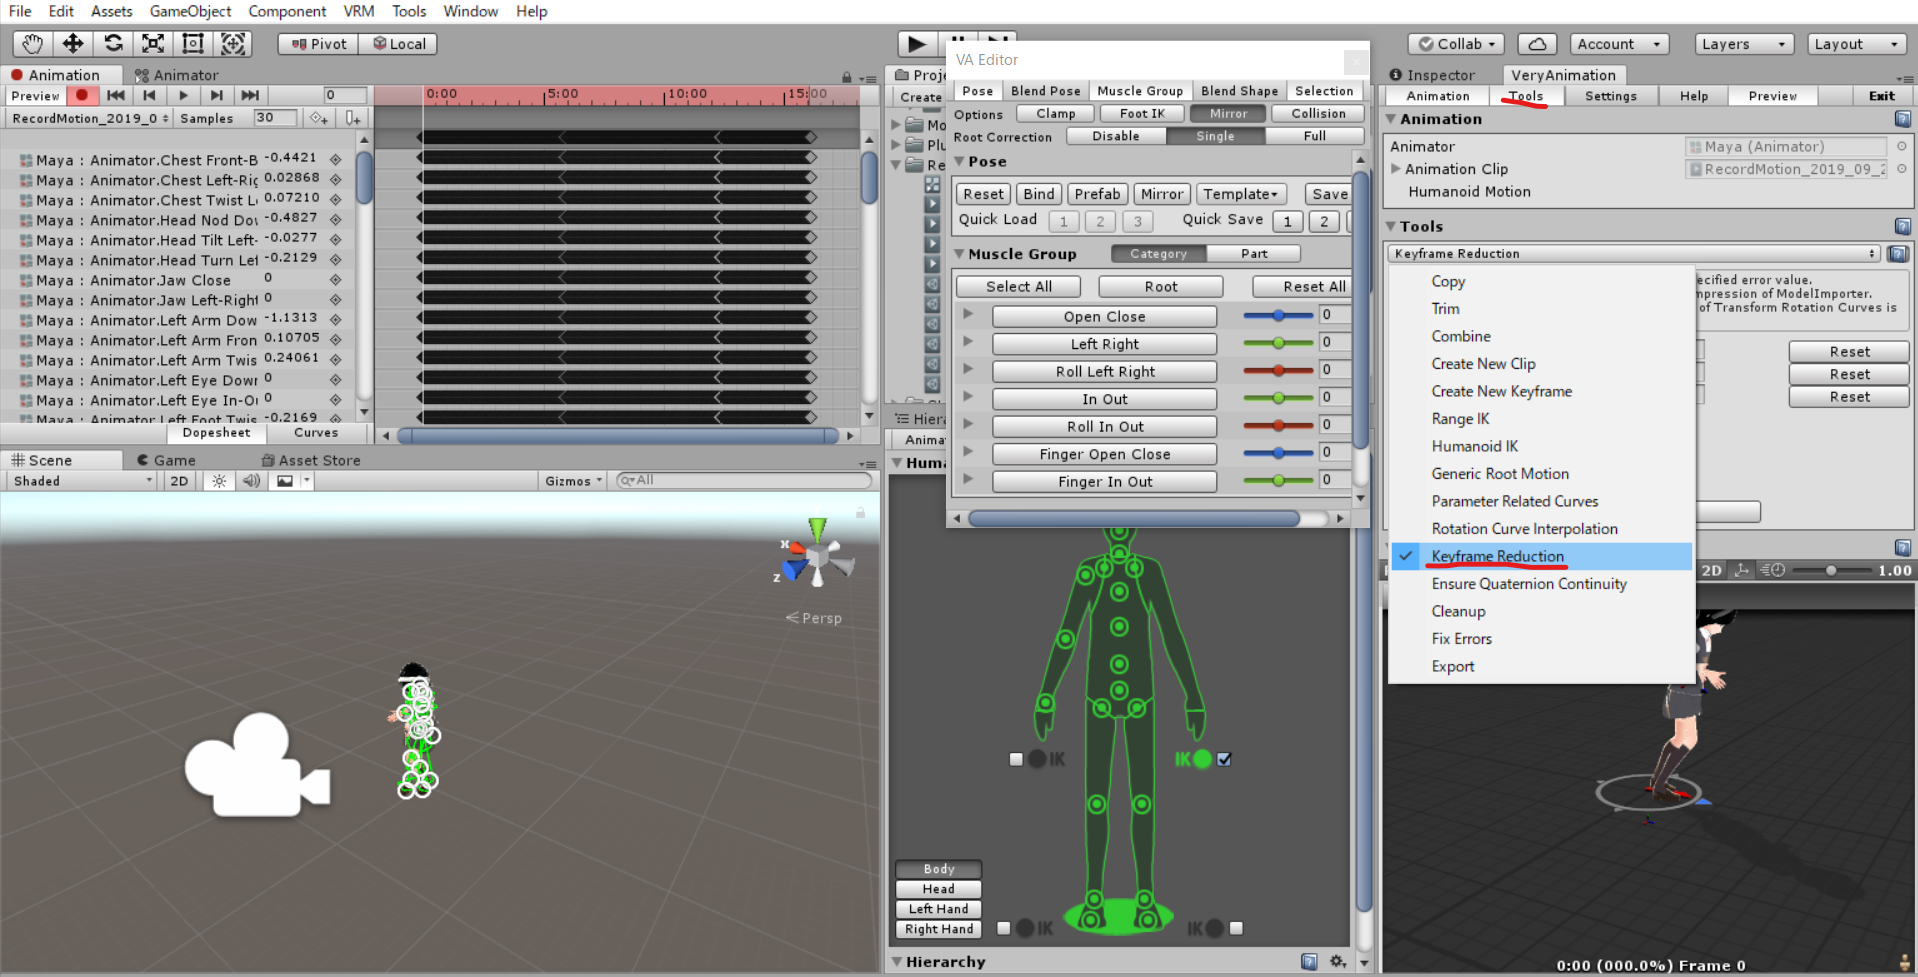
Preparing for Keyframe Reduction
If you select “Reduction”, keyframe reduction will be performed.

Keyframe Reduction
Parameters such as “Rotation Error”, “Position Error”, and “Scale and other Error” are used to set how much error is allowed in the reduction process. The larger the value, the fewer the number of keys, but the larger the difference from the original animation (in this case, I set all of them to 10 for keyframe reduction).
(In this case, I set all the keys to 10 and did keyframe reduction.) When executed, the number of keys has been reduced as shown below, making it easier to edit.
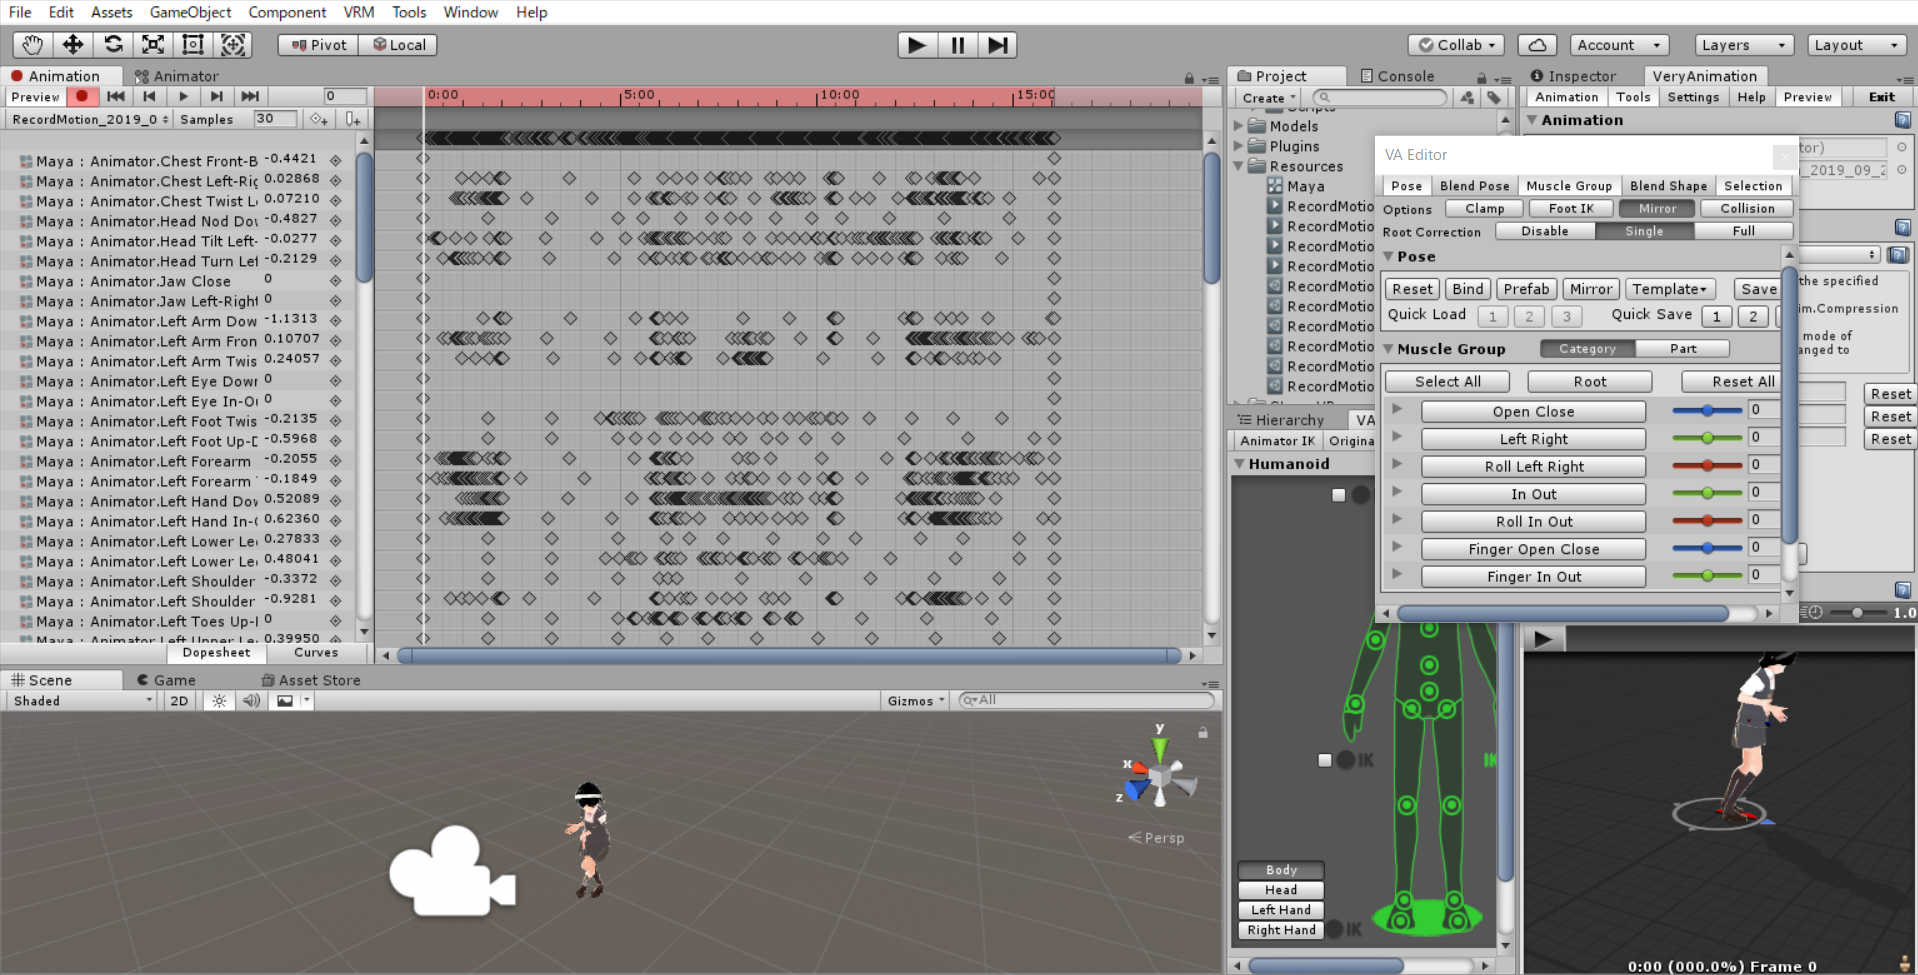
Result of keyframe reduction
Let’s check the actual contents. Let’s take a look at the movement of the right shoulder.
By selecting Right Shoulder from the VA Control window at the bottom right of the screen and Curves from the Animation window at the top left of the screen, you can easily check the movement as shown in the following image.
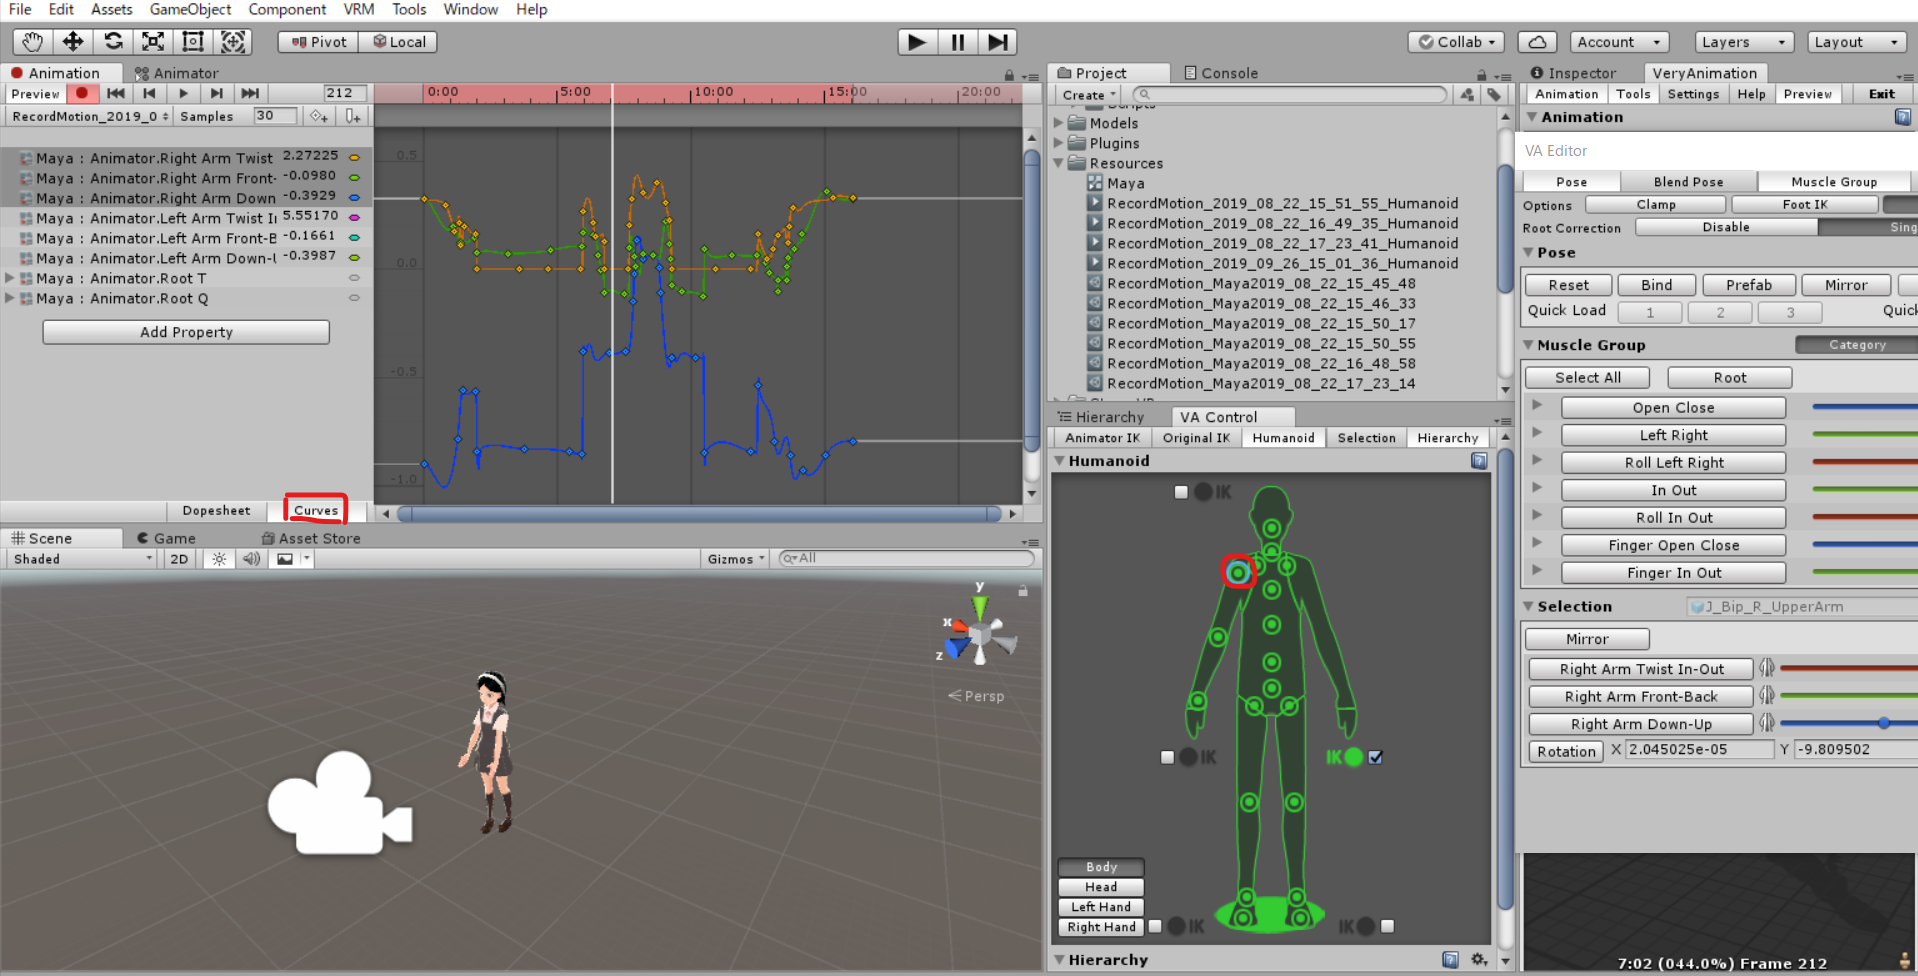
Checking the animation after keyframe reduction
By moving the bar in the Animation window, you can visually see the relationship between the key position and the character’s movement. Next, let’s move on to editing the actual animation based on this.
Checking the results of Keyframe Reduction
Editing the animation
Although motion-capture animation is attractive for its fine and natural movements, it can give the impression of “too much movement” if applied directly to the avatar, especially in the case of a simple motion capture like this one. Of course, the keyframe reduction makes it relatively smooth, but mechanical adjustments alone can remove the naturalness that should remain, so this time I manually adjusted the remaining areas of concern.
Cutting out the desired movement
The first step is to cut out the desired movement from the entire image.
As confirmed earlier, focus on a specific part (e.g., right shoulder) to confirm the approximate location, and then delete the area before and after the desired location. First, cut it out at the approximate location, and make any minor adjustments later.
Cutting out the desired movement
Adding Finger Movements
The next step is to add finger movements. Since finger movements are not included in the animation file exported from the motion capture recording, we will have to add them later if necessary.
In this case, we have animated the hand to pose for the piece at the timing when it is at the eye.
When using Very Animation, you can edit the joints you want to move by specifying them in the VA Editor.
In this case, I selected “Finger Open Close>Right Finger” and “Finger In Out>Right Finger”, and created the piece by editing the Curves in the Animation window.

Creating Finger Animation
Adding facial expressions
For VRM avatars, you can select “(Avatar Name)/face” from the Hierarchy window and specify the expression from the Blend Shape in the Skinned Mesh Renderer component.
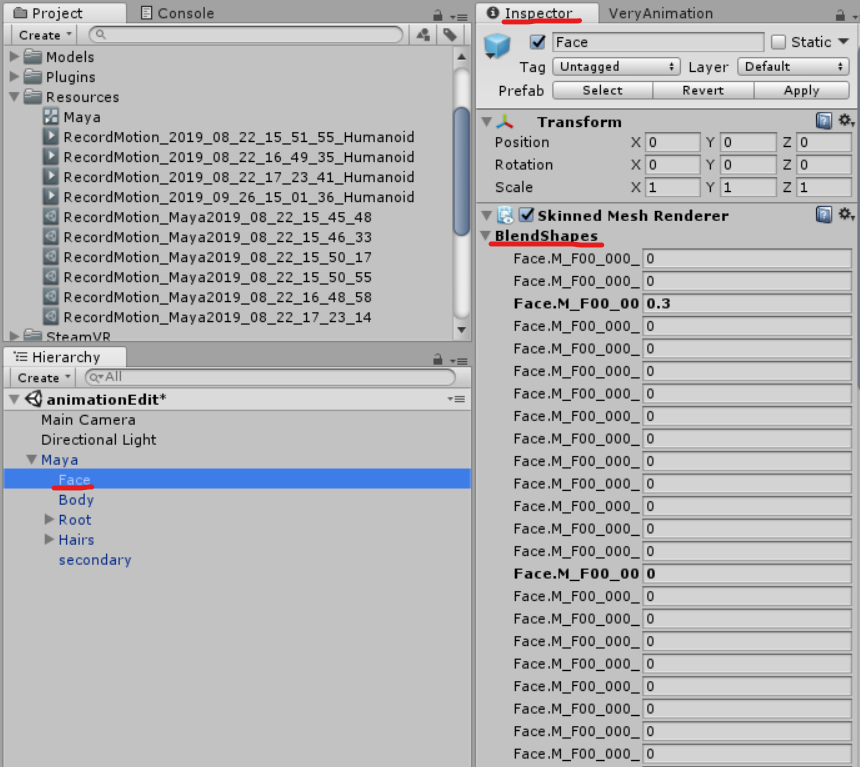
Expressions for VRM avatars
Activate recording mode from the Animation window and enter the values you want in the BlendShapes above to key them in. In this case, I added an expression so that one eye is closed and the mouth is wide open when the piece is done. You can also use Curves to adjust the transitions after you hit the rough keys.
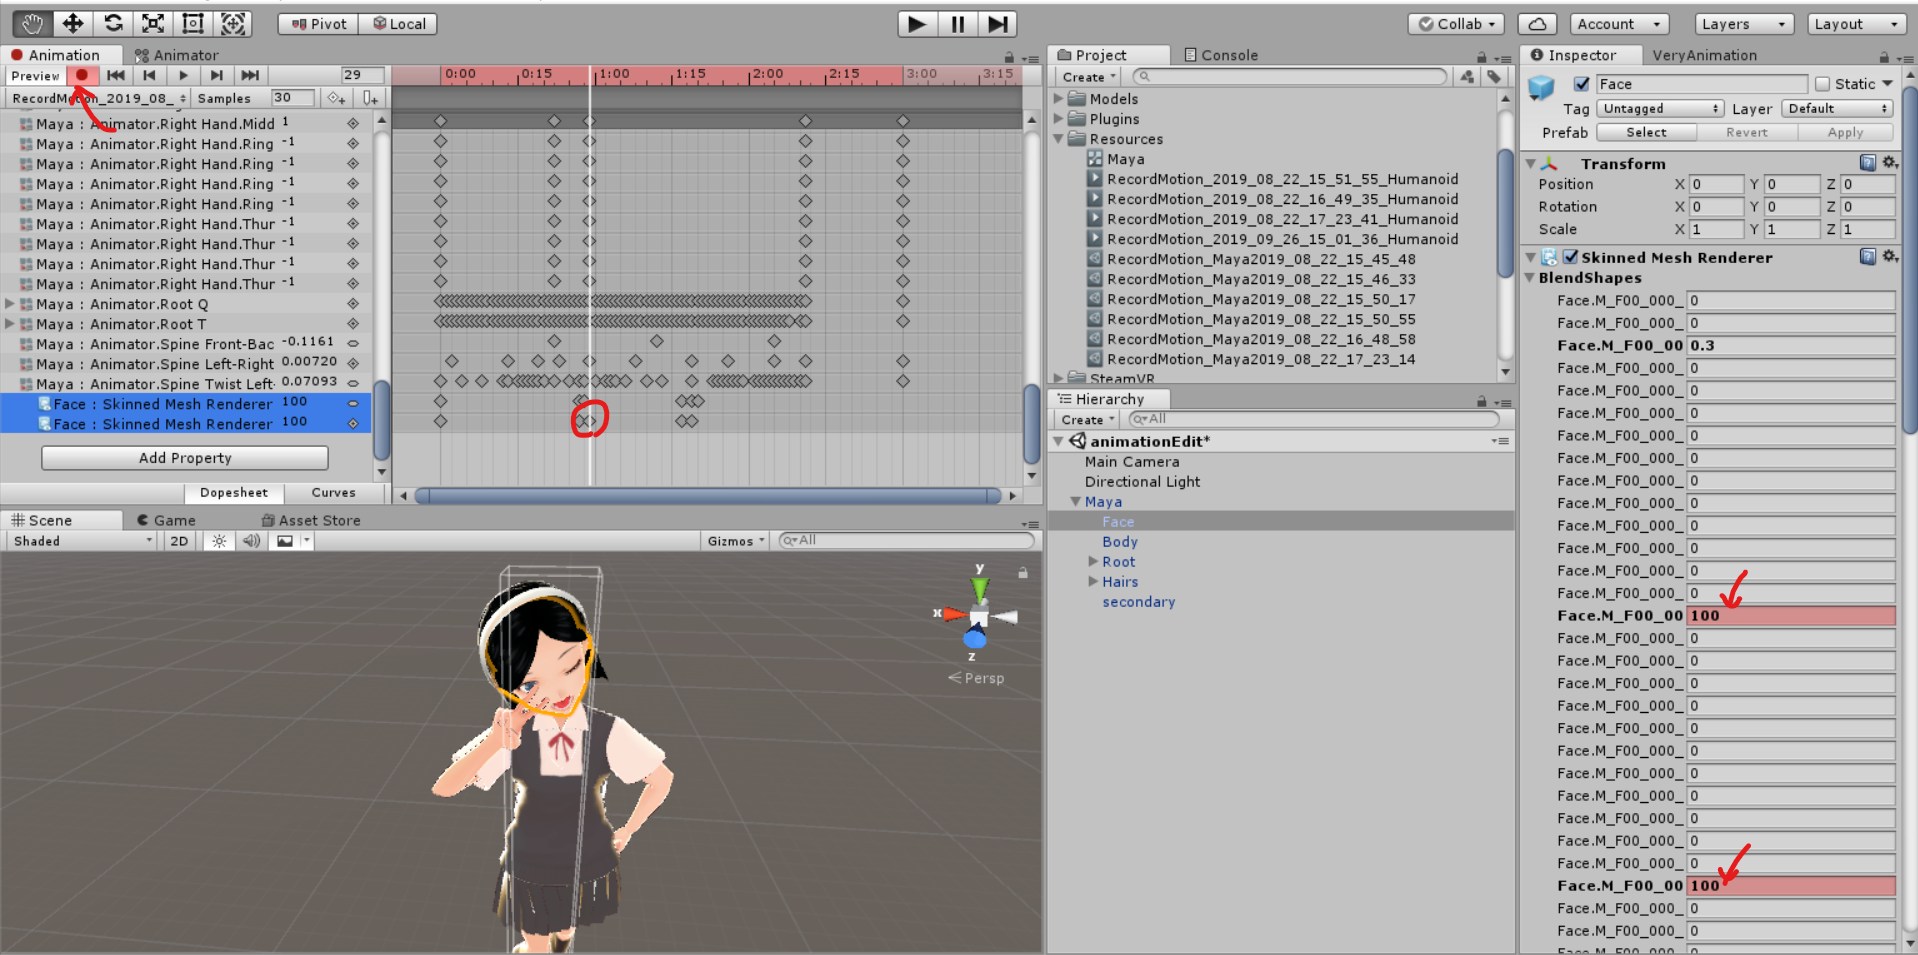
Adding Expressions
Now we can add expressions!
Finished image
After making some minor adjustments, we were able to create the following animation!
The waving animation was also created in the same way, and transitioned by the animator.
Finished image
This is a long article, but I hope it will be helpful for those who want to try creating their own original animations.