In this article, we will explain how to use Unity to cast shadows for objects in an AR scene. We will also explain how to upload and use this technique in STYLY AR scenes.
Shaders have a large impact on the way shadows are rendered in VR and AR scenes. Light sources cast light on 3D objects, which cast shadows on other objects behind them.
It is possible to render shadows on the floor in a VR scene, but in an AR scene where objects are placed in a real-world setting, it would be unnatural to have a floor plane to render these shadows.
This article explains how to cast shadows in an AR scene by only making the shadow visible, and hiding the plane which the shadow is cast on. The density and quality of the shadow can also be adjusted by changing the strength and resolution of the light. Adding a shadow to your AR object is useful when you want to make AR scenes more realistic.
Below is the sample image of the scene we will create.
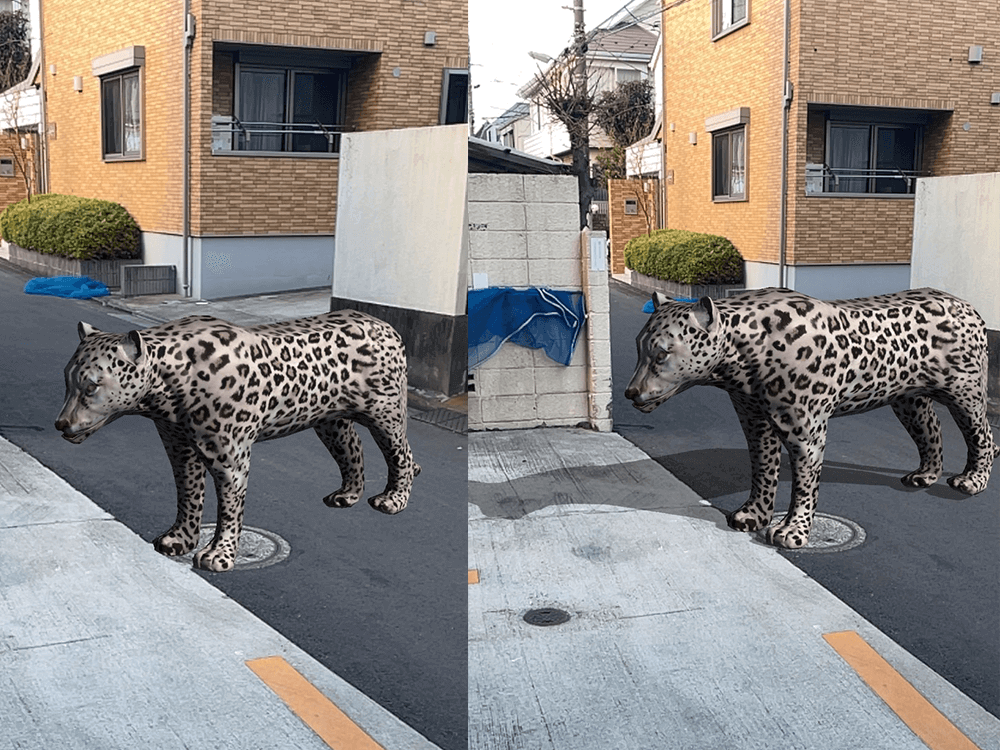
Left: AR object without shadow
Right: AR object with shadow
Preparation
First, let’s import an object you want to add a shadow to.
In the sample scene we will use a primitive sphere.
Add a sphere by right-clicking in the Hierarchy and selecting 3D Object > Sphere.
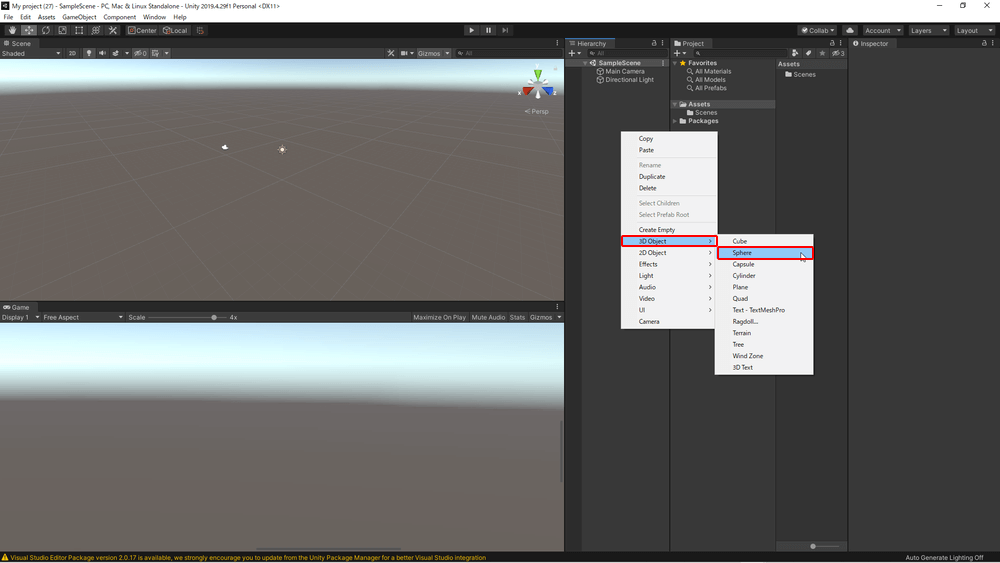
Adding a Sphere
Let’s set the Sphere’s position to (X=0, Y=1, Z=0) so we know exactly where it is.
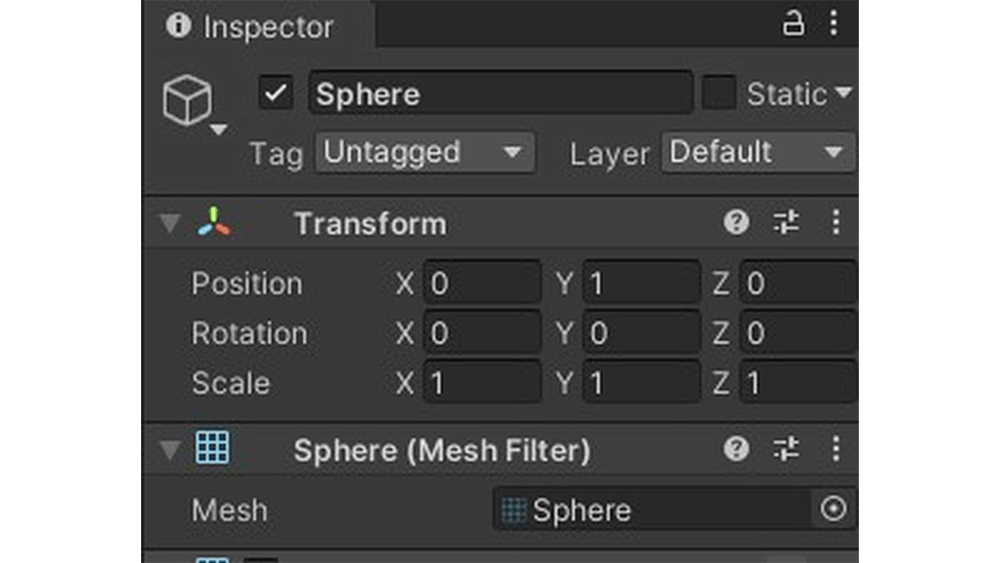
Position: X=0, Y=1, Z=0
Next, let’s prepare a plane to cast the shadow on.
As with the sphere, add a Plane by right-clicking in the Hierarchy and selecting 3D Object > Plane.
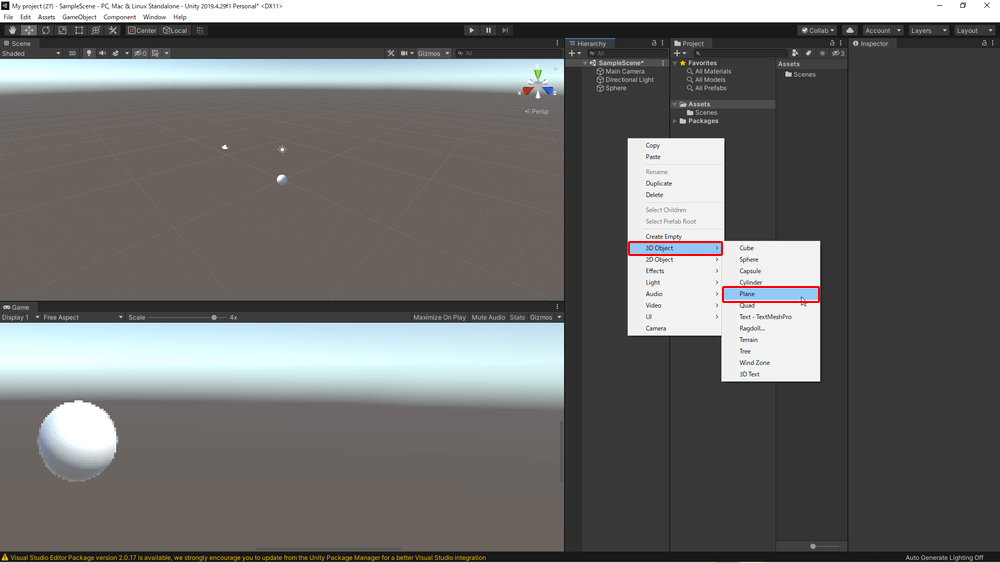
Adding a Plane
Set the position to (X=0, Y=0, Z=0).
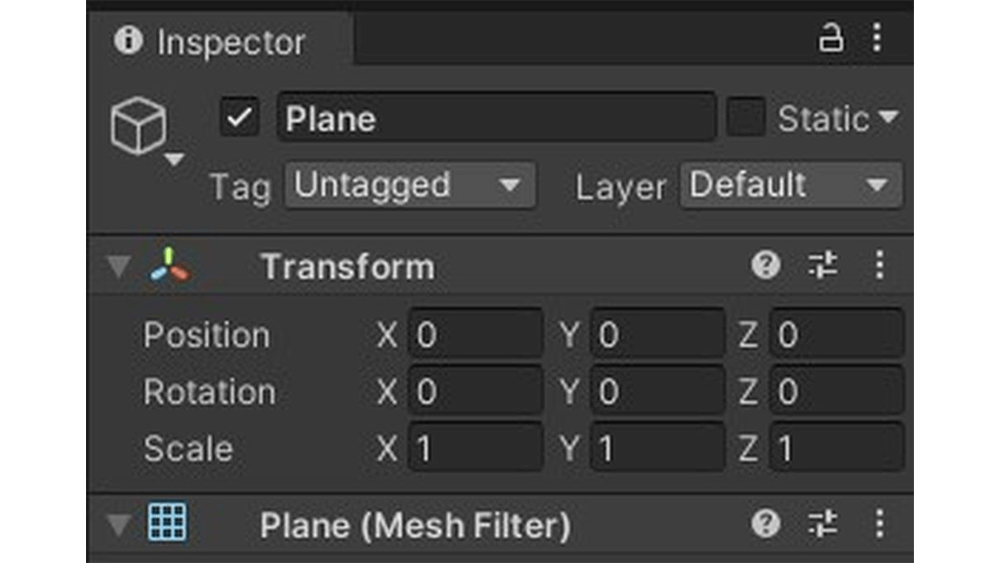
Position: X=0, Y=0, Z=0
Creating a Shadow Shader
The default shader will cast the Sphere’s shadow on the Plane.
To display only the shadow of the Sphere, we will have to create a new shader and material.
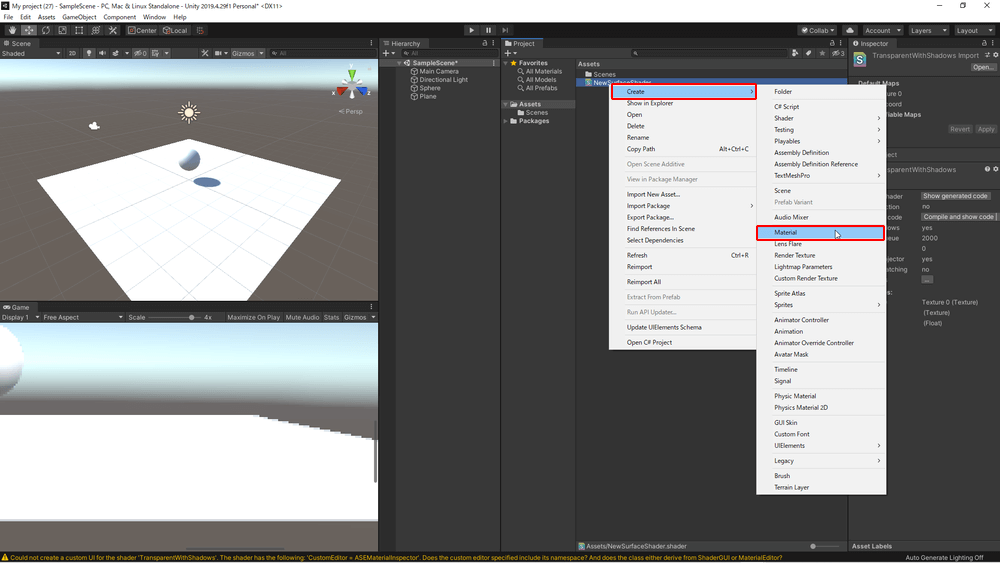
To do this, first right-click on Assets and select Create > Shader > Standard Surface Shader.
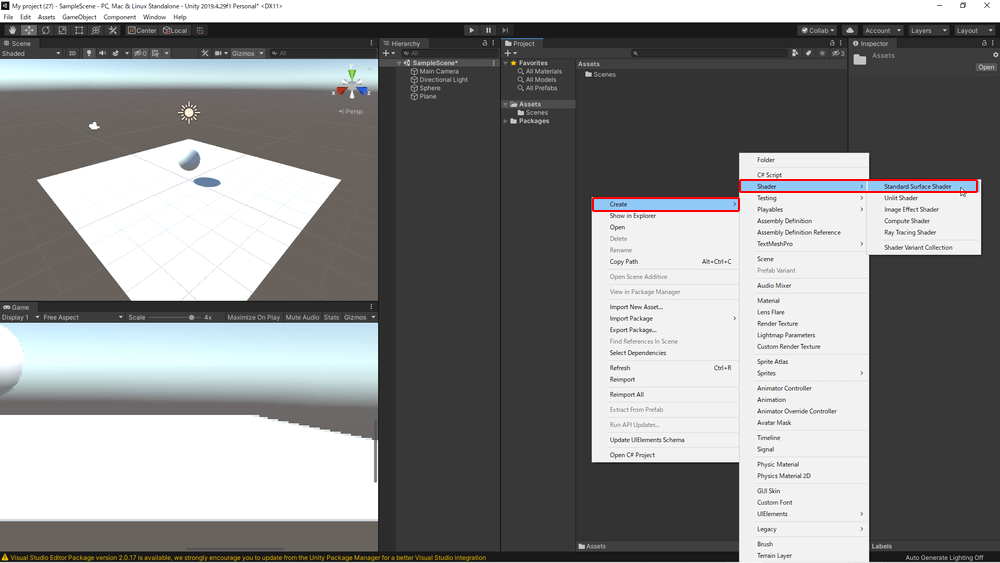
Create > Shader > Standard Surface Shader
Once you have added the Standard Surface Shader, copy the shader program below to your clipboard.
// Made with Amplify Shader Editor
// Available at the Unity Asset Store - http://u3d.as/y3X
Shader "TransparentWithShadows"
{
Properties
{
_Texture0("Texture 0", 2D) = "black" {}
[HideInInspector] _texcoord( "", 2D ) = "white" {}
[HideInInspector] __dirty( "", Int ) = 1
}

SubShader
{
Tags{ "RenderType" = "Transparent" "Queue" = "Geometry+0" "IgnoreProjector" = "True" }
Cull Back
ZWrite Off
Blend SrcAlpha OneMinusSrcAlpha
BlendOp Add
CGPROGRAM
#include "UnityPBSLighting.cginc"
#include "UnityShaderVariables.cginc"
#pragma target 3.0
#pragma surface surf StandardCustomLighting keepalpha
struct Input
{
float2 uv_texcoord;
};

struct SurfaceOutputCustomLightingCustom
{
fixed3 Albedo;
fixed3 Normal;
half3 Emission;
half Metallic;
half Smoothness;
half Occlusion;
fixed Alpha;
Input SurfInput;
UnityGIInput GIData;
};

uniform sampler2D _Texture0;
uniform float4 _Texture0_ST;

inline half4 LightingStandardCustomLighting( inout SurfaceOutputCustomLightingCustom s, half3 viewDir, UnityGI gi )
{
UnityGIInput data = s.GIData;
Input i = s.SurfInput;
half4 c = 0;
#if DIRECTIONAL
float ase_lightAtten = data.atten;
if( _LightColor0.a == 0)
ase_lightAtten = 0;
#else
float3 ase_lightAttenRGB = gi.light.color / ( ( _LightColor0.rgb ) + 0.000001 );
float ase_lightAtten = max( max( ase_lightAttenRGB.r, ase_lightAttenRGB.g ), ase_lightAttenRGB.b );
#endif
float2 uv_Texture0 = i.uv_texcoord * _Texture0_ST.xy + _Texture0_ST.zw;
float4 tex2DNode1 = tex2D( _Texture0, uv_Texture0 );
float4 appendResult8 = (float4(tex2DNode1.r , tex2DNode1.g , tex2DNode1.b , 1.0));
c.rgb = ( ( ase_lightAtten * _LightColor0 ) * appendResult8 ).rgb;
c.a = max( tex2DNode1.a , ( 1.0 - ase_lightAtten ) );
return c;
}

inline void LightingStandardCustomLighting_GI( inout SurfaceOutputCustomLightingCustom s, UnityGIInput data, inout UnityGI gi )
{
s.GIData = data;
}

void surf( Input i , inout SurfaceOutputCustomLightingCustom o )
{
o.SurfInput = i;
}

ENDCG
}
Fallback "Diffuse"
CustomEditor "ASEMaterialInspector"
}
/*ASEBEGIN
Version=15001
22;52;1491;745;1412.058;545.3112;1.441795;True;True
Node;AmplifyShaderEditor.TexturePropertyNode;5;-601.3947,-278.6907;Float;True;Property;_Texture0;Texture 0;1;0;Create;True;0;0;False;0;a511279f3fe5df64583b457d53fabf9a;cdb08e5d1f5844840a774f4db2098afc;False;black;Auto;0;1;SAMPLER2D;0
Node;AmplifyShaderEditor.TextureCoordinatesNode;6;-499.0693,34.59831;Float;False;0;-1;2;3;2;SAMPLER2D;;False;0;FLOAT2;1,1;False;1;FLOAT2;0,0;False;5;FLOAT2;0;FLOAT;1;FLOAT;2;FLOAT;3;FLOAT;4
Node;AmplifyShaderEditor.RangedFloatNode;18;-100.642,-293.6487;Float;False;Constant;_Float1;Float 1;2;0;Create;True;0;0;False;0;1;0;0;0;0;1;FLOAT;0
Node;AmplifyShaderEditor.LightColorNode;15;-209.5528,29.22202;Float;False;0;3;COLOR;0;FLOAT3;1;FLOAT;2
Node;AmplifyShaderEditor.SamplerNode;1;-238.8079,-181.0969;Float;True;Property;_TextureSample0;Texture Sample 0;1;0;Create;True;0;0;False;0;7be95422710fa4b018659390b6108d74;7be95422710fa4b018659390b6108d74;True;0;False;white;Auto;False;Object;-1;Auto;Texture2D;6;0;SAMPLER2D;;False;1;FLOAT2;0,0;False;2;FLOAT;0;False;3;FLOAT2;0,0;False;4;FLOAT2;0,0;False;5;FLOAT;1;False;5;COLOR;0;FLOAT;1;FLOAT;2;FLOAT;3;FLOAT;4
Node;AmplifyShaderEditor.LightAttenuation;12;-649.0541,252.1351;Float;False;0;1;FLOAT;0
Node;AmplifyShaderEditor.OneMinusNode;14;-103.5528,415.222;Float;False;1;0;FLOAT;0;False;1;FLOAT;0
Node;AmplifyShaderEditor.SimpleMultiplyOpNode;21;-9.070984,131.4897;Float;False;2;2;0;FLOAT;0;False;1;COLOR;0,0,0,0;False;1;COLOR;0
Node;AmplifyShaderEditor.DynamicAppendNode;8;101.4472,-170.778;Float;False;FLOAT4;4;0;FLOAT;0;False;1;FLOAT;0;False;2;FLOAT;0;False;3;FLOAT;0;False;1;FLOAT4;0
Node;AmplifyShaderEditor.SimpleMaxOpNode;13;112.4372,243.5498;Float;False;2;0;FLOAT;0;False;1;FLOAT;0;False;1;FLOAT;0
Node;AmplifyShaderEditor.SimpleMultiplyOpNode;16;227.4472,11.22202;Float;False;2;2;0;COLOR;0,0,0,0;False;1;FLOAT4;0,0,0,0;False;1;COLOR;0
Node;AmplifyShaderEditor.StandardSurfaceOutputNode;0;430.0907,-14.65567;Float;False;True;2;Float;ASEMaterialInspector;0;0;CustomLighting;TransparentWithShadows;False;False;False;False;False;False;False;False;False;False;False;False;False;False;True;False;False;False;False;Back;2;False;-1;0;False;-1;False;0;0;False;0;Custom;0.5;True;False;0;True;Transparent;;Geometry;All;True;True;True;True;True;True;True;True;True;True;True;True;True;True;True;True;True;0;False;-1;False;0;False;-1;255;False;-1;255;False;-1;0;False;-1;0;False;-1;0;False;-1;0;False;-1;0;False;-1;0;False;-1;0;False;-1;0;False;-1;False;2;15;10;25;False;0.5;True;2;SrcAlpha;OneMinusSrcAlpha;0;SrcAlpha;OneMinusSrcAlpha;Add;OFF;0;False;0;0,0,0,0;VertexOffset;True;False;Cylindrical;False;Relative;0;;0;-1;-1;-1;0;0;0;False;0;0;0;False;-1;-1;15;0;FLOAT3;0,0,0;False;1;FLOAT3;0,0,0;False;2;FLOAT3;0,0,0;False;3;FLOAT3;0,0,0;False;4;FLOAT;0;False;6;FLOAT3;0,0,0;False;7;FLOAT3;0,0,0;False;8;FLOAT;0;False;9;FLOAT;0;False;10;FLOAT;0;False;13;FLOAT3;0,0,0;False;11;FLOAT3;0,0,0;False;12;FLOAT3;0,0,0;False;14;FLOAT4;0,0,0,0;False;15;FLOAT3;0,0,0;False;0
WireConnection;6;2;5;0
WireConnection;1;0;5;0
WireConnection;1;1;6;0
WireConnection;14;0;12;0
WireConnection;21;0;12;0
WireConnection;21;1;15;0
WireConnection;8;0;1;1
WireConnection;8;1;1;2
WireConnection;8;2;1;3
WireConnection;8;3;18;0
WireConnection;13;0;1;4
WireConnection;13;1;14;0
WireConnection;16;0;21;0
WireConnection;16;1;8;0
WireConnection;0;9;13;0
WireConnection;0;13;16;0
ASEEND*/
//CHKSM=F061730E9029E8D3744314CF555EAA8F030C3348
Double-click the Standard Surface Shader to launch it in Visual Studio.
Delete the default code of the Standard Surface Shader in Visual Studio, and paste the code block that we copied to the clipboard here.
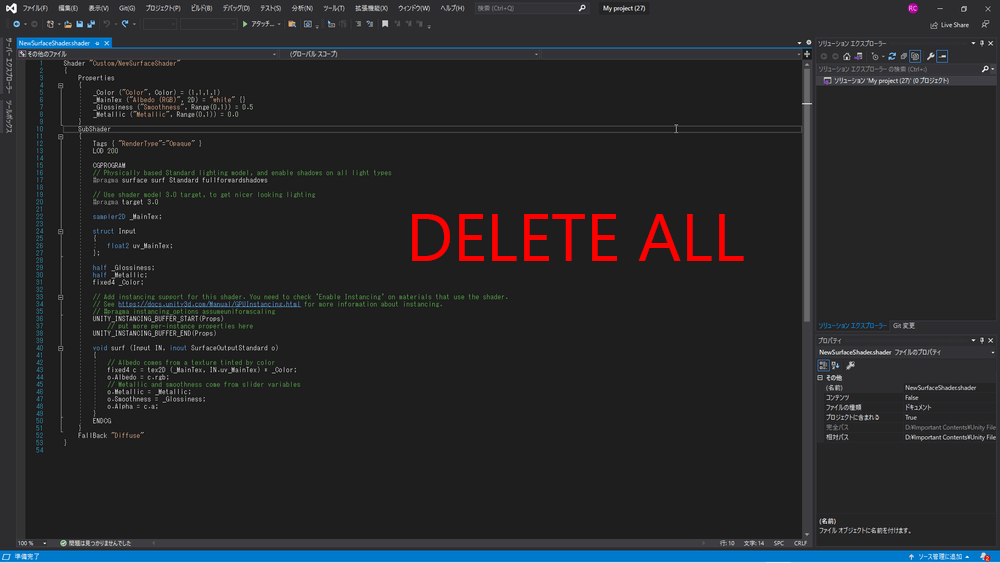
Open Visual Studio
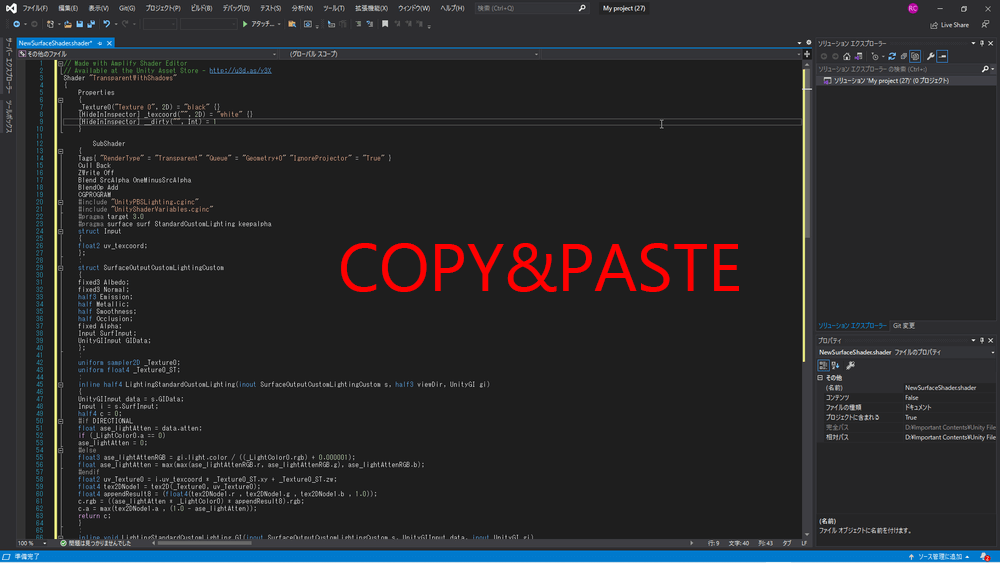
Paste the shader program from this article
Press Ctrl+[S] to save and close Visual Studio.
Now let’s go back to Unity. Select the added shader, right-click on it and choose Create > Material.
Create > Material
A material named “TransparentWithShadows” should be created and added to the Assets.
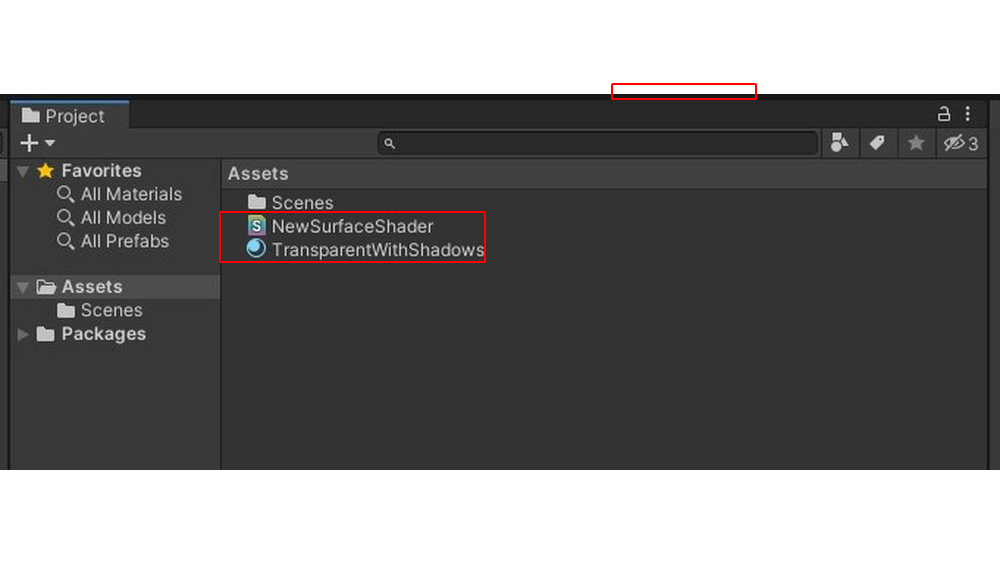
TransparentWithShadows
How to Use the Shader
To apply the new material that we created to the Plane, drag and drop the TransparentWithShadows material onto the Plane.
The Plane should disappear and only the sphere and shadow should be visible.
Drag and drop to the Plane to apply the material
The behavior of the shadow itself is the same as a regular shadow. The location of the shadow can be changed by rotating the Directional Light or by moving the object.
Keep in mind that the size of the plane is the area in which the shadow can be projected, so make sure to adjust the plane so that all of the shadow fits inside it.

Adjust the shadow by rotating the Directional Light and adjusting the plane size
To adjust the density of the shadow, change the Strength value of the Directional Light.
The closer the value is to 1, the darker the shadow will be — we recommend a value of 0.4 for a realistic shadow.
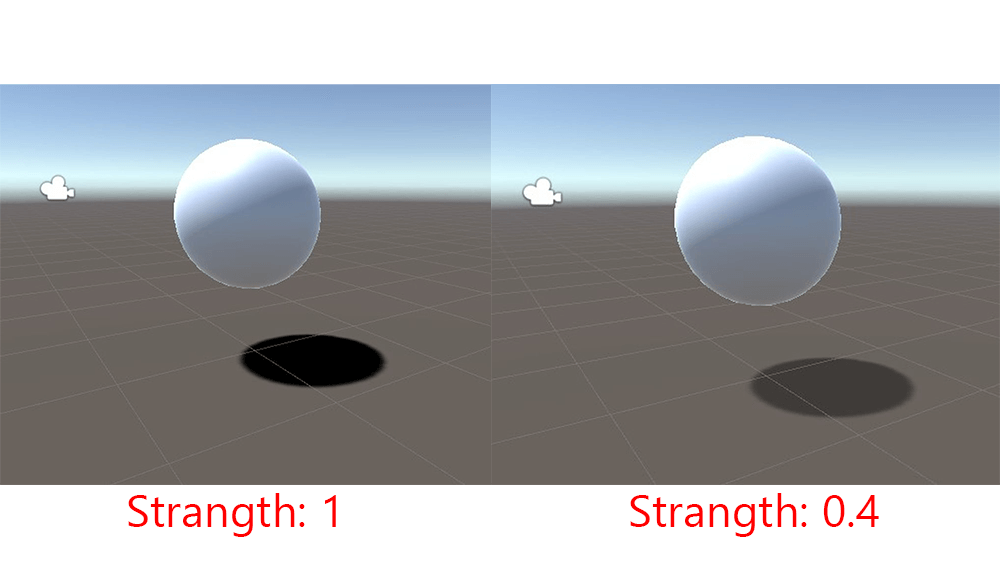
Changing the Strength of the Directional Light
The resolution of the Shadow can be changed from the Resolution of the Directional Light.
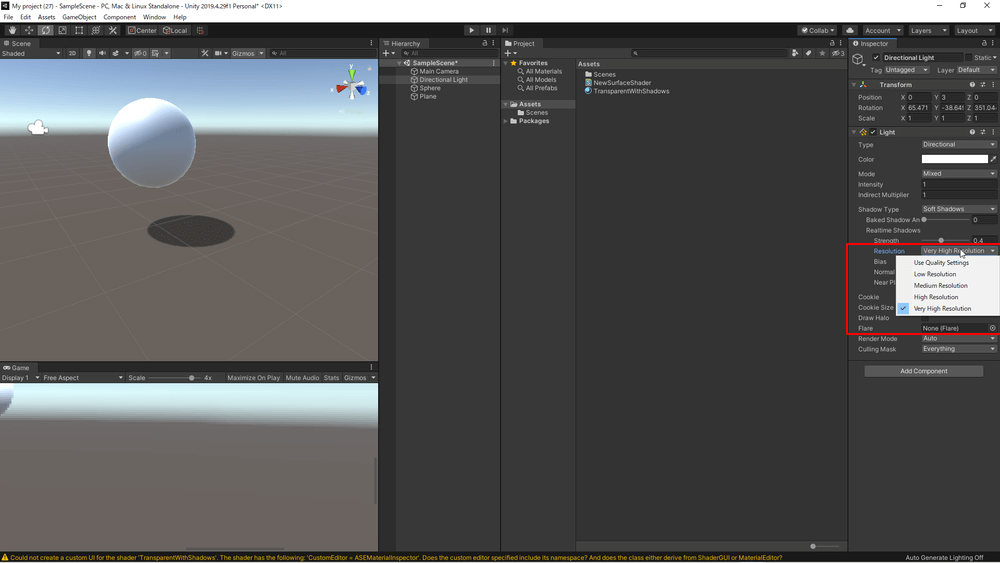
Changing the resolution of the shadow from Directional Light > Resolution
Finally, go to Window > Rendering > Lighting Settings to change the lighting settings.
When creating AR scenes, set the Skybox material to “None” and set the Source of Environment Lighting to “Color.”
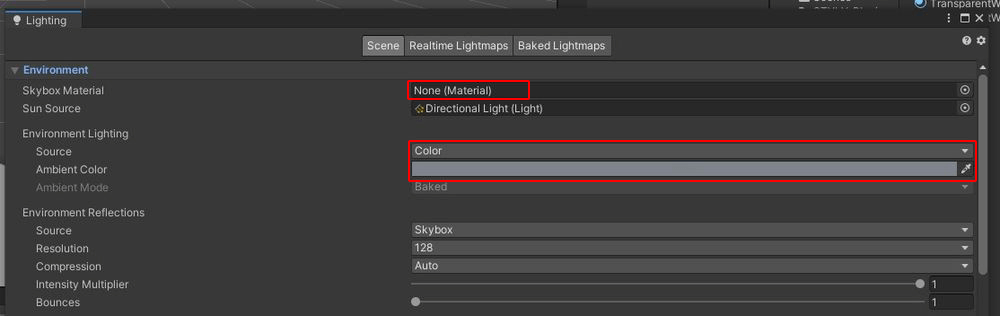
Skybox Material > None, Environment Lighting > Source > Select “Color”
How to Use the Shadow in STYLY
From here, we will explain how to upload and use this shadow material in STYLY. This is done by uploading only the Directional Light and Plane to STYLY.
First, make sure that the Render Mode of the Directional Light is set to Important.
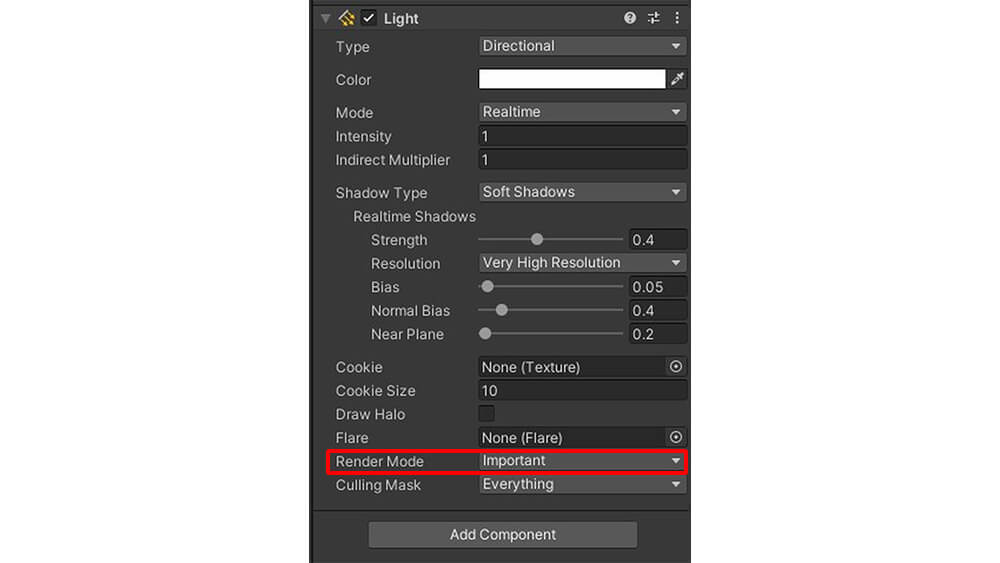
Set the Render Mode to Important
Drag and drop the Directional Light and Plane in Hierarchy into Assets to make them prefabs.

Drag and drop the Directional Light and Plane into the Assets
Select the Directional Light and Plane prefabs, right-click and select STYLY > Upload prefab or scene to STYLY.
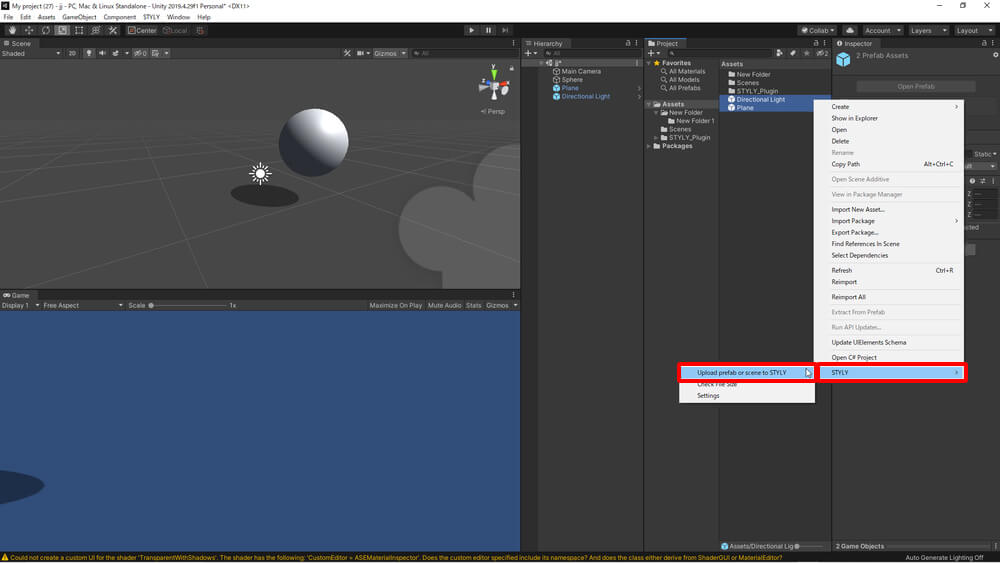
Uploading to STYLY
If you haven’t installed the STYLY Plugin for Unity, refer to the following articles on how to install and upload Unity prefabs to STYLY.
How to create a STYLY account:

How to upload to STYLY:

How to upload from Unity to STYLY:

Then, go to STYLY Studio, create a new AR scene and delete all objects except Your Position.
You do not need to delete AR Template Grid and Enable AR Occlusion if you are going to be using them in your scene. If not, we recommend deleting them as well to reduce file size.
Add the Directional Light and Plane you just uploaded to the scene from My upload.
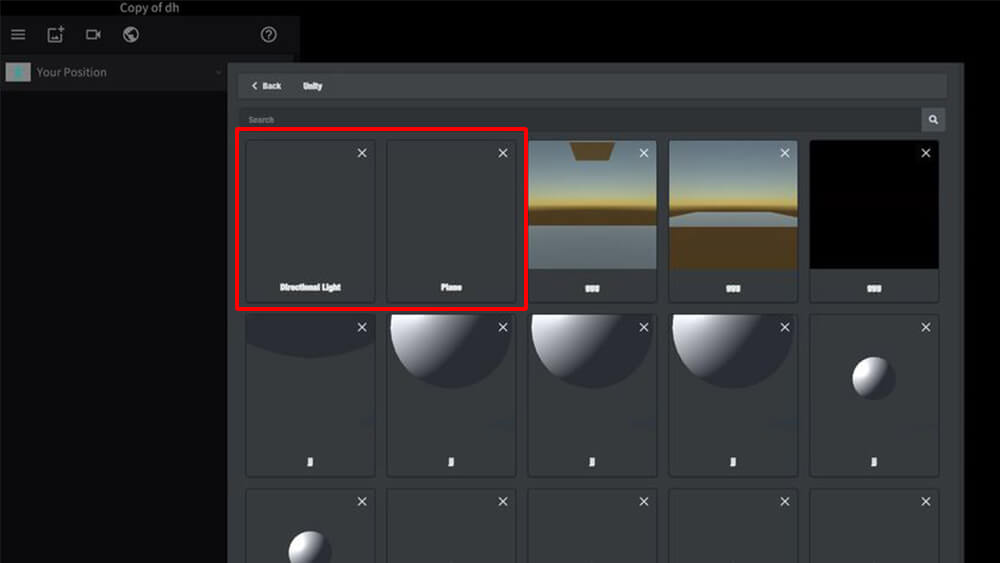
Add the uploaded Directional Light and Plane to your scene
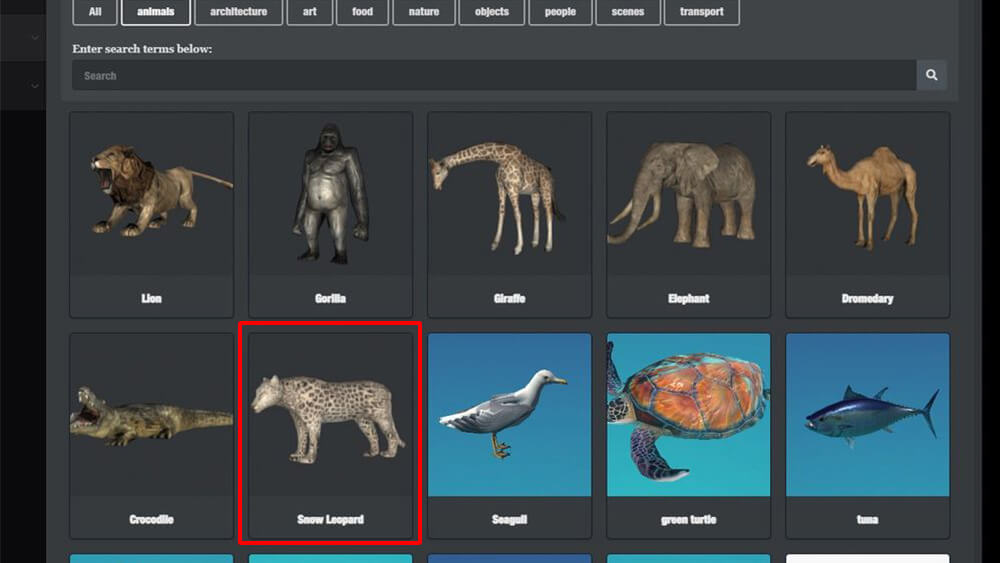
Next, add a 3D object (in this article, a Snow Leopard) from 3D Object > Model > animals.
Add a Snow Leopard
Since we cannot see shadows without a plane, add any floor plane to your scene.

Add a plane
Make sure that the plane is large enough to show all of the shadow, and that it’s not cut off.
Once you have adjusted the size and orientation of the objects, delete or hide the plane.
Then, publish the scene to STYLY, and you are done!
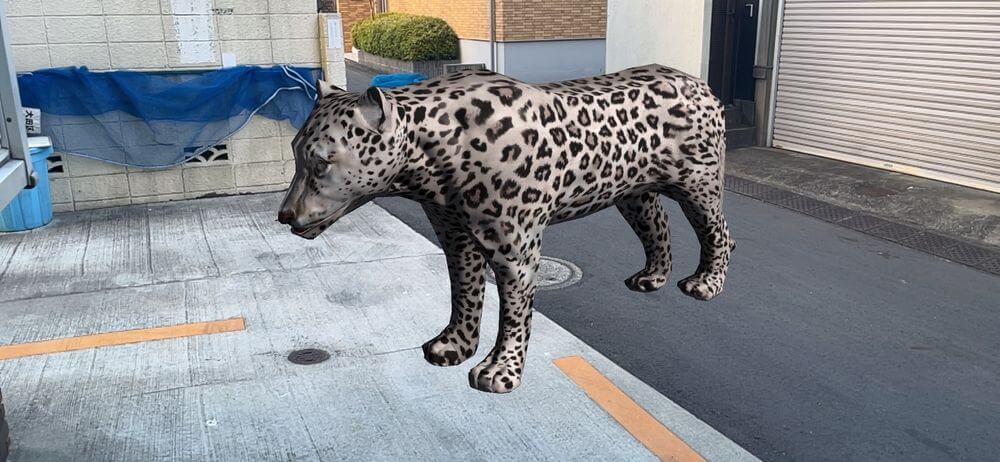
AR object without shadow
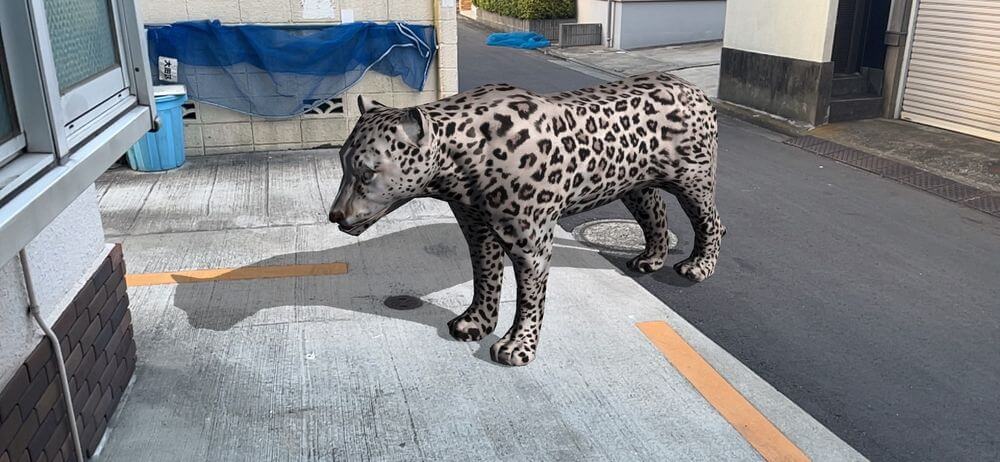
AR object with shadow
For questions about STYLY, bug reports, and improvement requests, please contact the STYLY FORUM:
https://en.forum.styly.cc/support/discussions
Certified (QA) by Shota Yoshizawa
Edited by SASAnishiki
Translated by cpnnn