In How to Build a VR Shooting Game, I will show you how to build a VR shooting game using Unity and Playmaker, upload it to STYLY, and publish it.
In this article, I’ll explain the settings of Playmaker and the preliminary preparations for importing the game materials into Unity.
- Advance preparation
- Gun Controller Settings
- Setting up the bullets
- How to generate enemy characters
- Enemy Character Settings
- BGM and SE Settings
- How to upload to STYLY
Part.1-7 continues, so let’s read and make it to the end!
About VR shooting games made with Unity and Playmaker
The girl is running at full speed towards the player.
This game involves firing teddy bears from a bowgun and hitting the girls.

You can try out the sample game in the STYLY GALLERY.
Will you be able to survive this adorable attack?
Advance preparation
You should install PlayMaker, a plugin for Unity, beforehand.
![[Unity Tutorial] Creating a Game Using Playmaker ① From Basic Introduction to Installing](https://styly.cc/wp-content/uploads/2019/06/1200px-160x160.jpg)
If you are new to using PlayMaker, please read the following articles to gain a better understanding of it.
![[Unity] Starting Playmaker from Scratch](https://styly.cc/wp-content/uploads/2019/09/PlaymaerCoreConcept-160x160.png)
Downloading assets for the game
How to manage your files

Check the Assets folder and create the following three folders.
- myPrefabs: Save all of the prefabs you’ll make in this project
- myScenes: Save all the scenes (this time only one scene)
- myUnityAssets: Create myUnityAssets: subfolder myAudio
Download the Asset
Next, open the Unity Asset Store.
Download from the Asset Store
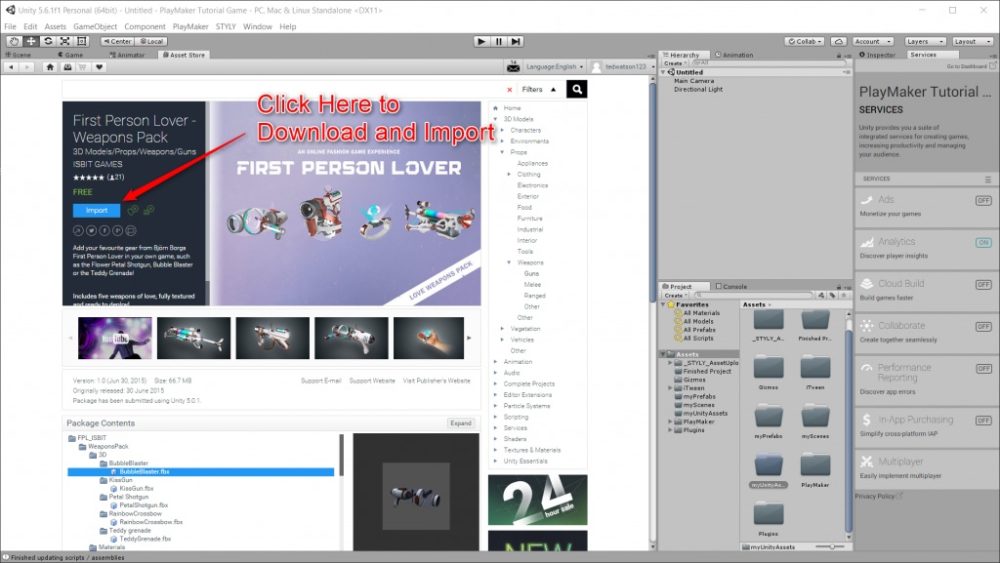
Download the following assets from the Unity Asset Store and import them into your Unity project.
First person lover – weapons pack
Bowguns and teddy bears being fired
Futuristic weapons set
The sound of a teddy bear being fired from the bowgun.
Amane Kisora-chan(FREE ver)
The girl who comes at the player
Asset Store Affiliate Textlink, Icon or Widget
Girl’s voice when she takes damage
Asset Store Affiliate Textlink, Icon or Widget
BGM for the space
Floor Segment
Stage
Organize your downloaded assets
Move them all to the myUnityAssets folder when you’re done.
Click on the RPGPuzzleGameMusic folder, then the Music folder, then the Looping folder, and then the Wav folder, then select and drag the Boss Fight track to the myAudio folder.
Now that the necessary music tracks have been moved, delete the RPGPuzzleGameMusic folder.
This shortens the upload time to STYLY and reduces clutter in the project.
Follow the same procedure, click on the mai_free_voices folder, select the wav folder and choose the audio file titled mai_free_08_damage and move it to the myAudio folder.
This also removes the mai_free_voices folder to avoid unnecessary clutter.
Finally, find the FuturisticWeaponSet folder and click on the hand_gun folder.
Take the only music file stored there, shot_hand_gun, and drag it into the myAudio folder.
Then erase the FuturisticWeaponSet folder completely.
After these processes, your myUnityAssets and myAudio folders should look like the following
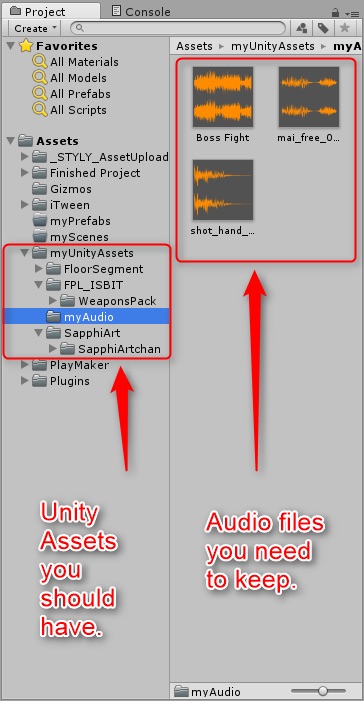
Files after organizing
Unity Settings
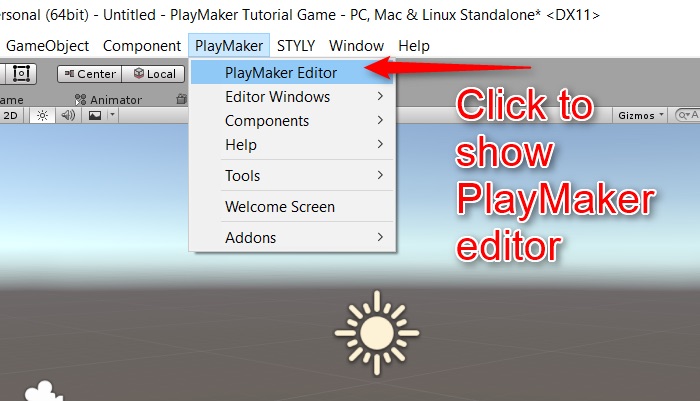
Open the Playmaker Editor
Go to the Playmaker tab on the top menu bar and select “Playmaker Editor” to open the editor.
Open the editor
Next, use the Playmaker tab to click on the editor and drag it to the appropriate position.
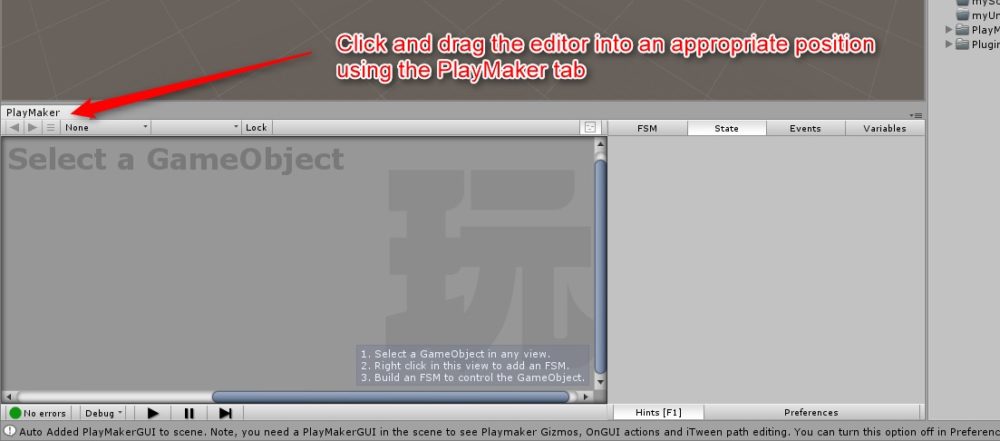
Putting the editor at the bottom left of the screen
In this article I have placed it at the bottom left of the screen for easy access.
Add Action Browser
Next, click on the Playmaker tab on the top menu bar again, and then click on “Action Browser” under the Editor Windows submenu.
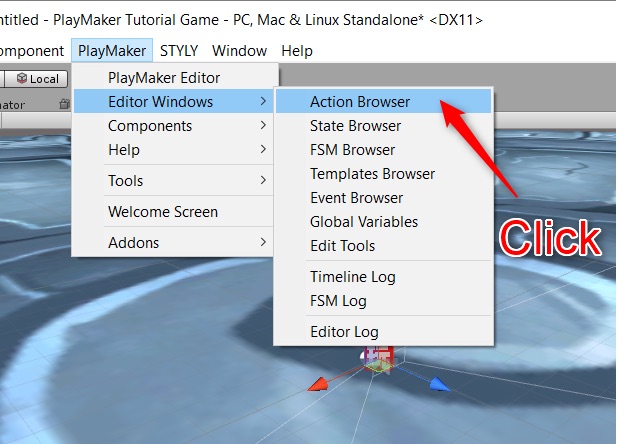
Open the action browser
This will open a separate window where you can easily add the “actions” you need in Playmaker.
Click on the window and drag it to where you want to place it.
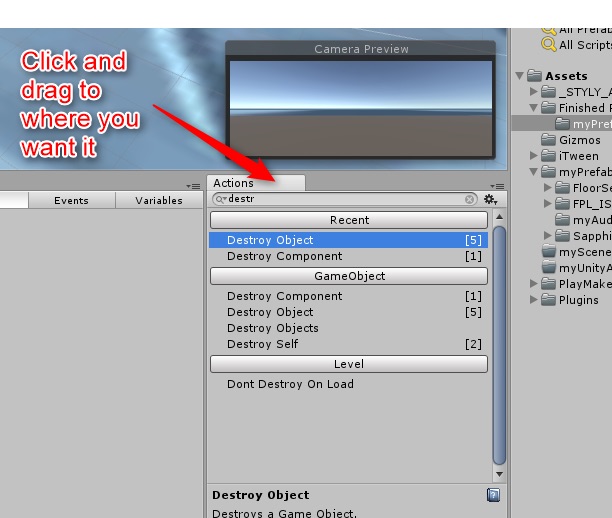
Place it in an easily understood location
In this article, I have added it just to the right of the Playmaker menu at the bottom of the screen.
Reset the Main Camera position
Next, we reset the “Main Camera” position because in VR, we want to be the camera ourselves rather than looking at the scene from a distance.

Reset the camera settings
Select Main Camera in the scene’s Hierarchy, then click on the little gear icon, and select Reset from the Settings menu.
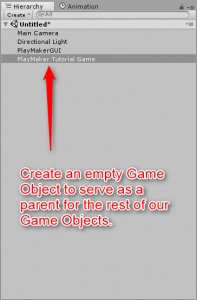
Create an empty Game Object
Finally, we need to create an empty Game Object in the scene’s Hierarchy.
This game object acts as the parent of the rest of the game objects.
In this article we will store all game objects as children of this empty parent object, and finally upload this prefab to STYLY.
Once you have created your game object, name it “PlayMaker Tutorial Game”.
Create a game object
Now you’re ready to make your own game!
Next time we will be setting up a gun to use in a VR shooting game!
![[Unity/Playmaker] How to make a VR shooting game – Setting the gun controller](https://styly.cc/wp-content/uploads/2018/05/-2018-05-10-14.01.35-e1584421548660.jpg)