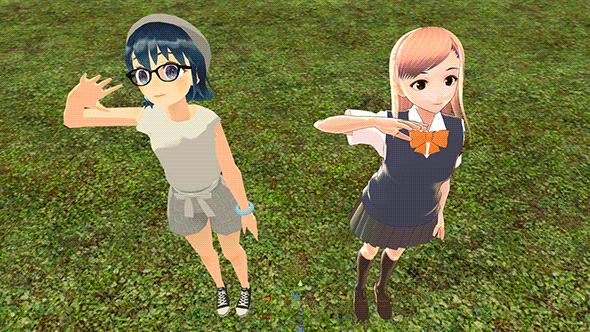
Today, I will introduce how to animate 3D models and upload them to STYLY. By using STYLY’s Unity plugin, you can keep the material feeling and animations of the model from Unity and upload it easily. You can use this tip for displaying home-made 3D models in VR exhibitions, so I hope you find it useful! ※ “STYLY Plugin for Unity” currently supports “Unity 2019.3.x” or under. You can download old Unity versions from here.
Animated models in Unity
How to use FBX models
Launch Unity and open a new project.
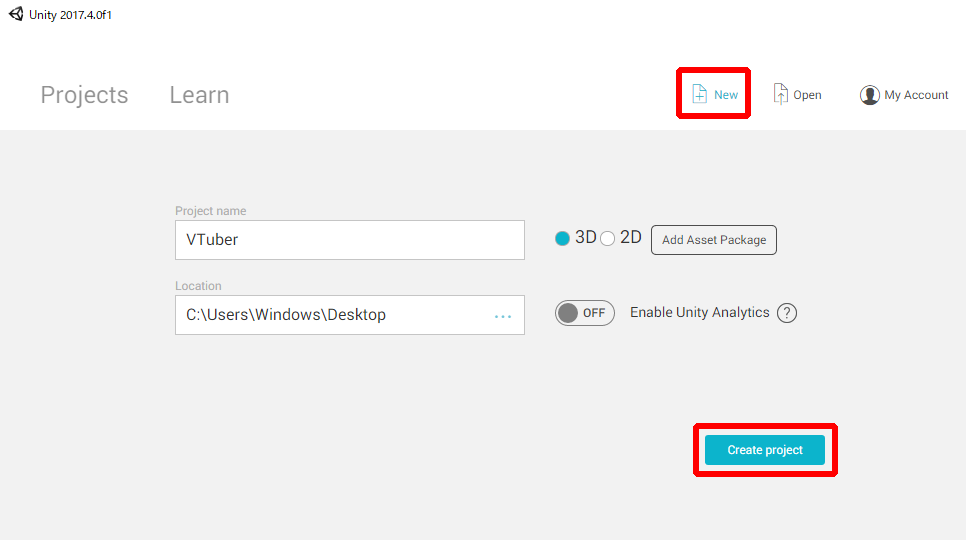
Opening a new project
Let’s place the FBX format model data in Unity. Please place the data inside the Assets folder in Project, or drag & drop it into the Project area. In this example, I created a new “model” folder and placed the data in it.

Placing the fbx model data in the Project folder
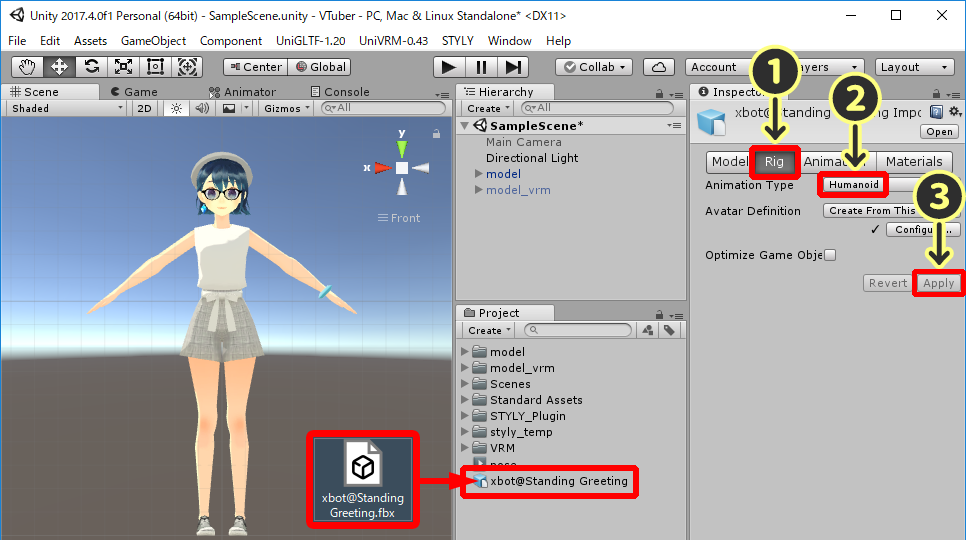
Left click the model data, and select the Inspector tab at the right part of the screen. Click the “Rig” tab, change the Animation Type to “Humanoid”, and click “Apply”.
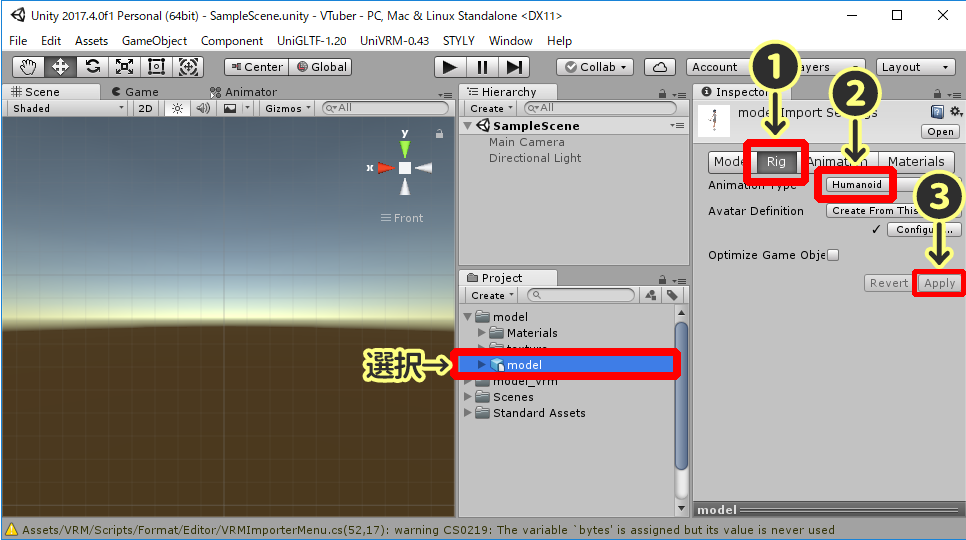
Changing the Rig to Humanoid
Next, let’s set the material for the 3D model. Change the tab to Materials, and click “Extract Materials…”. A choose folder screen will popup, so create a new folder named Materials, and click “choose folder”.
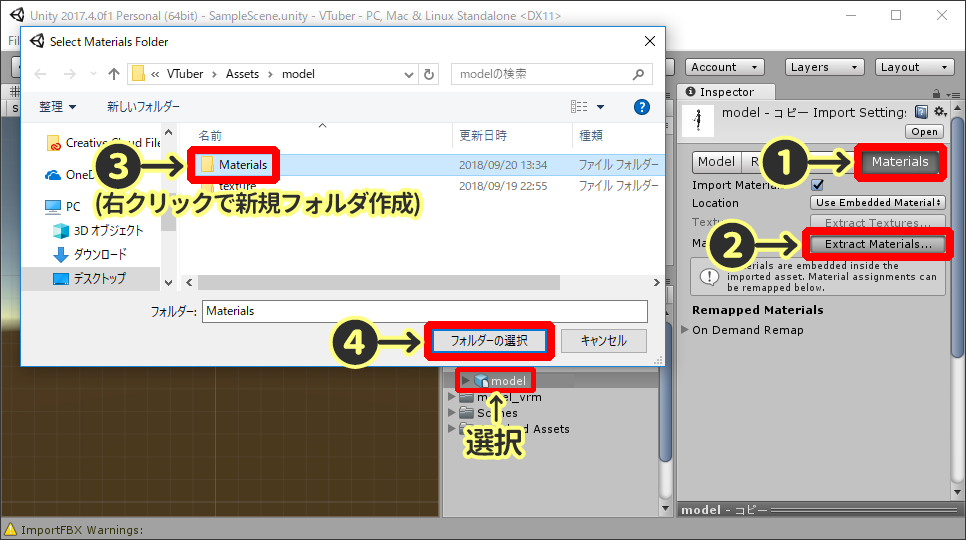
Enable changing materials
The model’s material will be saved inside the Materials folder, so choose it and set a Shader you like.
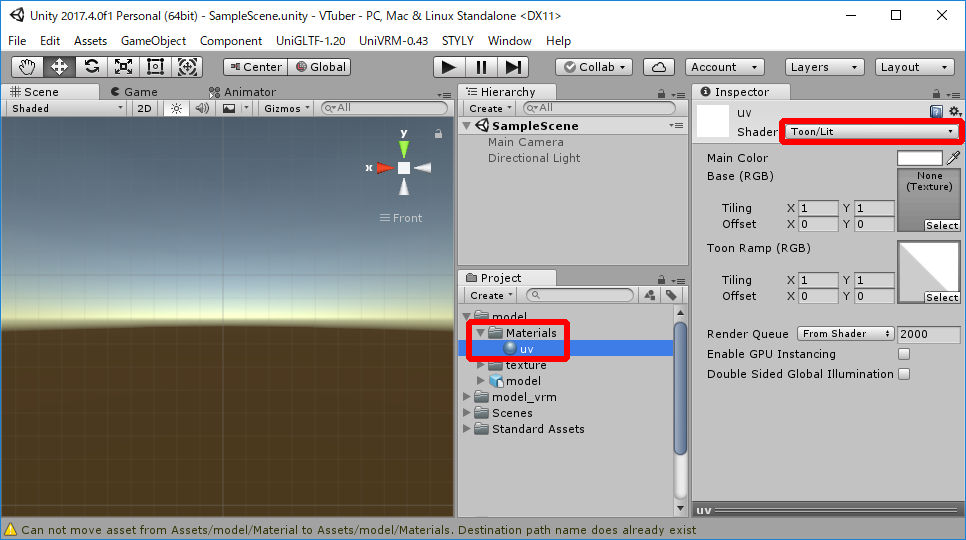
Changing the Material
Drag & drop the model data from the “Project” area to the “Hierarchy” area.

Drag & drop to Hierarchy
If the model has dangling accessories, or scripts like a lip syncing script, right click and select “Remove Component” to delete them. (DO NOT DELETE “Animator”!!)
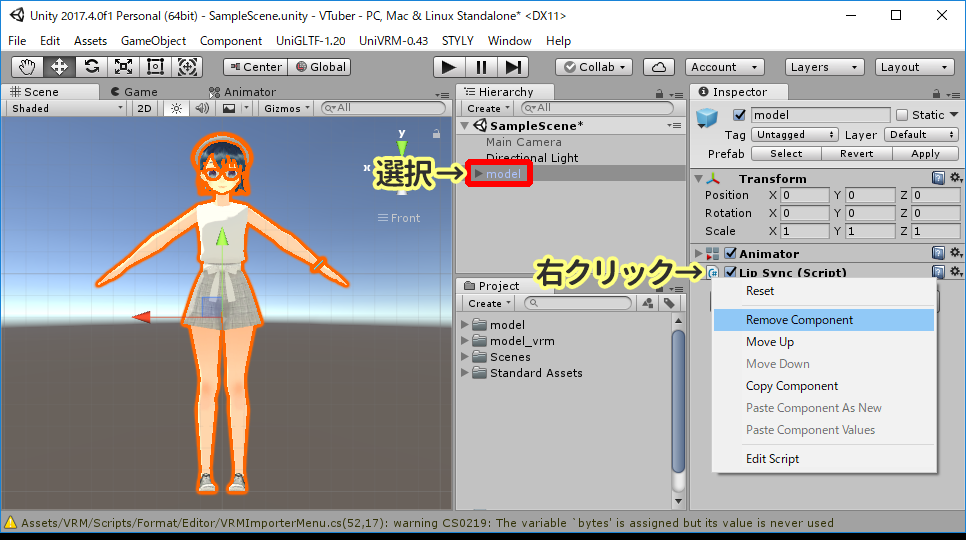
Removing unnecessary scripts
OK, we’re finished with the FBX model’s setting. Click here to move on to how to “set animations”.
How to use VRM models
Launch Unity and open a new project.
Opening a new project
Downloading UniVRM
Access the VRM official site download page (https://github.com/dwango/UniVRM/releases) and download the latest version of UniVRM.

Downloading UniVRM
Double click the unitypackage file you downloaded, and import the package to Unity.
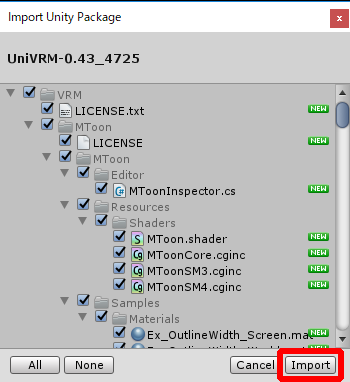
Import UniVRM to Unity
Importing a VRM model to Unity
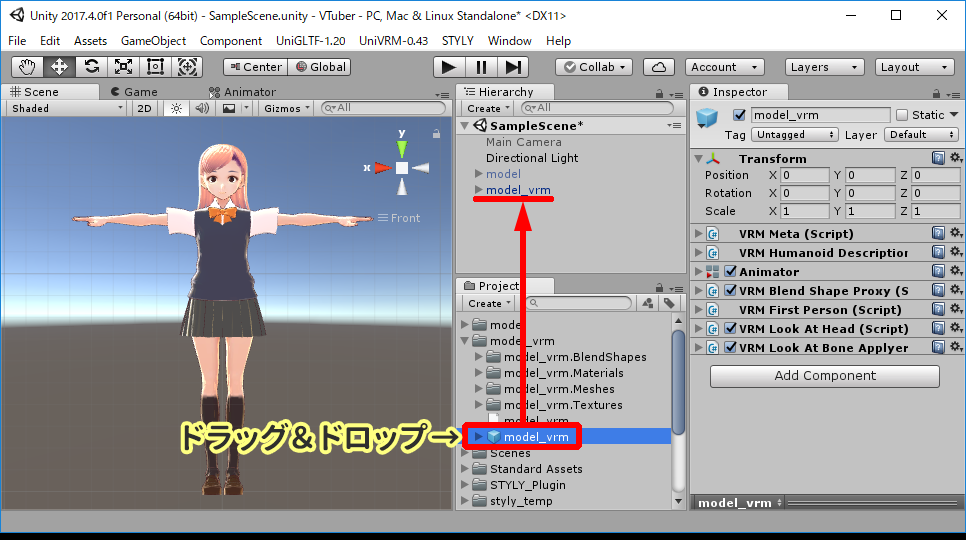
Let’s place the VRM format model data in Unity. Please place the data inside the Assets folder in Project, or drag & drop it into the Project area. In this example, I created a new “model_vrm” folder and placed the data in it. Once the data is placed in Unity, a Prefab is auto-created. Select the created Prefab, and check the “License” to check if the file is allowed for use in STYLY. The details for the licence is available here.

Placing a VRM model data in the Project
Drag & drop the Prefab file to the Hierarchy area.
Drag & drop the Prefab file to the Hierarchy area
Right click “Remove Component” to delete all scripts except “Animator”. If you are using a VRoid Studio-made VRM model, click “▷” and delete the “secondary” file too.
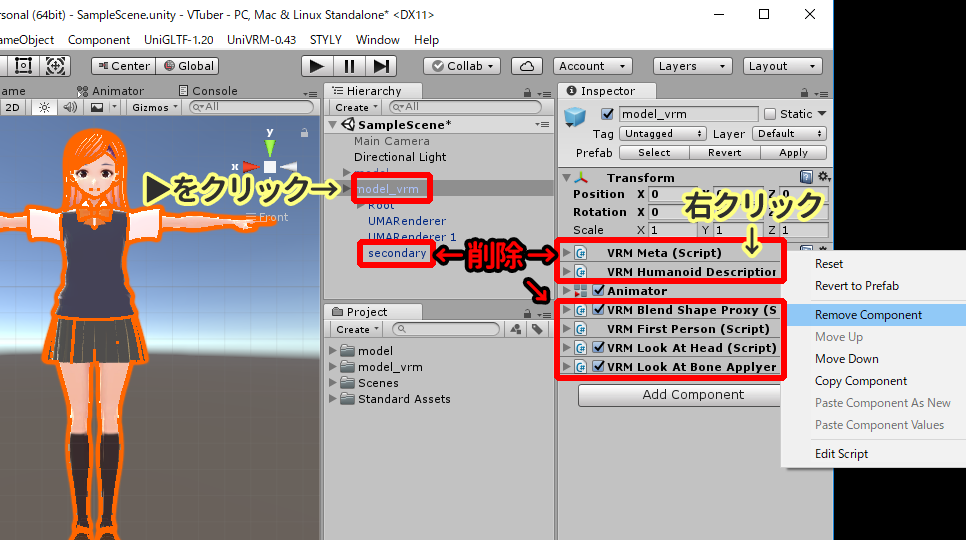
Removing unnecessary scripts
That’s it, we’re finished with the VRM model’s setting.
Adding animations to the model
Next, we will use Mixamo to set animations to the 3D model.
Downloading motion files from Mixamo
Mixamo is a service from the Adobe company, and there are many motion files and 3D models you can download from the website. Access the Mixamo website (a href=”https://www.mixamo.com” target=”_blank” rel=”noopener”>https://www.mixamo.com), and click “LOG IN” if you already have a Adobe ID, or click “SIGN UP” if you want to register as a new user.
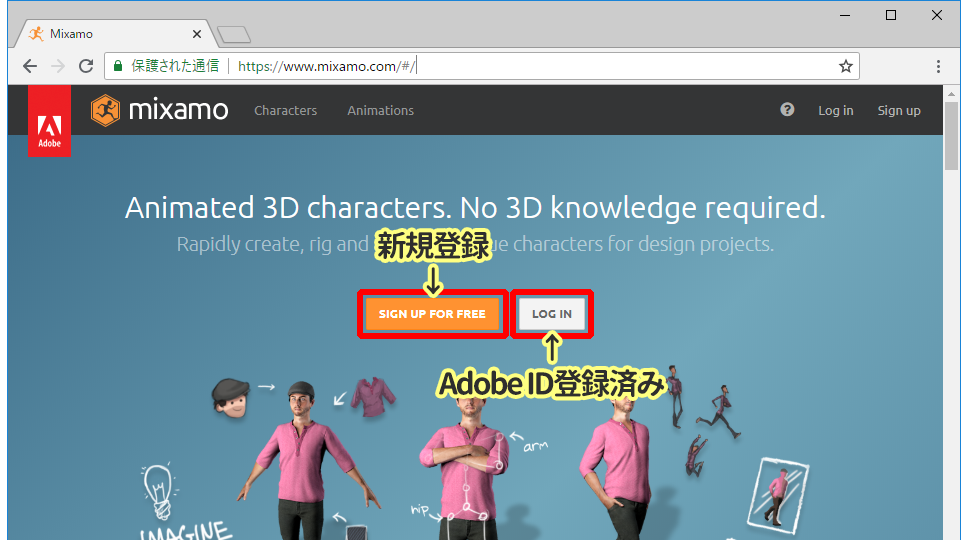
The Mixamo top page
When you log in to Mixamo, you will see a list of numerous motions. Search for a motion you prefer, then select it and click “DOWNLOAD”.
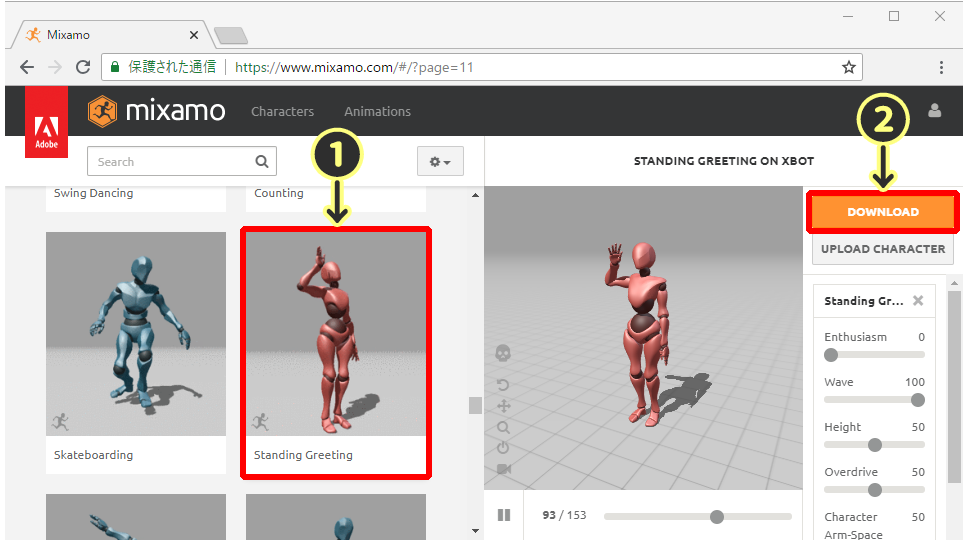
Downloading a motion file
For this example, I changed the download settings as below in order to fit the motion to the model data.
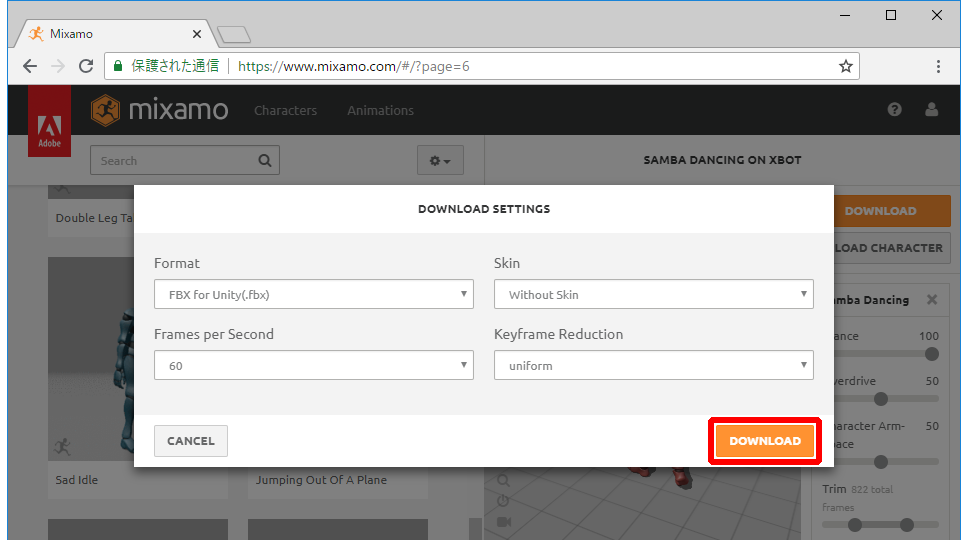
Downloading settings
Changing the motion setting
Add the downloaded FBX file to your Unity project. Place the data inside the Assets folder in Project, or drag & drop it into the Project area. Next, select the added file and choose the “Rig” tab, change the Animation Type to “Humanoid”, and click “Apply”.
Adding the Mixamo FBX file to the Project
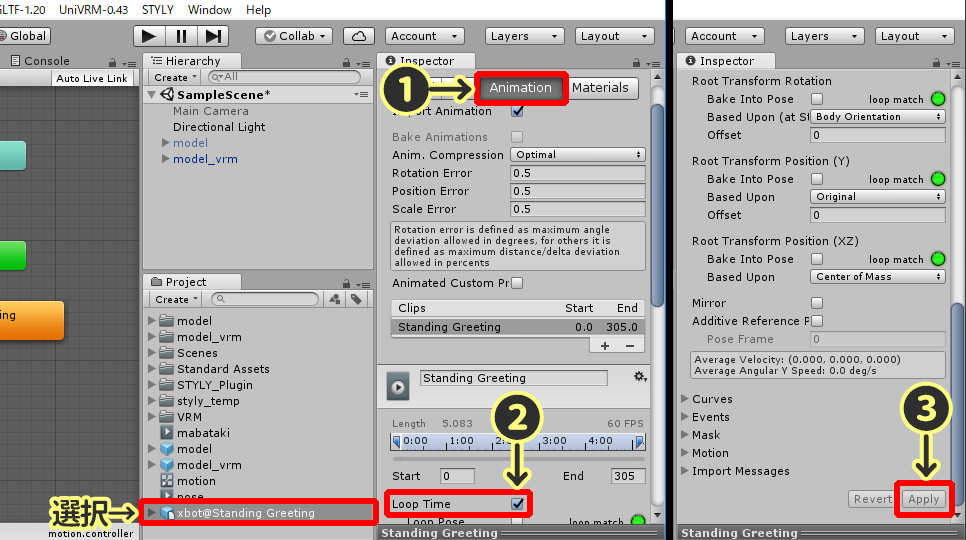
Then, select the ①”Animation” tab, check ②”Loop Time” and click ③”Apply”. The motion will loop with this setting.
Looping the Animation
Setting the animation to the model
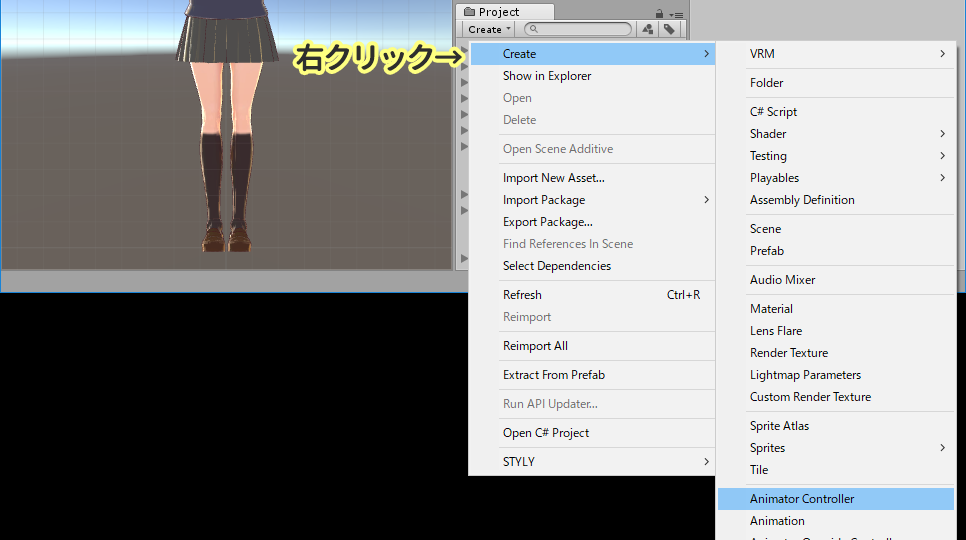
Right click somewhere in the Project area, and create a new “Animator Controller”. I named the controller “motion”.
Creating an Animator Controller
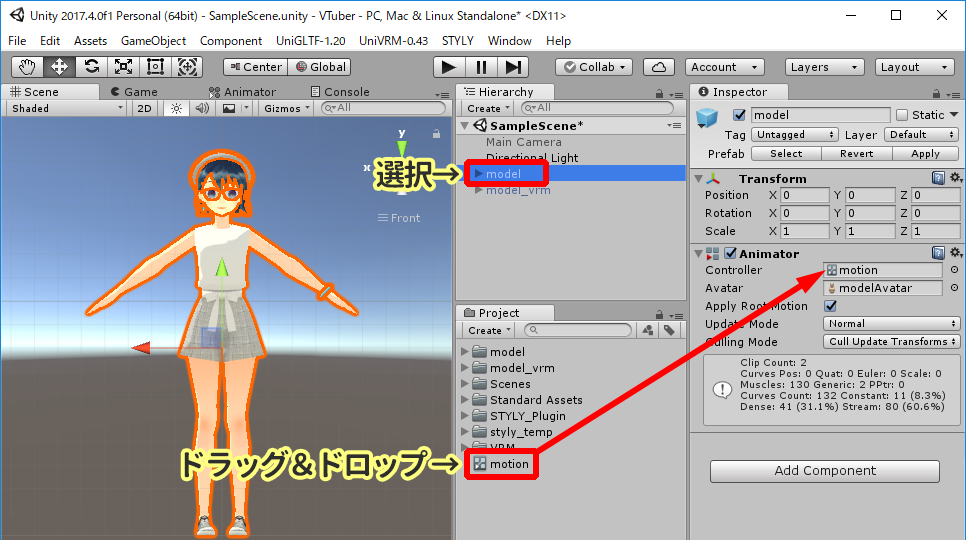
Click the model in the Hierarchy area, and find the Animator section, and for the “Controller”, drag & drop the “motion file” to it.
Setting the Animator Controller to the model
Double click the “motion” (Animator Controller) in the Project area, and show the Animator window. Click the ②「▷」 in the Mixamo FBX file, and drag & drop the “③Play icon” to the Animator area.
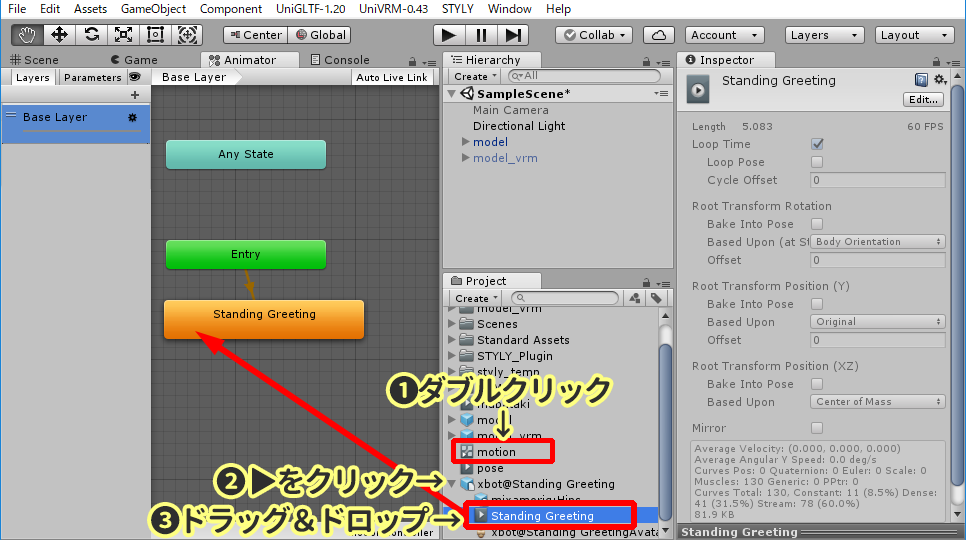
Placing the Animation in the Animator Controller
Finally, lets check if the motion works properly. Select the Scene tab to show the preview, and click the Play icon at the top of the screen.
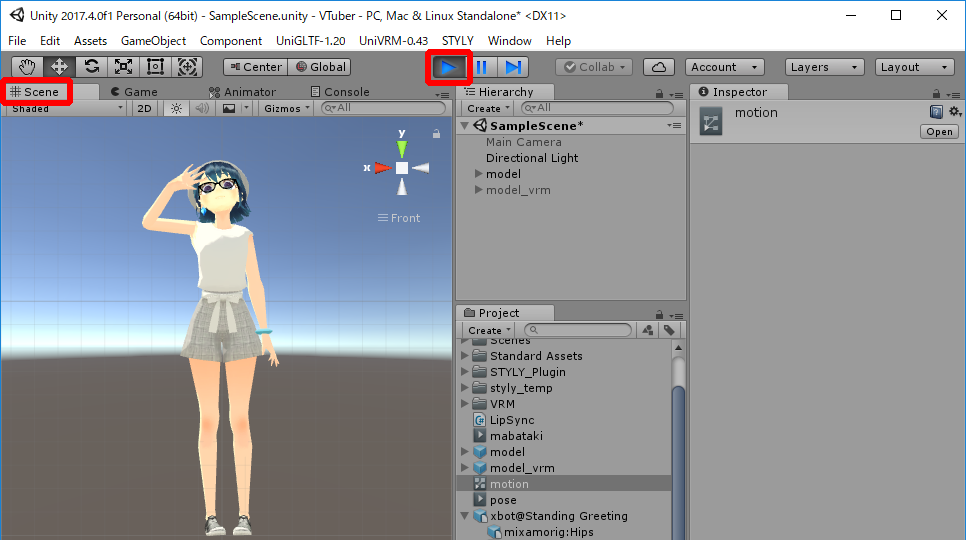
Motion test
Using self-made motions
You can also use self-made motions made using software like Blender. For models that have self-made motions, if you click 「▷」, a “Play icon” will appear. Use this file and perform the same actions as the Mixamo file.
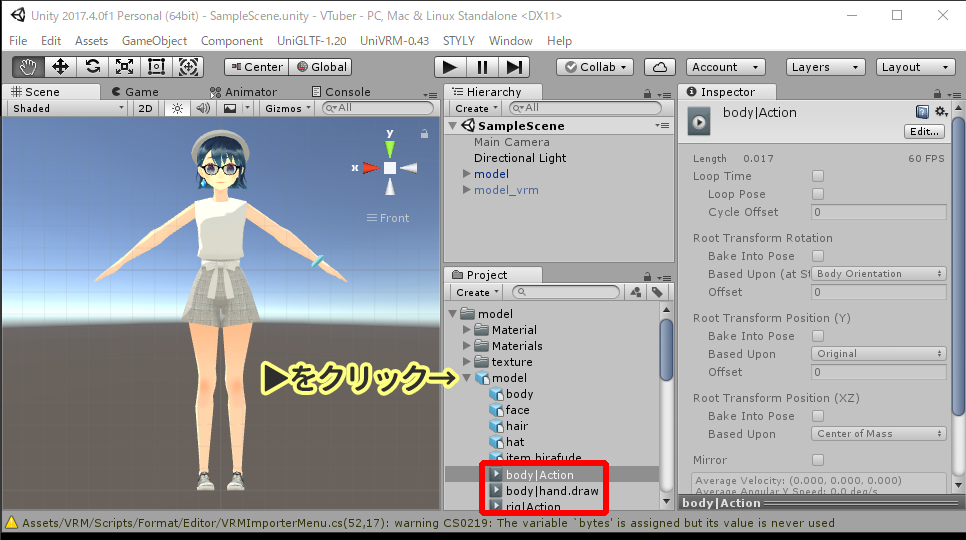
Using self-made animations
Blinking motions
If you set “blinking” motions to your character, your character’s sense of presence gets enhanced strongly. In order to set blinking for your model, a “BlendShape” (this controls the model’s facial expressions) has to be set to the model. For VRM models, BlendShape are set initially.
Create a new Animation
Click “Window>Animation” and open the Animation window.
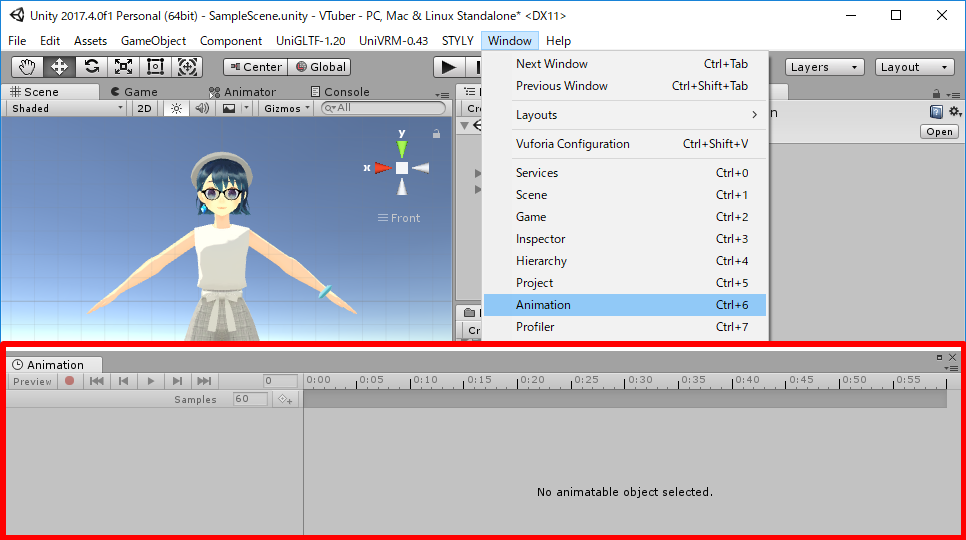
Opening the Animation Window
Make sure you have selected the model in the Hierarchy view, and click the ①”Pull down bar”, choose ②”Create New Clip…”, and ③”save” the newly created anim format file. I set the name to “mabataki.anim”.
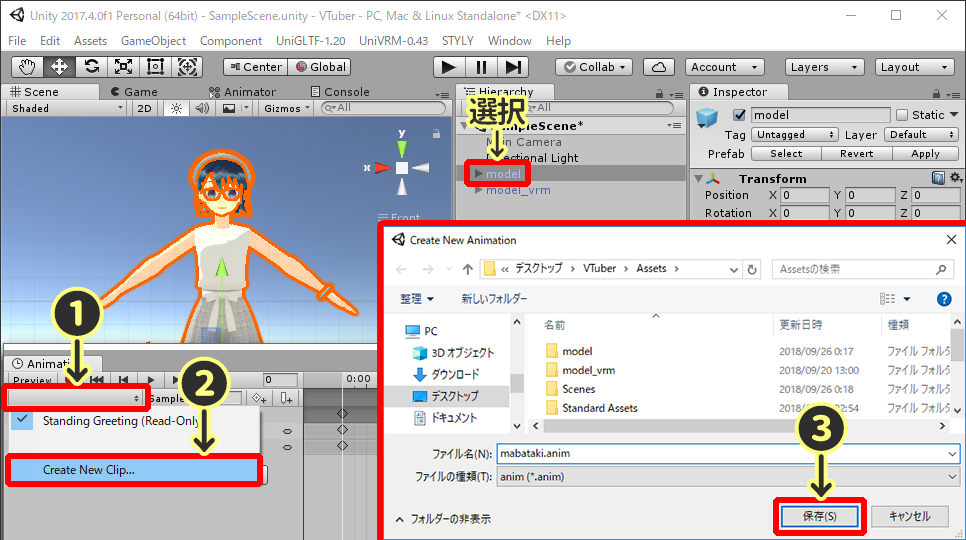
Create new animation
Record the blinking motion
In the Animation window, select “mabataki” and click the ①record icon, enter ②”0″, choose the ③face mesh, and ④Change the blink BlendShape value to 0. When you enter the value, a blue ◆ will appear in the timeline. If no ◆ appears, try changing the ④ to a value other than 0, and changing it to 0 after that.

Recording blinking 1
Then, change the ② to “230”, ③ to “0”.
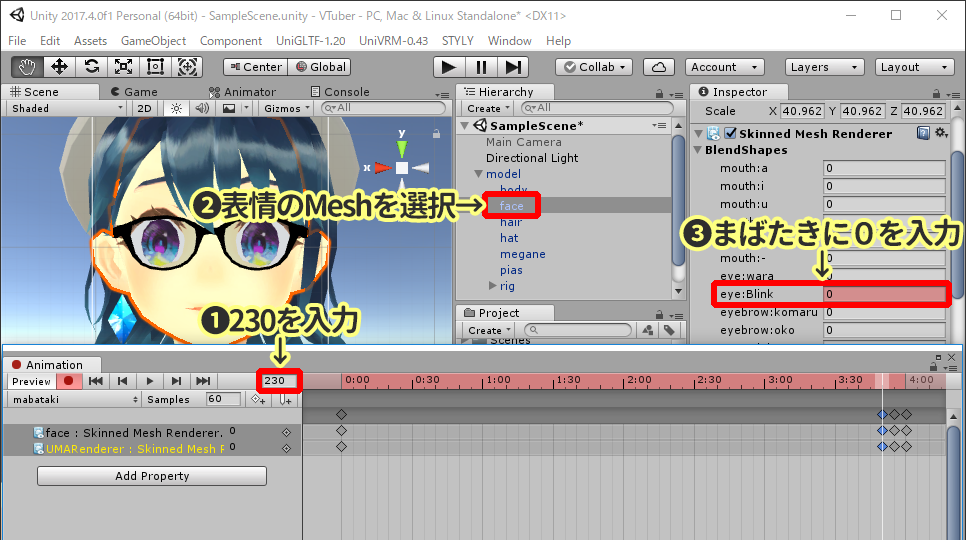
Recording blinking 2
Next, change the ② to “235”, ③ to “80”.
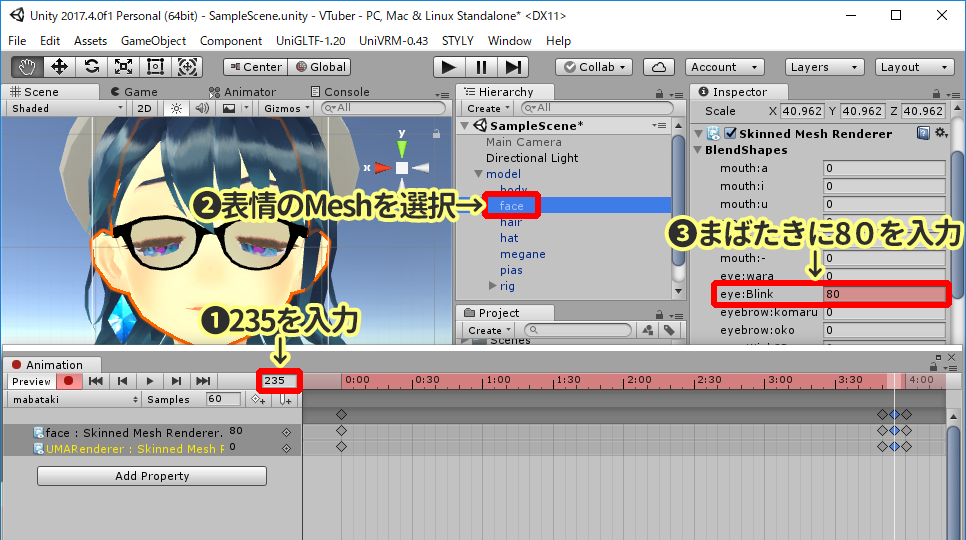
Recording blinking 3
Finally, change the ② to “240”, ③ to “0”, and click ④Stop record button.
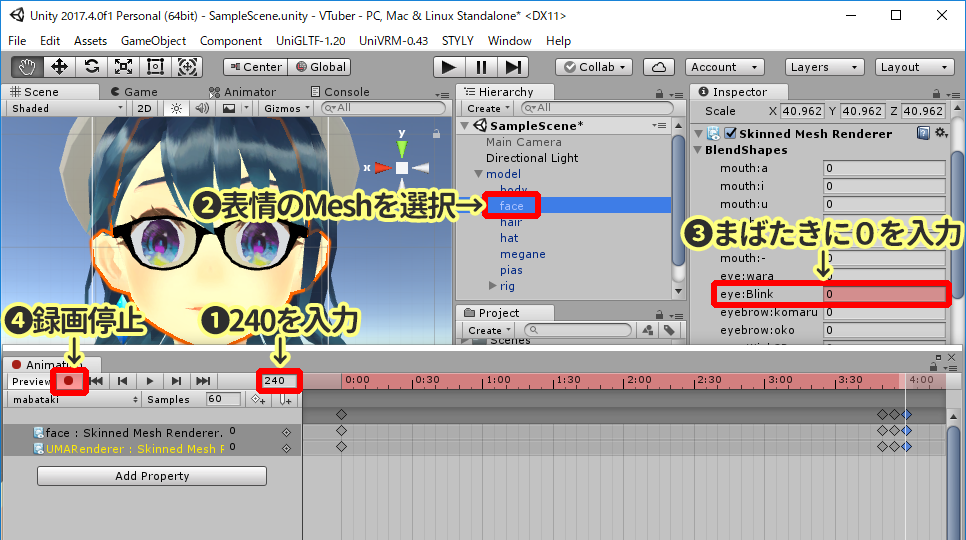
Recording blinking 4
For VRM models made using VRoid Studio, you can find the blink BlendShape in “Face.M_F00_000_Fcl_EYE_Close” of “UMARenderer”.
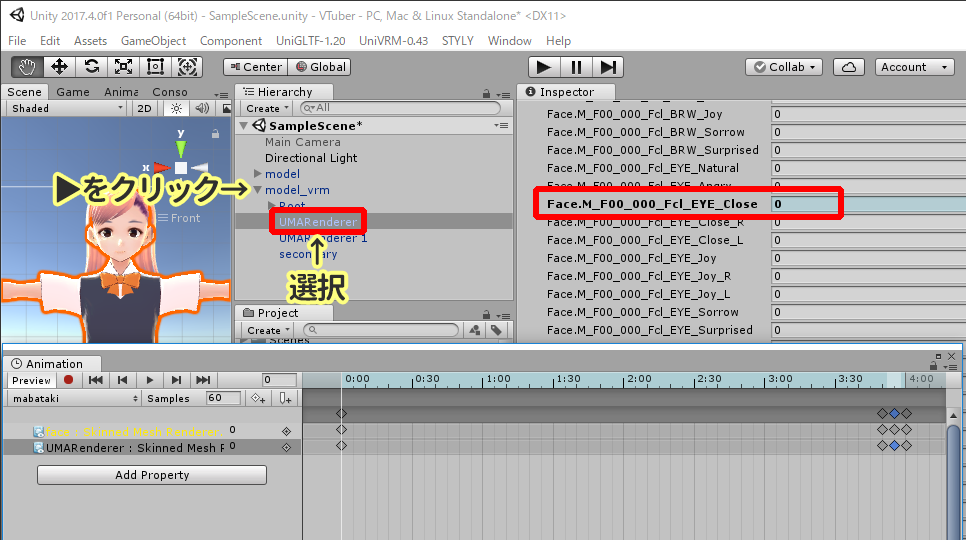
Blinking settings for VRoid Studio models
Setting the blinking motion to the model
Let’s set the created motion to the model. First, double click ①”motion” and open the Animator window, click the “+” icon, and newly create a “mabataki” layer. Drag & drop the “mabataki” into the layer.
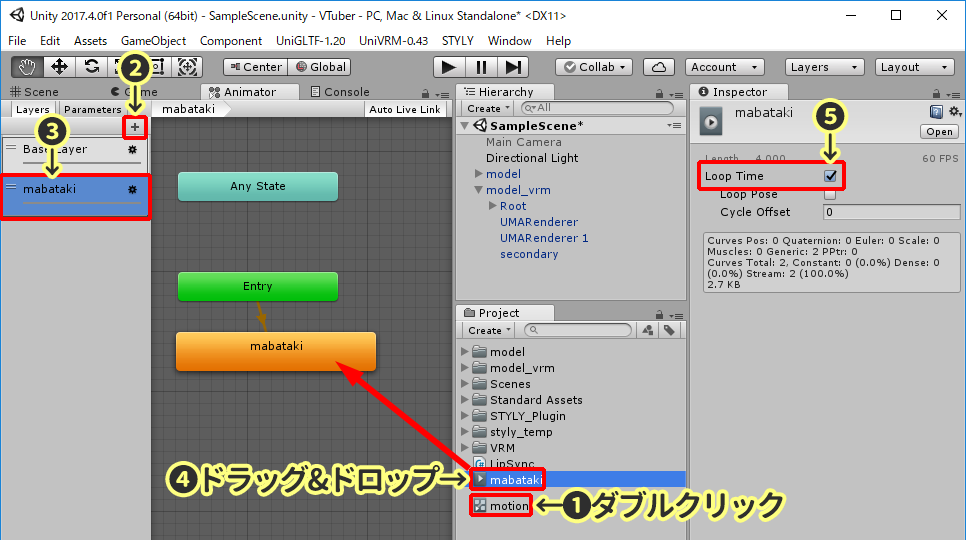
Setting the blink animation in the Animator Controller
Click the ①”Gear icon”, and change the value of ②「Weight」 to “1”.
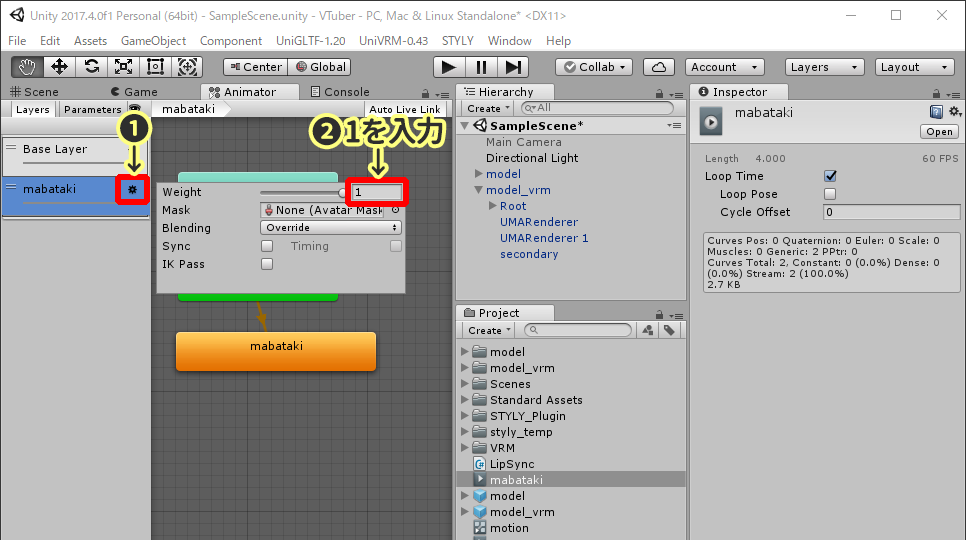
Setting weight to 1
Finally, let’s check the blinking motion. Select the Scene tab, click the Play button at the top of your screen, and see if the character properly blinks. You can change a different BlendShaper and set different face expressions for your character, so set whatever expression animation you want!
Blinking testing
Uploading to STYLY
So then, lets upload the animated 3D model to STYLY.
Download STYLY Plugin for Unity
First, access the STYLY official site (https://styly.cc/) and click ①”DOWNLOAD”, then scroll down to the ②DOWNLOAD button and click it.
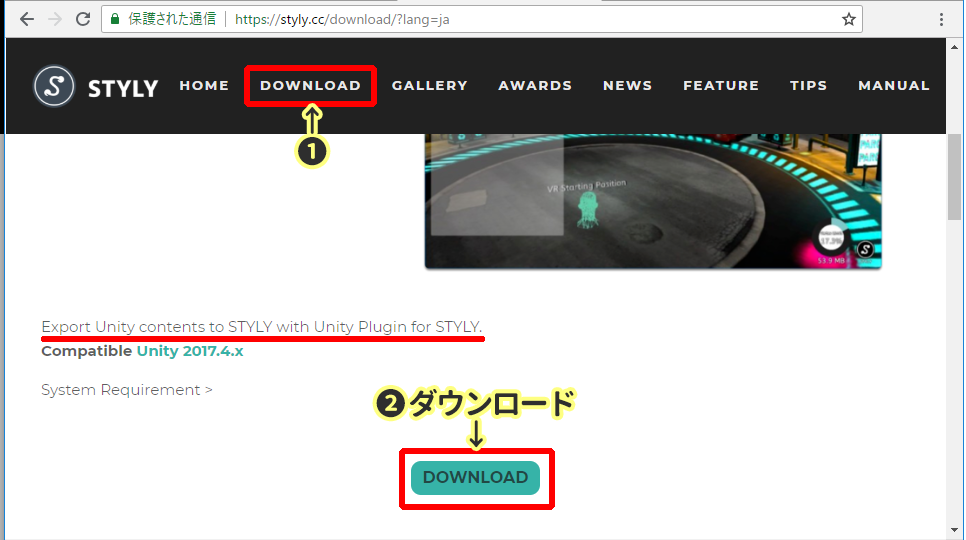
Download STYLY Plugin for Unity
Double click the downloaded unitypackage, and import it to Unity.
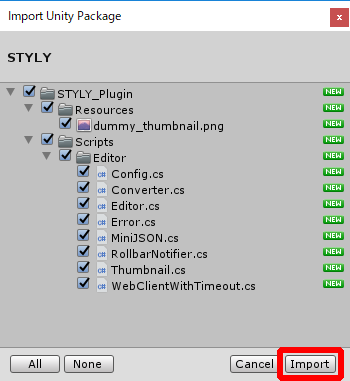
Import STYLY Plugin for Unity to Unity
Return to Unity, click the “STYLY>Asset Uploader Settings” at the top of the screen. Then click ②”Get STYLY API Key”, and a browser window will pop up, so copy the API key and Email from it, and paste it to the ③window in Unity.
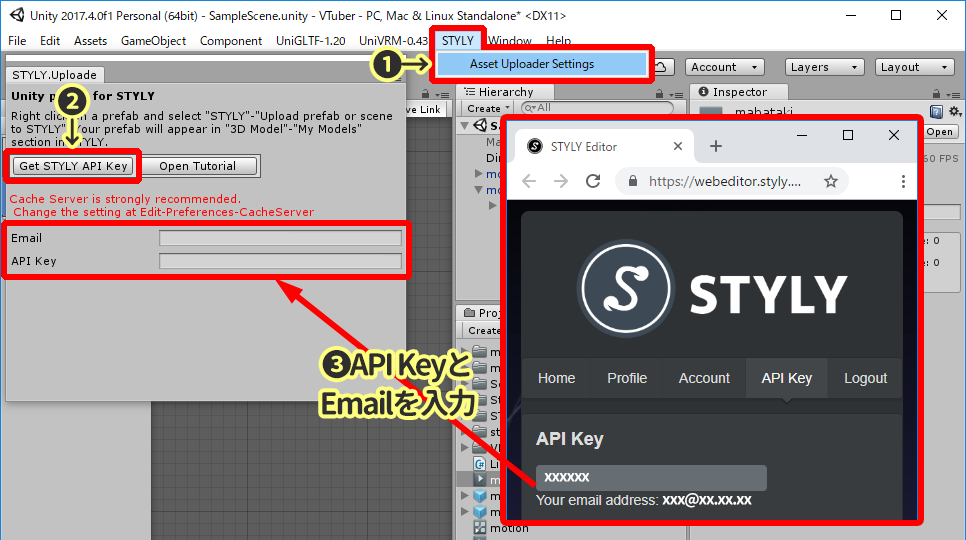
Setting the API key and Email
Uploading the model to STYLY
To upload the model to STYLY, you need to create a Prefab from the model. Drag & drop the model from the Hierarchy area to the Project area, and a Prefab will be created in the Project area.
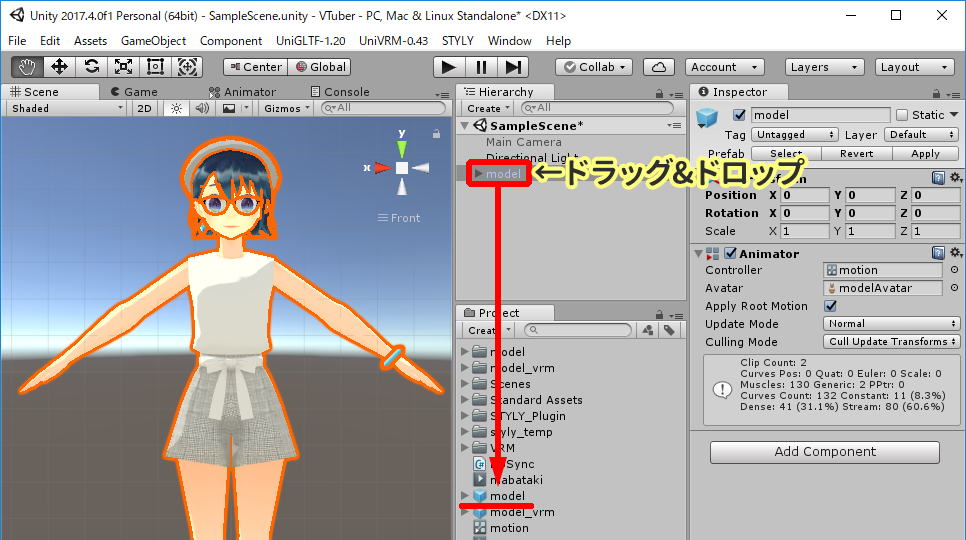
Create a Prefab from the model
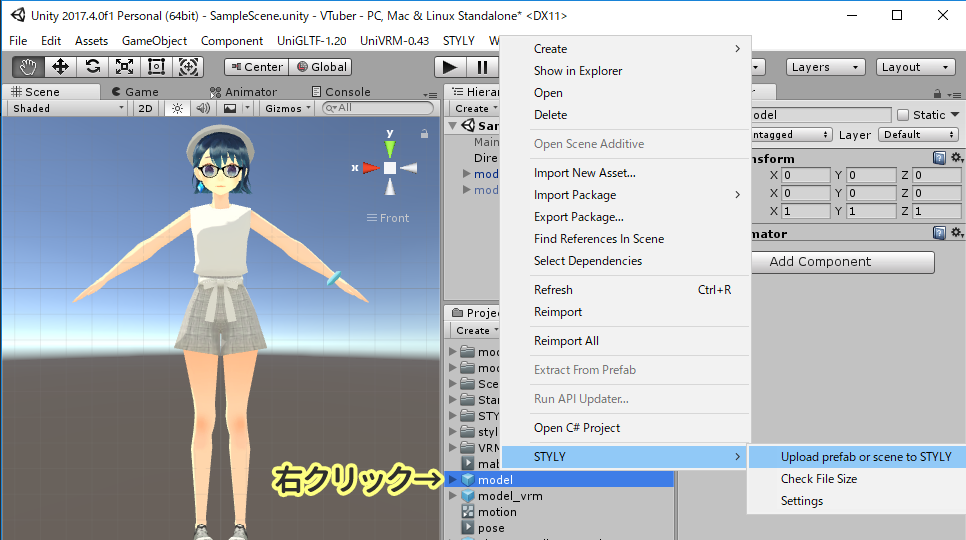
Right click the Prefab, and choose “STYLY>Upload Prefab or scene to STYLY”, then the upload process will begin.
Uploading the Prefab to STYLY
After some wait, the upload will get completed and the next popup will appear.
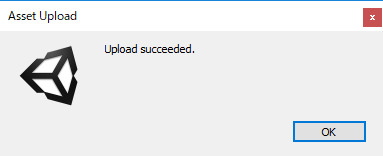
Upload completed
Placing the model in STYLY
Let’s place the 3D model you uploaded in STYLY. Open the STYLY Studio, and click the “photo icon” at the upper left.
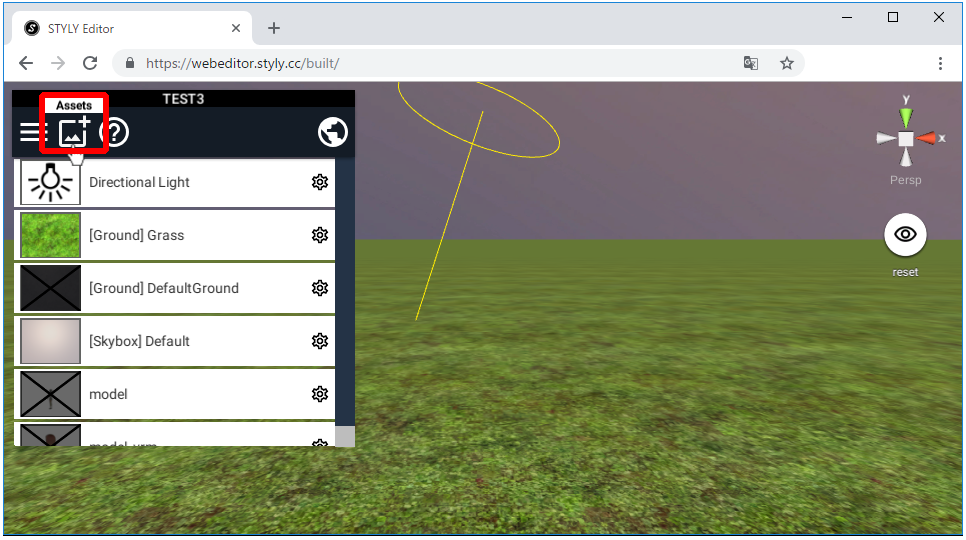
Choose Assets
Then, click the “3D Model” icon.
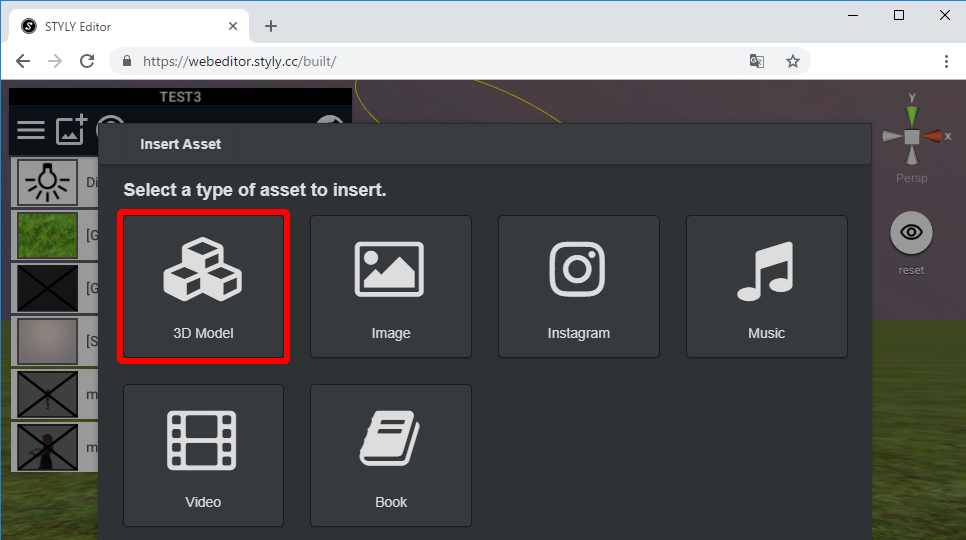
Choose 3D Model
Your model will be uploaded in the “My Models” tab, so click it.
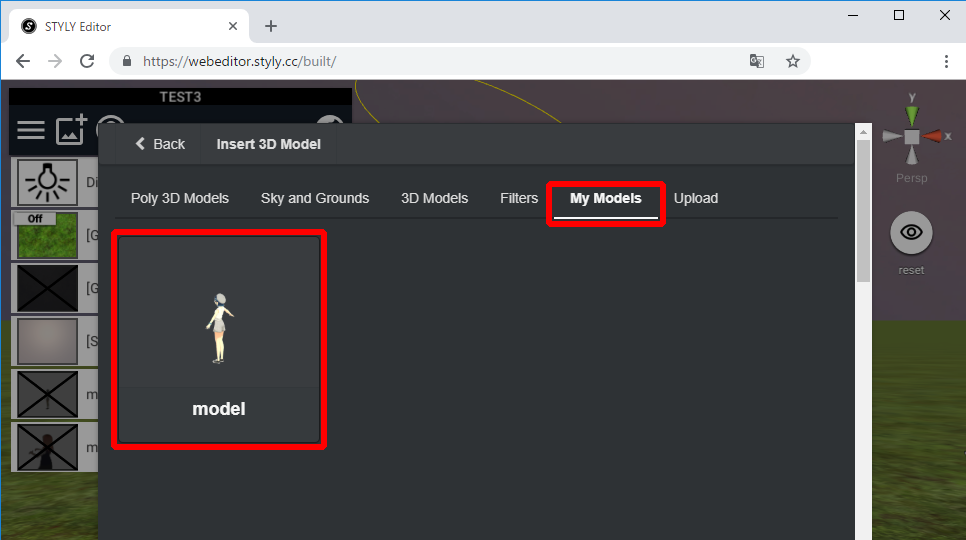
Choose your uploaded model
The model will be placed inside the scene, so move it to where you want to place it. We’re done! Great job!
Completed image
Today, we animated 3D model data of VTubers, and learned how to upload the data to STYLY. By using what we learned today, we can upload any kinds of models, even animals and robots. I hope you upload lots of models and create a sweet VR space.