In this article, I will introduce how to create an audio visualizer using Playmaker.
By using this technique, you can create an interactive scene with music.
Sample
Unity Package
▼You can download Unity Package here.
Audio Visualizer.unitypackage
Unity Project
▼You can download Unity Project here.
STYLY-Unity-Examples
Please look at the files in STYLY-Unity-Examples / Assets / STYLY_Examples / Audio Visualizer
Introduction
What Kind of Scene Can You Create?
By using the Playmaker custom action I will introduce in this article, you can create an audio visualizer-like object which will actively react to sounds. For example, you could create an object that changes shape according to certain wavelengths, or set it so that an effect will activate if the sound exceeds a set threshold. You can use your own ideas to create a more original effect also.
Preparations
In order to create the audio visualizer introduced in this article, you need to install the following software.
- Playmaker (Paid Asset)
- Playmaker Custom Action (Included in the Unity Plugin for STYLY)
To learn how to install Playmaker, please refer to this article.
![[Unity Tutorial] Creating a Game Using Playmaker ① From Basic Introduction to Installing](https://styly.cc/wp-content/uploads/2019/06/1200px-160x160.jpg)
To learn how to install Unity Plugin for STYLY, please refer to this article.

※What is a Playmaker custom action?
Playmaker is usually used by combining preset actions to form a logic, but users can also create new actions to expand Playmaker functionality.
User created actions are called ‘Custom actions’.
Caution
The audio visualizer looks perfect through a VRHMD, but will not work with a web player.
The reason for this is the distributed custom action does not support WebGL.
How to Use a Custom Action
Custom Action
When you open the Playmaker action browser with ‘Playmaker’ with ‘Unity Plugin for STYLY’ installed, you can find custom actions named ‘Init Audio Spectrum’ and ‘Get Audio Spectrum Level’ in the STYLY items.
By using these custom actions, you can analyze the audio spectrum of the music in the scene and access those values.
Init Audio Spectrum:
This will set the parameters to analyze the audio spectrum.
Get Audio Spectrum Level:
This will get the value of the audio spectrum at a specific wavelength
How to Use a Custom Action
I will introduce how to analyze the audio spectrum of the music in the scene, and how to access those values.
You will need an object in the scene in order to execute ‘Init Audio Spectrum’.
If you use ‘Get Audio Spectrum Level’ and specify the Index, then you can store certain wavelength values as Variables. By using these Variables and combining them with other Playmaker actions, you can create many uses.
For example, if you want to create an audio visualizer, you can use the ‘Set Scale’ action and use the variables from ‘Get Audio Spectrum Level’ to set the scale of the object.

Custom Action Settings
Init Audio Spectrum
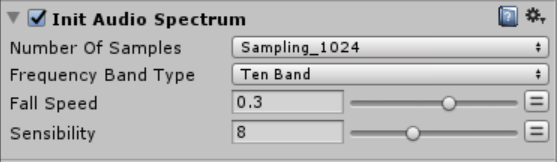
| Item | Description |
| Number Of Samples | The number of samples you gain from the spectrum. The number that fills xxx on Sampling_xxx will be the number of samples. The larger the number, the higher the accuracy, but the performance will get worse. |
| Frequency Band Type | The type of the frequency band. It is the number of the frequency bands. If you use ‘Ten Band’, the spectrum will become divided into 10 bands. |
| Fall Speed | The falling speed of the spectrum peak value. |
| Sensibility | The sensibility of the spectrum. If this value is high, it will transform quicker. |
Get Audio Spectrum Level
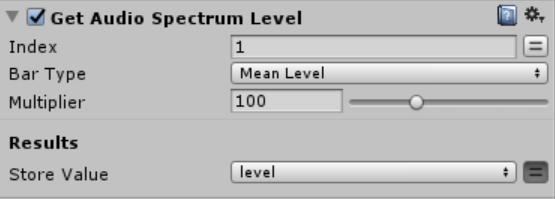
| Item | Description |
| Index | This will determine which spectrum it will analyze, counting the frequency from the bottom. If you want to take the first (lowest) frequency, you should set this to 0. |
| Bar Type | This determines how you take the spectrum values. If you plan nothing special, you are probably fine with ‘Mean Level’. ・Realtime: The realtime spectrum value ・Peak Level: The peak value ・Mean Level: The mean value. This is usually the smoothest. |
| Multiplier | The value to multiply the spectrum value. The result will be the value for Store Value, below. |
| Store Value | The final spectrum value. If you want to use it for something, you need to store it as a variable. |
How to Create an Audio Visualizer
I will explain how to create an audio visualizer using the custom action.
Add an Object with ‘Init Audio Spectrum’ in the Scene
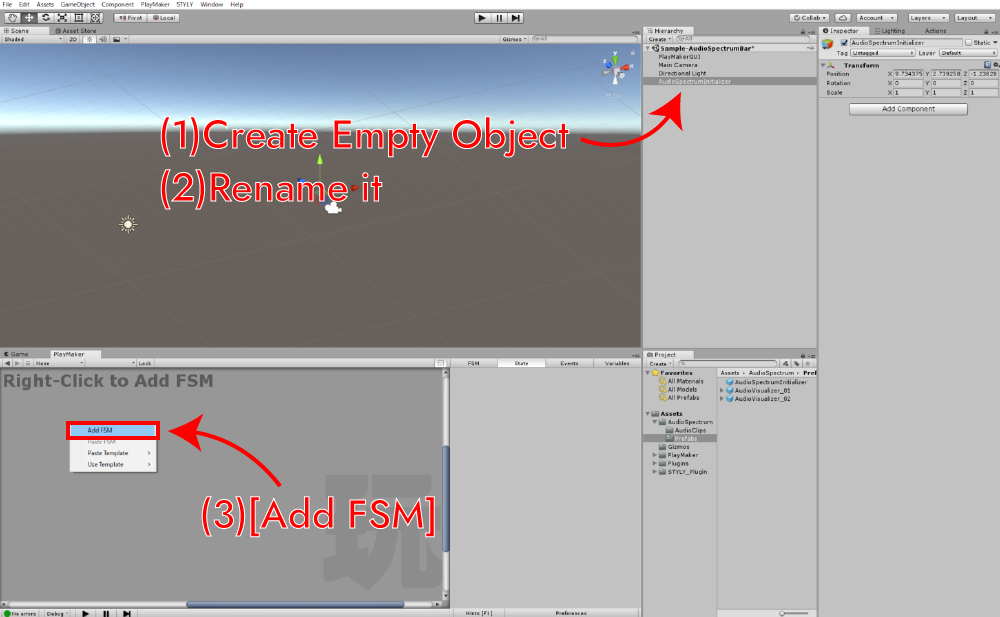
First, add an object with ‘Init Audio Spectrum’ to the scene.
Right click within the hierarchy window, and choose ‘Create Empty’ to create an object. Name it so you can recognize it afterwards. I named it ‘AudioSpectrumInitializer’ for this tutorial.
Right click on the Playmaker Editor while selecting the ‘AudioSpectrumInitializer’, and select ‘Add FSM’.
Open the Playmaker action browser, find the STYLY item, and double click on the ‘Init Audio Spectrum’ custom action. Now, the action has been added to the State.

Use ‘Get Audio Spectrum Level’ and Change the Object Size According to the Music
Next, create an object that will change size according to sound.
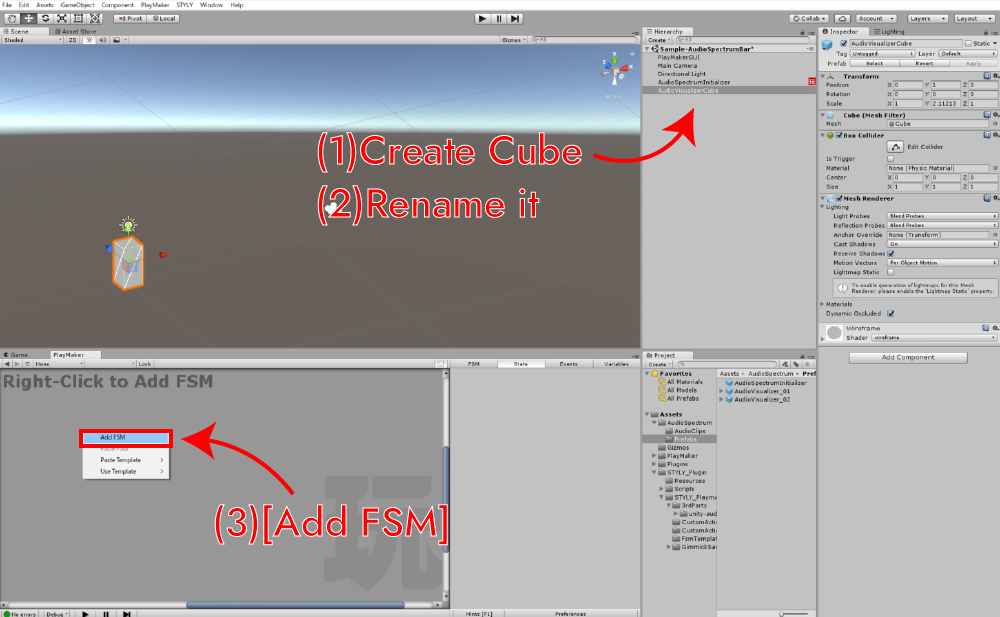
First, create an object. In this tutorial, I will use a Cube that will change size according to sound to create a simple audio visualizer.
Right click on the hierarchy window, and select ‘3D Object → Cube’ and place a Cube in the scene. I named it ‘AudioVisualizeCube’.
While selecting the ‘AudioVisualizeCube’, right click on the Playmaker Editor, and select ‘Add FSM’.
Open the Playmaker action browser, find the STYLY item, and add the ‘Get Audio Spectrum Level’ custom action to the State. Also, add the ‘Set Scale’ action from ‘Transform’ also.
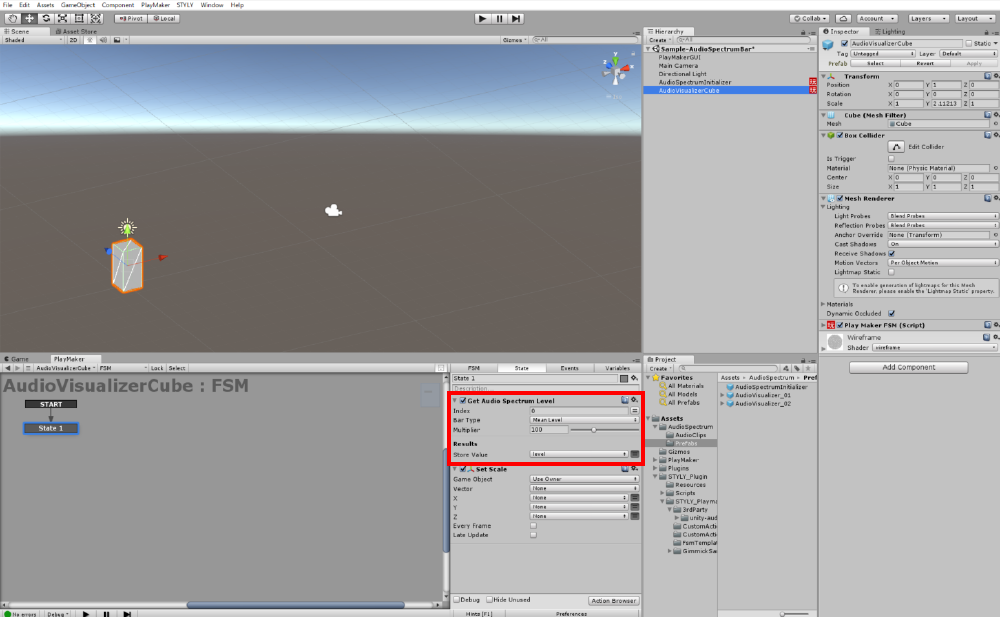
Lastly, we need to edit the settings for the custom action.
Index
The ‘Frequency Band Type’ for ‘Init Audio Spectrum’ is ‘Ten Band’, so we need to set it between 0 – 9. I used 0 for this example.
Bar Type
The ‘Realtime’, ‘Peak Level’, and ’Mean Level’ changes the movements. Select Mean Level.
Multiplier
This value will be multiplied to the result. The default value is 100.
Store Values
This specifies the Variables to store the values in.
Click on the 2 line button on the right, and change it so it can specify a variable. From the pull tab, select ‘New Variables…’, add a new variable named ‘level’, and store it there.
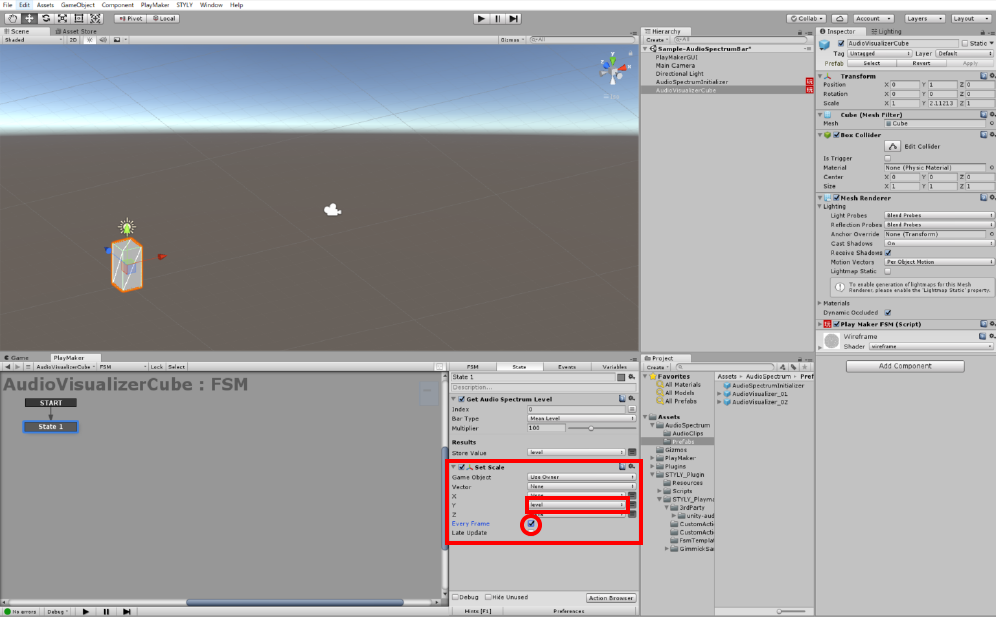
Set Scale
We will create an audio visualizer that only moves in the Y-axis direction.
Use the ‘level’ variable we just created for ‘Y’.
Also, check the ‘Every Frame’ box so that it will react to the sound for every frame.
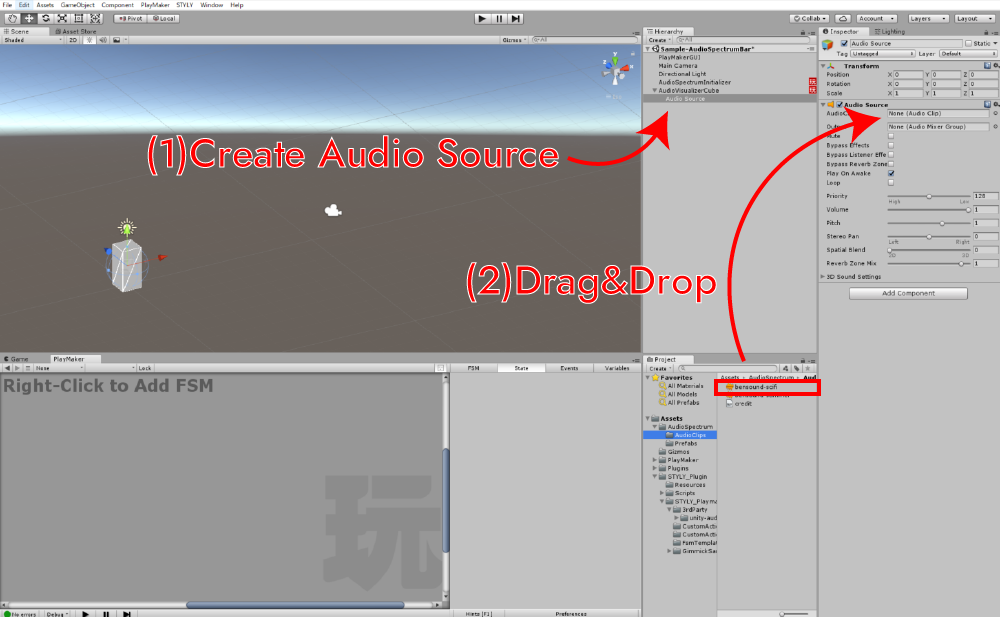
Place a Sound Source
The audio visualizer will not move unless there is a sound source, so we need to place one in the scene.
Right click in the hierarchy window, choose ‘Audio → Audio Source’ and place it in the scene.
Open the Audio Source Inspector window, and attach a sound file to the Audio Clip.
Done!
Now we have completed the audio visualizer.
Click the Unity Play button and see if the visualizer works properly.
If you want to create a scene where multiple cubes move according to certain frequencies, then simply create more and set the ‘Get Audio Spectrum Level’s Index’ to 0 – 9 and place them accordingly.
Upload to STYLY
Create a Prefab from the AudioSpectrumInitializer and audio visualizer object, and upload it to STYLY. You can store these 2 items in a single empty object, and upload them as one.
To learn how to upload assets from Unity to STYLY, please refer to the following article.
In the next article, I will introduce how to use the audio visualizer to create a simple VR music promotion video.