This article explains how to use the particle system, which is the default feature of Unity, to create a sun glow (=god ray).
By imitating a mysterious natural phenomenon, you can give an emotional impression to your scene.
At first glance, it looks like a volumetric light expression, but it is all particles.
Sample
To introduce God Ray, we created a scene of decaying ruins.
The presence of the God Ray in the deserted ruins gives the scene a mysterious impression.
I won’t explain the scene itself, but here are the assets I used to create the scene.
All assets except AllSky are free.
Creating a God Ray

God Ray Particles
First, let’s create a particle to represent the God Ray.
Our goal is to create a shimmering glow that looks like sunlight.
Creating a new particle
To create a new particle
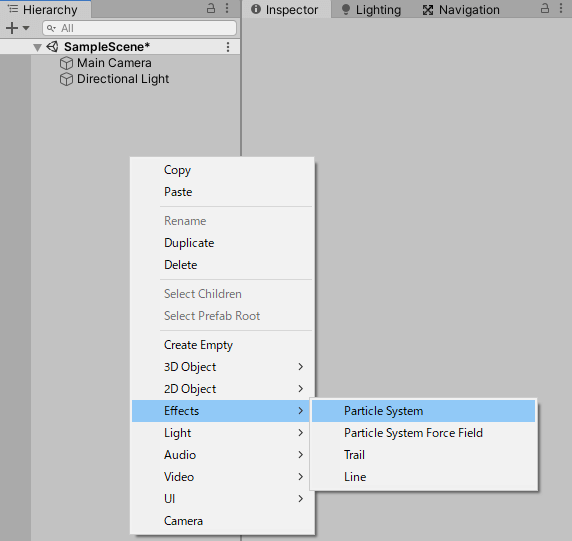
Right-click on the Hierarchy window > Effects > Particle System to create a new particle.
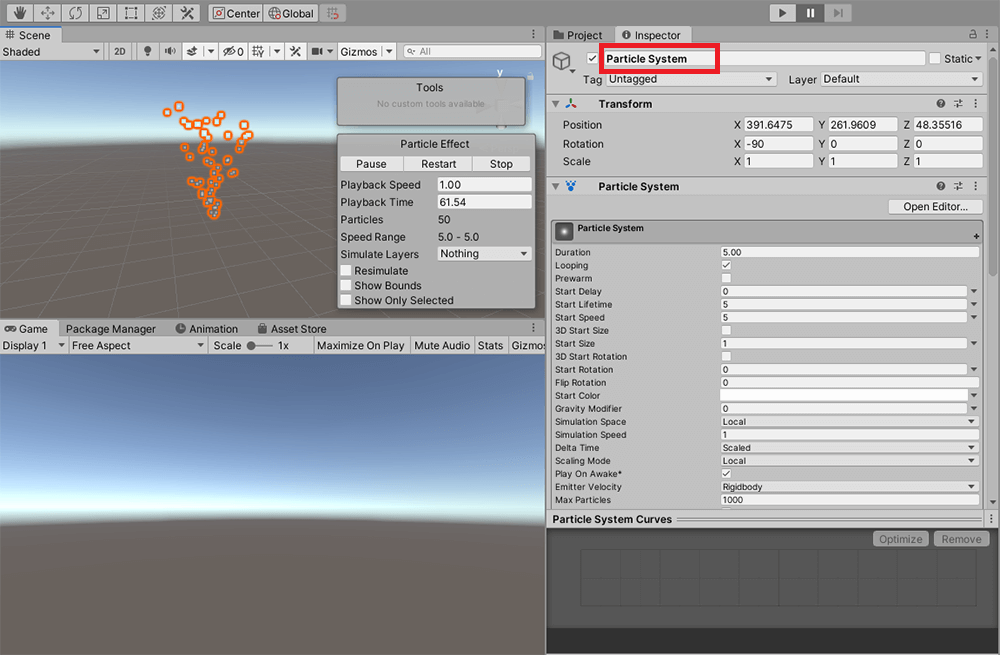
Edit it in the Inspector (rename it)
Once the particle is created, edit its parameters in the Inspector window.
You can leave the name of the particle as it is, but you may want to change it for easier understanding.
In this case, I call it “Godray”.
Editing the Main module
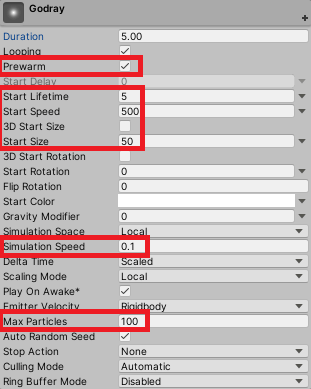
Editing the Main module
The Main module allows you to edit the basic settings of the particle.
See below for where to change the parameters.
| Parameters | Value |
|---|---|
| Prewarm | On |
| Start Lifetime | 5 |
| Start Speed | 500 |
| Start Size | 50 |
| Simulation Speed | 0.1 |
| Max Particles | 100 |
- Prewarm…It can be selected if Looping is applied. If this is applied, the image will be drawn and repeated from the beginning.
- Start Lifetime…The lifespan of the particle from the time it is generated until it disappears. The higher the value, the longer the lifespan will be displayed.
- Start Speed…The speed at which the particles move. The higher the value, the faster the speed.
- Start Size…The size of the particles. The larger the value, the larger the particle size.
- Simulation Speed…The speed at which the particles play. The higher the value, the faster the speed.
- Max Particles…The maximum number of particles to be displayed. The higher the value, the more particles can be displayed.
Editing the Emission Module
The default value for Emission is fine, so make sure that the checkbox is checked and edit the following items.
Editing the Shape Module

Editing the Shape Module
The Shape module is a module that allows you to set the shape of the particles.
See below for where to change the values.
| Parameters | Value |
|---|---|
| Shape | Cone |
| Radius | 50 |
- Shape… Select the shape of the particles to be emitted. You can leave it as the default Cone.
- Radius…Set the radius of the circle when Cone is applied to the shape. The higher the value, the larger the radius.
Editing the Color over Lifetime Module
The Color over Lifetime module allows you to set the color to change over the life cycle of the particle.
In order to create a solar-like effect, we will set the particles to go from transparent to white and back to transparent again.
Check the box and click on the Color section to open the Gradient Editor, which allows you to edit the colors.
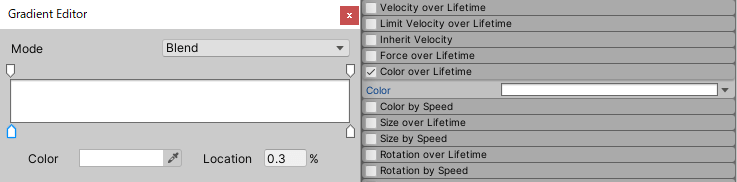
Editing the Color over Lifetime module
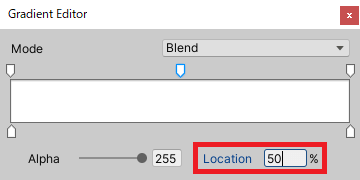
Click anywhere on the top of the slider to add a key.
At this point, you can change the position of the key by selecting it and entering the Rotation value in the lower right corner.
If you enter 50, it will be exactly half the value.
Editing the Color over Lifetime module
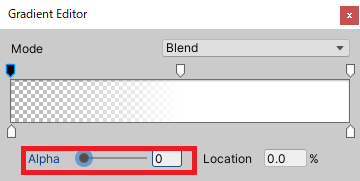
To make it transparent, set the Alpha value to 0 while the key is selected.
Editing the Color over Lifetime module
Make both ends transparent and you are done.
The beginning and end of the particle’s lifetime will now change to transparent.

Editing the Color over Lifetime Module
Editing the Renderer Module
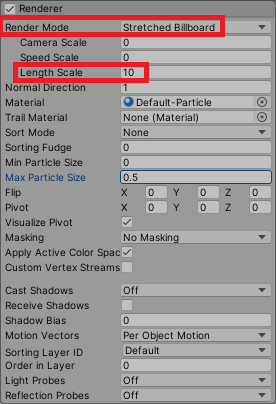
Editing the Renderer Module
The Renderer module is a module that allows you to configure the display of particles.
See below for where to change the values.
| Parameters | Value |
|---|---|
| Render Mode | Stretched Billboard |
| Length Scale | 10 |
- Render Mode…Sets how the particles will be rendered; if you apply Stretched Billboard, the particles will face the camera and stretch at the same time.
- Length Scale…This setting is available when Stretched Billboard is applied to Render Mode. This is the value for how long the particles will be stretched. The higher the value, the longer the particles will be stretched.
Creating Dust Particles

Dust particles (the extremely small, flickering white dots are particles)
Next, we will create a particle to represent the dust.
Creating a new particle
Create a new particle in the Hierarchy window as in the case of God Ray.
Editing the Main Module
See below for the location to change the parameters in the Main module.
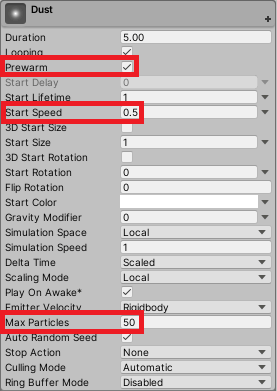
Edit the Main module
| Parameters | Value |
|---|---|
| Prewarm | On |
| Start Speed | 0.5 |
| Max Particles | 50 |
Editing the Emission module
The default value for Emission is fine, so make sure that the checkbox is checked and edit the following items.
Editing the Color over Lifetime module
The Color over Lifetime module should also be set to change colors to transparent and white, just like the God Ray.
Editing the Shape Module
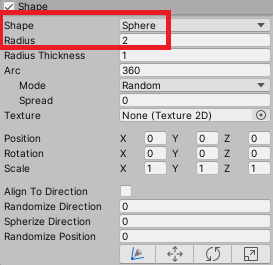
Editing the Shape Module
See below for where to change the values in the Shape module.
| Parameters | Value |
|---|---|
| Shape | Sphere |
| Radius | 2 |
Editing the Renderer Module
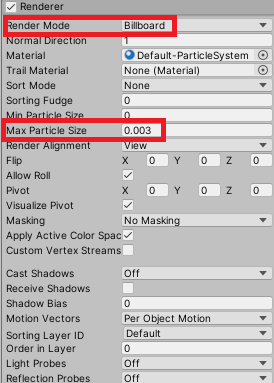
Editing the Renderer Module
To see where to change the values in the Renderer module, see below.
| Parameters | Value |
|---|---|
| Render Mode | Billboard |
| Max Particle Size | 0.003 |
- Render Mode…Sets how the particles will be rendered; if Billboard is applied, they will face the camera.
- Max Particle Size…Allows you to set the maximum size of the particles. The higher the value, the larger the particle itself will be.
Editing the Particle Size
This completes the editing of the particle values, but the size of the particles may not match the scene in which they are placed.
If this is the case, please use the Shape module to adjust the size.

Editing the Size of the Particles
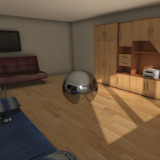
In this case, I adjusted the size of the particles so that they would fit in the gap and the dust would follow suit in order to create the effect of a god ray shooting from the top of the ruin placed in the scene.

Matching Particles to the Scene
Introduction to the article
The content of this article is based on the following article.
https://rakeshmalikblog.wordpress.com/2015/01/01/volumetric-light-using-particles/
Uploading to STYLY
Let’s actually upload your scene to STYLY and use it.
In this case, we’ll upload the Unity scene directly to STYLY, so please refer to this article.
How to create an account

Let’s learn VR/AR content creation with no experience!
NEWVIEW SCHOOL ONLINE is an online learning site where you can learn the basics of Unity and PlayMaker required for VR/AR content production, as well as the production process (and production techniques) of the attractive content distributed on STYLY!
- You can create VR/AR contents without writing programming code.
- Officially supervised Unity courses are available.
- Additional elements such as photogrammetric production methods and content weight reduction are available.
- You can learn how to think about creating VR/AR content.
