In this article, I will introduce how to create a Minecraft-like landscape and upload it to STYLY.
This article is a continuation of the following article.
Summary of the first part
In the first part, we created the appearance of the landscape, and in this article, I am going to introduce how to upload it to STYLY and finish it up. This article is made from the next 3 steps.
- Combining meshes and improving performance
- Save auto-created meshes
- Create a prefab from the saved meshes and uploading
I will explain the steps in detail.
Combining meshes and improving performance
Preparation
Adjusting a ground forming object
Adjust “VoxelGround.cs” as in the image below.
using UnityEngine;

public class VoxelGround : MonoBehaviour
{

    private float sizeX = 50f;
    private float sizeY = 10f;
    private float sizeZ = 50f;
    private float sizeW = 17f;

    private void Awake()
    {
        var material = this.GetComponent<MeshRenderer>().material;
        for (float x = 0; x < sizeX; x++)
        {
            for (float z = 0; z < sizeZ; z++)
            {
                GameObject cube = GameObject.CreatePrimitive(PrimitiveType.Cube);
                cube.transform.SetParent(transform);
                cube.GetComponent<MeshRenderer>().material = material;

                float noise = Mathf.PerlinNoise(x / sizeW, z / sizeW);
                float y = Mathf.Round(sizeY * noise);
                cube.transform.localPosition = new Vector3(x, y, z);

                SetUV(cube);
            }
        }
        Combine();
        transform.localPosition = new Vector3(-sizeX / 2, 0, -sizeZ / 2);
    }

    private void SetUV(GameObject cube)
    {
        cube.GetComponent<MeshFilter>().mesh.uv = GetBlockUVs(2, 15);

        if (cube.transform.position.y > sizeY * 0.3f)
        {
            cube.GetComponent<MeshFilter>().mesh.uv = GetBlockUVs(0, 15); //山
        }
        else if (cube.transform.position.y > sizeY * 0.2f)
        {
            cube.GetComponent<MeshFilter>().mesh.uv = GetBlockUVs(1, 2); //水面
        }
        else if (cube.transform.position.y > sizeY * 0.1f)
        {
            cube.GetComponent<MeshFilter>().mesh.uv = GetBlockUVs(15, 0); //溶岩
        }
    }

    private Vector2[] GetBlockUVs(float tileX, float tileY)
    {

        float pixelSize = 16;
        float tilePerc = 1 / pixelSize;

        float umin = tilePerc * tileX;
        float umax = tilePerc * (tileX + 1);
        float vmin = tilePerc * tileY;
        float vmax = tilePerc * (tileY + 1);

        Vector2[] blockUVs = new Vector2[24];

        //-X
        blockUVs[2] = new Vector2(umax, vmax);
        blockUVs[3] = new Vector2(umin, vmax);
        blockUVs[0] = new Vector2(umax, vmin);
        blockUVs[1] = new Vector2(umin, vmin);

        //+Y
        blockUVs[4] = new Vector2(umin, vmin);
        blockUVs[5] = new Vector2(umax, vmin);
        blockUVs[8] = new Vector2(umin, vmax);
        blockUVs[9] = new Vector2(umax, vmax);

        //-Z
        blockUVs[23] = new Vector2(umax, vmin);
        blockUVs[21] = new Vector2(umin, vmax);
        blockUVs[20] = new Vector2(umin, vmin);
        blockUVs[22] = new Vector2(umax, vmax);

        //+Z
        blockUVs[19] = new Vector2(umax, vmin);
        blockUVs[17] = new Vector2(umin, vmax);
        blockUVs[16] = new Vector2(umin, vmin);
        blockUVs[18] = new Vector2(umax, vmax);

        //-Y
        blockUVs[15] = new Vector2(umax, vmin);
        blockUVs[13] = new Vector2(umin, vmax);
        blockUVs[12] = new Vector2(umin, vmin);
        blockUVs[14] = new Vector2(umax, vmax);

        //+X
        blockUVs[6] = new Vector2(umin, vmin);
        blockUVs[7] = new Vector2(umax, vmin);
        blockUVs[10] = new Vector2(umin, vmax);
        blockUVs[11] = new Vector2(umax, vmax);

        return blockUVs;
    }

    private void Combine()
    {
        //Combining Meshes
        MeshFilter[] meshFilters = GetComponentsInChildren<MeshFilter>();
        CombineInstance[] combine = new CombineInstance[meshFilters.Length];

        int i = 0;
        while (i < meshFilters.Length)
        {
            combine[i].mesh = meshFilters[i].sharedMesh;
            combine[i].transform = meshFilters[i].transform.localToWorldMatrix;
            meshFilters[i].gameObject.SetActive(false);
            i++;
        }

        transform.GetComponent<MeshFilter>().mesh = new Mesh();
        transform.GetComponent<MeshFilter>().mesh.CombineMeshes(combine, true);
        transform.gameObject.SetActive(true);
    }

}
Confirming the result
Press the Ctrl + P key, and if a landscape like the one in the image below is created, it is a success.
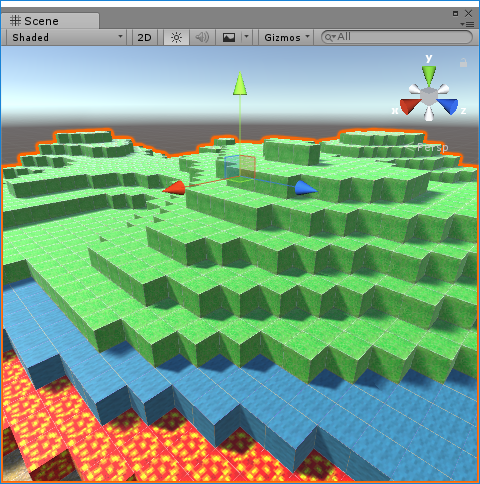
Combining 2500 cubes to 1 mesh
Explanation
Adjusting the script
    private void Combine()
    {
        //Combining meshes
        MeshFilter[] meshFilters = GetComponentsInChildren<MeshFilter>();              //The cube mesh created below Ground object
        CombineInstance[] combine = new CombineInstance[meshFilters.Length];           //Store the combined meshes in this array

        int i = 0;
        while (i < meshFilters.Length)
        {
            combine[i].mesh = meshFilters[i].sharedMesh;                               //Copy the meshes from each cube and copy it to the combined mesh
            combine[i].transform = meshFilters[i].transform.localToWorldMatrix;        //Copy the position for each cube and copy it to the combined mesh
            meshFilters[i].gameObject.SetActive(false);                                //Nulify the cube objects that are no longer needed
            i++;
        }

        transform.GetComponent<MeshFilter>().mesh = new Mesh();                        //Create a new mesh for the Ground object
        transform.GetComponent<MeshFilter>().mesh.CombineMeshes(combine, true);        //Combining the meshes
        transform.gameObject.SetActive(true);                                          //Enable the Ground object
    }
We combine the 2500 cubes into 1 mesh here.
The details of the implementation are explained in the comments.
By using the above script, we merge the 2500 cube objects to 1 object.
Save auto-created meshes
Preparation
Introducing the MeshSaver
Implement a tool called MeshSaver from the repository below.
Unity-MeshSaver
The implementation is completing from the following 3 steps
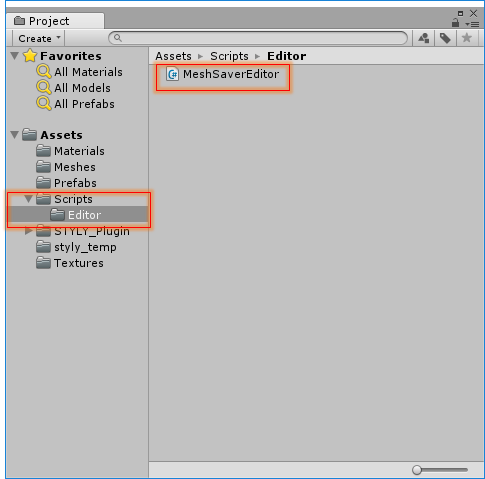
- Create a folder named “Editor” in the script folder. (CAUTION: If you name the folder a different name, the upload to STYLY will fail)
- Create a script named MeshSaverEditor in the Editor file
- Copy and paste the source code from the below URL
MeshSaverEditor
Implementing the MeshSave
Saving the Mesh
Press the Ctrl + P key, create a landscape in the Unity editor, and select the landscape object.

Select the landscape
Select “Save Mesh” from the options in the “Ground (Mesh Filter)” component of the currently selected object.
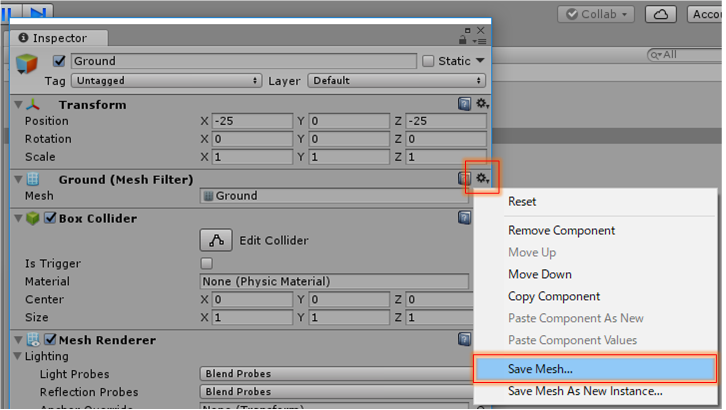
Save Mesh
Select the designation to save the mesh. ( In the sample, I saved it as Ground.Asset )
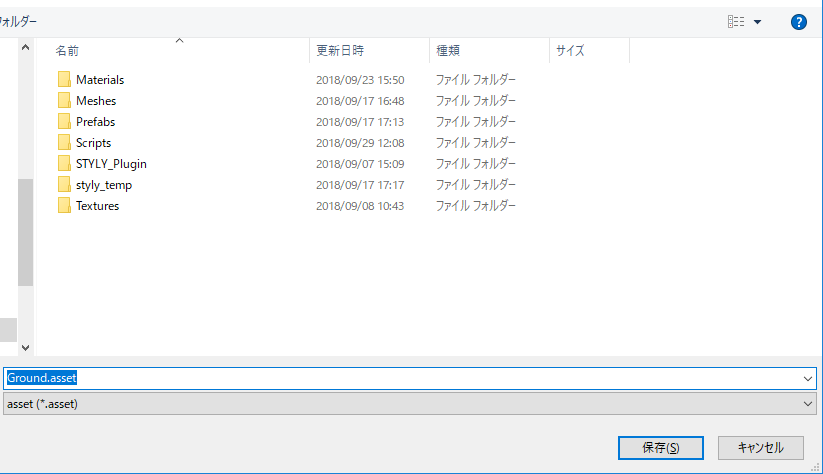
Selecting the designation
Confirming the result
Stop the Unity editor for a moment, select the Ground object, and click the mesh property select button of the Cube ( Mesh Filter ).
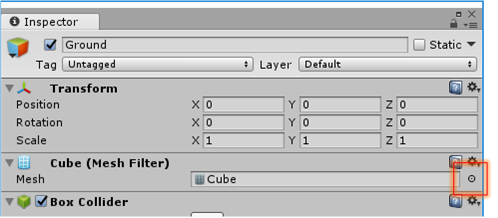
Opening the Mesh property
By selecting the “Ground.Asset” you just saved, a landscape mesh will appear in the Unity editor.
If the mesh is shown even if the Unity editor is stopped, it is a success.
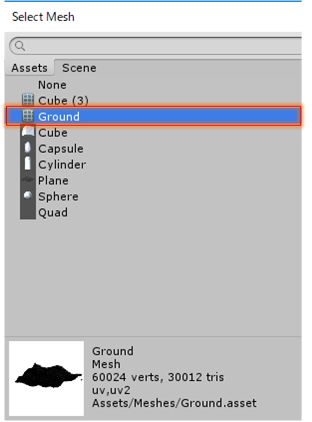
Selecting the landscape mesh
Creating a prefab from the mesh and uploading
Preparation
Creating a game object to use for the prefab
Create a cube to make the prefab from.
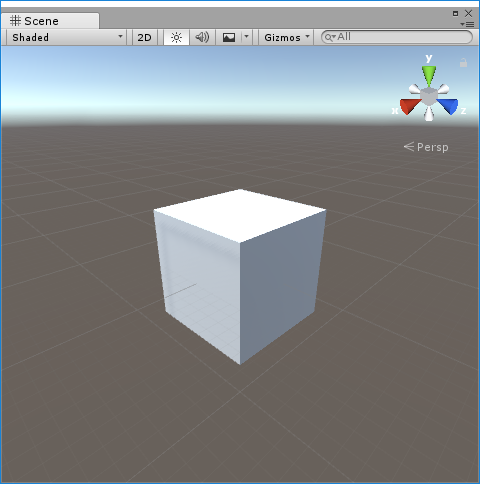
The cube to use for the prefab
Select the created cube, and perform the next two steps.
- Change the Mesh property of Cube (Mesh Filter) to “Ground”
- Change the Material property of Mesh Rendrerer to “terrain 6.26.56 PM”
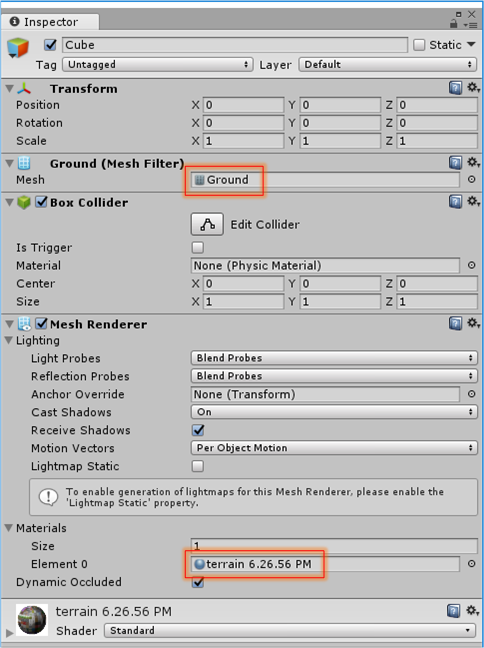
Change the mesh and material
Make a prefab from the game object
Drag and drop the object to the prefabs folder.
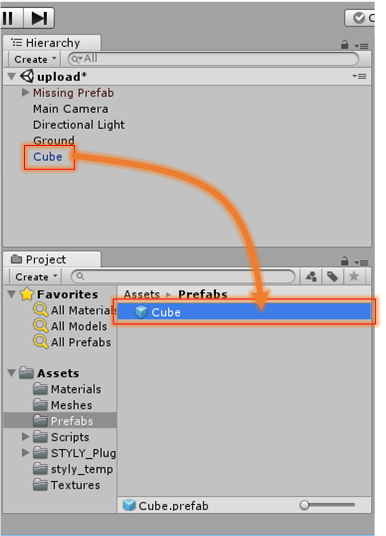
Make the cube into a Prefab
Uploading the prefab to STYLY
In order to upload the prefab to STYLY, you need to set an account and install the plugin.
For the details, refer to the following URL.

Confirm the results
You can select your uploaded prefabs from the “MyModels” folder in the STYLY editor.

Uploaded prefabs
Then, change the default landscape display to OFF, and adjust the cube display positions, and you’re done.
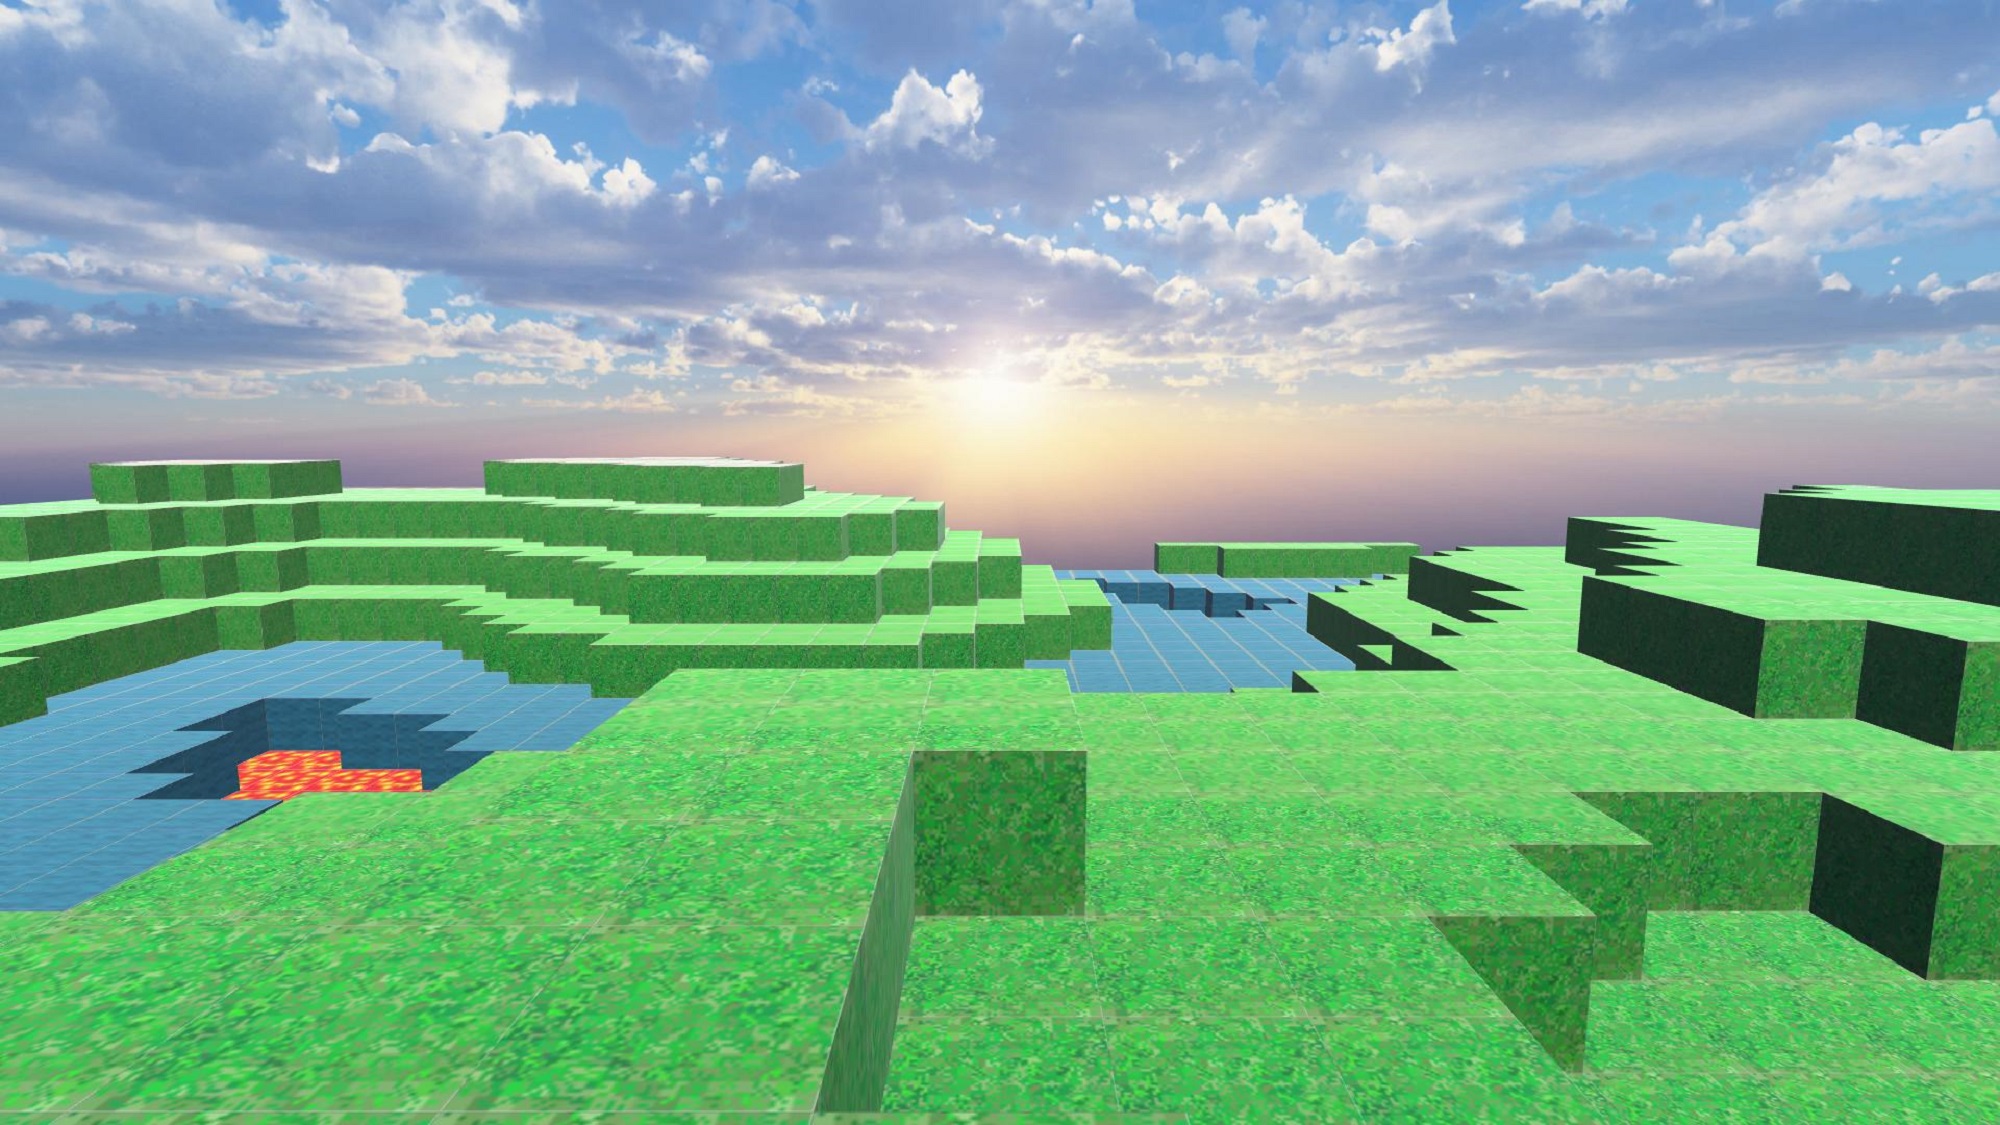
If you create the same landscape as in the sample, set X:-25、Y:-7.5、Z:-25 and the landscape will be placed as in the image below.
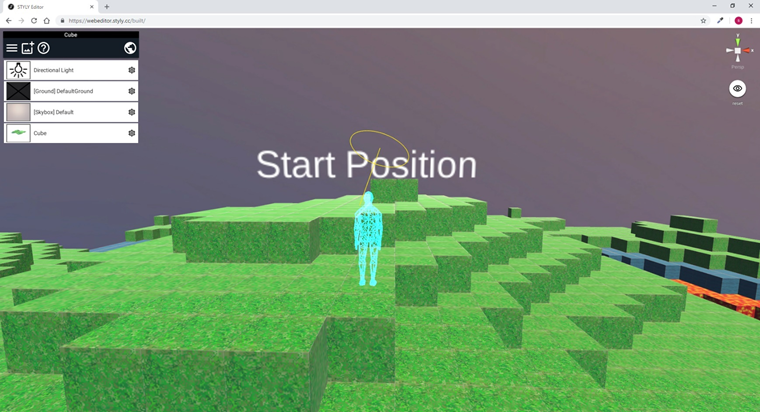
The Minecraft-like landscape imported to STYLY
Conclusion
That will be all for the tutorial for Creating a Minecraft-like landscape and uploading to STYLY.
You can add details to the scene by drawing caves, animals, plants using TiltBrush, or creating fireworks, exploding balls, adding assets.
By combining assets from previous articles, you can create an even interesting world.
This is not an official product of Minecraft. This product is not approved from Mojang, and is not related to Mojang.