In this tutorial for beginning modelers, I will explain how to use polygon modeling to create an object using 3dsMax.
Note: Windows10 is used for this tutorial
Preparations
Before starting polygon modeling with 3dsmax, let’s check if you have everything ready for this tutorial.
Installing 3dsmax
This tutorial is the 4th in the series. If you haven’t installed 3dsmax yet, please refer to the following article.
![[3ds Max Tutorial] How to install and launch [Part 1]](https://styly.cc/wp-content/uploads/2019/04/022-160x160.png)
Basic Knowledge About Each Tool
Are you familiar and have basic knowledge about each tool?
If you have any doubts or are unsure, please go back to this article.
![[3ds Max Tutorial] Basic Operations / User Interface [Part 2]](https://styly.cc/wp-content/uploads/2019/05/001-2-160x160.png)
The Previous Tutorial
In the previous tutorial, we used primitive to create a mahjong tile.
If you haven’t done this yet, please read the following article.
![[3ds Max Tutorial] Modelling Using Primitives [Tutorial ③]](https://styly.cc/wp-content/uploads/2019/06/xxx-160x160.png)
The Tools We Are Using for Today’s Article
This is the list of tools we are going to use.
If you are already familiar with the basic operations, please go on to the next step.
Main Toolbar
・None
Scene Explorer
・None
Command Panel
・Create
・Modify
Before Beginning
Before beginning the polygon modeling, first start with learning the basics.
Basic Knowledge ① [Geometry]
In the previous tutorial, we called an object a [Primitive].
Originally, a primitive means any basic shape.
In the previous tutorial, we used a [box] primitive.
We are going to use [geometry] shapes, which are more developed shapes.
Geometry is an object that is made by vertices / edges / polygons. You can create a developed and freeform shape by editing it.
Primitives cannot be edited directly, so we need to change it to polygons first.
You should already know what tool we need to use when you want to edit an object already placed in a scene.
Choose [Modify], then select [Edit polygon], and apply it.
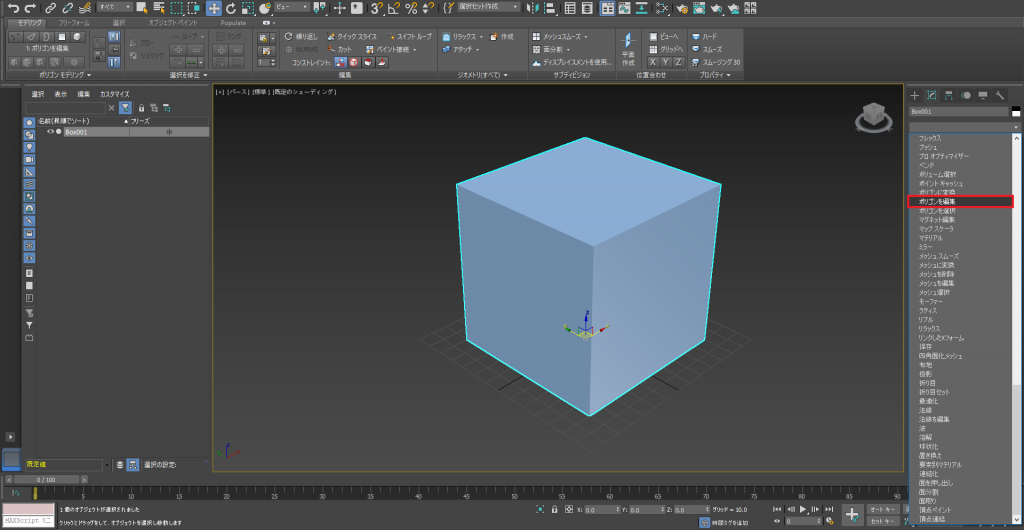
Edit polygons
If you have successfully changed it into editable polygons, you are ready to begin.
There are many new things in the screen, I will try to explain about each one.
First, let’s start with the basics. Geometry has 3 elements, vertices, edges, and polygons.
In order to edit these, we need to select all of them.
Let’s learn how to select them.
Basic Knowledge ② [Select]
There are a number of options when selecting.
If you just want to select vertices, or just faces, you need to specify so.
You need to remember the steps to do so.
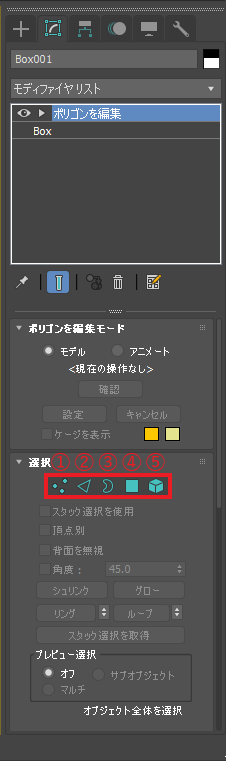
Select
① [Vertex]
Vertices are selected.
② [Edge]
Edges are selected.
③ [Borders]
An object’s borders are selected. A border is an edge which does not have polygons on one side.
Simply put, it is an edge of the polygon transferred object where one surface is deleted.
④ [Polygon]
Polygons are selected.
⑤ [Element]
All polygons of the object are selected.
You can select elements by clicking.
You can use range select by dragging.
If you want to select multiple elements, select while pressing [Ctrl].
If you want to deselect a element, select while pressing [Alt].
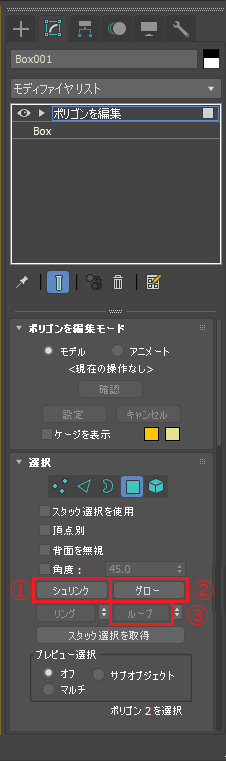
Select 2
① [Grow select]
The selected range enlarges for one step.
② [Shrink select]
The selected range shrinks for one step.
③ [Loop Select]
Selects the edges that are connected to the pre-selected edge.
Now that we have learned the basics, let’s start the [Edit] process.
Polygon Modeling
We can now start the polygon modeling since we have learned the needed knowledge.
This article has become long, so I will introduce polygon modeling in the next article.
Preview for Next Article
In this article, we learned basic knowledge and basic operations about polygon modeling, however we did not discuss polygon modeling.
In the next article, we will introduce polygon modeling.