- 1 Introduction
- 2 Play sound with Timeline
- 3 Create Shader
- 4 Change Shader with Timeline
- 4.1 Assign Cube to Timeline
- 4.2
- 4.3 Add a clip to Timeline
- 4.4 Convert into ‘Clip Track’
- 4.5 Duplicate Clip Track
- 4.6 Rename the Clip
- 4.7 Make Keyframe white
- 4.8 Synchronize the White track with sound
- 4.9 Disable ‘Snap’
- 4.10 Adjust the White track to the timing when the sound starts
- 4.11 Convert Animation clip into Asset
- 4.12 Troubleshooting: The Name field of AnimationClip doesn’t show up
- 4.13 Place AnimationClip in Timeline
- 4.14 Copy the length of other animation track
- 5 How to upload the asset from Unity to STYLY (For Scenes)
- 6 How to upload the asset from Unity to STYLY (For Prefab)
- 7 The setting for the sound to upload it to STYLY
Introduction
Example
A representation of a noise-style shader synchronized with noise-style music is shown below.
Sample
Github Sample Project
https://github.com/styly-dev/STYLY-Unity-Examples/tree/master/Assets/STYLY_Examples/NoiseMusicSync_Sample
Play sound with Timeline
Here I explain how to create a Timeline and play sound.
Create Timeline
Firstly, create a Timeline. Right-click on the Project window and select ‘Create > Timeline’.
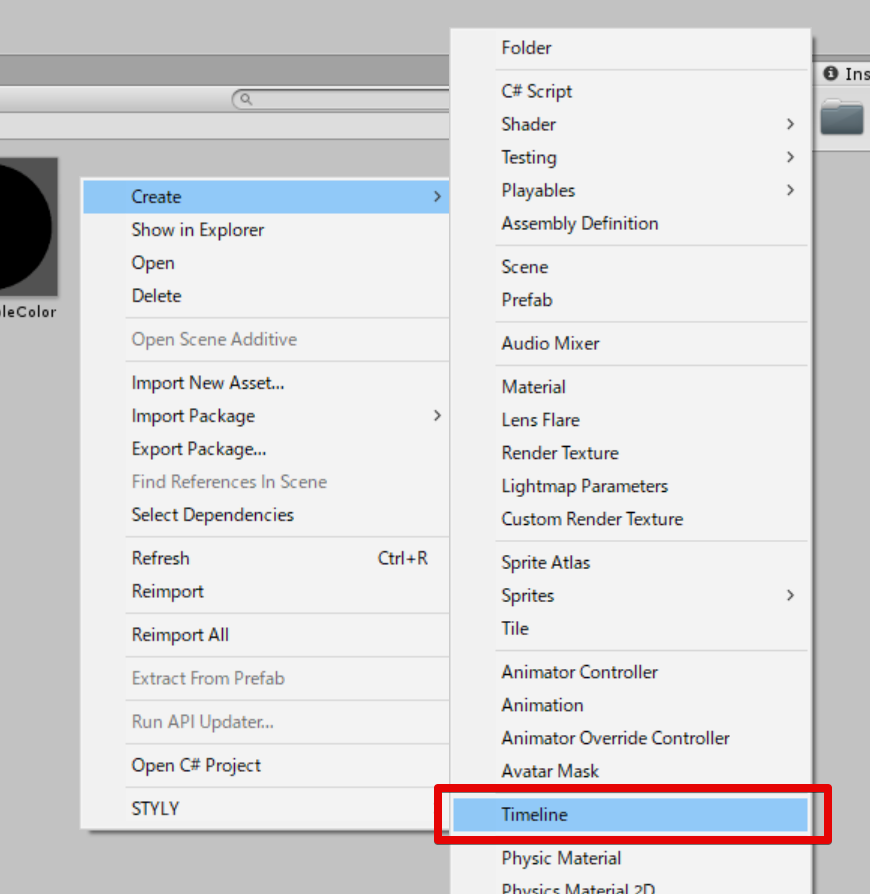
Create Timeline

The Timeline asset created
Convert Timeline asset into an object
Next, convert the Timeline asset into an object. Drag the Timeline asset created earlier into the Hierarchy window.
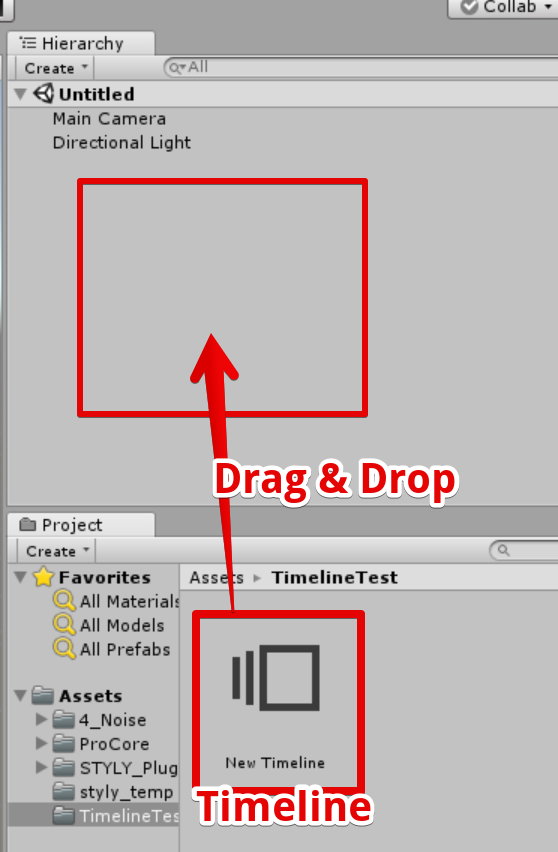
Drag the Timeline asset into the Hierarchy window
It creates a GameObject with PlayableDirector. You need PlayableDirector to enable Timeline.
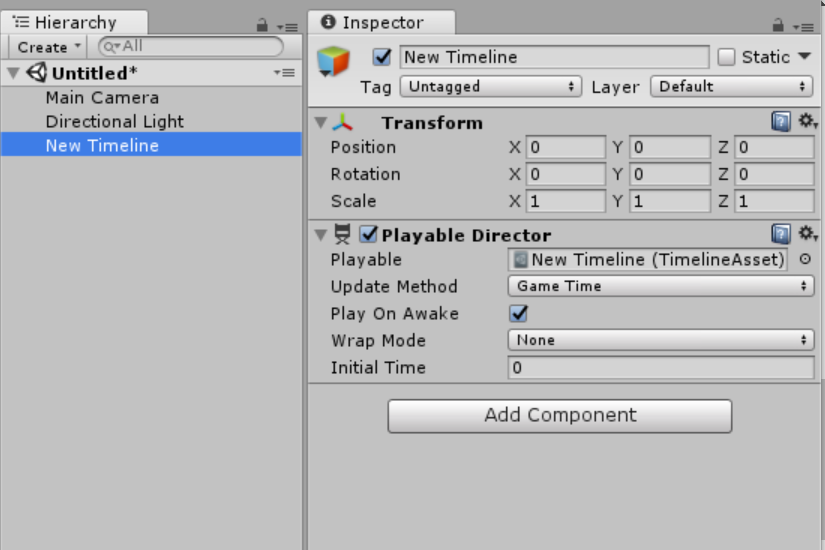
The created GameObject with PlayableDirectory
Double-click the Timeline asset to open the Timeline window.
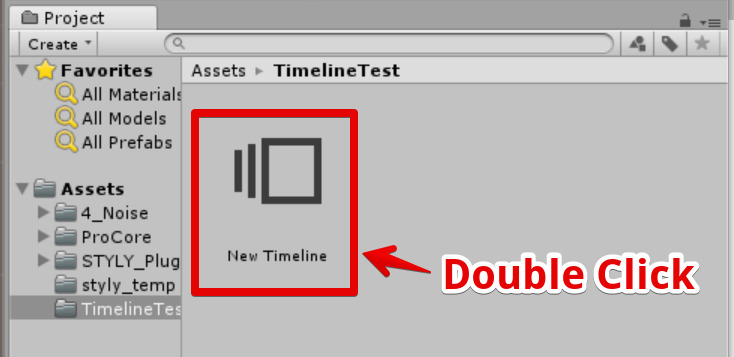
Double-click the Timeline asset
In the Timeline window, you can edit and play the Timeline. You basically work on this window when editing the Timeline.

Timeline window
Play sound
In this time, I use the sound that plays the sine wave at regular intervals.
You can download the sample sound (Link). Firstly, drag the sound data (AudioClip) into the Timeline.

It creates ‘AudioTrack’ and assigns ‘AudioClip’ to the Timeline.

AudioClip is assigned to Timeline
Drag the ‘sin_C5’ clip so that its left end is at 0.
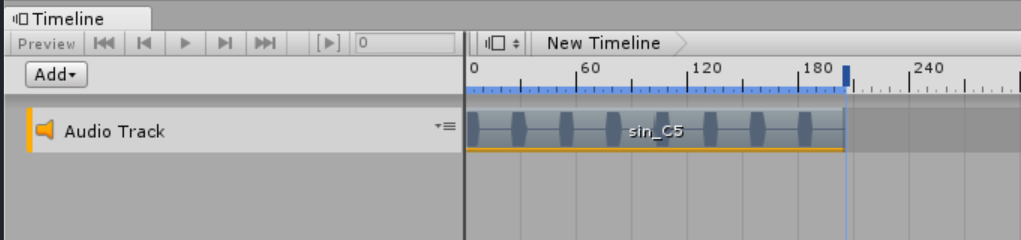
Adjust the starting point of the Audio Clip to 0
In this state, you can play the sound by pressing the Play button in Unity.
Lock Timeline
To avoid unselecting the Timeline when selecting other objects, lock the Timeline by clicking the ‘Padlock’ icon in the top-right corner of the window.
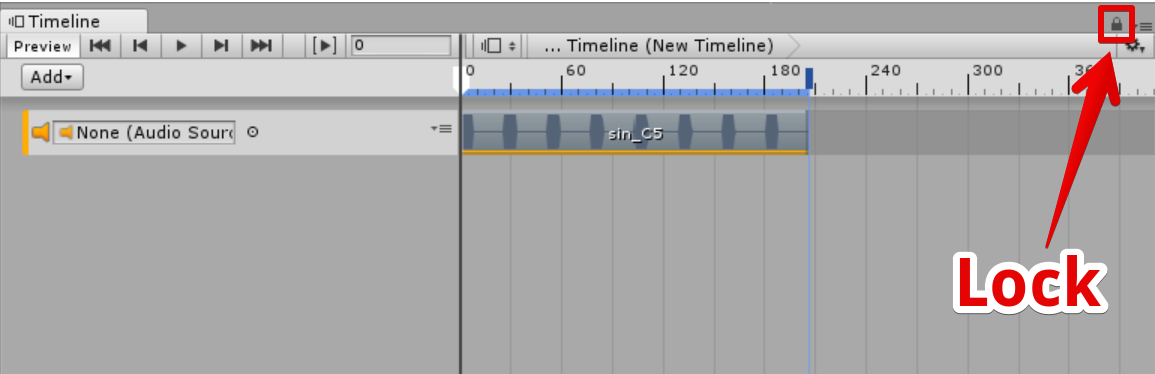
Lock Timeline
Create Shader
Next, create a shader that is controlled by the Timeline. Right-click the Project window to open the context menu and select ‘Create > Shader > Unlit Shader’ to create a shader.
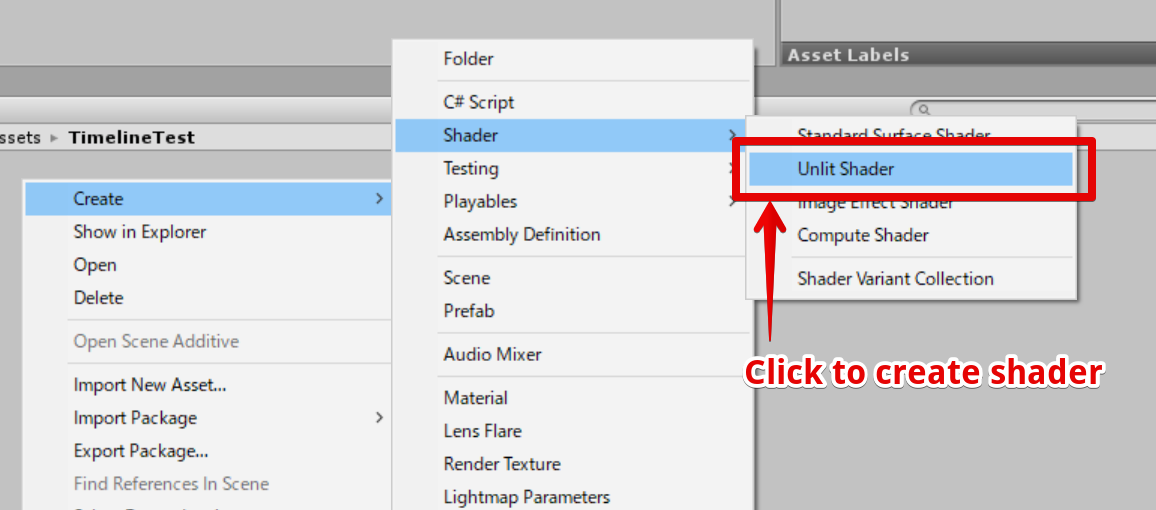
Create Shader
Name it ‘SimpleColor’.
SimpleColor.shader
Edit the shader as shown below.
Shader "Unlit/SimpleColor"
{
	Properties
	{
		_MainTex("Texture", 2D) = "white" {}
		_Color("Color", Color) = (0, 0, 0, 1) // color
	}
		SubShader
		{
			Tags { "RenderType" = "Opaque" }
			LOD 100

			Pass
			{
				CGPROGRAM
				#pragma vertex vert
				#pragma fragment frag
				// make fog work
				#pragma multi_compile_fog

				#include "UnityCG.cginc"

				struct appdata
				{
					float4 vertex : POSITION;
					float2 uv : TEXCOORD0;
				};

				struct v2f
				{
					float2 uv : TEXCOORD0;
					UNITY_FOG_COORDS(1)
					float4 vertex : SV_POSITION;
				};

				sampler2D _MainTex;
				float4 _MainTex_ST;
				float4 _Color; // color

				v2f vert(appdata v)
				{
					v2f o;
					o.vertex = UnityObjectToClipPos(v.vertex);
					o.uv = TRANSFORM_TEX(v.uv, _MainTex);
					UNITY_TRANSFER_FOG(o,o.vertex);
					return o;
				}

				fixed4 frag(v2f i) : SV_Target
				{
					return tex2D(_MainTex, i.uv) * _Color;
				}
				ENDCG
			}
		}
}
Create Material
Create a material from the above SimpleColor.
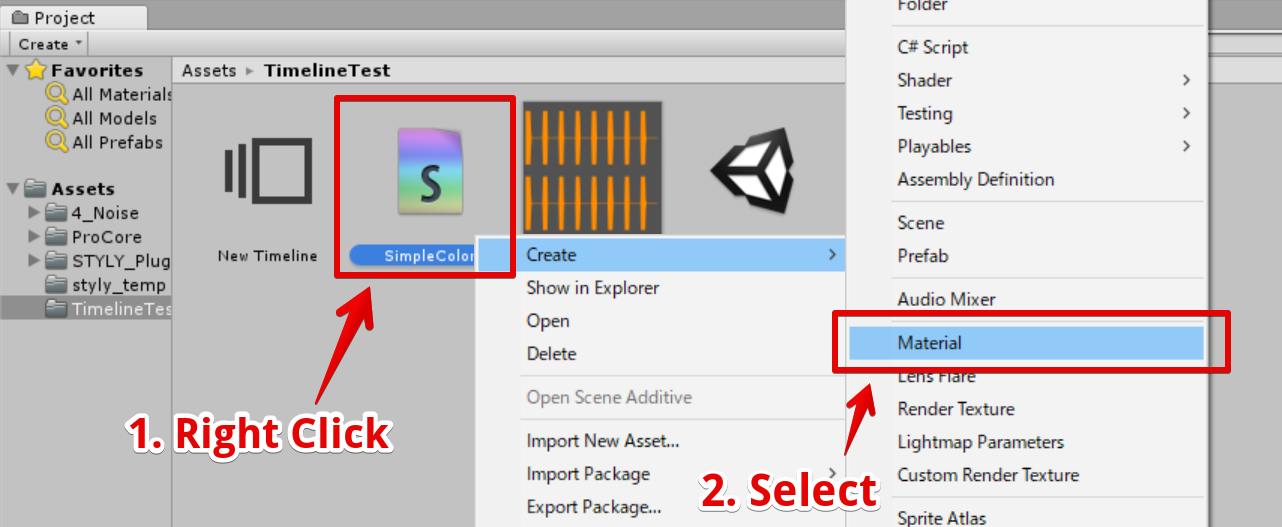
Create Material

The created material
Create a Cube
Press the Create button in the Hierarchy window and select ‘3D Object > Cube’ to create a Cube.
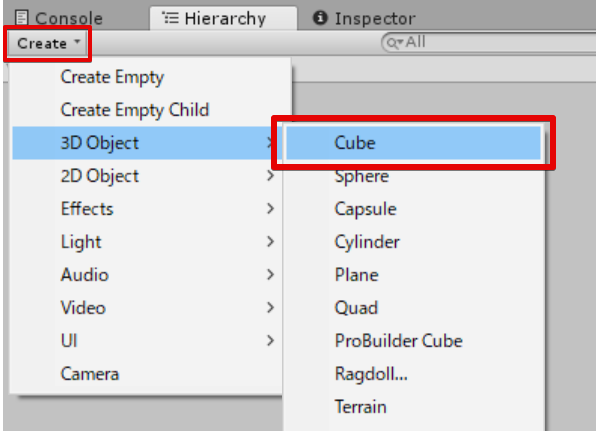
Create a Cube
Attach Material to Cube
Attach the material to the Cube by dragging the material into it.
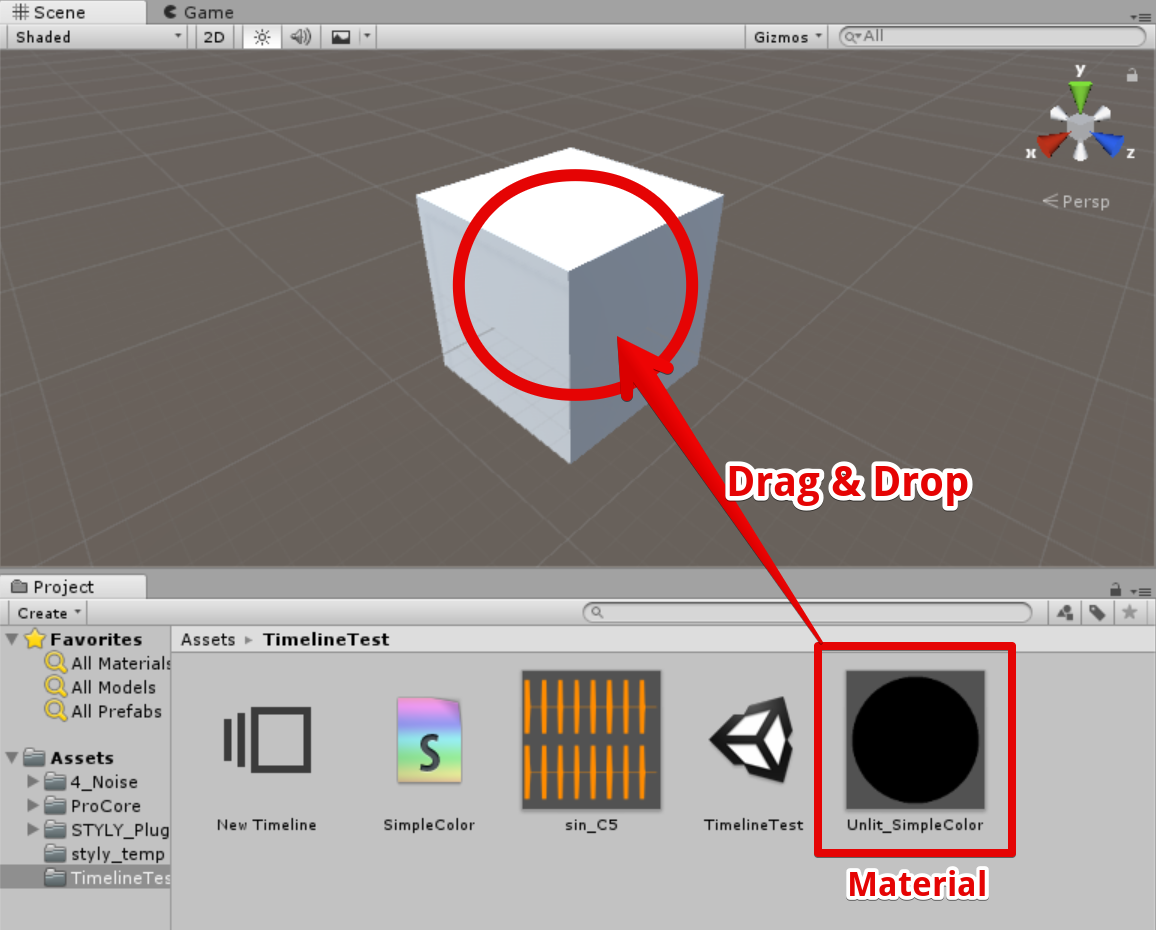
Attach the material to the Cube
When attaching the material, the Cube turns black.
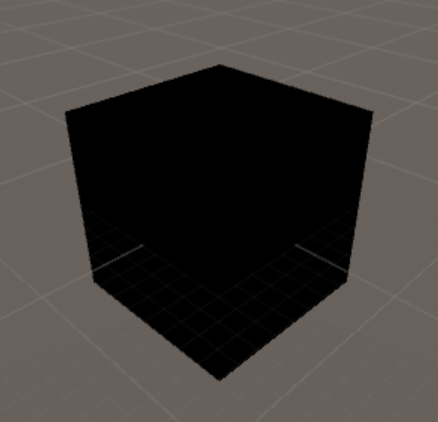
The result – The material has been attached
Change Shader with Timeline
Assign Cube to Timeline
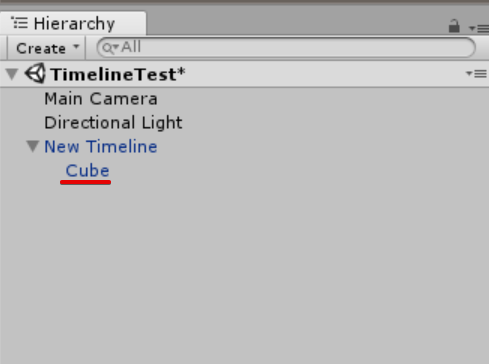
Drag the Cube into the Timeline to assign the Cube to the Timeline.
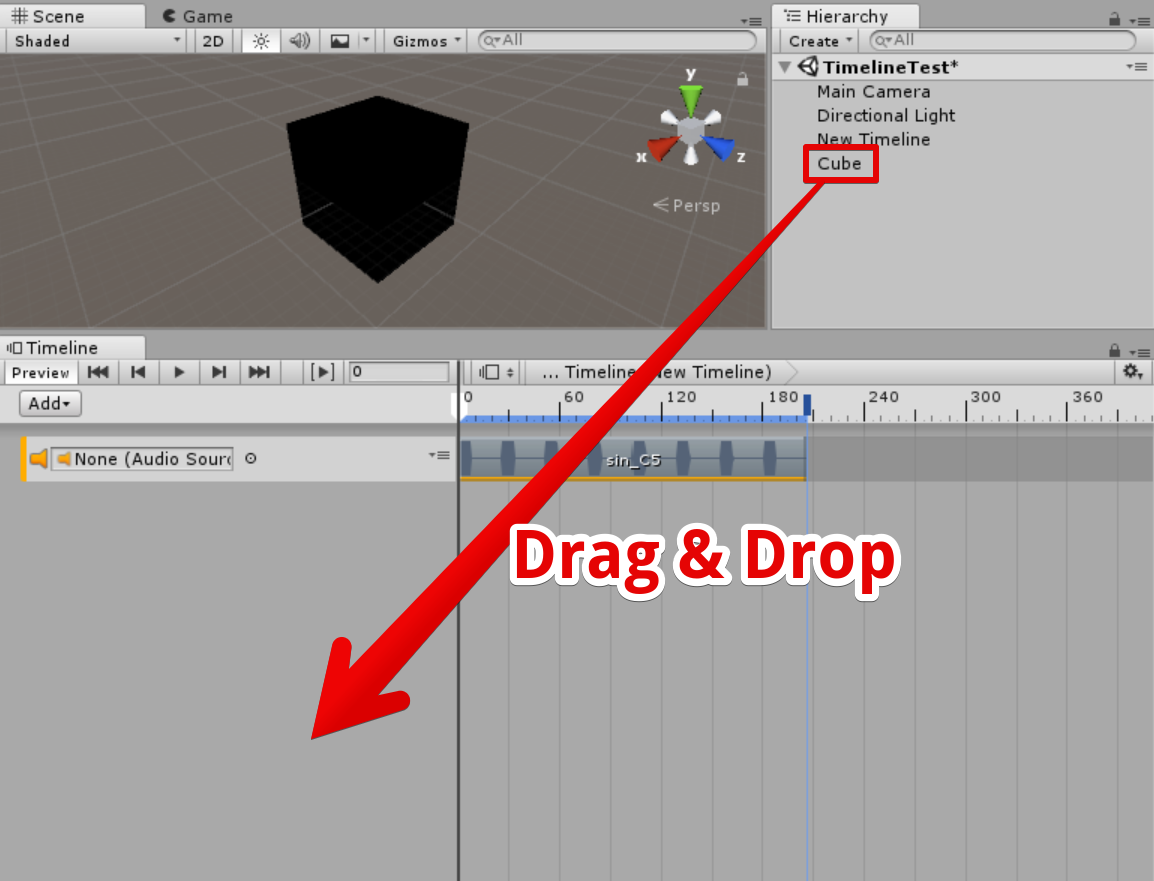
Drag Cube into Timeline
It brings up the menu. Select ‘Animation Track’.
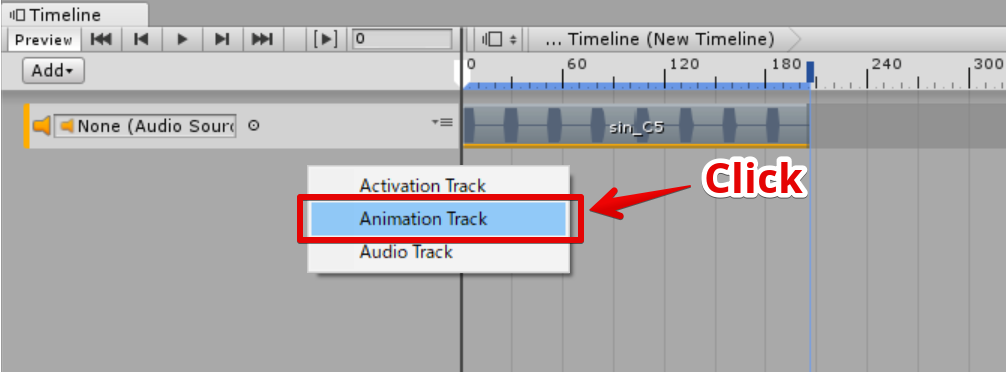
Select ‘Animation Track’
It creates the AnimationTrack for the Cube object in the Timeline.
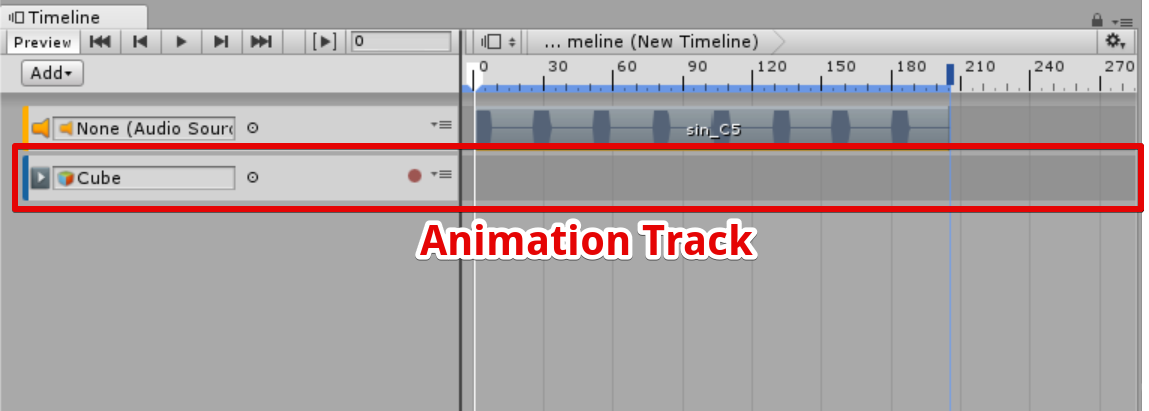
The created AnimationTrack
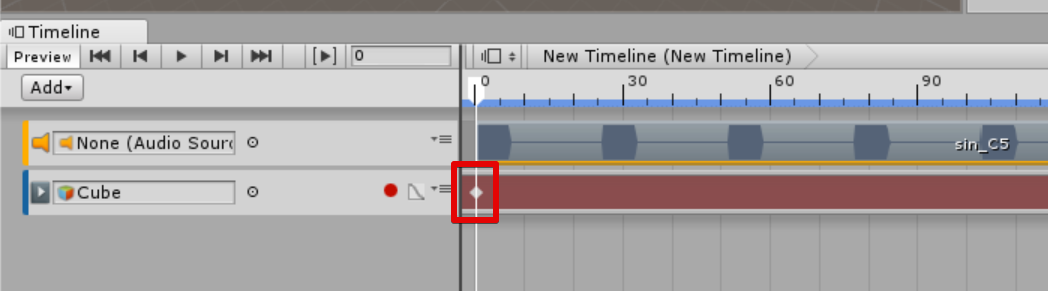
That’s all you need to assign the Cube object to the Timeline. Next, we are going to edit this ‘AnimationTrack’. Set the position of the ‘Seek Bar'(=the Playhead) to 0.
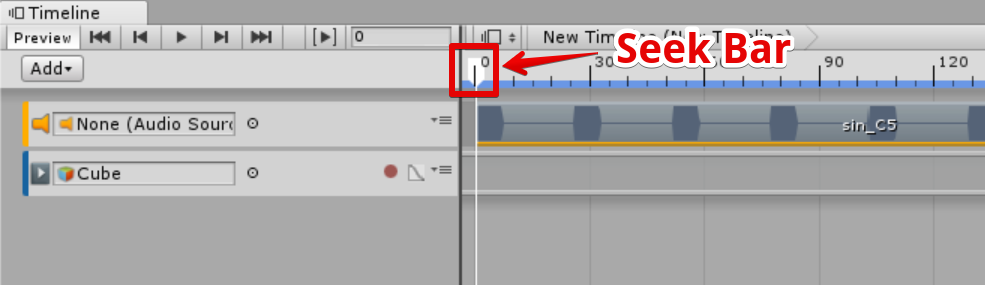
Set the position of the ‘Seek Bar’ to 0.
Alternatively, you can set the ‘Seek Bar’ position to zero by pressing the ‘<<‘ button on the Timeline.
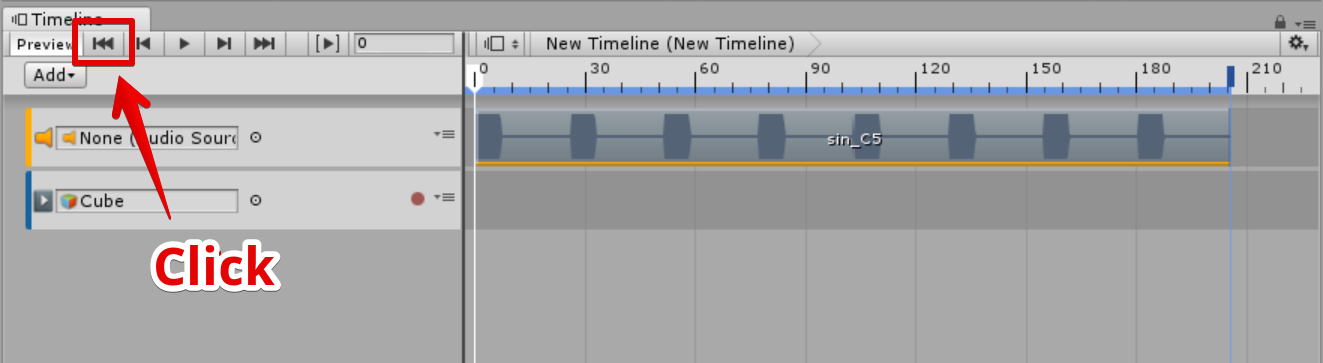
The button to set the Playhead position to zero
Add a clip to Timeline
Set Timeline to the ‘Recording’ mode
Click the red button in the upper left corner of the Timeline window to set the Timeline to the Recording mode.

Start Recording
Then, the AnimationTrack turns red, which means it became the Recording mode and it’s editable now.

The Timeline in the ‘Recording’ mode
Add a ‘Black’ keyframe
Next, select the Cube.
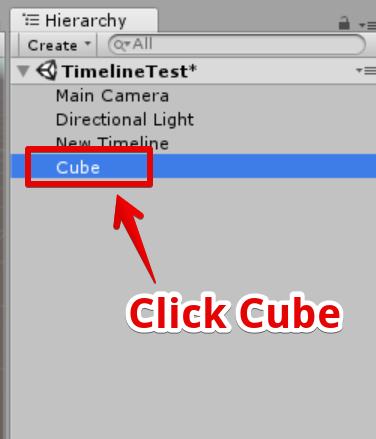
Click the Cube to select
Right-click ‘Color’ in the Material field of the Inspector window.
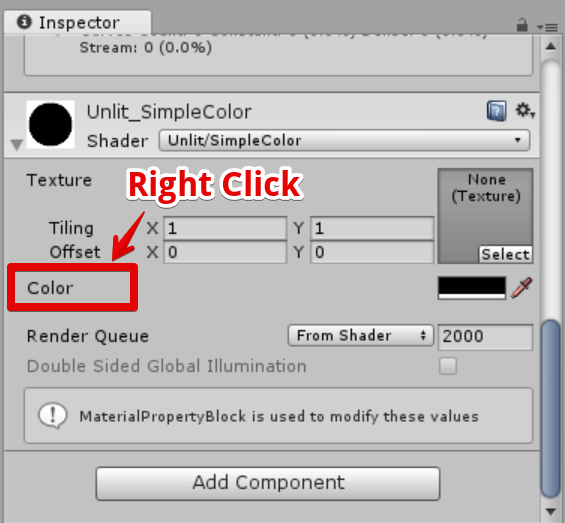
Right-click ‘Color’ in the Inspector window
It brings up the menu. Select ‘Add Key’.
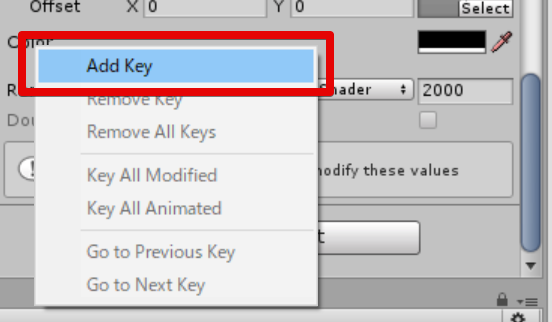
Select ‘Add Key’
It added the current Color information to the Timeline as a keyframe.
A keyframe is added at the position of the Timeline ‘Seek Bar’.
In this time, the ‘Black’ keyframe, ‘Color = (0, 0, 0, 1)’, has been added to the Timeline.
Convert into ‘Clip Track’
We added a keyframe just now. Then, let’s convert it into ‘Clip Track’ to make it easy to handle.
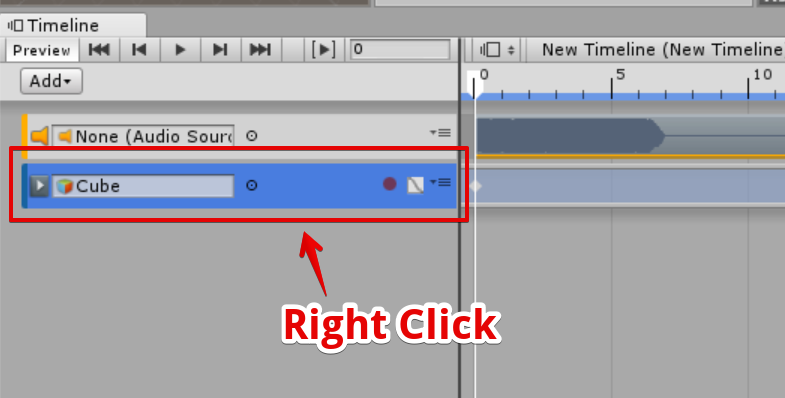
Right-click the Animation Track
In the displayed menu, select ‘Convert to Clip Track’.
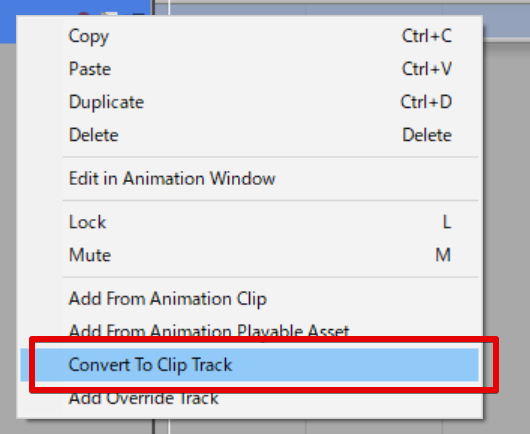
Convert into ‘ClipTrack’
It changes the keyframe into ‘Clip Track’.
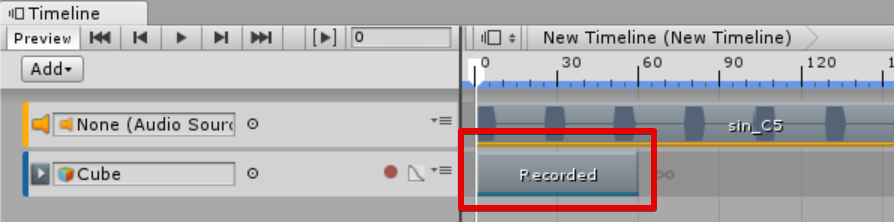
The created Clip Track
Double-click the Clip Track to open the Animation window and the Clip Track. This time, The ‘Color=(0, 0, 0, 1)’ keyframe is placed at 0:00.
Duplicate Clip Track
Right-click the Clip Track and select ‘Duplicate’ from the menu displayed.
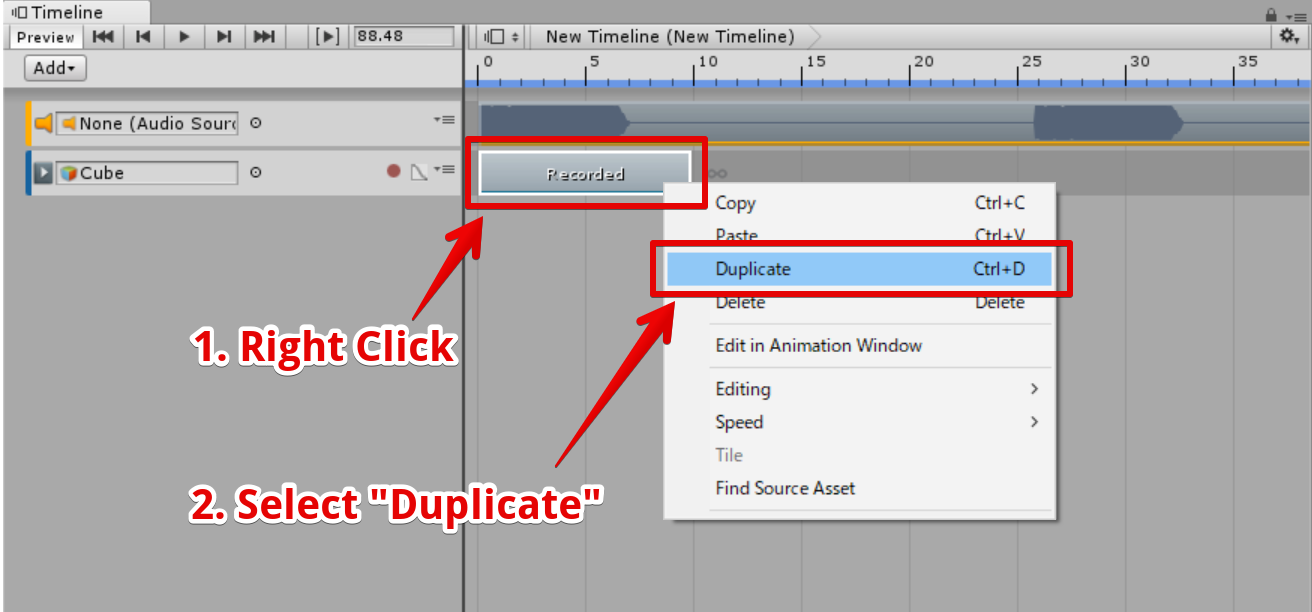
Duplicate ClipTrack
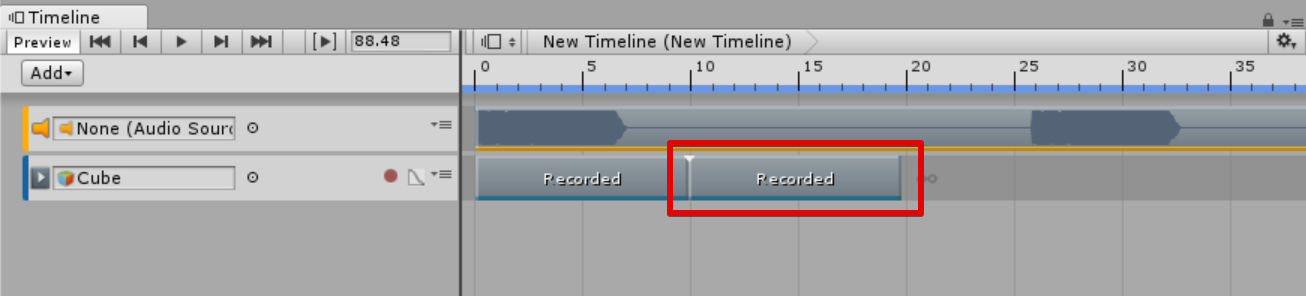
The duplicated ClipTrack
Rename the Clip
The name of the clip is not so descriptive at the moment, so we rename it. Firstly, click the first Recorded clip.
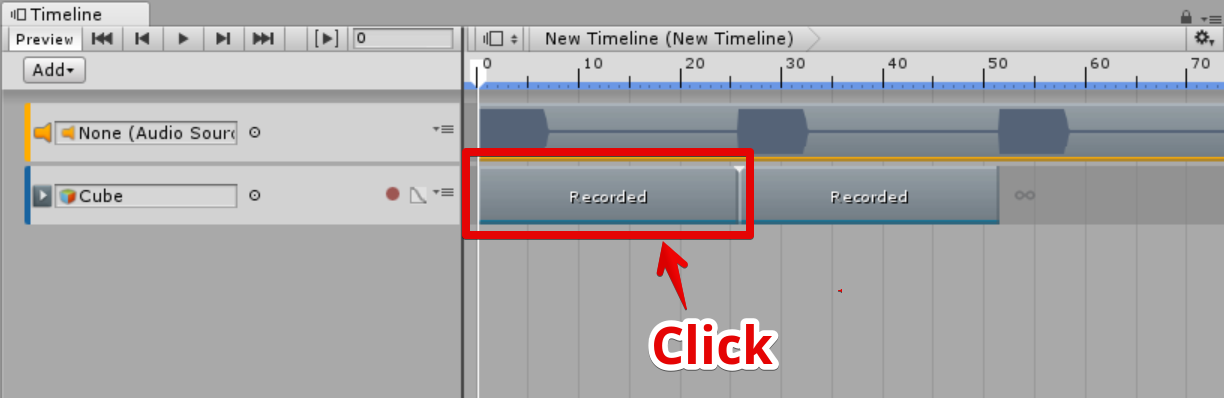
Click the first Recorded clip
Enter ‘Black’ in the Name field (It’s been set to ‘Recorded’ by default) at the top of the Inspector window.
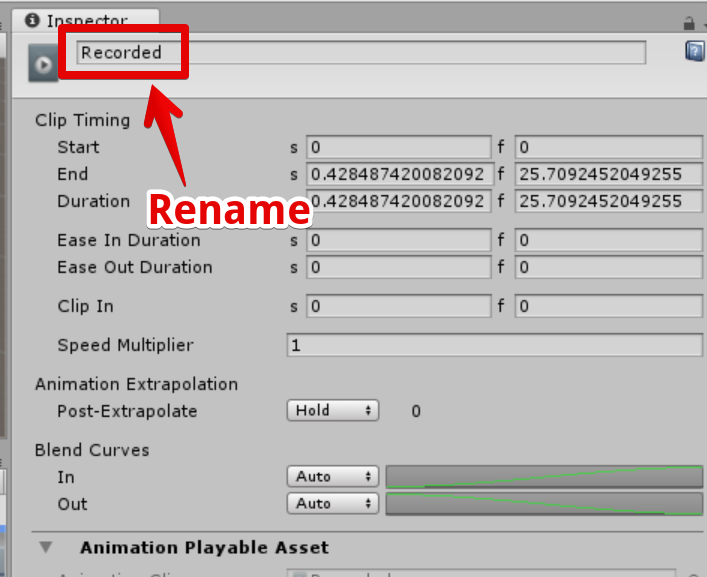
Change ‘Recorded’ into ‘Black’
Once you renamed, the text on the clip turns into ‘Black’.
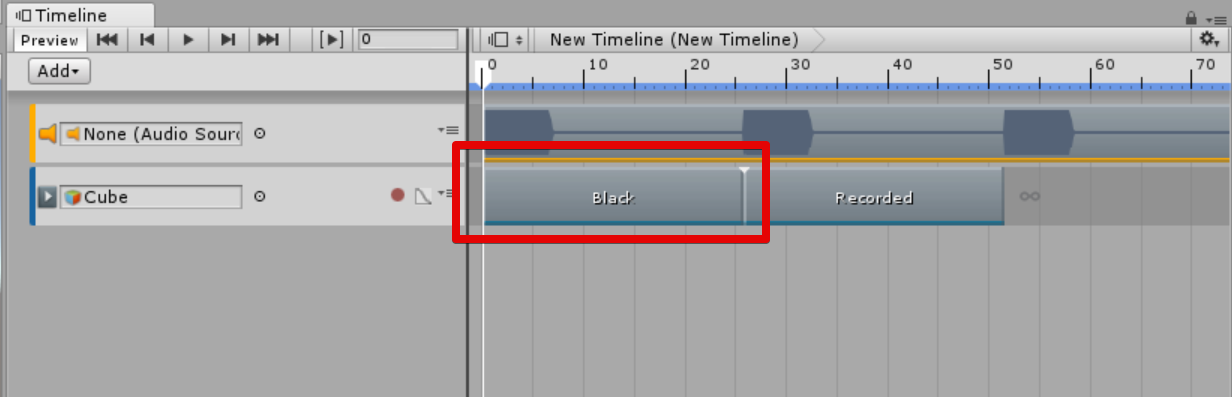
The text on the clip turned into ‘Black’
Similarly, rename the second clip ‘White’.

Result – the clips have been renamed
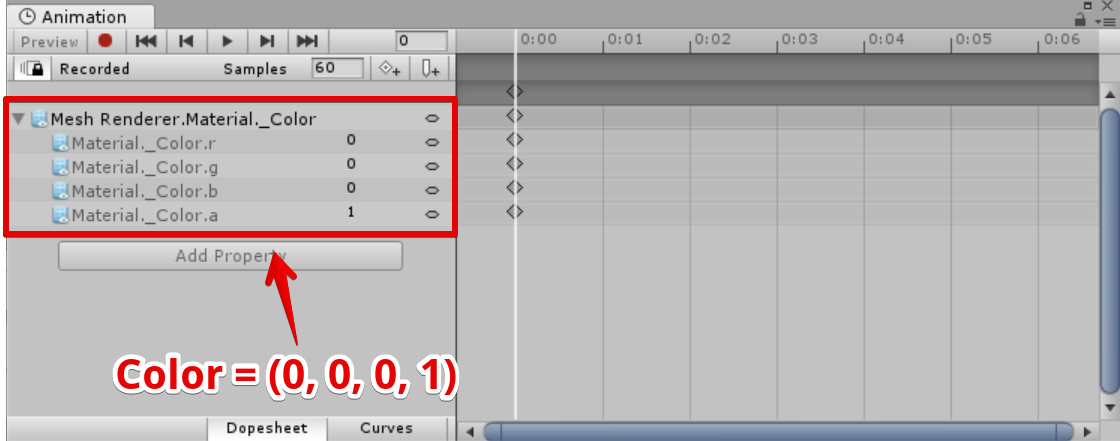
Make Keyframe white
Double-click the White clip to open.
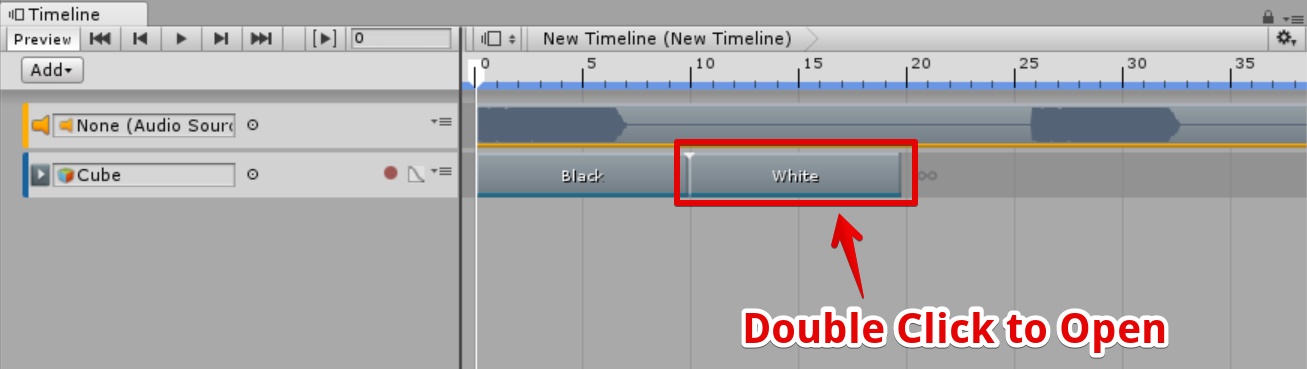
Double-click the White clip to open
Set the keyframe shown in the window to ‘Color = (1, 1, 1, 1)’.
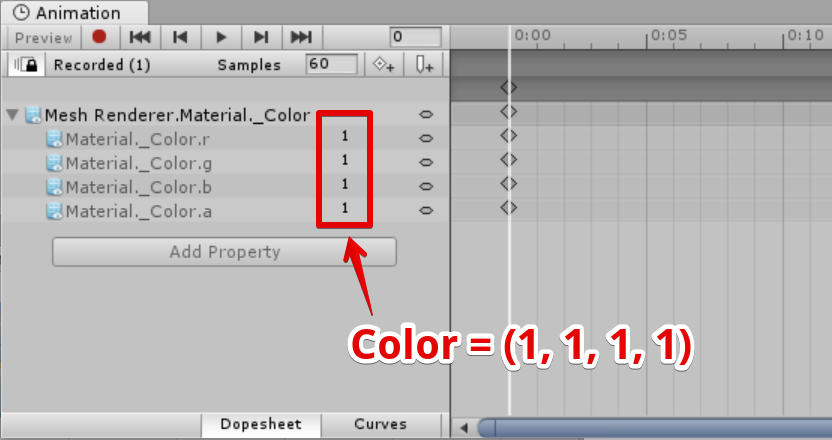
Set the keyframe to ‘Color = (1, 1, 1, 1)’
If you play the Timeline in this state, the cube turns white ‘Color = (1,1,1,1)’ when the White track starts.
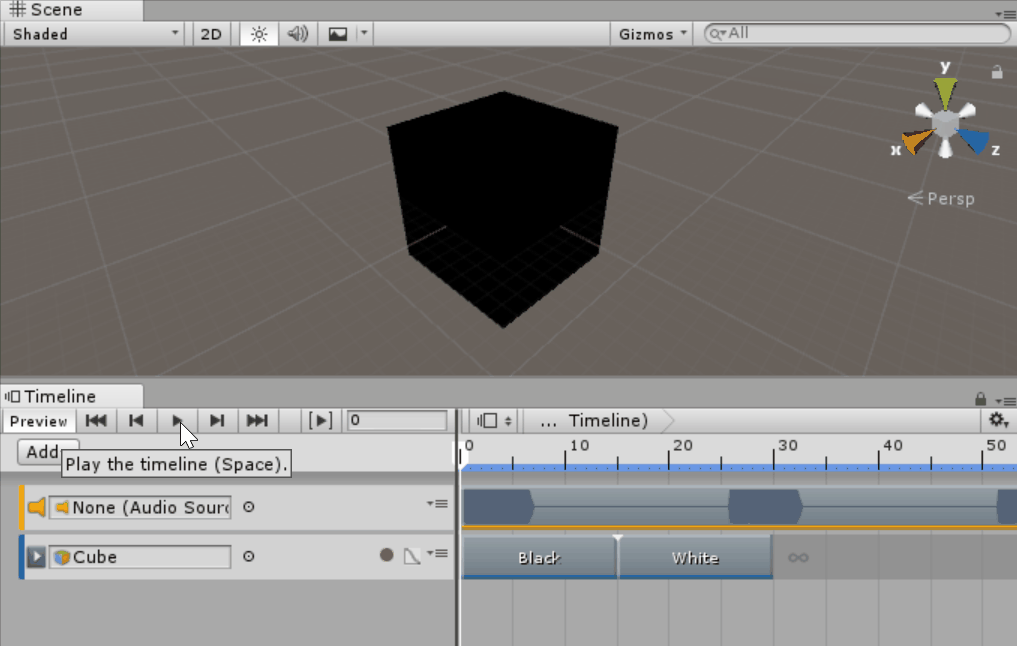
Cube turns white when the White track starts
Now the colour of the Cube changes but it’s not synchronized with the timing of the playing sound.
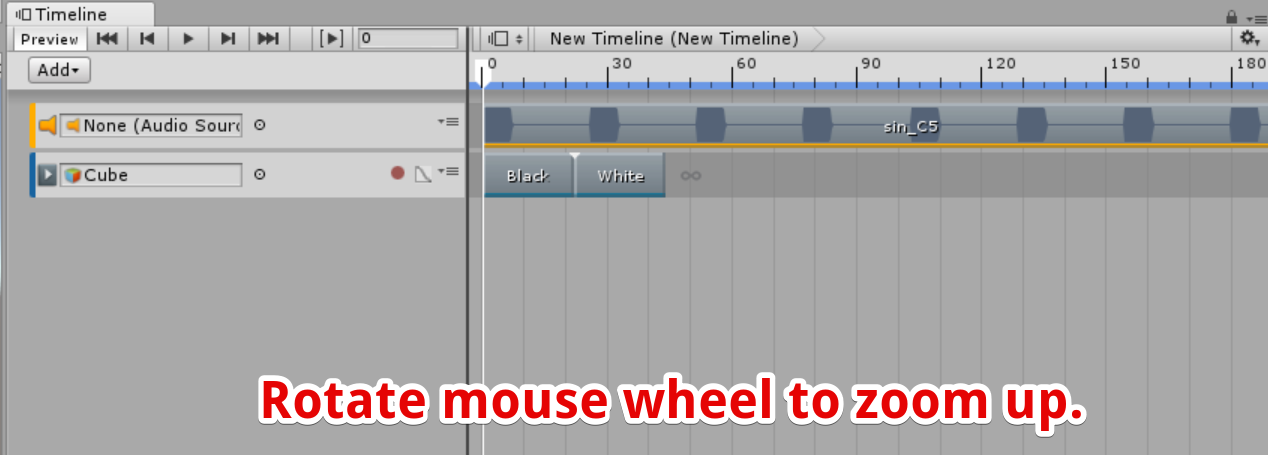
Synchronize the White track with sound
We synchronize the sound and the colour change by synchronizing the waveform and the White track. Since the waveform is displayed too small to adjust, scale it up by using the mouse wheel.
Use the mouse wheel to scale it up
Scale it up so that you can see the waveform.
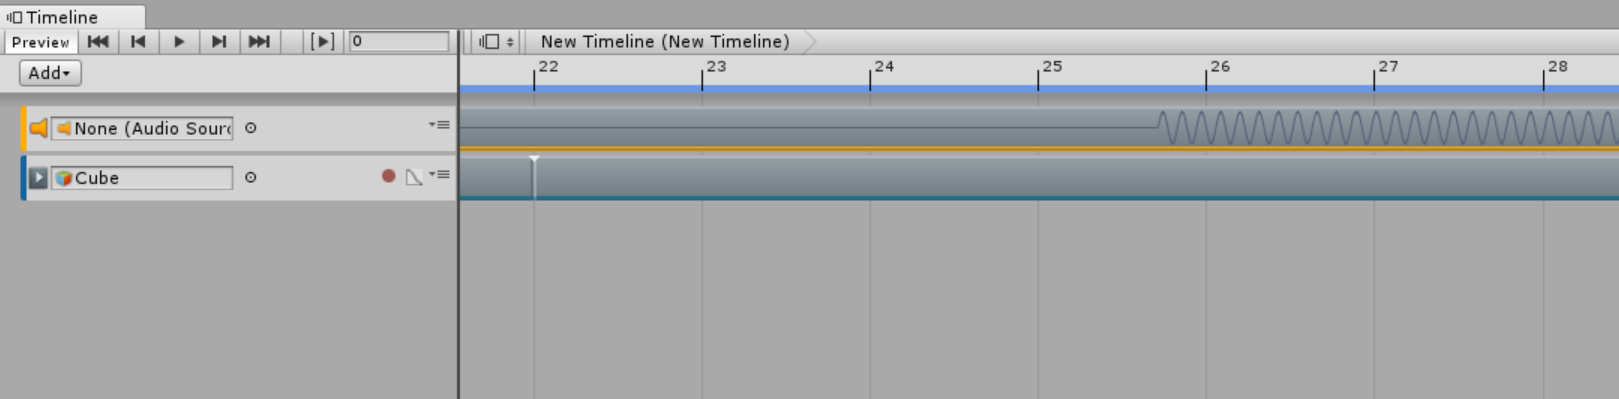
Scale it up until you can see the waveform
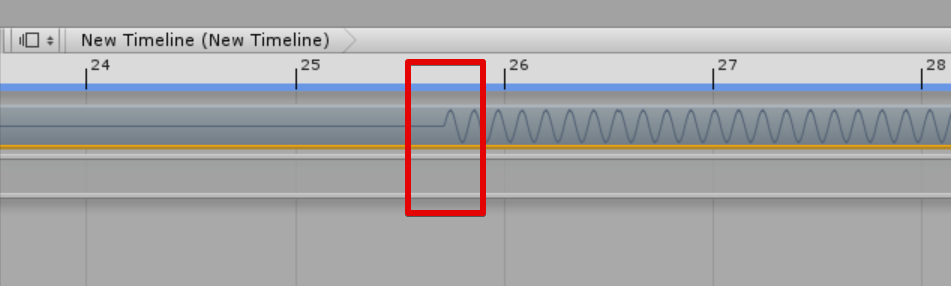
Next, we adjust the White clip to the timing when the sound starts, which is indicated by the red frame below.
Because ‘Snap to Frame’ is enabled by default, the track moves using frames when matching the track to the sound.
When moving the track, the track is snapped to a frame.
You need to turn off ‘Snap to Frame’ to solve it.
Disable ‘Snap’
Click the Cog icon in the top right corner of the window.
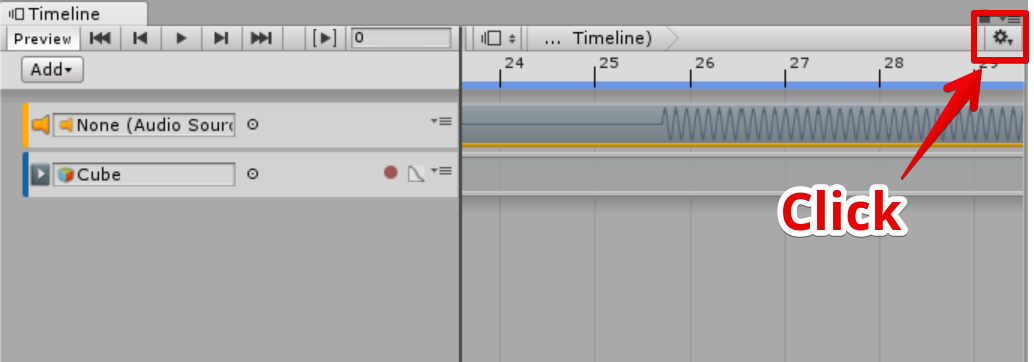
Click the Cog icon
You can find ‘Snap to Frame’ in the menu displayed, so uncheck it.
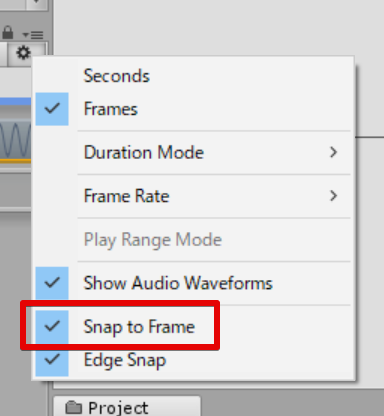
Uncheck ‘Snap to Frame’
You can move the track to anywhere as you disabled ‘Snap to Frame’.
Move the track with ‘Snap to Frame’ disabled
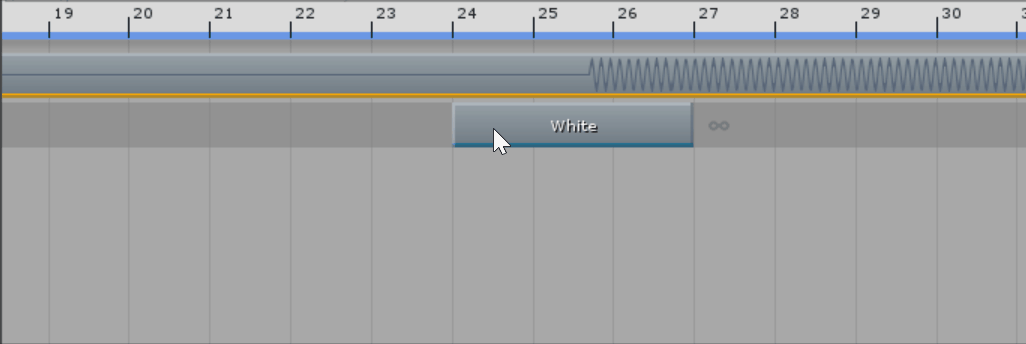
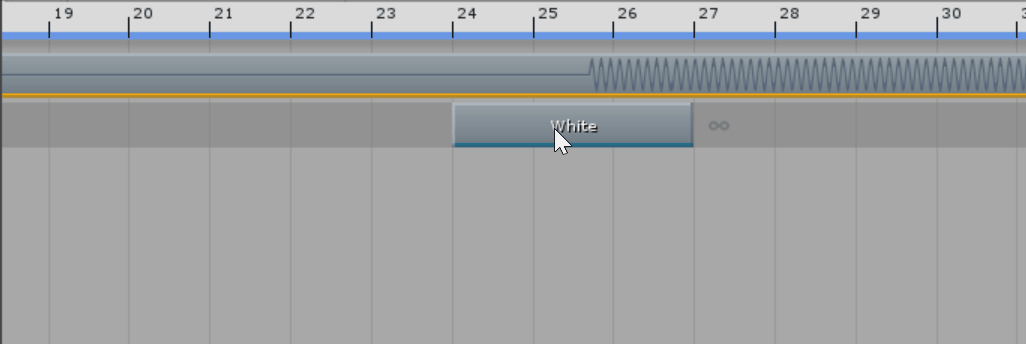
Adjust the White track to the timing when the sound starts
As shown below, place the White track so that it’s synchronized with the sound.
In this state, when playing back the scene, the cube turns white as the sound starts.
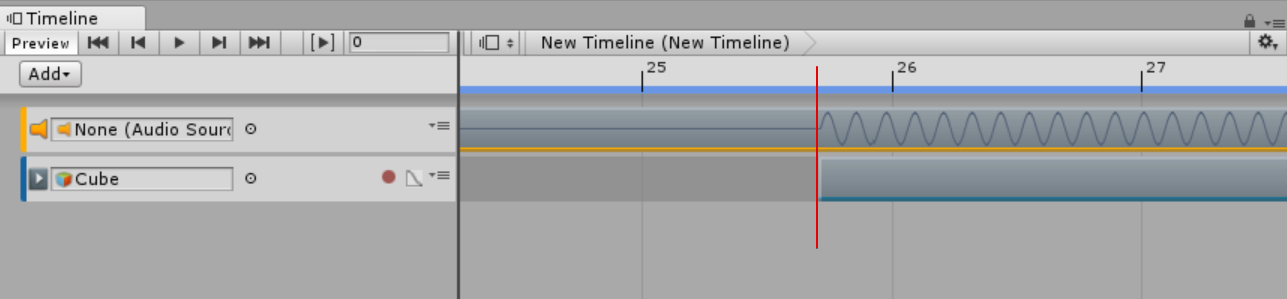
Anyway, let’s save the scene here. You can save the scene by selecting ‘File > Save Scene’ from the menu in the top left corner of the window.
Save the scene
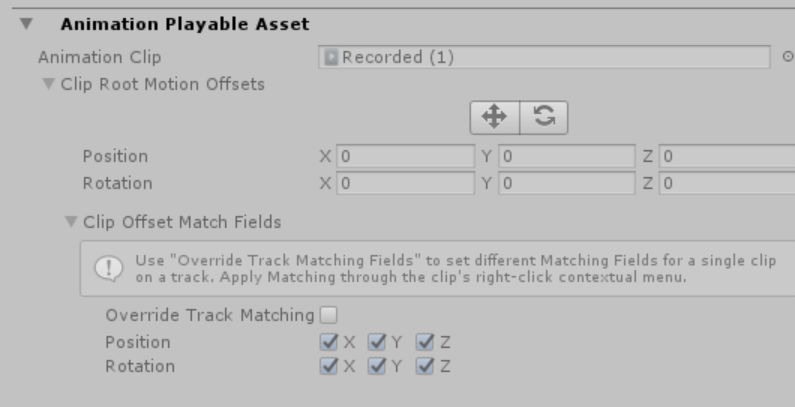
Convert Animation clip into Asset
If you converted the clip created in the Timeline into an asset, it would be more convenient as it could be shared for other use.
Name Asset
Firstly, select the Black clip and enter ‘SetBlack’ for ‘Animation Clip Name’ in the Inspector. Similarly, select the White clip and enter ‘SetWhite’ for ‘Animation Clip Name’ in the Inspector.
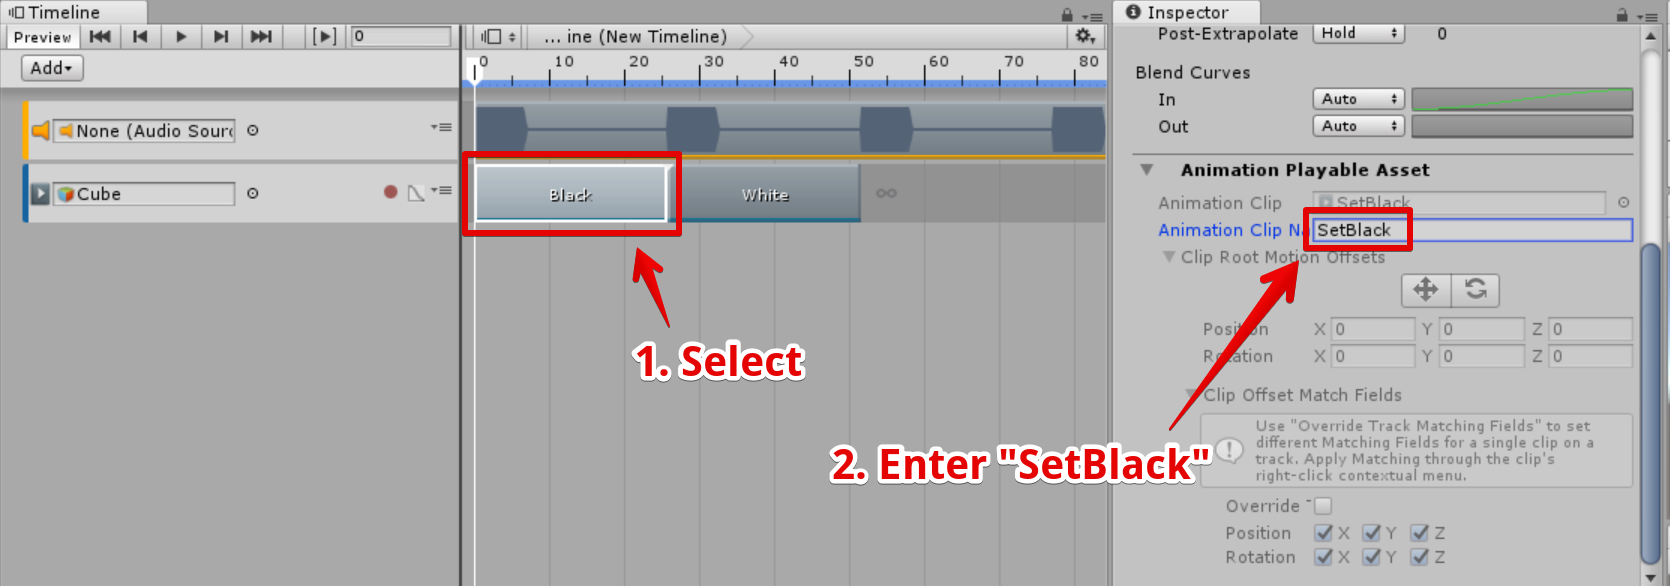
Enter ‘SetBlack’ in the ‘Animation Clip Name’ field
In this state, ‘AnimationClip’ is created in the Timeline asset by saving the scene.

‘AnimationClip’ appeared in the Timeline
Troubleshooting: The Name field of AnimationClip doesn’t show up
If you didn’t save the scene, the Name field of AnimationClip wouldn’t appear.
The Name field of AnimationClip wouldn’t appear if you didn’t save the scene.
You need to save the scene to solve it.
Save the scene
Convert AnimationClip to Asset
Select and duplicate the AnimationClip in the Timeline to take it out from the Timeline and convert it into an asset.
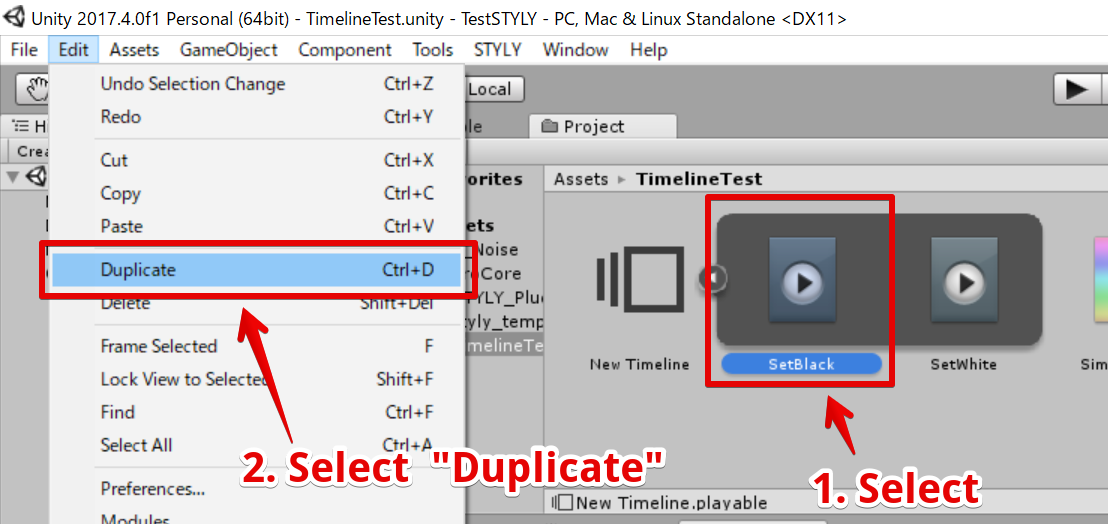
Duplicate AnimationClip
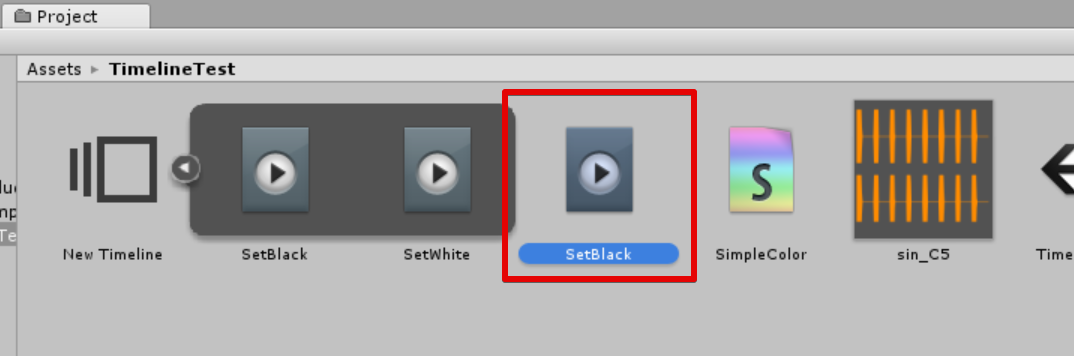
Then, the SetBlack animation is converted into an asset and the ‘SetBlack.anim’ file is created.
The AnimationClip converted into an asset
You also create ‘SetWhite.anim’ in the same way.
Place AnimationClip in Timeline
Drag the created SetWhite.anim and SetBlack.anim into the Timeline.
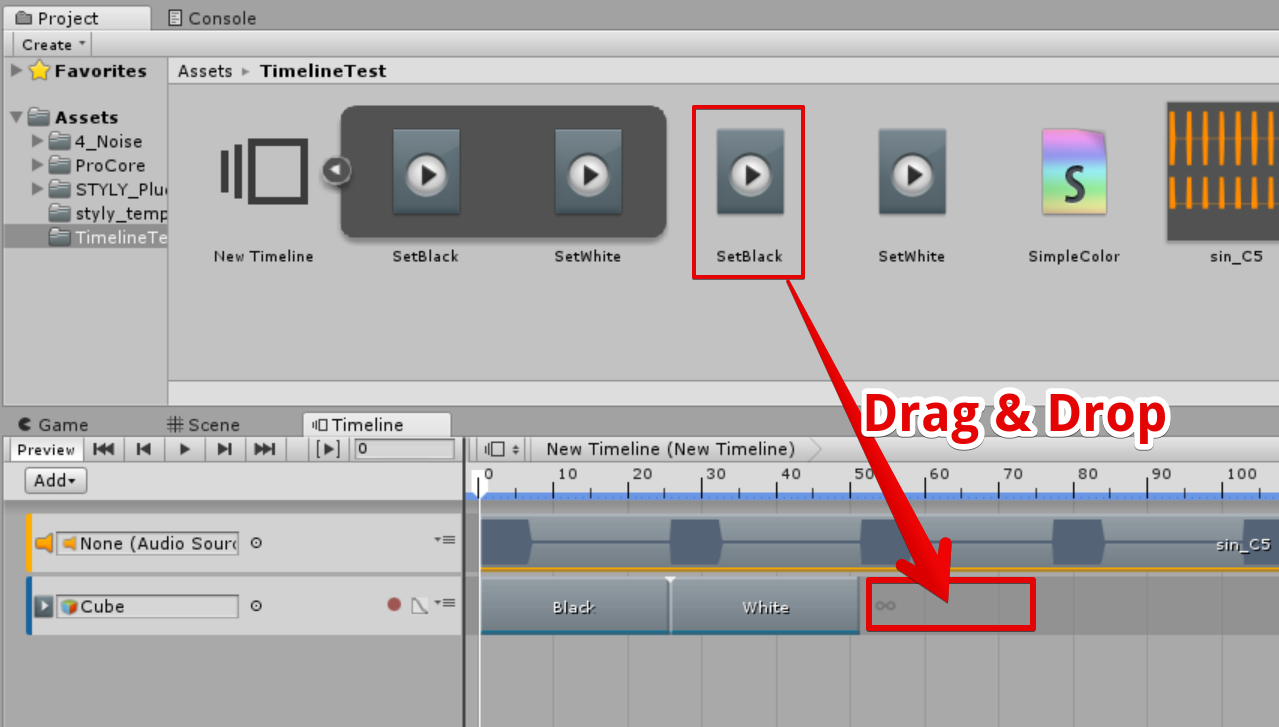
Assign ‘SetBlack.anim’ to ‘Timeline’
It creates the clip in the Timeline, but it looks too short.
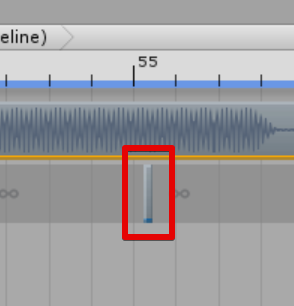
The SetBlack clip created in the Timeline
Copy the length of other animation track
As the length of the Black track seems to be relevant, I want to adjust the SetBlack tract to the same length. Firstly, select the Black clip and copy the ‘Duration’ value in the Inspector.

Copy the ‘Duration’ value
Select the SetBlack clip and paste it into the ‘Duration’ field.
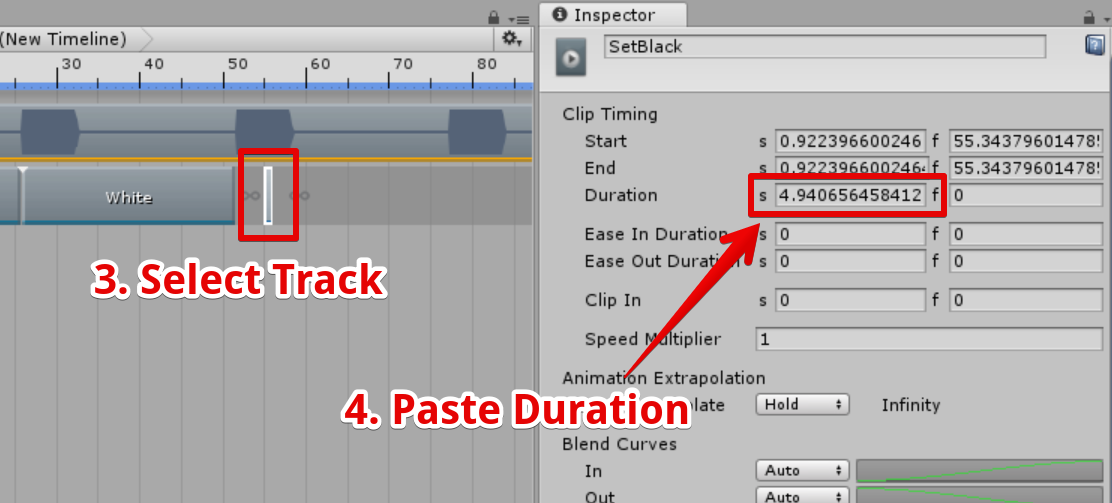
Paste the value into ‘Duration’
Now the length of the SetBlack clip is the same as the Black clip.
How the SetBlack clip looks after copying the Duration value
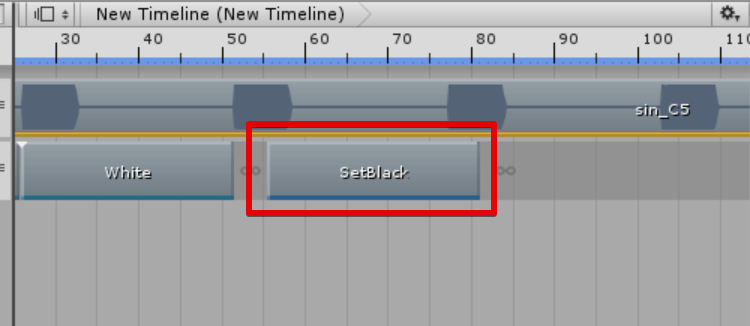
Similarly, place SetBlack clips and SetWhite clips alternately with no gaps.
SetBlack and SetWhite placed alternately
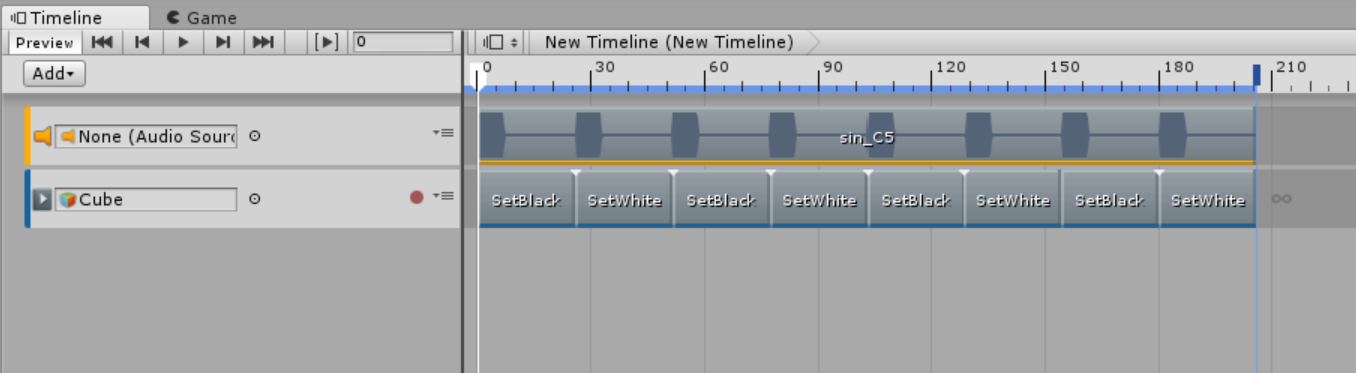
In this state, when playing back the scene, the colour turns white and black alternately, synchronizing with the sound.
That’s all you need to synchronize the shader with the sound.
How to upload the asset from Unity to STYLY (For Scenes)
By uploading the Scene with the Timeline object placed, you can upload the Timeline to STYLY. Please refer to the URL below to learn more about how to upload an asset.

How to upload the asset from Unity to STYLY (For Prefab)
If you want to upload the Timeline object as a Prefab, you need to put what the Timeline object refers to, into the Prefab. The Timeline object refers to the Cube this time, so put the Cube into the Timeline object.
Put the Cube into the Timeline object
Please refer to the URL below to learn more about how to upload an asset.
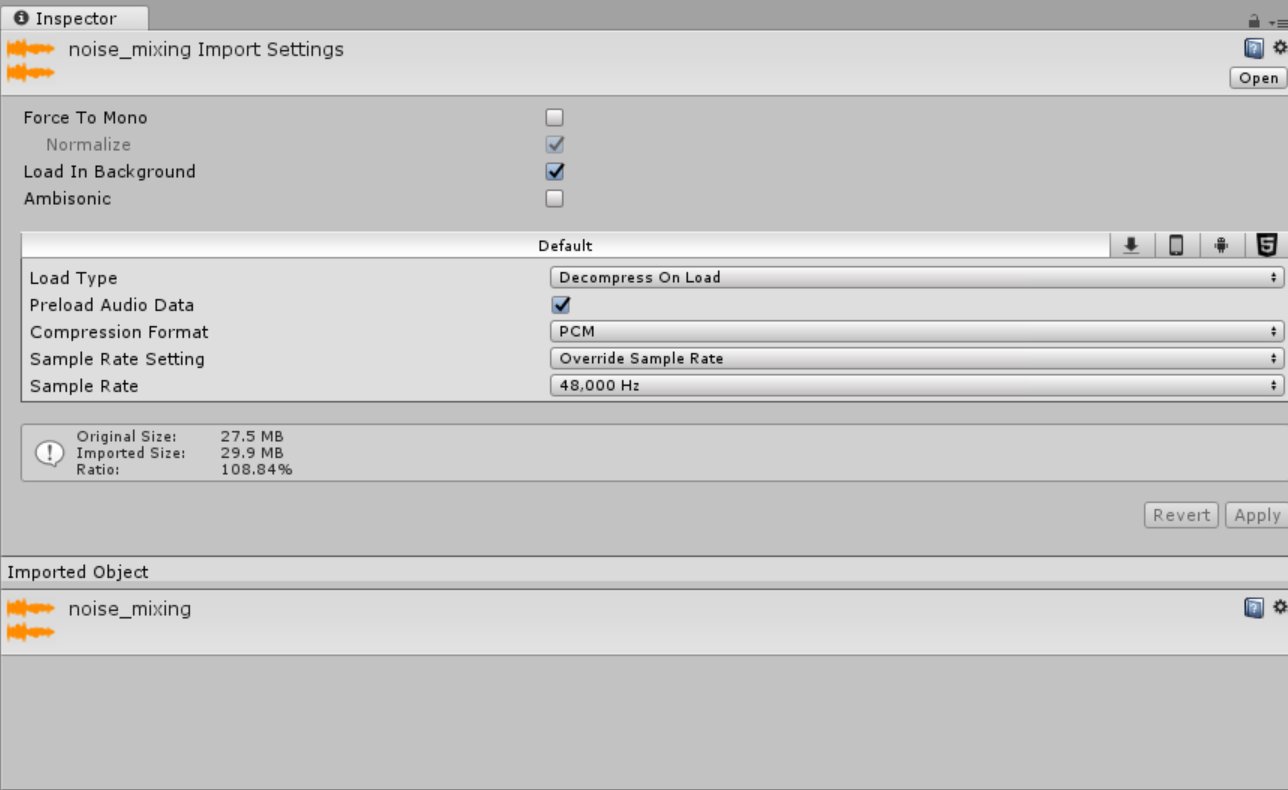
The setting for the sound to upload it to STYLY
If you uploaded a large sound data to STYLY, the changes of the shader and the sound would sometimes get out of sync because of the latency when playing back the sound. You can solve this latency by using the setting shown below; Use the ‘.wav‘ sound file; Check ‘Load in background‘ (i.e. load the sound with the other thread); Set ‘Compression Format‘ to PCM.