This is a tutorial for those who are trying to model with 3dsMax for the first time. In this article, you will be able to learn the basics of the tools.
※Windows10 is used for this tutorial.
Preparations
Before learning the basic operations of 3dsMax, let’s check if you are ready to start the tutorial.
Install 3dsMax
If you completed the previous tutorial, you should have already installed it.
If you haven’t read the previous tutorial and have not installed 3dsMax, please review the previous tutorial here.
![[3ds Max Tutorial] Basic Operations / User Interface [Part 2]](https://styly.cc/wp-content/uploads/2019/05/001-2-160x160.png)
User Interface
Firstly, let’s learn where the tools are and how they are used.
In this series of tutorials, we sometimes review the frequently-used tools and operations. So you can follow these tutorials, but you would progress much faster if you learned more operations.
Mastering the tools introduced in this article will be important. Future tutorials will be made on the assumption that previous tutorials and methods learned in them have been mastered.
User Interface
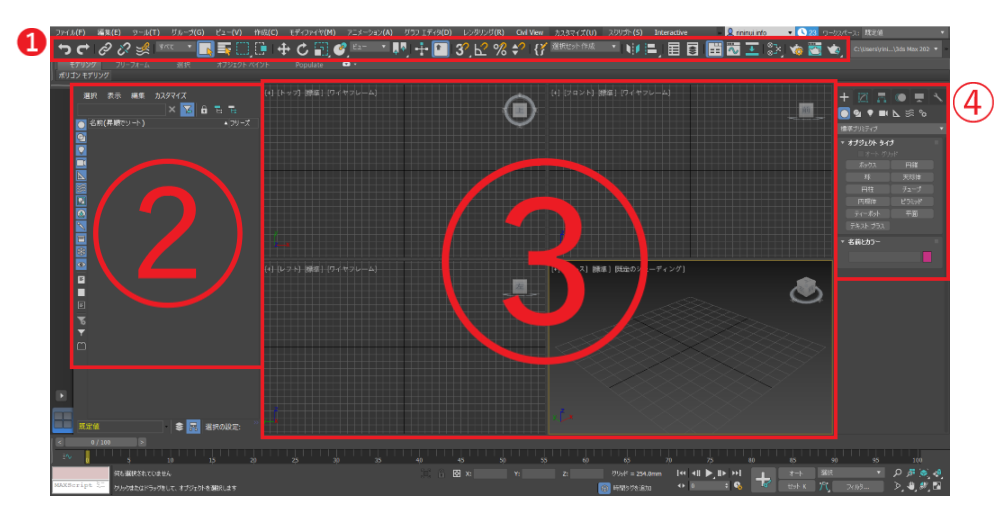
As you follow this tutorial and start using 3dsMax, you will become very familiar with its user interface.
The screen in the image above is divided into several windows and they are numbered 1 to 4.
I will explain how each window works.
① Main Toolbar
As the name suggests, it contains the most frequently used tools.
It’s hard to see the details in the screenshot above, so let’s zoom in to have a closer look.
By the way, you can also learn more about each tool on the official site.

Main Toolbar
Let’s start with a well-known operation, ‘Undo / Redo’.
It allows you to undo most of the operations up to the point of your last save.
There are some exceptions but you won’t see them in this tutorial. If you are concerned about them, learn more about them on the official site.
The shortcuts are ‘Ctrl+Z’ (Undo) and ‘Ctrl+Y’ (Redo).
Many of the tools in the main toolbar have their own keyboard shortcut. Remembering them will help you to operate more efficiently.
The second group contains very basic operations: move, rotate, and scale.
I will explain the detail of those tools later.
Those three tools do not have shortcuts.
③ Reference Coordinate System / Use Center Flyout
‘Reference Coordinate System’ allows you to specify the coordinate system used for ‘Move’, ‘Rotate’, ‘Scale’ etc. And, you use ‘Use Center Flyout’ to set the geometric centre for ‘Scale’ and ‘Rotate’ operations.
They are frequently used when you move or rotate an object associated with others.
④ Snap
Regarding the ‘Snap’ operations, there are ‘Snaps toggle’ (Shortcut: ‘S’ key), ‘Angle snap toggle’ (‘A’ key), ‘Percentage snap toggle’ (Shift+Ctrl+P), and ‘Spinner snap toggle’ (No shortcut).
You will get used to their behaviors while using it, so just remember where they are for now.
Simply put, it’s a tool to paint. You can apply highly-refined material and texture.
Please read more about the material editor on the official site if you want to learn more.
The shortcut is ‘M’.
These tools are used to output the created models and animations as images and videos.
You will learn more about their settings and operations in the future tutorials, so just remember that there are such tools for now.
The shortcut is ‘F10’.
② Scene Explorer
It displays the object placed in the scene. In Scene Explorer you can select, hide/unhide and freeze objects, and can switch layers.
Let’s take a closer look.
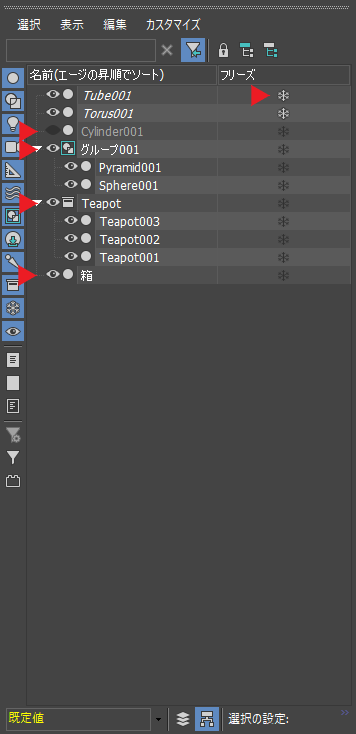
Scene Explorer
In the screenshot above, each marked line shows how the object is shown in Scene Explorer when applying the following operations:
▶ Freeze
▶ Hide
▶ Group
▶ Container
▶ Rename
If you draw illustrations, you might have been familiar with these operations.
③ Viewport
Whenever you use 3dsMax, you deal with ‘Viewport’, which displays the objects you created.
Viewport has eight styles.
① Perspective
② Orthographic
③ Top
④ Bottom
⑤ Front
⑥ Back
⑦ Left
⑧ Right
Once you get used to those eight Viewports, you will be able to do modelling more efficiently.
Additionally, Viewport has various layouts with 1 to 4 panes.
Please find your easy-to-use layout.
In Viewport, there are also various operations to control how objects are displayed.
You will eventually learn all of them, but for now let’s remember the function shown here.
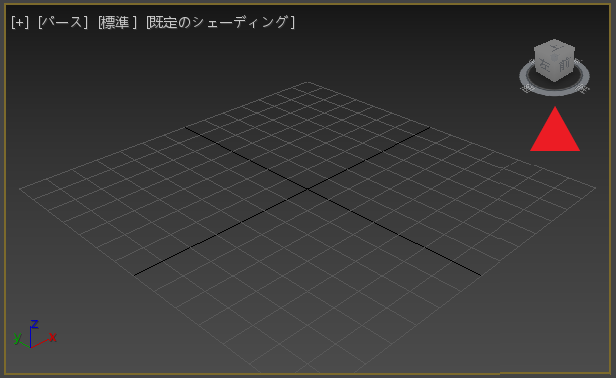
ViewCube
It’s a tool for you to operate the view intuitively.
There should be an icon in the top right corner of Viewport. But, don’t worry if you couldn’t see it. You can unhide it by clicking ‘[+]’ in the top left corner.
④ Command Panel
‘Command Panel’ is used to place a primitive and also to apply various operations to it.
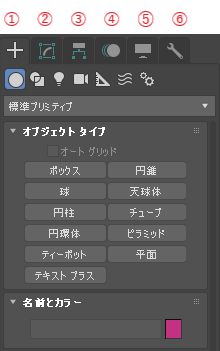
Command Panel
In the screenshot above, you can see the ‘Command Panel’ consists of six elements.
Let’s look into them one by one.
① Create
In most cases, you create an object from here.
This panel has seven controls.
But, I intentionally skip them in this tutorial.
That’s because you use this panel very frequently in the next tutorial, so you won’t miss opportunities to get used to it!
② Modify
Use this panel if you want to modify the object you created.
It’s also used frequently in the next and subsequent tutorials, so let’s remember it.
Use this panel to manage the child-parent relations between objects.
I have not used this operation so often, please come back for an introduction to this element in a future tutorial.
④ Motion
It has the tools to adjust the motion of objects.
⑤ Display
According to the Autodesk Knowledge Network, it controls the display of objects in the scene. Earlier in this tutorial I introduced Scene Explorer which functions the same way as Display.
However, this Display panel has some operations that Scene Explorer cannot easily handle.
It doesn’t mean you need to use them often. Only a difficult task requires advanced functions.
You wouldn’t use this panel as this series of tutorials won’t involve such difficult tasks.
The ‘Utilities’ panel will help you to create your work.
The panel itself is very useful with many standard tools available. Additionally, you can set your favorite plug-ins yourself.
It’s difficult to introduce all of the functions here. Some tools are hard to learn until you actually use them.
Therefore, I will explain the ‘Utilities’ panel as we use it.
Follow-Ups
This is the end of the tutorial.
I hope that you get the chance to master the information in this article. If you feel that you need to return to a previous tutorial, please feel free to do so. I understand it’s hard to master everything at first glance.
At the beginning of each tutorial you will find a link to return to a previous tutorial.
It helps to master each of these tutorials through hands-on experience.
In the Next Tutorial
We finally start creating a model in the next tutorial. It starts with simple modelling work using geometric primitives.