- 1 Introduction
- 2 About ShaderGraph
- 3 Installation of ShaderGraph
- 4
- 5 Create Shader Graph
- 6
- 7
- 8 Display Texture
- 9
- 10 Port shader graph to ShaderLab
- 11 Example #2: Generate Noise pattern
- 12 Example 3: Make scrolling stripe pattern
- 13 Port the stripe shader graph to ShaderLab
- 13.1 Display the ShaderLab code generated by the shader graph
- 13.2 Find the part equivalent to the flag function in the generated code
- 13.3
- 13.4 Copy and Paste ‘Unity_Add_***’ functions
- 13.5 Delecte ‘SurfaceDescription’
- 13.6 Modify the argument
- 13.7 Modify the reference name of uv
- 13.8 Modify the variable type of uv
- 13.9
- 13.10 Correct the way to refer to uv element
- 13.11 Modify the return statement
- 13.12
- 13.13 The frag function after the modification
- 13.14
- 13.15 The whole shader code
- 14 Example4: the Noise effect
- 15 How to upload an asset from Unity to STYLY
Introduction
Although ShaderGraph itself cannot be uploaded to STYLY, you can upload it to STYLY by converting it into the shader code for Unity2017.4.
*As of 2020/04/14, the recommended version of STYLY is Unity 2019.3.6f1, but ShaderGraph is not available and is being supported.
Click here to check which Unity versions are compatible with STYLY.
https://document.styly.cc/doc/docs/en-US/creator/creator_plugin_intro/#about-the-corresponding-unity-version
About ShaderGraph
ShaderGraph
System requirement for ShaderGraph
ShaderGraph requires Unity2018.3 or later.
Samples of ShaderGraph
https://github.com/UnityTechnologies/ShaderGraph_ExampleLibrary https://github.com/rngtm/ShaderGraphExample
Installation of ShaderGraph
I explain how to install Unity 2018.3 and ShaderGraph here.
Install Unity2018.3
This time, we install Unity2018.3 by using Unity Hub. You can skip this section if you already have Unity2018.3 or later installed. Firstly, download Unity Hub from the URL shown below and install it. https://docs.unity3d.com/ja/2018.1/Manual/GettingStartedInstallingHub.html
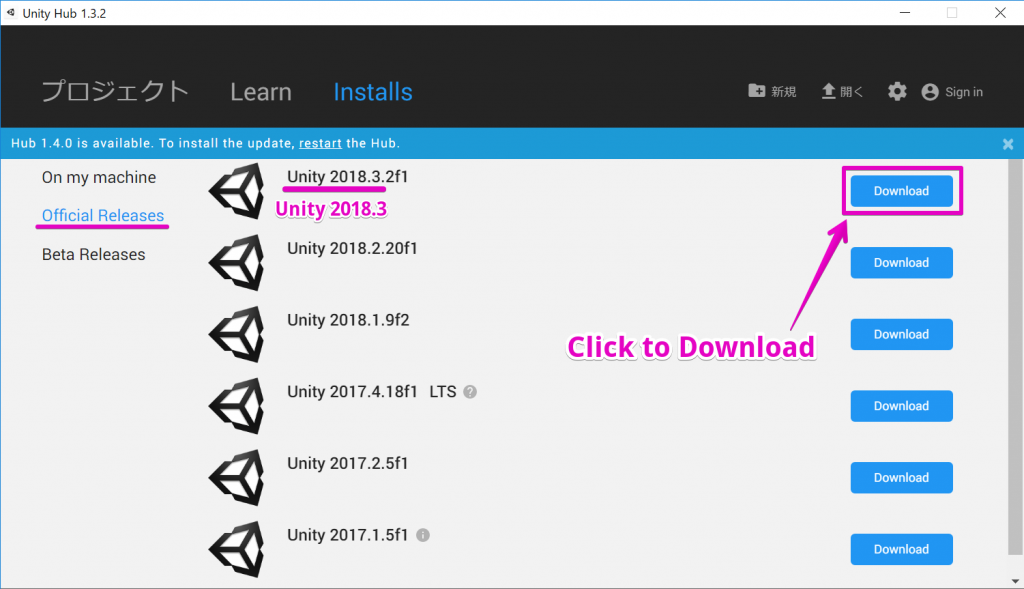
Click the Download button of Unity2018.3 or later
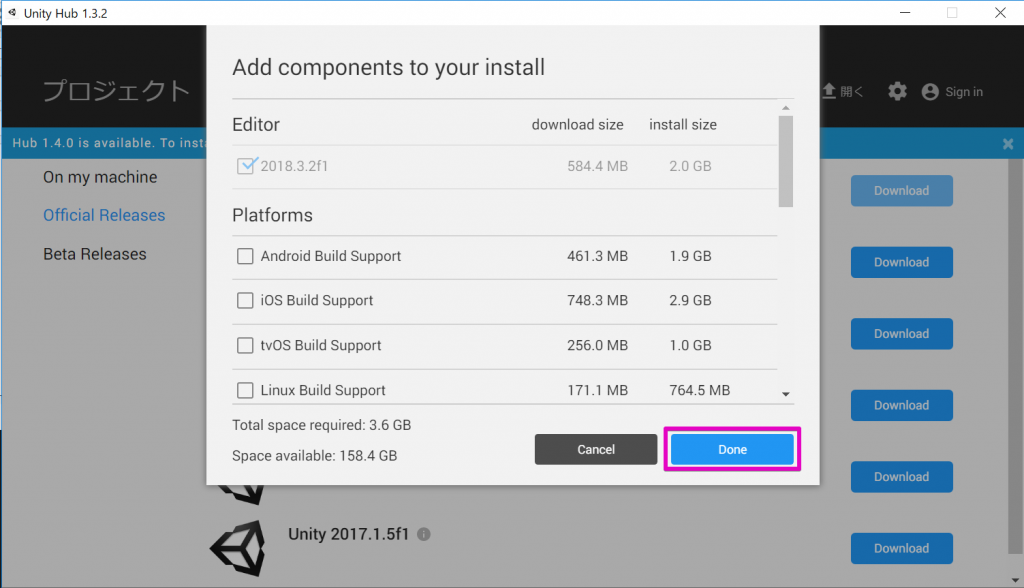
Select ‘Done’ to start downloading and installing
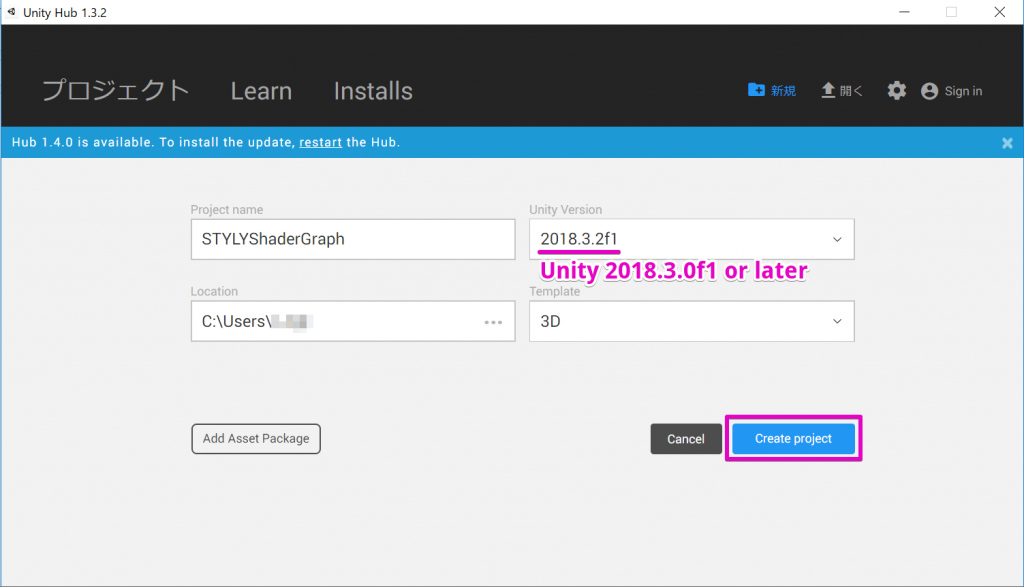
Create Unity project
After installing Unity2018.3 or later, create a Unity project. Please note that the Unity project you create here is not the Unity project for STYLY (Unity2017.4.0f1). You only use this Unity project to create data for ShaderGrapgh. Select Unity2018.3 or later from UnityHub to create a new Unity project.
Install ShaderGraph by PackageManager
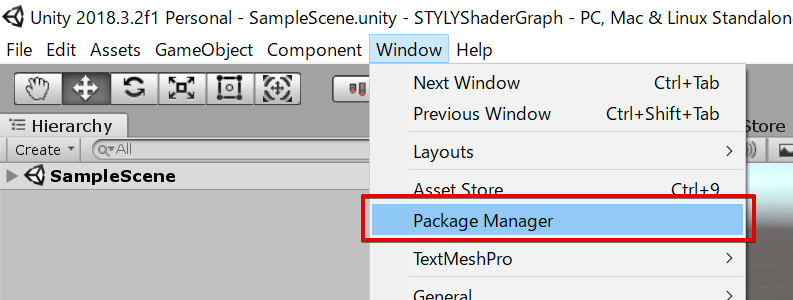
Launch Package Manager
It displays the list of the packages, but ShaderGrapgh is hidden by default. So click ‘Advanced’ and select ‘Show preview package’.
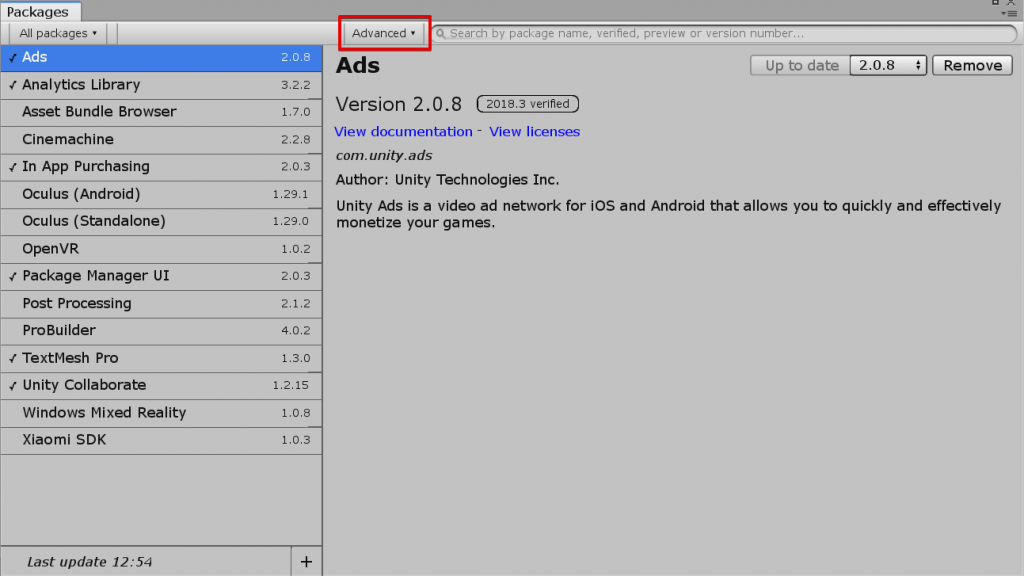
Click ‘Advanced’
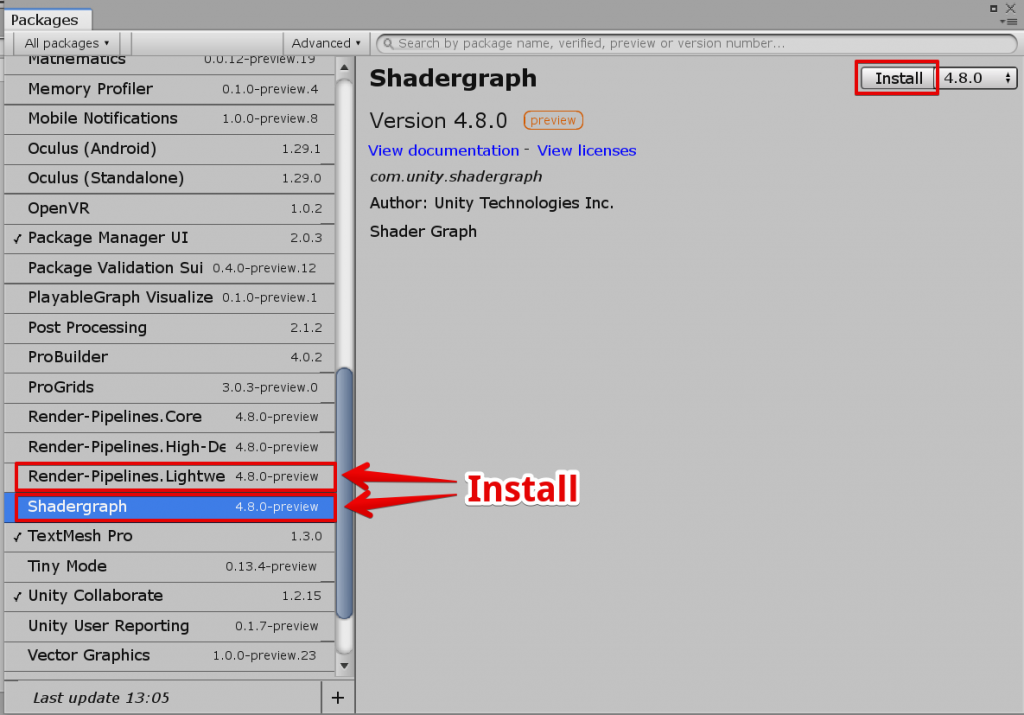
Install ‘ShaderGraph’ and ‘Render-Pipeline.Lightweight’
Register Lightweight RP with Unity
Finally, you need to register ‘Lightweight Render Pipeline’ with Unity.
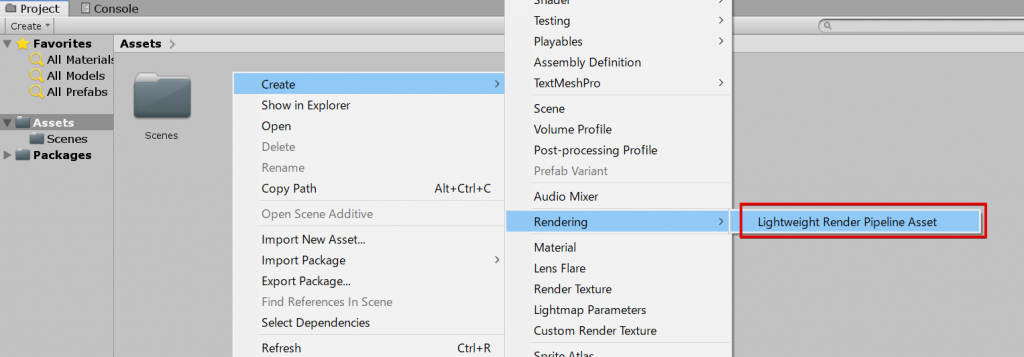
Create the ‘Lightweight Render Pipeline’ asset
Select ‘Create > Rendering > Lightweight Render Pipeline Asset’ to create the ‘Lightweight Render Pipeline’ asset.
Create the ‘Lightweight Render Pipeline’ asset
The ‘Lightweight Render Pipeline’ asset created
Register the ‘Lightweight Render Pipeline’ asset
Select ‘Edit > Project Settings…’ to open the setting window.
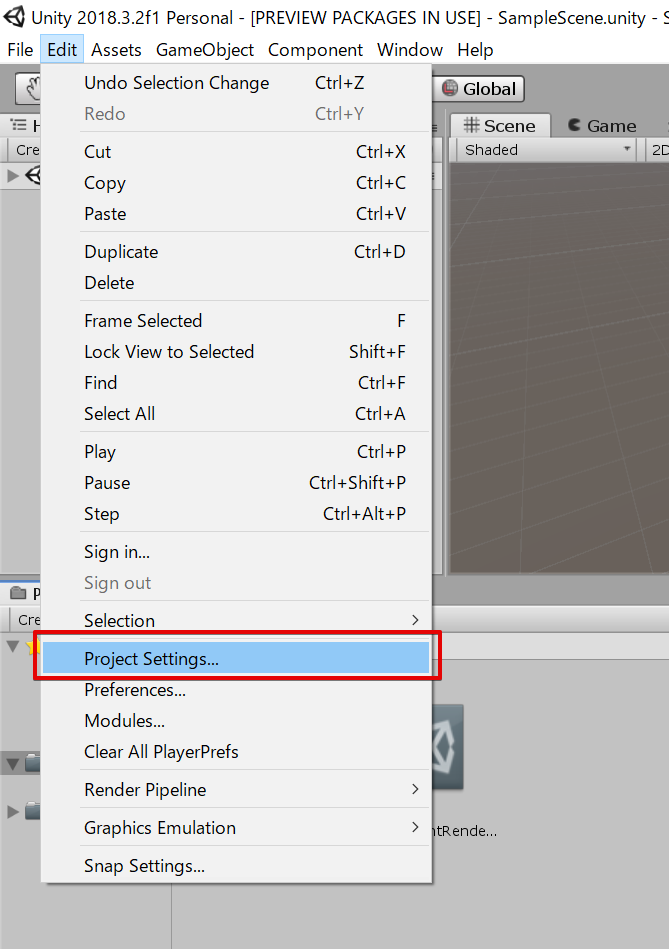
Open the ‘Project Settings’ window
Register the ‘Lightweight Render Pipeline’ asset created earlier with the setting window.
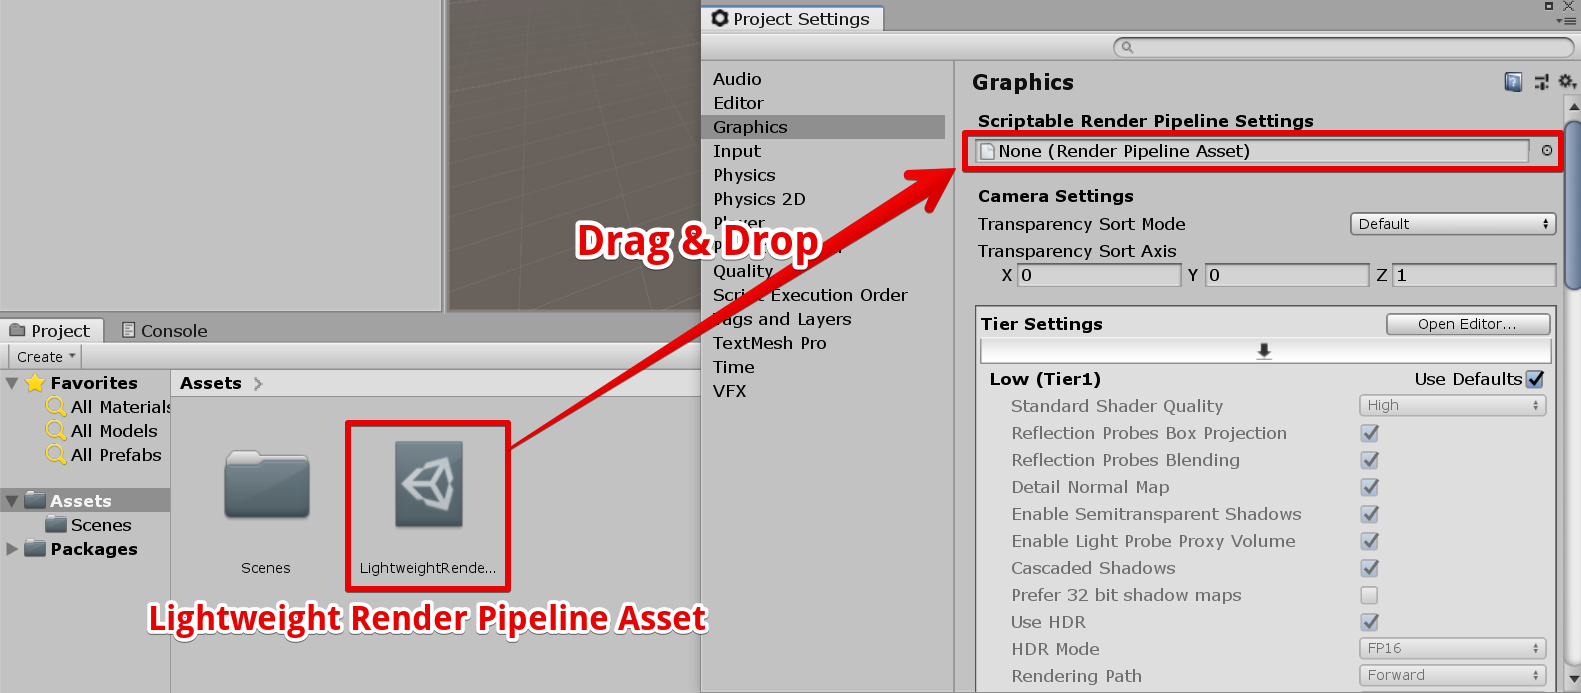
Register the ‘Lightweight Render Pipeline’ asset
It’s a long sequence, but we have now completed the introduction of ShaderGraph.
Create Shader Graph
Let’s actually create a shader graph.
Create shader-graph asset
Right-click on the Project window and select ‘Create > Shader > Unlit Graph’ to make the asset of shader graph. Since we just need to add colour this time, select ‘Unlit Graph’.
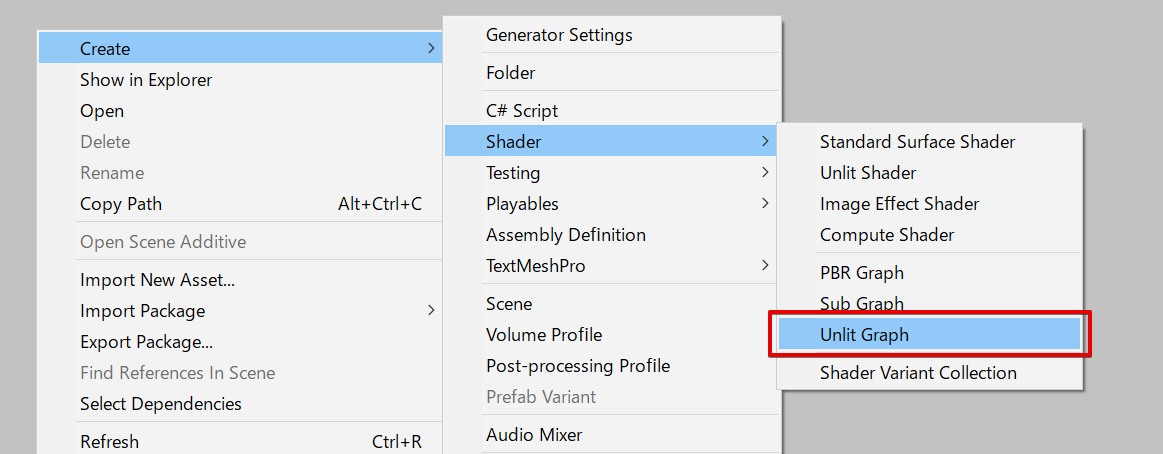
Create ‘Unlit Shader Graph’
The shader graph created
Open shader graph
Double-click this shader graph to open the shader-graph editor window. It displays the shader graph with just one ‘Unlit Master’ node placed.
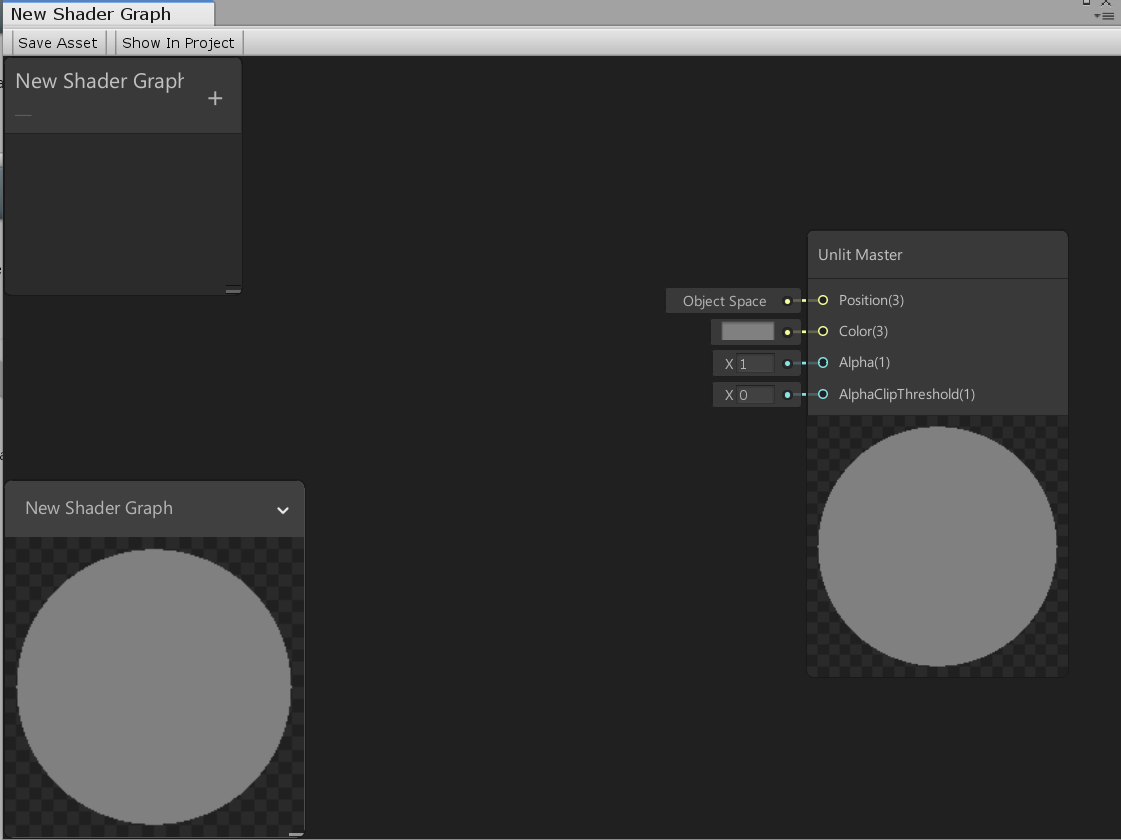
The shader-graph editor window
Attach the shader graph to a board
Right-click the shader graph and select ‘Create > Material’ to create a material.
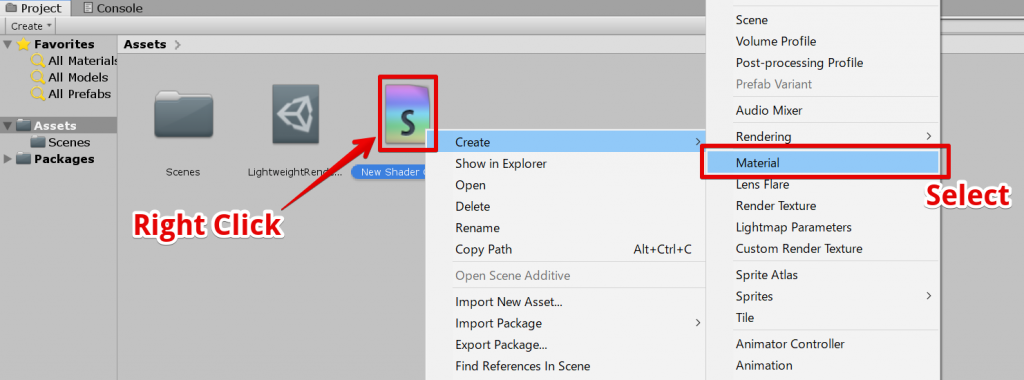
Create a material
Attach the created material to an object. This time I attached the material to the board created by selecting ‘Create > 3D Object > Plane’ in the Hierarchy window.
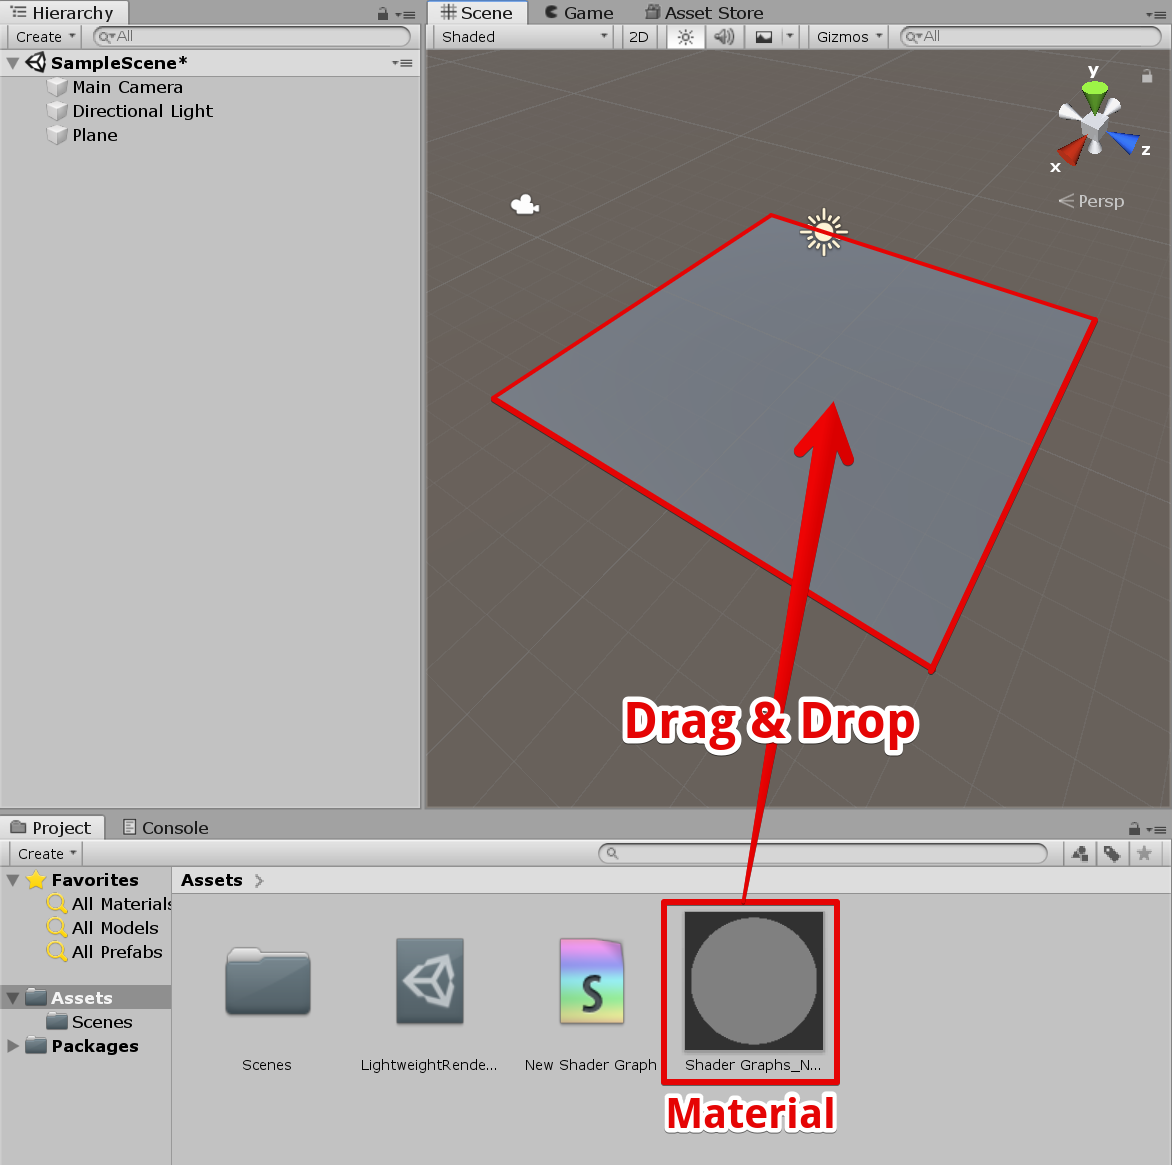
Attach the material to a board
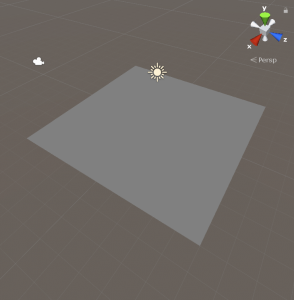
Result – The material attached
Change the colour
You can see the Colour pin on the Unlit Master node. It is the information about the colour to output to the final stage. Let’s set ‘Color’ to green and click ‘Save Asset’ in the top-left corner of the window to save.
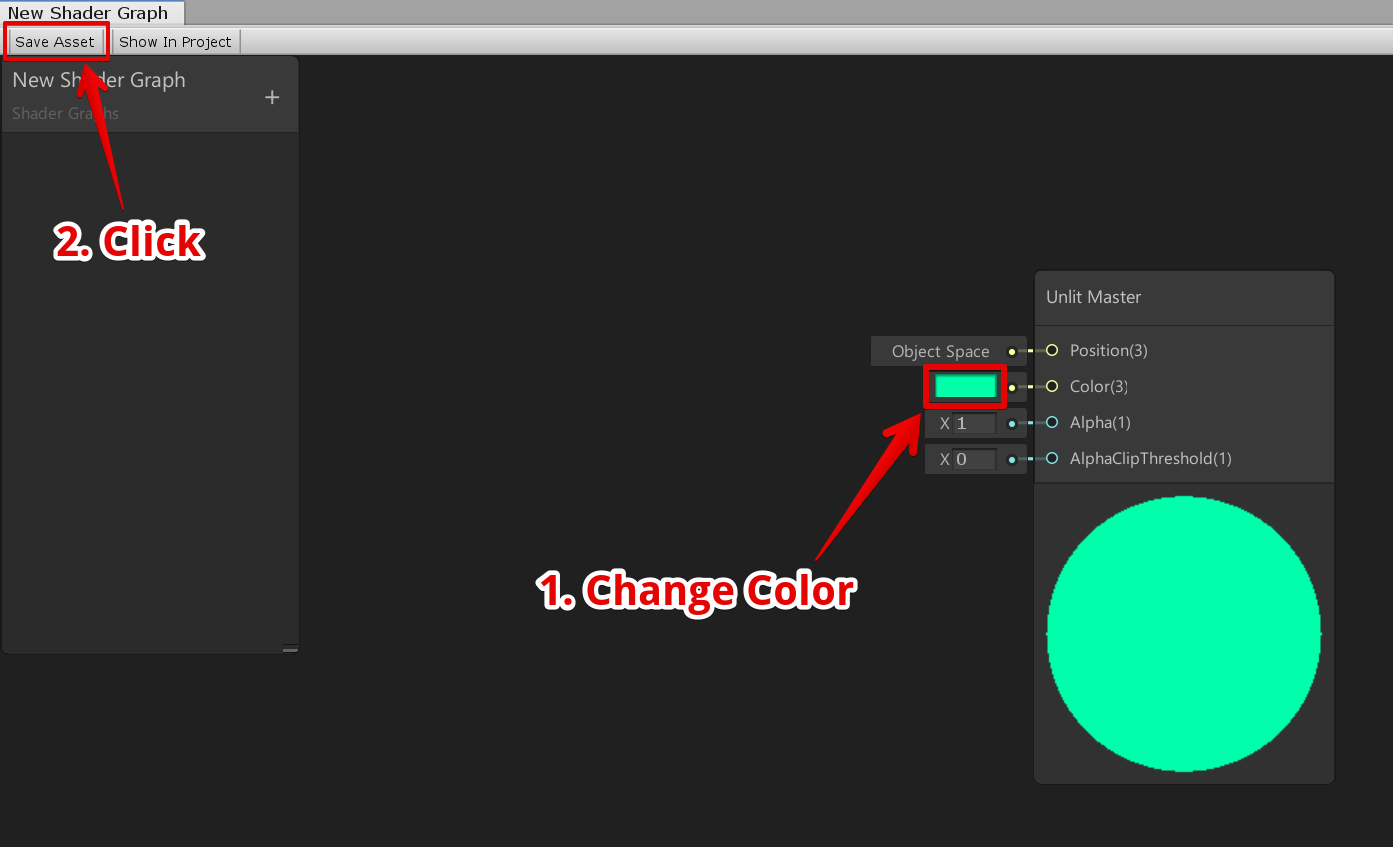
Change the colour of the Unlit Master node
The board has also been coloured in green.
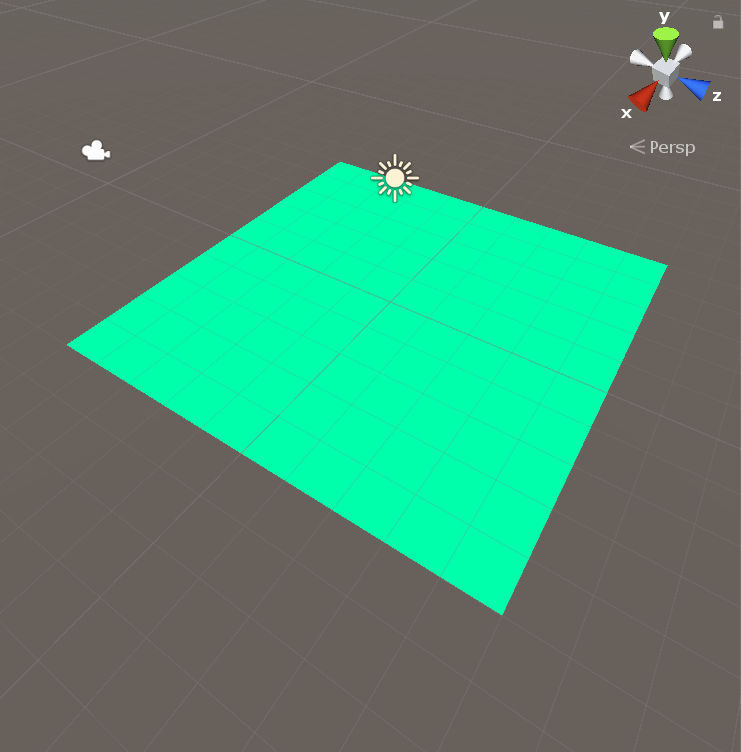
The result – the colour has been changed
Display Texture
Next, let’s display the texture.
Add UV node
Hit the space key on the shader-graph window, enter ‘uv’ and press the Enter key.
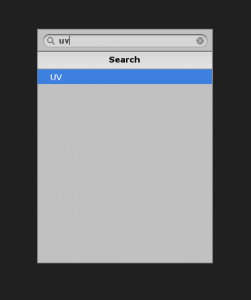
Add UV node
A UV node has been added.
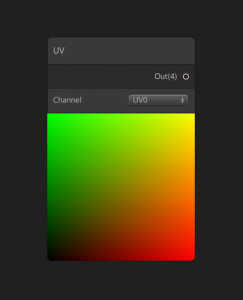
UV node
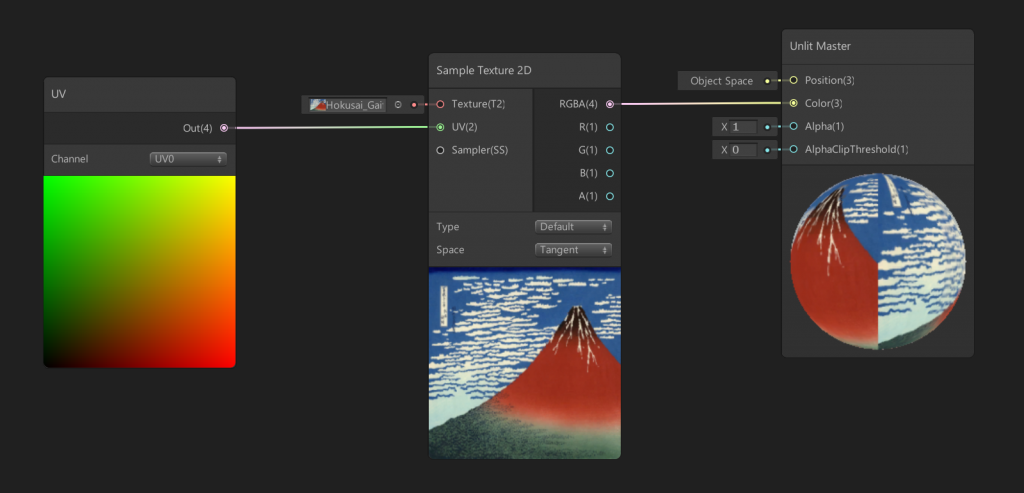
In the same way, create the ‘Sample Texture 2D’ node and connect the UV node with the Unlit node as shown below. Assign a texture to the ‘Sample Texture 2D’ node.
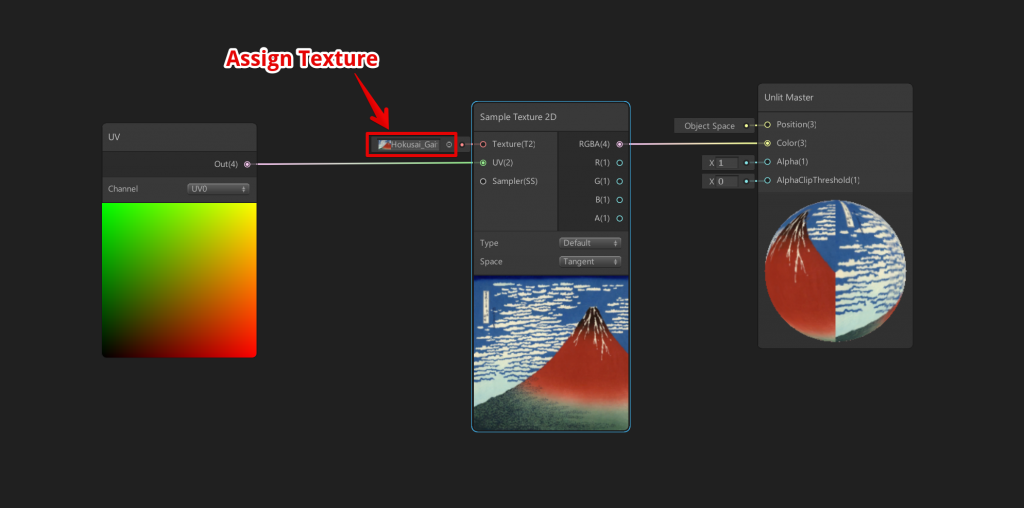
The shader graph to display a texture
Once the shader graph was saved, the colour of the texture is applied to the board and it should look like the shown below.
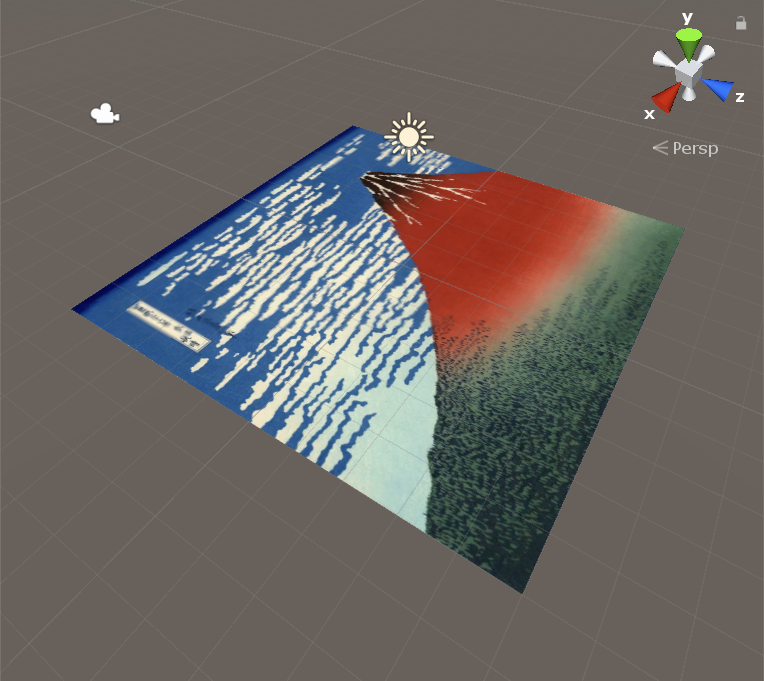
The appearance of the board
Port shader graph to ShaderLab
Next, let’s port this shader graph to ShaderLab. Once it’s ported to ShaderLab, you can upload it to STYLY.
Create Unlit Shader
Firstly, select ‘Create > Shader > Unlit Shader’ in the Project window to create an Unlit shader file.

The code of the created shader is shown below.
Shader "Unlit/NewUnlitShader"
{
    Properties
    {
        _MainTex ("Texture", 2D) = "white" {}
    }
    SubShader
    {
        Tags { "RenderType"="Opaque" }
        LOD 100

        Pass
        {
            CGPROGRAM
            #pragma vertex vert
            #pragma fragment frag
            // make fog work
            #pragma multi_compile_fog

            #include "UnityCG.cginc"

            struct appdata
            {
                float4 vertex : POSITION;
                float2 uv : TEXCOORD0;
            };

            struct v2f
            {
                float2 uv : TEXCOORD0;
                UNITY_FOG_COORDS(1)
                float4 vertex : SV_POSITION;
            };

            sampler2D _MainTex;
            float4 _MainTex_ST;

            v2f vert (appdata v)
            {
                v2f o;
                o.vertex = UnityObjectToClipPos(v.vertex);
                o.uv = TRANSFORM_TEX(v.uv, _MainTex);
                UNITY_TRANSFER_FOG(o,o.vertex);
                return o;
            }

            fixed4 frag (v2f i) : SV_Target
            {
                // sample the texture
                fixed4 col = tex2D(_MainTex, i.uv);
                // apply fog
                UNITY_APPLY_FOG(i.fogCoord, col);
                return col;
            }
            ENDCG
        }
    }
}
The code to calculate the colour in Unlit Shader
The following code actually generates the colour.
fixed4 frag (v2f i) : SV_Target
{
    // sample the texture
    fixed4 col = tex2D(_MainTex, i.uv);
    // apply fog
    UNITY_APPLY_FOG(i.fogCoord, col);
    return col;
}
This process extracts the colour from the texture, applies ‘fog’ to it and then output it as the final colour.
Output the texture colour as it is
Modify the above code as shown below.
fixed4 frag (v2f i) : SV_Target
{
    fixed4 col = tex2D(_MainTex, i.uv);
    return col;
}
It extracts the colour from the texture and output it, which is the same as the shader graph shown below.
The shader graph to display the texture
The relation between the Unlit shader and the shader graph
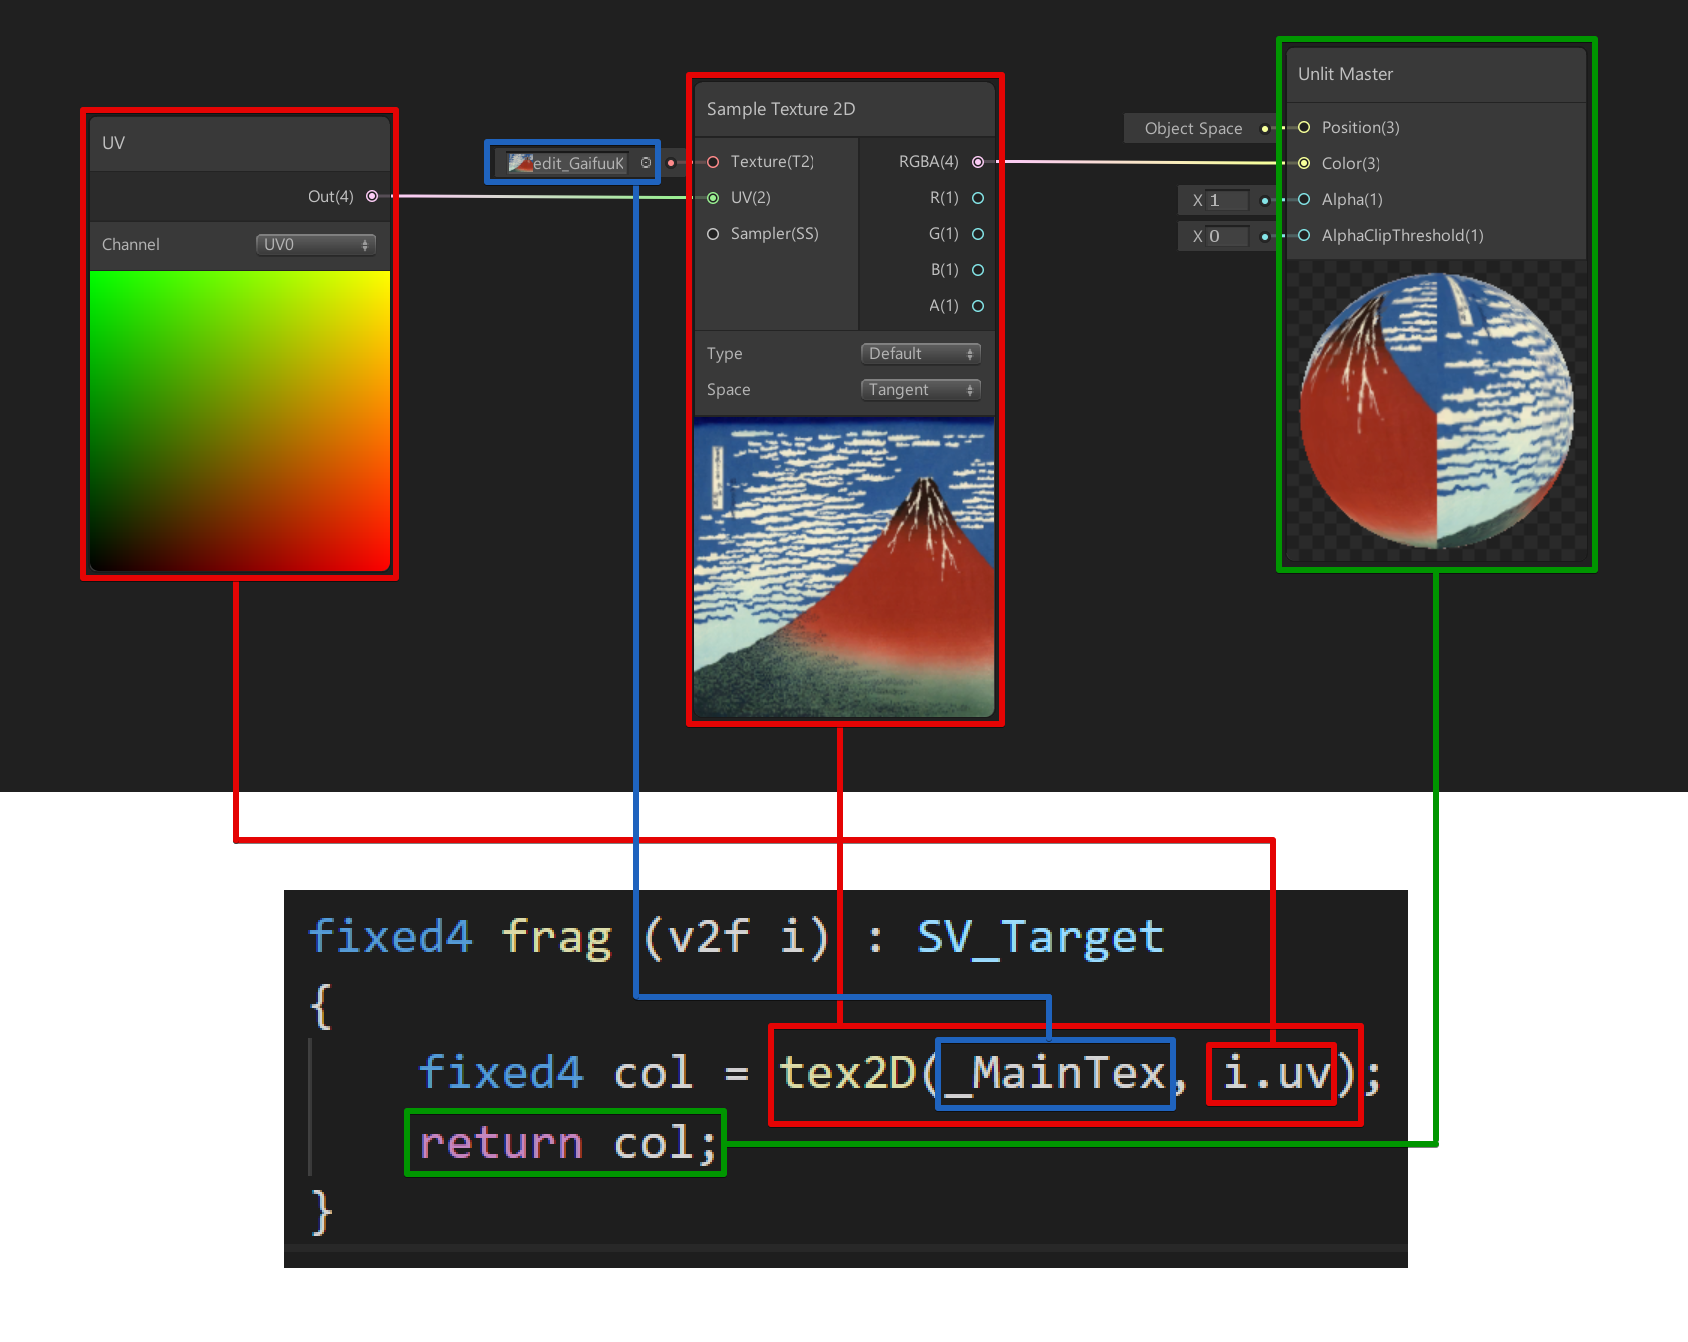
The relation between ShaderGraph and ShaderLab
Example #2: Generate Noise pattern

Shader Graph
You can make a noise pattern by setting up the shader graph as shown below.
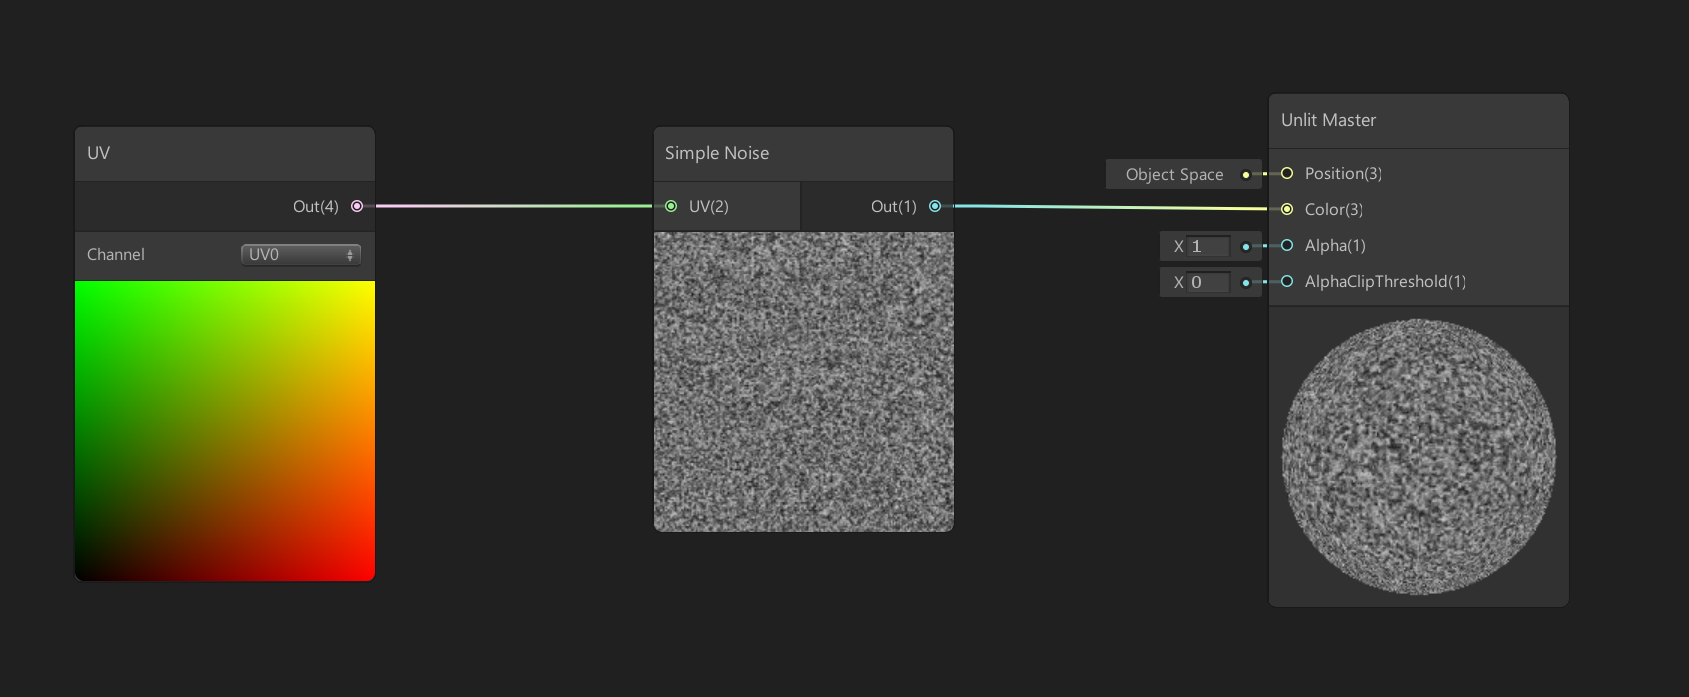
The shader graph to generate a noise pattern
Port the node to ShaderLab partially

If you open the documentation of the ‘Simple Noise’ node, the following documentation will be opened in the web browser. https://github.com/Unity-Technologies/ShaderGraph/wiki/Simple-Noise-Node In the documentation, you will find the following shader code. This is the shader code of ‘SimpleNoise’.
inline float unity_noise_randomValue (float2 uv)
{
    return frac(sin(dot(uv, float2(12.9898, 78.233)))*43758.5453);
}

inline float unity_noise_interpolate (float a, float b, float t)
{
    return (1.0-t)*a + (t*b);
}

inline float unity_valueNoise (float2 uv)
{
    float2 i = floor(uv);
    float2 f = frac(uv);
    f = f * f * (3.0 - 2.0 * f);

    uv = abs(frac(uv) - 0.5);
    float2 c0 = i + float2(0.0, 0.0);
    float2 c1 = i + float2(1.0, 0.0);
    float2 c2 = i + float2(0.0, 1.0);
    float2 c3 = i + float2(1.0, 1.0);
    float r0 = unity_noise_randomValue(c0);
    float r1 = unity_noise_randomValue(c1);
    float r2 = unity_noise_randomValue(c2);
    float r3 = unity_noise_randomValue(c3);

    float bottomOfGrid = unity_noise_interpolate(r0, r1, f.x);
    float topOfGrid = unity_noise_interpolate(r2, r3, f.x);
    float t = unity_noise_interpolate(bottomOfGrid, topOfGrid, f.y);
    return t;
}

float t = 0.0;
for(int i = 0; i < 3; i++)
{
    float freq = pow(2.0, float(i));
    float amp = pow(0.5, float(3-i));
    t += unity_valueNoise(float2(UV.x*Scale/freq, UV.y*Scale/freq))*amp;
}
Out = t;
Copy and paste the code of SimpleNoise
#define Scale 500
float unity_simpleNoise_float(float2 UV)
{
    float t = 0.0;
    for(int i = 0; i < 3; i++)
    {
        float freq = pow(2.0, float(i));
        float amp = pow(0.5, float(3-i));
        t += unity_valueNoise(float2(UV.x*Scale/freq, UV.y*Scale/freq))*amp;
    }
    return t;
}
Then call this function from the frag function in ShaderLab to display ‘Noise’. So now it’s completed.
fixed4 frag (v2f i) : SV_Target
{
    fixed4 col = unity_simpleNoise_float(i.uv);
    return col;
}
The whole shader code
Shader "Unlit/NewUnlitShader"
{
    Properties
    {
        _MainTex ("Texture", 2D) = "white" {}
    }
    SubShader
    {
        Tags { "RenderType"="Opaque" }
        LOD 100

        Pass
        {
            CGPROGRAM
            #pragma vertex vert
            #pragma fragment frag
            // make fog work
            #pragma multi_compile_fog

            #include "UnityCG.cginc"

            struct appdata
            {
                float4 vertex : POSITION;
                float2 uv : TEXCOORD0;
            };

            struct v2f
            {
                float2 uv : TEXCOORD0;
                UNITY_FOG_COORDS(1)
                float4 vertex : SV_POSITION;
            };

            sampler2D _MainTex;
            float4 _MainTex_ST;

            v2f vert (appdata v)
            {
                v2f o;
                o.vertex = UnityObjectToClipPos(v.vertex);
                o.uv = TRANSFORM_TEX(v.uv, _MainTex);
                UNITY_TRANSFER_FOG(o,o.vertex);
                return o;
            }

            ///  SimpleNoise //////////////////////////////////////////////
            inline float unity_noise_randomValue (float2 uv)
            {
                return frac(sin(dot(uv, float2(12.9898, 78.233)))*43758.5453);
            }

            inline float unity_noise_interpolate (float a, float b, float t)
            {
                return (1.0-t)*a + (t*b);
            }

            inline float unity_valueNoise (float2 uv)
            {
                float2 i = floor(uv);
                float2 f = frac(uv);
                f = f * f * (3.0 - 2.0 * f);

                uv = abs(frac(uv) - 0.5);
                float2 c0 = i + float2(0.0, 0.0);
                float2 c1 = i + float2(1.0, 0.0);
                float2 c2 = i + float2(0.0, 1.0);
                float2 c3 = i + float2(1.0, 1.0);
                float r0 = unity_noise_randomValue(c0);
                float r1 = unity_noise_randomValue(c1);
                float r2 = unity_noise_randomValue(c2);
                float r3 = unity_noise_randomValue(c3);

                float bottomOfGrid = unity_noise_interpolate(r0, r1, f.x);
                float topOfGrid = unity_noise_interpolate(r2, r3, f.x);
                float t = unity_noise_interpolate(bottomOfGrid, topOfGrid, f.y);
                return t;
            }

            #define Scale 500
            float unity_simpleNoise_float(float2 UV)
            {
                float t = 0.0;
                for(int i = 0; i < 3; i++)
                {
                    float freq = pow(2.0, float(i));
                    float amp = pow(0.5, float(3-i));
                    t += unity_valueNoise(float2(UV.x*Scale/freq, UV.y*Scale/freq))*amp;
                }
                return t;
            }
            ///  SimpleNoise //////////////////////////////////////////////

            fixed4 frag (v2f i) : SV_Target
            {
                fixed4 col = unity_simpleNoise_float(i.uv);
                return col;
            }
            ENDCG
        }
    }
}
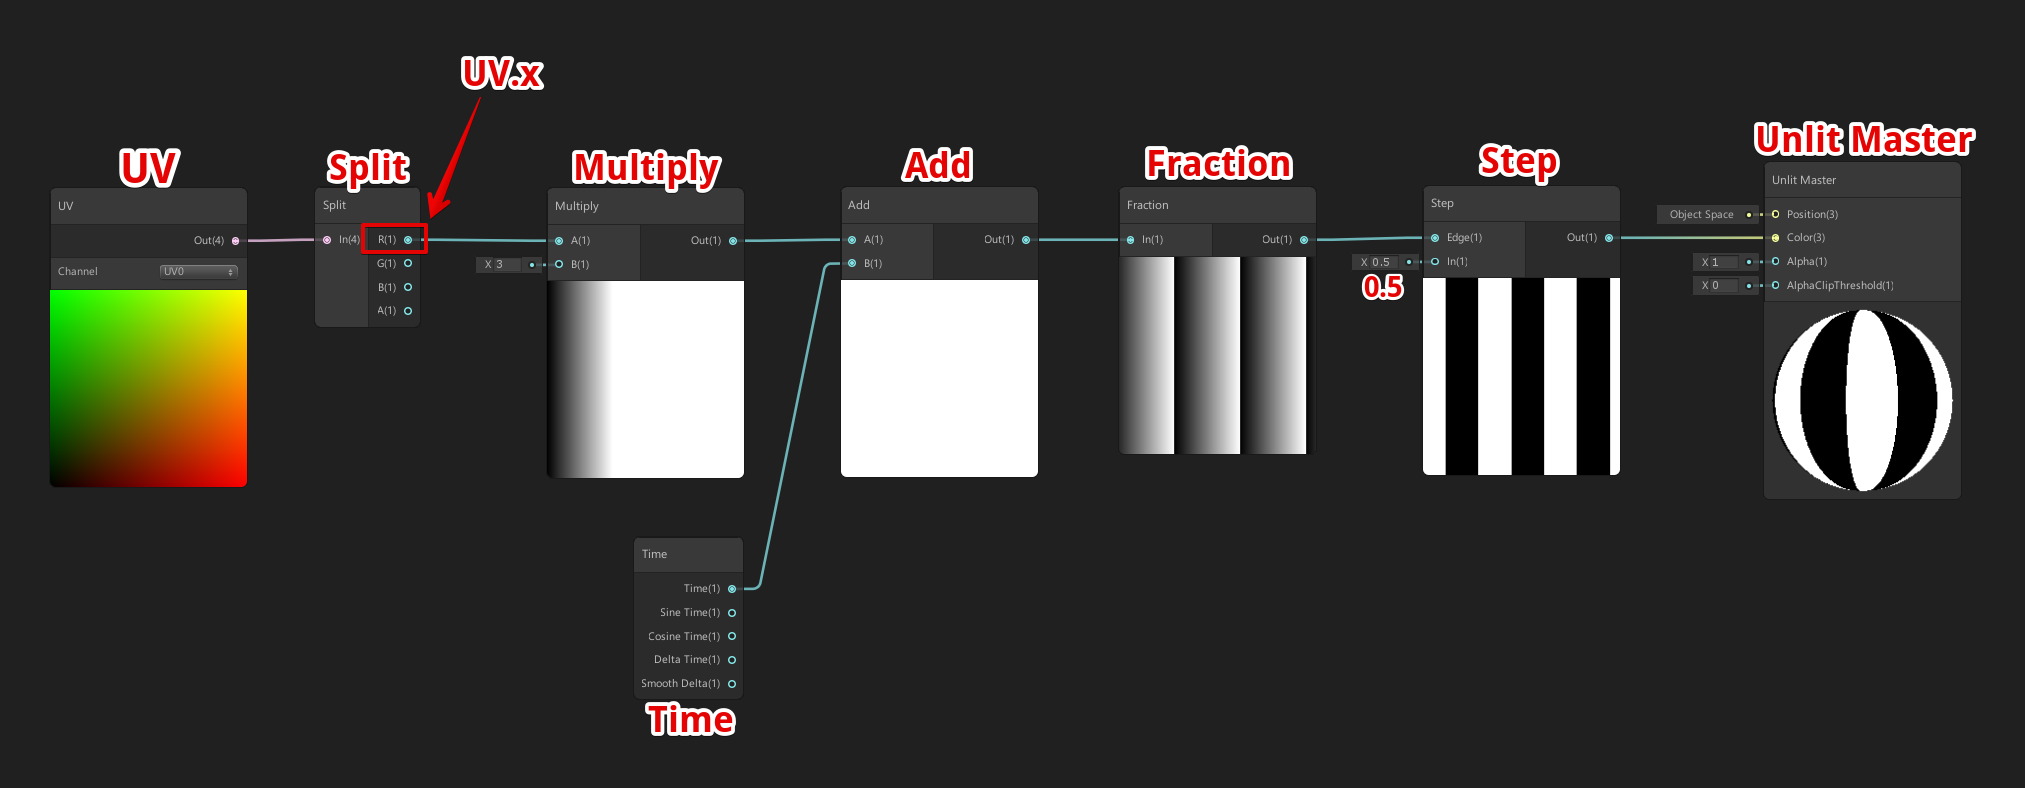
Example 3: Make scrolling stripe pattern
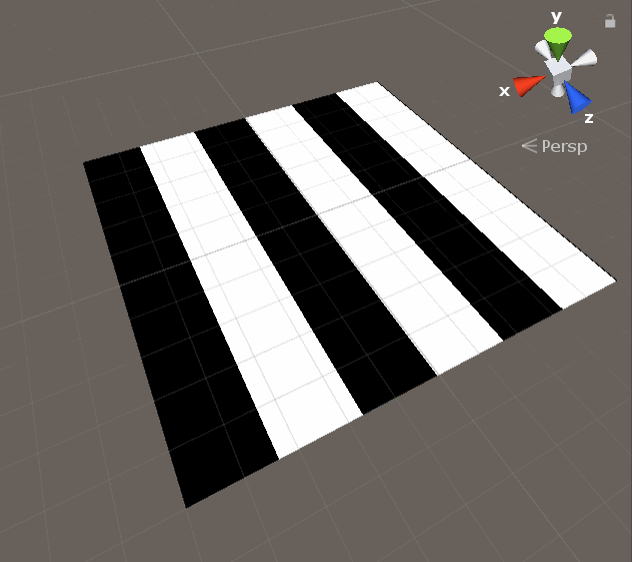
Scrolling stripe pattern
The shader graph shown blow generates a scrolling stripe pattern.
Port the stripe shader graph to ShaderLab
Let’s port this stripe shader graph to ShaderLab.
Display the ShaderLab code generated by the shader graph
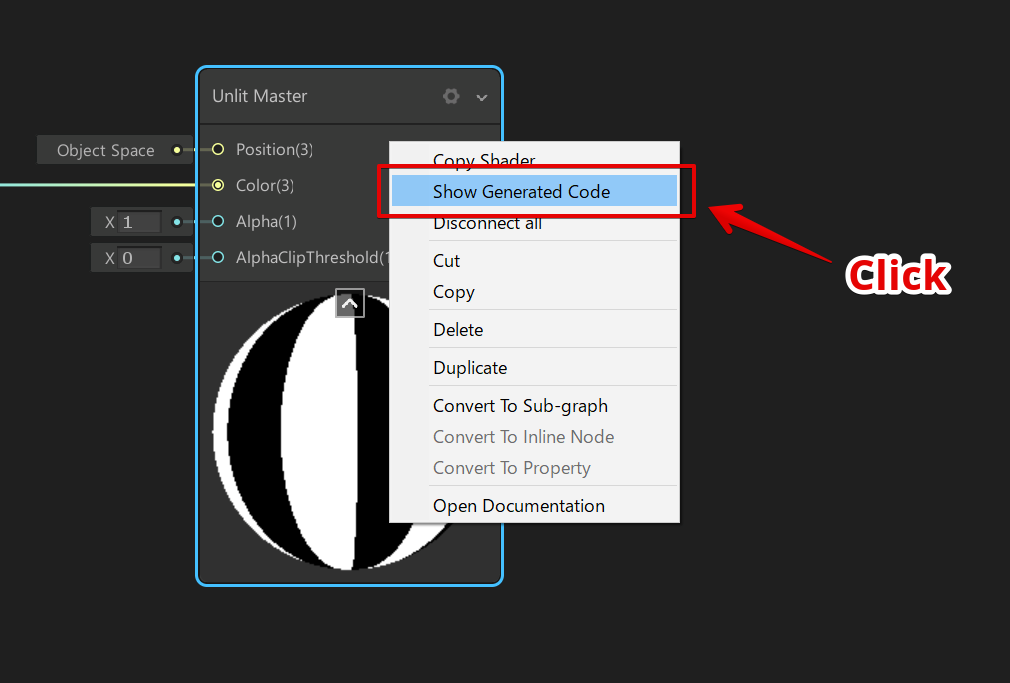
The actual shader code generated is shown below.
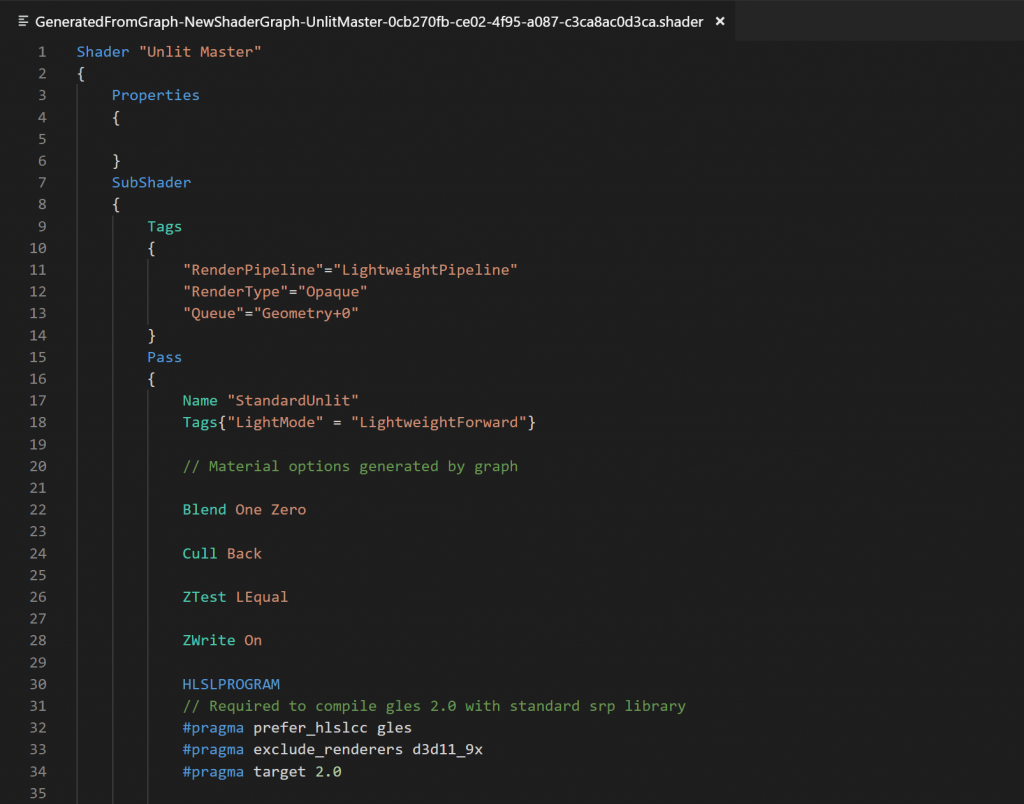
This shader code works with ‘Scriptable Render Pipeline’ available in Unity2018 or later.
So now I explain how to port this shader code to Unity2017.4.0f1 and makes it uploadable to STYLY.
Find the part equivalent to the flag function in the generated code
SurfaceDescription PopulateSurfaceData(SurfaceDescriptionInputs IN)
{
    SurfaceDescription surface = (SurfaceDescription)0;
    float4 _UV_5352AF33_Out = IN.uv0;
    float _Split_ADBF75FC_R = _UV_5352AF33_Out[0];
    float _Split_ADBF75FC_G = _UV_5352AF33_Out[1];
    float _Split_ADBF75FC_B = _UV_5352AF33_Out[2];
    float _Split_ADBF75FC_A = _UV_5352AF33_Out[3];
    float _Multiply_318DDBE1_Out;
    Unity_Multiply_float(_Split_ADBF75FC_R, 3, _Multiply_318DDBE1_Out);

    float _Add_45F8AE1E_Out;
    Unity_Add_float(_Multiply_318DDBE1_Out, _Time.y, _Add_45F8AE1E_Out);
    float _Fraction_BBF94AC3_Out;
    Unity_Fraction_float(_Add_45F8AE1E_Out, _Fraction_BBF94AC3_Out);
    float _Step_AA2EEF1D_Out;
    Unity_Step_float(_Fraction_BBF94AC3_Out, 0.5, _Step_AA2EEF1D_Out);
    surface.Color = (_Step_AA2EEF1D_Out.xxx);
    surface.Alpha = 1;
    surface.AlphaClipThreshold = 0;
    return surface;
}
Paste the code of this PopulateSurfaceData function in the frag function.
fixed4 frag (v2f i) : SV_Target
{
    SurfaceDescription surface = (SurfaceDescription)0;
    float4 _UV_5352AF33_Out = IN.uv0;
    float _Split_ADBF75FC_R = _UV_5352AF33_Out[0];
    float _Split_ADBF75FC_G = _UV_5352AF33_Out[1];
    float _Split_ADBF75FC_B = _UV_5352AF33_Out[2];
    float _Split_ADBF75FC_A = _UV_5352AF33_Out[3];
    float _Multiply_318DDBE1_Out;
    Unity_Multiply_float(_Split_ADBF75FC_R, 3, _Multiply_318DDBE1_Out);

    float _Add_45F8AE1E_Out;
    Unity_Add_float(_Multiply_318DDBE1_Out, _Time.y, _Add_45F8AE1E_Out);
    float _Fraction_BBF94AC3_Out;
    Unity_Fraction_float(_Add_45F8AE1E_Out, _Fraction_BBF94AC3_Out);
    float _Step_AA2EEF1D_Out;
    Unity_Step_float(_Fraction_BBF94AC3_Out, 0.5, _Step_AA2EEF1D_Out);
    surface.Color = (_Step_AA2EEF1D_Out.xxx);
    surface.Alpha = 1;
    surface.AlphaClipThreshold = 0;
    return surface;
}
Copy and Paste ‘Unity_Add_***’ functions
Copy and paste the following four functions used in the generated code.
void Unity_Multiply_float (float A, float B, out float Out)
{
    Out = A * B;
}
void Unity_Add_float(float A, float B, out float Out)
{
    Out = A + B;
}
void Unity_Fraction_float(float In, out float Out)
{
    Out = frac(In);
}
void Unity_Step_float(float Edge, float In, out float Out)
{
    Out = step(Edge, In);
}
Delecte ‘SurfaceDescription’
Modify the argument
The argument of the frag function is ‘i’ at the moment. Change it into ‘IN’. Before the modification
fixed4 frag (v2f i) : SV_Target
After the modification
fixed4 frag (v2f IN): SV_Target
Modify the reference name of uv
It’s defined as ‘uv’ in v2f, so modify the following line to rename it ‘uv0’. Before the modification
float4 _UV_5352AF33_Out = IN.uv0;
After the modification
float4 _UV_5352AF33_Out = IN.uv;
Modify the variable type of uv
Since uv is defined as float2 for IN, change the variable type in the left side of the expression from float4 to float2. Before the modification
float4 _UV_5352AF33_Out = IN.uv;
After the modification
float2 _UV_5352AF33_Out = IN.uv;
Correct the way to refer to uv element
You can access each element of float2 or float4 by the following syntax.
float4 value = float4(1.0);
float x = value[0]; // x = value.x
float y = value[1]; // y = value.y
float z = value[2]; // z = value.z
float w = value[3]; // w = value.w
Since the uv value is float2 this time, the z and w element don’t exist. Therefore delete the code shown below.
float _Split_ADBF75FC_B = _UV_5352AF33_Out[2];
float _Split_ADBF75FC_A = _UV_5352AF33_Out[3];
Modify the return statement
Currently, it returns the colour and the alpha value stored with the properties. But, since it needs to return the colour information this time, delete the lines shown below.
surface.Color = (_Step_AA2EEF1D_Out.xxx);
surface.Alpha = 1;
surface.AlphaClipThreshold = 0;
return surface;
return _Step_AA2EEF1D_Out;
The frag function after the modification
After all the modifications above, the frag functions should be as follows.
fixed4 frag (v2f IN) : SV_Target
{
    float2 _UV_5352AF33_Out = IN.uv;
    float _Split_ADBF75FC_R = _UV_5352AF33_Out[0];
    float _Split_ADBF75FC_G = _UV_5352AF33_Out[1];

    float _Multiply_318DDBE1_Out;
    Unity_Multiply_float(_Split_ADBF75FC_R, 3, _Multiply_318DDBE1_Out
    float _Add_45F8AE1E_Out;
    Unity_Add_float(_Multiply_318DDBE1_Out, _Time.y, _Add_45F8AE1E_Out);
    float _Fraction_BBF94AC3_Out;
    Unity_Fraction_float(_Add_45F8AE1E_Out, _Fraction_BBF94AC3_Out);
    float _Step_AA2EEF1D_Out;
    Unity_Step_float(_Fraction_BBF94AC3_Out, 0.5, _Step_AA2EEF1D_Out

    return _Step_AA2EEF1D_Out;
}
The whole shader code
After porting, the whole shader code should be as follows.
Shader "Unlit/NewUnlitShader"
{
	Properties
	{
		_MainTex ("Texture", 2D) = "white" {}
	}
	SubShader
	{
		Tags { "RenderType"="Opaque" }
		LOD 100

		Pass
		{
			CGPROGRAM
			#pragma vertex vert
			#pragma fragment frag
			// make fog work
			#pragma multi_compile_fog

			#include "UnityCG.cginc"

			struct appdata
			{
				float4 vertex : POSITION;
				float2 uv : TEXCOORD0;
			};

			struct v2f
			{
				float2 uv : TEXCOORD0;
				UNITY_FOG_COORDS(1)
				float4 vertex : SV_POSITION;
			};

			sampler2D _MainTex;
			float4 _MainTex_ST;

			v2f vert (appdata v)
			{
				v2f o;
				o.vertex = UnityObjectToClipPos(v.vertex);
				o.uv = TRANSFORM_TEX(v.uv, _MainTex);
				UNITY_TRANSFER_FOG(o,o.vertex);
				return o;
			}


            void Unity_Multiply_float (float A, float B, out float Out)
            {
                Out = A * B;
            }

            void Unity_Add_float(float A, float B, out float Out)
            {
                Out = A + B;
            }

            void Unity_Fraction_float(float In, out float Out)
            {
                Out = frac(In);
            }

            void Unity_Step_float(float Edge, float In, out float Out)
            {
                Out = step(Edge, In);
            }

			fixed4 frag (v2f IN) : SV_Target
			{
				float2 _UV_5352AF33_Out = IN.uv;
				float _Split_ADBF75FC_R = _UV_5352AF33_Out[0];
				float _Split_ADBF75FC_G = _UV_5352AF33_Out[1];

				float _Multiply_318DDBE1_Out;
				Unity_Multiply_float(_Split_ADBF75FC_R, 3, _Multiply_318DDBE1_Out);
				float _Add_45F8AE1E_Out;
				Unity_Add_float(_Multiply_318DDBE1_Out, _Time.y, _Add_45F8AE1E_Out);
				float _Fraction_BBF94AC3_Out;
				Unity_Fraction_float(_Add_45F8AE1E_Out, _Fraction_BBF94AC3_Out);
				float _Step_AA2EEF1D_Out;
				Unity_Step_float(_Fraction_BBF94AC3_Out, 0.5, _Step_AA2EEF1D_Out);

				return _Step_AA2EEF1D_Out;
			}
			ENDCG
		}
	}
}
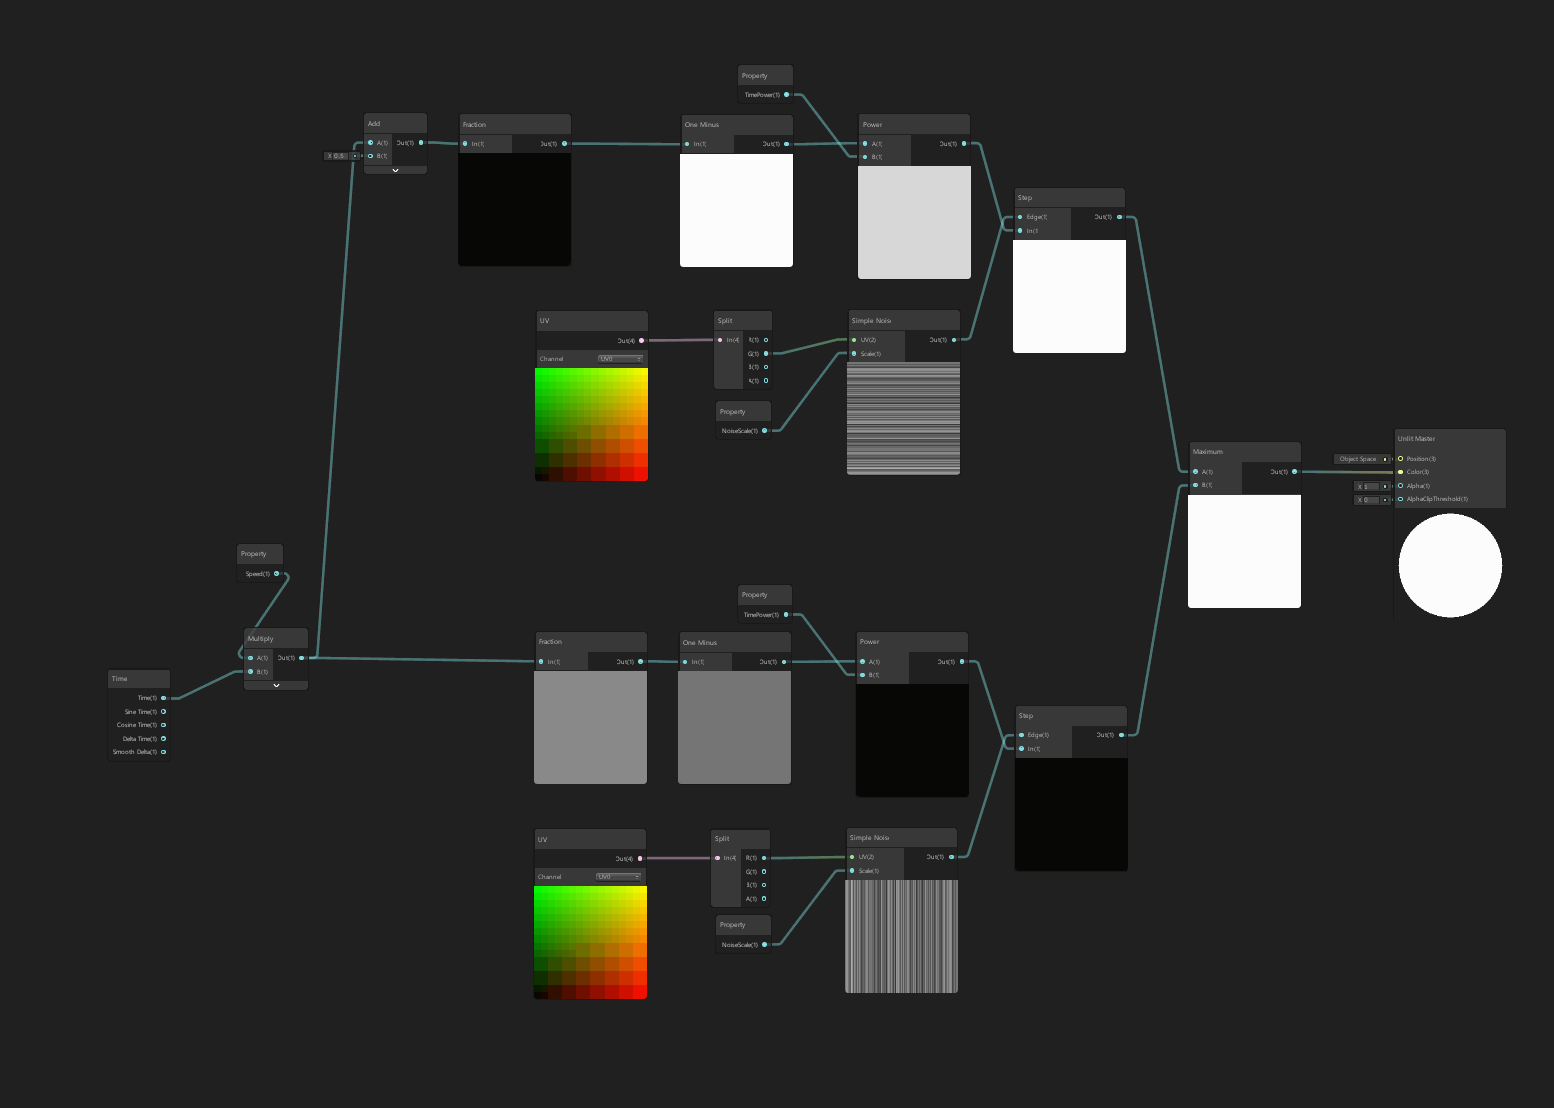
Example4: the Noise effect

Display vertical noise pattern and horizontal noise pattern alternately

The shader graph to display vertical noise pattern and horizontal noise pattern alternately
Port to ShaderLab
After poring the Noise shader above to Shaderlab, the code should be as follows.
Shader "Unlit/TwoNoiseShader"
{
    Properties
    {
		_MainTex ("Texture", 2D) = "white" {}
        Vector1_A6C402D7("TimePower", Float) = 8
		Vector1_E7DE3A15("Speed", Float) = 1.2
		Vector1_CFAA147C("NoiseScale", Float) = 500
    }
	SubShader
	{
		Tags { "RenderType"="Opaque" }
		LOD 100

		Pass
		{
			CGPROGRAM
			#pragma vertex vert
			#pragma fragment frag
			// make fog work
			#pragma multi_compile_fog

			#include "UnityCG.cginc"

			struct appdata
			{
				float4 vertex : POSITION;
				float2 uv : TEXCOORD0;
			};

			struct v2f
			{
				float2 uv : TEXCOORD0;
				UNITY_FOG_COORDS(1)
				float4 vertex : SV_POSITION;
			};

			sampler2D _MainTex;
			float4 _MainTex_ST;

            float Vector1_A6C402D7;
            float Vector1_E7DE3A15;
            float Vector1_CFAA147C;

			v2f vert (appdata v)
			{
				v2f o;
				o.vertex = UnityObjectToClipPos(v.vertex);
				o.uv = TRANSFORM_TEX(v.uv, _MainTex);
				UNITY_TRANSFER_FOG(o,o.vertex);
				return o;
			}

			/////////////////////////////////////////////////////
			inline float unity_noise_randomValue (float2 uv)
			{
				return frac(sin(dot(uv, float2(12.9898, 78.233)))*43758.5453);
			}

			inline float unity_noise_interpolate (float a, float b, float t)
			{
				return (1.0-t)*a + (t*b);
			}
			inline float unity_valueNoise (float2 uv)
			{
				float2 i = floor(uv);
				float2 f = frac(uv);
				f = f * f * (3.0 - 2.0 * f);

				uv = abs(frac(uv) - 0.5);
				float2 c0 = i + float2(0.0, 0.0);
				float2 c1 = i + float2(1.0, 0.0);
				float2 c2 = i + float2(0.0, 1.0);
				float2 c3 = i + float2(1.0, 1.0);
				float r0 = unity_noise_randomValue(c0);
				float r1 = unity_noise_randomValue(c1);
				float r2 = unity_noise_randomValue(c2);
				float r3 = unity_noise_randomValue(c3);

				float bottomOfGrid = unity_noise_interpolate(r0, r1, f.x);
				float topOfGrid = unity_noise_interpolate(r2, r3, f.x);
				float t = unity_noise_interpolate(bottomOfGrid, topOfGrid, f.y);
				return t;
			}

            void Unity_SimpleNoise_float(float2 UV, float Scale, out float Out)
            {
                float t = 0.0;

                float freq = pow(2.0, float(0));
                float amp = pow(0.5, float(3-0));
                t += unity_valueNoise(float2(UV.x*Scale/freq, UV.y*Scale/freq))*amp;

                freq = pow(2.0, float(1));
                amp = pow(0.5, float(3-1));
                t += unity_valueNoise(float2(UV.x*Scale/freq, UV.y*Scale/freq))*amp;

                freq = pow(2.0, float(2));
                amp = pow(0.5, float(3-2));
                t += unity_valueNoise(float2(UV.x*Scale/freq, UV.y*Scale/freq))*amp;

                Out = t;
            }

            void Unity_Multiply_float (float A, float B, out float Out)
            {
                Out = A * B;
            }

            void Unity_Add_float(float A, float B, out float Out)
            {
                Out = A + B;
            }

            void Unity_Fraction_float(float In, out float Out)
            {
                Out = frac(In);
            }

            void Unity_OneMinus_float(float In, out float Out)
            {
                Out = 1 - In;
            }

            void Unity_Power_float(float A, float B, out float Out)
            {
                Out = pow(A, B);
            }

            void Unity_Step_float(float Edge, float In, out float Out)
            {
                Out = step(Edge, In);
            }

            void Unity_Maximum_float(float A, float B, out float Out)
            {
                Out = max(A, B);
            }
			/////////////////////////////////////////////////////

			fixed4 frag (v2f IN) : SV_Target
			{
                float2 _UV_41543244_Out = IN.uv;
                float _Split_791929F1_R = _UV_41543244_Out[0];
                float _Split_791929F1_G = _UV_41543244_Out[1];
                // float _Split_791929F1_B = _UV_41543244_Out[2];
                // float _Split_791929F1_A = _UV_41543244_Out[3];
                float _Property_A34CC187_Out = Vector1_CFAA147C;
                float _SimpleNoise_7780AF9D_Out;
                Unity_SimpleNoise_float((_Split_791929F1_G.xx), _Property_A34CC187_Out, _SimpleNoise_7780AF9D_Out);
                float _Property_BB3AE4B0_Out = Vector1_E7DE3A15;
                float _Multiply_C7983931_Out;
                Unity_Multiply_float(_Property_BB3AE4B0_Out, _Time.y, _Multiply_C7983931_Out);

                float _Add_F4937AD1_Out;
                Unity_Add_float(_Multiply_C7983931_Out, 0.5, _Add_F4937AD1_Out);
                float _Fraction_DC83F623_Out;
                Unity_Fraction_float(_Add_F4937AD1_Out, _Fraction_DC83F623_Out);
                float _OneMinus_3CCE1B16_Out;
                Unity_OneMinus_float(_Fraction_DC83F623_Out, _OneMinus_3CCE1B16_Out);
                float _Property_652E266A_Out = Vector1_A6C402D7;
                float _Power_B837429A_Out;
                Unity_Power_float(_OneMinus_3CCE1B16_Out, _Property_652E266A_Out, _Power_B837429A_Out);
                float _Step_52333ACB_Out;
                Unity_Step_float(_SimpleNoise_7780AF9D_Out, _Power_B837429A_Out, _Step_52333ACB_Out);
                float2 _UV_DAF98106_Out = IN.uv;
                float _Split_22E8C67A_R = _UV_DAF98106_Out[0];
                float _Split_22E8C67A_G = _UV_DAF98106_Out[1];
                float _Property_9D173142_Out = Vector1_CFAA147C;
                float _SimpleNoise_BFF5A899_Out;
                Unity_SimpleNoise_float((_Split_22E8C67A_R.xx), _Property_9D173142_Out, _SimpleNoise_BFF5A899_Out);
                float _Fraction_8C0CEF59_Out;
                Unity_Fraction_float(_Multiply_C7983931_Out, _Fraction_8C0CEF59_Out);
                float _OneMinus_AEBC704A_Out;
                Unity_OneMinus_float(_Fraction_8C0CEF59_Out, _OneMinus_AEBC704A_Out);
                float _Property_78DB6EAB_Out = Vector1_A6C402D7;
                float _Power_8970AF46_Out;
                Unity_Power_float(_OneMinus_AEBC704A_Out, _Property_78DB6EAB_Out, _Power_8970AF46_Out);
                float _Step_83B2C153_Out;
                Unity_Step_float(_SimpleNoise_BFF5A899_Out, _Power_8970AF46_Out, _Step_83B2C153_Out);
                float _Maximum_A494F6AC_Out;
                Unity_Maximum_float(_Step_52333ACB_Out, _Step_83B2C153_Out, _Maximum_A494F6AC_Out);

				return _Maximum_A494F6AC_Out;
            }
			ENDCG
		}
	}
}
How to upload an asset from Unity to STYLY
Please refer to the instruction from the link below to learn how to upload an asset from Unity to STYLY. https://styly.cc/ja/manual/unity-asset-uploader/