In this article, I will show how to use ‘Sound of Text’ that can download the voice generated by Google Translate, and how to create a function that plays the generated voice when approaching the object in STYLY.
How to use ‘Sound of Text’
It’s easy to use. You just enter the text to convert into voice and select the language. Access:
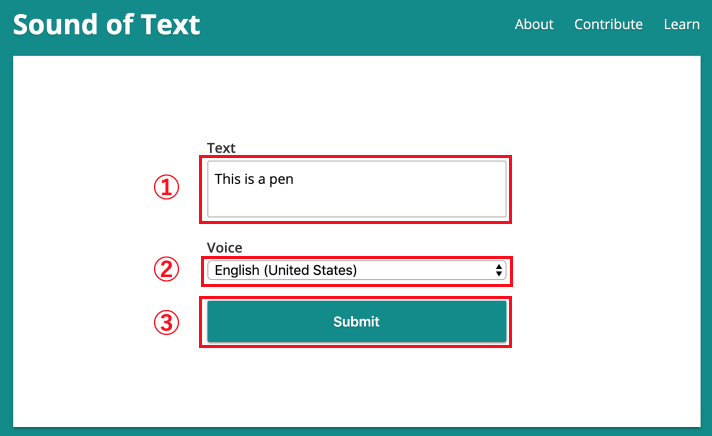
’Text input’ field – Sound of Text
① Enter the text to convert into voice (I entered ‘This is a pen.’ this time).
② Select the language.
③ Press ‘Submit’ to start converting into voice.
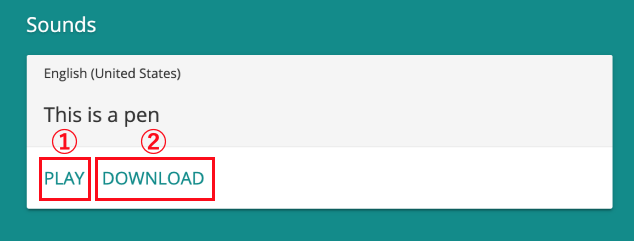
The download screen
The screen shown above pops up when the conversion is completed.
① Press ‘PLAY’ to play the voice.
② Press ‘DOWNLOAD’ to download the voice file in MP3 format.
Create the function to play the voice when approaching the object
This time, we create a Scene that plays the generated voice when the player approaches the object in STYLY.
Please read the following article to learn how to create a function that plays the voice when the player approaches the object.
In the article above, you could skip the two chapters, ‘3.2 Create Spotlight’ and ‘3.4 Add action to control the light’ as they are just for the light, which is not required this time. However, you may also implement the whole project if you are rather happy to do it. Adding a light doesn’t cause any problems anyway.

Duplicate the Prefab
After finishing all the procedures shown in that article, duplicate the created ‘Sensor light’ Prefab and rename it to the text of the voice (i.e. ‘This is a pen’ ), which is more intuitive.
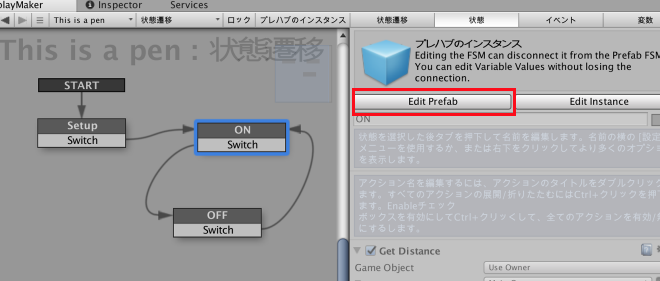
Select ‘Edit Prefab’
When selecting the Prefab, the screen shown above appears. Select ‘Edit Prefab’ as we edit the Prefab now.
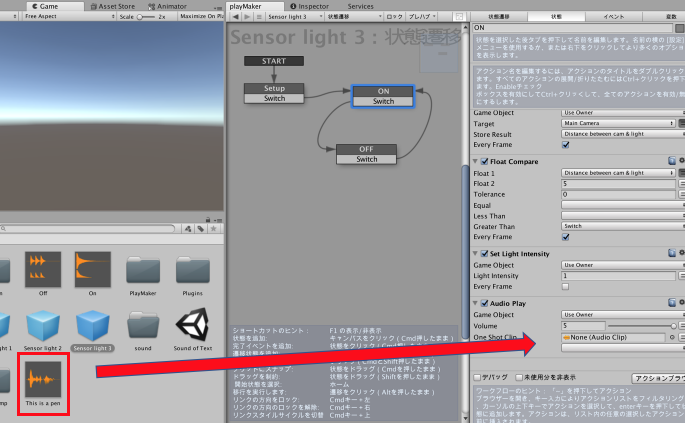
Add the generated voice to ‘One Shot Clip’
Add the generated audio file to ‘Assets’ in the Project window and drag it into ‘One Shot Clip’.
That’s all you need to replace the voice.
Drag and drop the Prefab into ‘Assets’ in the Project window and upload it to STYLY.
In Web Studio, we place the 3D model of a pen and set it up to play the voice ‘This is a pen’ when approaching the pen.
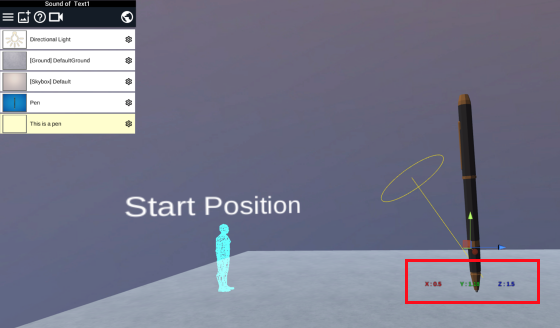
Adjust the position in Web Studio
A good trick is to arrange the uploaded audio file at the same position as the 3D model. You can check the X, Y and Z coordinate of an object by selecting it in STYLY Web Studio.
You can taste the created Scene from the link below.
- Click the PLAY button (it takes a little while until the Scene starts).
- Approach the pen by the ‘zoom in’ operation with the mouse or trackpad.
- The voice will be played.
By developing it more, you could also make a voice guide to introduce the exhibits in a museum as shown below.
- Click the PLAY button.
- After launching the Scene, approach the picture.
- The voice guide for the picture will be played.