“How to Build a VR Shooting Game” shows you how to build a VR shooting game using Unity and PlayMaker, upload it to STYLY, and publish it.
This article shows you how to add settings and animations for the enemy girl in Unity.
-
Advanced preparation
-
Gun Controller Settings
-
Setting up the bullets
-
How to generate enemy characters
-
Enemy Character Settings
-
BGM and SE Settings
-
How to upload to STYLY
Part.1-7 continues, so let’s read them through and make it to the end!

Last time, we created a system to manage the number of enemies.
![[Unity/Playmaker] How to make a VR shooting game and generate enemy characters](https://styly.cc/wp-content/uploads/2018/05/コメント-2020-03-28-053330-160x160.png)
Girls’ Settings
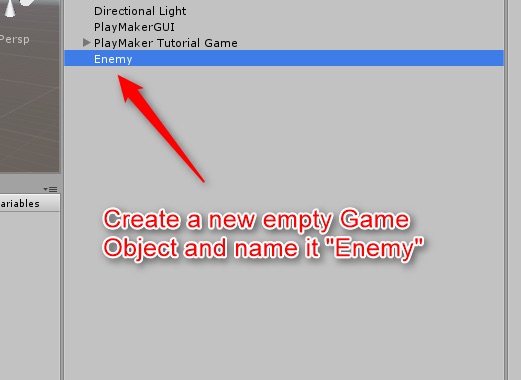
Create an Enemy
To get started, create an empty Game Object in the Scene Hierarchy and name it “Enemy”.
Create a new game object
Next, find the “SapphiArtchan” pre-fab in the myUnityAssets folder and drag it to the Enemy object to make it a child object, as shown in the image below.
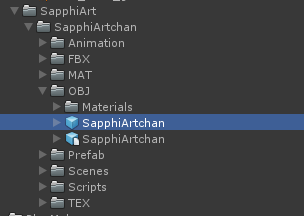
SapphiArtchan Store
Location : SapphiArt > SapphiArtchan > OBJ > SapphiArtchan
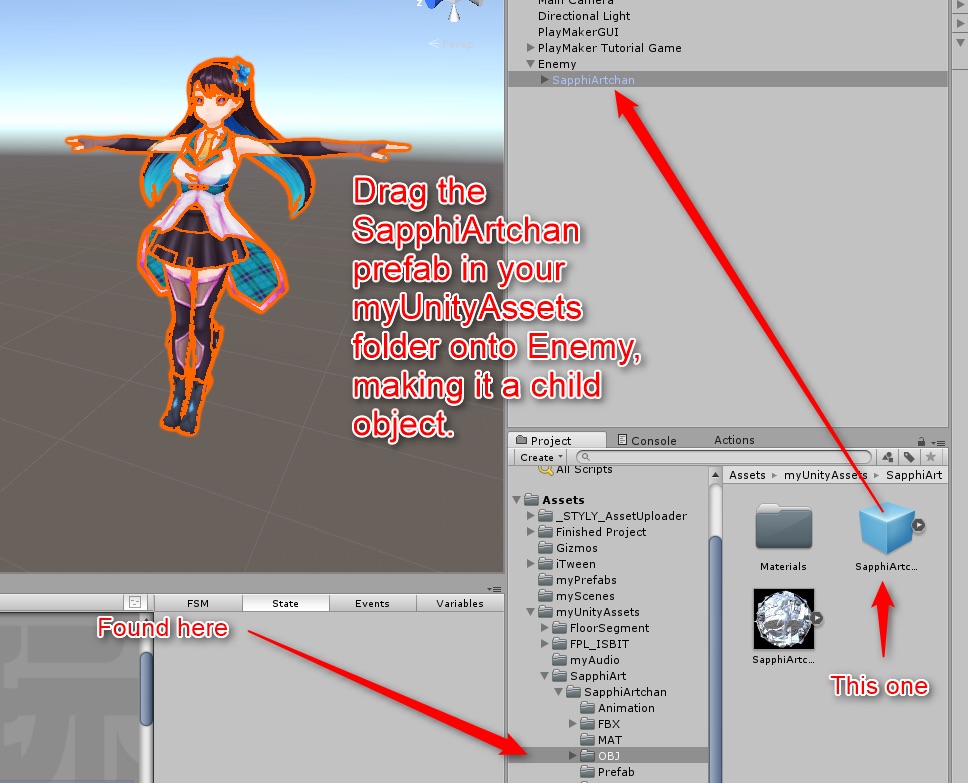
Dragging SapphiArtchan
Change SapphiArtchan to “girl” and simply rename it.
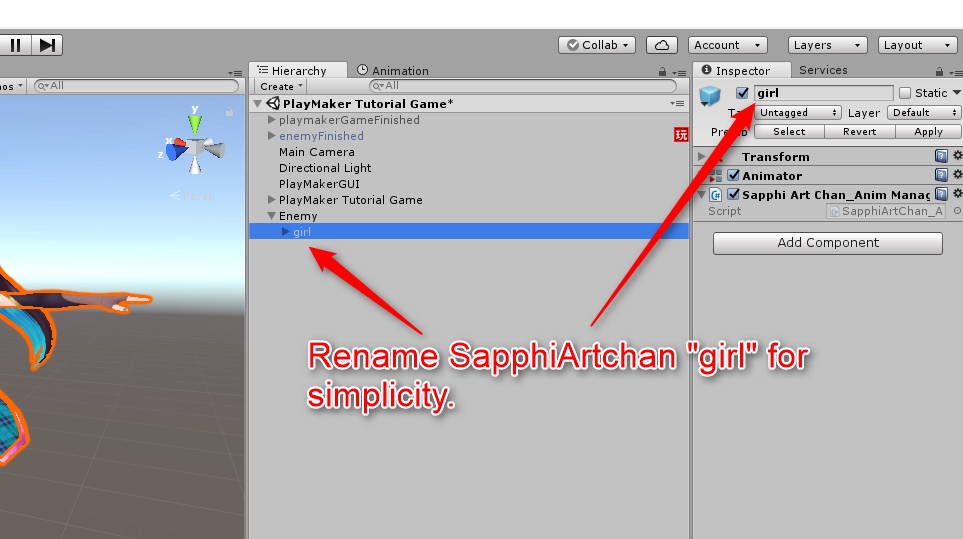
I’ll name her “girl”.
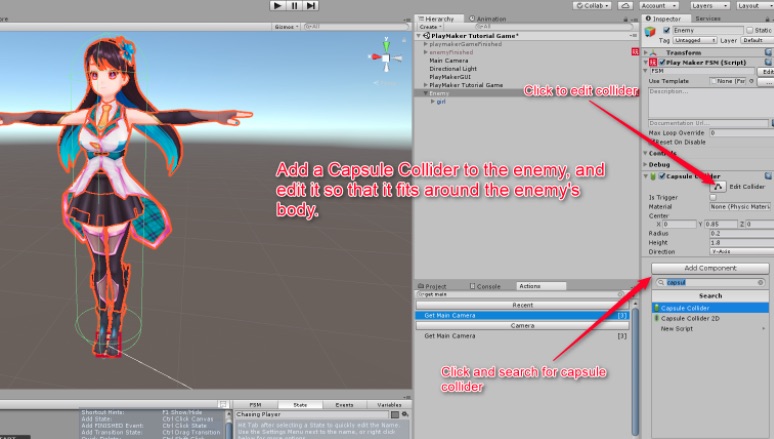
Add Capsule Collider
Next, as shown in the image below, add a Capsule Collider component in the Enemy object’s inspector window and edit it to fit nicely around the body of “girl”.
Click on the Edit Collider button and drag it to resize it.
Add Capsule Collider
Refer to the following figures and configure Capsule Collider.
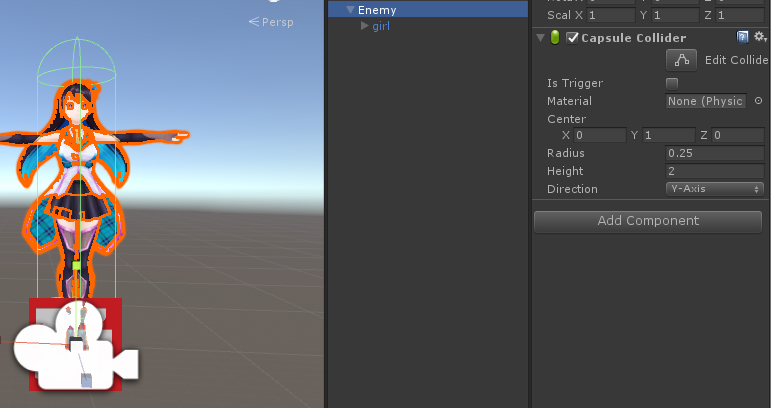
Configure the Capsule Collider
Add Rigid body
Also, add the object of “girl” to a rigid body so that the physical laws come into play.
From this point, check the Use Gravity and Is Kinematic boxes.
The effect of Is Kinematic causes “girl” to collide with an o-gun bullet.
However, you are not affected by FORCE other than gravity in the game.
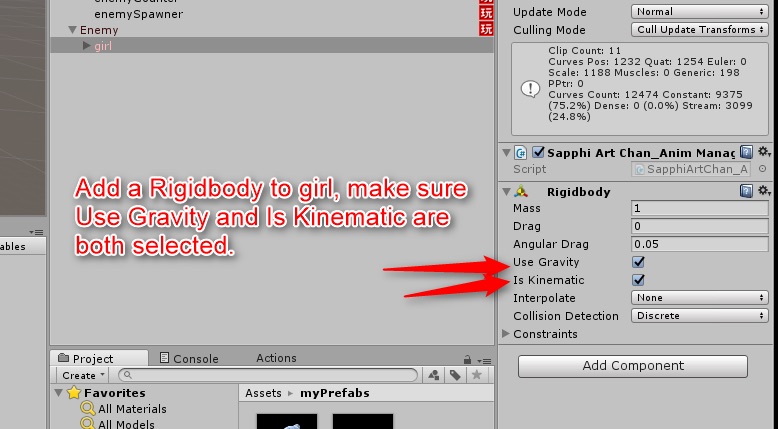
Setting the rigid body
Remove the C# script.
Next, click on the little gear icon next to the Sapphi Art Chan_Anim C# script, then click on Remove Component.
The C# script is not compatible with STYLY, so you need to remove it.
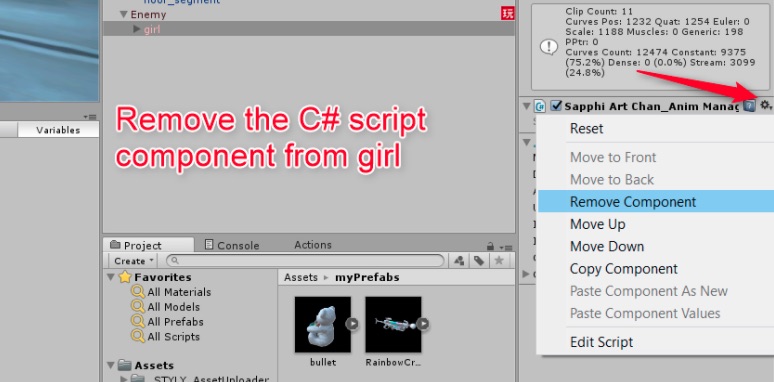
Remove the C # script
Change Position
Finally, set the Y-value of “girl” to -1 so that the girl appears at the correct height on the stage.
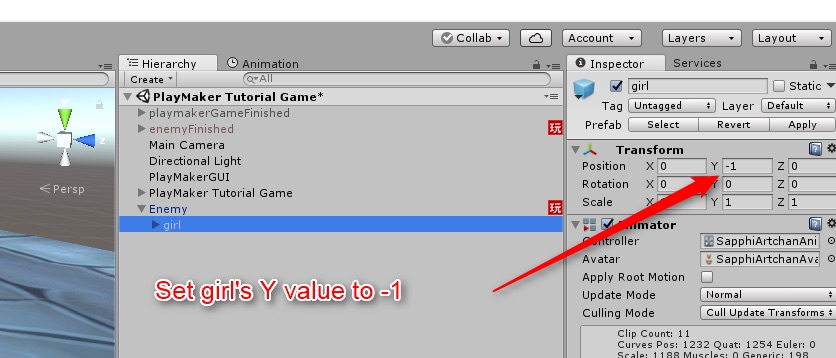
Set the value of Position Y to -1.
FSM Settings
Setup State Setup
Creates new FSM in the Enemy object with the Setup state of the start.
Add the “Get Main Camera” and “Get Child” actions and set them up as shown in the image.
We get and store the main camera as a game object called mainCamera, find “girl” in Child Name, and store it in a variable of the same name.
(It’s very useful to store it here as a variable, since you’ll need to refer to both the main camera and the “girl” later in the FSM).

FSM settings for Enemy object
Setting the Chasing Player state
Next, we create a new state called “Chasing Player” and connect it to the FINISHED transition of the Setup state.
Then create a new event called “releasedPlayer” and add it to the Chasing Player.
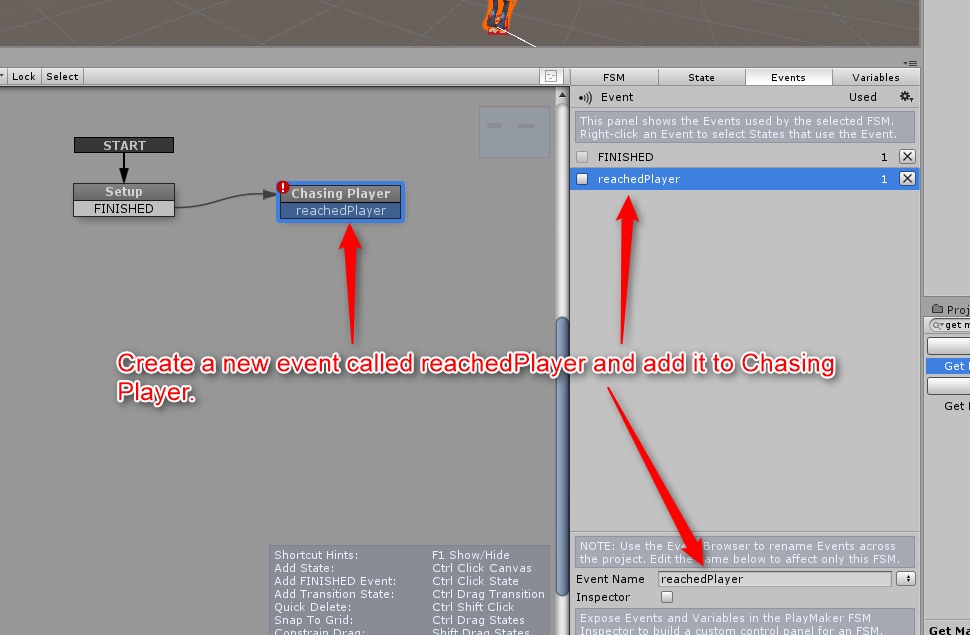
Setting the Chasing Player state
Add the “Smooth Look At” and “move Towards” actions to the Chasing Player state, as shown in the figure below.
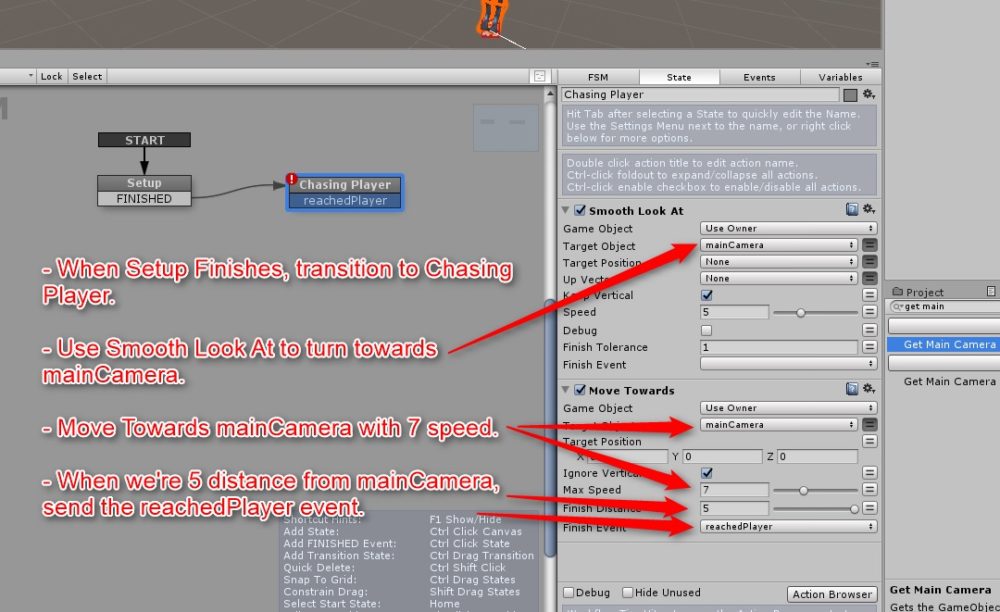
Setting up the Smooth Look At and move Towards actions
The Smooth Look At action causes “girl” to face the main camera, i.e. in the direction of the player in the VR space.
The Move Towards action, which moves “girl” towards the player, is the key to this game.
If the “Finish Distance” is set to 5, ”girl” will stop at an appropriate distance from the player and trigger the releasedPlayer event when this move action is completed.
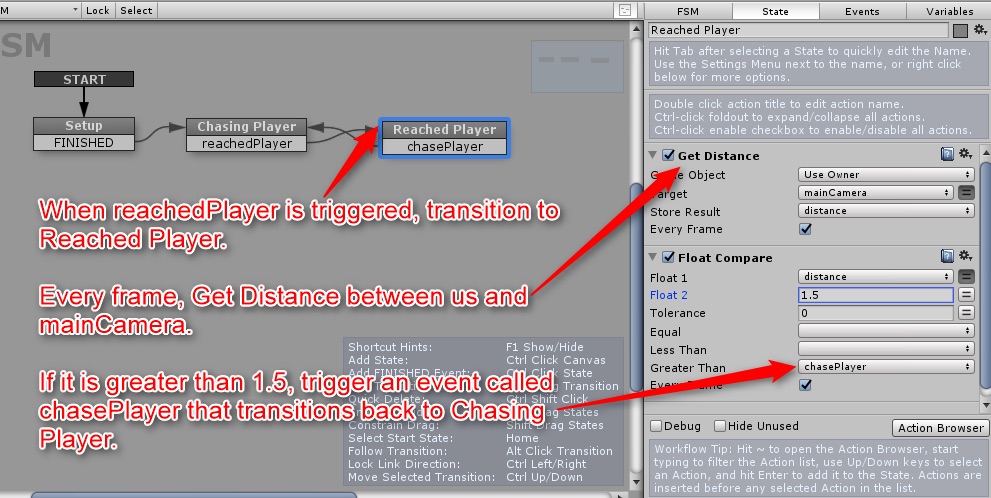
Setting the Reached Player state
Create the “Released Player” state and connect it to the releasedPlayer transition as shown in the image below.
Add a “Get Distance” action to calculate the distance between the enemy (Use Owner) and the player (mainCamera).
Then add the “Float Compare” action so that the chasePlayer transition happens when the distance is greater than 1.5 (and the chasePlayer transition happens when the distance is greater than 1.5).
This action causes the enemy to chase the player again if the player is more than 1.5 away from the enemy.
Setting the Reached Player state
Create bullets and enemy hits
Next, go back to the Chasing Player state and add the “Trigger Event” action.
This is the action that detects the “trigger”.
The word “trigger” here means collider.
When I created the enemy earlier, I added a capsule collider to the enemy in order to make contact with other colliders in the scene.
If the bullet and the enemy’s collider are overlapped for a certain amount of time, it will be judged as a collision.
Select On Trigger Stay as the type of trigger to be sent to the “die” event after the Trigger Event.
That is, we create a “Dead” state, as shown in the image, and add a transition from “die” to this state.

Create a Dead State
Setting up the Chasing Player state and creating the Dead state
Next, add a Trigger Event action with the exact same configuration as the Released Player state.
The reason for this is that the player may shoot the enemy in this state.
We also add a “die” transition event from this state to the Dead state.
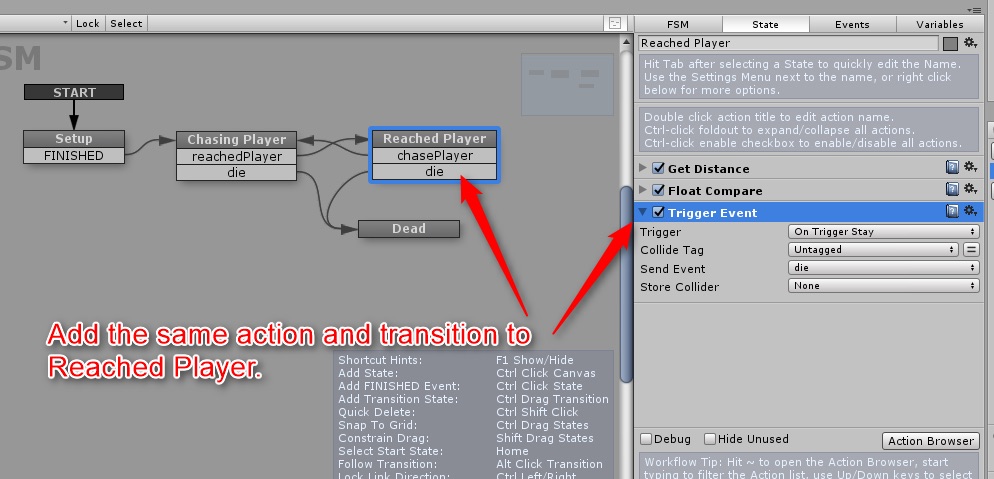
Setting the Reached Player state
Configuring the Dead State
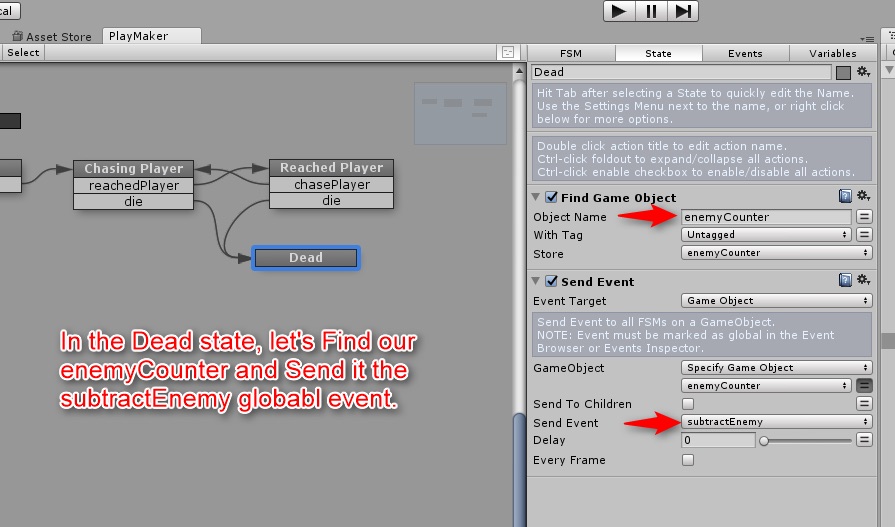
Click on the Dead state and add a “Find Game Object” action to find the enemyCounter and store it in a variable of the same name.
We, then, make the Send Event a subEnemy and execute the Send Event action on the enemyCounter variable.
This is a global event that was created in advance in the project.
The combination of these two actions places an enemyCounter object that constantly monitors the number of enemies on the screen, and if one enemy dies, a message is sent to reduce it by one from the total number of enemies.
Configuring the Dead State
Add the “Destroy Component” action and select “Capsule Collider” from the UnityEngine drop-down menu and remove it.
By removing the capsule collider, bullets fired at close range to the enemy character will be able to hit the enemy correctly.
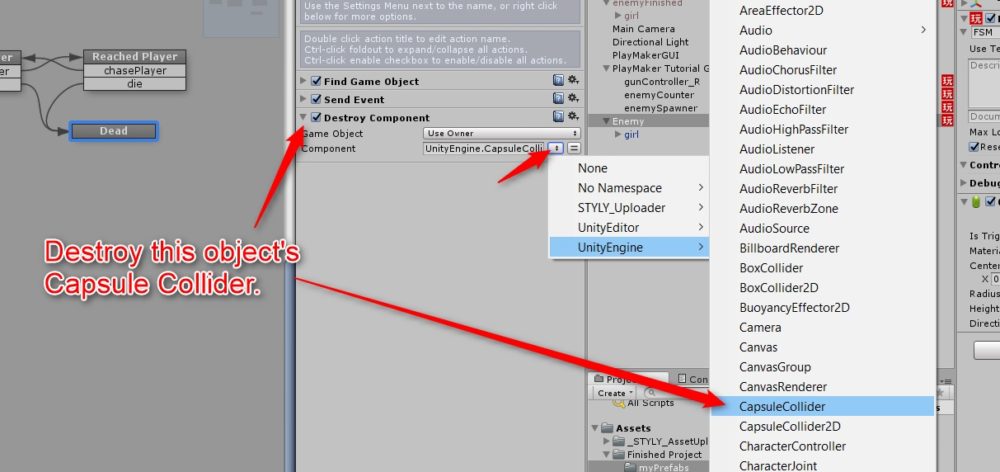
Select Capsule Collider
Finally, the “Wait” action allows the Dead state to wait 10 seconds and send an event called “destroySelf”. Then, check the Real Time box.
We connect this transition to a new state called Destroying Self.
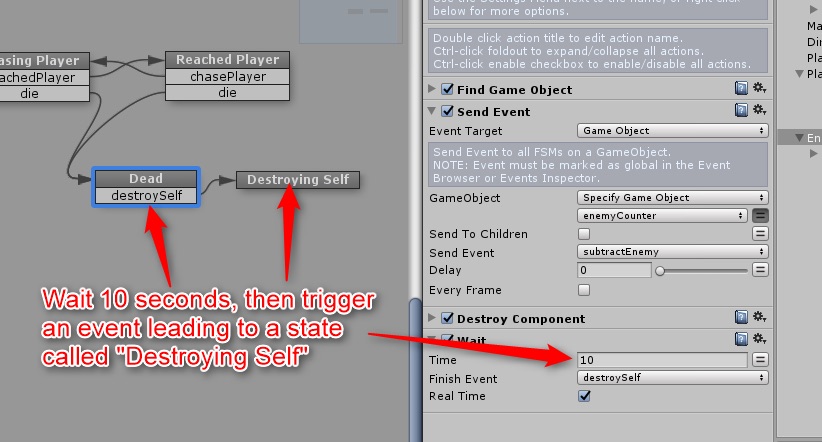
Added the Wait action.
Create a single “Destroy Self” action in the Destroying Self state to unlock Detach Children.
The reason for this is to keep child elements from the game while granting them to the enemy.
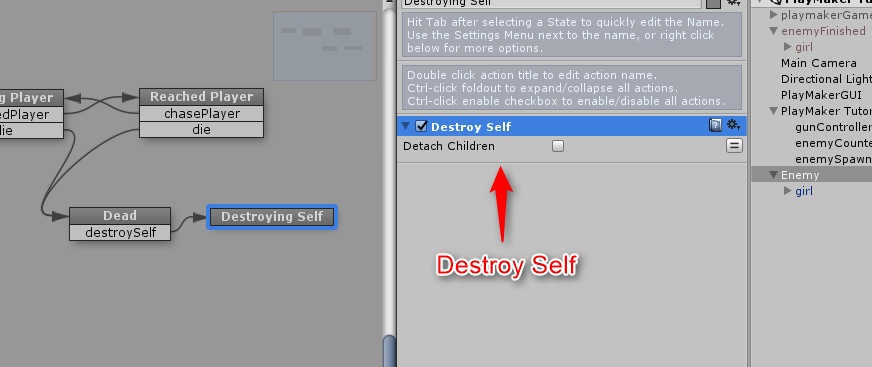
Adding the Destroy Self action
Prefabrication of enemy objects
Now, create a pre-fab of enemy objects.
First, drag the enemy object from the scene hierarchy directly into the myPrefabs folder.
Next, remove the original game object from the scene hierarchy, as shown in the image below.
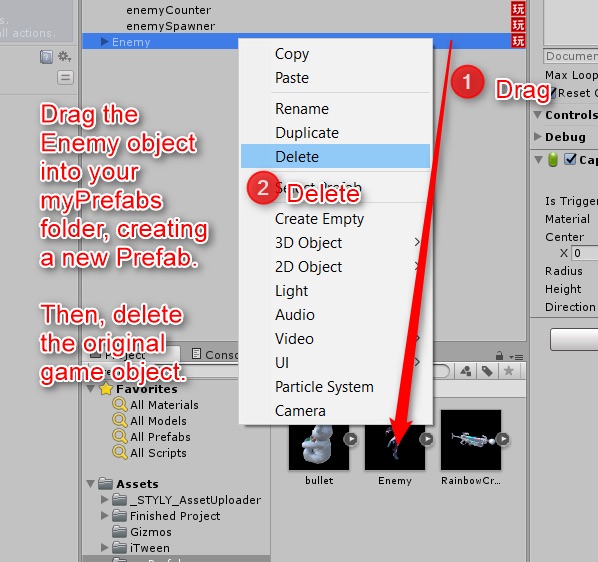
Prefabrication of Enemy
Edit enemySpawner’s FSM
Drag the Enemy prefab you created into the Game Object field to complete the enemySpawner’s FSM.
Select the enemySpawner object and proceed to the Spawning Enemy state in the FSM.
Drag the Enemy pre-fab to the Game Object field of the Create Object action with the red error icon.
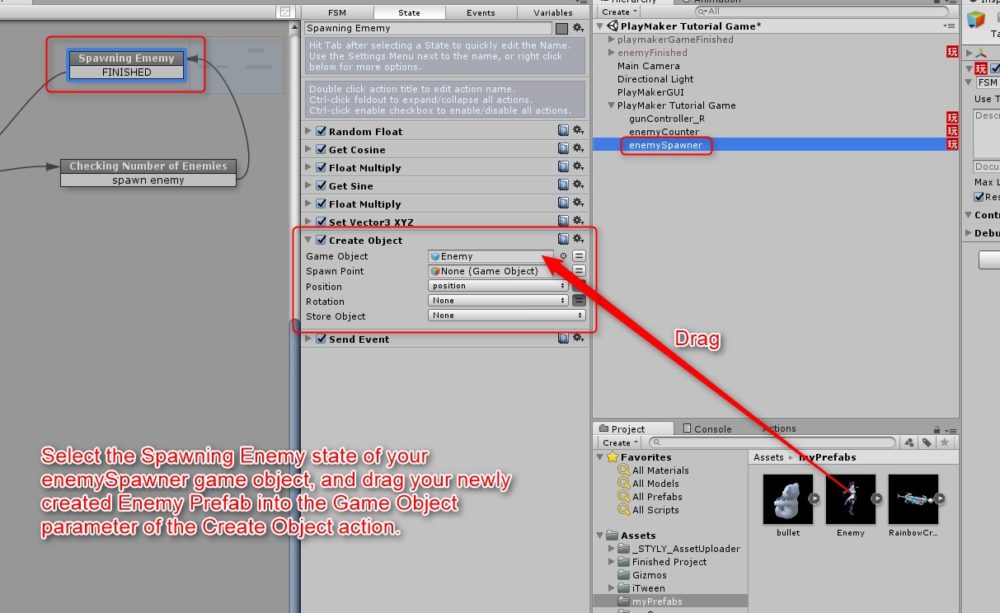
Drag Enemy to Creat Obect
In addition, with PlayMaker, you can directly edit FSM even if the object is prefabricated once.
If you need to edit the Enemy prefab again, you can do so by selecting it from the myPrefabs folder.
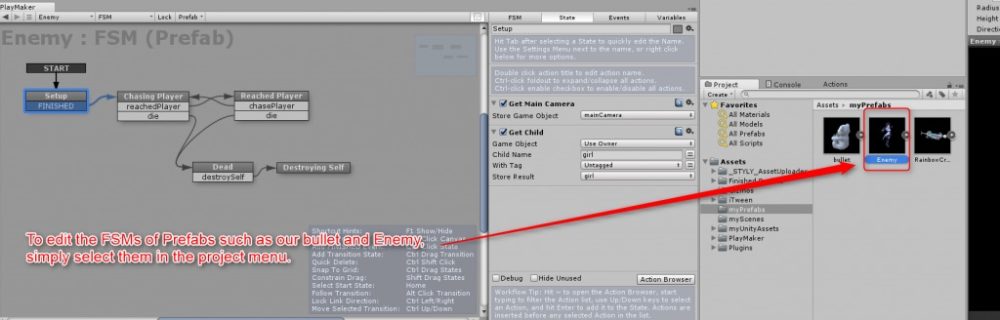
Re-editing prefabricated objects
Animation Settings
Once you have the logic for the enemy “girl”, you can add animation to “girl”.
Select the object of “girl”, Enemy, from the Scene Hierarchy and click Window > Animator from the drop-down menu to bring up animation controller of “girl”.
The SapphiArthcan model we use in the tutorial comes with a variety of animations, and in order to add them, just select the animation that you want and make minor modifications.
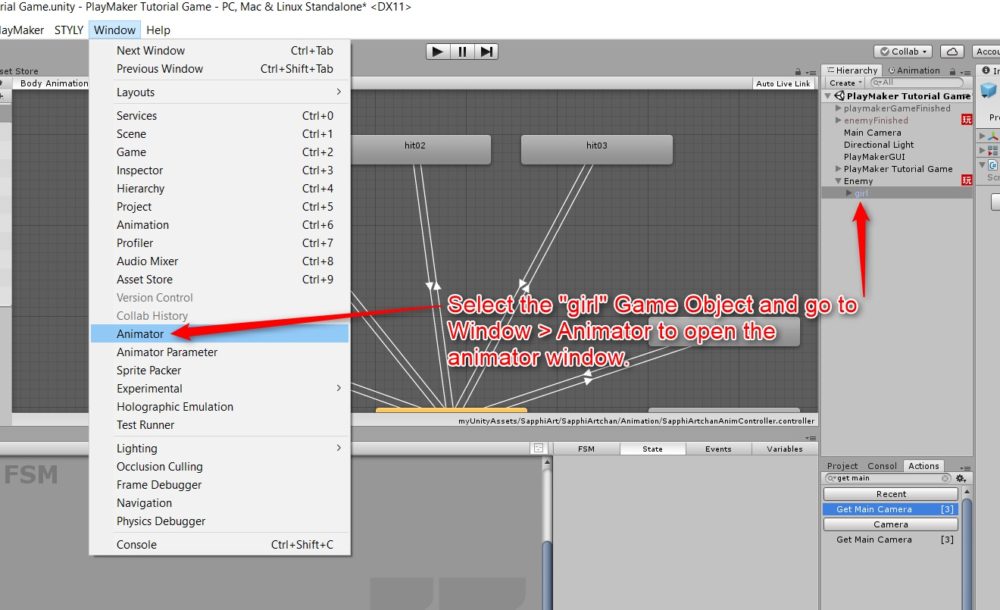
Select Animator
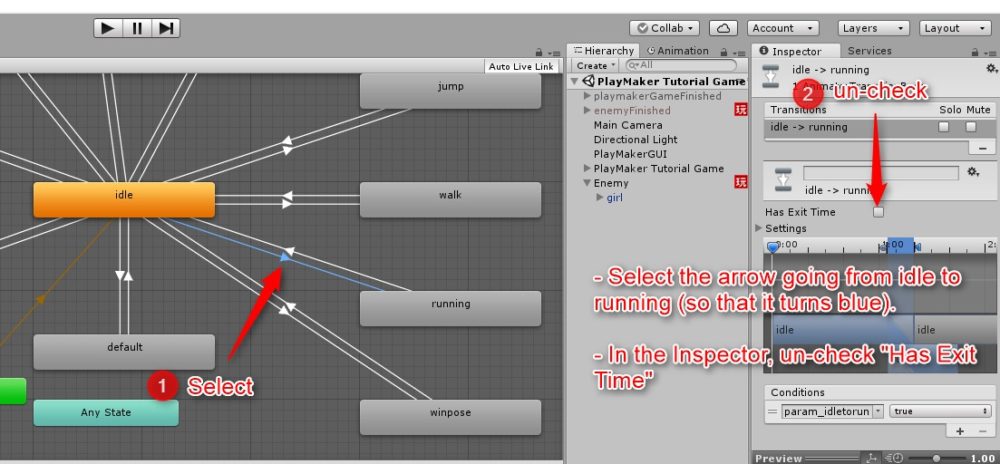
First, we set the transition arrows connected to “idle” and “running” to 0.
Select each of the two arrows and uncheck the Has Exit Time box in the Inspector window.
Repeat this for the “hit01” and “KO_big” animations, as shown in the image.
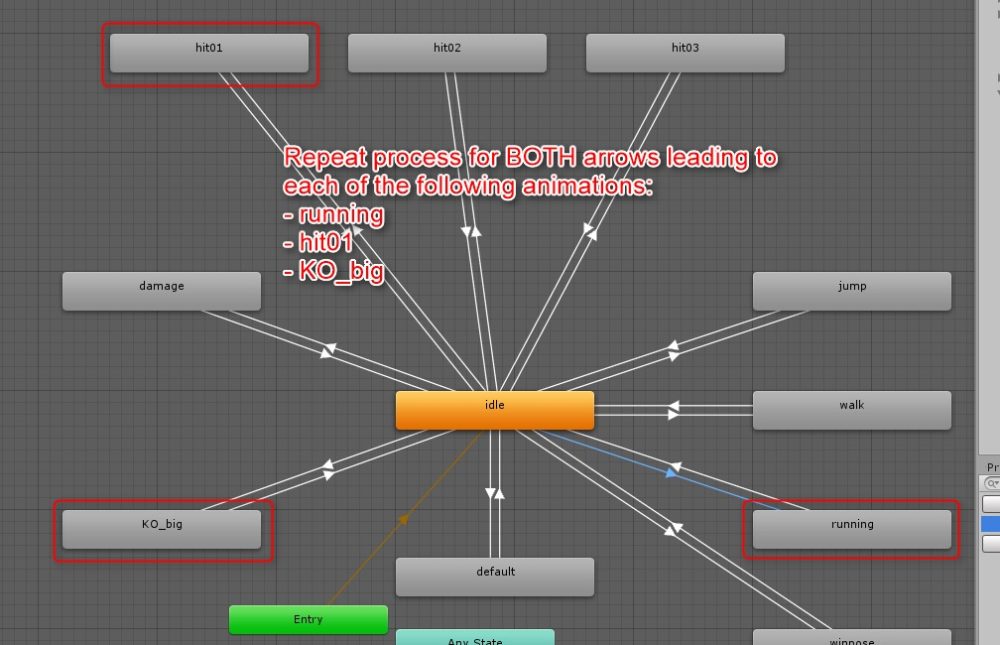
Uncheck the Has Exit Time box.
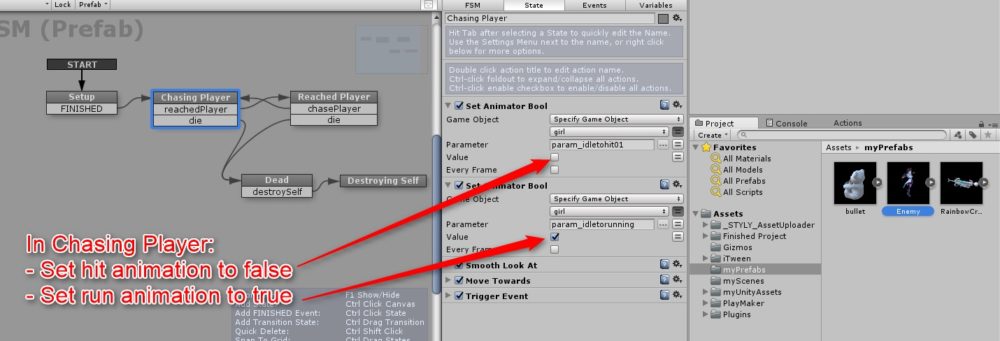
Get it back to the Chasing Player state in the FSM in the Enemy pre-fab for a moment.
Create two “Set Animator Bool” actions.
One is to set the parameter to “param_idletohit01” and uncheck the Value box and set it to false.
The second is to set the parameter to “param_idletorunning” and check the box to make it mature.
Note that param_idletohit01 means attack and param_idletorunning means running animation.
With the settings above, if the enemy is attacking the player, the enemy stops attacking and switches to running.
Setting the Chasing Player State
Go to the Reached Player state in the FSM of the Enemy pre-fab and create two “Set Animator Bool” actions.
In the first case, parameter is set to “param_idletorunning” and Value is set to false.
In the second case, parameter is “param_idletohit01” and Value is set to true.
This will stop the runnnig animation and start attacking (kicking) enemies as they approach the player.
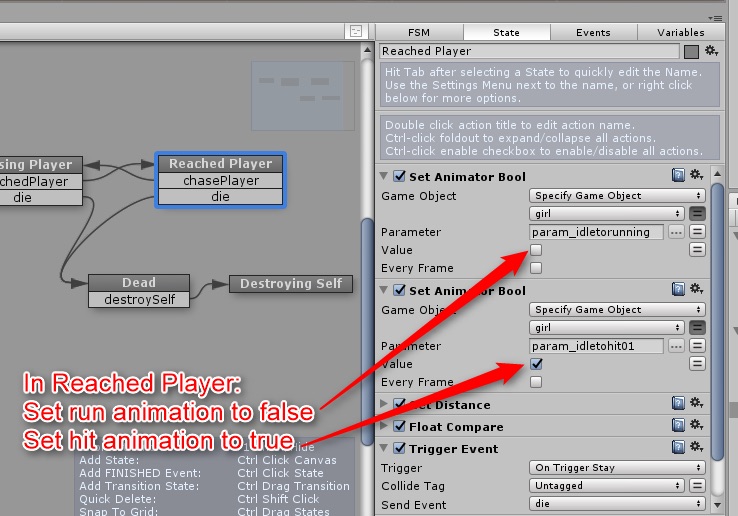
Setting the Reached Player state
Similarly, go to the Dead state and add three “Set Animator Bool” actions.
Set param_idletohit01 and param_idletorunning to false for the first and second Set Animator Bool actions.
For the third Set Animator Bool action, set the KO animation “param_idletoko_big” to be true.
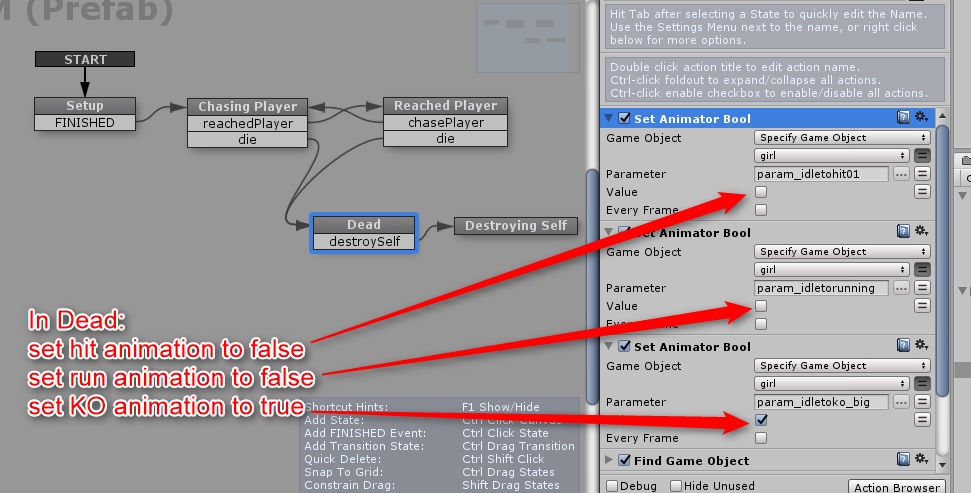
Description of the Dead State
Now when you proceed to the Dead State, all other animations will stop and the KO animation will be activated, with the enemy falling to the floor.
This completes the enemy’s animation settings.
Next time, let’s add sounds to the game.
Sample Scene
You can try out the sample game in the STYLY GALLERY.