If you have used Unity, you may have heard that you can use GitHub in Unity, but you may not know how to use it.
In this article, I’ll briefly introduce the GitHub function and show you how you can implement GitHub when developing with your team using Unity.
I think this is an area where you can improve your production efficiency by getting used to Unity early on.
The more you get used to using GitHub, the more effective it will be, so please start working on it as soon as possible!
*This article is a continuation of the previous article. Please see Part 1 first.
Advantages of Integrating GitHub and Unity
The advantages of integrating GitHub and Unity are as follows
- You will be able to edit your Unity project at any time while saving it as a version. It allows you to revert to any version when you want to revert the editing status.
- Multiple people can share the editing status and develop at the same time.
However, “GitHub for Unity”, which is provided by GitHub, does not have the function to share the editing status with multiple people (as of August 2021).
This article also shows you how to use a service called SourceTree, which supports collaborative development in Unity, to allow multiple people to use the same project.
This article is intended for people who
- People who have heard of GitHub, but don’t really know how to use it.
- Those who have been working with Unity for a while and want to be able to use Unity in a version-controlled manner according to the production status.
- Those who want to work with Unity in a team, but you don’t know how to link the team’s work in Unity.
- Those who want to introduce one of the easiest ways to manage Git, visualizing it in a source tree.
This article does not cover how to introduce GitHub to Unity for team development or how to upload a collaborative project to the web via GitHub.
I’ll start with two things: 1. to be able to manage the production status of each version, and 2. to be able to work with multiple people on a project.
Also, since the goal is to be able to do team development (2), GitHub for Unity, which only includes version control functions, will not be covered in this article.
So, let’s start with the explanation.
Step6. Integrating Unity and SourceTree
In the previous article, we worked up to the point where we were able to link GitHub and SourceTree.
In Step 6 and later, I’ll explain how to visualize the co-editors and production status, and how to revert the version.
SourceTree does not allow you to create a project in Unity and then register the project’s files to GitHub.
Therefore, we need to insert the files manually.
To do that, we will first create an empty Unity project.
(It doesn’t necessarily have to be an empty project, but for the sake of clarity, we’ll start with an empty project.)
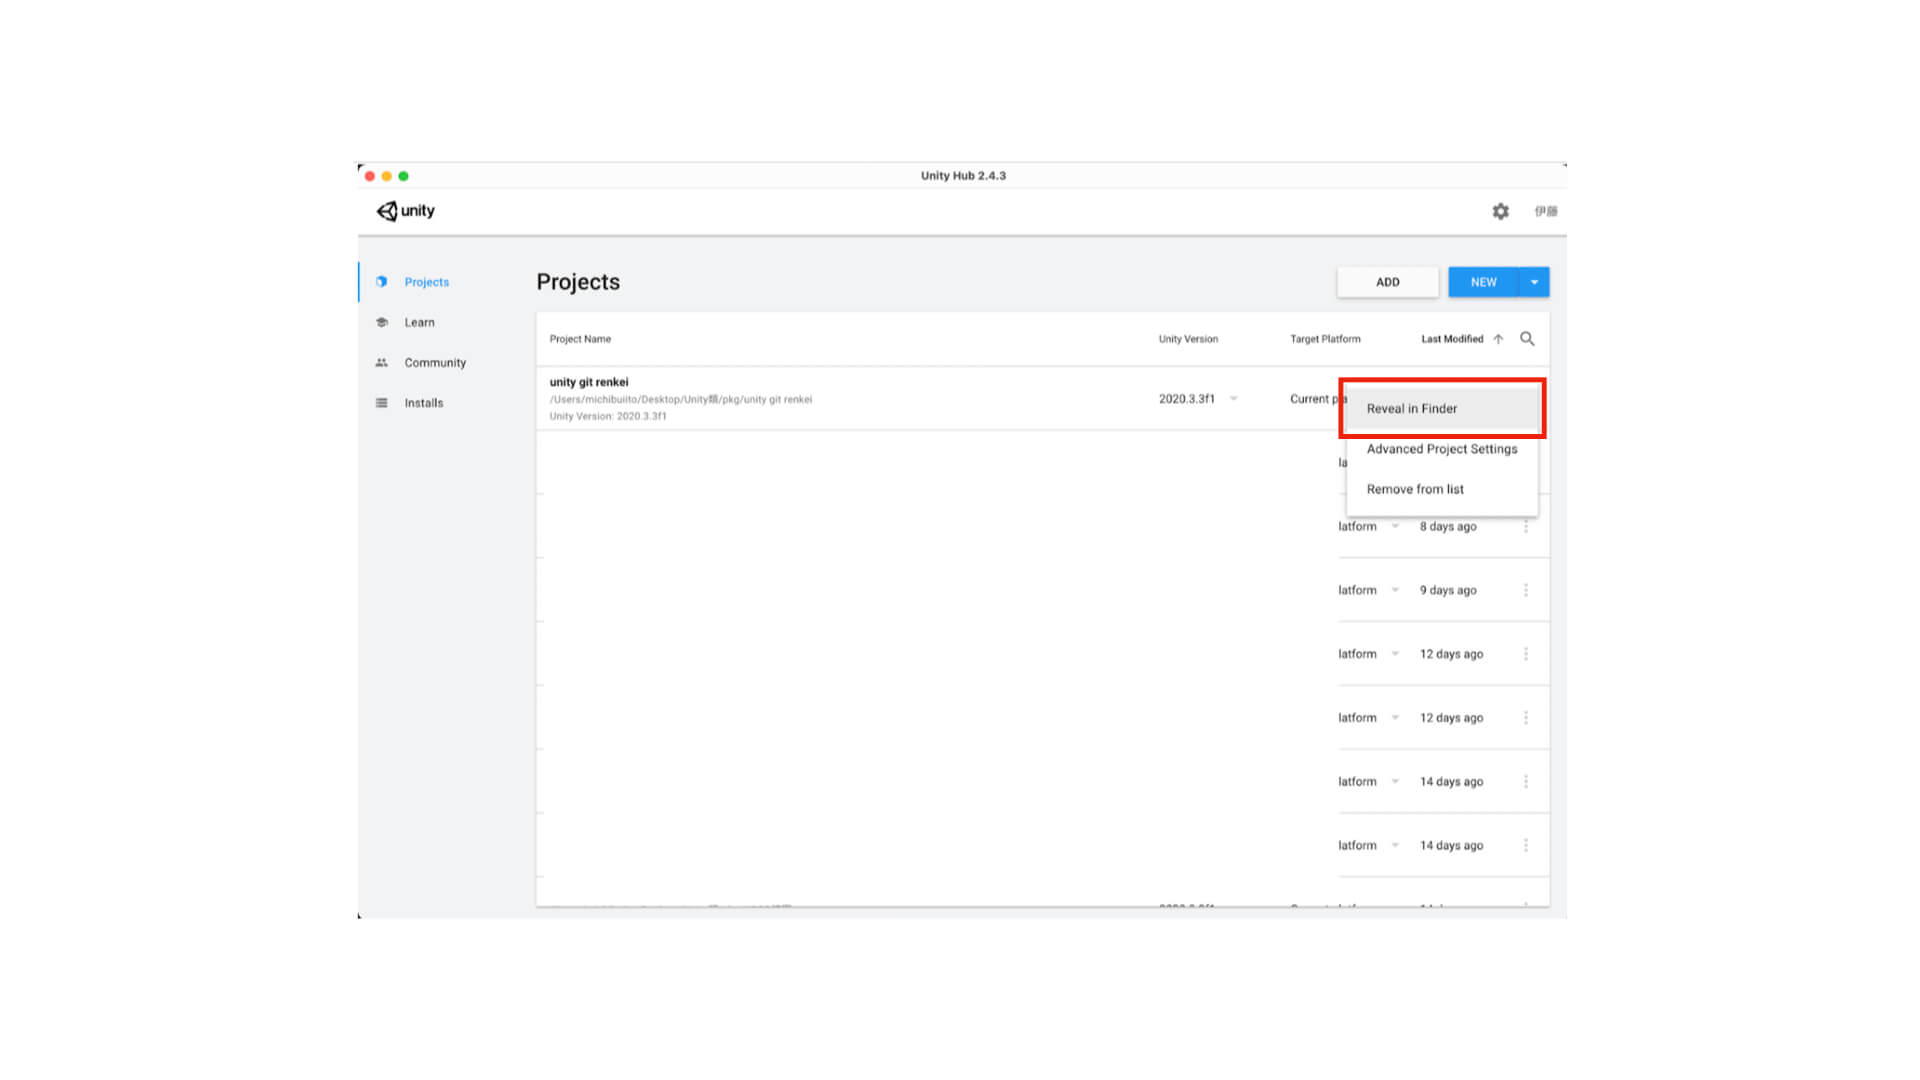
In this example, I named the project “unity git renkei” for the sake of clarity. You can open the file where the project is saved by clicking the “Reveal in Finder” button on the right side of the project list.
*”renkei” means “integration” in Japanese.
(Unity saves all edits made in Unity as a file. The file is saved in this folder.)
Open the file where the project is saved from UnityHub
From within the source tree, you can also view the location of the folder by selecting “Show in Finder” from the File Status column in the upper left workspace.
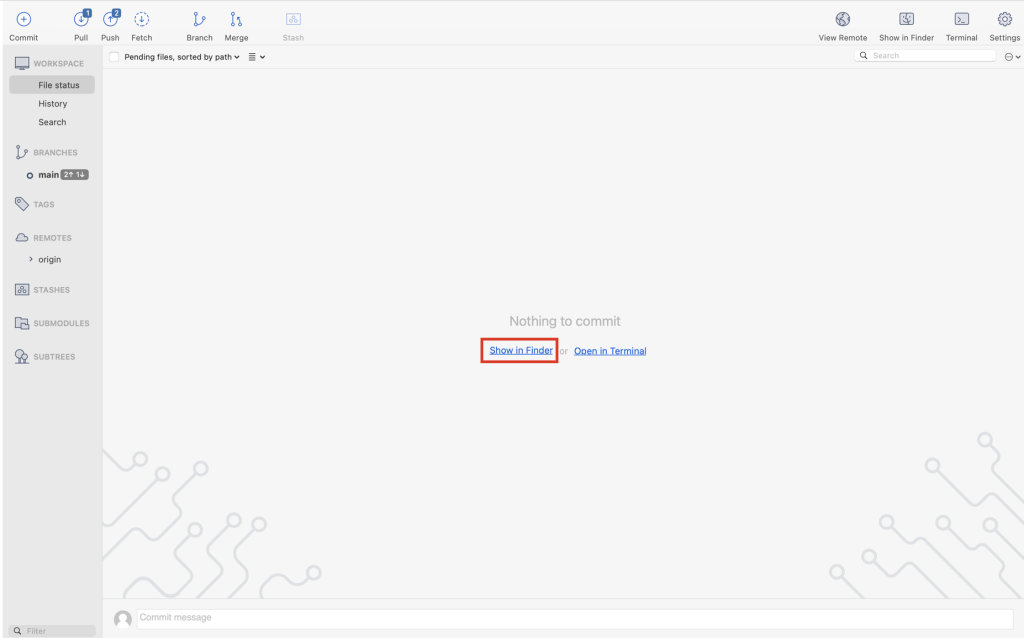
Select Show in Finder for the source tree as well
Save the Unity project folder to the folder where you want to save the SourceTree.
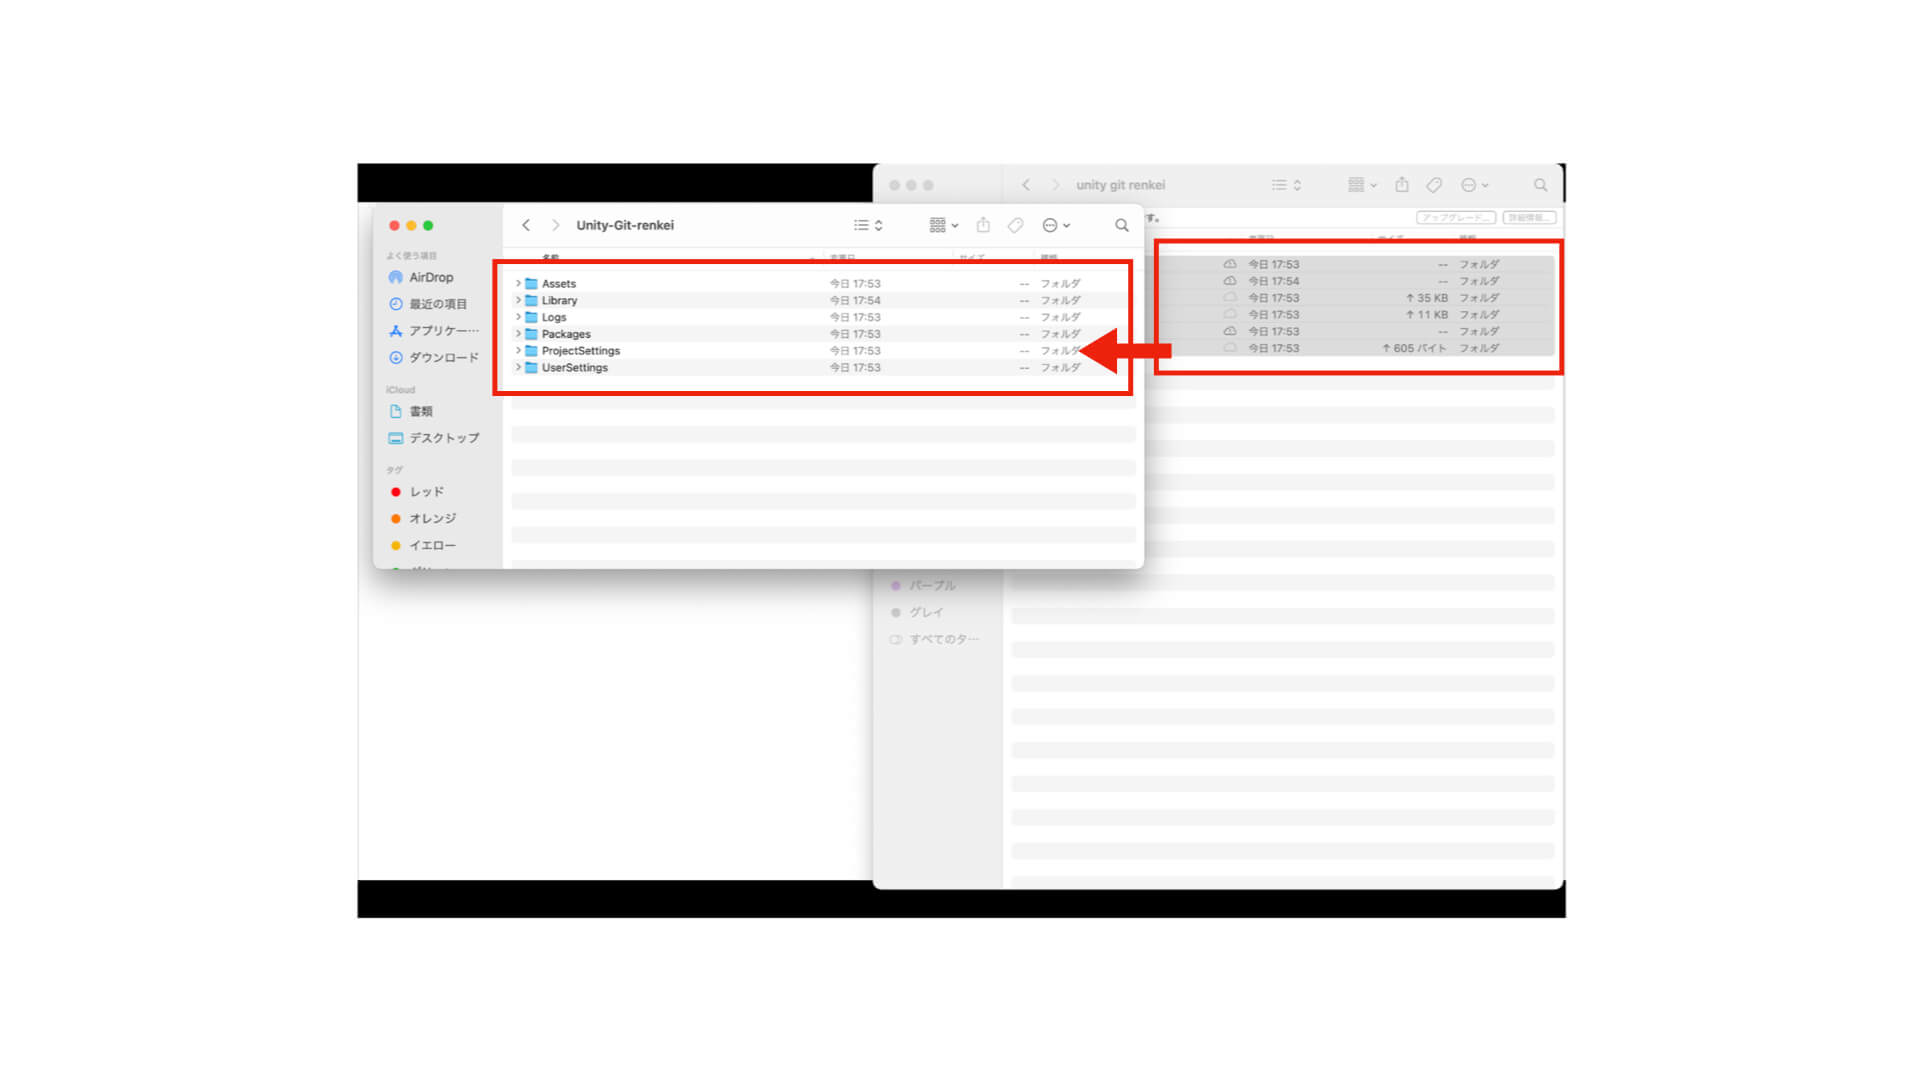
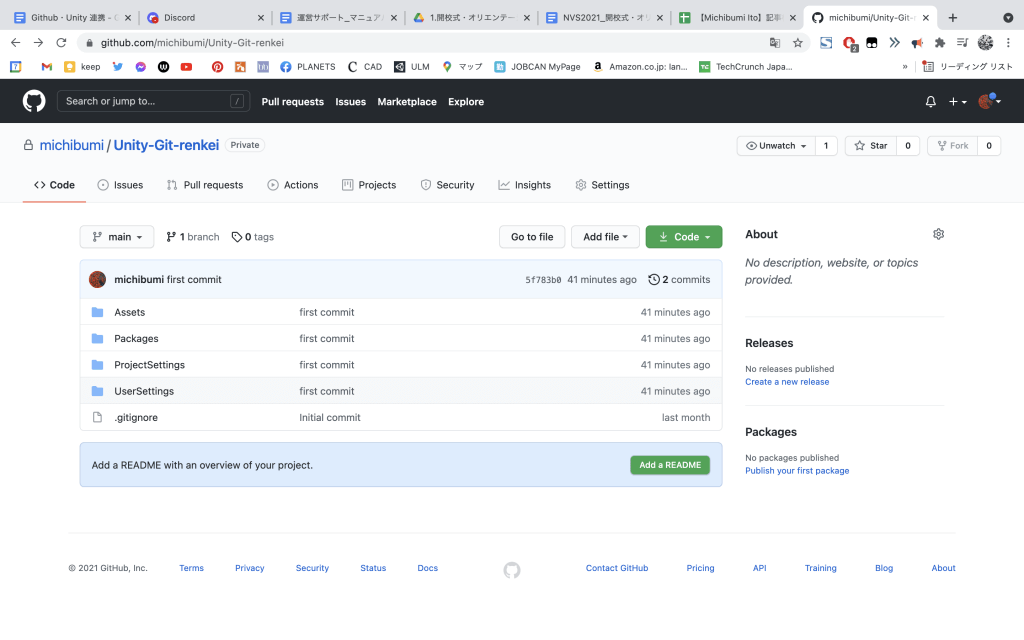
Reflecting Unity files in the source tree
Here, it’s a little confusing, but I copied and pasted “Assets, Library, Logs, Packages, ProjectSettings, UserSettings” from the Unity project folder called “unity git renkei” into the SourceTree folder called “Unity-Git-renkei”.
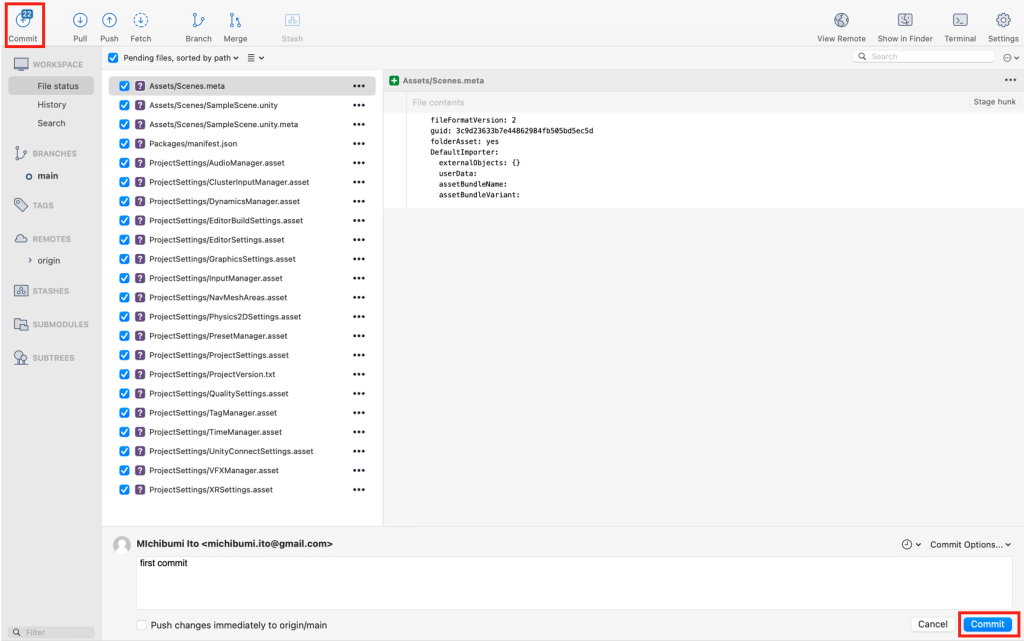
Screenshot of the source tree with Unity files reflected. Check “Pending File” and select “Commit” on the top left of the screen.
Then you will see the information of the Unity project files in the lower left corner of the SourceTree.
Select the checkbox to the left of the “Pending Files” to select all the data you have registered.
After you have selected all the files, select “Commit” on the screen (detailed explanation of committing is given later, so at this point you should be able to work).
You will then see a field where you can enter a memo for the commit, so enter a memo of your choice and select commit. In this case, I chose first commit.
This means that you have committed to your local file.
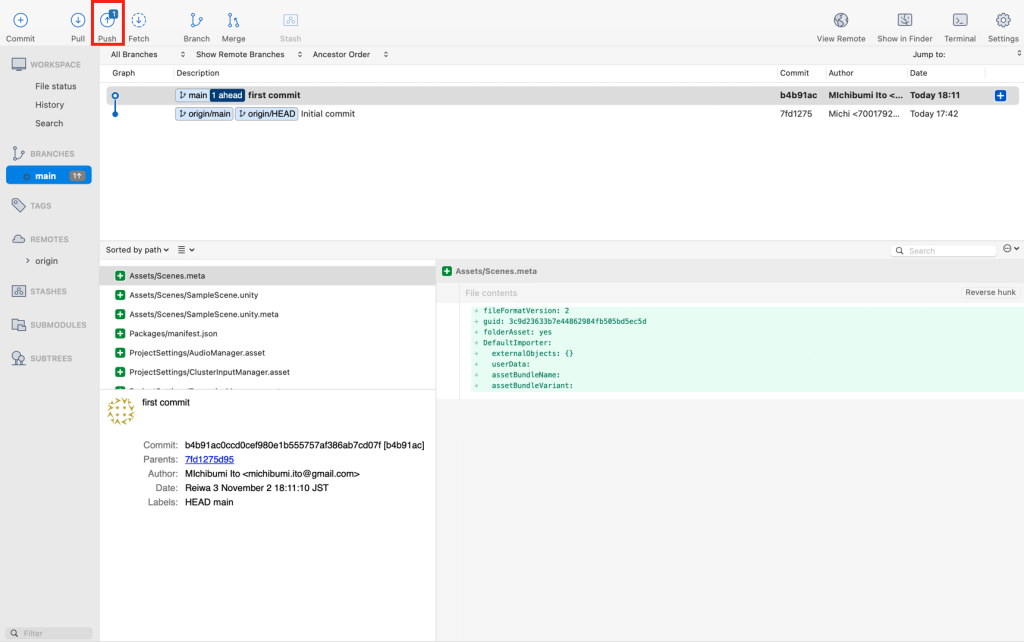
Save it to the online server by selecting Push.
Next, select the commit that you have registered (in this case, you can see the first commit that you wrote down earlier), and select “Push” at the top of the source tree.
This push operation will upload the current data to the server, and save your edits so that other editors can see them (a detailed explanation of the push operation is given later, so at this point, you only need to be able to do the operation).
After this, open the project that was moved to the clone in Unity.
The files you moved the folder to be opened from Add in UnityHub.
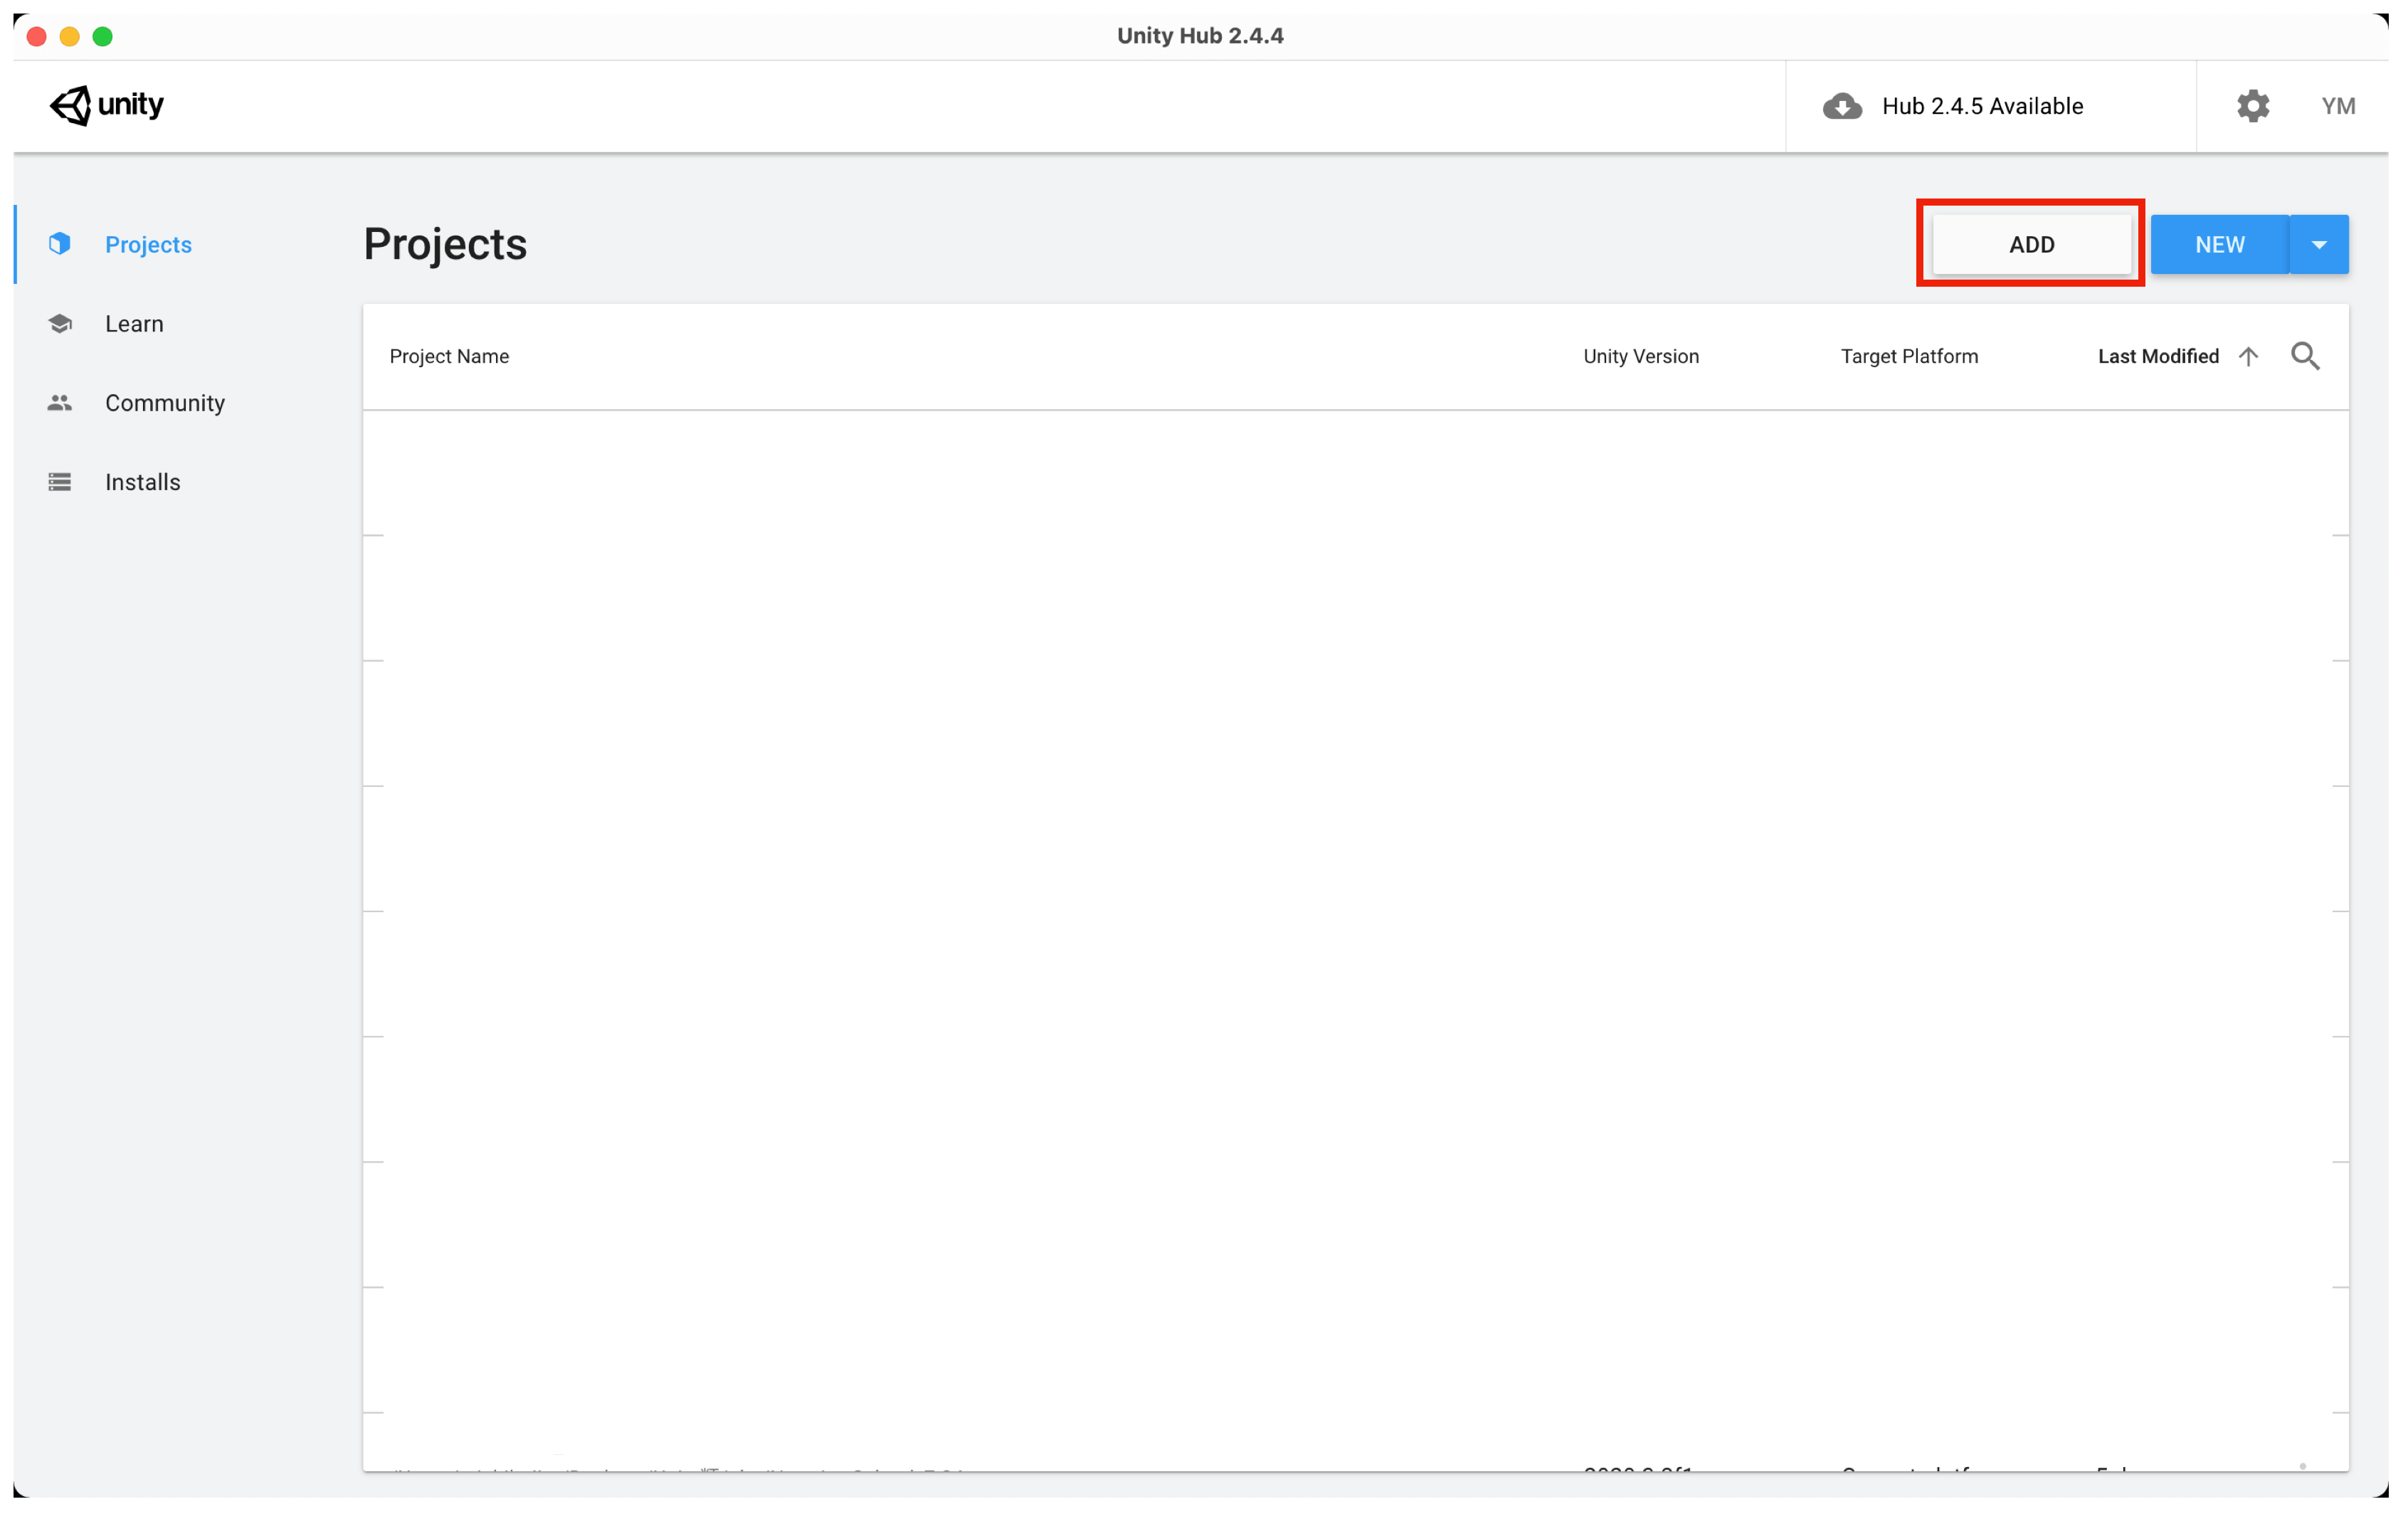
You can select a project from a folder from “ADD” in the upper right corner of the project selection in UnityHub.
You can create a Unity project that can be synced to GitHub by copying the data from the default project you just created, selecting the cloned file, and opening the project.
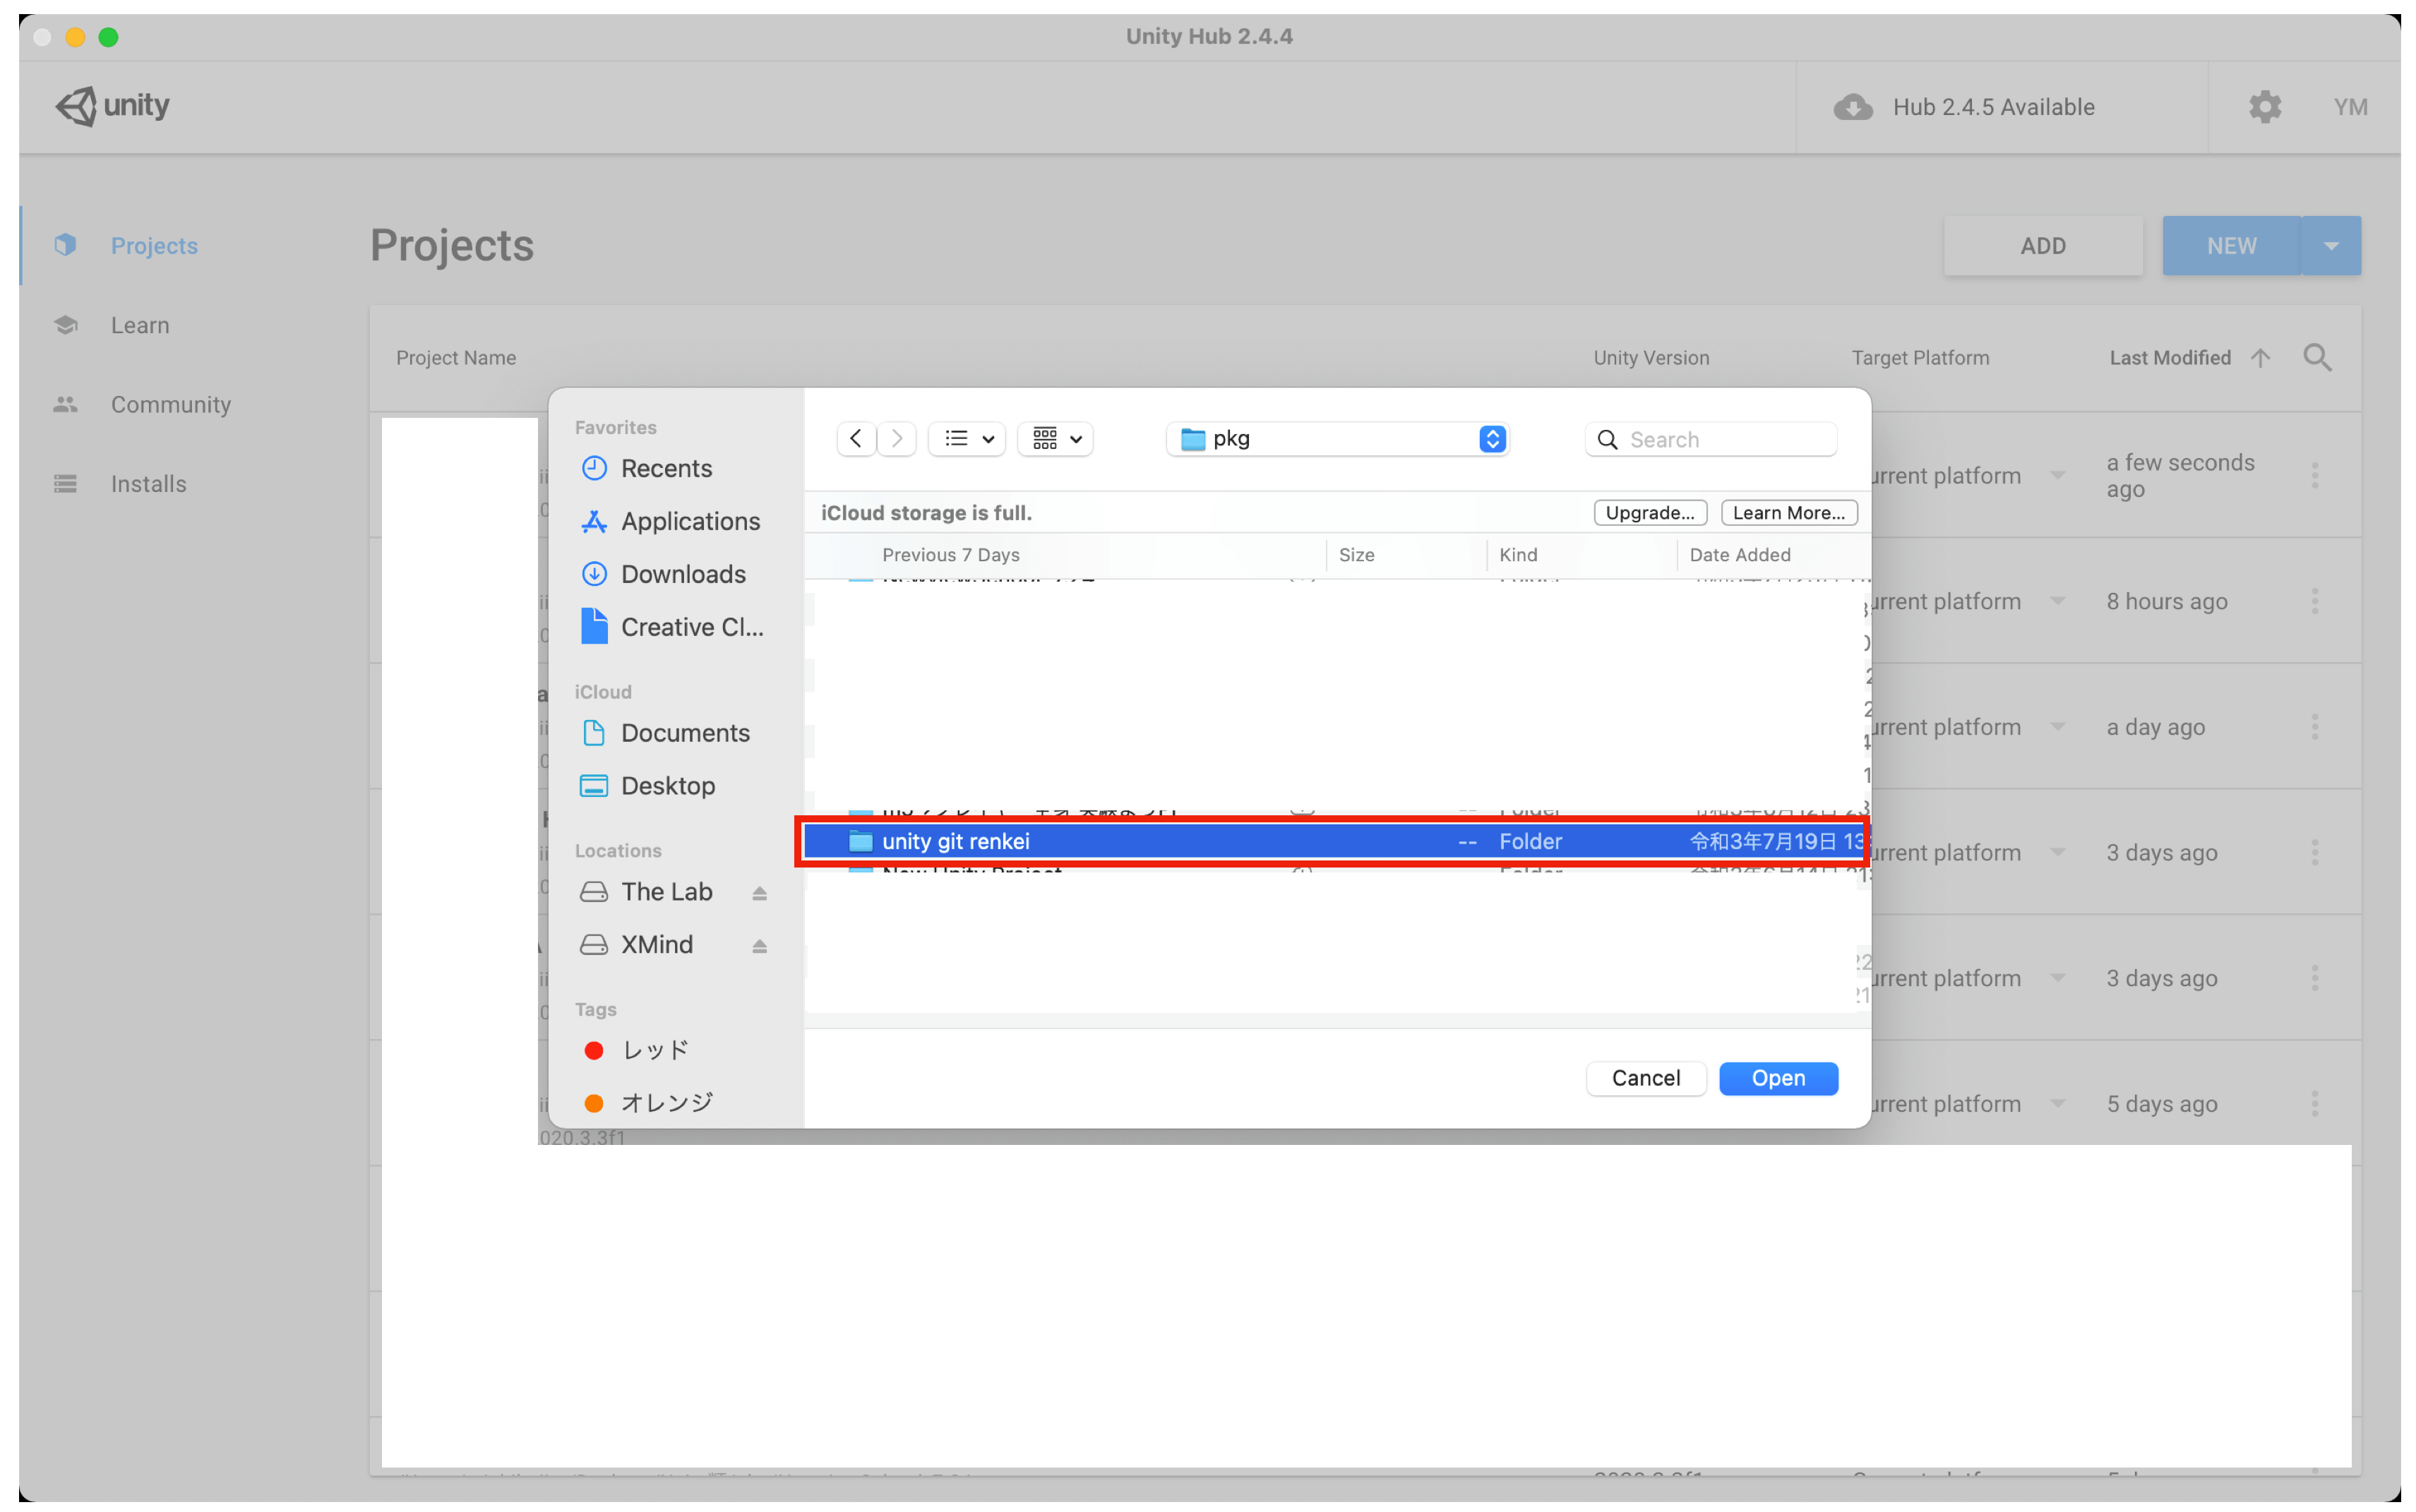
Copy the default project and open the cloned file in Unity.
Now you’re set up to update the files on GitHub with SourceTree, which will be saved in a folder when you update Unity!
From here on, I will explain how to use Unity and GitHub for collaborative editing and version control.
I will explain in the following order.
- How to invite a co-editor
- Reflecting your own editing status to the team / Reflecting other people’s editing status to you
- Notes on co-editing
- How to revert your editing status
How to invite a co-editor
You can invite co-editors from GitHub.
Open the applicable repository on GitHub and click
“Settings” on the right side of the menu that says “Code/Issues/Pull requests/Actions/Projects/Security/Insights/Settings”.
Select “Manage access” at the top of Options in the left column.
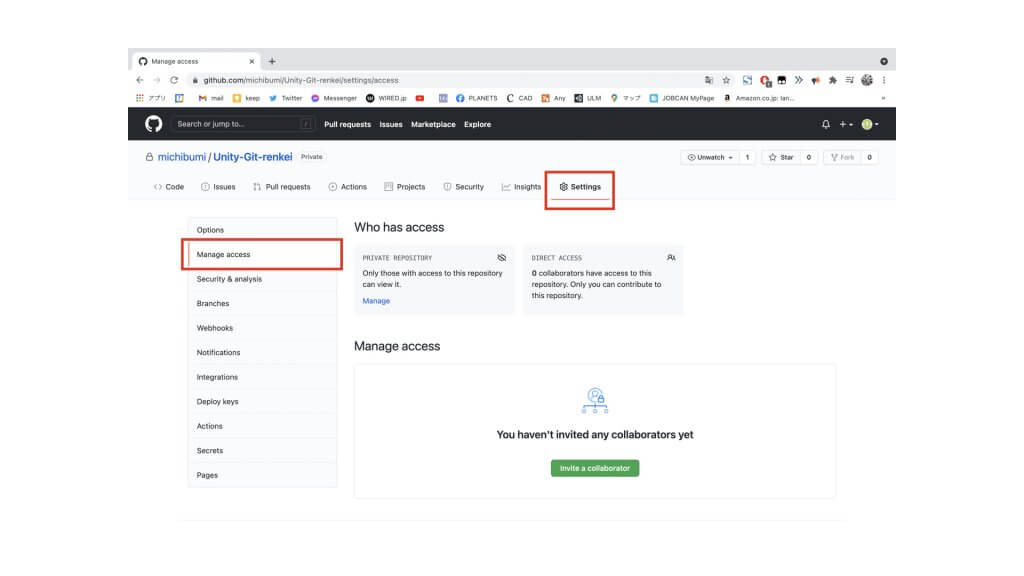
Select Manage Access from Settings
Once you have selected Manage access, the green button “Invite a collaborator” will open the following tab where you can invite a collaborator.
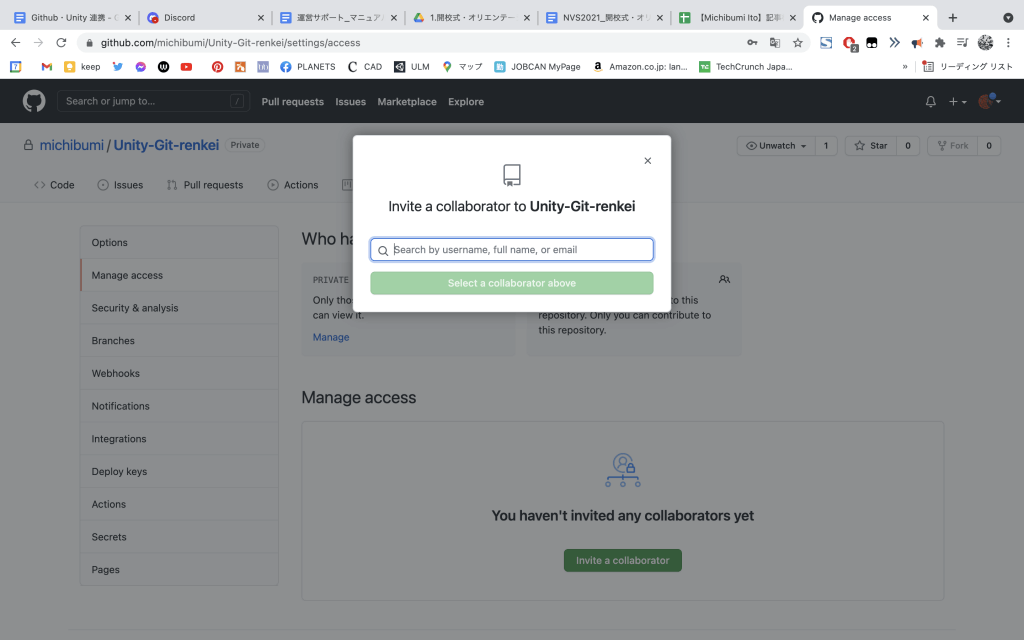
Enter the GitHub account of the person you want to invite in this box to invite him or her.
Reflecting your own editing status to the team / Reflecting other people’s editing status to you
Explanation of the basic operation “commit”
A commit in GitHub is a command to register a file you’ve added or changed in Git.
Commit allows you to save your edits in Git, but at this point, if you’re working on a project, it doesn’t save the edits you’ve committed to other people. You will only be able to save your own edits locally.
In GitHub, there is a concept of local and remote repositories.
When you collaborate with a team, each of you saves data in your local repository first, and then collects it in a remote repository.
Commit is the process of saving your edits in the local repository.
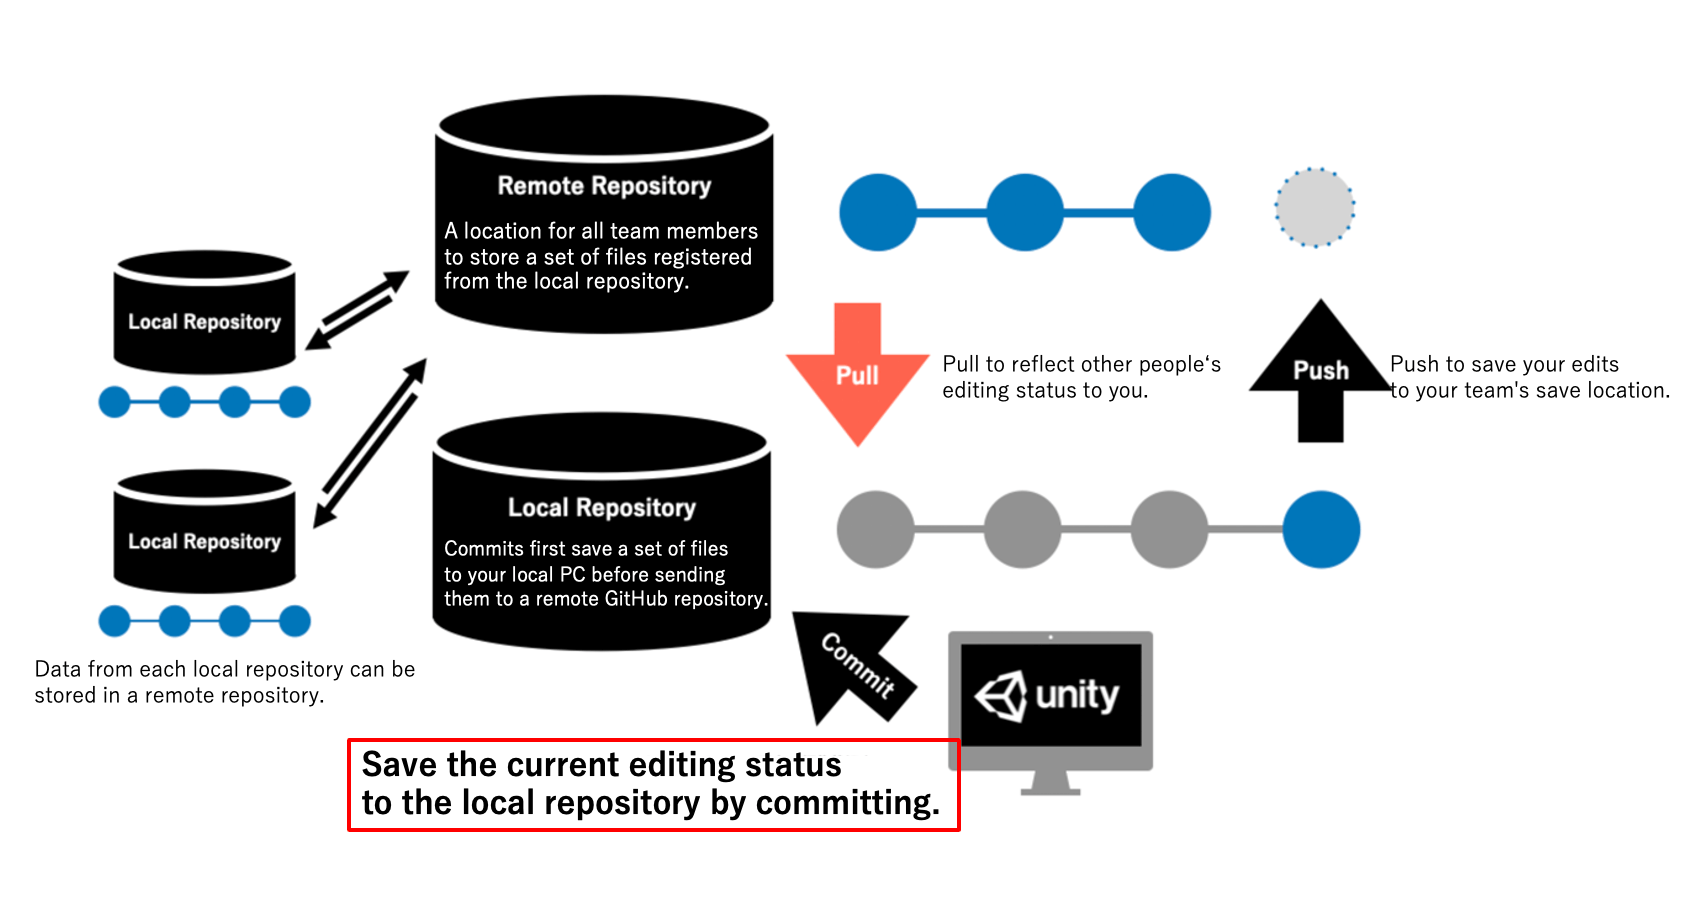
Commit allows you to save your edits to your local repository.
Let’s actually commit the editing status of Unity to GitHub.
First, let’s make some edits to the Unity project we have just created (left).
This time, I put some cubes in the Hierarchy and also created a Prefab for it in Assets (right).
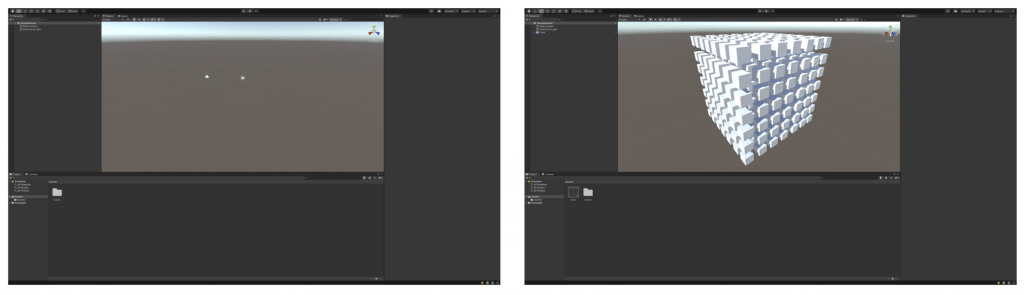
I made a prefab with lots of cubes in Unity.
If you “Save” this project and open the file of this project from Reveal in Finder in UnityHub as before, you will see that the above edits have been saved on the file.
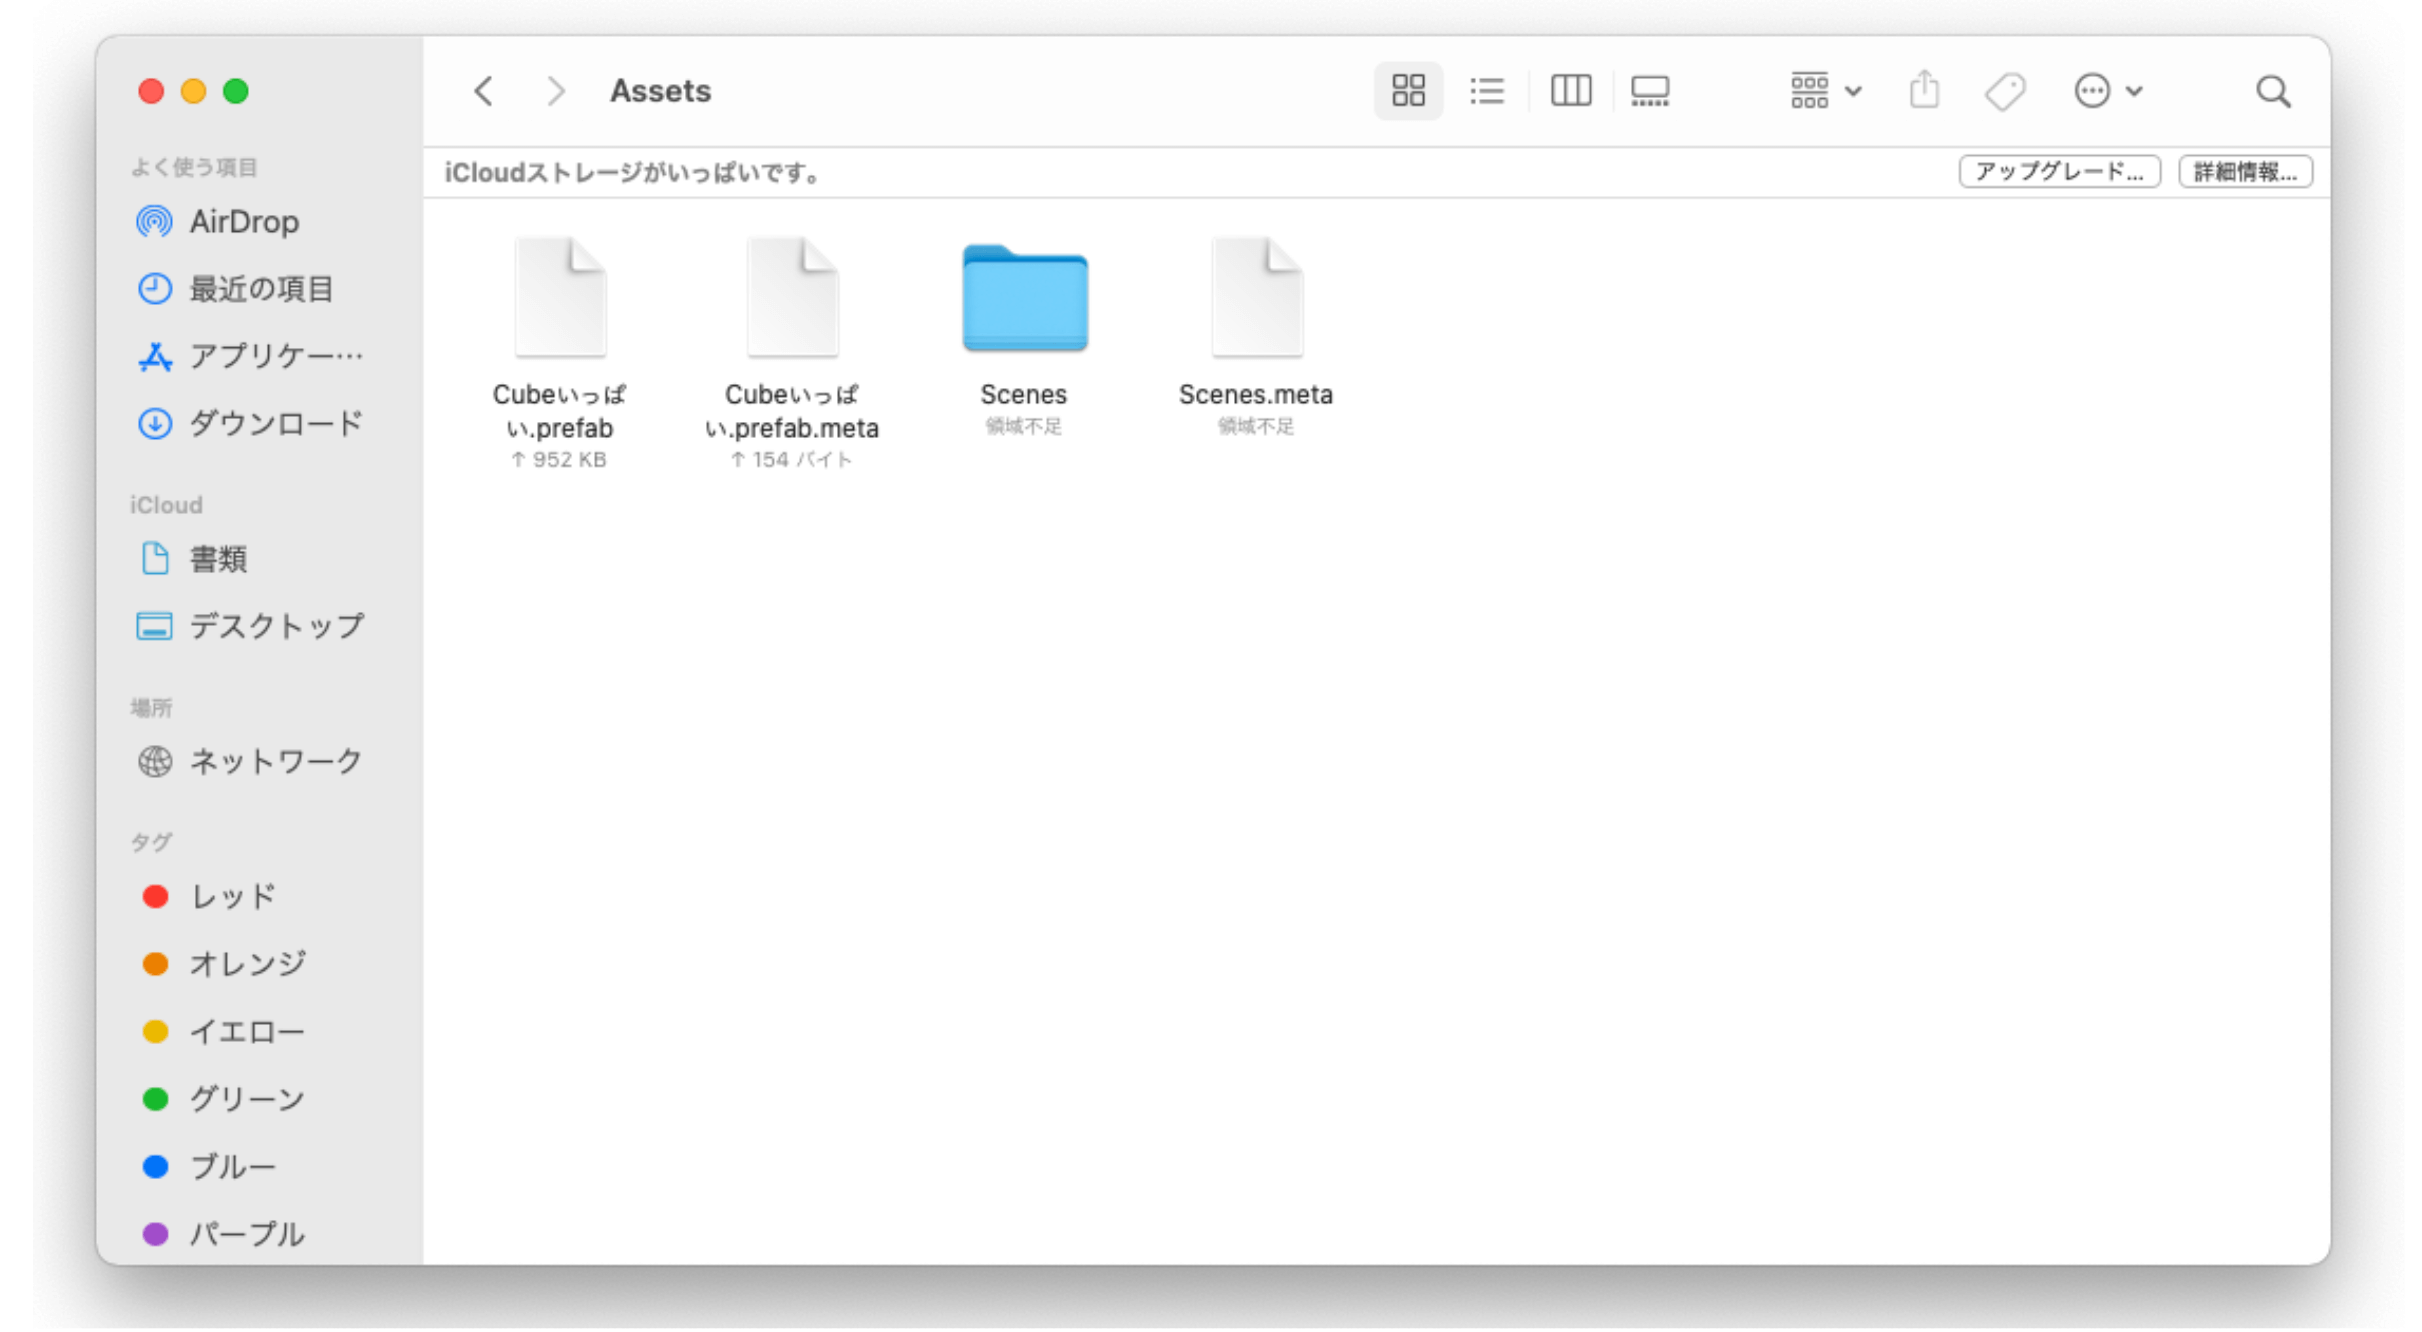
The state of Assets after Save.
Cube and its metadata are reflected in Assets (I won’t go into the explanation of metadata this time because it would be off topic).
Commit this data. In the pending files, select the one you want to save and choose commit.
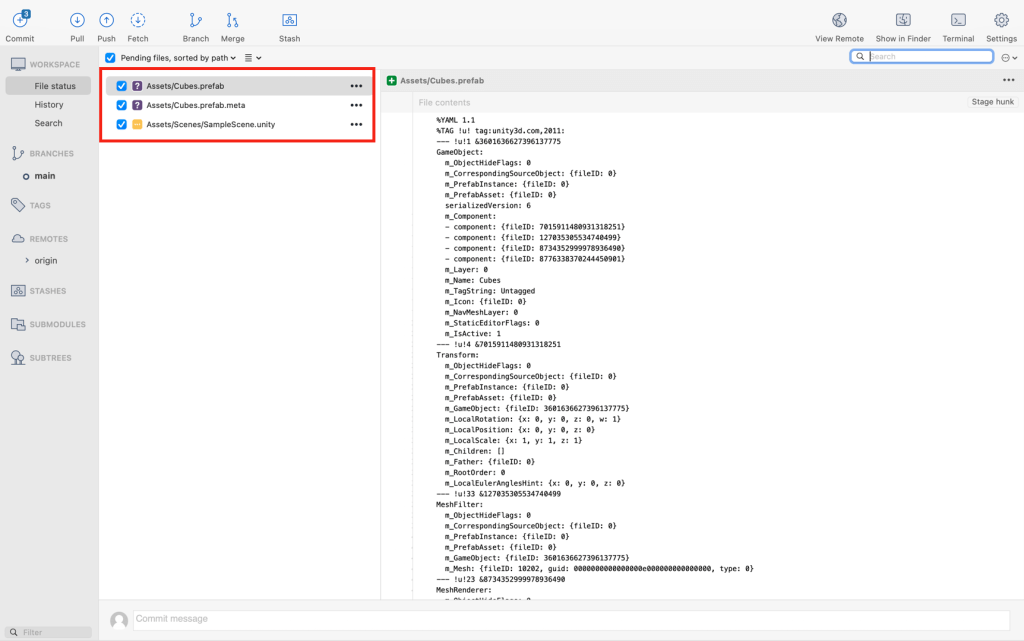
As before, make sure that the file you are saving is checked and select commit.
You can add a comment in the field below (in this case, I added “add CUbes”).
If you get a confirmation for the addition, press OK. Now your local repository will reflect your current editing status!
Explanation of the basic operation “push”
Pushing in GitHub means saving your local work to a remote repository (where you store your edits).
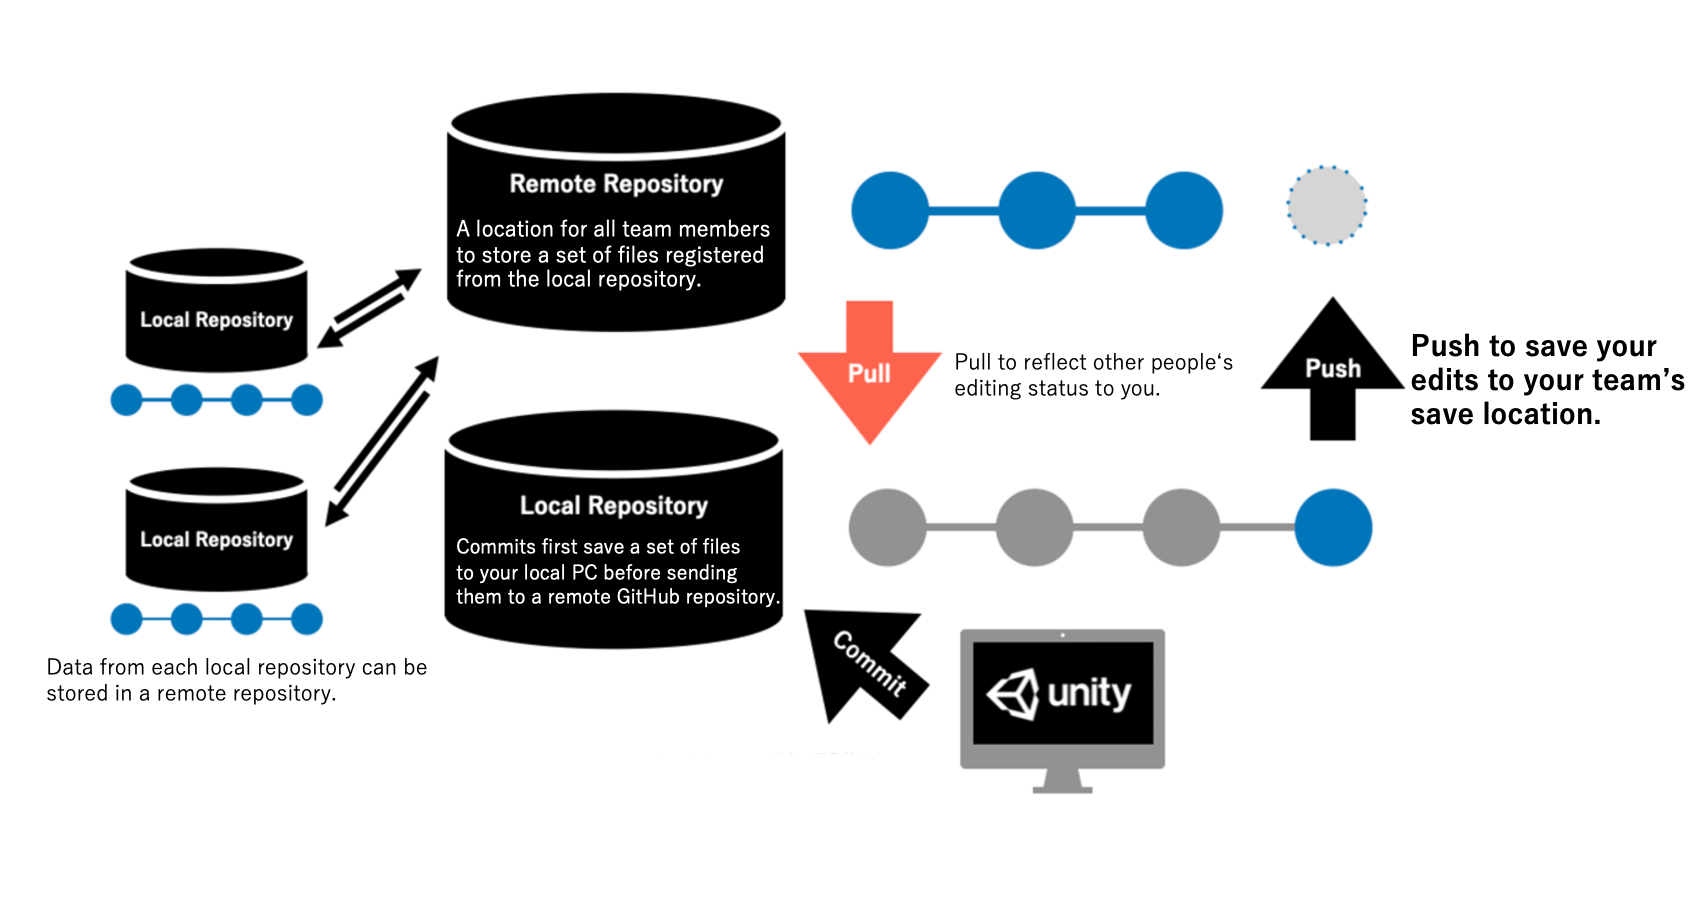
Pushing allows you to reflect the state of the edits that were saved in the local repository to the remote repository.
Select the one you have just committed and select push at the top of the source tree, you will get a confirmation as shown above, press OK.
This has saved the data of the edit status to the remote repository.

Press “OK” to push the selected items as they are checked.
The change is that the “origin/master” label has been added.
This label is called “branch”.
“origin/master” refers to the remote repository and “master” refers to the local repository.
Explanation of the basic operation “pull”
In GitHub, a pull is the opposite of a push.
Pulling data from the remote repository, where collaborative editing data is stored, to your local repository to reflect the editing status in Unity is called pull.
By pulling, you can reflect other people’s edits stored in the remote repository to your own local repository.
Notes on Collaborative Editing
When collaborating on a project using GitHub, you need to be careful.
If multiple people are working on the same thing at the same time, it can lead to a situation called a “conflict”, where someone’s work is not reflected, or the data is unintended due to overlapping edits, which can be the reason for errors and bugs.
In this case, you will get an error like “error CS 8300 : Marge conflict marker encounterd” in Unity.
There are several ways to avoid this conflict, but a simple idea is to separate the work area as much as possible.
The following ideas will help you deal with the problem.
- Common scenes should not be messed with together.
- Common prefabs should not be manipulated with together.
- (If you are working with a program) check in advance the scope of the program to be edited and the scope of changes to be applied by the program, and avoid overlapping work areas and editing targets.
As a simple example, you can avoid this by creating a folder for each worker in Unity’s Assets, and then combining the editing statuses while working on each, or by having only the person in charge of the integration work on the final integration so that the work does not overlap. You can avoid conflicts by creating folders for each worker and using scenes, prefabs, assets, etc. in each folder.
(Folders can be created by right-clicking on the Unity Project window > Create > Folder.)This is what it looks like.
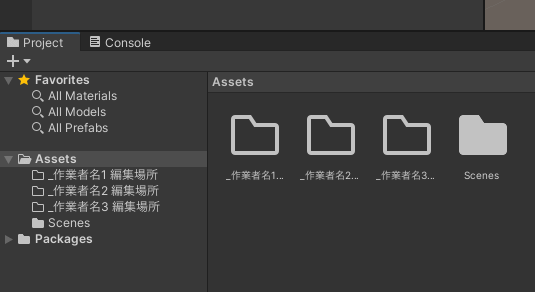
Here’s an image of how you can create a folder for each worker in Unity
It’s also a good idea to create some simple rules for organizing and naming your scenes, prefabs, assets, etc., to make the integration process easier.
For example, here’s what it looks like
- Decide with your team how to create a folder hierarchy for each type of data, and organize prefabs into prefabs and materials into materials folders.
- If the opening scene is called “OP”, and the main character for the OP scene is called “MainCharacter”, and the worker’s name is “Sato” (for example), the file name should be “OP_MainCharacter_Sato”, so that you can tell what the data is for just by looking at the name.
If you are having trouble with the conflict, please refer to some sites for solutions, as appropriate.
How to revert the editing status
You can revert the status of your edits in SourceTree.
If you accidentally commit/pull/push, etc., you can do so by following the steps below.
Right-click (or two-finger-click on mac) on the commit you want to revert, which is the one before the one you accidentally committed. In the tab that appears, select “Reset main to this commit”.
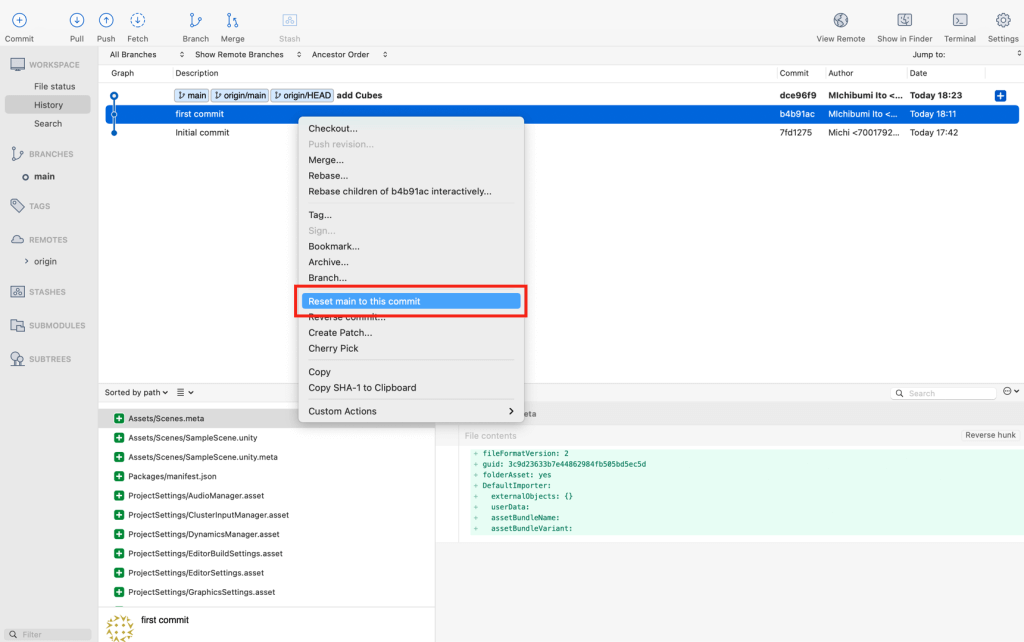
Select “Reset main to this commit”
This will bring up a tab like the one in the image below, where you can select any mode to complete the move.
If you select Soft, you can pretend that the commit never happened, so you can select the same file again and commit it again.
This allows you to revert any commit back to the previous one.
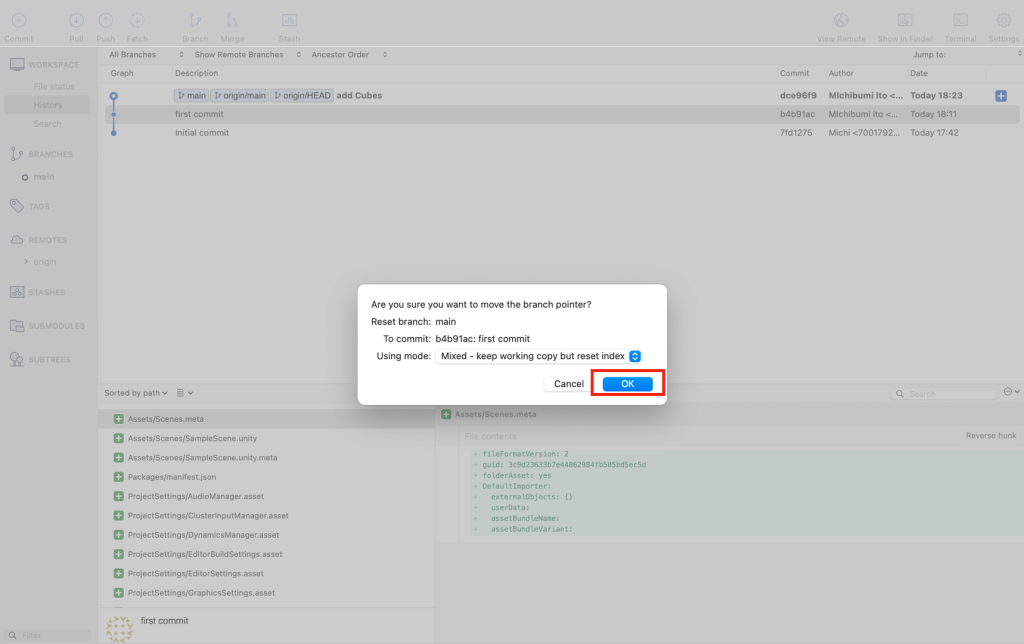
You can choose any mode to revert to. Mix is the most common, and once you get used to it, you can select it deliberately!
Thanks for reading the long story so far!
If you’ve made it this far, you’ve basically got Unity and GitHub working together!
If you can handle the contents of the above article in Unity, you will be able to do the following
- Reset your edits if you want to go back to a certain point in time
- Facilitate multiple people working on a particular project (without having to output and import the Unity package every time you edit)
I think that the earlier you get used to Unity, the more efficient your production will be. The more you get used to it, the more effective it will be, so get started early!
Also, there may be times when you inevitably get stuck in your work. In that case, you can ask us questions at “STYLY FORUM” where we have accumulated knowledge and questions for using Unity and STYLY, or refer to the article about GitHub.