In this article, I introduce how to make a gimmick to make an object appear only when being viewed through a window. The sample project shows some gimmicks by the window shader. Referring to it, please make your original one.
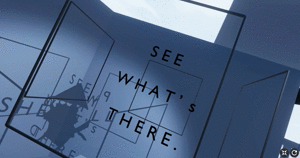
The completion image
Samples
You can taste the sample space from STYLY GALLERY.
9 Windows
You can download the Unity project introduced in this article.
STYLY-Unity-Examples
What is Window Shader?
By Window Shader, you can make a gimmick to make an object appear just when being viewed through a window, which is introduced in Mr 凹’s blog.
It’s a shader that can render various things by using your ingenuity and get along well with VR where you can change your viewpoint freely.
You can make a surprising mechanism by just using this shader, so I recommend it to beginners as well.
A gimmick is created by attaching a dedicated shader to each of ‘window’ and ‘object placed on the other side of the window’.
You can read the detailed technical explanation in Mr 凹’s blog, so check it if you are interested in.
The code of Window Shader
Window Shader
Shader "Window"
{

Properties
{
   _Mask ("Mask", Int) = 1
}

SubShader
{

Tags
{
    "RenderType" = "Opaque"
    "Queue" = "Geometry-2"
}

CGINCLUDE

#include "UnityCG.cginc"

struct v2f
{
    float4 vertex : SV_POSITION;
    UNITY_VERTEX_OUTPUT_STEREO
};

v2f vert(appdata_base v)
{
    v2f o;
    UNITY_SETUP_INSTANCE_ID(v);
    UNITY_INITIALIZE_VERTEX_OUTPUT_STEREO(o);
    o.vertex = UnityObjectToClipPos(v.vertex);
    return o;
}

fixed4 frag (v2f i) : SV_Target
{
    return 0;
}

ENDCG

Pass
{
    ColorMask 0
    ZWrite Off
    Stencil
    {
        Ref [_Mask]
        Comp Always
        Pass Replace
    }

    CGPROGRAM
    #pragma vertex vert
    #pragma fragment frag
    ENDCG
}

}

}
The Shader for the object placed on the other side of the window / Masked Object Shader
Shader "MaskedObject"
{

Properties
{
    _Mask("Mask", Int) = 1
    _Color ("Color", Color) = (1,1,1,1)
    _MainTex ("Albedo (RGB)", 2D) = "white" {}
    _Glossiness ("Smoothness", Range(0,1)) = 0.5
    _Metallic ("Metallic", Range(0,1)) = 0.0
}

SubShader
{

Tags
{
    "RenderType" = "Opaque"
}

Stencil
{
    Ref [_Mask]
    Comp Equal
}

CGPROGRAM

#pragma surface surf Standard fullforwardshadows
#pragma target 3.0

sampler2D _MainTex;

struct Input
{
    float2 uv_MainTex;
};

half _Glossiness;
half _Metallic;
fixed4 _Color;

void surf(Input IN, inout SurfaceOutputStandard o)
{
    fixed4 c = tex2D (_MainTex, IN.uv_MainTex) * _Color;
    o.Albedo = c.rgb;
    o.Metallic = _Metallic;
    o.Smoothness = _Glossiness;
    o.Alpha = c.a;
}

ENDCG

}

}
The Shader for the object placed on the other side of the window (For Sprite) / Masked Object Shader (Sprite)
Shader "MaskedObject/Sprite"
{
	Properties
	{
		[PerRendererData] _MainTex ("Sprite Texture", 2D) = "white" {}
		_Mask ("Mask", Int) = 1
		_Color ("Tint", Color) = (1,1,1,1)
		[MaterialToggle] PixelSnap ("Pixel snap", Float) = 0
	}

	SubShader
	{
		Tags
		{
			"Queue"="Transparent"
			"IgnoreProjector"="True"
			"RenderType"="Opaque"
			"PreviewType"="Plane"
			"CanUseSpriteAtlas"="True"
		}

		Cull Off
		Lighting Off
		ZWrite Off
		Blend One OneMinusSrcAlpha

		Stencil {
		Ref [_Mask]
		Comp Equal
		}

		Pass
		{
		CGPROGRAM
			#pragma vertex vert
			#pragma fragment frag
			#pragma multi_compile _ PIXELSNAP_ON
			#include "UnityCG.cginc"

			struct appdata_t
			{
				float4 vertex   : POSITION;
				float4 color    : COLOR;
				float2 texcoord : TEXCOORD0;
			};

			struct v2f
			{
				float4 vertex   : SV_POSITION;
				fixed4 color    : COLOR;
				float2 texcoord  : TEXCOORD0;
			};

			fixed4 _Color;

			v2f vert(appdata_t IN)
			{
				v2f OUT;
				OUT.vertex = UnityObjectToClipPos(IN.vertex);
				OUT.texcoord = IN.texcoord;
				OUT.color = IN.color * _Color;
				#ifdef PIXELSNAP_ON
				OUT.vertex = UnityPixelSnap (OUT.vertex);
				#endif

				return OUT;
			}

			sampler2D _MainTex;
			sampler2D _AlphaTex;
			float _AlphaSplitEnabled;

			fixed4 SampleSpriteTexture (float2 uv)
			{
				fixed4 color = tex2D (_MainTex, uv);

#if UNITY_TEXTURE_ALPHASPLIT_ALLOWED
				if (_AlphaSplitEnabled)
					color.a = tex2D (_AlphaTex, uv).r;
#endif //UNITY_TEXTURE_ALPHASPLIT_ALLOWED

				return color;
			}

			fixed4 frag(v2f IN) : SV_Target
			{
				fixed4 c = SampleSpriteTexture (IN.texcoord) * IN.color;
				c.rgb *= c.a;
				return c;
			}
		ENDCG
		}
	}
}
Use Window Shader in Unity
Let’s use Window Shader actually.
Crate a shader
Firstly, we create a shader.
① Right-click on the Project window and select ‘Create’ > ‘Standard Surface Shader’ to create a new shader’. Create two of them.
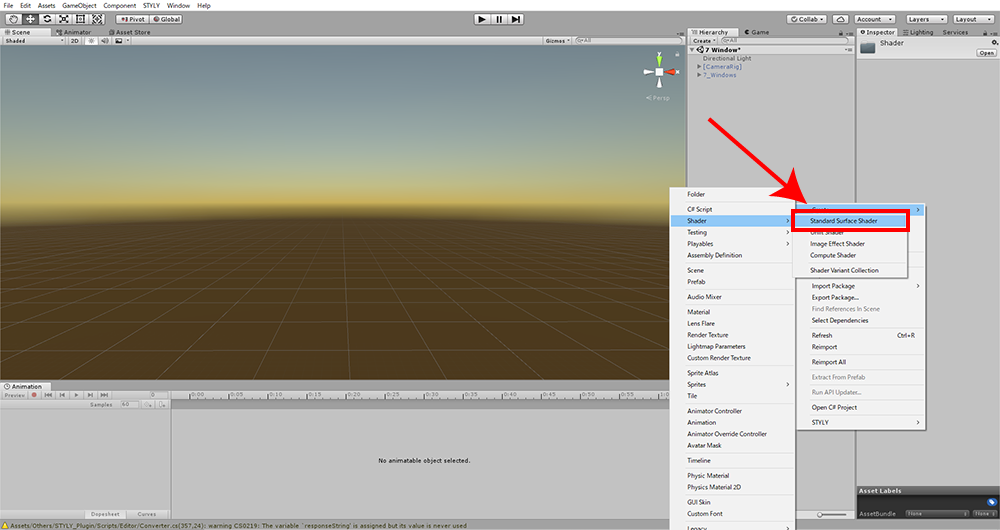
Create new shaders.
② Rename one ‘Window Shader’, and the other ‘Masked Object Shader’.
③ Double-click each shader created to edit its code. After deleting all the existing codes, paste the code for the shader shown earlier in this tutorial.
Paste the corresponding code in each shader.
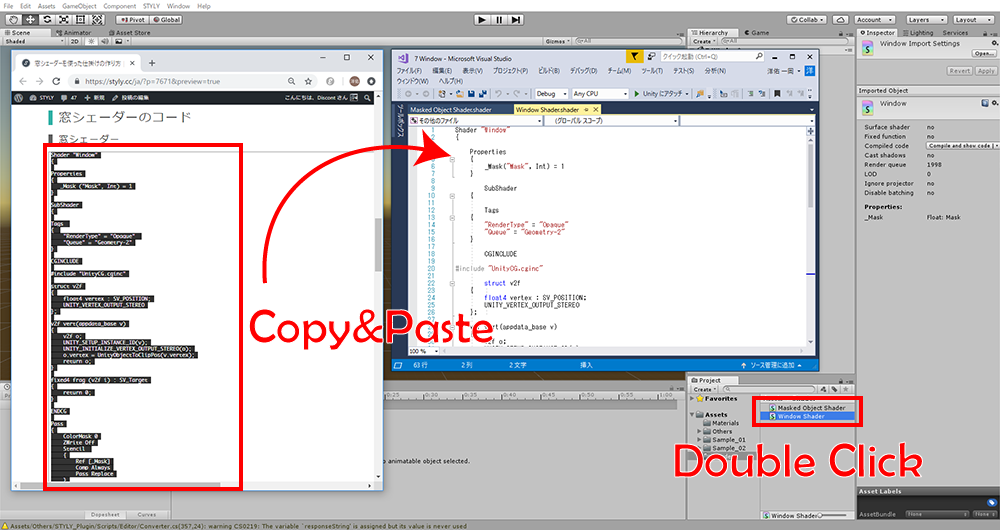
Edit the shaders.
After you finished editing the shaders, return to the Unity screen.
It completes creating shaders.
Create a material
Next, create a material.
① Right-click on the Project window and select ‘Create’ > ‘Material’ to make a new material. Create two of them.
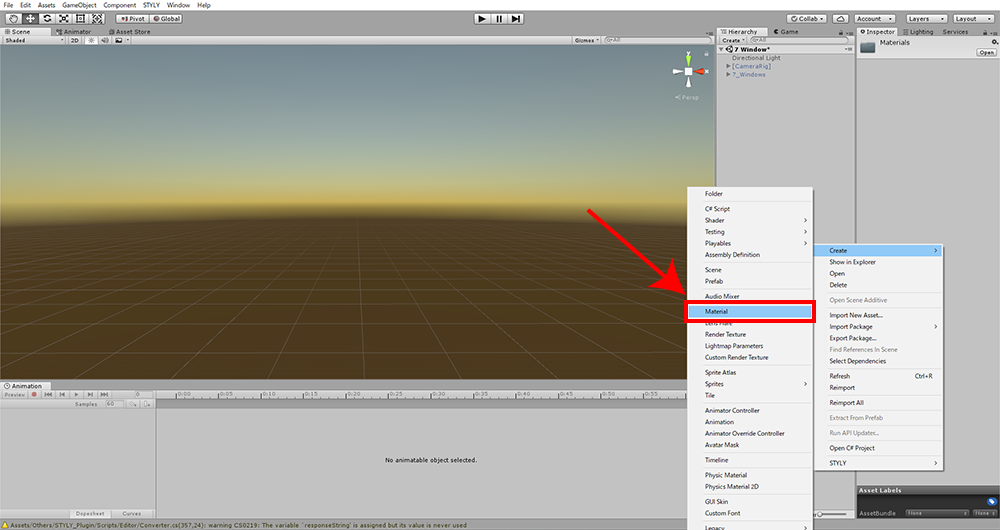
Create materials.
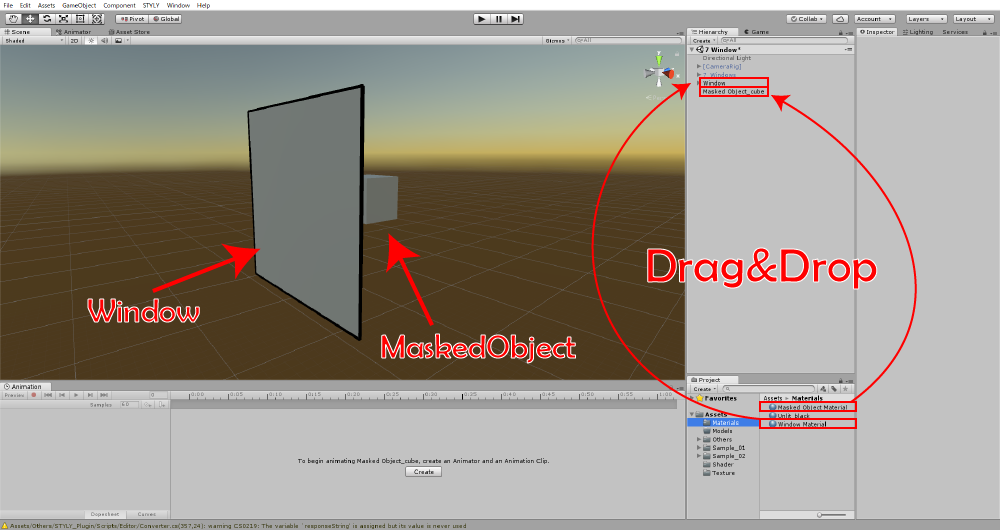
② Rename one ‘Window Material’ and the other ‘Masked Object Material’.
② Open the Inspector of the material created and drag the shader created earlier onto the blank space on the Inspector.
Drag ‘Window Shader’ onto ‘Window Material’, and ‘Masked Object Shader’ onto ‘Masked Object Material’.
Alternatively, you can select the corresponding shader from the drop-down menu.
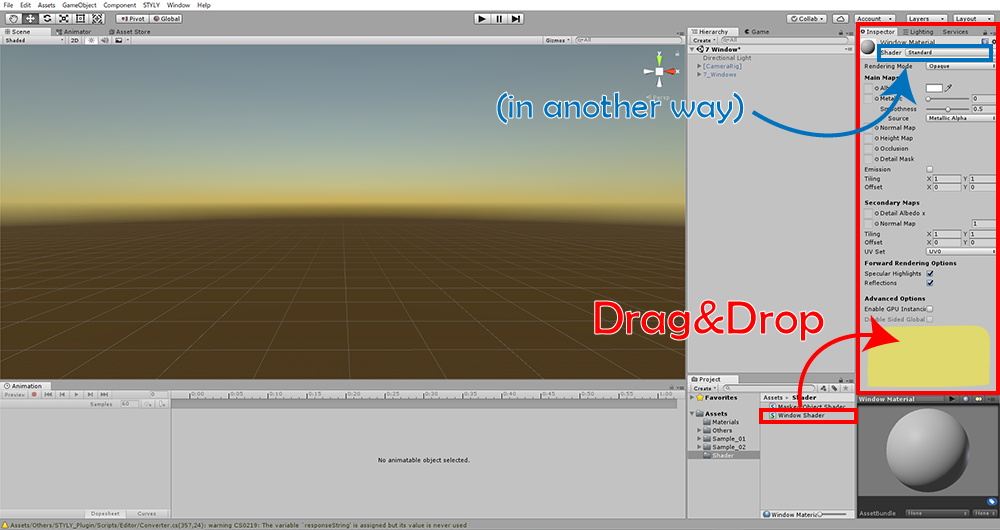
Attach the shader to the material.
It completes the materials.
Create a window
Next, we prepare ‘Window object’ and ‘Object viewed through the window’.
You can use any 3D object to make them.
For simplicity, we use ‘Quad’ to create a general window.
Right-click on the Hierarchy window and select ‘3D Object’ > ‘ Quad’. Rename it ‘Window’.
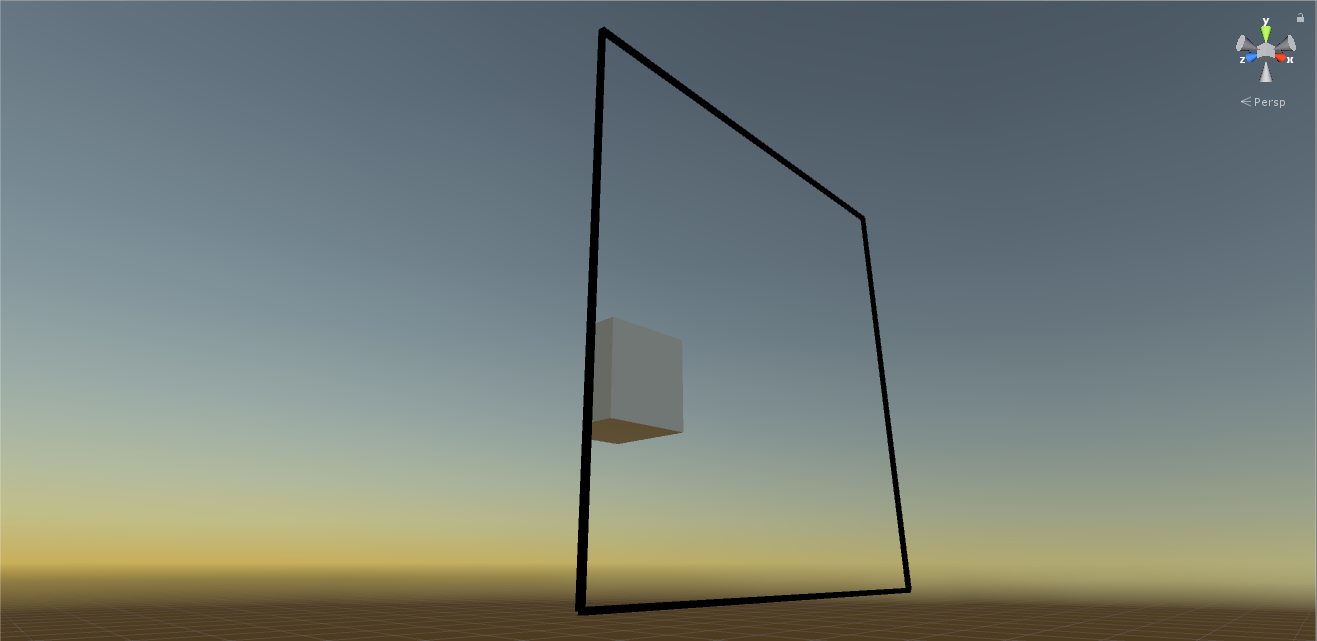
Please note that ‘Quad’ consists of directional surfaces and it’s visible from one side but not visible from the other side. When attaching the window shader to it, you need to view from ‘visible’ side.
After attaching ‘Window Material’, the mesh becomes invisible, so create a frame if you need it.
This time, we transform ‘Box’ into a frame in a simplified way.
Firstly, right-click the Hierarchy window and select ‘3D Object’ > ‘Box’. Rename it ‘frame_01’. Drag the ‘frame01’ created onto ‘Window’ to make ‘frame_01’ a child object of ‘Window’.
Open the Inspector of ‘frame_01’ and set the ‘Scale’ value. Set (X, Y, Z) to (1, 0.01, 0.01).
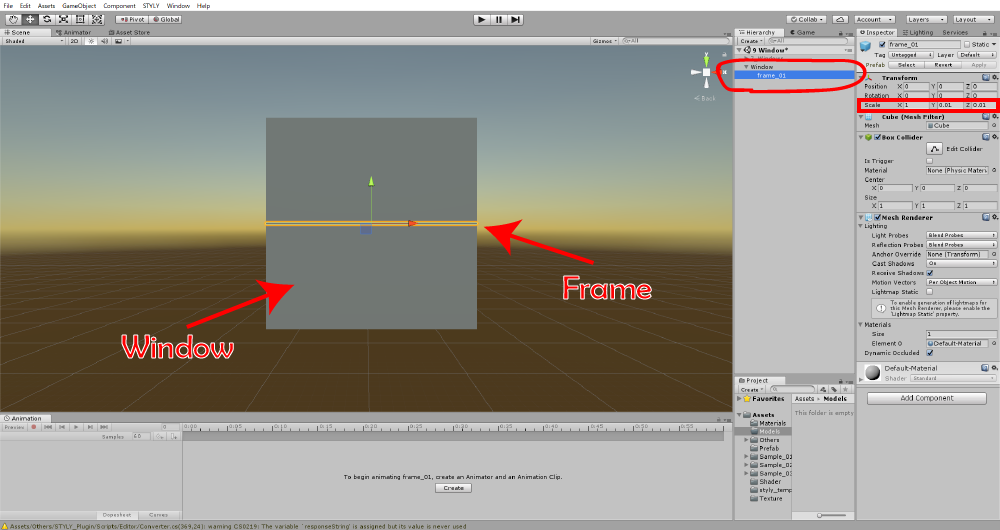
Crate a frame.
To change the colour of the frame, create a material and attach it to the frame.
Right-click on the Project window and select ‘Create’ > ‘Material’. Rename it ‘Frame’.
Open the Inspector of ‘Frame’ and click the colour-selection tool next to ‘Albedo’.
It brings up the colour-selection window, so select the colour you want. I selected black here.
The material is applied by attaching it to ‘frame_01’.
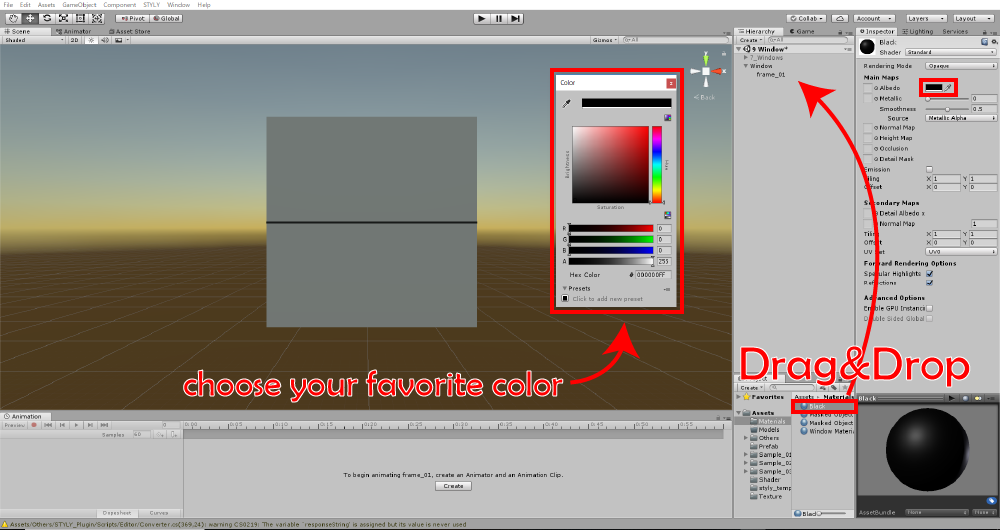
Select the colour you want.
Now you just need to duplicate it to make four frames and place them at correct positions. Right-click on ‘frame_01’ then you can select ‘Copy’ or ‘Paste’. Use those functions to duplicate the frame.
Set the position and rotation of each frame as shown below.
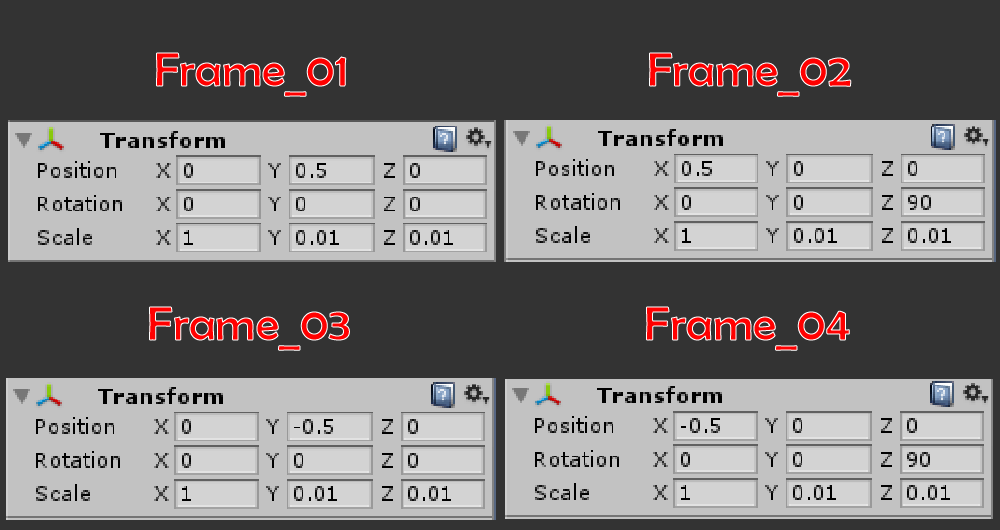
Set the positions of the frames.
Next, place ‘the object viewed through the window’ on the other side of the window.
We simply place a ‘Box’ this time.
Right-click on the Hierarchy window and select ‘3D object’ > ‘Box’. Rename it ‘Masked_object’.
Open the Inspector of ‘Masked_object’ and set the X, Y and Z value of ‘Scale’ to 0.25, 025 and 0.25. Place it a little behind ‘Window’.
Attach the material
By attaching the material, the gimmick of the window shader is completed.
Attach the material.
Attach ‘Window Material’ to ‘Window’ and ‘Masked Object Material’ to the object viewed through the window.
It completes the gimmick.
The completion of the window shader.
【Advanced】Apply the window shader to a Sprite
Sprite is an object for 2D graphics and it’s very convenient when placing characters and images in VR space.
To make a sprite appear only when viewed through the window, you need to use a dedicated shader, ‘Masked Object Shader(Sprite)’.
Note that ‘Window Shader’ is commonly used here.
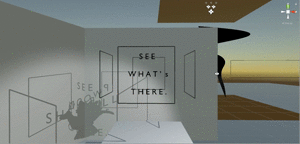
This time, as seen below, we create characters floating in the air.
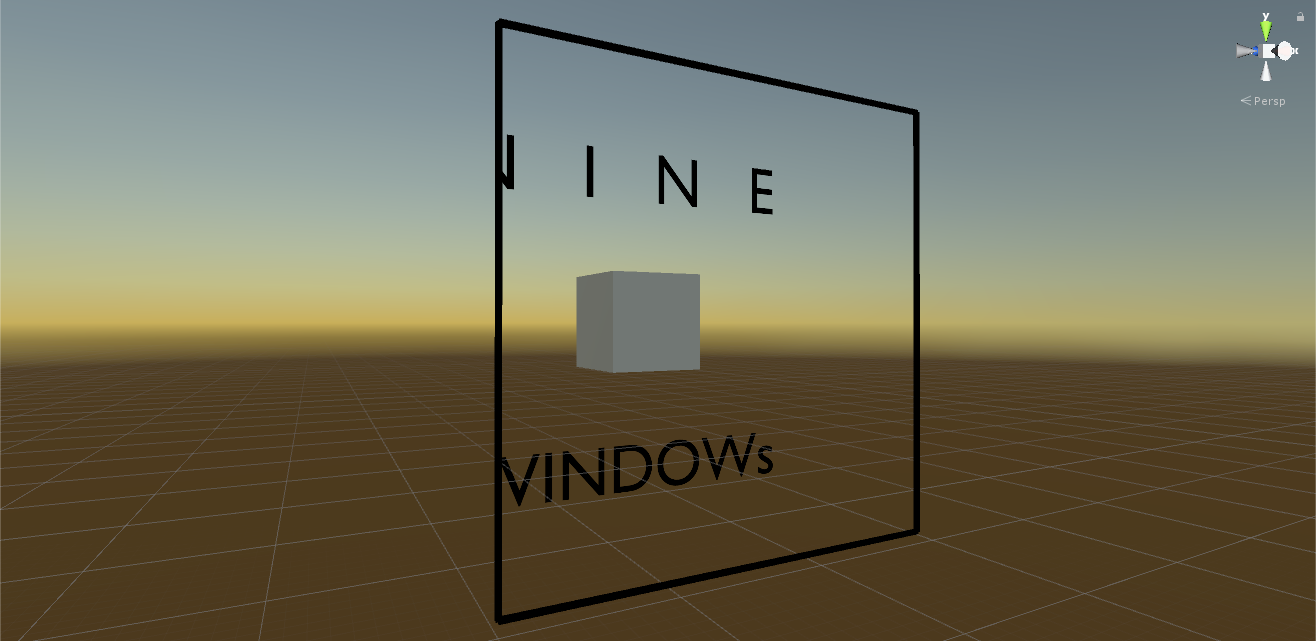
Apply the gimmick of the window shader to Sprite
Firstly, prepare an image used as Sprite. When you display characters only, as seen in this example, prepare an image (.png) with a transparent background.
I prepare an example of a transparent image below, so you can copy and use it to make the same result.

An example of a transparent image
After preparing an image, drag it onto the Project window in Unity to import it.
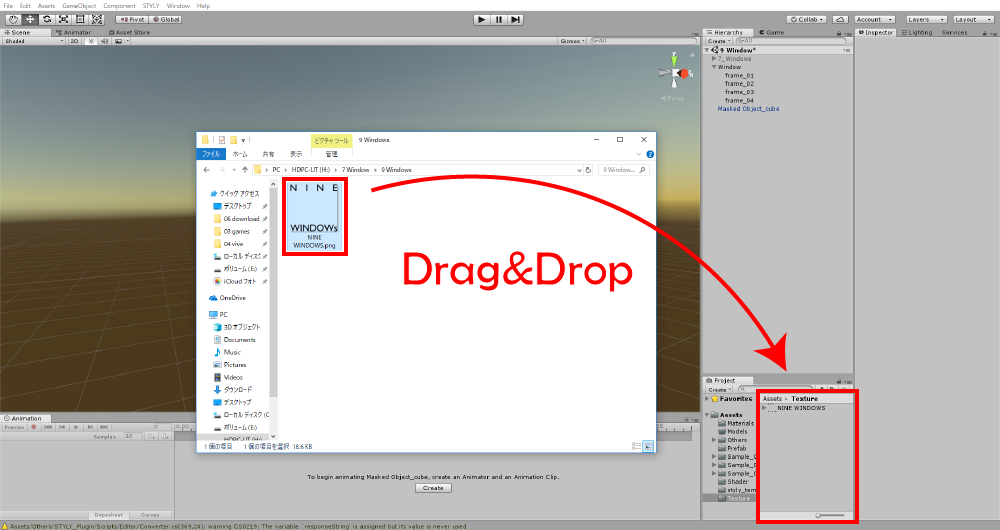
Import image to Unity
Open the Inspector fo the image. You will find the ‘Texture Type field’ set to ‘Default’. Change it to ‘Sprite(2D and UI)’ by the drop-down menu.
After that, press the Apply button at the bottom of the Inspector window to confirm the change.
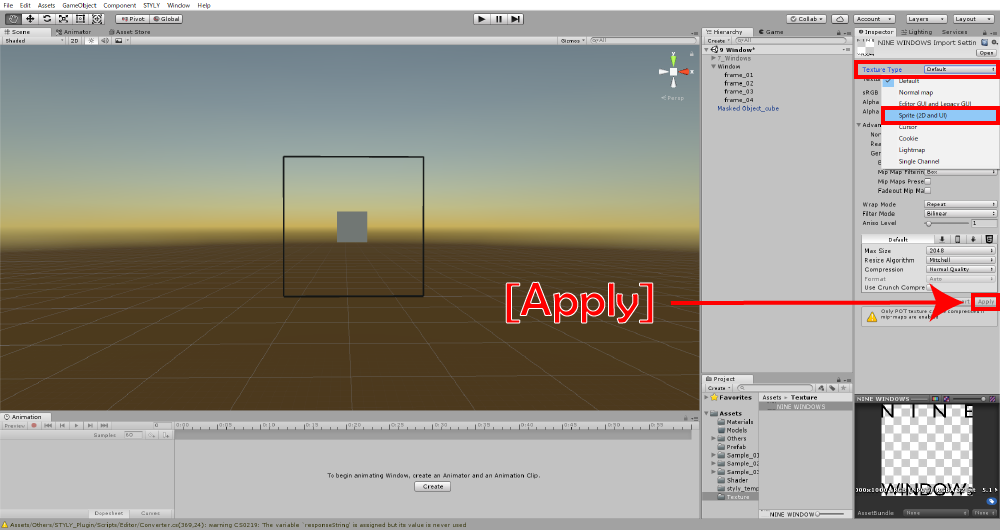
Change Texture Type.
It finishes the preparation to use an image as Sprite. Drag the image in the Project window onto the Hierarchy window to make the Sprite object appear in the Scene.
Scale it to an appropriate size and place it a little behind ‘Window’.
Then, to make it work, create a material and attach it in the same way that we create ‘Masked Object Material’ earlier.
The shader for Sprite, ‘Masked Object Shader (Sprite)’, was shown earlier in this article.
【Advanced】Change the Mask value
The window shader has its Mask value set and the object is visible only when the Mask value of ‘Window Shader Material’ is identical to the Mask value of ‘Masked Object Material’.
By exploiting this system, you can create a gimmick to make a different object visible when you viewed each window.
An example – Switch visible object by the Mask value
It’s very easy to change the Mask value.
Open the Inspector of the material and specify the value in the ‘Mask’ field.
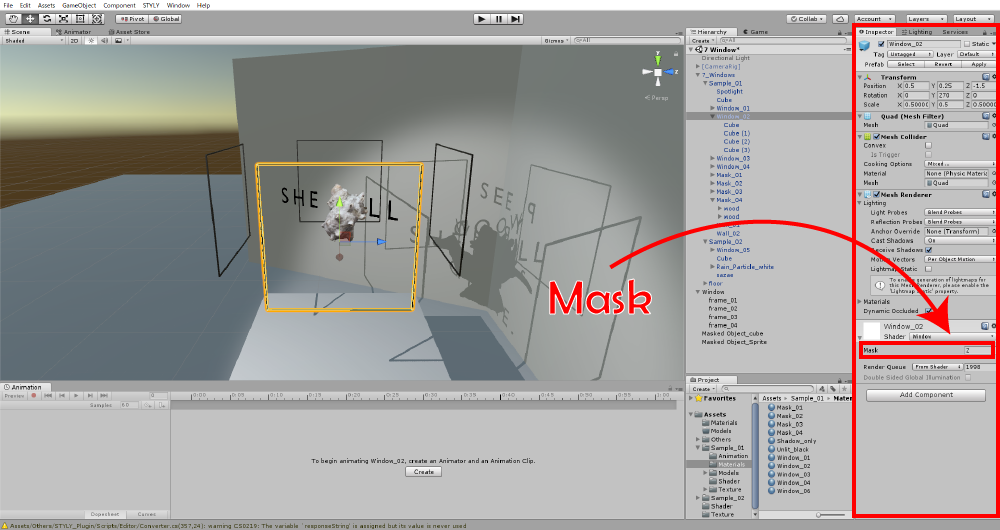
Change the Mask value
By preparing multiple materials and set different mask value for each. Then, set the combinations of mask values for windows and objects, you can create a gimmick shown below.
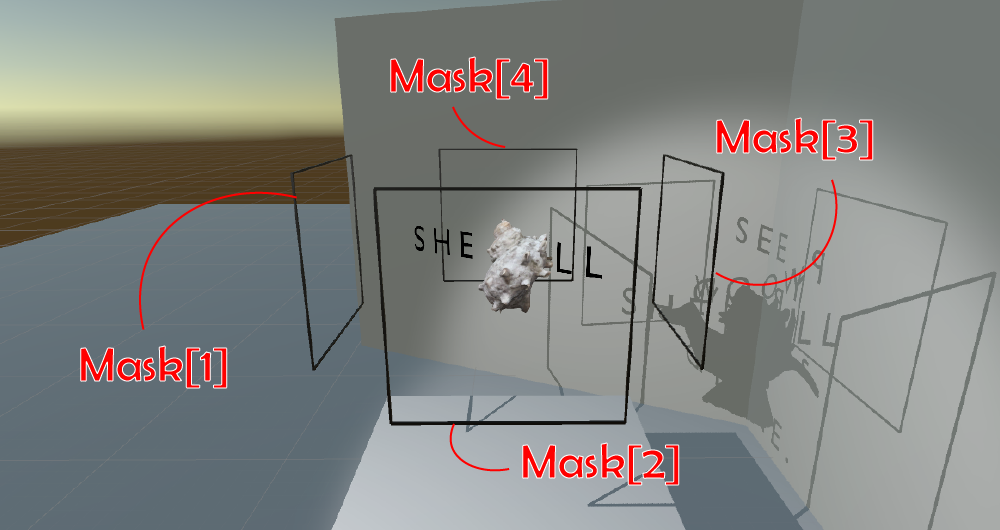
An example of the combination of the mask values
Import it to STYLY
It’s fairly easy to import the gimmick by the window shader to STYLY.
You just need to convert the created object into a Prefab and upload it to STYLY.
The article below explains how to upload an asset from Unity to STYLY in detail.
Read the Article
With Window shader, you can create various gimmick by using your ingenuity.
Please find various rendering techniques, referring to this tutorial.