In this article, we create a ‘singing-and-dancing’ live space with the ‘particle’ effect and the model created with VRoid Studio.
By applying this method, you can create your favourite live-performance space by using your original model, playing other songs or creating your original particle performance.
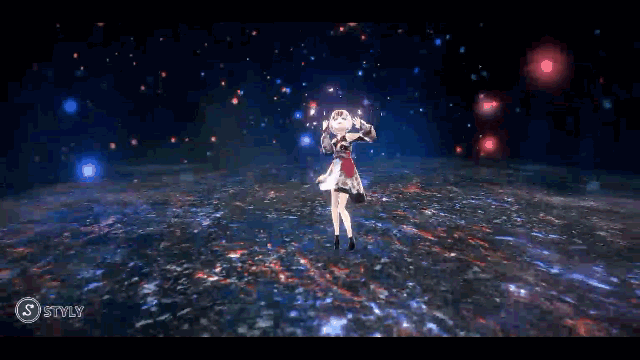
The completion image – ‘Particle Live’
I will show the instruction in the series of four separate articles, which consist of Chapter 1 to 11.
This article covers Chapter 7 and 8, showing how to create a stage and construct a ‘live performance’ by using ‘Timeline’.
Create a stage
We use ‘Ultimate VFX (Unity Asset)’ to create a stage with the particle effects.
The whole workflow is as follows.
- The introduction of Ultimate VFX (Unity Asset)
- Create a project for Ultimate VFX.
- Find your favourite particle from the samples.
- Export the sample as a package.
- Import into the project you are working on.
Introduction of Ultimate VFX (Unity Asset)
Ultimate VFX is a collection of particles, which is an Asset downloadable from Asset Store.
Asset store: https://assetstore.unity.com/packages/vfx/particles/ultimate-vfx-26701
Introduction video: https://youtu.be/vUfIJSVWGKs
Although it is a paid Asset ($40), I recommend it because it has 100+ very high-quality particles that allow you to create various expressions by combining and customizing them.
By the way, Unity 2018.1.6 or newer is recommended for the latest version (v.3.5.1) of this Asset. So some samples won’t work because I use Unity2017.4.3 this time.
In addition, please note that the sample with C# scripts doesn’t work in STYLY.
*In this article, I’m using Unity2017.4.3.
Click here to check which Unity versions are compatible with STYLY.
https://document.styly.cc/doc/docs/en-US/creator/creator_plugin_intro/#about-the-corresponding-unity-version
Basically, the functionality is almost unchanged, so you should be able to create it without any problems.
Create a project for Ultimate VFX
Since the size of the Asset is large, we create a separate project with Unity2017.4.3 to access the sample particle.
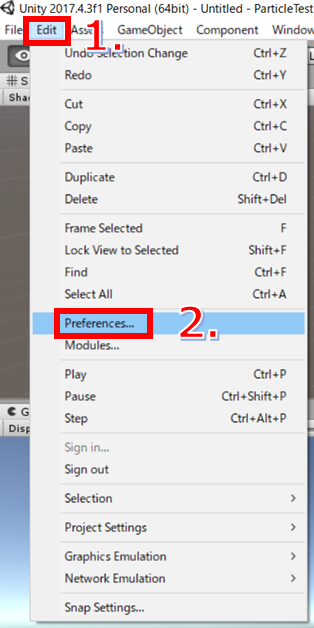
Before importing the Asset, set up the project as instructed by the following document:
Document: https://docs.google.com/document/d/1tYHk3tcSv4tijzf8jPKg-Sa0_rg-5TqnXCZgRnASCEg/edit
Select ‘Edit > Preferences’ in the Editor menu.
Preparation ~1
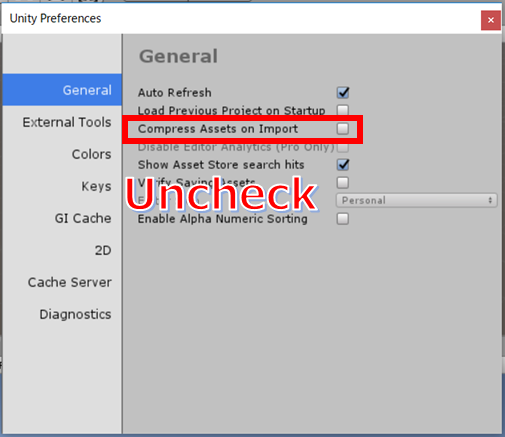
Uncheck the ‘Compress Assets on Import’ box on the General tab.
Preparation ~2
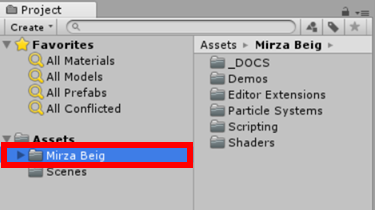
The preparation has been done, so now download and import the Asset.
Confirm that the ‘Mirza Beig’ folder has been created.
Import the Asset
Find your favourite particle from the sample Scene
In the Project window, press the ‘Search by Type’ button and select ‘Scene’.

Search by ‘Scene’
It will find multiple Scenes. Each Scene starting with ‘1 -‘ contains a single particle. The others have combined particles.
This time, we select ‘1 – Ultimate VFX (Demo)’ that has the most variations of particles.
You can access multiple particles by playing ‘1 – Ultimate VFX (Demo)’ with Editor. The outline of the operation is as follows.
- Switch Particle: Click ‘PREV’ or ‘NEXT’ in the bottom right corner of the screen. Alternatively, you can use the mouse wheel.
- PRACTICE MODE: You can switch ‘Looping’ and ‘One-Shot’. ‘Looping’ generates particles continuously and ‘One-Shot’ generates a single particle when clicking the left button. Particles perform quite differently for each mode, so I recommend checking them in both modes.
- LEVEL: You can switch ‘None’ and ‘Basic’ to hide/unhide the floor. For some particles, you can check how they bounce on the floor.
- Note the name of your favourite particle.

View particles
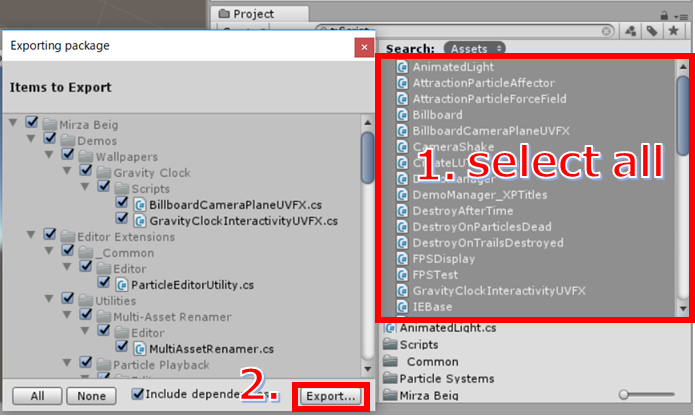
Export the sample as a package
Export the Prefab of your favourite particle.
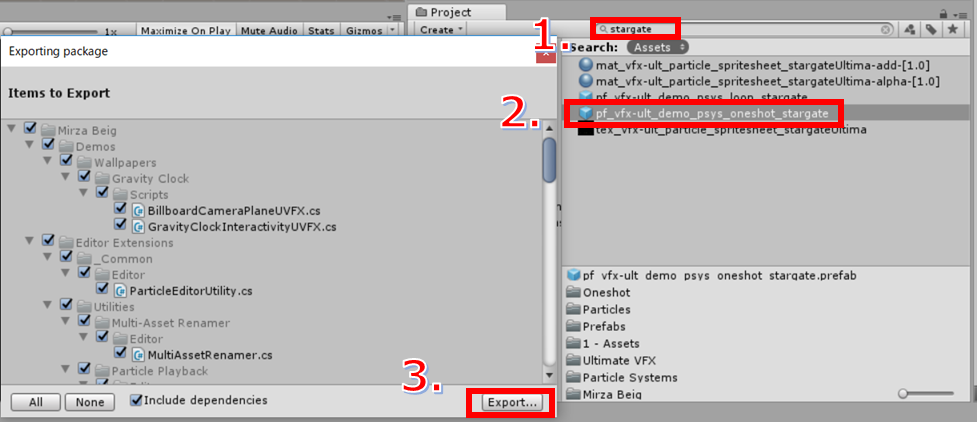
As an example, I will export a particle called ‘stargate’.
In the Project window, enter ‘stargate’ in the search box.
Right-click ‘pf_vfx-ult_demo_psys_oneshot_stargate’ and select ‘Export Package’. Then, press the ‘Export…’ button.
※You can distinguish between ‘Looping’ and ‘One-shot’ by the name.
Export the particle
Please note the followings when exporting.
Since the Prefab with C# scripts cannot work in STYLY, how it looks in STYLY is different from how it looks when it’s played with the Editor.
To progress efficiently, I recommend checking if it doesn’t include any C# script by making a sample Scene and placing the Prefab in it.
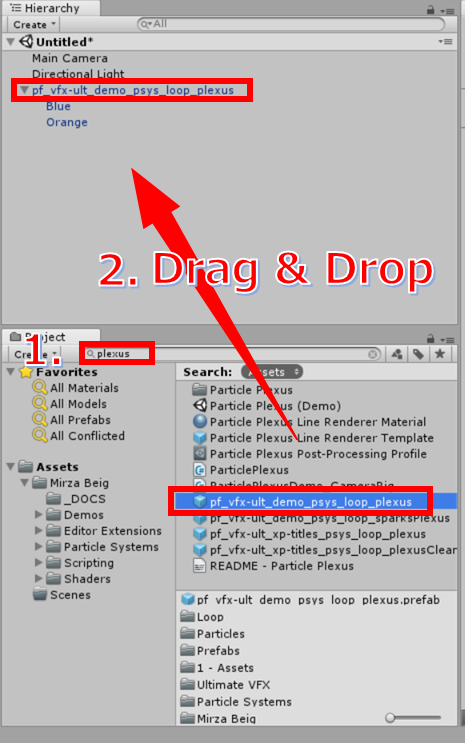
For example, let’s check it for a particle called ‘plexus’.
Select ‘File > New Scene’ in the Editor menu to create a Scene for checking.
In the same way as we did earlier, find ‘pf_vfx-ult_demo_psys_loop_plexus’ and drag it into the Hierarchy window.
Place the particle
Since the object is deactivated, activate it and then click ‘Play’ on the ‘Particle Effect’ panel. If you see the image different from what was seen when it’s played with the Editor, it does include C# scripts.
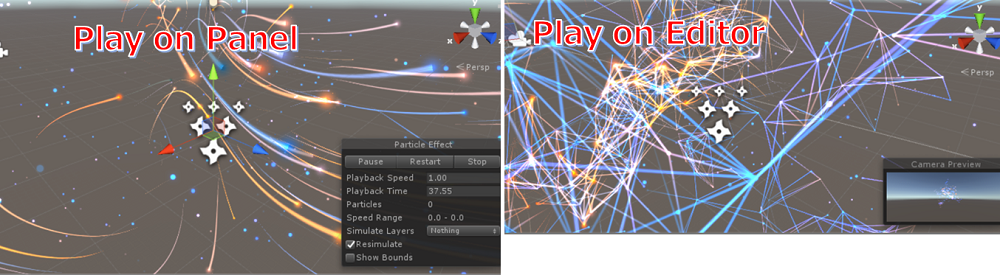
The difference of the particle with/without C# scripts
You can also check if there are C# scripts with the Inspector of the child objects of ‘pf_vfx-ult_demo_psys_loop_plexus’, but it takes time as there are a lot of objects to check.
In addition, the ‘Ultimate VFX’ Asset includes the script to resize particles in a simple way, so export it too.
In the Project window, press the ‘Search by Type’ button and select ‘Script’.
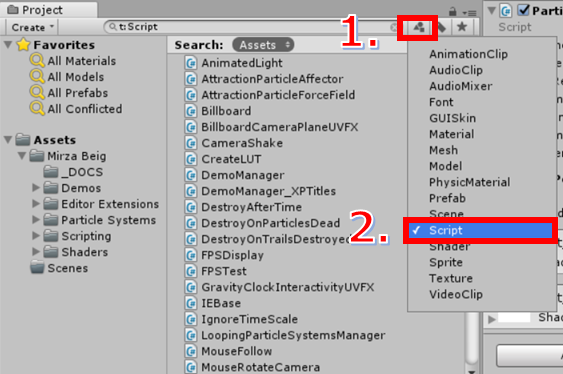
Search by ‘Script’
Select all the extracted scripts with ‘Ctrl+A’ and export them.
Export the scripts
Import into the project you are working on
Import the Prefab and scripts into the project you are working on, and customize them.
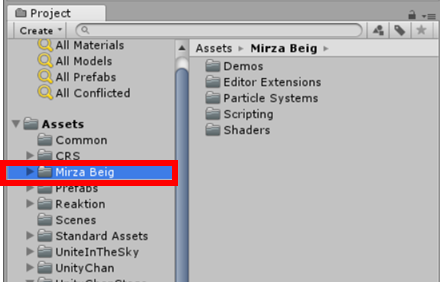
Firstly, import the exported ‘particle’ Prefab and scripts into the project you are working on.
It creates the ‘Mirza Beig’ folder directly under ‘Assets’.
Import the particle
Let’s resize the particle.
Drag and drop the Prefab into the Hierarchy and activate the object.
Select ‘Window > Mirza Beig > Particle Scaler’ in the Editor menu to display the panel.
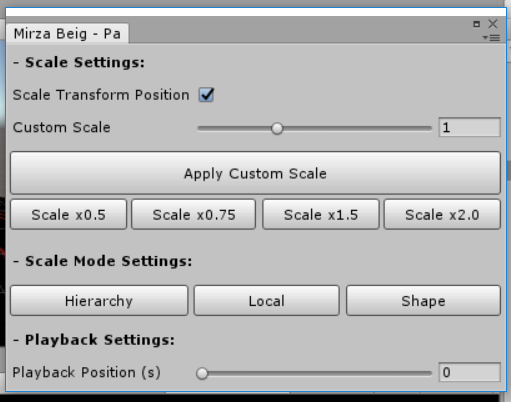
Adjust the scale of the particle
Pressing the ‘Hierarchy’ button under ‘Scale Mode Settings’. Then, you can adjust the scale as you like by using the ‘Custom Scale’ slider or the ‘Scale×0.5’ button.
Construct ‘Live performance’ with Timeline
Enable the created object to be controlled by Timeline.
Create Timeline
Press the ‘Add Component’ button to add the ‘Playable Director’ component to the imported character.
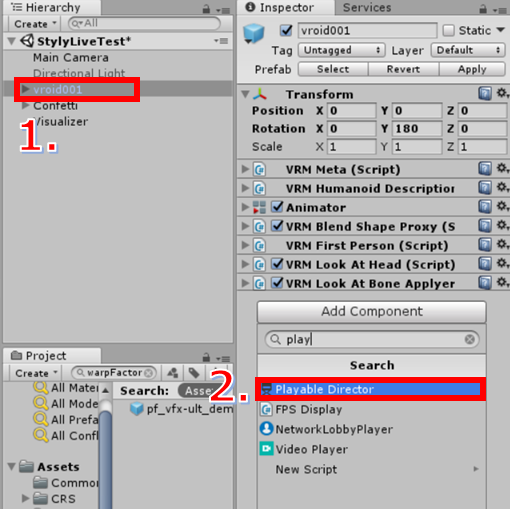
Add the ‘Playable Director’ component
If the TimeLine tab is not displayed, select ‘Window >Timeline’ to display it.
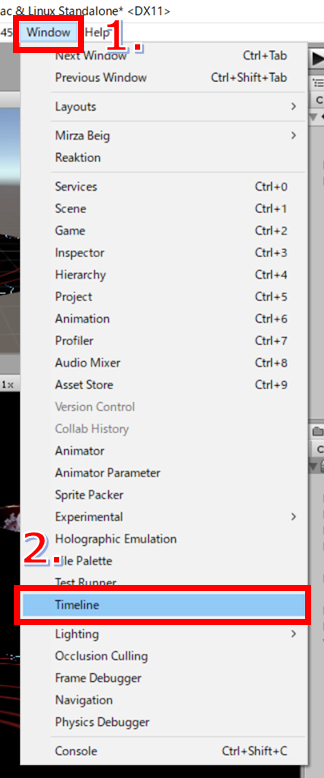
Display the TimeLine tab
Select ‘Assets > Create > Timeline’ to create a Timeline.
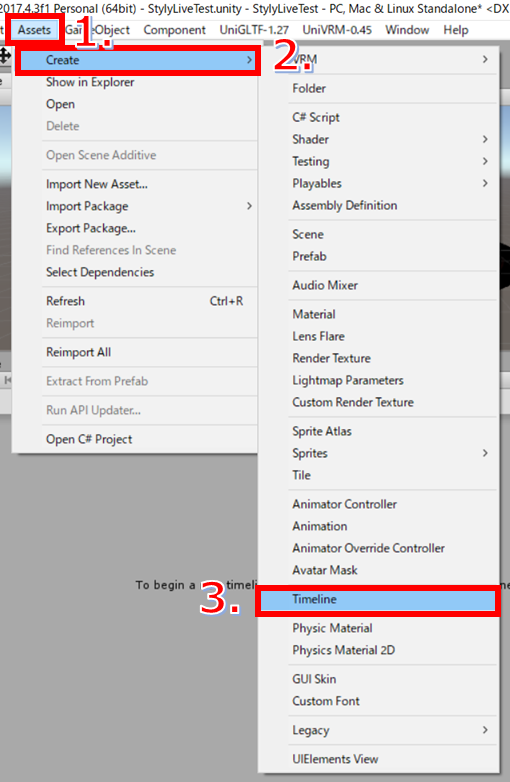
Create a Timeline
Since the TimeLine is created directly under the ‘Assets’ folder, move it under the TimeLine folder and rename it ‘ParticleLiveTL’ for better visibility.
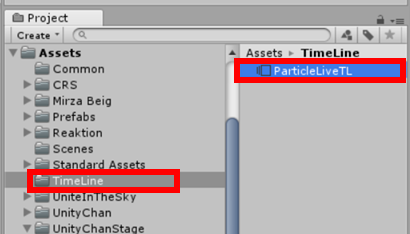
Rename it ‘ParticleLiveTL’
Drag and drop ‘ParticleLiveTL’ into ‘Playable’ in the ‘Playable Director’ component.
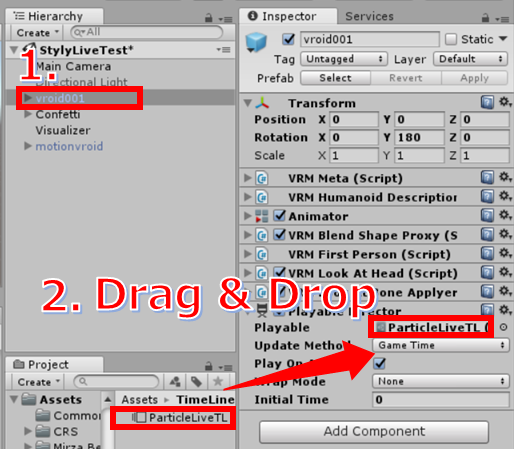
The setting for Playable Director
Set ‘Controller’ in the ‘Animator’ component to ‘EmptyAnimator’ (See the screenshot below).
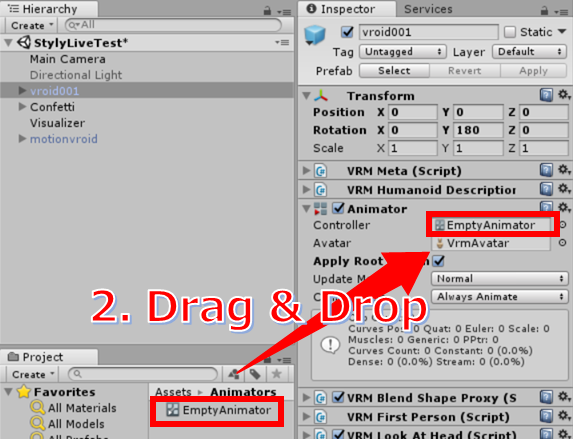
Set ‘Controller’ to ‘EmptyAnimator’
※This empty Animator was created by right-clicking and selecting ‘Create > AnimatorController’, and renamed to ‘EmptyAnimator’.
Now it’s ready to edit the TimeLine.
Set up the animation for the character
Select the character in the Hierarchy window and set up the animation in Timeline editor.
In the Timeline editor, select ‘Add > Animation Track’ to create a Track.
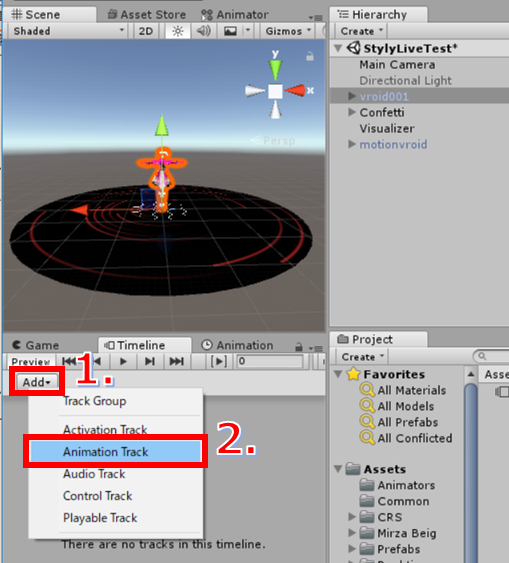
Create ‘Animation Track’
Drag and drop the character into the GameObject of the Track.
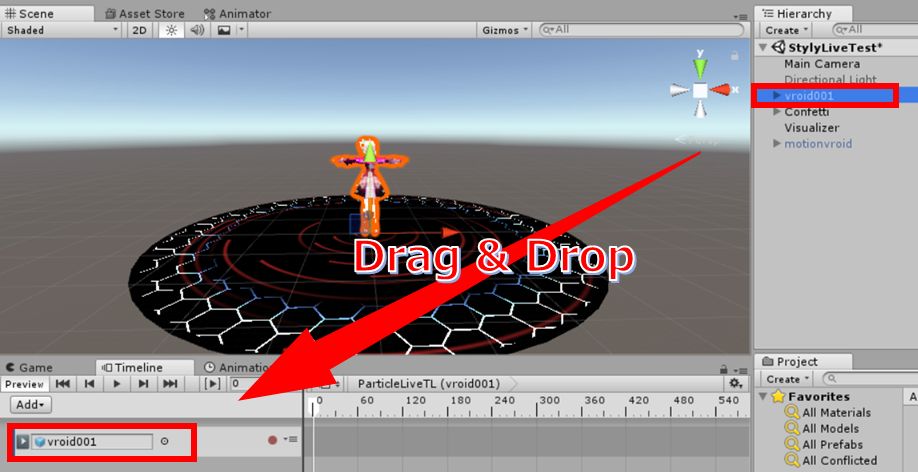
Assign the character to the GameObject of the Track.
Drag and drop ‘Take001’ into the Clip. Select the Clip and set the ‘Start’ of ‘Clip Timing’ to 0.
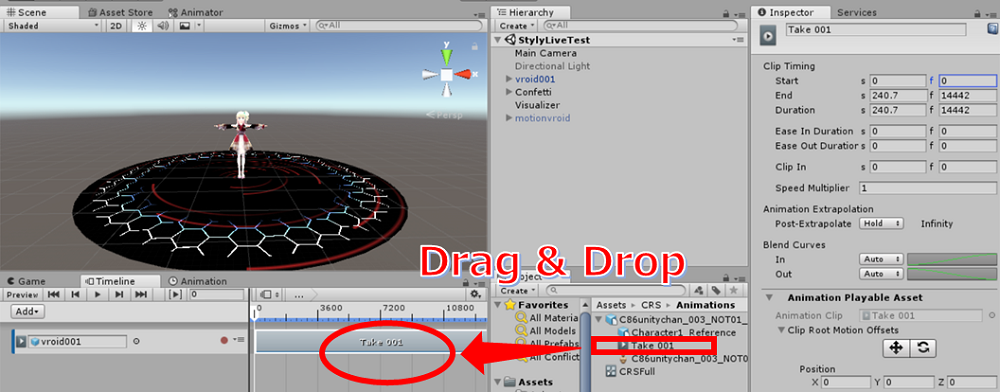
Assign ‘Take 001’ to the Clip
Set up ‘Audio Track’
In the Timeline editor, select ‘Add > Audio Track’ to create a Track.
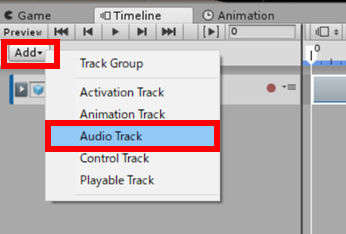
Create ‘Audio Track’
Drag and drop ‘Unite In The Sky (full)’ into the Clip. Select the Clip and set the ‘Start’ of ‘Clip Timing’ to 2 (i.e. starting in two seconds).
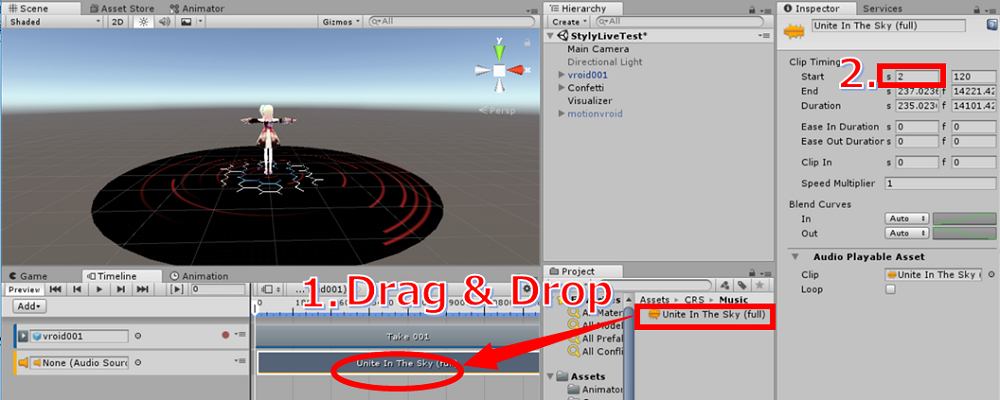
Assign ‘Unite In The Sky (full)’ to the Clip
By the way, the Play button on the Timeline editor doesn’t playback the song.
※In Unity2018, you can playback it by pressing the cog icon in the top right corner and checking the ‘Enable Audio Scrubbing’ box.
Hide the character at the end of the live performance
In the Timeline editor, select ‘Add > Activation Track’ to create a Track.
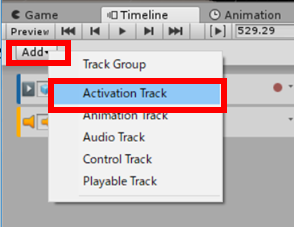 Create ‘Activation Track’
Drag and drop the character into the GameObject of the Track. Select the Clip and set the ‘Start’ of ‘Clip Timing’ to 0. Set ‘End’ to the timing when you want to hide the character.
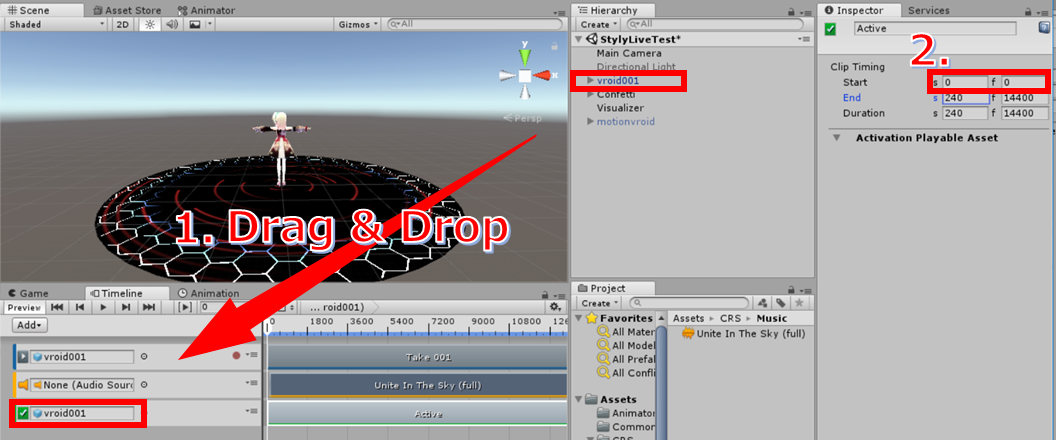 Assign the character to the GameObject of the Track.
Set up Particle and Shader
Arrange the imported particle on the Timeline so that it synchronizes to the song.
Control the particle by activating and deactivating the particle object on the Activation Track.
Since the ‘playback’ function in the Timeline editor doesn’t play the song, it’s difficult to set the timings when switching ‘active’ and ‘inactive’ for the particle. I, therefore, recorded the playback in the editor and set the timings while comparing the recorded video and the animation that played in the Timeline editor.
The following is a setting example of the particle effect just after the playback starts.
※I recommend grouping the particle performances that share the same starting and finishing timing by ‘Track Group’ to have better visibility.
In the Timeline editor, select ‘Add > Track Group’ to create a Track Group.
 Use ‘Track Group’ ~1
Rename it ‘CRS’ and press the ‘+’ button to create two Active Tracks. Then, drag and drop the Visualizer object and the Confetti object into them to assign.
 Use ‘Track Group’ ~2
In the same way, add other particle effects.
The Timeline of the Scene uploaded to STYLY is shown below.
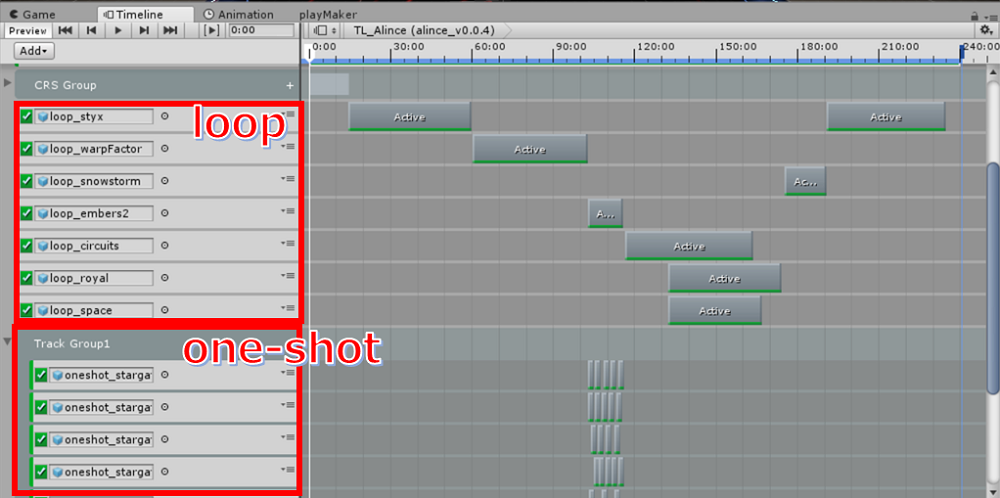
The Timeline of the Scene uploaded to STYLY
※Since it included a paid Asset, I excluded it from the sample project.
That’s all for today!
In the next 4th article, I will introduce the workflow from ‘Enhance the presence of the character’ to ‘Upload to STYLY’.
[Related articles]