この記事では、Playmakerで「点灯/消灯の切り替えが可能な懐中電灯」を作成する方法を紹介します。
コントローラーのトリガーを使ってアクションを起こす方法を理解すれば、様々なギミックの作成にも応用可能です。
Playmaker入門としてもおすすめの内容です。
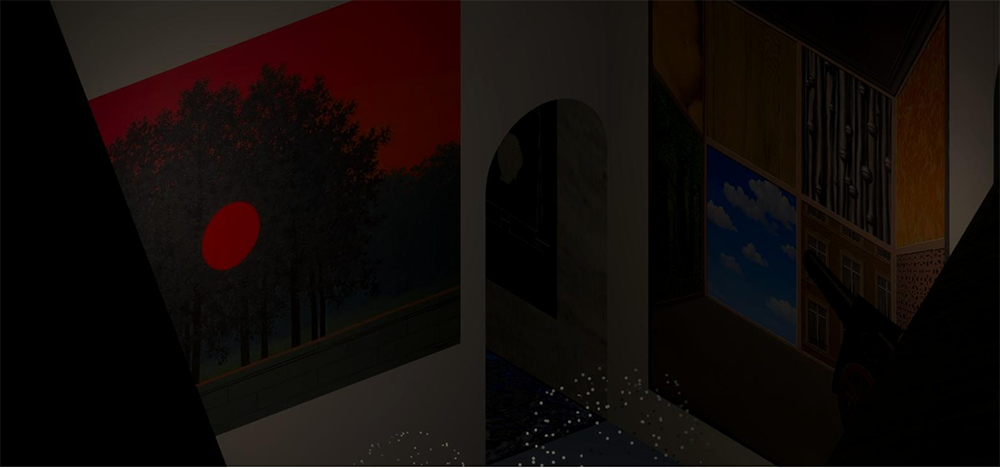
完成イメージ
サンプル
STYLY GALLERYからサンプル空間を体験できます。
The Night Museum
記事で紹介しているUnityプロジェクトのダウンロードはこちらからできます。
STYLY-Unity-Examples
事前準備
まずは、Githubよりサンプルプロジェクトをダウンロードし、Unityで開いてください。
STYLY_Examplesの中の「Flashlight」というフォルダが今回使用するものです。
STYLY-Unity-Examples
このサンプルプロジェクトにはPlayMakerが必要です。(PlayMakerは有料アセットです)
Unity Asset Store Playmaker
懐中電灯を作成し、プレイヤーに持たせる
今回作成するのは、「コントローラーのトリガーを引くと点灯し、離すと消灯する懐中電灯」です。
Playmakerを使用してロジックを組んでいきます。
ロジックのおおまかな流れは以下の通りです。
①シーンの読み込み時に、プレイヤーのコントローラーに懐中電灯を持たせる
②トリガーが引かれたら、点灯状態に遷移する。
⇅
③トリガーが離されたら、消灯状態に遷移する。
全体の設計図
全体設計図
懐中電灯を作成する
まずはシーン読み込み時にプレイヤーに持たせる懐中電灯を作成します。
ヒエラルキーウィンドウにて右クリックします。「Light」→「Spotlight」と選択してSpotlightを作成し「Flashlight」と名前を付けます。
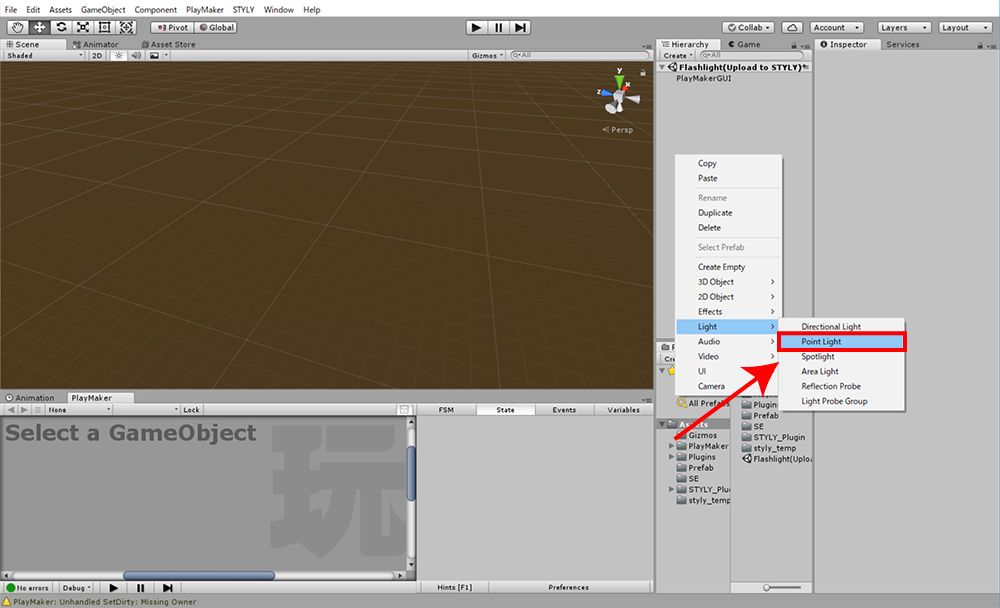
Spotlightの作成
初期設定で「Rotation」のX軸が「90」に設定されているので、これを「0」に変更します。
懐中電灯として使うには照射距離が短く照射範囲が狭いので、Spotlightのプロパティを変更します。
ここでは「Range」を「15」に、「Spot Angle」を「38」に設定しました。(お好みで調整してOKです)
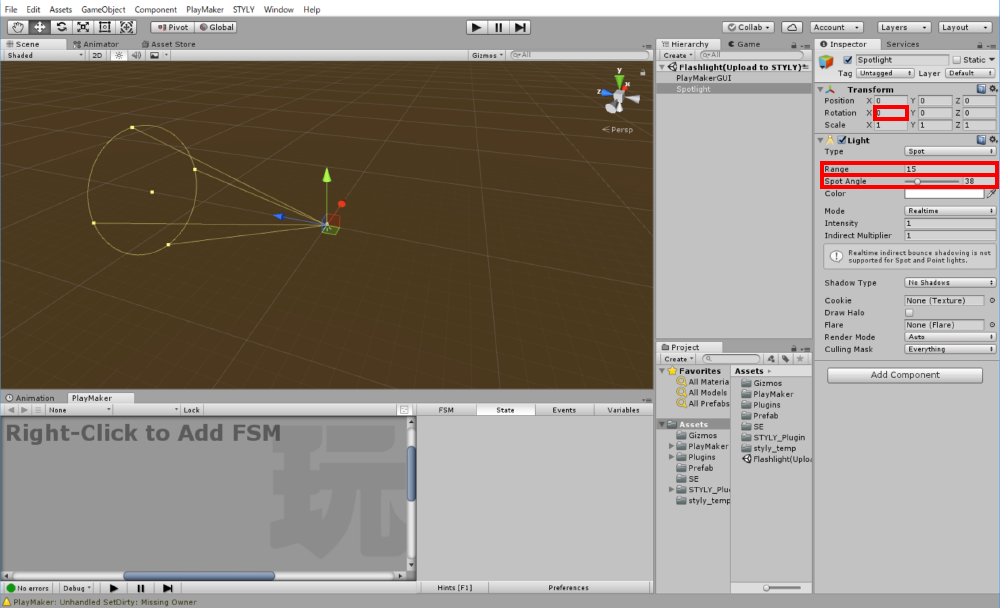
RangeとSpot Angleの設定
懐中電灯で照らしたときに影が落ちるようにしたいので、「Shadow Type」を「Hard Shadow」に変更し、「Render Mode」を「Important」に変更します。
(STYLYの仕様上、「Render Mode」を「Important」に設定しないと影が正しく描画されません)
これにて懐中電灯の作成が完了しました。
作成した「Flashlight」をプロジェクトウィンドウにドラッグ&ドロップし、プレハブ化しておきます。
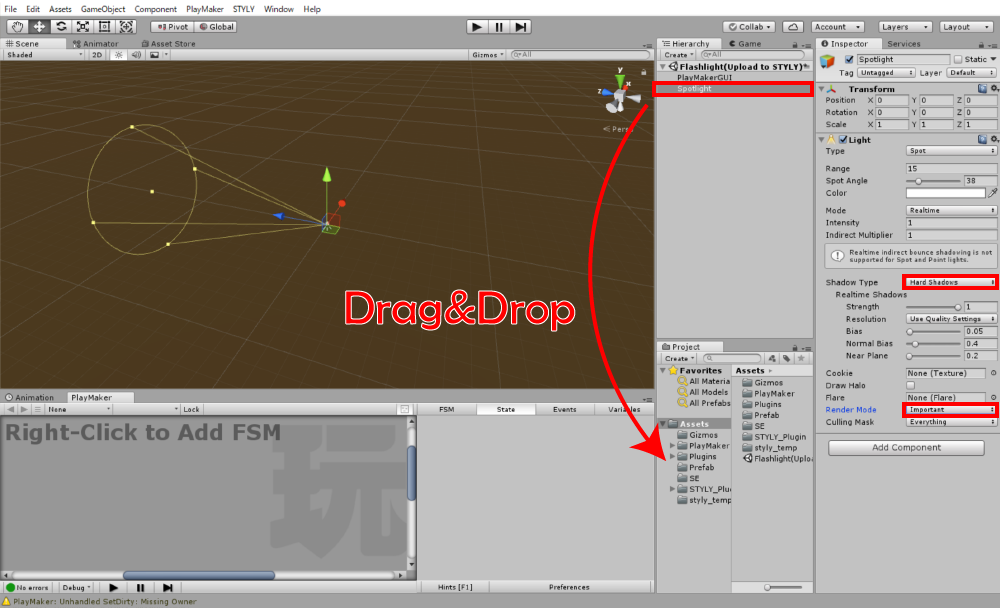
影の設定
シーン再生時にプレイヤーに懐中電灯を持たせる
次にシーンに空オブジェクトを作成してロジックを組んでいきます。
ロジックの大まかな流れは以下の通りです。
①「Find game object」でシーン内のコントローラーを見つける。
②「Get Position」でコントローラーの空間座標を取得する。
③「Get Rotation」でコントローラーの角度を取得する。
④「Create Object」で先ほど作成した「Flashlight」をシーン内のコントローラーの位置に出現させる。
⑤「Set Parent」でFlashlightをコントローラーの子オブジェクトにし、コントローラーに追従させる。
ヒエラルキーウィンドウにて右クリックします。「Create Empty」を選択して空オブジェクトを作成し「Controller_Flashlight」と名前を付けます。
ここに、Playmakerにてロジックを組んでいきます。
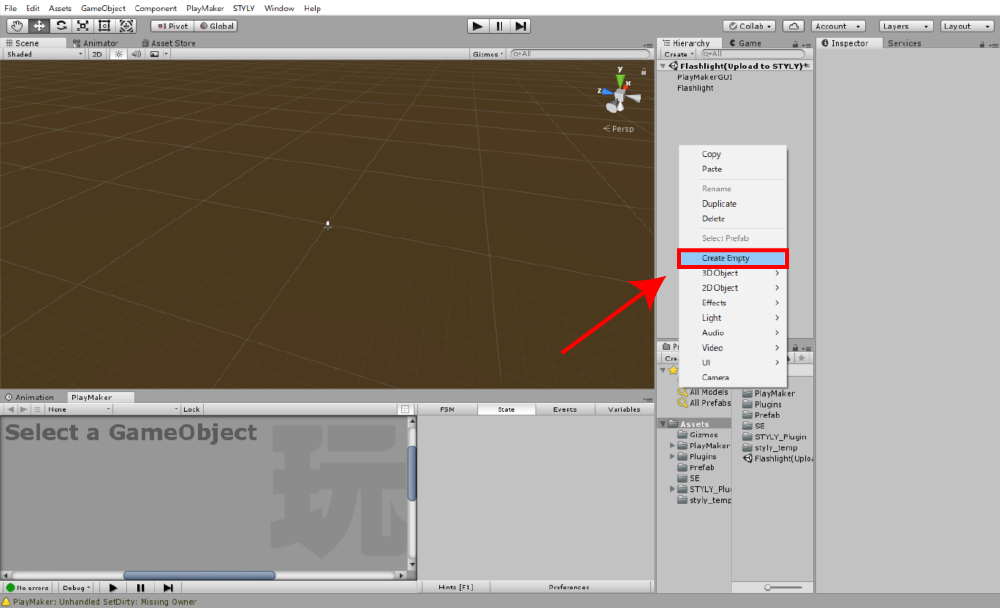
空のオブジェクトを作成
Playmaker Editorを開き、ウィンドウ上で右クリックして「Add FSM」を選択します。
(Playmakerウィンドウはメニューバーの「Playmaker」→「Playmaker Editor」から開くことができます)
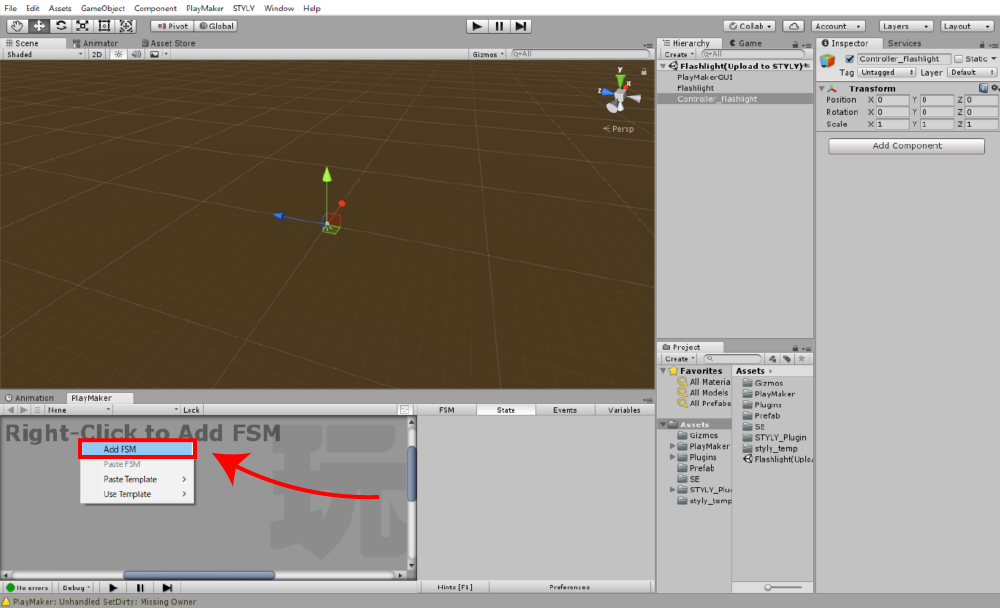
FSMの作成
作成した「State1」を「SetUp」とリネームし、「Find game object」「Get Position」「Get Rotation」「Create Object」「Set Parent」の5つのアクションを追加していきます。
アクションを追加するには、Action Browserを使用します。
Action Browserを開いたら、検索欄を利用して「Find game object」「Get Position」「Get Rotation」「Create Object」「Set Parent」の5つのアクションを検索し、アクションを「SetUp」に追加してください。
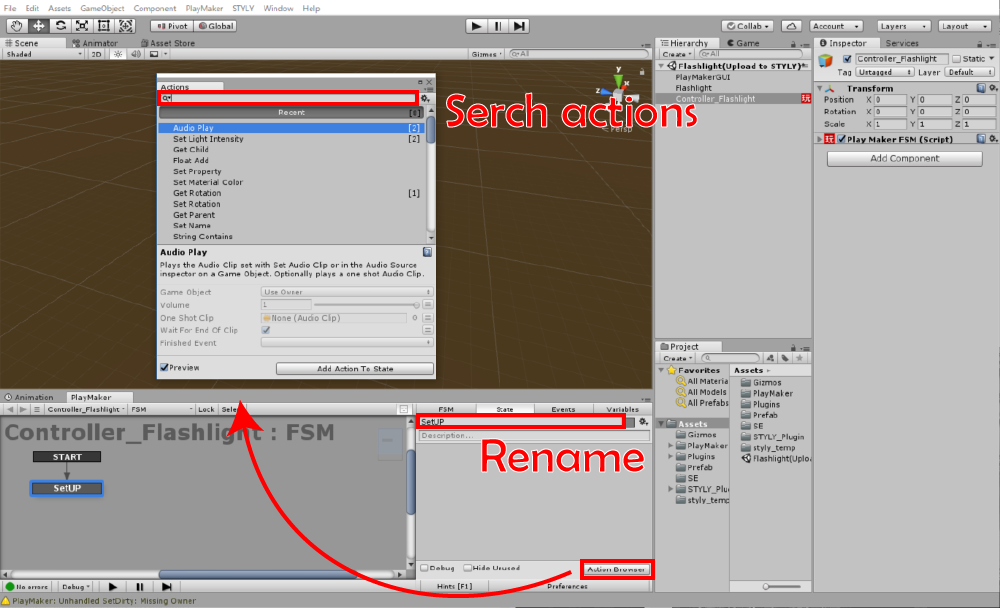
アクションの追加
アクションの追加が完了したら、各アクションを次のように設定していきます。
◆「Find game object」
Object Nameには「Controller (right)」と入力。
次にStoreをクリックして「New variable…」を選択し、「Controller」と名付けます。
これでシーン内の右コントローラーが検索され、「Controller」という変数に格納されるようになりました。
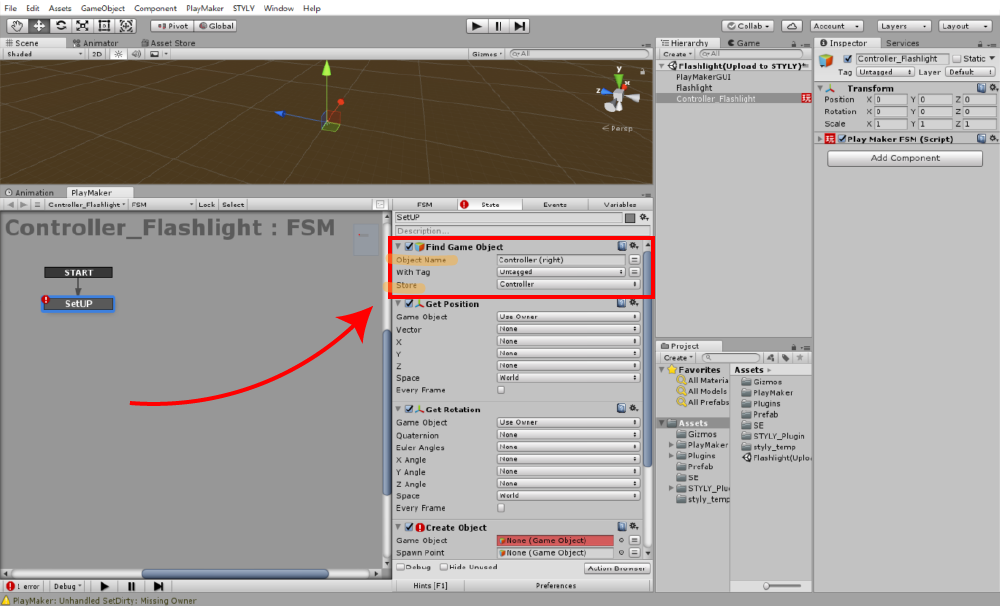
Find Game Objectの設定
◆「Get Position」
「Game object」のプルタブをクリックして、「Specify Game Object」を選択します。
オブジェクトを指定する欄が出てきたら右の二本線のボタンを押し、変数を指定できるよう切り替えます。
そして先ほど作成した「Controller」という変数を指定しましょう。
Vectorをクリックして「New variable…」を選択し、「Controller Position」と名付けます。
これでシーン内のコントローラーの空間座標が、「Controller Position」という変数に格納されるようになりました。
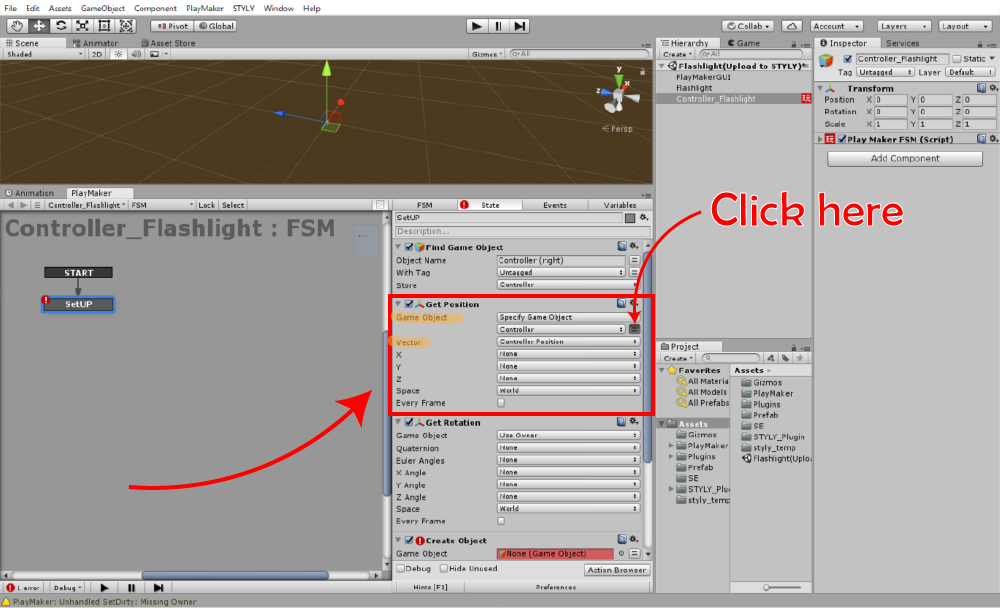
Get Positionの設定
◆「Get Rotation」
「Game object」のプルタブをクリックして、「Specify Game Object」を選択します。
オブジェクトを指定する欄が出てきたら右の二本線のボタンを押し、変数を指定できるよう切り替えます。
そして先ほど作成した「Controller」という変数を指定しましょう。
Euler Anglesをクリックして「New variable…」を選択し、「Controller Rotation」と名付けます。
これでシーン内のコントローラーの空間座標が、「Controller Rotation」という変数に格納されるようになりました。
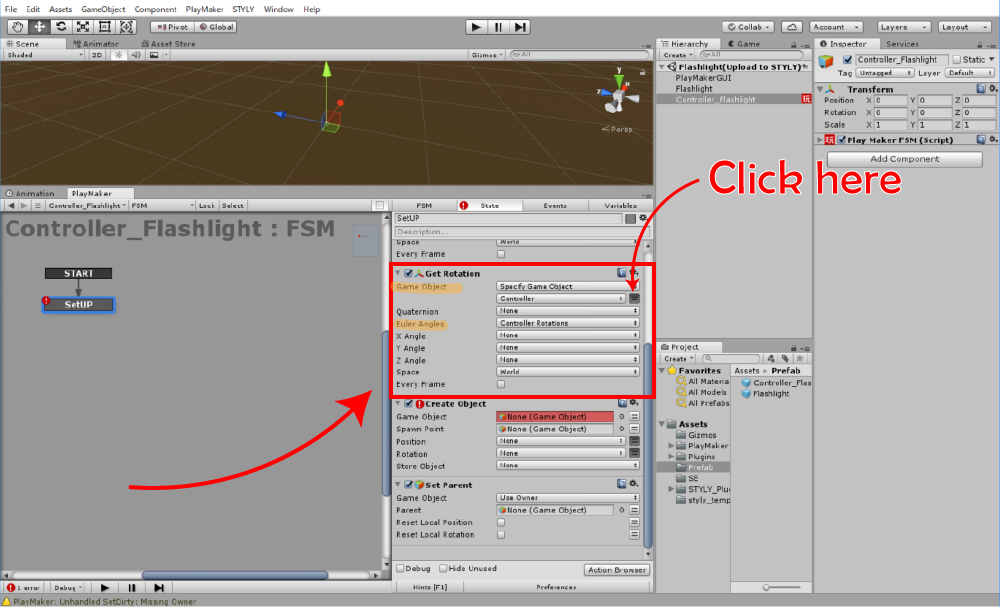
Get Rotationの設定
◆「Create Object」
「Game object」に先ほど作成した「Flashlight」というPrefabを指定します。
「Positin」は先ほど作成した変数「Controller Position」を指定します。
「Rotation」は先ほど作成した変数「Controller Rotation」を指定します。
「Store Object」をクリックして「New variable…」を選択し、「Created Flashlight」と名付けます。
これでシーン内のコントローラーの位置に懐中電灯が出現し、「Created Flashlight」という変数に格納されるようになりました。
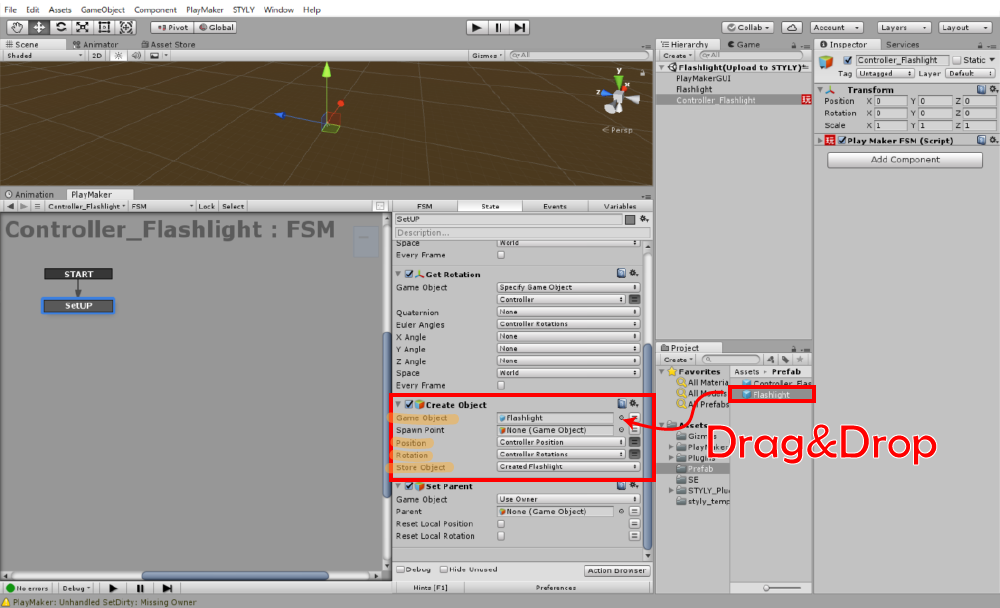
Create Objectの設定
◆「Set Parent」
このActionの目的は「シーンに生成した懐中電灯をコントローラーの子オブジェクトにして、コントローラーに追従させる」ことです。
「Game object」のプルタブをクリックして、「Specify Game Object」を選択します。
そして二本線のボタンを押して変数を指定できるよう切り替えて、先ほど作成した「Created Flashlight」を指定しましょう。
次に「Parent」を設定します。
右の二本線のボタンを押して変数を指定できるよう切り替えたら、「Controller」を選択しましょう。
これでシーン内に生成したFlashlightがコントローラーの子オブジェクトになり、コントローラーに追従するようになりました。
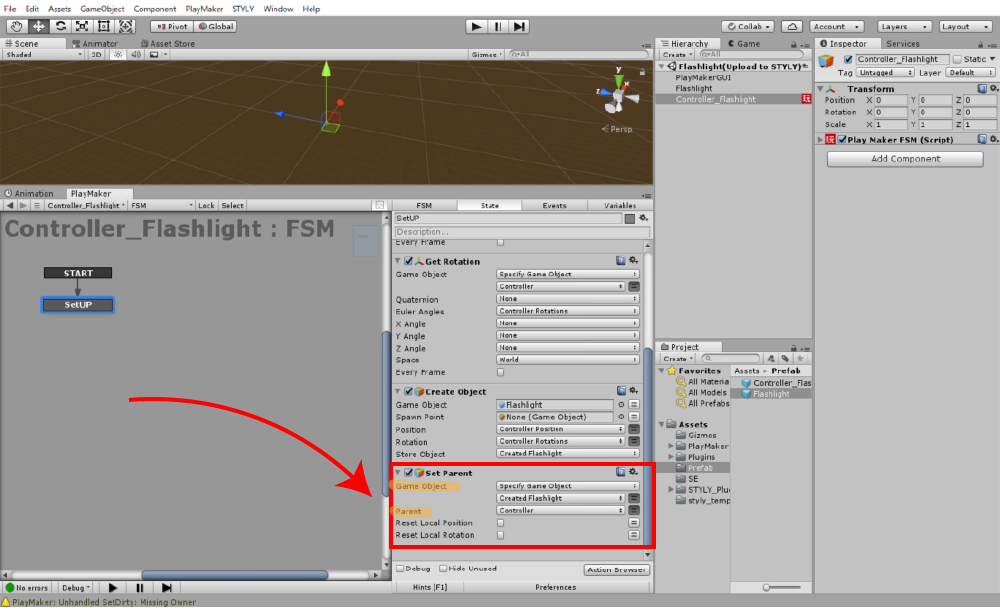
Set Parentの設定
グローバルイベントでトリガーの「引き」と「離し」を検出する
“Global_TriggerPressDown_R”と“Global_TriggerPressUp_R” のふたつのグローバルイベントを利用すると、トリガーの「引き」と「離し」を検出することができます。
STYLYシーン上にてコントローラーのトリガーが「引かれる」と「Global_TriggerPressDown_R」のイベントが有効になり、
トリガーが「離される」と「Global_TriggerPressUp_R」のイベントが有効になるというわけです。
これらふたつのグローバルイベントを作成しましょう。
Eventsリストにて「Global_TriggerPressDown_R」「Global_TriggerPressUp_R」という名前のイベントを作成します。
イベント名が一字でも違うと正しく動作しないので注意しましょう。
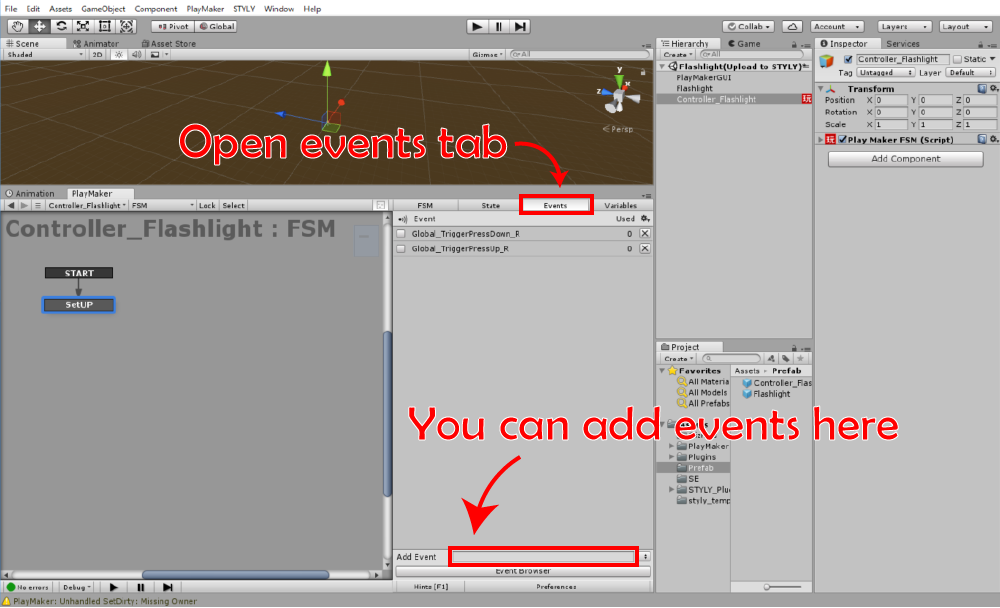
グローバルイベントの追加
トリガーで点灯/消灯を切り替えられるようにする
まずはPlaymaker Editorにて新しいStateを作成し、「OFF/Waiting Trigger R」と名前を付けます。
先ほど作成した「SetUp」のアクションが実行された後、「OFF/Waiting Trigger R」の状態に遷移させる必要があります。
「SetUp」を右クリックし「Add Transition」→「FINISHED」と選択し、「FINISHED」というイベントを作成します。
これをドラッグ&ドロップするように操作すると矢印が出てくるので、これを「OFF/Waiting Trigger R」に接続します。
これで「SetUp」のアクションが実行された後、「OFF/Waiting Trigger R」の状態に遷移するようになりました。
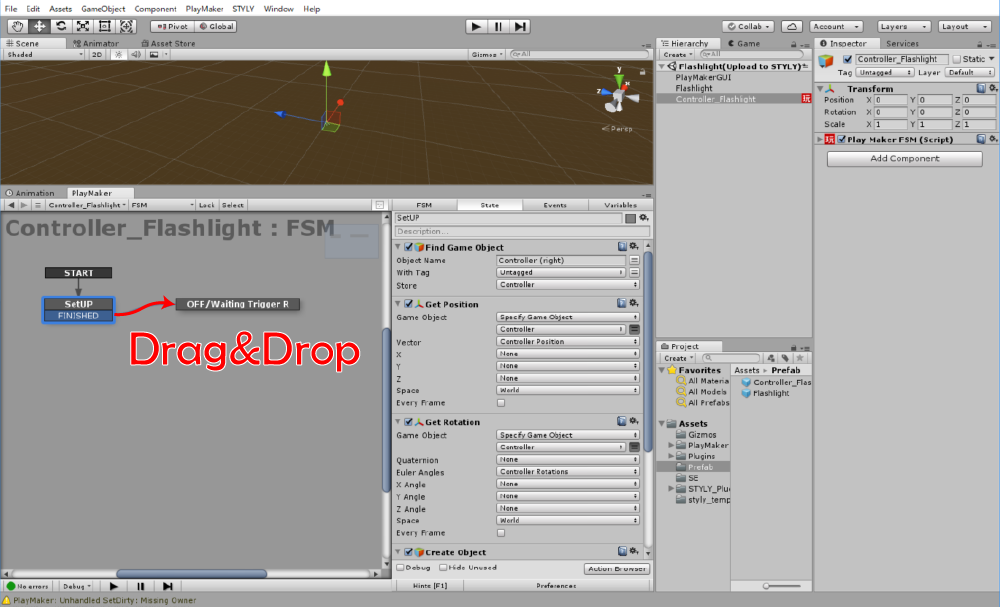
遷移の作成
次にトリガーで点灯と消灯を切り替えられるようにロジックを組んでいきます。
ロジックの大まかな流れは以下の通りです。
①「Global_TriggerPressDown_R」が有効になったら点灯状態に遷移する。
②「Global_TriggerPressUp_R」が有効になったら消灯状態に遷移する。
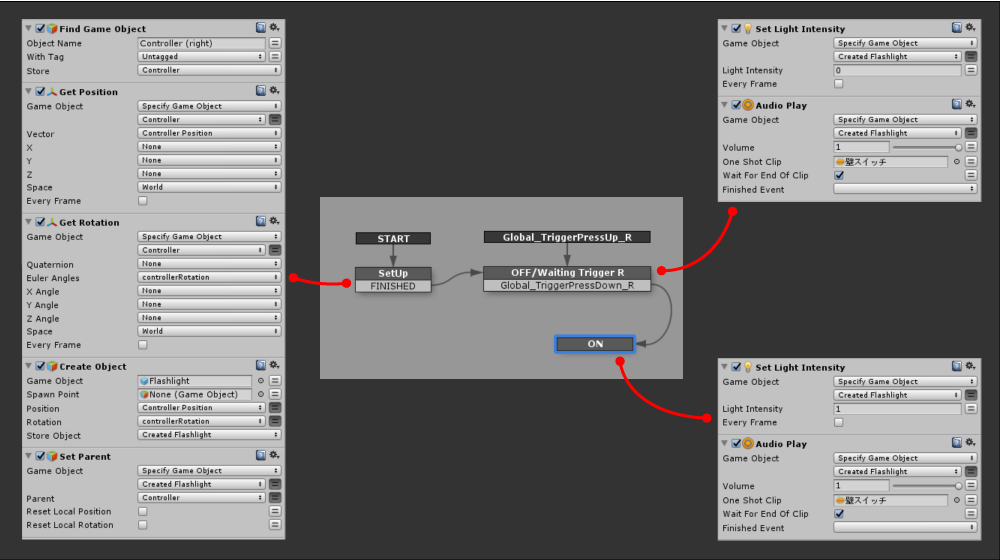
これを実現するために、次の画像のように遷移を作っていきます。
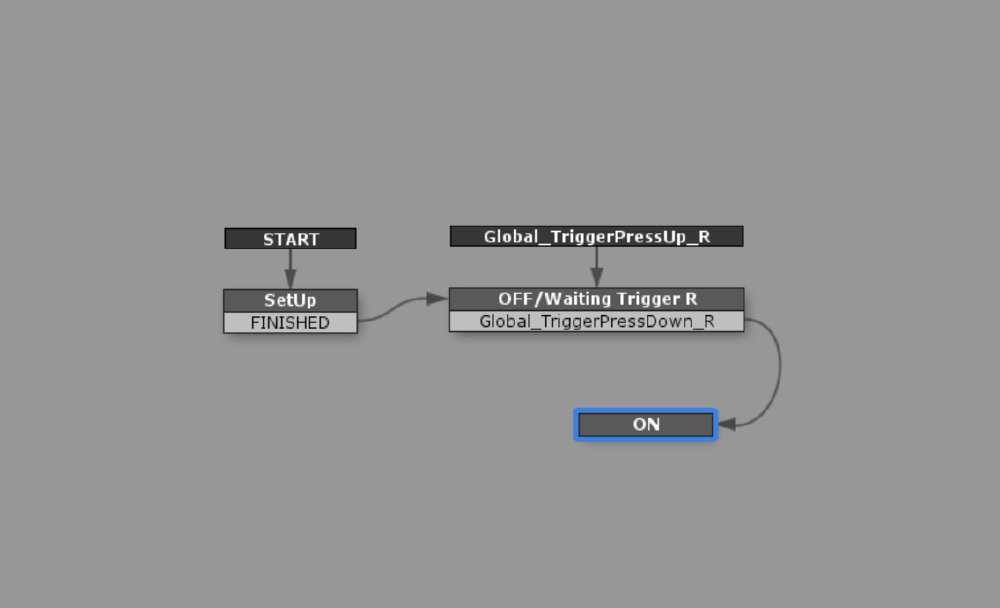
遷移の完成イメージ
- 「OFF/Waiting Trigger R」を右クリックし、「Add Grobal Transition」→「Global_TriggerPressUp_R」と選択。
- 「OFF/Waiting Trigger R」を右クリックし、「Add Transition」→「Global_TriggerPressDown_R」と選択。
- 新しいStateを作成して「ON」と名前を付ける。
- 「Global_TriggerPressDown_R」をドラッグ&ドロップするように操作すると矢印が出てくるので、これを「ON」に接続。
これにて、トリガーが引かれると「ON」の状態になり、トリガーが離されると「OFF」の状態になるループが完成しました。
あとはそれぞれの状態に応じてライトがON/OFFするようにアクションを追加するだけです。
「OFF/Waiting Trigger R」と「ON」の両方のStateに「Set Light Intensity」のアクションを追加します。
「Game object」には「Created Flashlight」を選択し、「Light Intensity」を「OFF/Waiting Trigger R」では「0」に、「ON」では「1」に設定しましょう。
これにて懐中電灯の完成です。
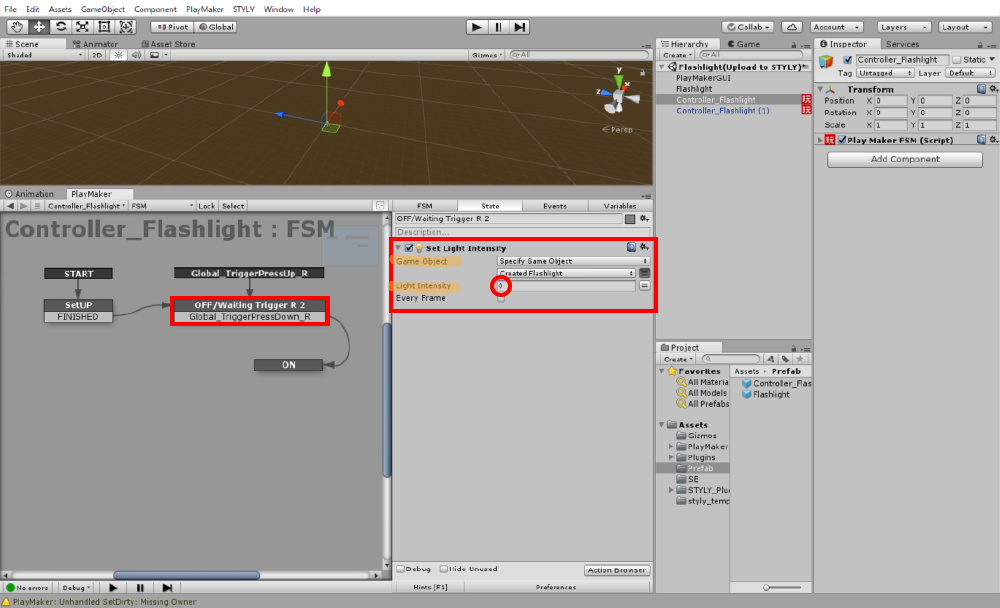
OFF/Waiting Trigger Rの設定
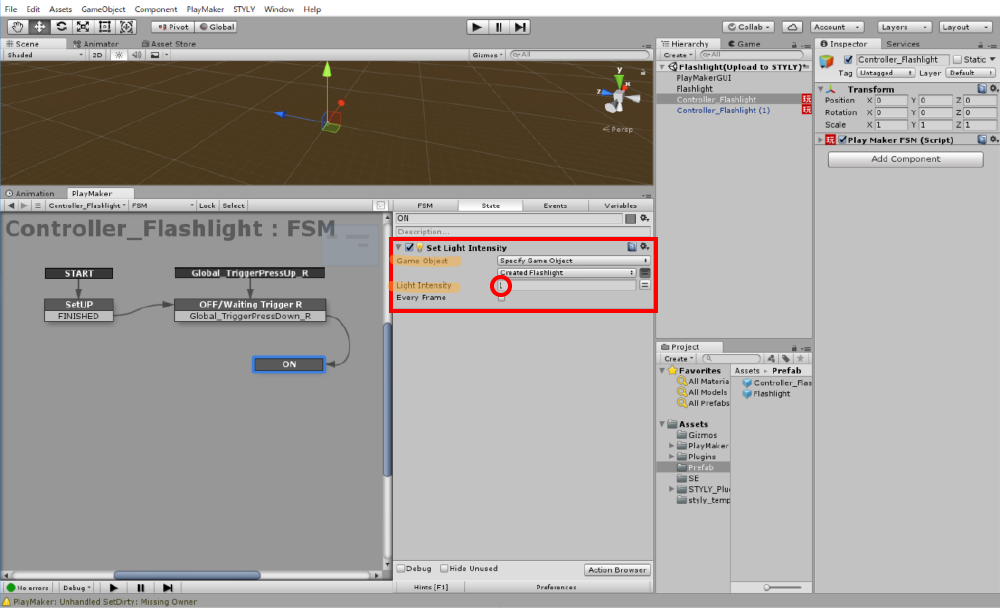
ONの設定
効果音をつける
懐中電灯のON/OFFに合わせて効果音を鳴らすには、「ON」「OFF/Waiting Trigger R」の状態に遷移したときに効果音が鳴るようにアクションを追加すればよいです。
まずは懐中電灯(Flashlight)に「Audio Source」をアタッチします。今回は「スイッチ」というSEを用意しました。
適当なサウンドファイルを用意し、懐中電灯にドラッグ&ドロップでアタッチします。
アタッチした「Audio Source」の「Play On Awake」のチェックを外し、Spatial Blendのレバーを3D側に寄せます。
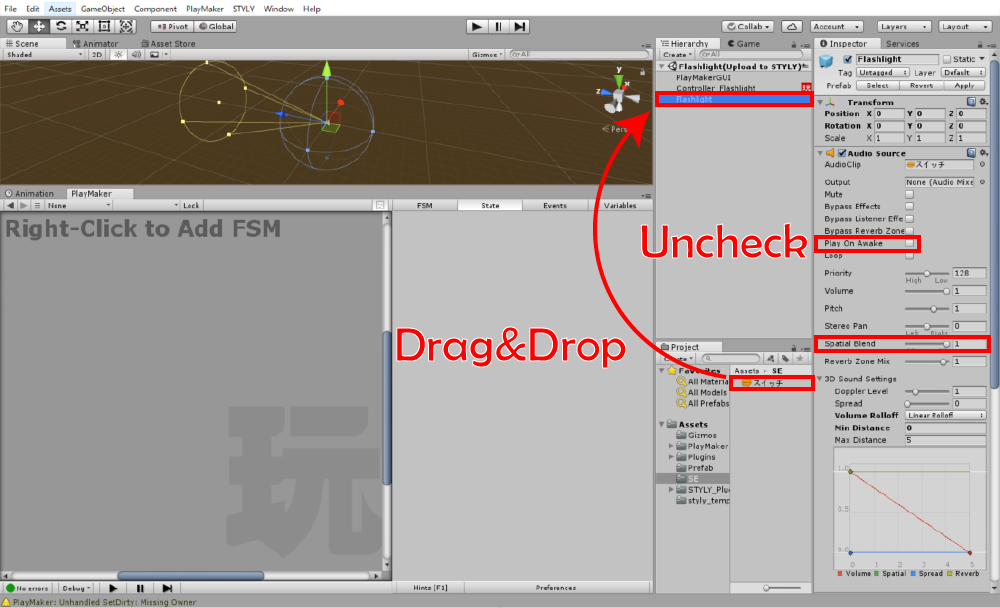
Audio Sourceのアタッチ
設定が完了したらインスペクター上部のPrefabの横にある「Apply」ボタンを押し、加えた変更をプレハブに保存しましょう。
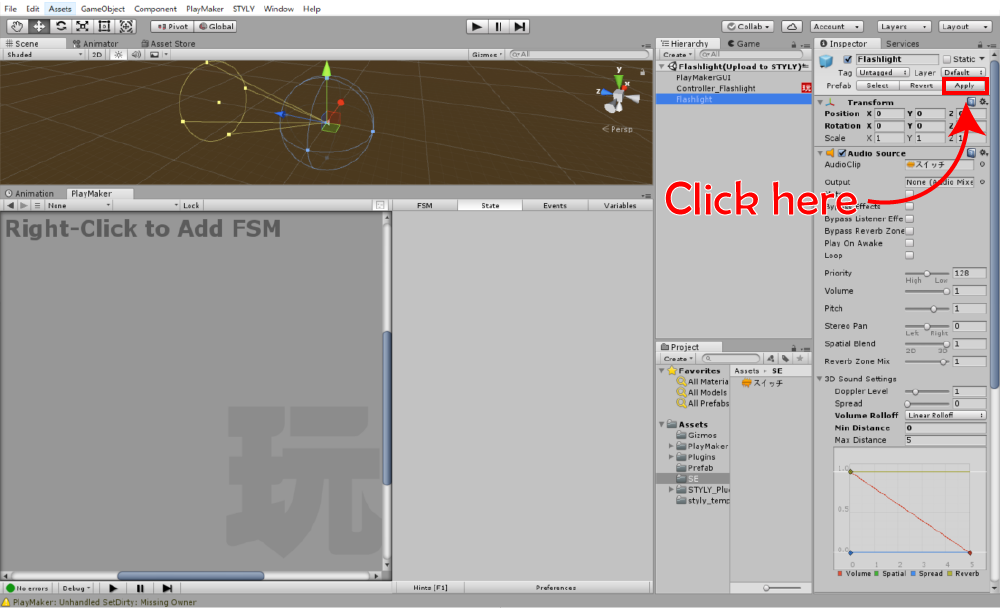
変更をプレハブに保存
次に「Controller_Flashlight」のStateにアクションを追加していきます。
- 「ON」のStateに「Audio Play」のアクションを追加します。
- 「Game object」には「Created Flashlight」を選択し、「One shot Clip」に「スイッチ」をアタッチします。
これにて懐中電灯のONになったときに効果音が鳴るようになりました。
(ライトが「OFF」になった時にも効果音を鳴らすには、「OFF/Waiting Trigger R」にも「Audio Play」のアクションを追加します)
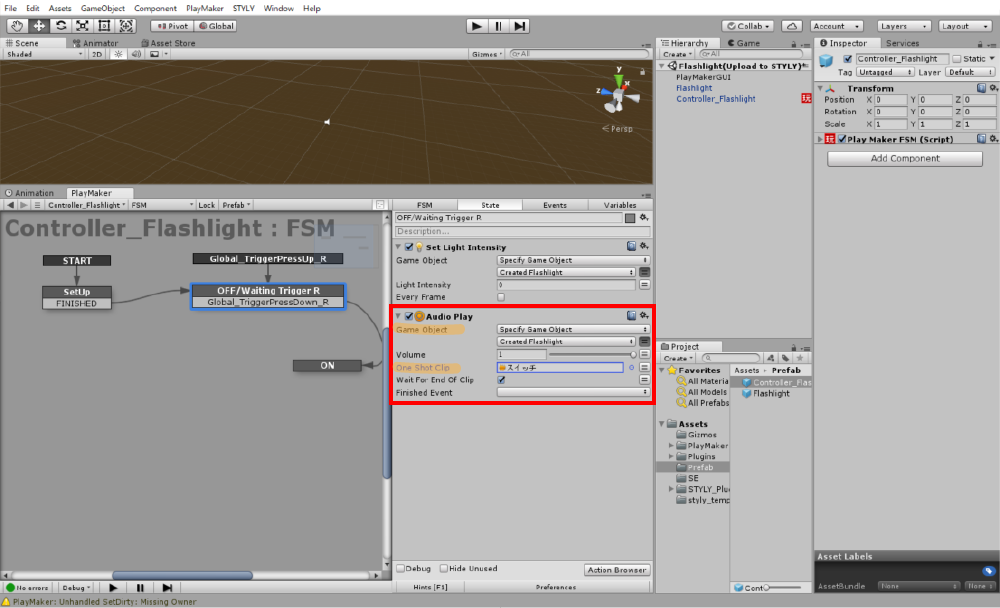
Audio Playの設定
シーンを暗くする
シーンを暗くする方法としてディレクショナルライトの削除がありますが、完全に暗くなるわけではありません。さらに暗くしたい場合は、環境光の設定を変更します。
この詳しい方法は以下の記事にて紹介しています。
STYLYにインポート
作成したギミックをSTYLYで使用するには、作成した「Controller_Flashlight」をプレハブにしてアップロードします。
UnityからSTYLYにアセットをアップロードする方法はこちらの記事で詳しく解説しています。

いかがだったでしょうか。
Playmakerを利用したアイテムの作り方をマスターすれば、いろいろなギミックに応用できます。
この記事を参考に、自分だけのオリジナルアイテムを作成してみて下さい。