In this tip, I will show how to create a zoetrope in VR using the principle of animation. It has a visual effect like ‘frame drop’, so it’s a useful expression when you want to introduce a unique atmosphere to space design.
I use ‘jumping astronauts’ as an example to explain the procedure, but this method can be applied to any 3D objects. So read this article to increase your variations of visual expressions.

Sample
You can taste the sample space from STYLY GALLERY.
Astronaut Zoetrope
You can download the Unity project introduced in this article from the link below.
This time, we use the ‘ZOETROPE’ folder in STYLY_Examples.
STYLY_Unity_Examples
Preparation
▼If you want to learn the basics to use Unity, refer to the article below▼

Get 3D model
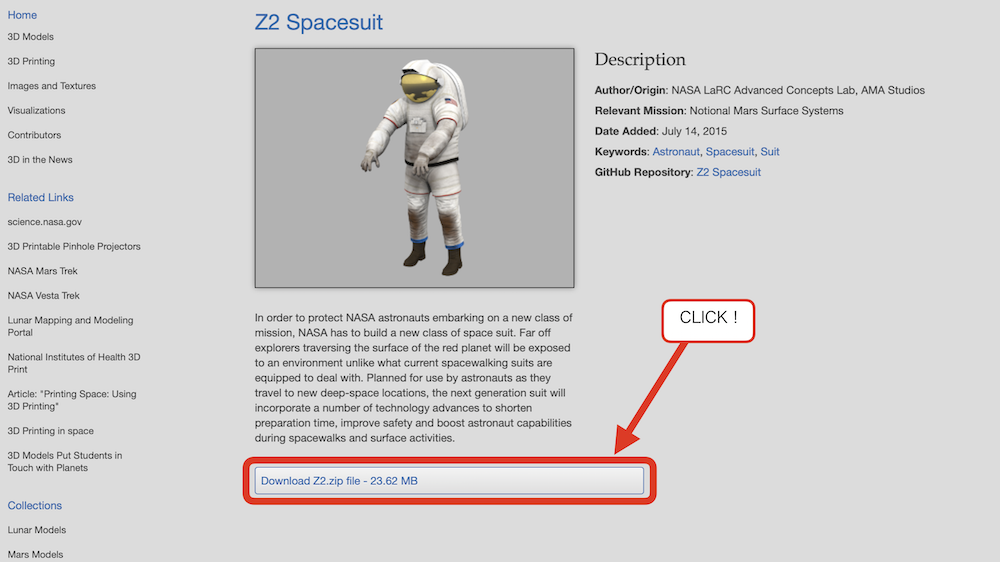
Firstly, get the 3D model ‘Z2 Spacesuit’ from the official NASA site shown below.
NASA 3Dmodel Z2 Spacesuit (Reference source: NASA)
(Please check the user policy for the models NASA provides from here)
・3D model ‘Z2 Spacesuit’
3D model to use in this article
Import 3D model to Unity
Launch Unity and drag the ‘Z2’ folder containing the data downloaded, into the ‘Asset’ folder in the ‘Project’ window. Now the preparation has been completed.
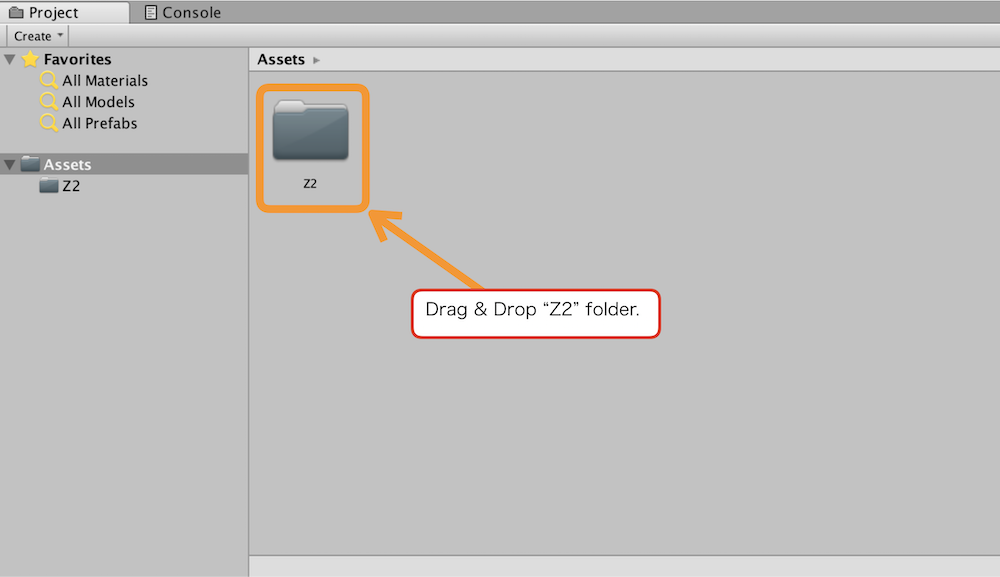
If it’s imported successfully, you will see the ‘Z2’ folder in ‘Asset’.
What is Zoetrope?
Zoetrope is a rotation-type flip animation, which has a mechanism that creates the illusion of the motion by rotating sequenced pictures or objects.
What makes the images ‘animated’ is an illusion created when gradually-changing images keep passing in front of your eyes. Zoetrope is a toy with this mechanism, which was invented and got popular around the 19th century. By using the mechanism of Zoetrope, you can create animation not only with 2D material such as paper, film, but also with a 3D object such as a figure doll, or 3D model. In this tip, I introduce the procedure to create 3D Zoetrope in VR space by using 3D models.
Arrange 3D models
The models need to equally spaced and arranged in a circle to create a zoetrope.
We arrange the 3D models in the following order.
A. Basic settings for 3D model
B. Duplicate the model set up in Procedure A.
C. Arrange the duplicated models in a circle.
A. Basic settings for 3D model
[A-1]
Place the floor where the models can jump. In the Hierarchy window, select ‘Create > 3D Object > Plane’.
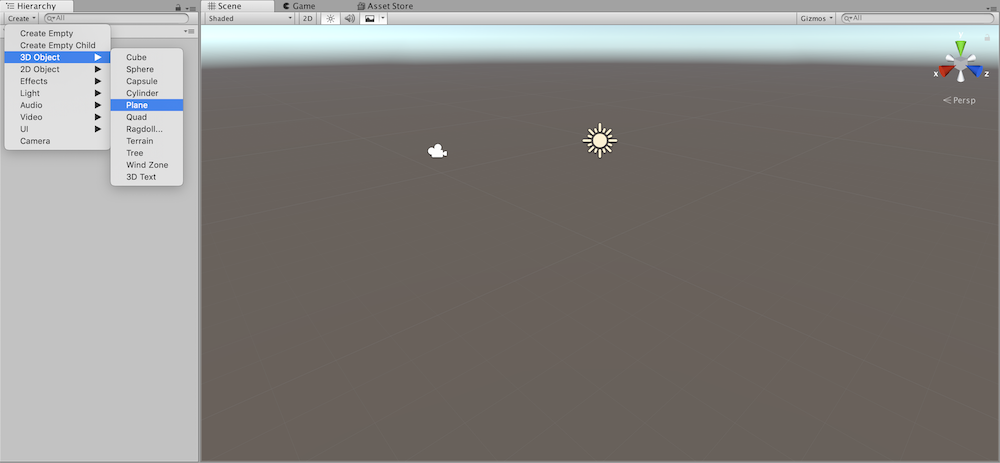
Create a floor
[A-2]
Resize the Plane. In the ‘Transform’ field on the Inspector tab, set the X and Z value of ‘Scale’ to 10.
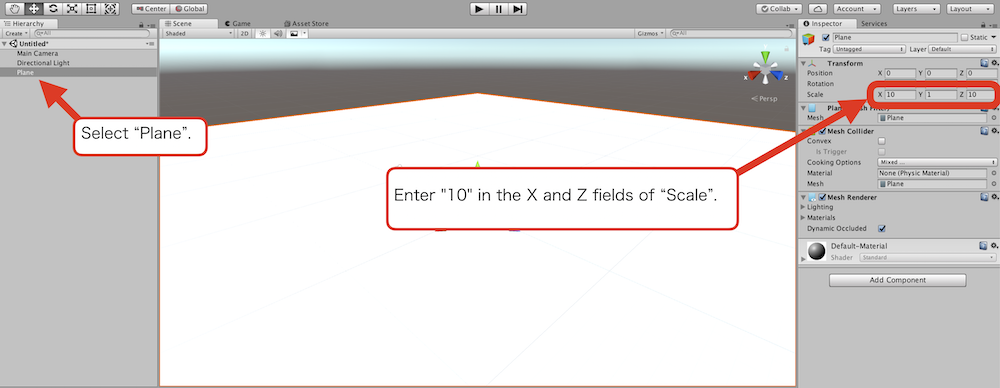
Resize the floor
[A-3]
Drag the ‘Z2’ 3D model under the ‘Z2’ folder in the Project window, into the Hierarchy window to add.
[A-4]
With the ‘Z2’ folder selected in the Hierarchy window, set the X, Y and Z values of ‘Scale’ to 5 in the Transform field on the Inspector tab
[A-5]
In the ‘Transform’ field on the Inspector tab, set the Z value of ‘Position’ to -30.
![[A-3]~[A-5]の作業](https://styly.cc/wp-content/uploads/2019/03/z_eng_4.png)
Procedure [A-3] to [A-5]
[A-6]
Right-click on the Hierarchy window and select ‘Create empty’ to create an empty GameObject (It is displayed as ‘GameObject’ in the window).
[A-7]
Select the ‘GameObject’ created in Procedure A-6 and check that the X, Y and Z values of ‘Position’ are set to ‘0’ in Transform field on the Inspector tab.
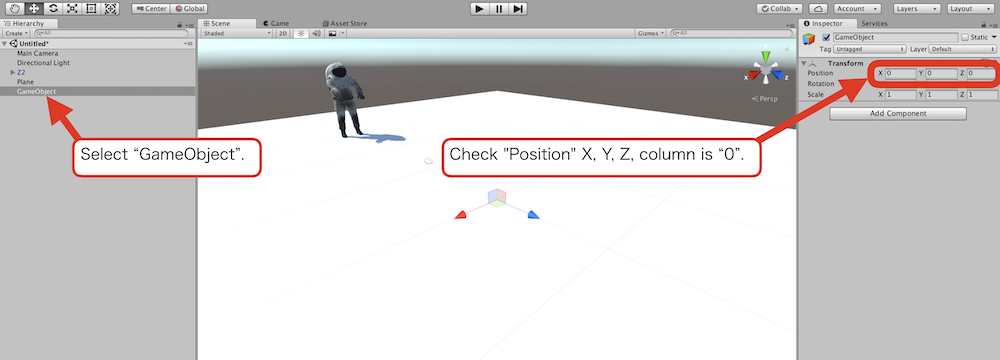
Check the ‘Position’ values in ‘GameObject’
[A-8]
Drag ‘Z2’ in the Hierarchy window into the ‘GameObject’.
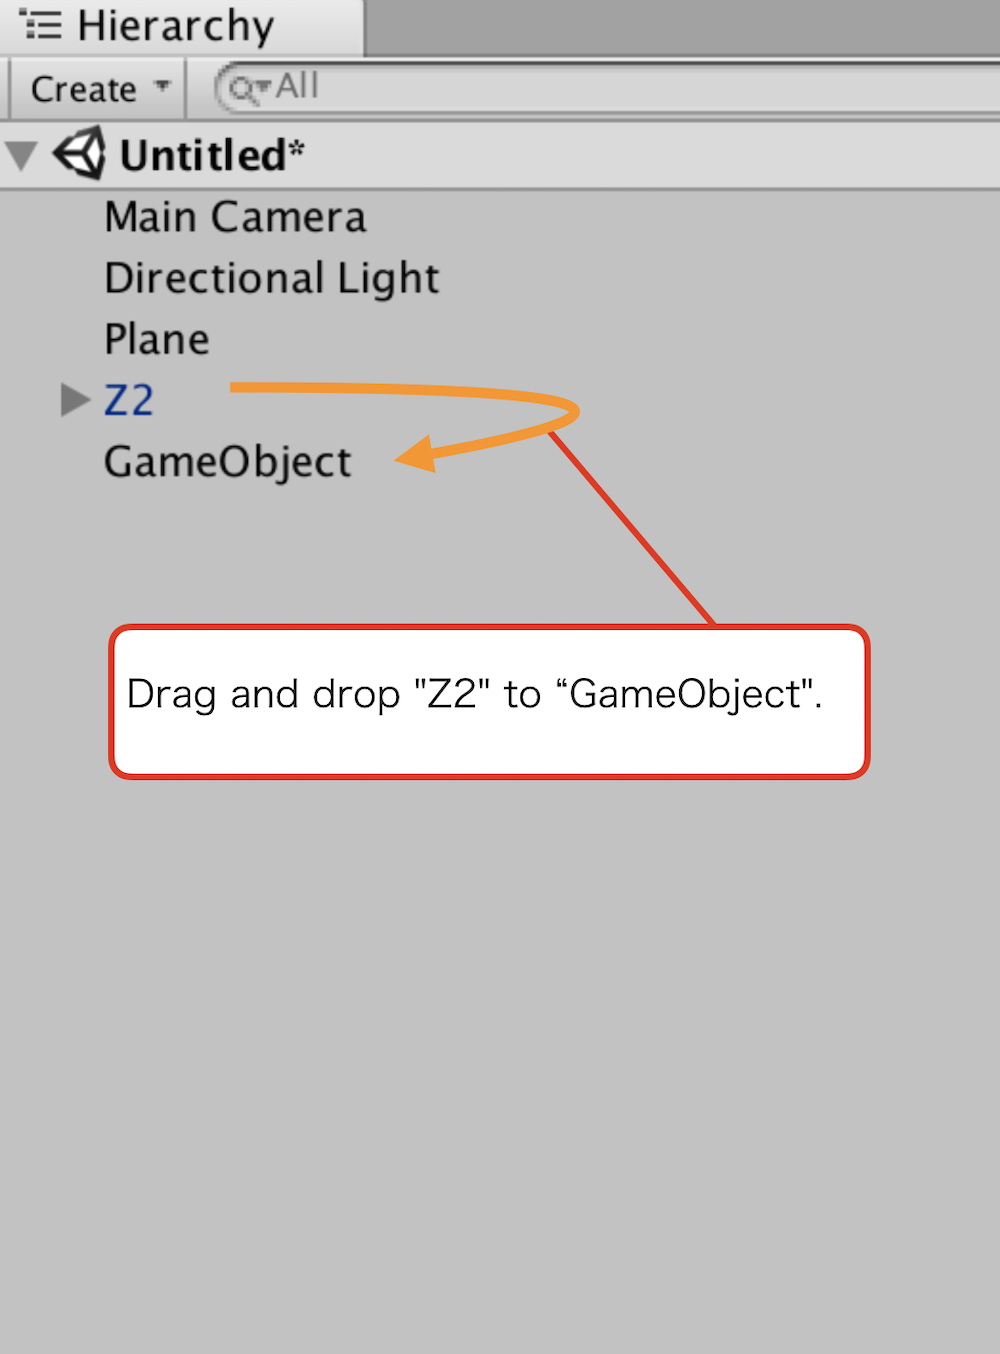
Drag and drop ‘Z2’ into the empty ‘GameObject’.
B. Duplicate 3D model set up in Procedure A (Convert into Prefab and then Duplicate)
[B-1]
Right-click ‘Asset’ in the Project window and select ‘Create > Folder’ to create a folder. Rename it ‘Zoetrope’.
Then, drag and drop the ‘GameObject’ in the Hierarchy window into the ‘Zoetrope’ folder (i.e. convert it into Prefab).
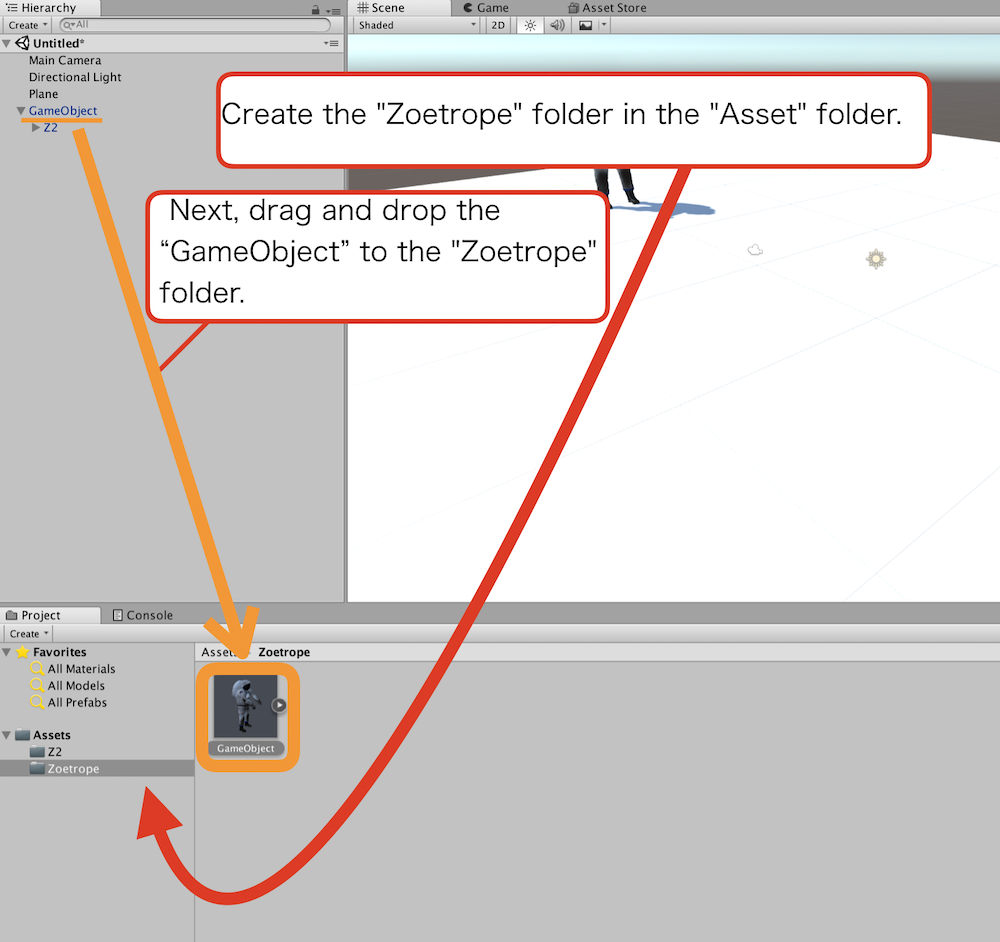
Convert the object into Prefab
[B-2]
Drag the ‘GameObject’ Prefab created in the ‘Zoetrope’ folder into the Hierarchy window to duplicate ‘GameObject’ in the Scene. Repeat it 24 times to create 24 objects.
[B-3]
After duplicating, delete the unnumbered ‘GameObject’ in the Hierarchy window.
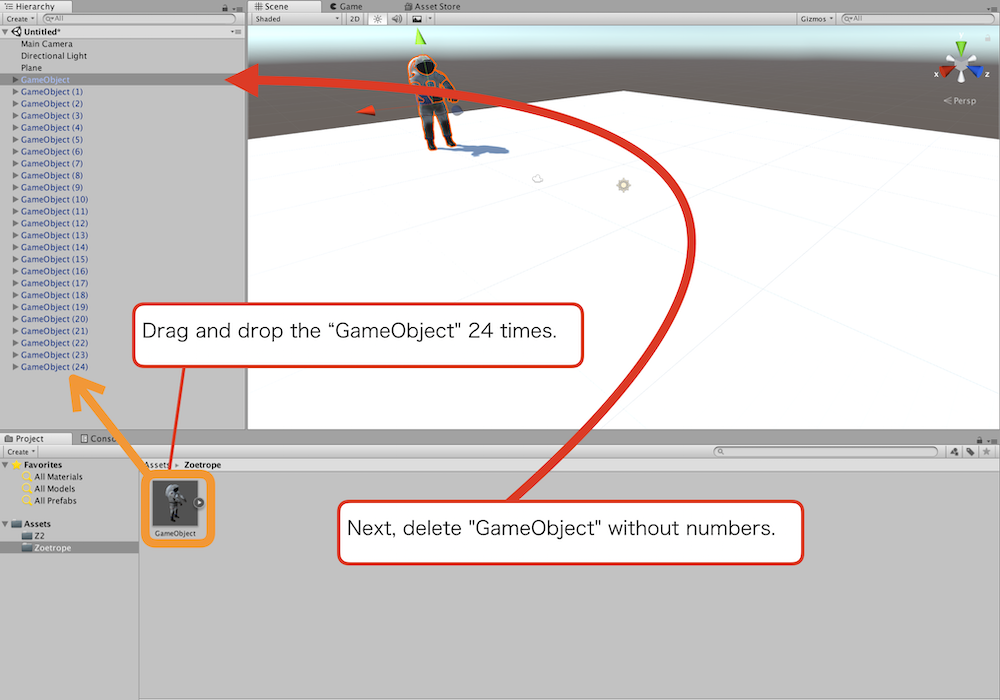
Duplicate the object 24 times
C. Arrange duplicated 3D models in a circle
Arrange in a circle the 24 objects duplicated in the Hierarchy window (‘GameObject (1) ~ ‘GameObject (24)’).
Use the ‘Rotation’ field to move an object along a circle or sphere. the X, Y and Z value corresponds to the rotation angle for each axis. For example, the object rotates around Y-axis by 15 degrees when setting the Y value of ‘Rotation’ from 0 to 15. Arrange the astronauts in a circle by using this function.
Select each object and enter the Y value of ‘Rotation’ in the Transform field on the Inspector referring to the ‘Rotation Y’ values in the table below.
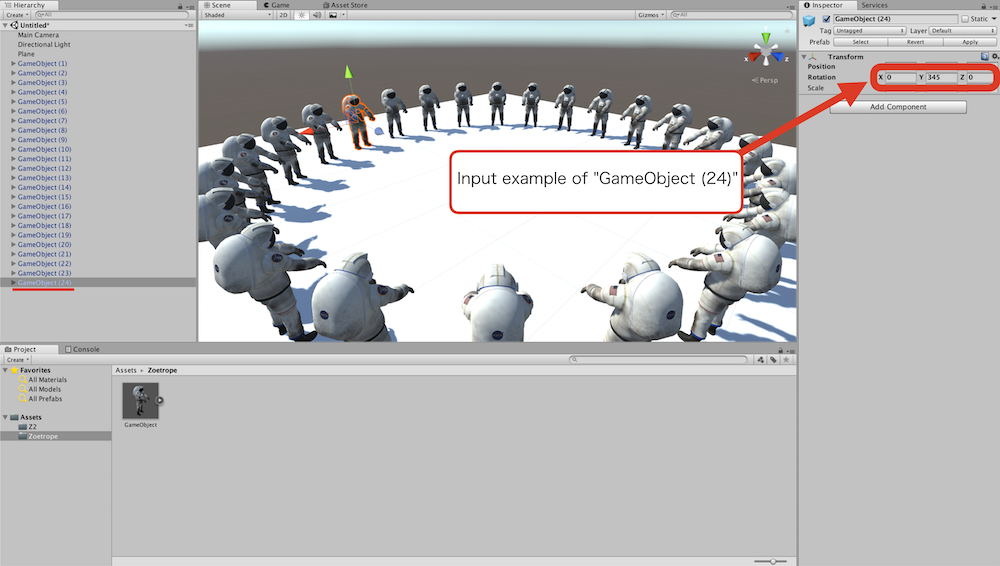
Enter the ‘Rotation Y’ value for each GameObject
| Object Name | Rotation Y |
| GameObject (1) | 0 |
| GameObject (2) | 15 |
| GameObject (3) | 30 |
| GameObject (4) | 45 |
| GameObject (5) | 60 |
| GameObject (6) | 75 |
| GameObject (7) | 90 |
| GameObject (8) | 105 |
| GameObject (9) | 120 |
| GameObject (10) | 135 |
| GameObject (11) | 150 |
| GameObject (12) | 165 |
| GameObject (13) | 180 |
| GameObject (14) | 195 |
| GameObject (15) | 210 |
| GameObject (16) | 225 |
| GameObject (17) | 240 |
| GameObject (18) | 255 |
| GameObject (19) | 270 |
| GameObject (20) | 285 |
| GameObject (21) | 300 |
| GameObject (22) | 315 |
| GameObject (23) | 330 |
| GameObject (24) | 345 |
Table: ‘Rotation Y’ values
Next, we set up the motion.
Set up the motion
Each 3D model needs to change its shape little by little to express motions in Zoetrope. In this tip, we shift each model vertically to create an effect like ‘jumping’.
You can shift the models by adjusting the ‘Position’ values. Firstly, select ‘GameObject (1)’ and set the Y value of ‘Position’ to ‘0.2’ in the Transform field on the Inspector tab. It vertically shifts ‘GameObject (1)’ a bit.
Then, enter the values for ‘GameObject (2)’ to ‘GameObject (24), referring to the table (Position Y) below.

Select ‘GameObject (1)’ and enter the Y value of ‘Position’ in the Transform field on the Inspector tab.
| Object Name | Position Y |
| GameObject(1) | 0.2 |
| GameObject(2) | 0.4 |
| GameObject(3) | 0.6 |
| GameObject(4) | 0.8 |
| GameObject(5) | 1 |
| GameObject(6) | 1.2 |
| GameObject(7) | 1.4 |
| GameObject(8) | 1.6 |
| GameObject(9) | 1.8 |
| GameObject(10) | 1.6 |
| GameObject(11) | 1.4 |
| GameObject(12) | 1.2 |
| GameObject(13) | 1 |
| GameObject(14) | 0.8 |
| GameObject(15) | 0.6 |
| GameObject(16) | 0.4 |
| GameObject(17) | 0.2 |
| GameObject(18) | 0 |
| GameObject(19) | 0 |
| GameObject(20) | 0 |
| GameObject(21) | 0 |
| GameObject(22) | 0 |
| GameObject(23) | 0 |
| GameObject(24) | 0 |
Table: Position Y
Set Rotational Speed of Zoetrope
Next, set up the animation to rotate all the 3D models together.
1. Right-click on the Hierarchy window and select ‘Create empty’ to create an empty GameObject (It’s displayed as ‘GameObject’ in the window). Then, rename it ‘Rolling Object’.
2. Drag and drop all the model, ‘GameObject (1)’ to ‘GameObject (24)’, into ‘Rolling Object’.
3. With ‘Rolling Object’ selected, select ‘Animation’ from the ‘Window’ menu on the toolbar to open the ‘Animation’ window.
4. Click ‘Create’ in the ‘Animation’ window and follow the messages to save the Animation data to the default place. Then, it brings up the timeline.
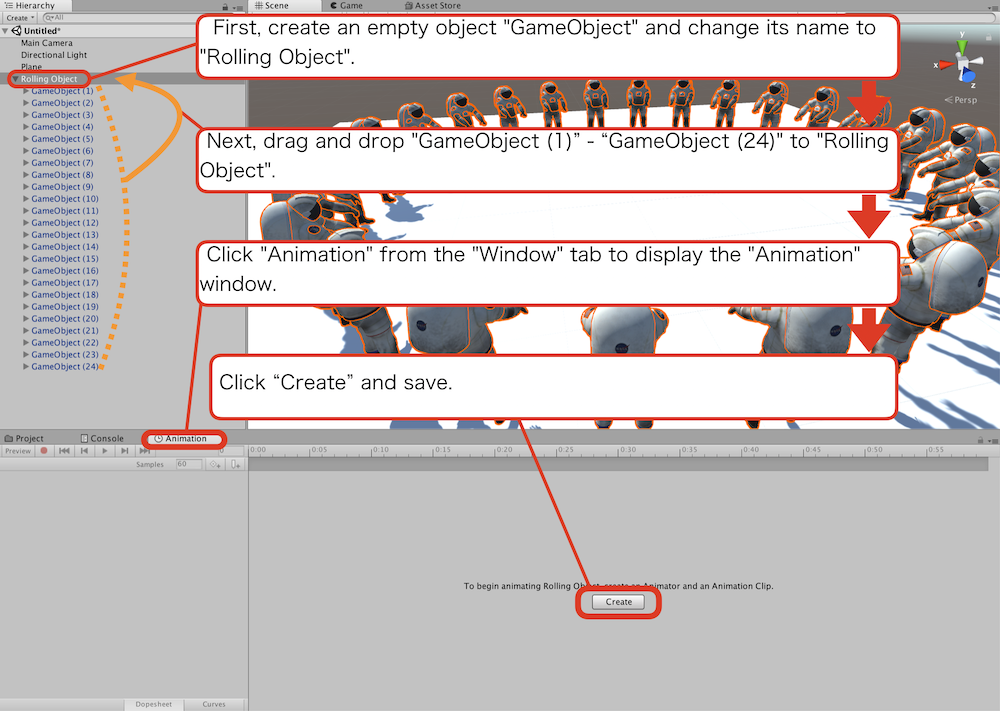
Set up ‘Animation’
5. Next, in the ‘Animation’ window, press ‘Add Property’ button to open the menu. Select ‘Transform > Rotation’ from the menu and press the ‘+’ button next to ‘Rotation’.
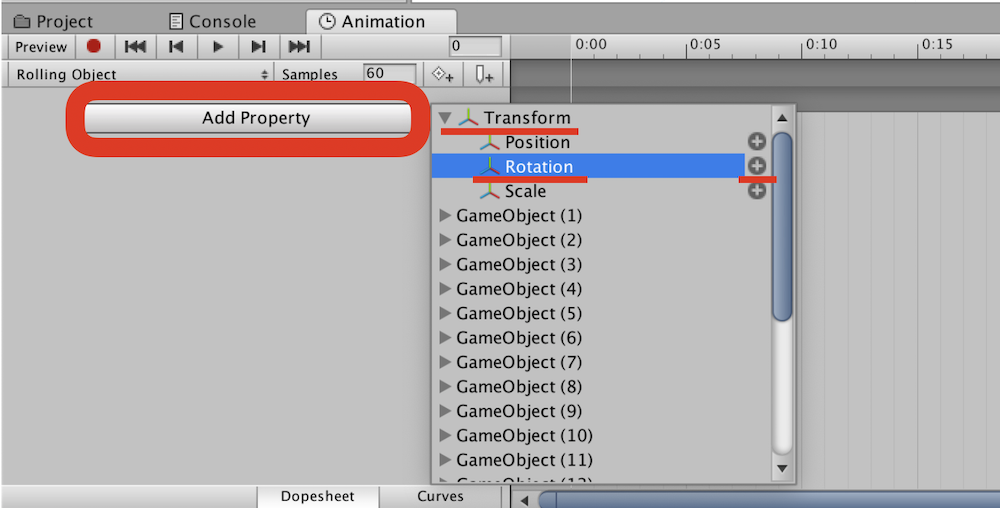
Use ‘Add Property’
6. Next, place Keyframes. Keyframe is a marker to set the timing of the motion.
Firstly, find the two fields to enter values in the ‘Animation’ window. Then, set the lower field to 60 and the upper field to 120 (See the screenshot below).
7. Press the ‘Add Keyframe’ button (See the screenshot below). It places the ‘◇’ maker in the timeline, which means that a Keyframe has been placed at the 120th frame (= 2 seconds). Note that the Keyframe at the 60th frame (= 1 second) has already been set by default.
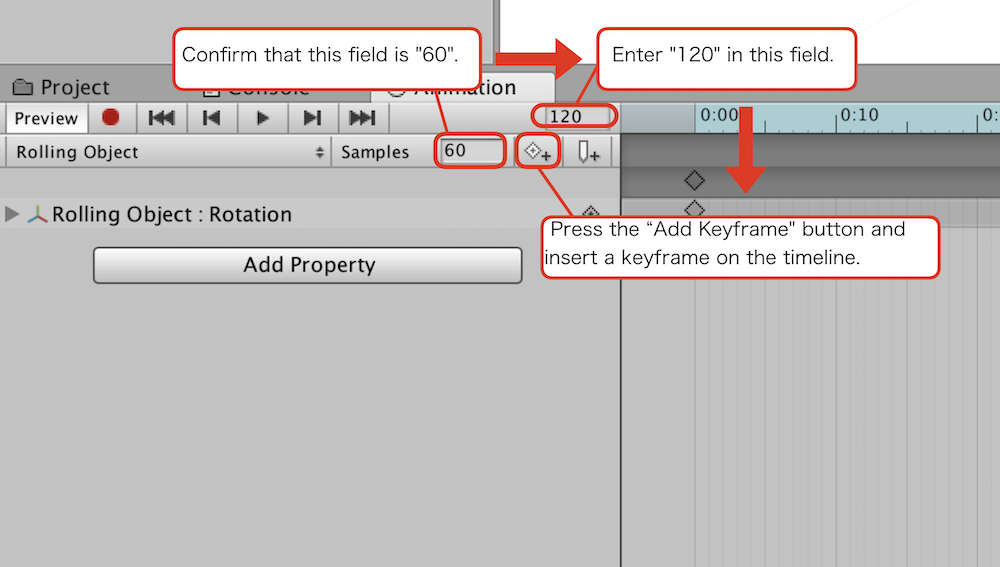
The setting for the timeline
8. Then, set each value shown in the table (the timing for Keyframe) for the upper field in the Animation window, and press ‘Add keyframe’ each time to place Keyframe.
| The timing for Keyframes |
| 120 |
| 180 |
| 240 |
| 300 |
| 360 |
| 420 |
| 480 |
| 540 |
| 600 |
Table: The timing for Keyframes
9. Next, press the ‘Record’ button in the Animation window. If the fields shown in the screenshot below turn red, following your operations (as instructed in the next procedure, Procedure 10) will be recorded as the ‘Animation’ data.
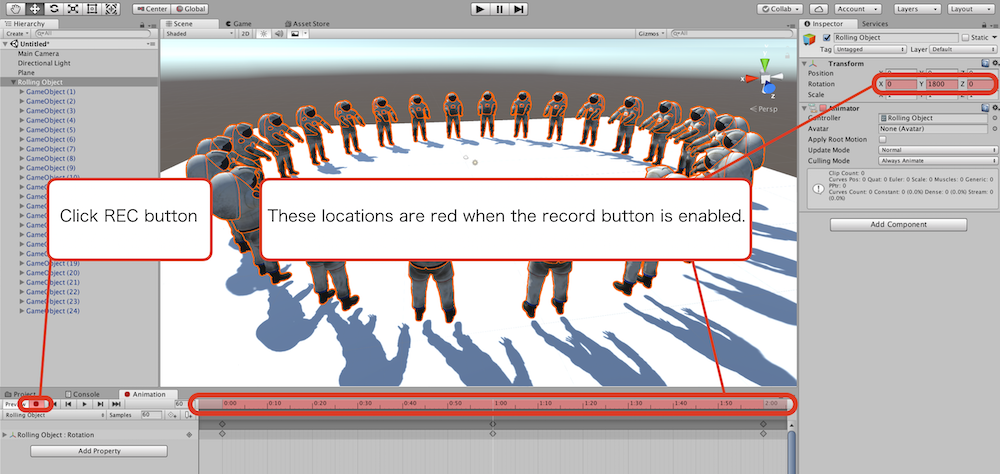
The ‘Recording’ state of the ‘Animation’ window
10. Set up the rotation. Referring to the example below, enter the values (the setting for the rotation) shown in the table below.
Example: in the case of the 60th frame
Enter ’60’ in the upper field in the ‘Animation’ window and then enter ‘1800’ in ‘Rotation Y’ on the Inspector tab.
| The timing for Keyframes | Rotation Y |
| 0 | 0 |
| 60 | 1800 |
| 120 | 3600 |
| 180 | 5400 |
| 240 | 7200 |
| 300 | 9000 |
| 360 | 10800 |
| 420 | 12600 |
| 480 | 14400 |
| 540 | 16200 |
| 600 | 18000 |
Table: The setting for the rotation
Now, it’s completed.
Press the PLAY button in the GAME window to start the Zoetrope.
Upload to STYLY
Read this article to learn how to upload an asset from Unity to STYLY.

The more you add motions such as moving the astronauts’ hands, making them dance, the more complicated and original your Zoetrope will be.
(Example: Maillots de bain)
Please try making various Zoetropes.