In this article, I will explain how to create a concert scene where a model created by VRoid Studio can sing and dance, with particle stage effects.
By understanding the basics, you can use your original model, use a different song, or use original paritcle effects and create a original concert scene.
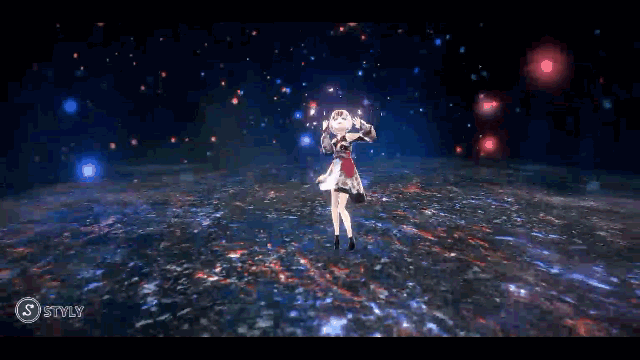
This is the final image of the concert scene we are going to create
There are 11 chapters, and there will be 4 articles in this series.
This article will be about chapter 6, and I will explain how to transfer base information such as songs and animations from the CandyRockStar Project (CRS Project).
Transfer base information (Songs, Animations) from the CandyRockStar Project (CRS Project)
We will transfer some songs, animations, particles, and shaders from the CandyRockStar Project (CRS Project), and import them to our project.
Preparation
First, we will change the MainCamera settings to be able to check stage effects more easily with the game view when playing the Editor.
Please change the Inspector settings as in the image below.
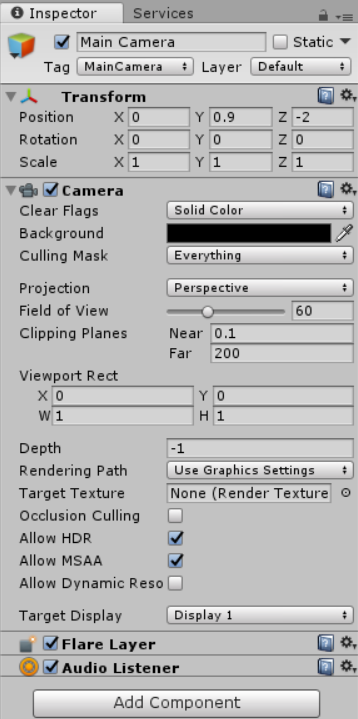
Main Camera Object settings
Uncheck Directional Light and deactivate it.
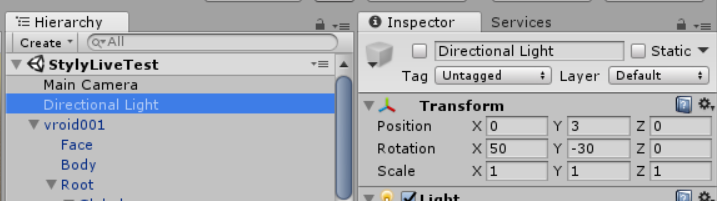
Deactivating Directional Light
That is all for the settings.
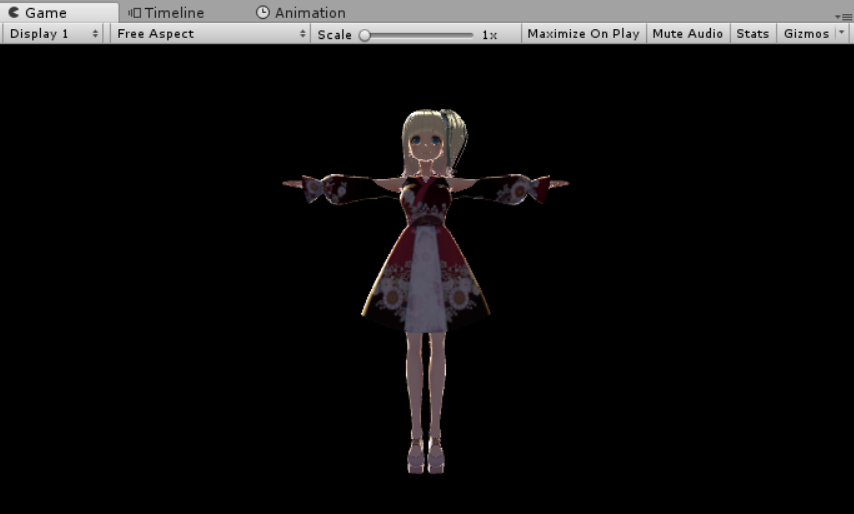
Game view with the changed settings
Next, we will start the transferation, so download the CRS Project, and open the project in Unity 2019.3.6f1. The preparation is complete.
Click here to check which Unity versions are compatible with STYLY.
https://document.styly.cc/doc/docs/en-US/creator/creator_plugin_intro/#about-the-corresponding-unity-version
Unity-Chan “Candy Rock Star” Live Demo
https://github.com/unity3d-jp/unitychan-crs
Transfer Song
Type in “unite” in the CRS project search box, and find “Unite In The Sky(full)”.
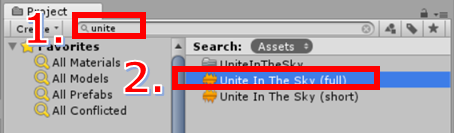
Search for song
Select it and then right click → select Show in Explorer and open “Unite In The Sky (full).mp3”.
Drag & drop the mp3 file into your created project, and the transfer of the song is done.
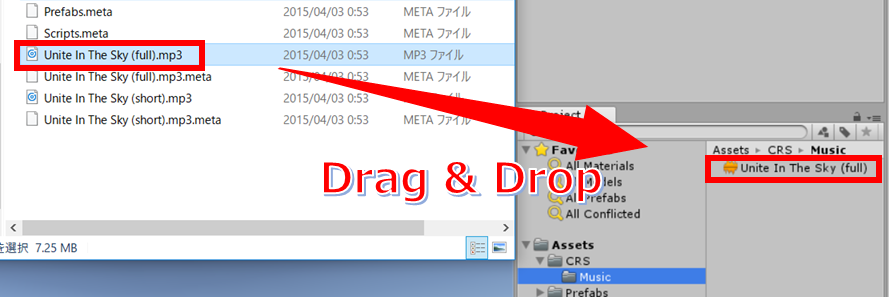
Transfer Song
Transfer Character Animation
Type in “C86” in the CRS project search box, and find “C86unitychan_003_NOT01_Final”.
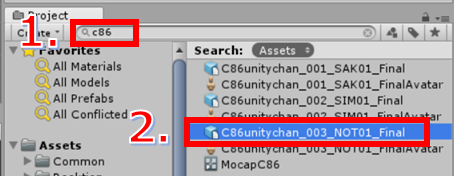
Search for animation
Select it and then right click → select Show in Explorer and open “C86unitychan_003_NOT01_Final.fbx”.
Drag & drop the fbx file into your created project, and the transfer of the animation is done.
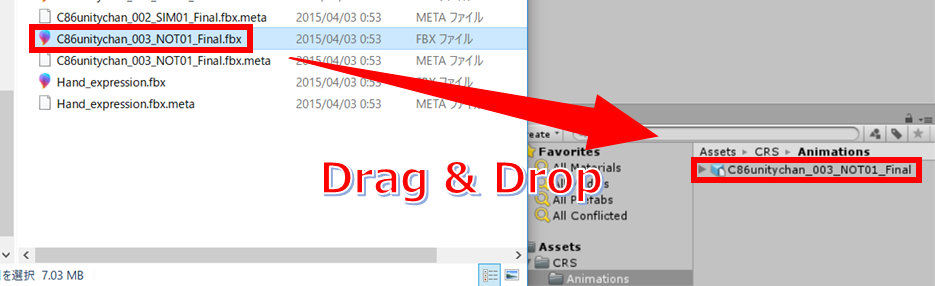
Transfer Animation
Next, we will set the animation, and check the animation working in the Editor.
Select the “C86unitychan_003_NOT01_Final” you imported, select the Rig tab in the Inspector window, and change the Animation Type to Humanoid and Apply.
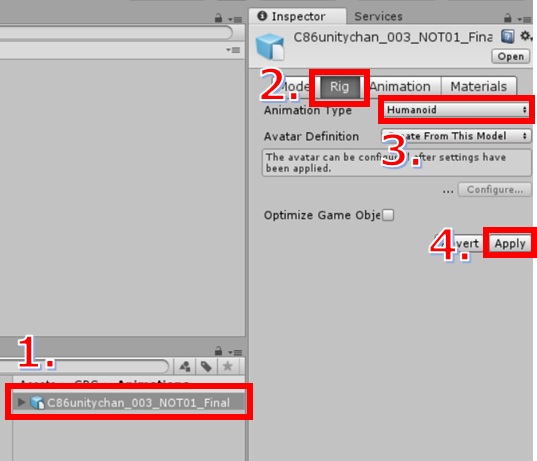
Change Animation Type to Humanoid
Create a new Animation Controller by Right click → Create → Animation Controller.
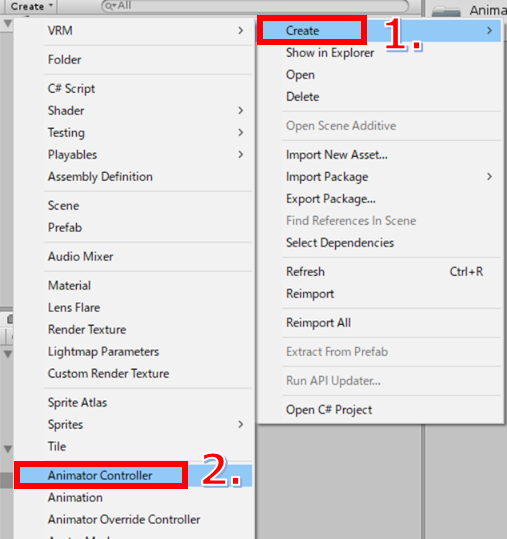
Create Animation Controller
Double click the Animation Controller and open the Animator window, and create a New State by right click → Create State → Empty.

Edit Animation Controller
D&D “Take001” which you can find under “C86unitychan_003_NOT01_Final” into Motion in the Inspector window of the New State.
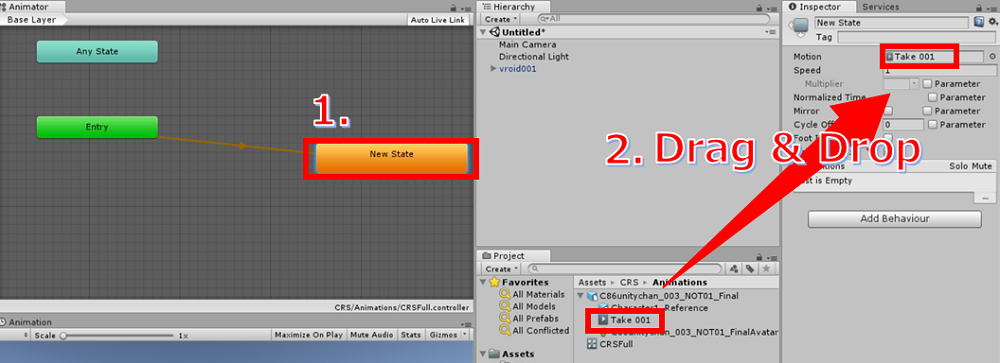
Motion settings
Finally, set an Animation Controller with VRoid, select Apply Root Motion and check that the animation works in the Editor.
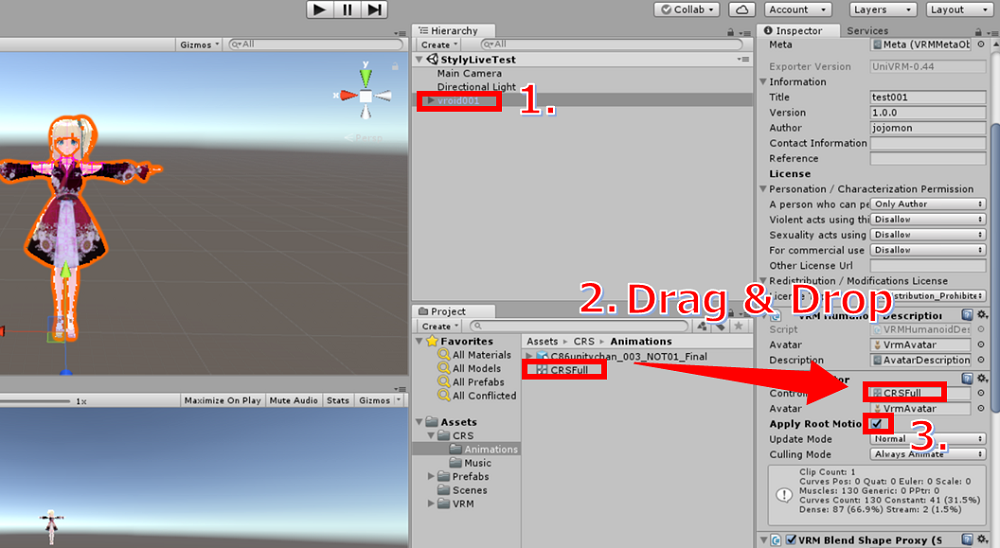
Apply Animation Controller
Transfer Particle effects
In the CRS projects, there are particles that occur according as the character’s hand moves. We will transfer these particles too.
First, we need to prepare with these steps.
Type in “spray” in the CRS project search box, and find the spray folder, so export it.(Right click → Export Package)
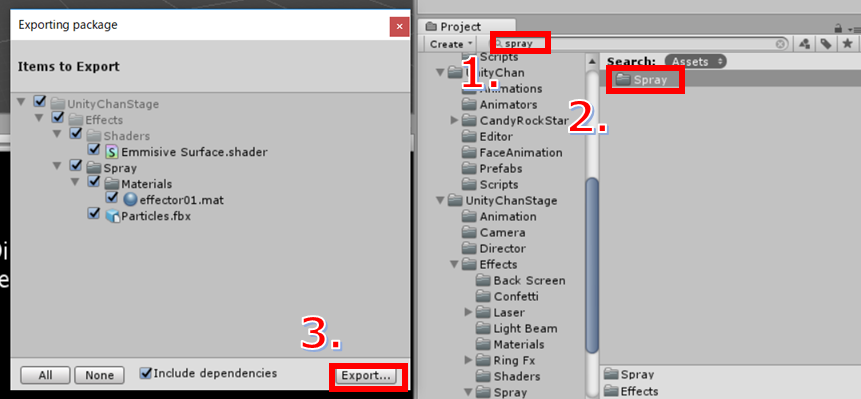
Exporting particle from CRS project
Double click the Package and import it to the project. (UnityChanStage will be created under Assets)
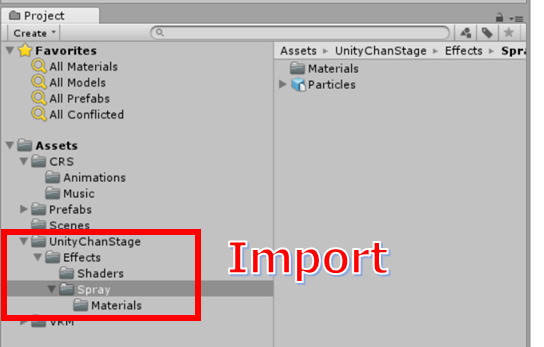
Import Particle
Next, we will create the Particle.
Open GameObject → Effects → Particle System in the Editor menu.
Change the name to “Spray”, and change the Inspector settings as in the image below.
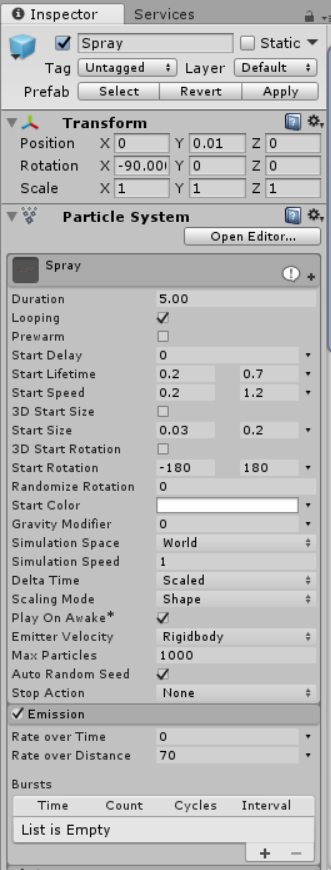
Particle Settings 1
Particle Settings 2
Particle Settings 3
In order to change Size over Lifetime, adjust it from open editor.

over Lifetime settings
There will be 4 vertices, and the Time, Value will be as in below.
| ? | Time | Value |
| 1 | 0 | 0 |
| 2 | 0.086 | 1 |
| 3 | 0.877 | 1 |
| 4 | 1 | 0 |
Set the Renderer Mode to Mesh, click the + icon to be able to set 4 meshes, and set meshes from the Particles folder beneath the Spray folder, as in the image below.
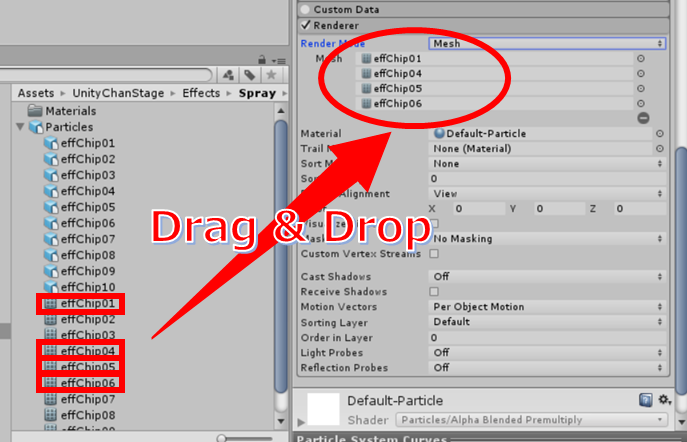
Renderer settings
To change the particle colors to pink, edit the Material. Select “effector01”, which is included in “Spray”, and change the Emmission in the Inspector window to pink.
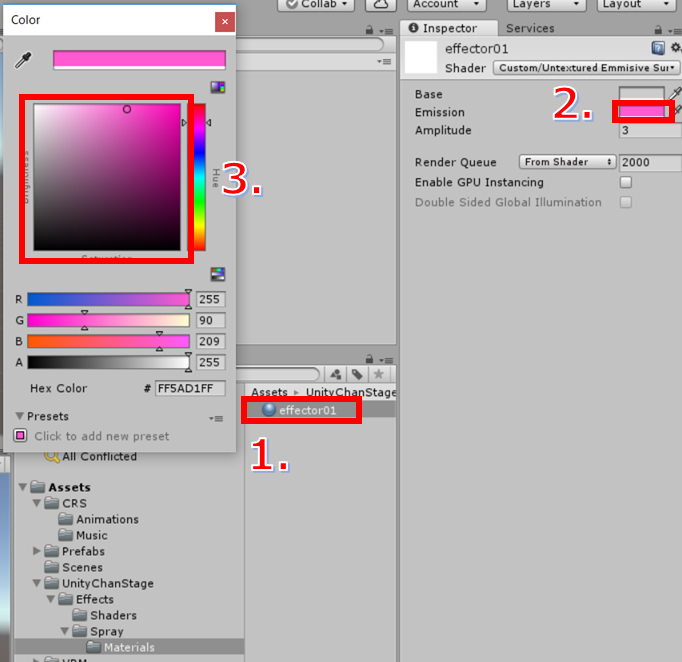
Change Color
D&D effector01 to Material in Renderer, and set it.
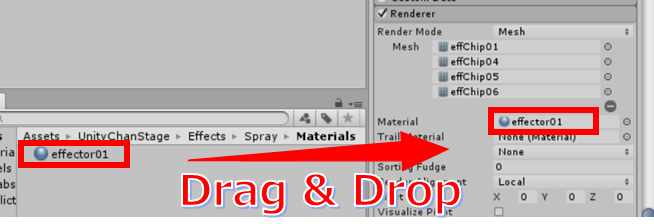
Material settings
The other settings are as in below. To change effect area, click ▼ and select “Random Between two constants”.

Change effect area with Random Between Two Constants
・Start Liftime → 0.2 , 0.7
※Random Between two constants
・Start speed → 0.2 , 1.2
※Random Between two constants
・Start size → 0.03 , 0.2
※Random Between two constants
・Start rotation → -180 , 180
※Random Between two constants
・Simulation space → world
・Scaling mode → shape
・Check the following options and edit
・Emission
Rate over Time → 0
Rate over Distance → 70
・Shape
Radius → 0.04
Randomize direction → 1
・Limit Velocity over Lifetime
Speed → 0
Dampen → 0.08
・Force over Lifetime
x,y,z → -6, -6, -6
6, 6, 6
※Random Between two constants
Space → world
Randomize → Check
・Size over Lifetime
Adjust from open editor in the upper right hand
・Rotation over Lifetime
Angular Velocity → 500 , 2500
※Random Between two constants
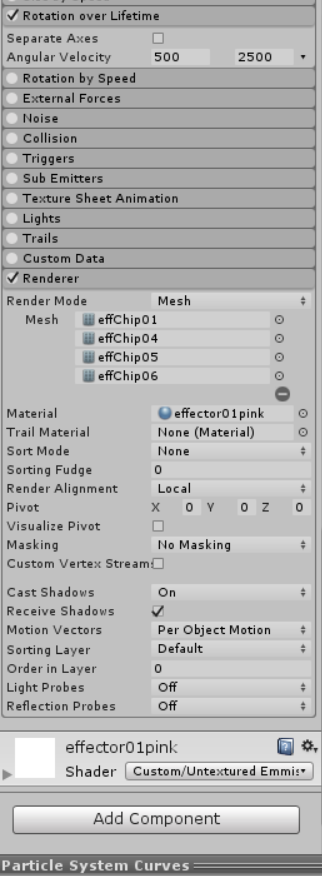
・Renderer
Render Mode → Mesh
Mesh → effChip01
effChip04
effChip05
effChip06
Material → effector01
Trial Material → none
Render Alignment → local
Cast Shadows → on
Receive Shadows → Check
Create a Prefab from the Particle
Create a Prefab from the Particle
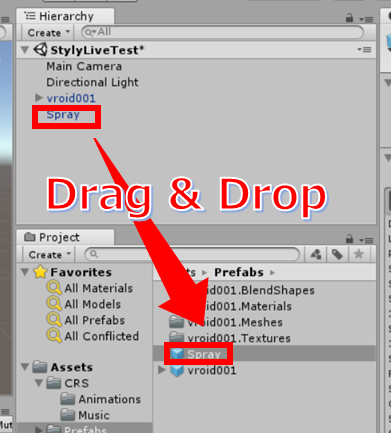
D&D “Spray” from the Hierarchy to the Project folder, and create a Prefab. Then, change the Position and Rotation.
- Position(0, 0.01, 0)
- Rotation(-90, 0, 0)
Move the Spray Prefab to under each of the following character objects.
- J_Bip_L_Hand
- J_Bip_R_Hand
- J_Bip_R_UpperLeg
- J_Bip_L_UpperLeg
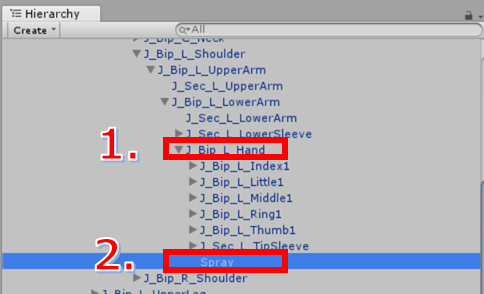
Arranging Particle placement
Particle Transfer 2
Next, we will create a confetti particle effect.
First, the preparation steps.
Type in “confetti” in the CRS project search box, and find the Confetti folder, so export it. (Right Click → Export Package)
Double click the Package and import it to the project.
Next, we will create the Particle.
Select Create Empty in the Hierarchy, and name the created object “Confetti”, set Transform as in the image below.
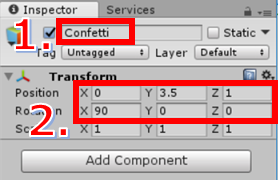
Change name and Transform settings
Create a Particle from GameObject → Effects → Particle System within Editor, and set it as a child object of Confetti.
Set Particle as in below.
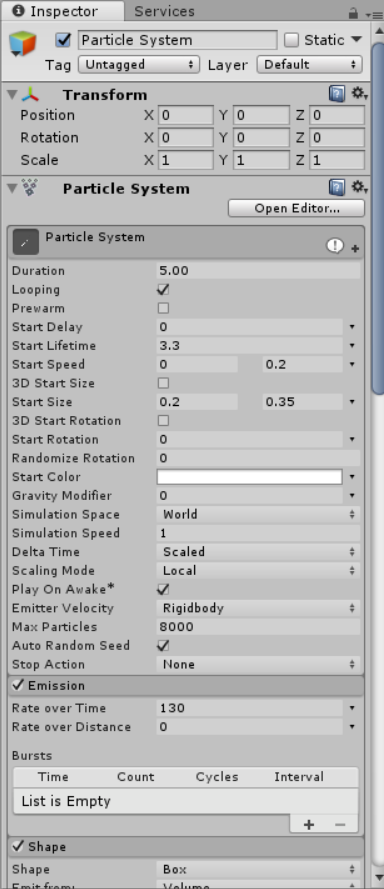
Particle Settings 1
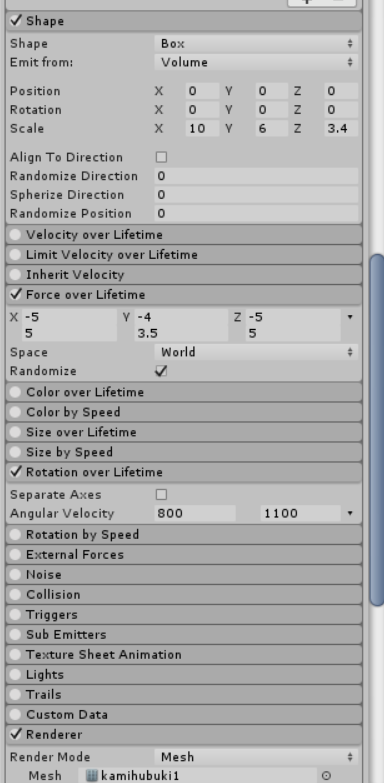
Particle Settings 2
Particle Settings 3
Additional Settings
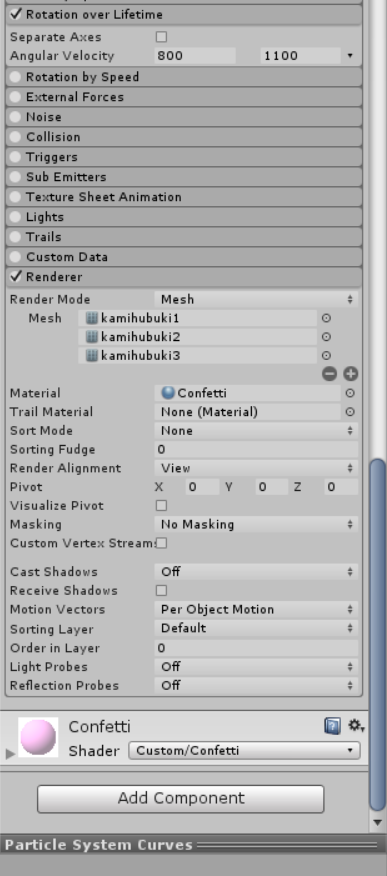
Set the Renderer Mode to Mesh, click the + icon to be able to set 4 meshes, and set meshes from the Confetti folder, as in the image below.
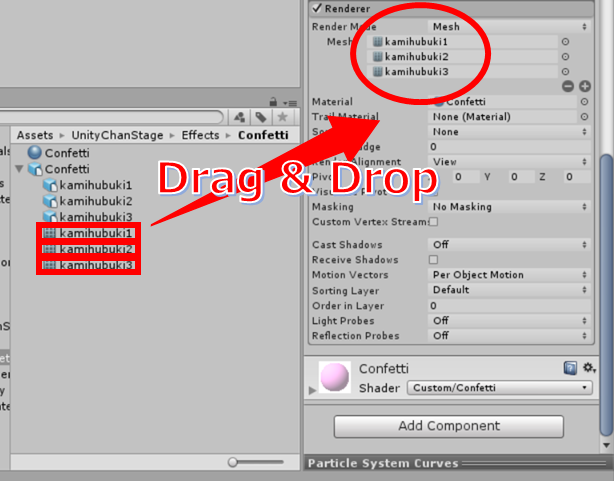
Renderer additional settings
Duplicate the created Particle with Ctrl + D, and change Transform.

Duplicate particle and change Transform
Create a Directinal light as a child object of the Confetti object.(Select the Confetti object and right click → Light → Directional light)
Set the Directional light as in below.
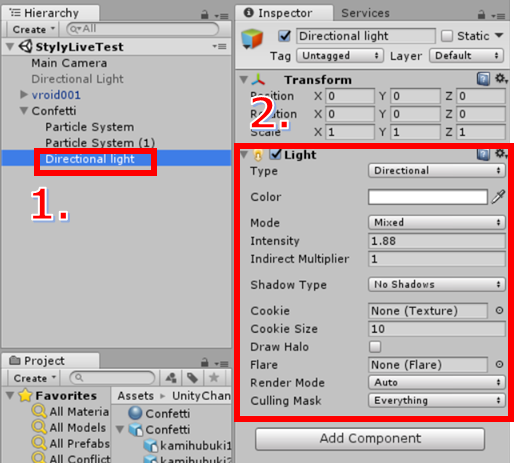
Add Directional light and edit
The confetti particle is done.
Shader transfer
Next, we will tranfer the stage floor.

Stage floor shader
Type in “Visualizer” in the CRS project search box, and find the Visualizer folder, export it.(Right click → Export Package)
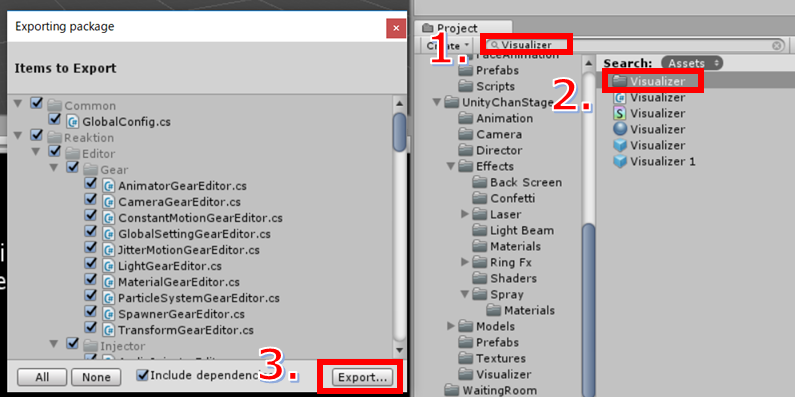
Export Visualizer folder
Export the stage object too.
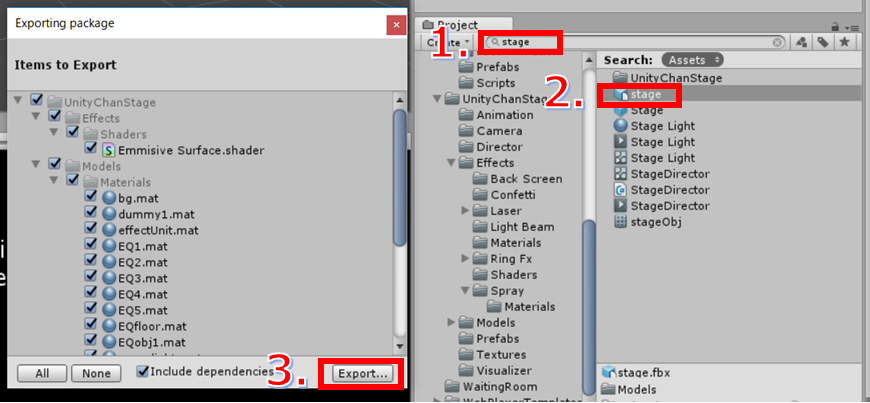
Export stage object
Double click the Package and import it to the project.
Then, we will create the stage floor.
Create a Quad object in Hierarchy, and name it “Visualizer”.(Right Click → 3D Object → Quad)
Note:I set Transform Position x, y, z to 0
D&D the “EQfloor” mesh from the stage folder to the Visualizer object Mesh.

Visualizer object creation and settings 1
The Mesh Collider is unneeded, so we Remove component.
Set mesh renderer as in below. For Material, D&D “Element0” from the Visualizer folder.
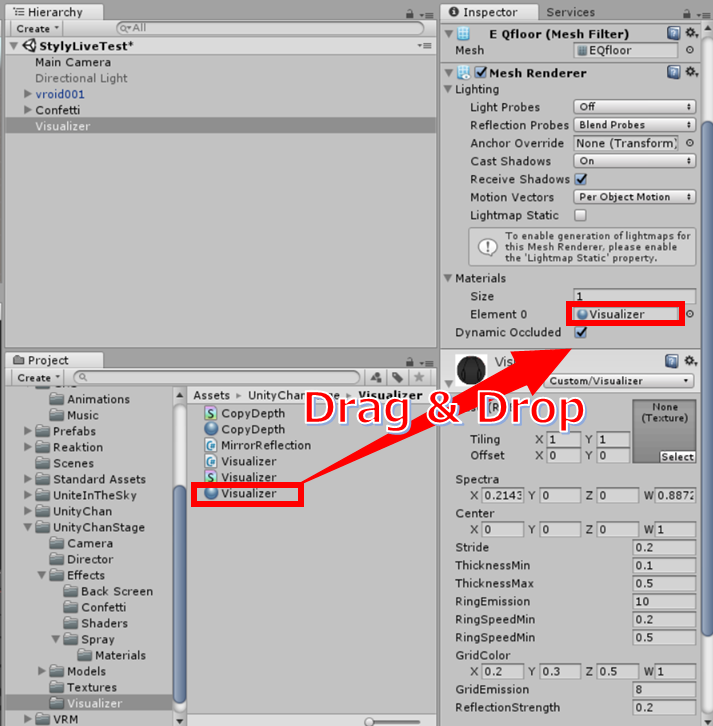
Visualizer object creation and settings 2
Set ShaderNoneBlack to the Texture of Visualizer Shader, and we’re done.(Select → ShaderNoneBlack)
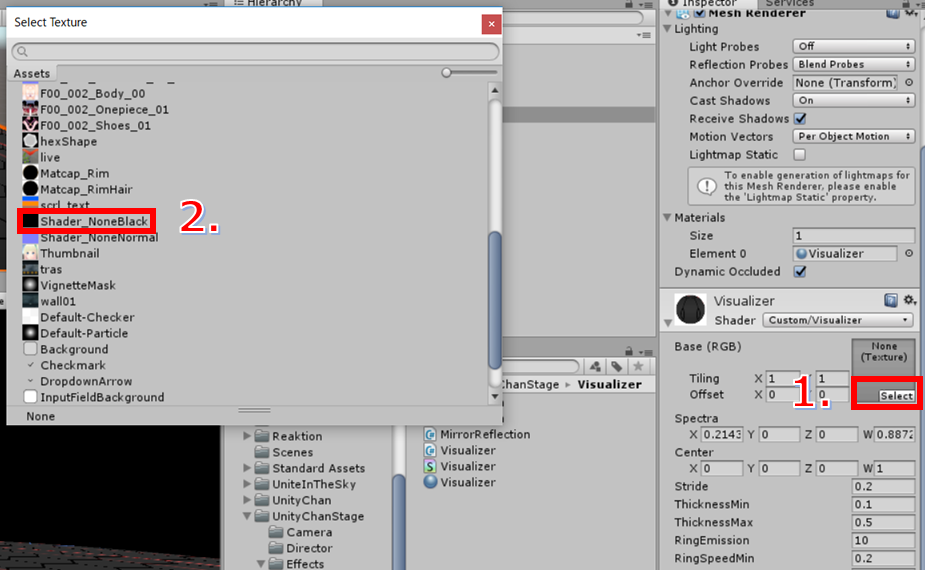
Visualizer object creation and settings 3
That is all for today’s article!
For the next 3rd article, I will explain how to create the stage, and how to structure the concert using a timeline.
[Related Articles]