この記事ではVRoid Studioで作成したモデルを使ってパーティクルの演出の中、歌って踊るライブ空間を作成します。
これを応用すれば、自分で作成したオリジナルモデルを利用したり、別の曲を利用したり、またオリジナルのパーティクル演出をしたりと自分好みのライブ空間を作成できます。
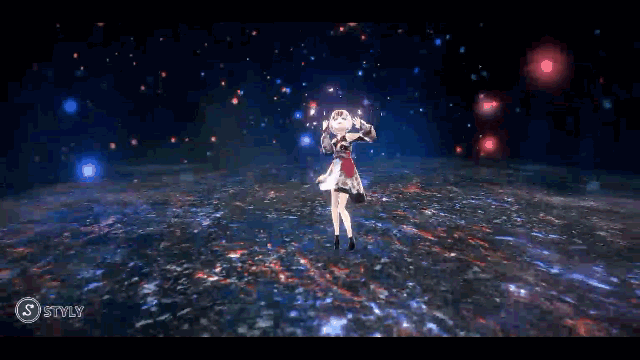
パーティクルライブの完成イメージです
1~11章までを全4回に分けてご紹介します。
本記事では6章を扱い、CandyRockStarプロジェクトからベース情報(曲、アニメーションなど)への移植をご紹介します。
CandyRockStarプロジェクト(以下、CRSプロジェクト)からベース情報(曲、アニメーションなど)を移植
CandyRockStarプロジェクト(以下、CRSプロジェクト)から曲、アニメーション、パーティクル、シェーダの一部を作成中のプロジェクトに移植します。
事前準備
Editor再生時にゲームビューで演出を確認しやすいようMainCameraの設定を変更します。
Inspectorから以下の画像のように設定します。
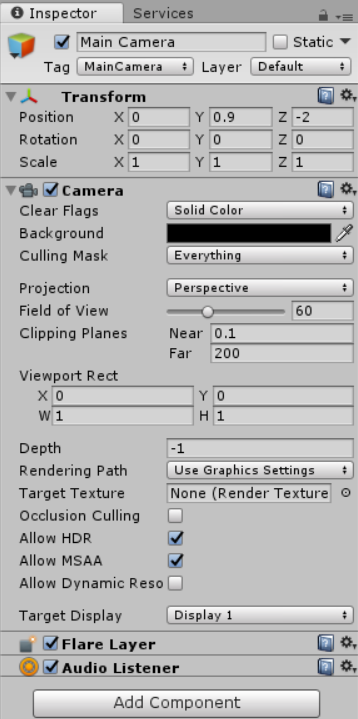
Main Cameraオブジェクトの設定
Directional Lightのチェックを外して非アクティブにします。
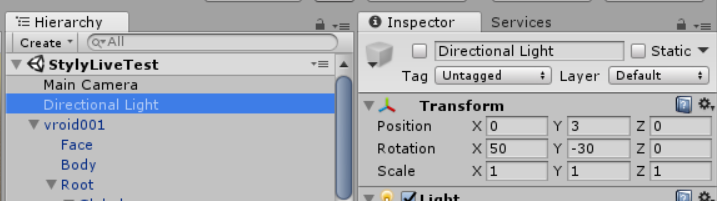
Directional Lightを非アクティブ化
以上で設定完了です。
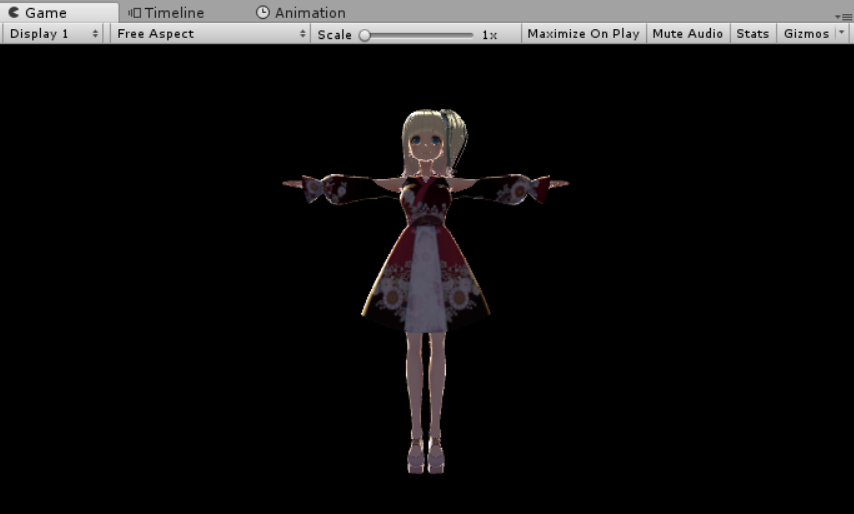
設定完了後のゲームビュー
ここから移植をしていきますので、CRSプロジェクトをダウンロードしプロジェクトをUnity 2019.3.6f1で開いて事前準備完了です。
STYLYと互換性のあるUnityバージョンはこちらからご確認ください。
https://document.styly.cc/doc/docs/en/creator/creator_plugin_intro/#%E5%AF%BE%E5%BF%9C%E3%81%99%E3%82%8Bunity%E3%83%90%E3%83%BC%E3%82%B8%E3%83%A7%E3%83%B3%E3%81%AB%E3%81%A4%E3%81%84%E3%81%A6
Unity-Chan “Candy Rock Star” Live Demo
https://github.com/unity3d-jp/unitychan-crs
曲の移植
CRSプロジェクト検索窓に「unite」と入力すると「Unite In The Sky (full)」が見つかります。
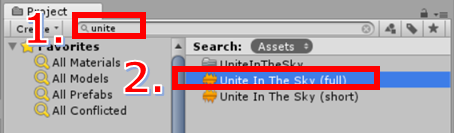
曲の検索
こちらを選択した状態で右クリック→Show in Exploreでエクスプローラで「Unite In The Sky (full).mp3」を開きます。
mp3ファイルを作成したプロジェクトにD&Dして曲の取り込みは完了です。
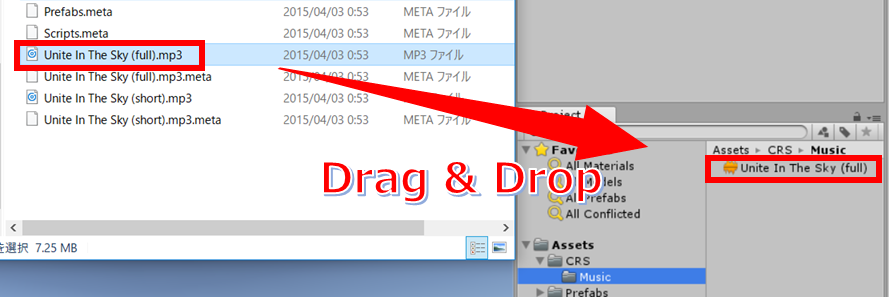
曲の取り込み
キャラクター全体のアニメーションの移植
CRSプロジェクト検索窓に「C86」と入力すると「C86unitychan_003_NOT01_Final」が見つかります。
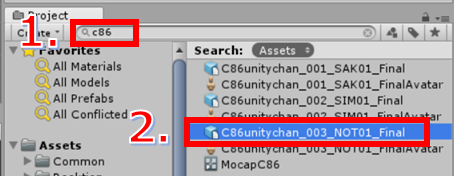
アニメーションの検索
こちらを選択した状態で右クリック→Show in Exploreでエクスプローラで「C86unitychan_003_NOT01_Final.fbx」を開いてください。
fbxファイルを作成したプロジェクトにD&Dして取り込みは完了です。
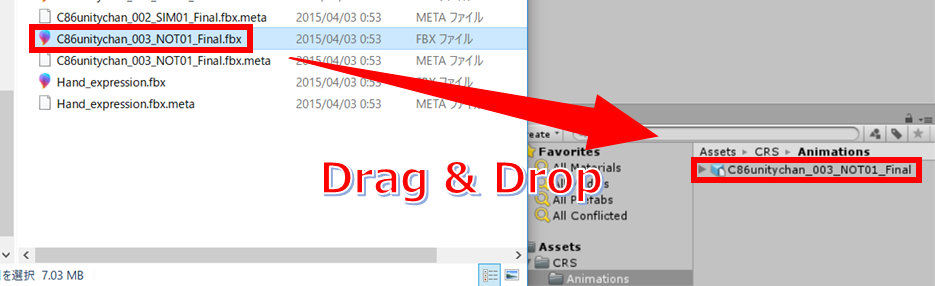
アニメーションの取り込み
続けてアニメーションを設定してEditor上で動くところまで確認します。
取り込んだ「C86unitychan_003_NOT01_Final」を選択し、InspectorのRigタブを選択、Animation TypeをHumanoidに変更しApplyをクリックします。
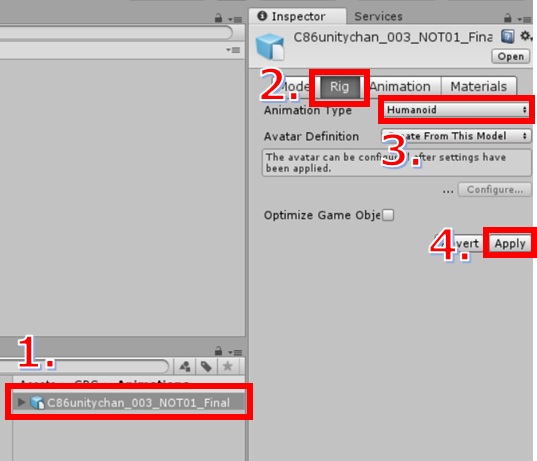
Animation TypeをHumanoidに変更
次に右クリック→Create→Animation ControllerでAnimation Controllerを作成します。
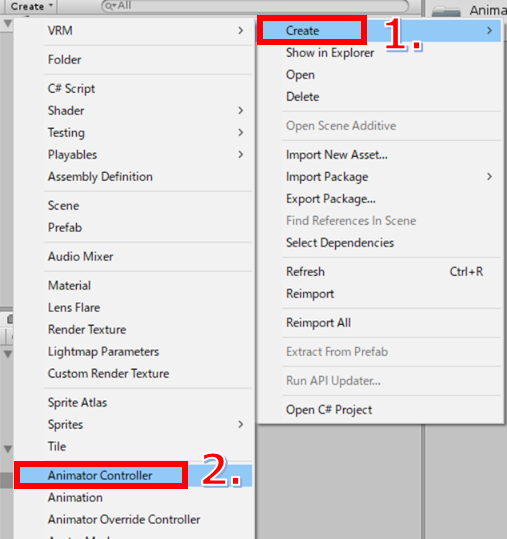
Animation Controllerの作成
作成したAnimation ControllerをダブルクリックしてAnimatorウィンドウを表示し、何もないところで右クリック→Create State→EmptyでNew Stateを作成します。

Animation Controllerの編集
New StateのInspectorのMotionに先ほど取り込んだ「C86unitychan_003_NOT01_Final」配下のTake001をD&Dします。
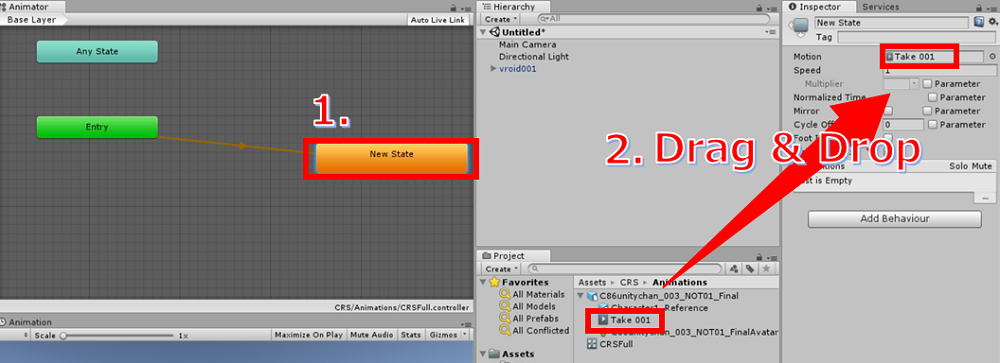
Motionの設定
最後にVRoidにAnimation Controllerを設定し、Apply Root MotionにチェックをいれEditorを再生し動くことを確認しアニメーション取り込みは完了です。
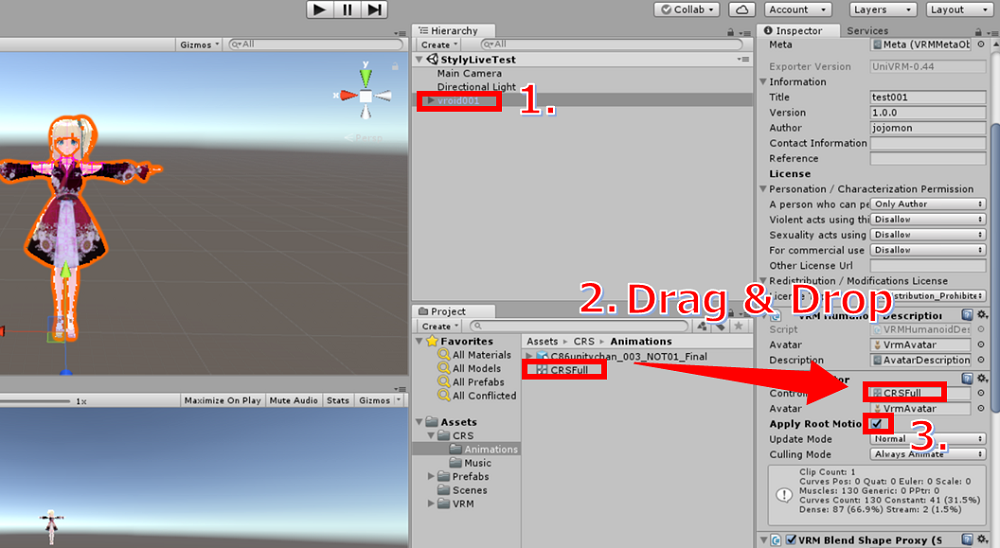
Animation Controllerの適用
パーティクルの移植1
CRSプロジェクトにはキャラクターの手などの動いた距離に合わせて発生するパーティクルがあり、こちらも移植します。
まずはパーティクル作成の準備です。
CRSプロジェクト検索窓に「spray」と入力するとsprayフォルダが見つかりますのでExportします。(右クリック→Export Package)
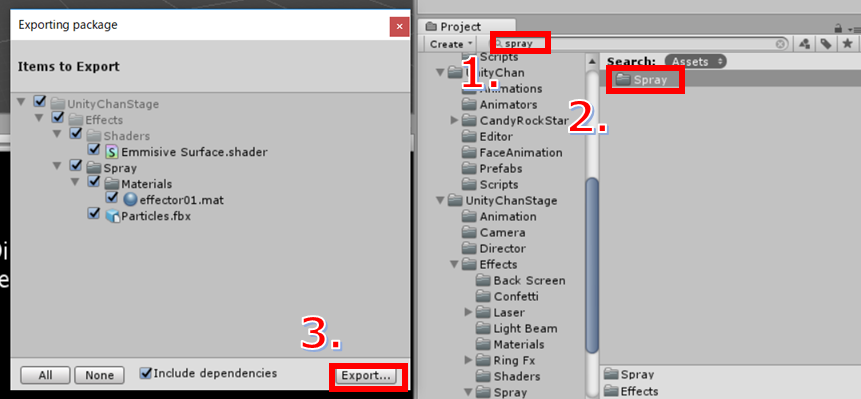
CRSプロジェクトからパーティクルのエクスポート
ExportしたPackageを作成したプロジェクトにダブルクリックでImportします。(Assets直下にUnityChanStageが作成されます。)
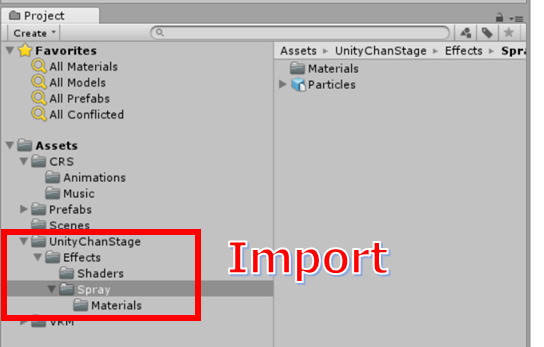
パーティクルのインポート
ここからパーティクルを作成します。
パーティクルはEditorメニューのGameObject → Effects → Particle Systemから作成します。
名称を「Spray」に変更してInspectorから画像の通り設定します。
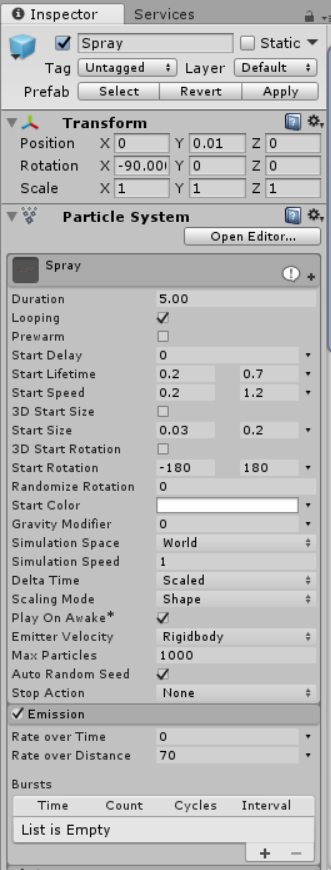
パーティクル設定1
パーティクル設定2
パーティクル設定3
なおSize over Lifetimeはopen editorから調整します。

over Lifetimeの設定
頂点は全部で4頂点になりTime, Valueは次の通りです。
| ? | Time | Value |
| 1 | 0 | 0 |
| 2 | 0.086 | 1 |
| 3 | 0.877 | 1 |
| 4 | 1 | 0 |
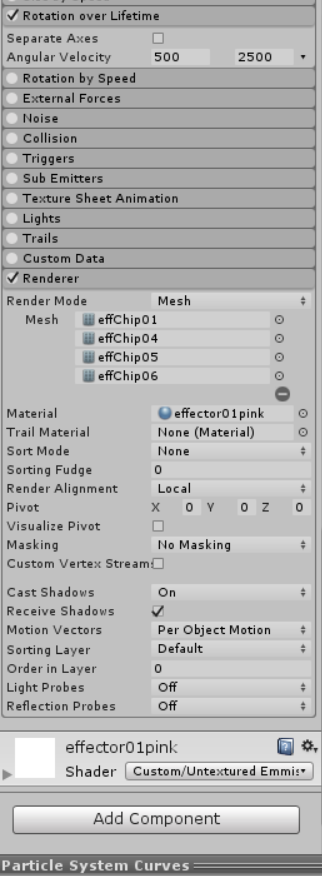
RendererのRenderer ModeはMeshに変更し、+をクリックして設定できるMeshを4つに増やし先ほどImportしたSprayに含まれるParticles直下のMeshを画像の通り設定します。
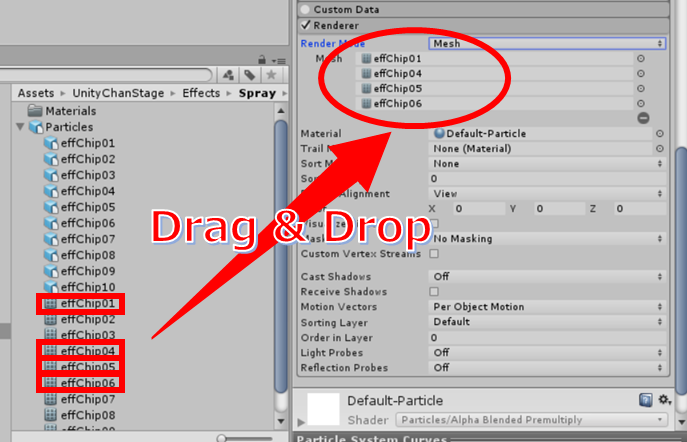
Rendererの設定補足
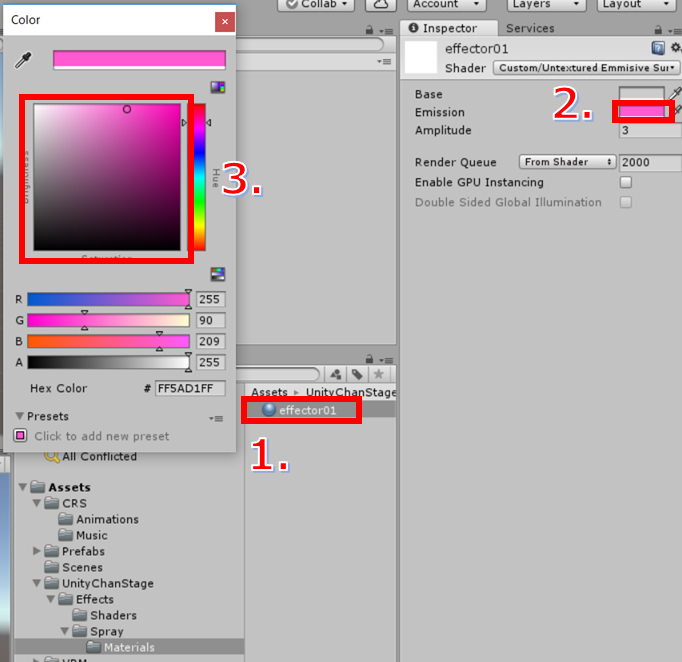
パーティクルの色をピンクに変更するため、Materialを編集します。ImportしたSprayに含まれるeffector01を選択し、InspectorのEmmisiionをピンクに設定します。
カラーの変更
effector01はRendererのMaterialにD&Dで設定します。
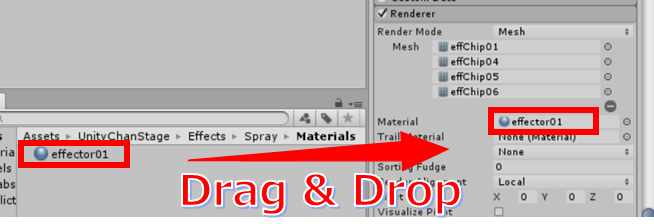
マテリアルの設定
その他設定値は次の通りです。なお範囲指定は▼から「Random Between two constants」を選択すると行えます。

Random Between Two Constantsで範囲指定
・Start Liftime → 0.2 , 0.7
※Random Between two constants
・Start speed → 0.2 , 1.2
※Random Between two constants
・Start size → 0.03 , 0.2
※Random Between two constants
・Start rotation → -180 , 180
※Random Between two constants
・Simulation space → world
・Scaling mode → shape
・以下にチェックを入れ編集
・Emission
Rate over Time → 0
Rate over Distance → 70
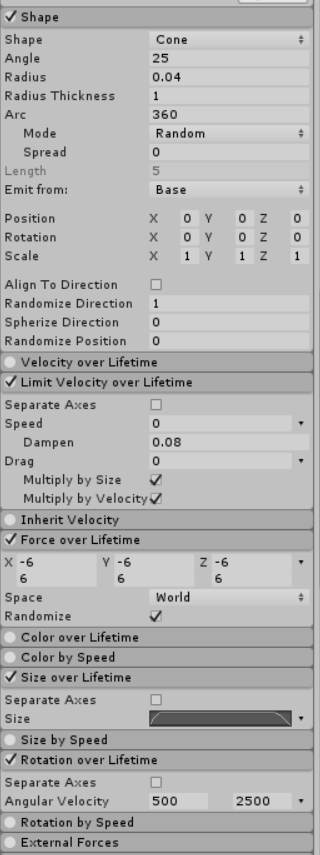
・Shape
Radius → 0.04
Randomize direction → 1
・Limit Velocity over Lifetime
Speed → 0
Dampen → 0.08
・Force over Lifetime
x,y,z → -6, -6, -6
6, 6, 6
※Random Between two constants
Space → world
Randomize → チェック
・Size over Lifetime
右上のopen editorから調整する
・Rotation over Lifetime
Angular Velocity → 500 , 2500
※Random Between two constants
・Renderer
Render Mode → Mesh
Mesh → effChip01
effChip04
effChip05
effChip06
Material → effector01
Trial Material → none
Render Alignment → local
Cast Shadows → on
Receive Shadows → チェック
パーティクルをPrefab化します。
パーティクルをPrefab化
HierarchyのSprayをProjectフォルダにD&DしてPrefabにPositionとRotationを変更します。
- Position(0, 0.01, 0)
- Rotation(-90, 0, 0)
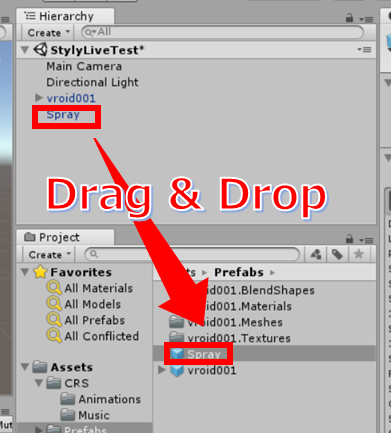
Prefab化したSprayを下記のキャラクターに含まれるオブジェクト直下に配置して完了です。
- J_Bip_L_Hand
- J_Bip_R_Hand
- J_Bip_R_UpperLeg
- J_Bip_L_UpperLeg
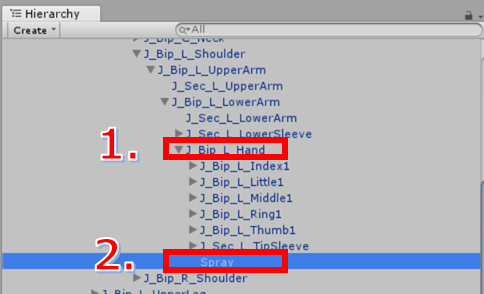
パーティクルの配置例
パーティクルの移植2
紙ふぶきを降らす演出を作成します。
まずはパーティクル作成の準備をします。
CRSプロジェクト検索窓に「confetti」と入力するとConfettiフォルダが見つかりますのでExportします。(右クリック→Export Package)
ExportしたPackageを作成したプロジェクトにダブルクリックでImportします。
ここからパーティクルを作成します。
HierarcyでCreate Emptyでオブジェクトを作成し名称を「Confetti」にし、Transformを画像の通りに設定します。
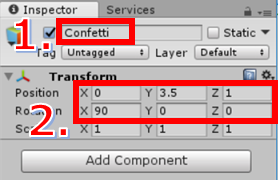
名称とTransformの変更
パーティクルをEditorのGameObject → Effects → Particle Systemから作成し、Confettiの子オブジェクトにします。
Particleを画像の通りに設定します。
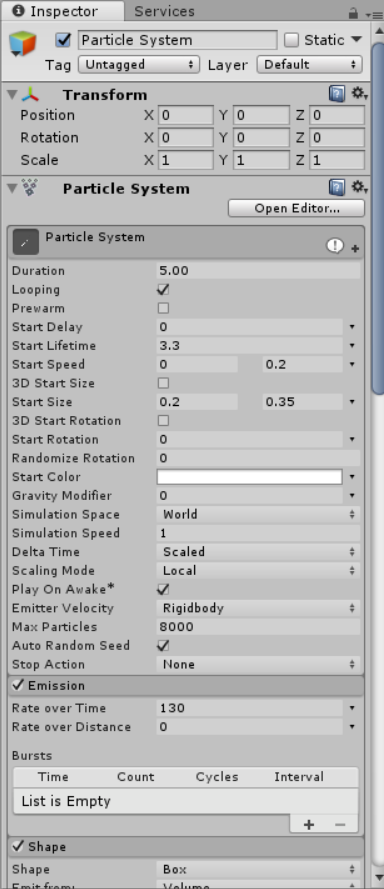
パーティクル設定1
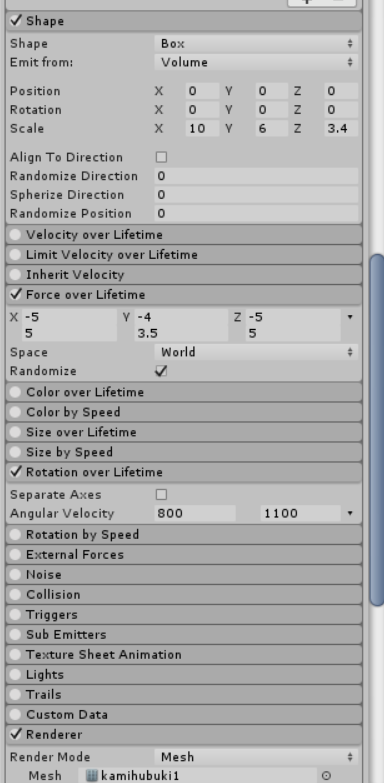
パーティクル設定2
パーティクル設定3
設定方法の補足をします。
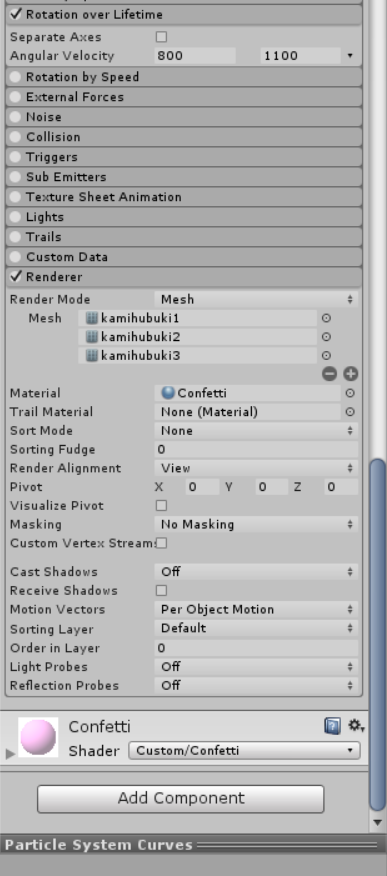
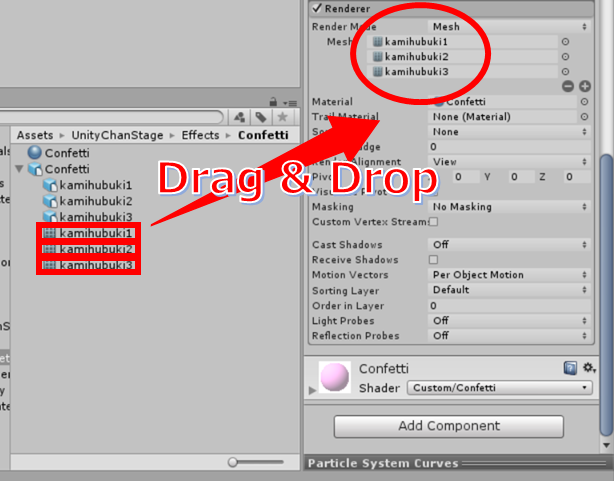
RendererのRenderer ModeはMeshに変更し、「+」をクリックして設定できるMeshを3つに増やし先ほどImportしたConfettiフォルダに含まれるConfetti直下のMeshを画像の通り設定します。
Rendererの設定補足
作成したParticleをCtrl+Dで複製し、Transformを変更します。

パーティクルの複製とTransformの変更
Directional lightをConfettiオブジェクトの子オブジェクトとして作成します。(Confettiオブジェクトを選択して右クリック→Light→Directional light)
Directional lightを画像の通り設定します。
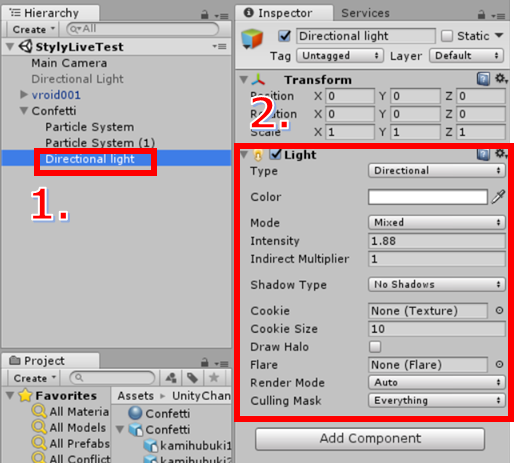
Directional lightの追加と編集
紙ふぶきパーティクルは完成です。
シェーダの移植
ステージの床を移植します。

ステージ床のシェーダ
CRSプロジェクト検索窓に「Visualizer」と入力するとVisualizerフォルダが見つかりますのでExportします。(右クリック→Export Package)
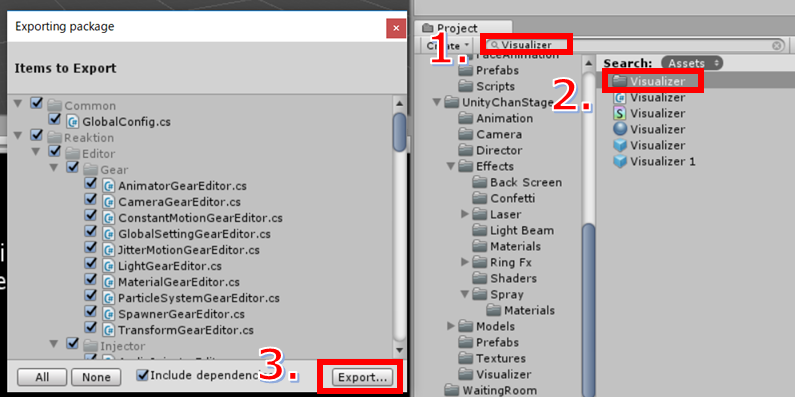
Visualizerフォルダのエクスポート
同様にstageオブジェクトをExportします。
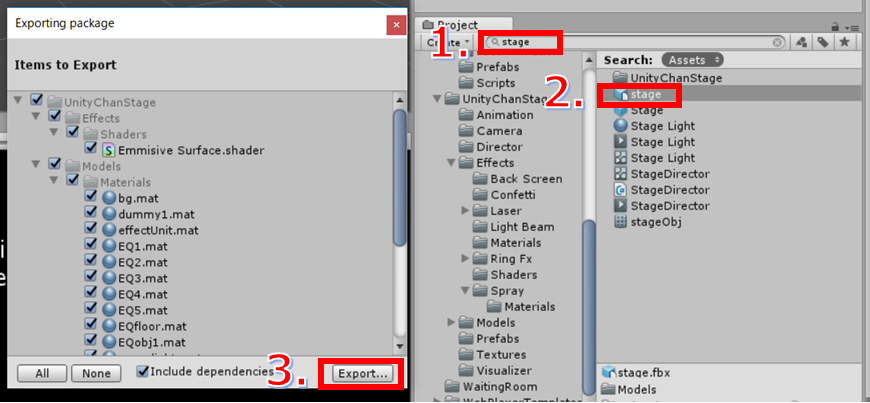
stageオブジェクトのエクスポート
ExportしたPackageを作成したプロジェクトにダブルクリックでImportします。
ここからステージの床を作成します。
HierarcyでQuadオブジェクトを作成して名称を「Visualizer」にします。(右クリック→3D Object→Quad)
※TransformのPositionはx, y, z すべて0にしています
VisualizerオブジェクトのMeshにImportしたstage配下の「EQfloor」メッシュをD&Dします。

Visualizerオブジェクトの作成と設定1
Mesh Colliderは不要なのでRemove componentします。
Mesh Rendererは画像のように設定します。マテリアルはImportしたVisualizerマテリアルをElememt0にD&Dします。
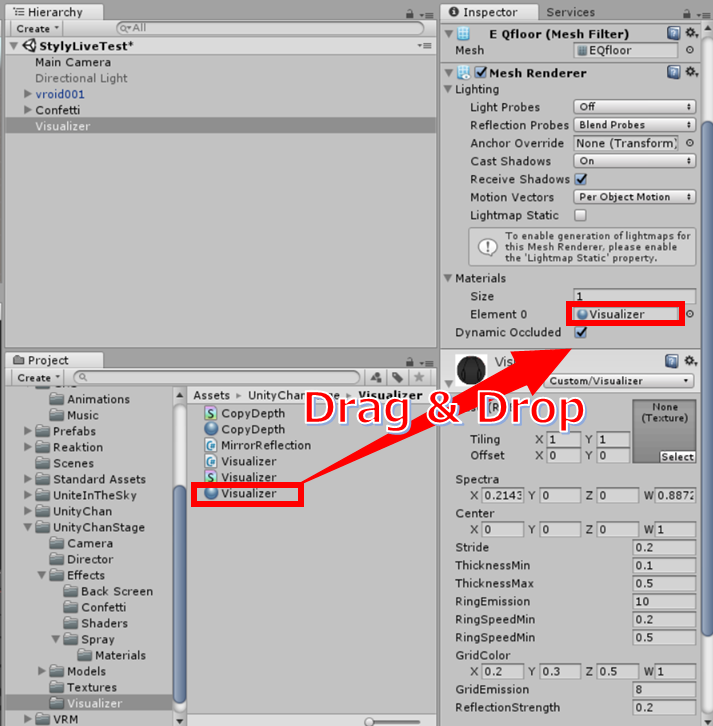
Visualizerオブジェクトの作成と設定2
Visualizer ShaderのTextureにShaderNoneBlackを設定して完了です。(select→ShaderNoneBlack)
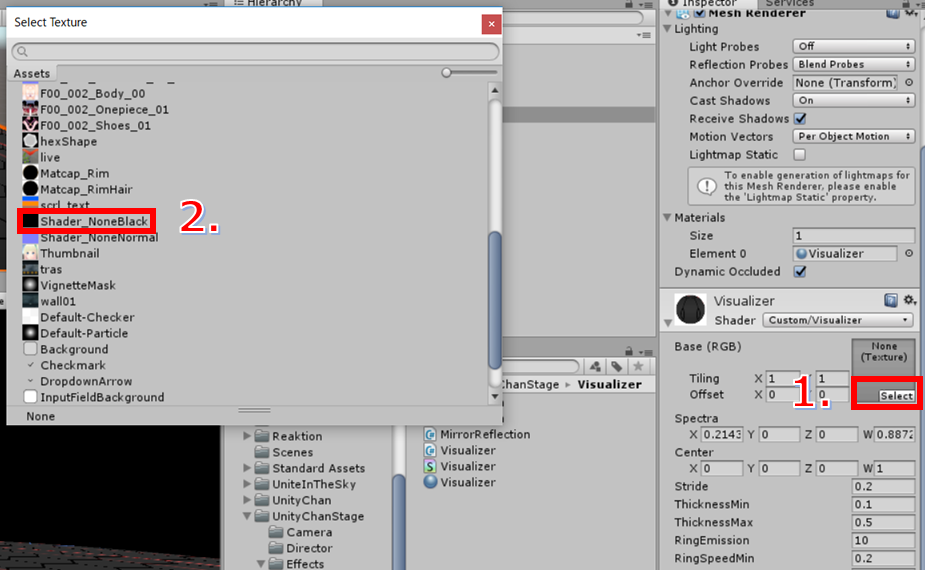
Visualizerオブジェクトの作成と設定3
本記事は以上で終了です!
次回の第3回はステージの作成とタイムラインでライブを構成するところまでをご紹介します。
[関連記事]