Deform 1.0 allows you to simulate deforming objects in your Unity scene.
You can simulate deforming objects in your Unity scene. Deform objects intuitively in your scene to create new visuals that are rarely seen in Unity.
For example, you can use the object twisting feature to deform a person or a building as shown below.
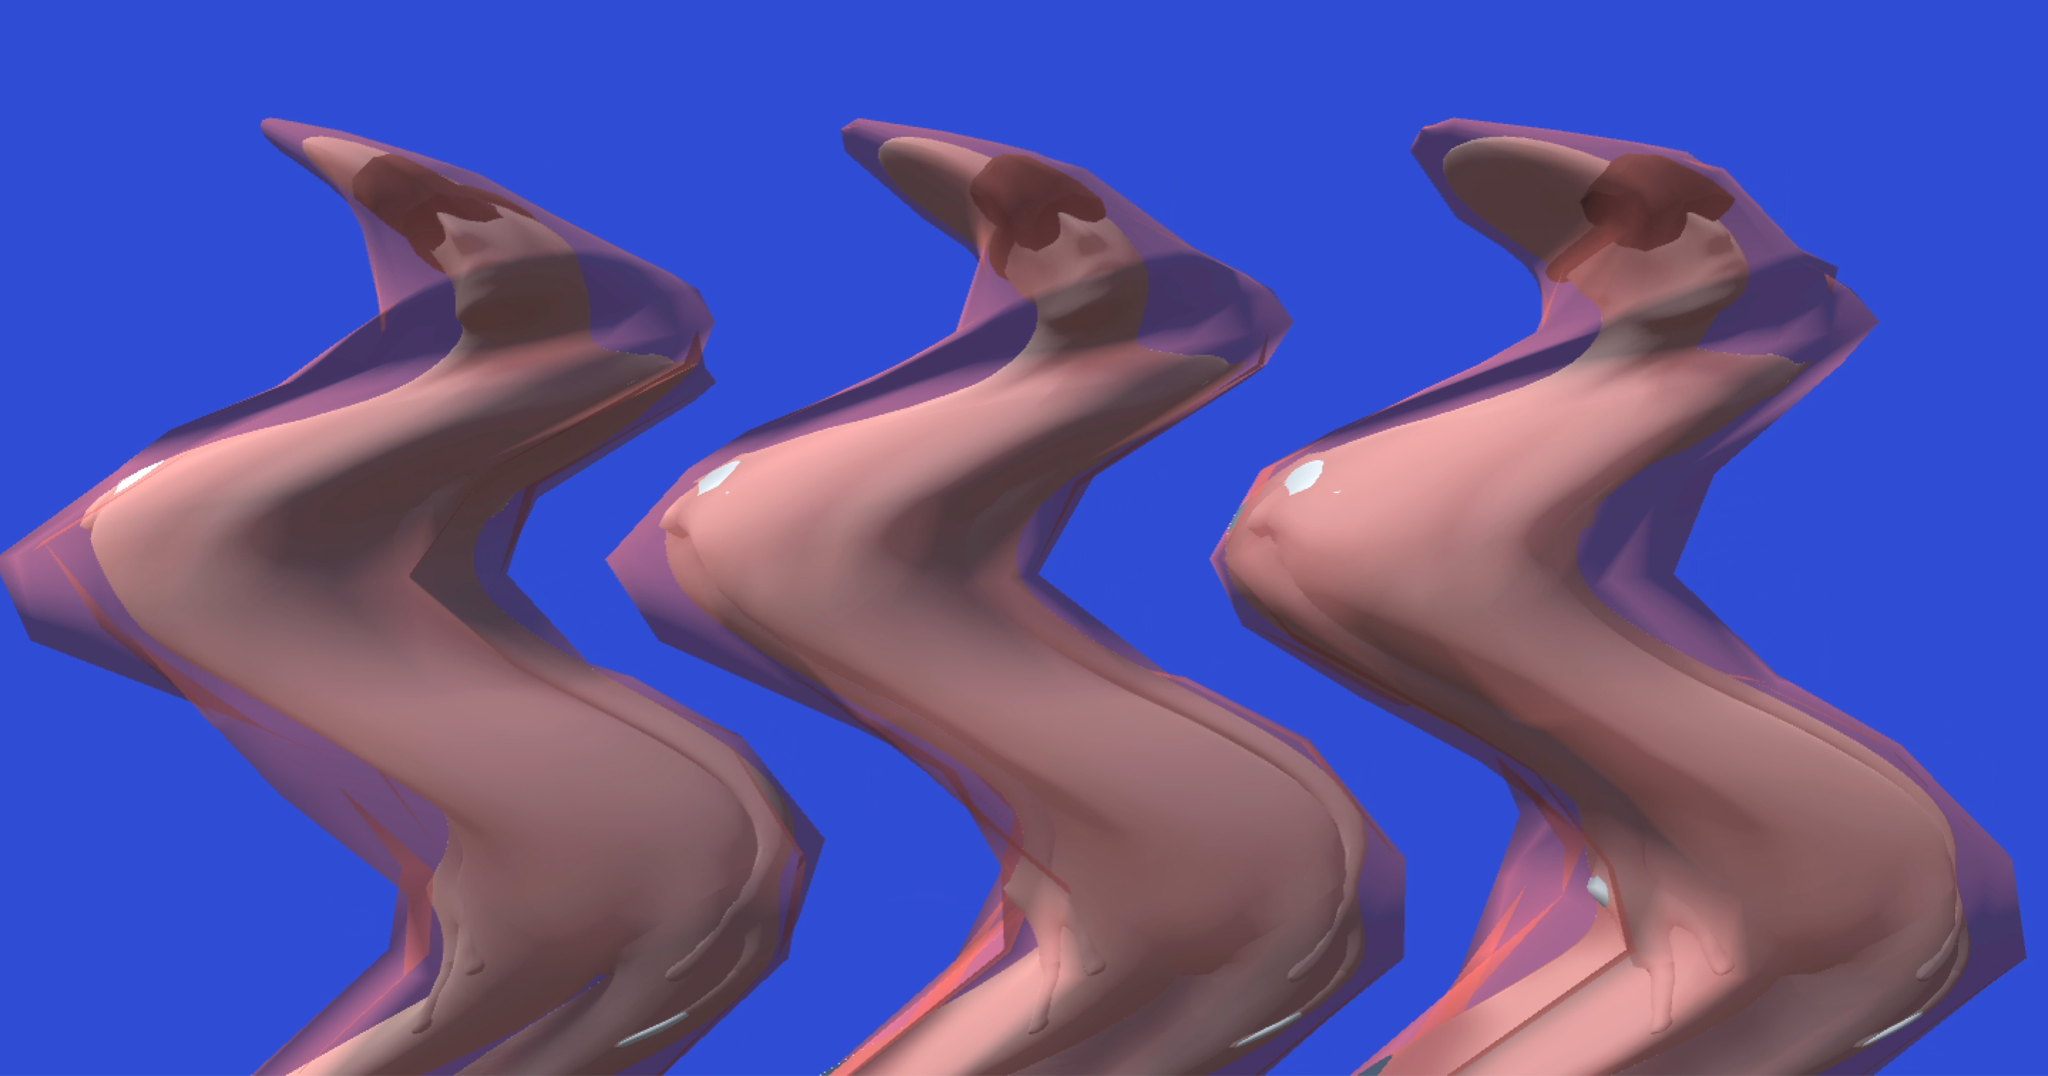
Transforming a person

Image of multiple buildings deformed with a gradient
There are a number of assets on the Unity Asset Store that can be used to deform objects, but I’d like to introduce Deform 1.0, which is free and easy to set up.
You can use it by using the source code that MIT has released on GitHub.
You can also check out this video to see how to use it.
Let’s install it on Unity
About the Unity version:
Unity 2018.3 or later is required to use Deform 1.0.
Click here to check which Unity versions are compatible with STYLY.
https://document.styly.cc/doc/docs/en-US/creator/creator_plugin_intro/#about-the-corresponding-unity-version
Also, just importing the GitHub file directly into your Unity project will not work, as you need to resolve the dependencies of the files you import.
The installation procedure is written by the producer, and I will explain how to do it.
First, create a Unity project in which you want to install Deform 1.0, and close it.
*To avoid unnecessary bugs, it is recommended to put this Deform into a Unity project that has not had any work done on it since it was created.

Reveal in Finder to open the files that make up Unity.
From the UnityHub, select the vertical three-point leader on the right side of the project you created and click “Reveal in Finder” (in the figure below, the four lower three-point leaders are marked in red for convenience, but you can select the red box of the project you want to open).

Open Packages.
After opening Reveal in Finder, open “Packages” of the opened Unity project.
When you open Packages, you will find a file called “manifest.json”.
Open this file with any editor application and copy and paste the following line under “”dependencies”: {” to add it.
"com.beans.deform": "https://github.com/keenanwoodall/Deform.git",

Insert the code to put Deform 1.0 in the text of manifest.json
Note:
This code should be inserted in half-width characters.
Depending on your editor, some of the characters may become full-width when you copy and paste.
Be careful not to mix in double-byte characters or leave out commas after the code when copying and pasting.
Once you have added the lines as shown in the image above, save and close these files, and then open the Unity project where you made this edit.
If you see a “Tools” tab in the Unity toolbar and can select “Deform” as shown in the picture below, the installation is complete.

If you see Deform in the toolbar, the installation is complete.
At this point, you may get the following error.
This error can be caused by external tools such as Git or SourceTree that do not properly connect the path to access Git.
This can be solved by creating a new environment variable with the path to the Git exe file and rebooting the PC.
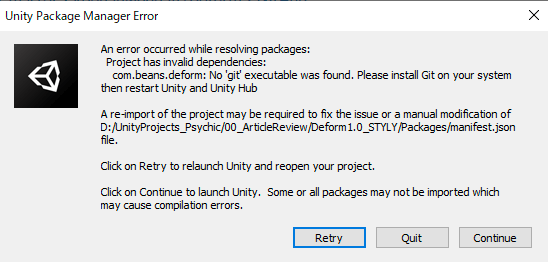
Example of an error screen
Let’s try to use Deform 1.0.

The default cube (left) and the blue cube of Deform1.0 (right)
First of all, in this article, we will try to use Deform1.0 with the objects that are prepared beforehand in Deform1.0.
Open “Deform” under “Tools” in the toolbar you just checked and select “Creator Window”.
This will open the window in the lower right corner of the image below, and select “Deformable”.
This will open the Deform1.0 default blue cube.
In this article, we will use this blue cube to explain how to use Deform1.0.
To get a better understanding of Deform1.0, let’s simply compare this blue cube with the cube that can be generated by default in Unity.
If you set the Shaded tab in the upper left corner of the Scene window to “Shaded and WireFrame”, the wireframe of the object will be displayed, and you can see that the blue cube has a relatively fine mesh.
Deform 1.0 deforms objects by editing the object’s mesh.
Therefore, it can only be successfully applied to objects with a certain degree of mesh division.
Please keep this in mind when using objects that you prepare yourself.
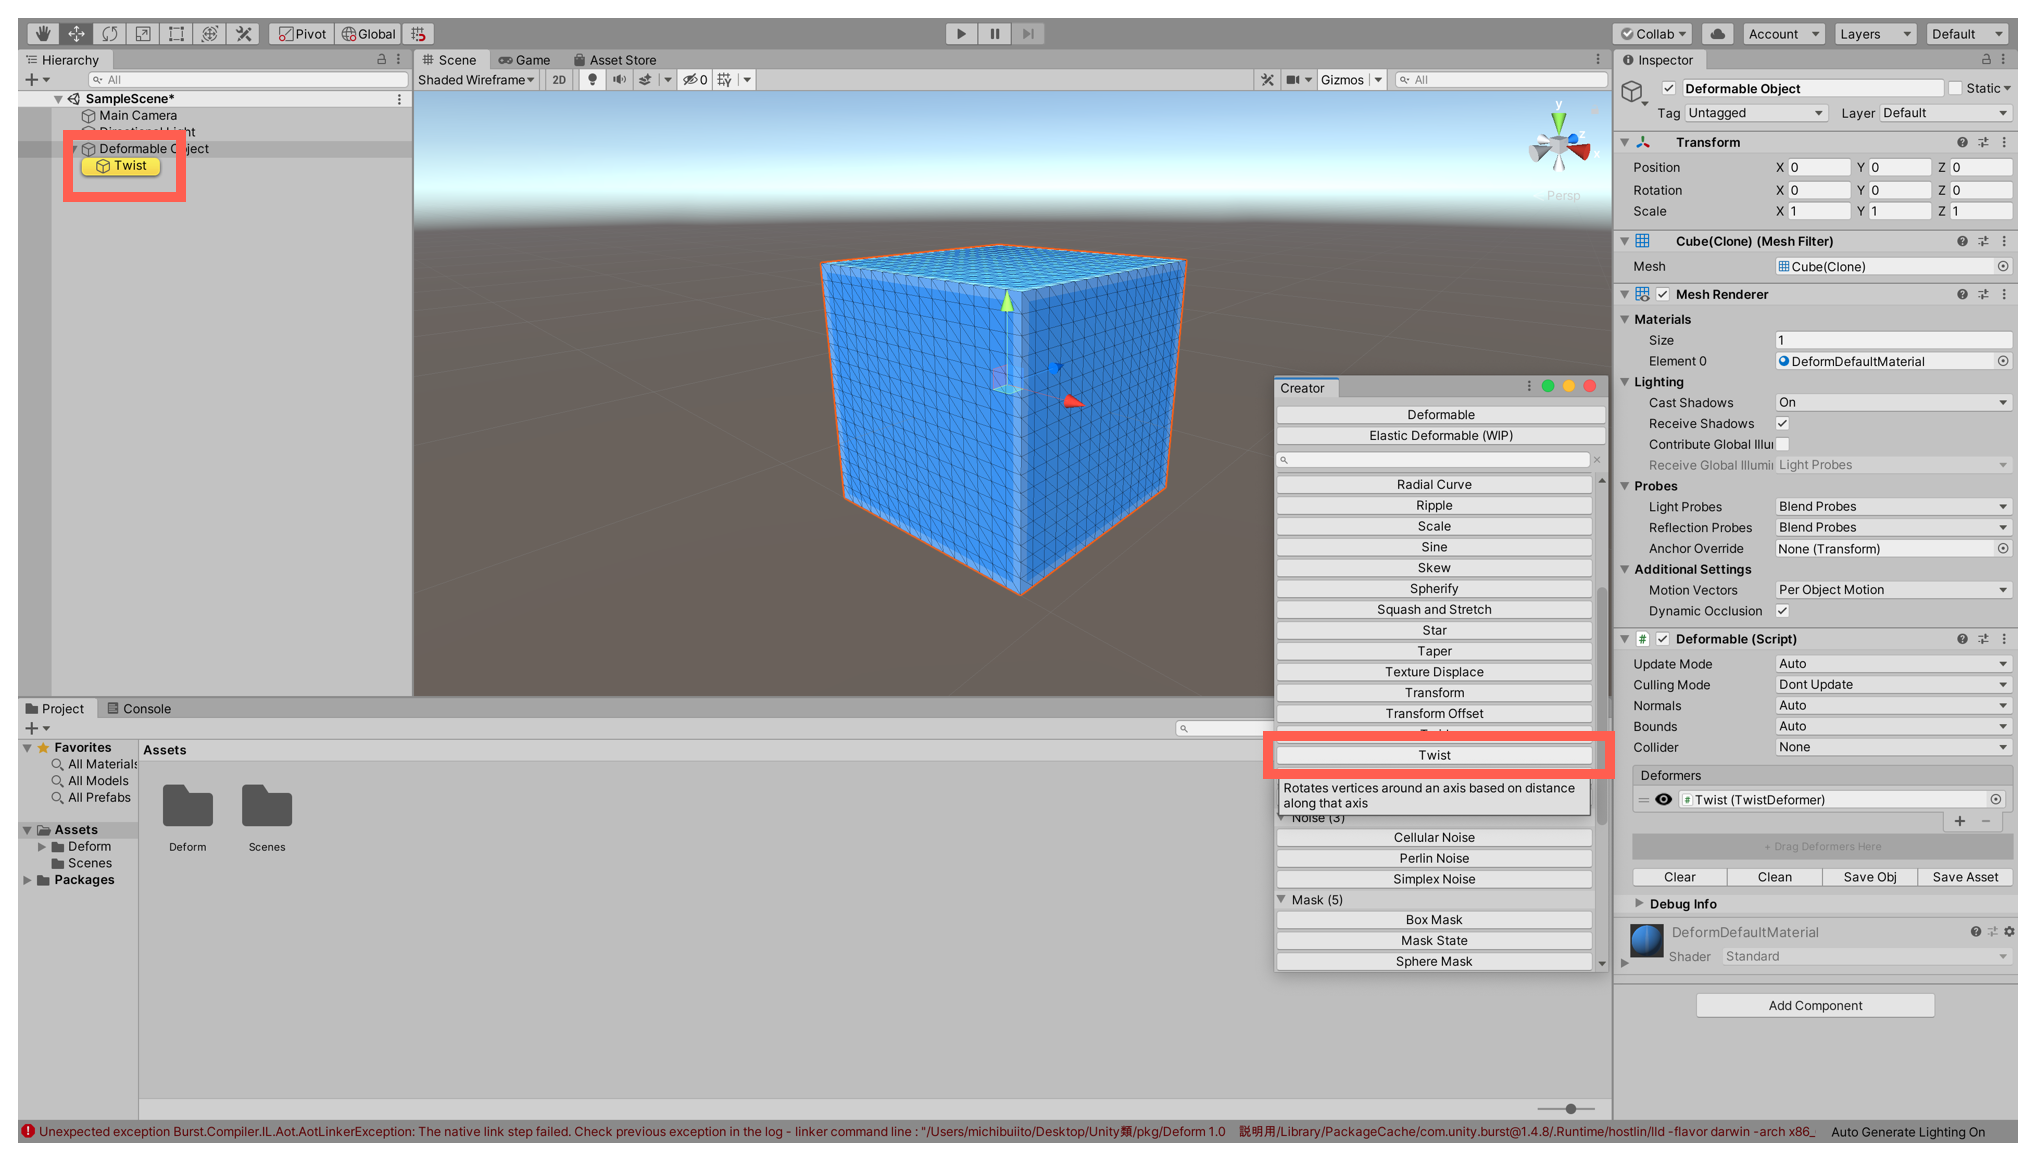
Selecting Twist from the Creator Window
Now, let’s start using Deform1.0.
Select this blue cube “Deformable Object” and select “Twist” from the Creator Window.
If you look at the Hierarchy window, you will see that an object named Twist has been added as a child object of the selected object.

You can move the object directly or edit it from the Inspector.
The following is what it looks like in a Gif.

Editing gif
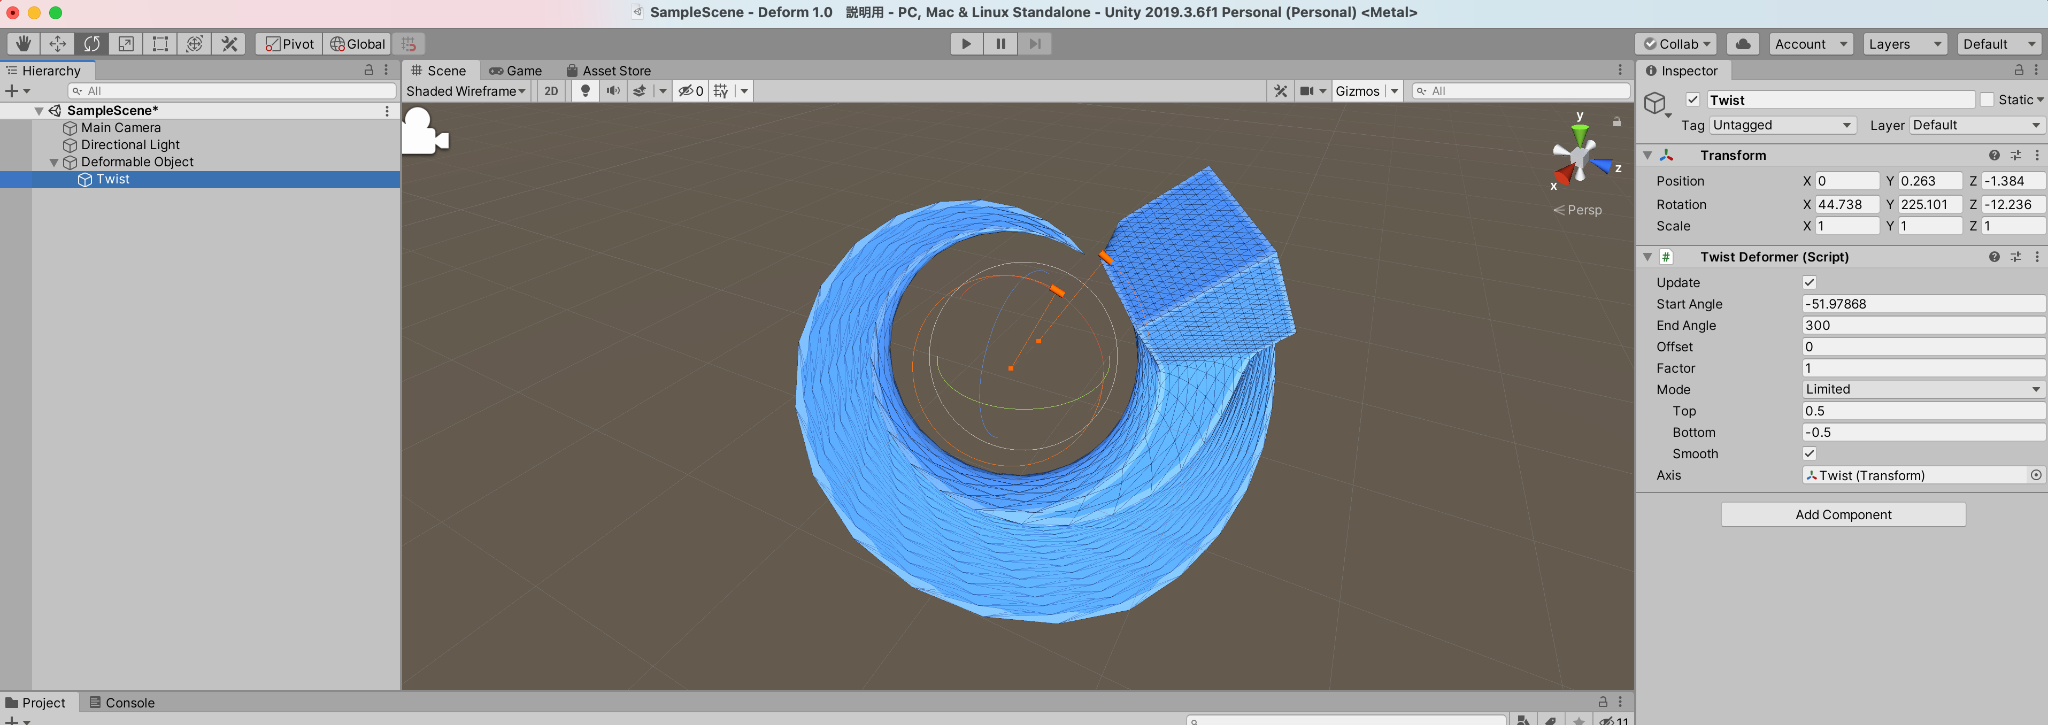
When you select this object called Twist, you will be able to select the orange lever as shown in the left image below.
When this orange lever is twisted, the object will be twisted with it.
You can also edit it in the inspector, as shown in the right image below.

Twisting the deformer will also change the twist of the object.
You can also change the direction of the deformation by rotating the Twist’s orange lever and changing the angle.
In the case of Twist, the central axis rotates, so the cube can be deformed as if it were wrapped around the direction of deformation.
By changing the position of the Twist, you can create a variety of shapes from a single cube, for example, the contents of the deformation can be brought out of the object, as shown in the image below.
Changing the position of the deformer will cause the deformation to follow.
Furthermore, multiple deformers such as Twist can be attached to the same object.
For example, the image below is a combination of a Twist and a Ripple.

Multiple Deformers can be stacked on top of each other.
As you can see, Deformer 1.0 allows you to transform even simple objects into a variety of shapes, giving them an impression that you don’t see very often, and making it easy to perform transformations that would otherwise be a bit of a hassle in modeling.
In addition to Twist, there are many other types of transforms available, so be sure to try them out.
Changing the values in the inspector will visually reflect the transformation, making it interesting to experiment.
Setting up your own object deformations
So far, I have explained how to deform the blue cube that Deform 1.0 prepared for us.
As shown in the image below, you can deform an object with “blah-blah-blah Mesh” and “Mesh Renderer” by selecting “Deformable” from “Add Component” and attaching it to a component.

Deforming a text object
Let’s save the deformed object in its deformed form.
If you want to save the deformed object, select “Save Obj” in Deformer 1.0, give it a name of your choice, and save it.
If you save it in the automatically opened Asset folder, it will be saved directly in the Asset of the Unity project window, as shown in the following image.

You can save it with Save Obj on the Inspector.
How to upload to STYLY
Due to the specification of STYLY, it is currently not possible to upload an object with C# code.
Therefore, save the deformed object using the above method, and then upload the prefab or scene without the code.
Note that in Deform 1.0, if you don’t Save Obj, the deformation will be melted when you remove the code.
How to create a STYLY account

How to upload a 3D model to STYLY

How to upload from Unity to STYLY
