In this article, we create a ‘singing-and-dancing’ live space with the particle effect and the model created with VRoid Studio.
By applying this method, you can make your favourite live space by using your original model, playing other songs or creating your original particle effect.
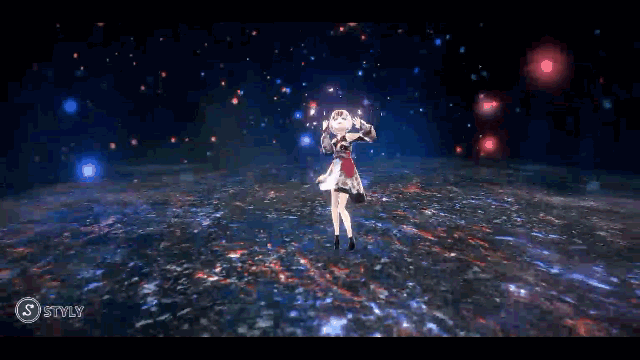
The completion image – ‘Particle Live’
I will show the instruction in the series of four separate articles, which contain Chapter 1 to 11.
This article covers Chapter 9 to 11, explaining the workflow from ‘Enhance the presence of the character’ to ‘Upload to STYLY’.
Enhance the presence of the character
In order to enhance the presence of the character, we add motion to facial expression, lips, hair and clothes.
We create all of them as ‘Animation Clip’ and control them by ‘Timeline’ and ‘AnimatorController’ (this is because C# scrips cannot be uploaded to STYLY).
※Note that the ‘VRMSpring Bone’ script set as ‘secondary object’ cannot be uploaded to STYLY.
Create facial expression
There is a published script to convert the facial expression into an Animation Clip easily, so I use it this time.
Download ‘BlendShapeEditHelper20150913.zip’ from the link on the page shown below.
Save Blend shape as Animation Clip | Unity
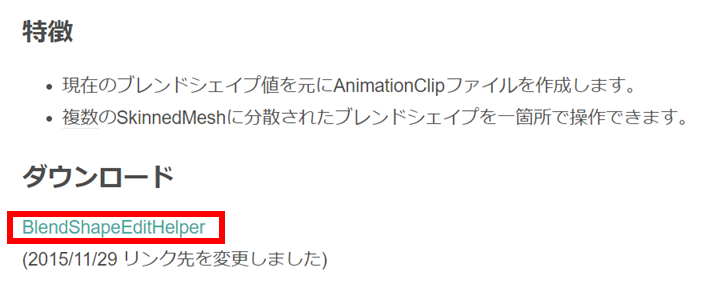
Download the ‘BlendShapeEditHelper’ script
Uncompress the zip file and double-click ‘BlendShapeEditHelper.unitypackage’ to import into the project.
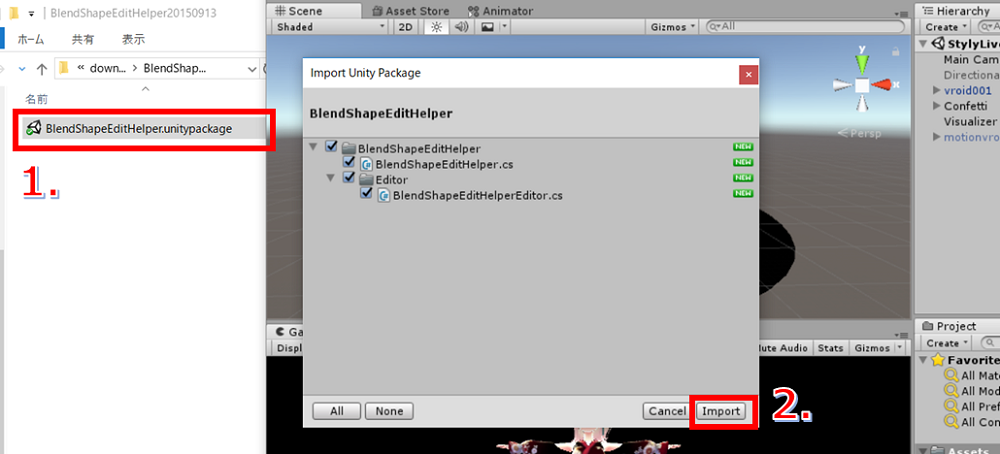
Import the ‘BlendShapeEditHelper’ script
Attach the ‘BlendShapeEditHelper’ script to the character with ‘Add component’.
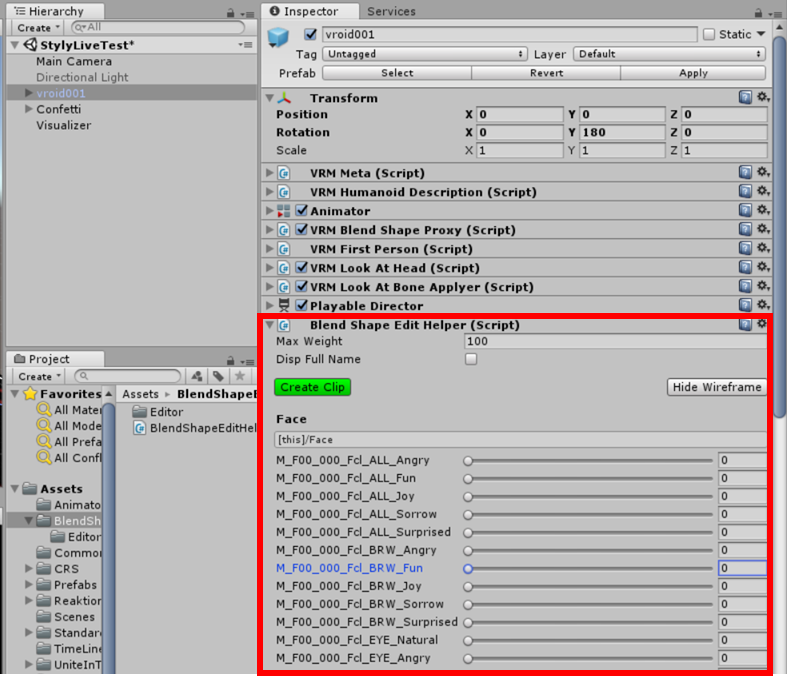
‘Add Component’ the BlendShapeEditHelper script
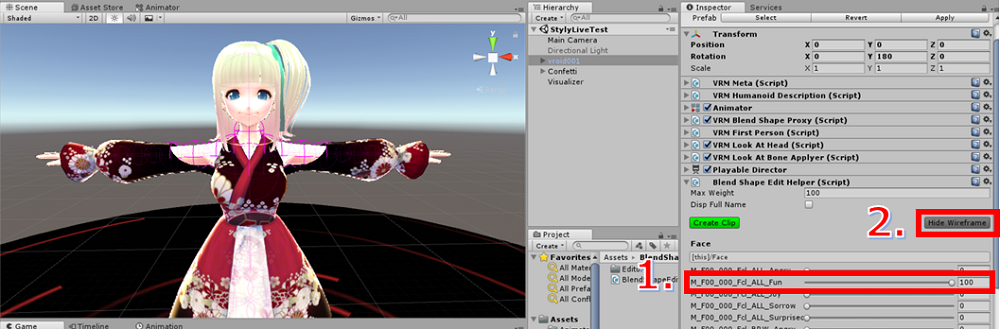
Now, we are going to create 6 patterns of facial expressions.
- Pattern #1 (Happy)
- In the Inspector, set ‘M_F00_000_Fcl_All_Fun’ value to 100 (Set all other values to 0).
- If it’s difficult to see the facial expression due to the wireframes, click the ‘Hide Wireframe’button to hide them.
Set up facial expressions
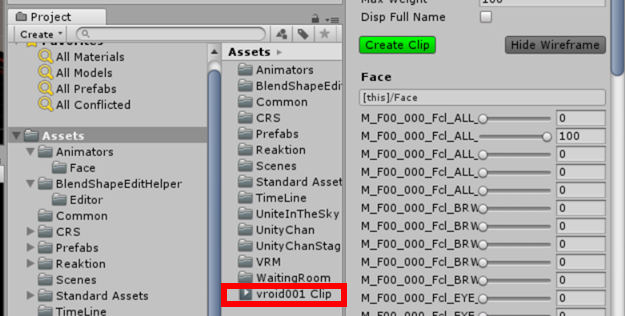
- Click the ‘Create Clip’ button to create an Animation Clip.
- It creates the Clip ‘vroid001 Clip’ directly under the ‘Assets’ folder, so rename it ‘AllFun’ and move it under the ‘Face’ folder.
Create ‘Animation Clip’ for facial expression
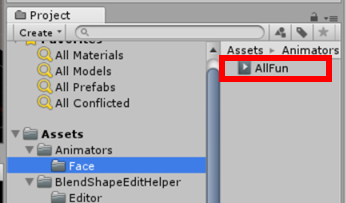
Rename the Animation Clip ‘AllFun’
- Pattern #2 (Joyful)
- Set the ‘InspectorのM_F00_000_Fcl_All_Joy’ to 100 (Set all other values to 0).
- Rename the Clip ‘AllJoy’.
- Pattern #3 (close both eyes)
- In the Inspector, set the ‘M_F00_000_Fcl_Eye_Close’ value to 100 (Set all other values to 0).
- Rename the Clip ‘EyeClose’.
- Pattern #4 (Close the right eye)
- In the Inspector, set the ‘M_F00_000_Fcl_Eye_Joy_R’ value to 100 (Set all other values to 0).
- Rename the Clip ‘EyeJoyR’.
- Pattern #5 (close the left eye)
- In the Inspector, set the ‘M_F00_000_Fcl_Eye_Joy_L’ value to 100 (Set all other values to 0).
- Rename the Clip ‘EyeJoyL’.
- Pattern #6 (Close both eyes / smile)
- In the Inspector, set the ‘M_F00_000_Fcl_Eye_Joy’ value to 100 (Set all other values to 0).
- Rename the Clip ‘EyeJoy’.
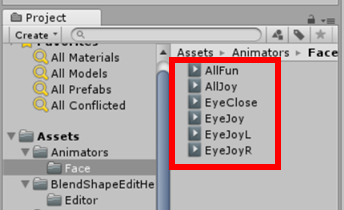
Create 6 patterns of ‘Animation Clips’ for facial expressions
Set the created Animation Clips on the Timeline.
In the TimeLine editor, select ‘Add > Animation Track’ to create a Track.
The track is created at the bottom, so drag and drop it at the top. Note that the order of the Animation Clips changes the loading order and their behaviours.
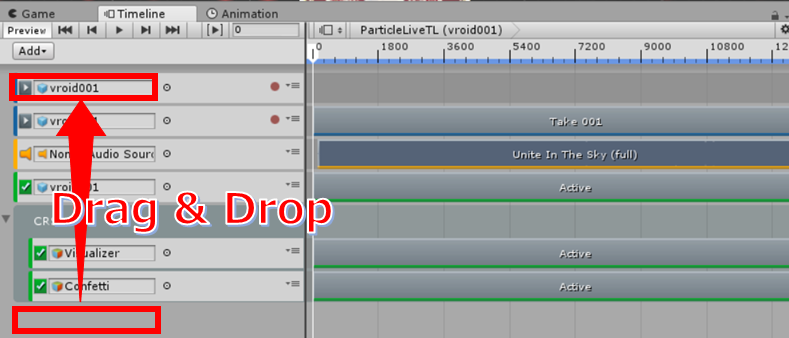
Move the Track for facial expression to the top of the Timeline Editor.
Drag and drop the character into the GameObject of the Track.
From here, we drag and drop the expressions of Pattern #1 to #6 into the Clip one by one so that they synchronize to the whole animation and the song.
If you found ‘displaying time in frames’ not intuitive, you can display time in seconds from the ‘Cog’ icon.
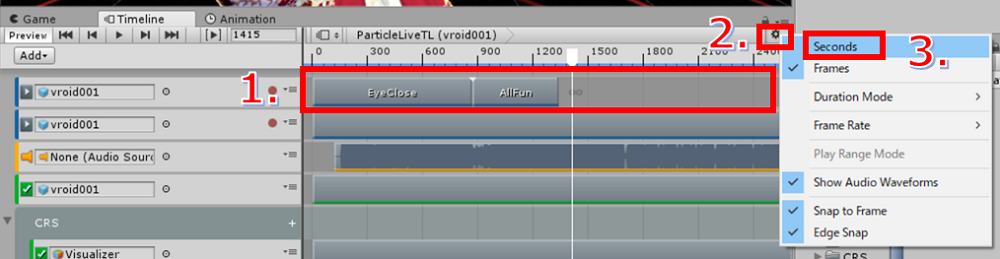
In the Clip, set the facial expression to sync with the song
In addition, when switching the expressions, you can overlap the Clips to make the transition smooth.
Overlap the Clips
I ended up with the expression as shown in the following screenshot. After all, it was the most time-consuming task to set up facial expressions.

The timeline with facial expressions set
Set up LipSync
By transferring a Prefab (LipSyncController) from the CRS project, move the lips when playing in the Editor.
Then, convert the generated motions of the lips into Animation Clip by the script.
Transfer Prefab from the CRS project
Enter ‘LipsSync’ in the search box of the CRS project and find the ‘LipSyncController’ Prefab.
With it selected, right-click and select ‘Export Package’ to export.
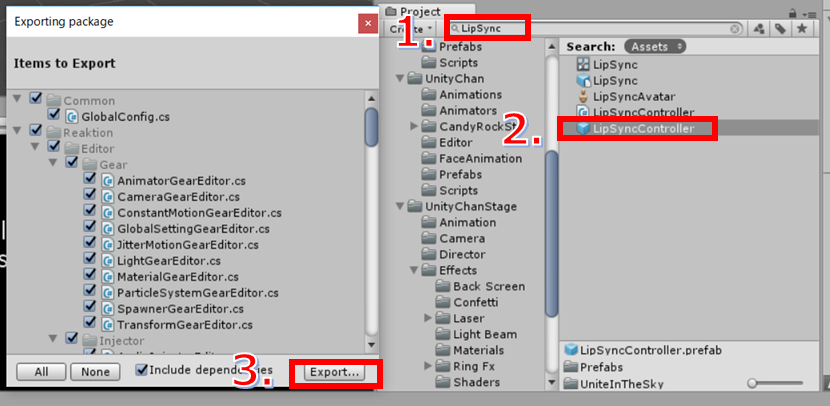
Export ‘LipSyncController.prefab’
Double-click the Package to import into the project you are working on.
Import the ‘LipSyncController’ script
Make the imported Prefab (LipSyncController) useable for VRoid.
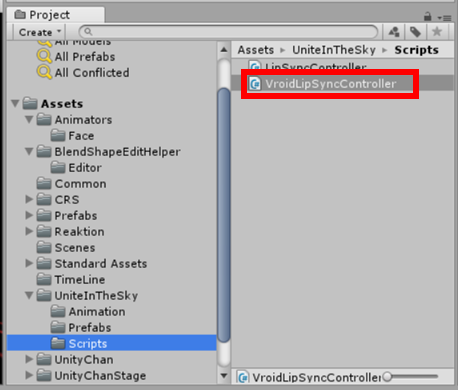
Firstly, in order to make the LipSyncController script, which is attached to the Prefab (LipSyncController), useable for VRoid, duplicate it with ‘Ctrl+D’ and rename it ‘VroidLipSyncController’.
Open the ‘VroidLipSyncController’ script and modify the lines after ‘void LateUpdate()’ as shown below.
    void LateUpdate()
    {
        var total = 100.0f;

        var w = total * GetWeight(nodeA);
        // target.SetBlendShapeWeight(6, w);
        target.SetBlendShapeWeight(29, w);
        total -= w;

        w = total * GetWeight(nodeI);
        // target.SetBlendShapeWeight(7, w);
        target.SetBlendShapeWeight(30, w);
        total -= w;

        w = total * GetWeight(nodeU);
        // target.SetBlendShapeWeight(8, w);
        target.SetBlendShapeWeight(31, w);
        total -= w;

        w = total * GetWeight(nodeE);
        // target.SetBlendShapeWeight(9, w);
        target.SetBlendShapeWeight(32, w);
        total -= w;

        w = total * GetWeight(nodeO);
        // target.SetBlendShapeWeight(10, w);
        target.SetBlendShapeWeight(33, w);
    }
The setting values in this code have been taken from ‘Face.M_F00_000_Fcl_MTH_AFace.M_F00_000_Fcl_MTH_A, I, U, E, O’ in ‘BlendShapes’ attached to the Face object.
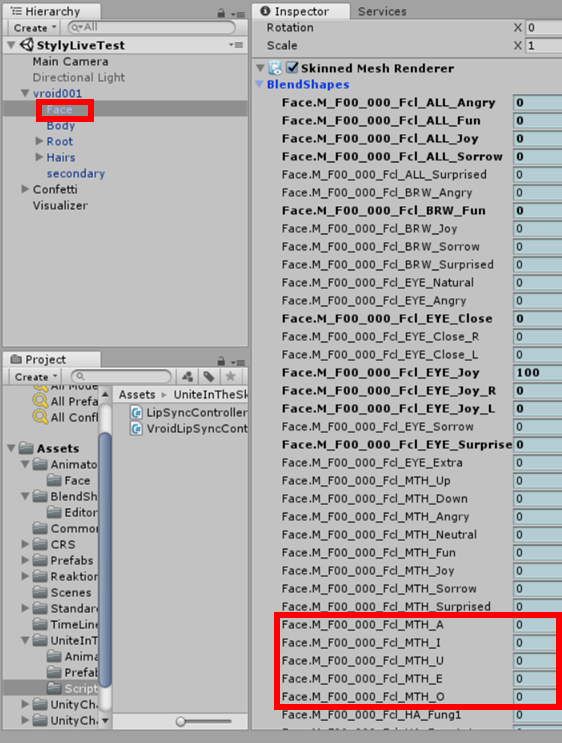
The BlendShapes to be set for the modified script
Note that the setting values depend on the version of VRoid.
Next, drag the Prefab (LipSyncController) into the Hierarchy to replace the LipSyncController script with ‘VroidLipSyncController’.
Set the parameters as shown in the following screenshot.

Set the ‘VroidLipSyncController’ script
The lips now move when playing back in the Editor.
Convert the motion of lips generated by the Editor, into Animation Clip
We use the ‘CreateBlendShapeAnimeClip’ script in the ‘Script’ folder of the sample project.
Create an empty object in the Hierarchy. Rename it ‘CreateAnimation’ and attach the ‘CreateBlendShapeAnimeClip’ script to it.
For ‘Target Name’ in the Inspector, set the object that ‘BlendShapes’ are attached to. In this project, it is ‘Face’.
And, for MTH_A, I, U, E and O, set the Blendshapes, Face.M_F00_000_Fcl_MTH_A, I, U, E and O respectively.

Set up the CreateBlendShapeAnimeClip script
It starts to generate the Animation at the same time as the playback starts in the Editor. Hit the space key when the lip motion finished. Then, the Animation Clip is created with the name specified in ‘Target Name’, directly under the ‘Assets’ folder.
Set the generated Animation in the Timeline.
In the Timeline editor, select ‘Add > AnimationTrack’ to create a Track and place it at the second from the top.
Drag and drop the character into the GameObject of the Track.
Drag and drop the created Animation into the Clip and set ‘Start’ of ‘Clip Timing’ to 0.
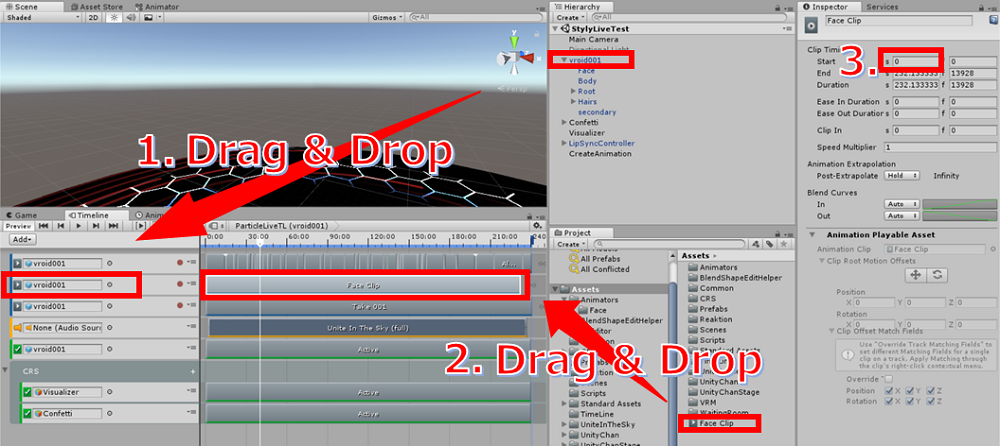
Set the lip animation in the Timeline
Deactivate ‘LipSyncController’ in the Hierarchy. If the setting was completed successfully, the lips should move.
※Deactivate the CreateBlendShapeAnimeClip script as it won’t be used any more.
Add motion to hair and clothes
Since the model exported from VRoid has included the VRMSpringBone script set by default, its hair and clothes move in the Editor. However, we need to create motions by Animation Clip because C# scripts cannot be uploaded to STYLY.
We use the CreateBoneAnimeClip script in the Scripts folder of the sample project.
Attach the CreateBoneAnimeClip script to the CreateAnimation object.
The followings show how to use the CreateBoneAnimeClip script.
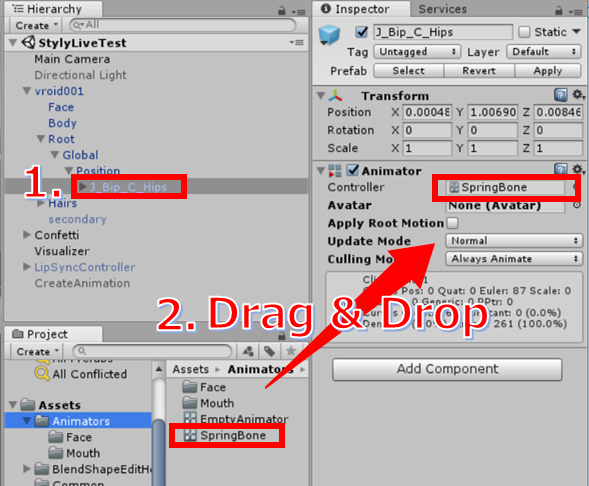
For ‘RootPath’, specify a parent object at a higher level than any objects you will specify for ‘RootBones’. This time, I specified ‘J_Bip_C_Hips’.
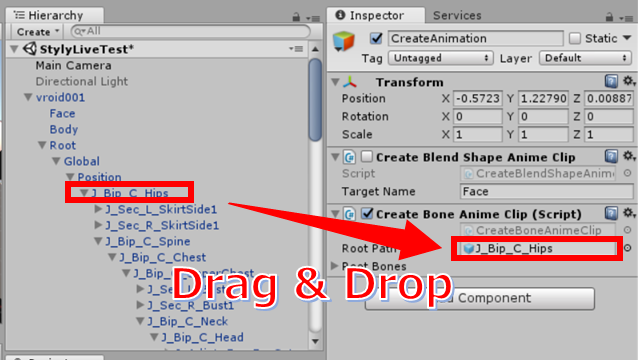
Set up the CreateBoneAnimeClip script
For ‘RootBones’ of the CreateBoneAnimeClip script, specify all the objects that are set as ‘RootBones’ of the VRMSpringBone script attached to the secondary object.
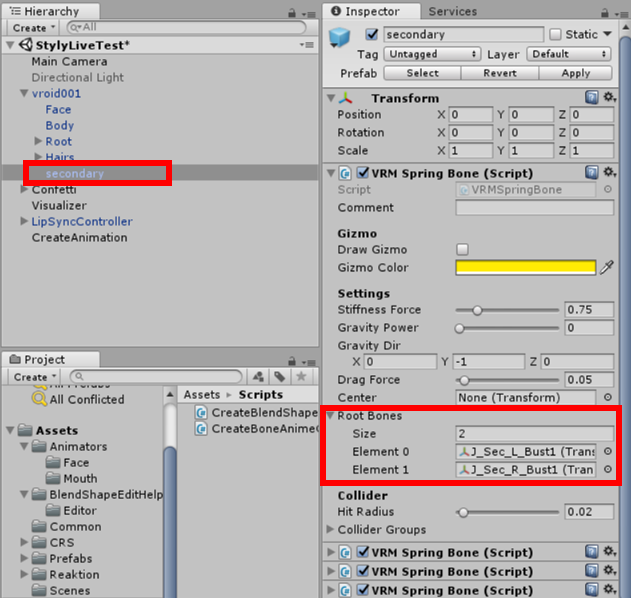
The objects to be specified for ‘RootBones’ in the CreateBoneAnimeClip script ~1
The motions of the child objects linked to the specified objects are recorded in the Animation Clip.
The objects to specify are 13 objects with the name starting with ‘HairJoint’ directly under the ‘J_Bip_C_Head’ object and 12 objects in the following list.
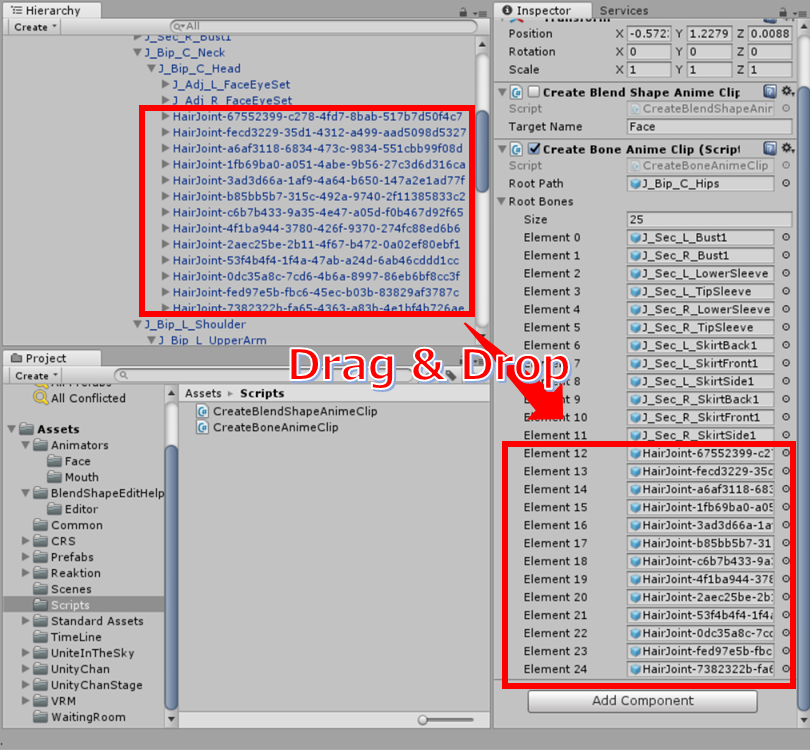
The objects to be specified for ‘RootBones’ in the CreateBoneAnimeClip script ~2
- J_Sec_L_Bust1
- J_Sec_R_Bust1
- J_Sec_L_LowerSleeve
- J_Sec_L_TipSleeve
- J_Sec_R_LowerSleeve
- J_Sec_R_TipSleeve
- J_Sec_L_SkirtBack1
- J_Sec_L_SkirtFront1
- J_Sec_L_SkirtSide1
- J_Sec_R_SkirtBack1
- J_Sec_R_SkirtFront1
- J_Sec_R_SkirtSide1
After specifying the objects, playback in the Editor and then hit the space key at the end of the song. Then, the Clip is created with the name specified for ‘RootPath’, under the Assets folder.
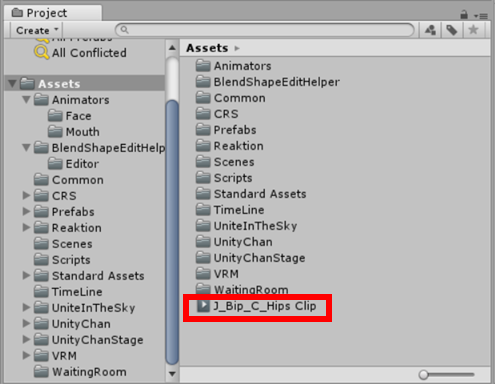
Create the Animation Clip for hair and clothes
It took 10+ minutes from pressing the Space key to completing the Animation Clip. This process was using 21.3GB of memory, so the PC with less than 16GB memory could struggle with it. If you create a lot of hairs when making the character with VRoid, the objects to be processed will increase and take more time to create the Animation Clip.
Create a new Animator (Create > AnimationController) and assign the created Clip to it.
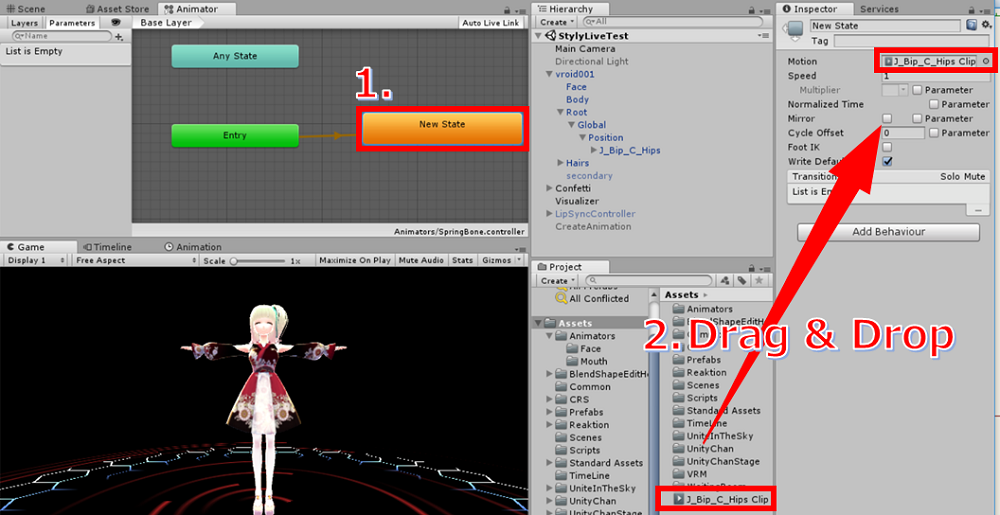
Create and set up the Animator to move hair and clothes ~1
By pressing ‘Add Component’, attach an Animator to the object specified for ‘RootPath’ (i.e. J_Bip_C_Hips) and specify the Animator Controller created earlier in ‘Controller’.
Create and set up the Animator to move hair and clothes ~2
Finally, deactivate the ‘secondary’ object to check the motions. If it works, it’s completed now.
※This CreateBoneAnimeClip script has several issues (Overall performance and the behaviour for large movement) and points to be improved (Automate the parameter set-ups in the Inspector). I would improve it if time allows, but I leave as it is for the time being.
Adjust the effect with Post Processing Stack
Finally, we adjust the effect with ‘Post Processing Stack’.
To use ‘Post Processing Stack’ in STYLY, you need to import ‘Post Processing Stack’ (Free Asset) and ‘PlayMaker’ (Paid Asset).
Post Processing Stack (free)
https://assetstore.unity.com/packages/essentials/post-processing-stack-83912
Playmaker ($45.5)
https://assetstore.unity.com/packages/tools/visual-scripting/playmaker-368
The following article summarized the detail of how to use it, so I just show how to set up the profile here.
The settings for the profile are shown in the following screenshots.
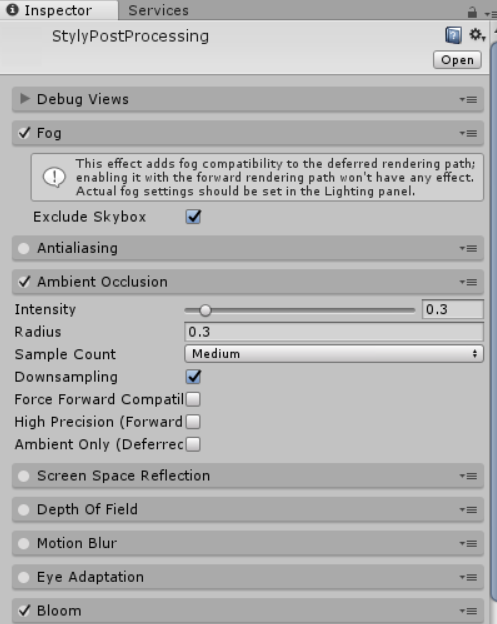
The setting for the profile ~1
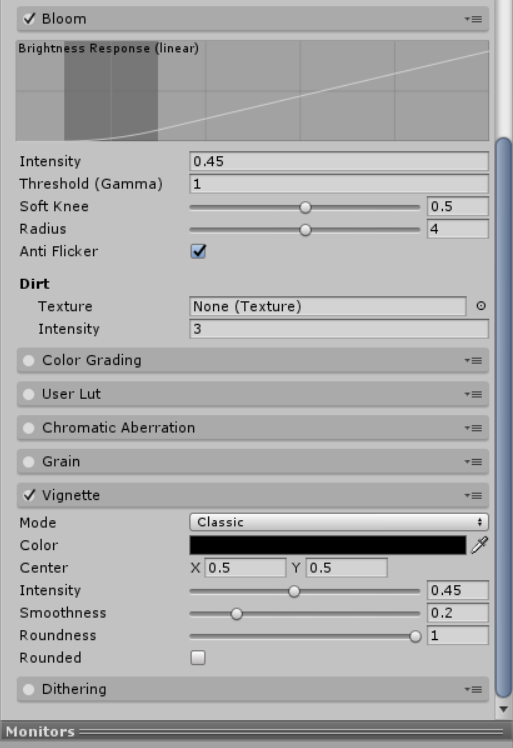
The setting for the profile ~2
Upload to STYLY
Create a Prefab and upload it to STYLY.
Create Prefab
Create an empty object to upload and rename it ‘StylyLiveUpload’.
Make the character and all the particle objects created so far, into the child objects of ‘StylyLiveUpload’.
Drag and drop ‘StylyLiveUpload’ into the Project view to convert it into a Prefab.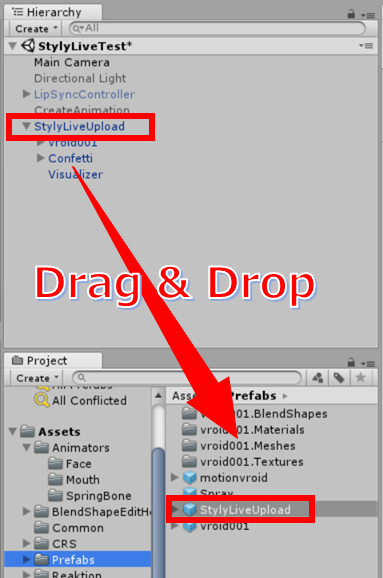
Upload to STYLY
Please read the following article to learn how to upload.
How to upload an asset from Unity to STYLY:

Adjust the Scene
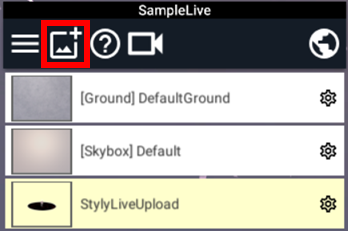
Following the article above, upload the Prefab. After placing the character, we change the Skybox and turn ‘DefaultGround’ off.
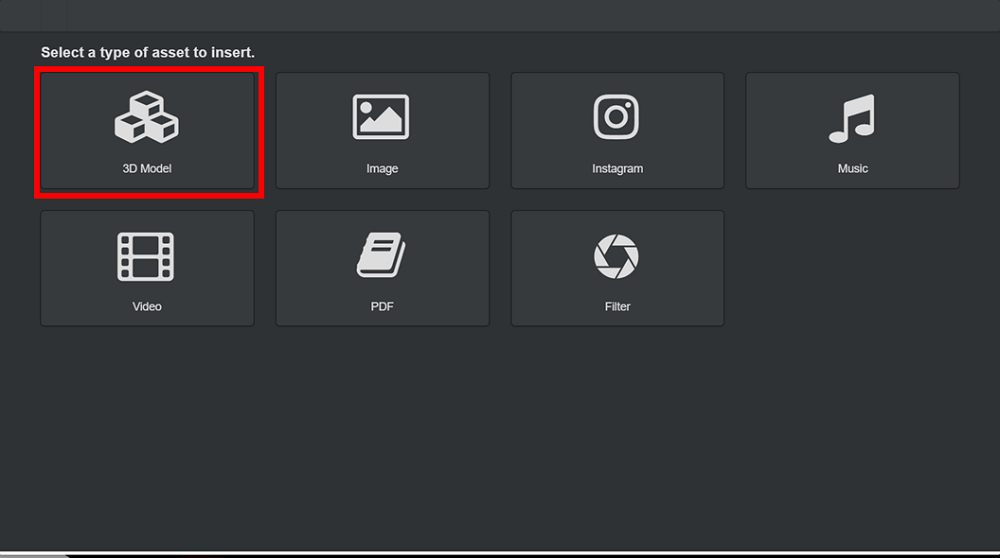
Change the Skybox.
Press the Assets button to display the Asset list and select ‘3D Model’.
The Assets button
The Assets list
On the ‘Sky and Ground’ tab, select ‘[Skybox]Dark’.
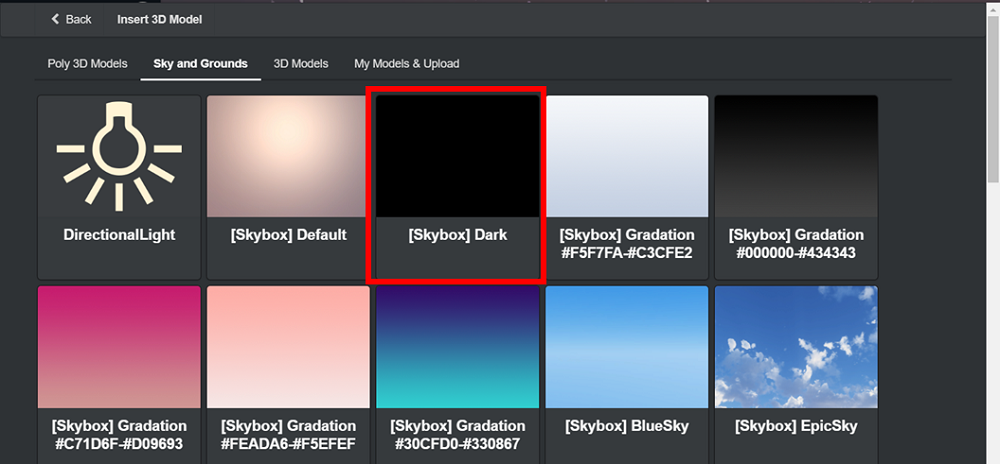
Skybox Dark
Finally, turn ‘DefaultGround’ off.
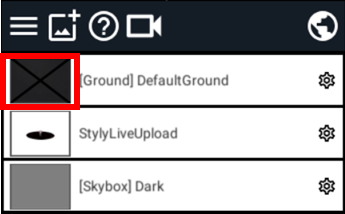
Turn DefaultGround off
Now it’s completed.
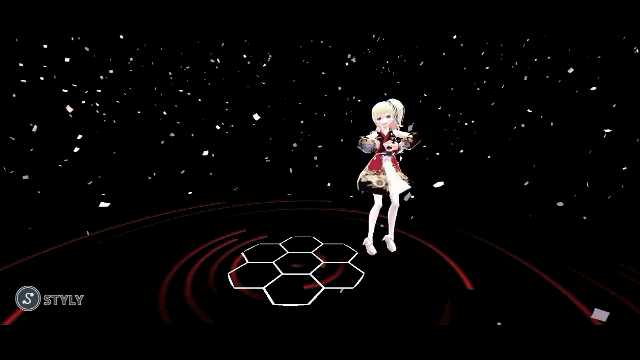
The completion image – ‘Particle Live’
How did you find this article? It concludes ‘Create Particle Live with VRoid Studio and STYLY’.
Please create your favourite ‘Particle Live’ by customizing the character, song, animation and particle effect!
[Related articles]