Blender handles many different types of data, and most of it is structured in a similar way. This article explains the structure of Blender data.
Overview of Data in Blender
In Blender, we can add and modify a wide variety of data, such as object, mesh, material, and texture data.
To manage all these data, Blender has its own data management system.
In this article, we will explore how Blender manages data, and I will explain how objects are made into links and instances.
At the end of the article, I will explain how to upload a sample scene to STYLY using links created in Blender.
* This article was written using Blender 3.2.
“Library Override” is a feature available from Blender 3.2 onward. Please note that there may be minor differences in different versions.
Data in Blender
Definitions of terms used in Blender
- Data: In Blender, various types of data are referred to as “data.”
- User: The object to which the data refers (e.g., a mesh object using a material).
- Link: The connection between data and an object.
- Instance: An object that is derived from and created from the same data. Changes to the original data are applied to each instance.
How is Data Managed in Blender?
In Blender, internal data is managed in a certain way.
I will explain how to navigate Blender data with a material as an example. Most data is structured similarly.
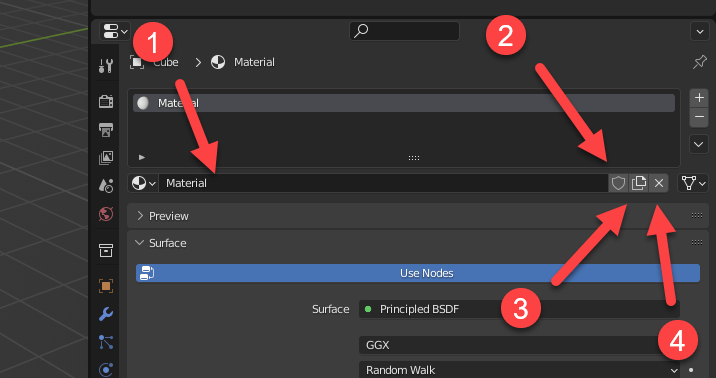
Blender’s data structure
This is what each number refers to:
- Name: The name of the data.
- Fake User: A fake user allows us to save the data, even if there is no user for the data.
- New: Creates new data. In this example, a new material is created.
- Unlink: Breaks the data link. Shift + Click to set the number of users to zero and break all existing links.
The second “Fake User” is important to note, as this is how Blender handles unlinked data.
By default, Blender will remove any unlinked data from the BLEND file. However, it is possible to keep the data-block in a BLEND file by pressing this Fake User button to create a pseudo-user to which the data-block can be linked.
There are times when we want to run a script or use some other type of data-block in the future. In such cases, the Fake User function comes in handy.
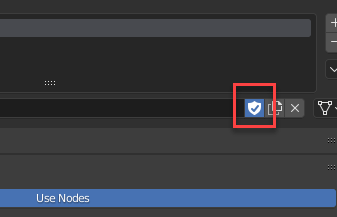
Fake user is enabled
If there is more than one user, a number is displayed to show how many users are linked to the data.
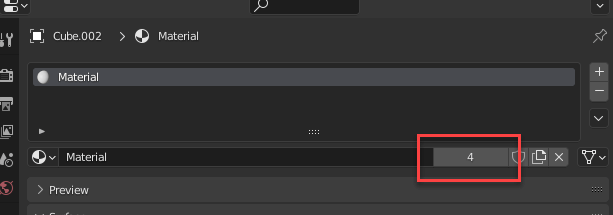
The material is linked to multiple users
We can see that this object has four users. Therefore, if you modify this data, the changes will be applied to all four users.
However, let’s say you share the same material on the walls of a house, but you only want to change the south wall.
In this case, select the south wall, and press the button with the number of users.
Make a copy for a single user
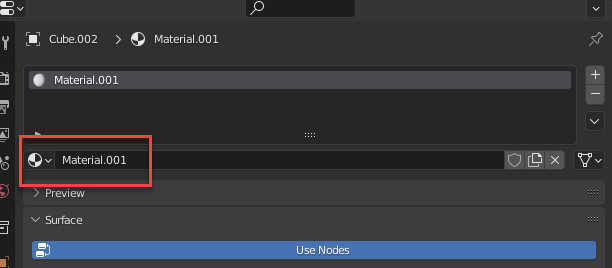
This creates a single user copy for that material.
The button with a number disappears, and a new material is created with “.001” added to the end.
The suffix is added because there cannot be multiple data with the same name in Blender.
This creates a different material, so changes to this material are only applied to a single object—in this case the south wall of the house.
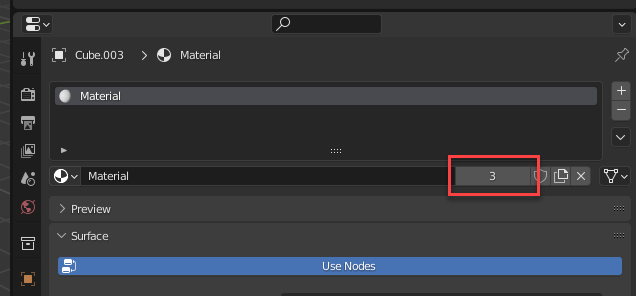
Material with one fewer user (4 → 3)
Here, we can see that the number of users for the original material has been reduced from “4” to “3.”
This is how Blender handles data for most of its features, such as image texture files, as seen below:
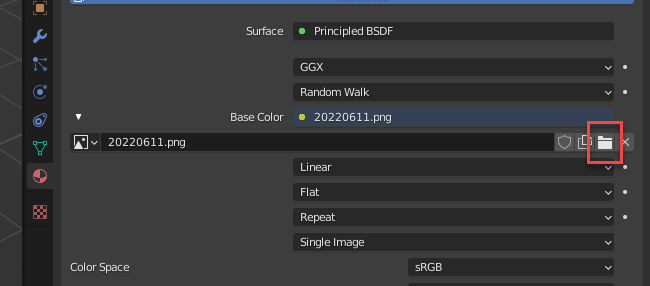
Image texture data
Image files can be linked to materials, so a single image texture file can be linked to multiple materials to share texture.
The buttons available will change according to the type of data. For example, image files will have a button to navigate to the file location.
In addition to textures, image files can also be used as an element for compositors. Therefore, it is not necessary to load the same image as new data.
To switch the data type, click the disclosure triangle to expand the data-block, and select the data to which you want to switch.
Clicking the data will select it in the outliner panel, but the property panel will remain as is. If you want to edit the properties of the data, make sure to select the property you want to edit in the property panel.
Switching data inside the outliner
Objects are hierarchically linked. For example: object (which will be discussed below) > mesh > material. If data at the upper level is linked, data lower in the hierarchy is shared as equivalent data, so a single user copy cannot be created. If you want to create a single user copy, you must first make the upper-level data a single user.
It is structured this way because linked objects should have equivalent data to the source object, so removing a link at a lower level in the linked object creates a conflict for the source object.
Of course, there are cases where the same material is linked for different objects, in which case the number of users is indicated. When it is made to be a single user, the object shared by the linking source and destination objects will independently retain its single user copy.
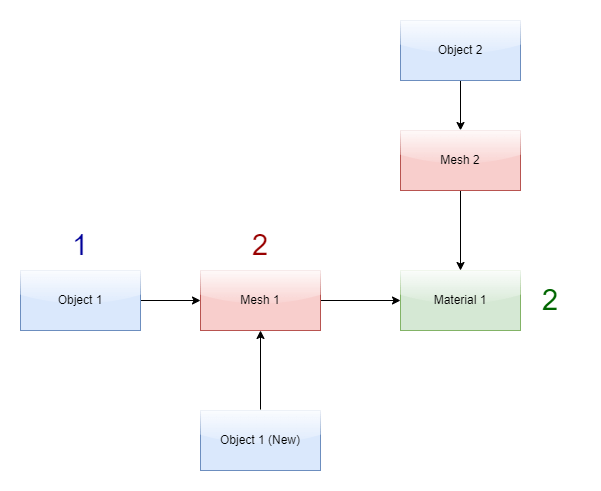
For example, let’s say there are two objects sharing a material and one link, as shown below.
In this case, the link for “Object 1” is only linked to “Object 1,” so “Material 1” only has two users, even though it appears that the material is applied to three objects.
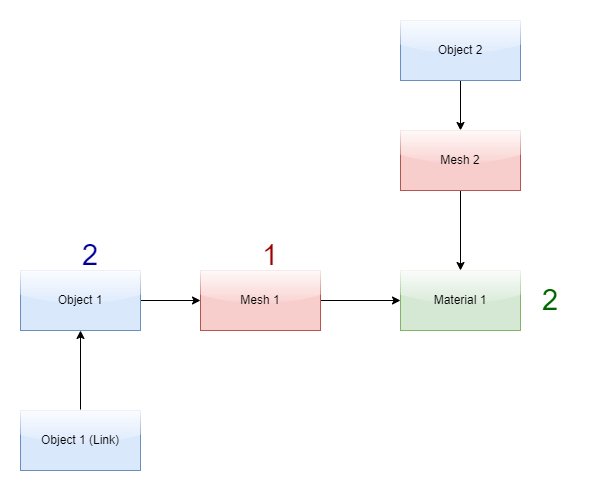
The default state
If we unlink “Object 1 (Link),” there will only be one user for “Object 1,” and it will have no linked objects.
Since “Object 1” has been unlinked, there is only one user for “Object 1” without any links.
Instead, there are now two users for “Mesh 1.”
Object 1 unlinked
Next, we will unlink “Mesh 1” from “Object 1.”
This time, the link to “Mesh 1” is removed, so the number of users for “Mesh 1”decreases.
Instead, the number of users for “Material 1” increases.
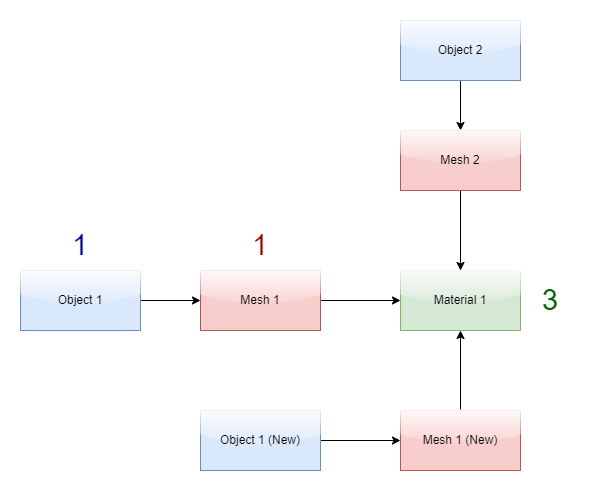
Mesh unlinked
Therefore, if the link from “Mesh 2” is removed while the link is still connected (as in the initial state shown above), it will change to something like this:
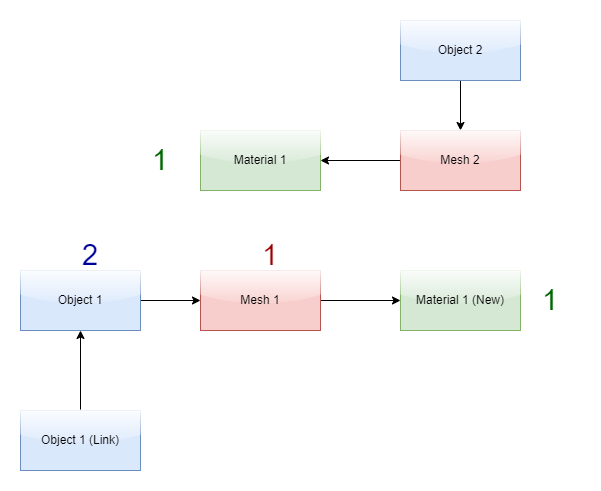
Unlinked from other objects
Note that linking is bidirectional, and with the exception of links between files, the data will always be equal.
When data is linked to another object, any data can be deleted without affecting the other data, including the first data created.
It’s also possible to make data-blocks single user without retracing the data-block. To do this, select Object > Relations > Make Single User and select the object you want to make single user.
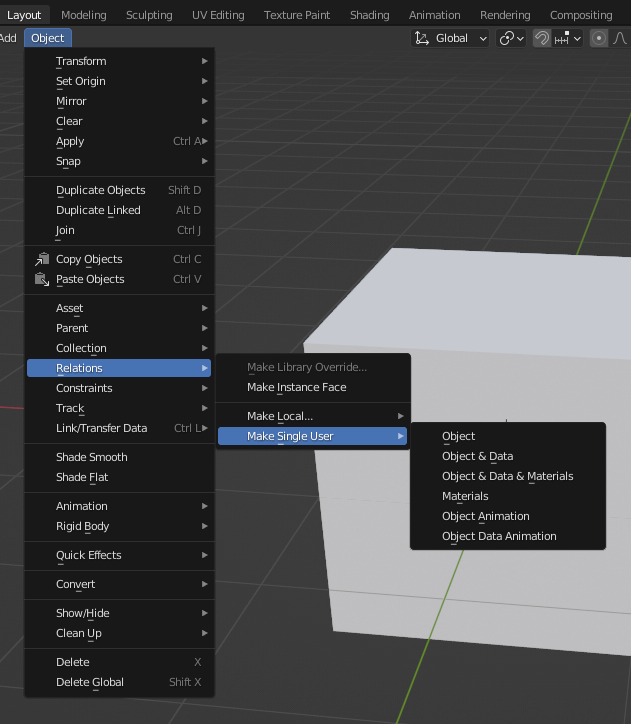
Make Single User menu
Objects as Instances
Objects can also be linked in the same way and treated as instances.
This is done using the command Alt + D.
Creating an instance
As shown above, changes made to an object in Edit Mode will also be applied to the instance.
Number of instances
As you can see from the image, the number of instances will be shown in the properties.
All mesh data is nested under an object, so when linked, the same mesh data will appear under the instanced object.
Mesh data is located inside the object data-block
Imagine the object as a box with data inside it.
Because the object is a box, moving the box does not affect the other objects, but changes are reflected when the box is modified in Edit Mode.
Changes made to the object in Edit Mode
If you want to prevent modifications in Edit Mode from being applied to the linked object, make the mesh single user.
In addition to the mesh data, such instances can be created for lights, cameras, and more.
Advantages of Using Linked Instances
Unlike regular duplicates, linked duplicates have the following advantages:
- Memory consumption is reduced because there is less object data to be managed
- Changes can be applied to multiple objects simultaneously
Using Scenes
In Blender, it is possible to create multiple scenes. This allows you to do the modeling in one scene and link the modeled data to perform the layouting in another.
The advantage of this approach is that when you want to edit a model, you can switch scenes without having to worry about other objects in the same layout scene.
Let’s try out this feature. You can create a new scene by clicking the buttons in the top bar of the Blender workspace.
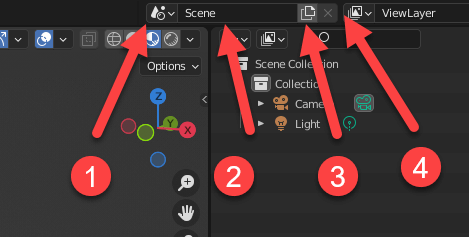
Scenes
This is what each section does:
- Switch scene
- Scene name (this is editable)
- Create new scene
- Delete scene (if there is only one scene, it will be grayed out like in the example and cannot be deleted)
Let’s press “3” and create a new scene. A menu will pop up with the following options:
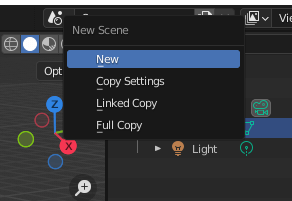
Create new scene menu
Let’s press “3” and create a new scene. A menu will pop up with the following options:
- New: Creates a new blank scene.
- Copy Settings: Creates a new blank scene with the settings copied.
- Linked Copy: Creates a new scene with objects linked from the current scene.
- Full Copy: Creates a new scene duplicated from the current scene.
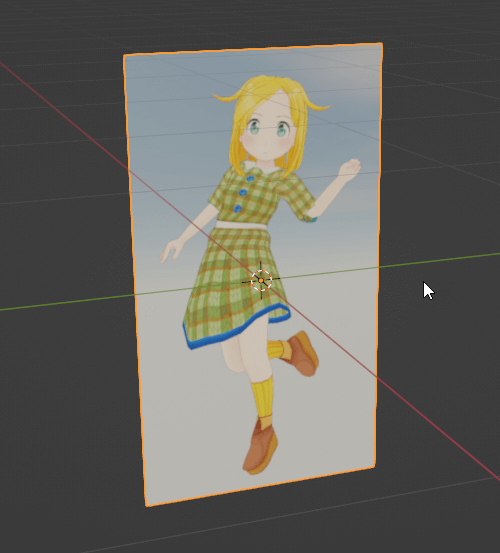
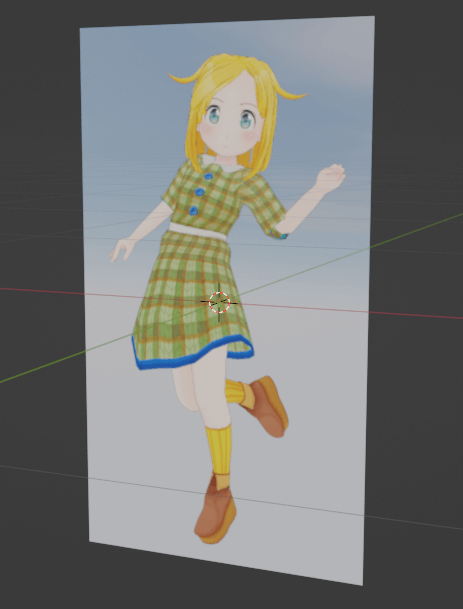
In our case, we will select “New” and place a new plane loaded with an image, “sample.png.”
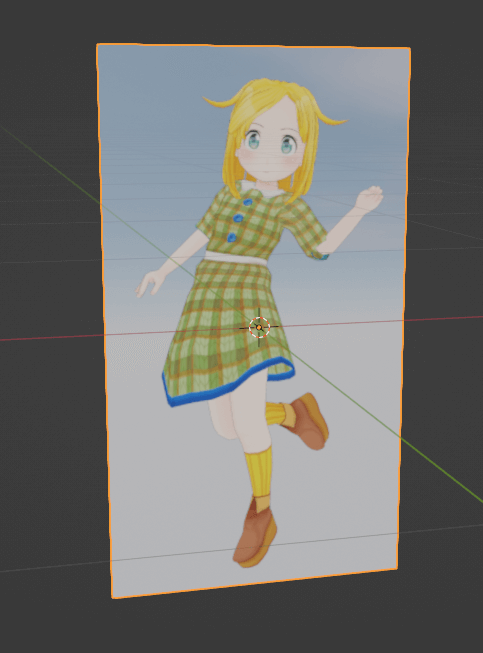
Object placed inside the new scene
In actual production, we would do the modeling in this scene, but this time I will skip this process and create an instance in another scene using this plane object.
Select the object. Then, from the Object menu, select Link/Transfer Data > Link Objects to Scene, and select the first scene (Scene).
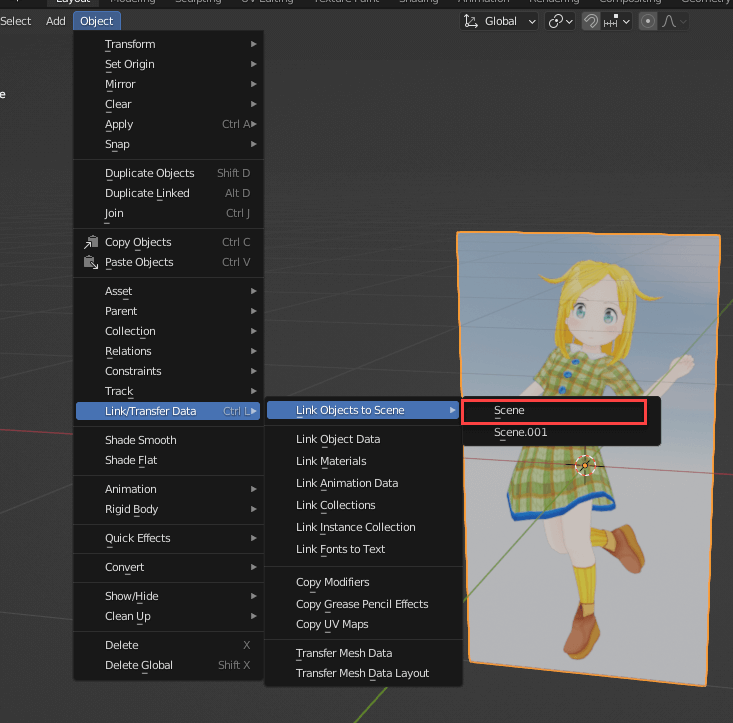
Link objects to scene
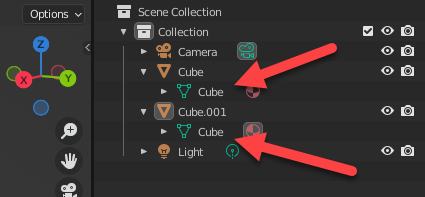
You will see the object you just placed in the new scene (“Scene.001”) appear in the original scene (“Scene”).
However, not changing any setting will lead to many inconveniences. This is because if you move this object in the original scene, the changes will also be applied to the object in the new scene.
At the beginning of this article, I explained that when you create a linked object, the object is like a box, and the box can be moved without being affected by the linked object.
The same applies for links across scenes.
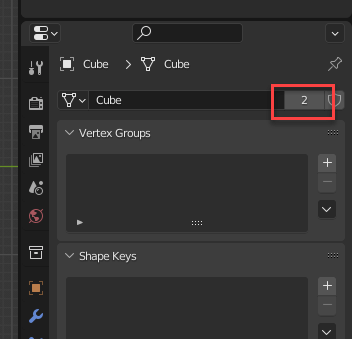
When you select the object in the outliner, it shows that there are “2” users.
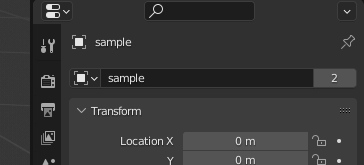
An object with two users
Press this number to make the object a single user.
Object made to have a single user
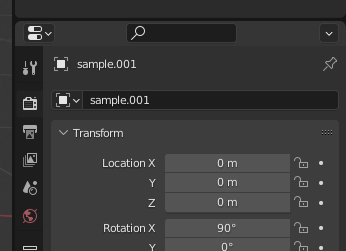
The number disappears, and the name of the sample changes to “Sample.001” to prevent duplication.
Now, if you check the mesh information, you will see that the number of users for the mesh has changed to “2.”

The mesh now has two users
Now, changes made to the object will not be applied to the data in the new scene, but as with a regular instance, any changes made to the object in Edit Mode will be applied.
If you want to prevent this as well, make the mesh single user too.
Referencing External Data as a Library
Blender data is stored in BLEND files, and you can reference data from other BLEND files.
It is possible to reference model data, materials, and more—all individually.
In this example, we will add a plane with an image “sample.png” loaded in one BLEND file (the same as in the Scene example) and save it.
Sample plane object
Next, create a new file, and select File > Link….
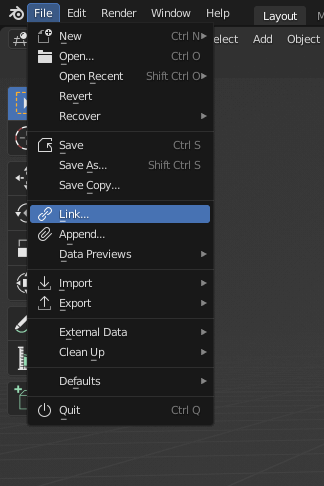
File > Link…
This opens the Blender File View. Select “data1.blend,” which is the file we saved previously.
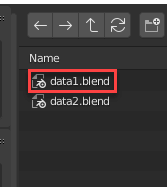
Select the file you want to link
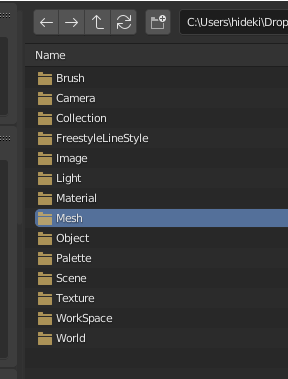
When you click the BLEND file, you will see the following hierarchy.
What is displayed here are not actual files, but a hierarchical display of data types within the file as if it were a collection of files.
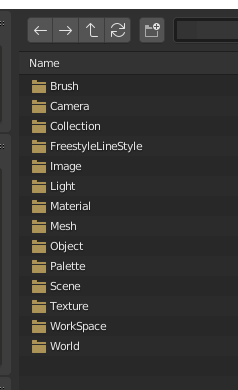
Contents of the BLEND file
Let’s look inside the “Object” folder.
You can see the objects listed, and among them is the “sample” object. Let’s select it.
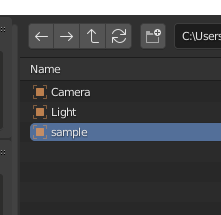
Inside “Object”
Click the “Link” button to place the sample object in the new scene.
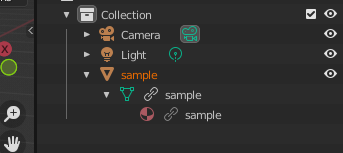
The imported linked object
Linked items are indicated by a link icon like this:

A linked object looks like this in the outliner
If you try rotating this linked object, you can see that it will not work. This is because in Blender, linked objects cannot be edited.
Blender does not allow you to edit linked objects because this time, the link is unidirectional. Unlike with scenes, it is not possible to make it single user.
Therefore, it is not very useful as is. However, it is possible to link in a different way, as if the object were a box but at a different level.
Try opening the file again, but this time select “Mesh.”
“Mesh” category
Select the mesh “sample.”
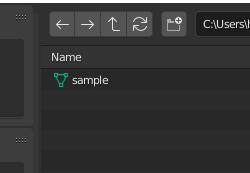
Inside “Mesh”
Although similar, this time you will see that the object does not have a link icon.
Object without a link icon
In this state, the object can be moved.
However, if you try to enter Edit Mode, you will see an error message reporting that doing so is not possible because you will be editing the mesh.
The object can now be rotated
When linked, any edits to the original data will be applied to the linked copy.
If a fully editable duplicate is required, use “Append” instead of “Link.”
By using Append, any modifications to the source data will not be applied to the appended data.
Make Local and Library Overrides
To this point, we have looked closely at how linked objects work. A different feature called “Make Local” is a much simpler process.
I will also explain library overrides, a new feature from Blender 3.0 onward that allows for even more linked object flexibility.
Make Local
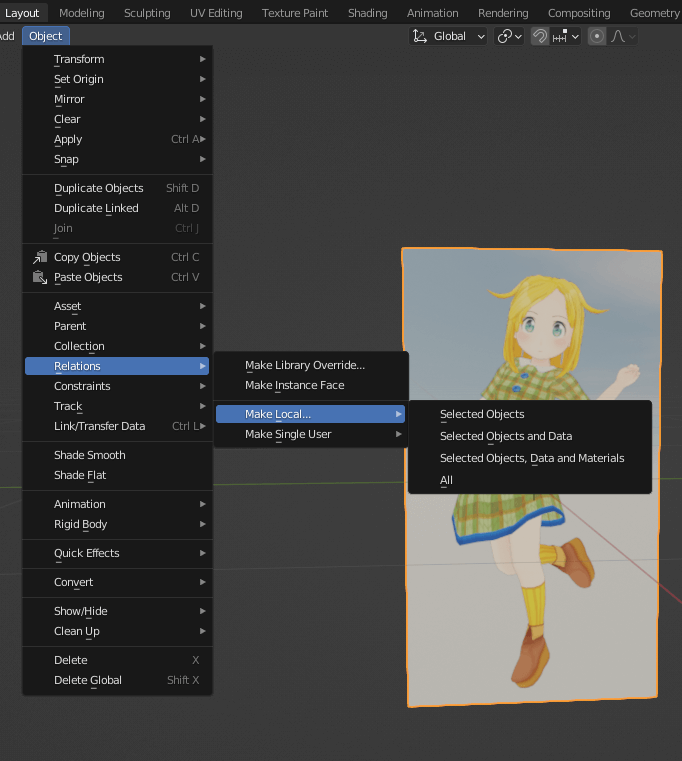
To localize an object, select Object > Relations > Make Local… .
There are four different localization options. You can choose to localize the selected objects only; the selected objects and their associated data; the selected objects, their data, and materials; and all.
Make Local
Library Override
Library override is a feature added from Blender 3.0 onward.
Like localized library overrides, library override objects behave like a linked object. However, when the original data is modified, the library override object applies changes from the original data only to the unmodified properties.
This is useful when you want to create derivatives of objects or add animation to them.
Library overrides can be created by selecting Object > Relations > Make Library Override… .
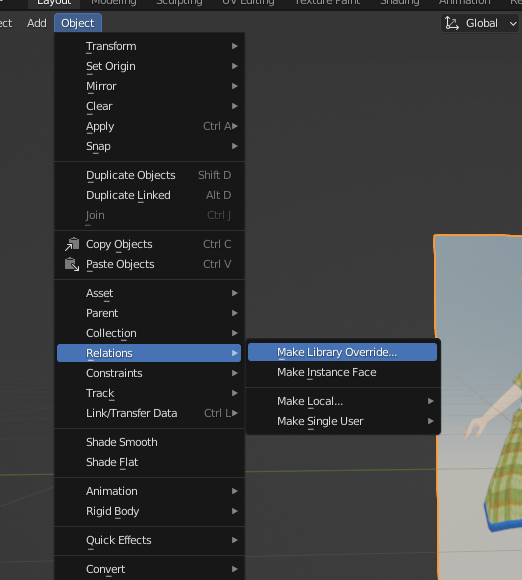
Make Library Override…
The object with the library override will look like this:
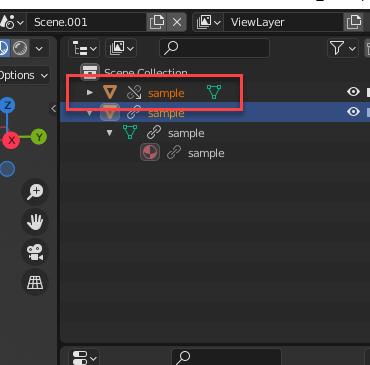
Library override in the outliner
In the case of a library override, the data behaves as if it were duplicated.
After it is created—even if the object in the duplicated scene is deleted—the library override object will not be deleted. However, the duplicated status of the library override object will be preserved, so if you want to create multiple types of variants, be sure to create them from the original linked object.
Therefore, we recommend keeping the original object hidden rather than deleting it.
If you want to edit data inside the library override object, right click in the outliner and select “Make Library Override Hierarchy” to make that area and everything underneath its hierarchy single user.
Furthermore, “Make Library Override Single” is another option that allows you to manually override a single data-block in the hierarchy.
Make the library override a single user object
However, because this feature is relatively new, sometimes the data is not saved properly. Therefore, in the sample scene below, we made the objects local.
This bug may be fixed in future versions, but for now, keep in mind that some property information may not be saved properly.
How to Inspect Your Blender Data
To see a list of the data stored in a BLEND file, switch to “Blender File” in the outliner.

Switching to Blender File
In Blender File mode, you can see a batch list of the data in your BLEND file.
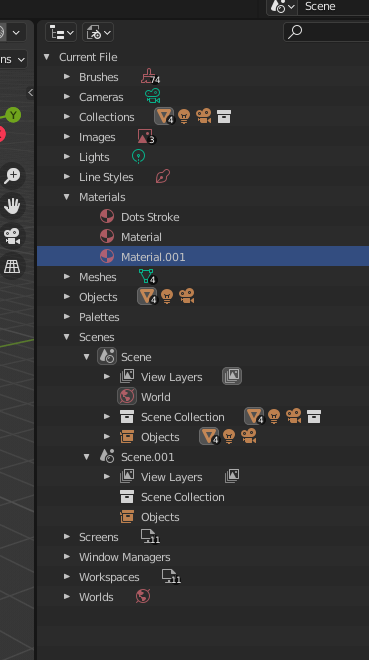
Blender File batch list
You can also use the Data API view to inspect and edit your data.
This view allows you to see how Blender stores data, and it can be used for more advanced editing.
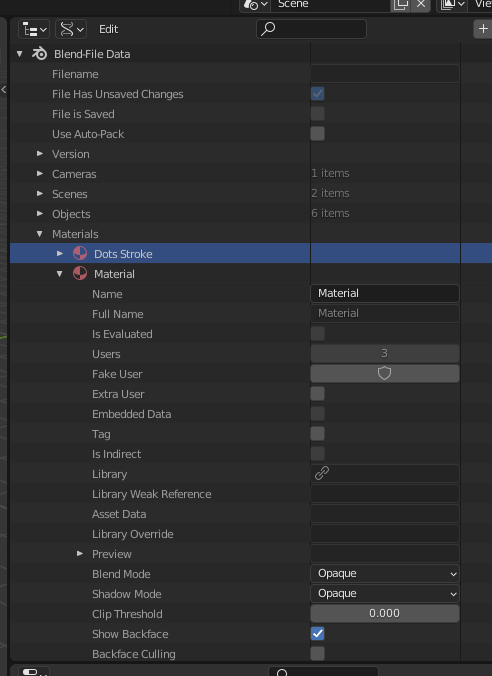
Data API
Using These Features in STYLY Production
Scenes created using links can be uploaded to STYLY by converting them to FBX format.
In this example, we will upload the following scenes.
We used the first scene for the overall layout, so we will name it “Layout.”
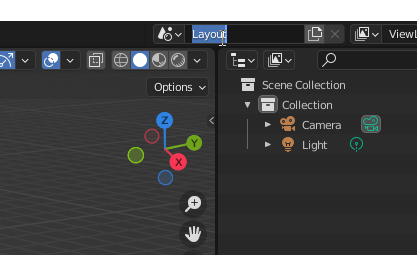
Renaming the Scene Collection
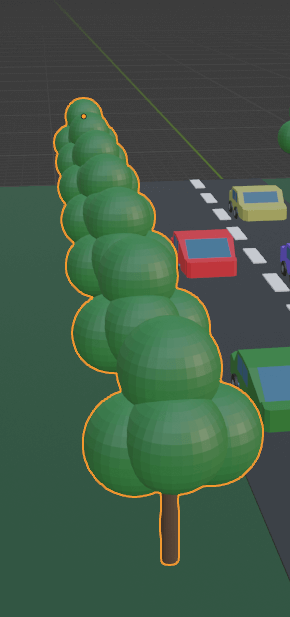
We will create another scene and model a simple tree to be placed in the scene.
We will name this scene “Tree.”
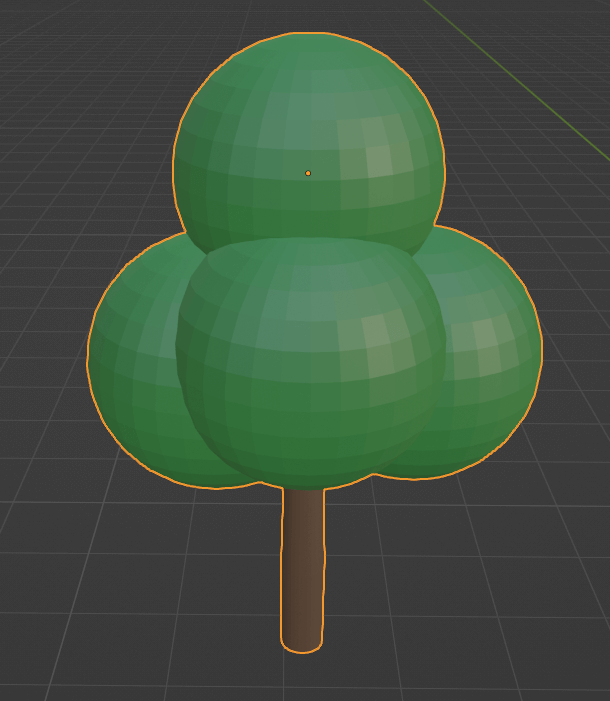
A tree model
We will also create a simple house model in a different scene.
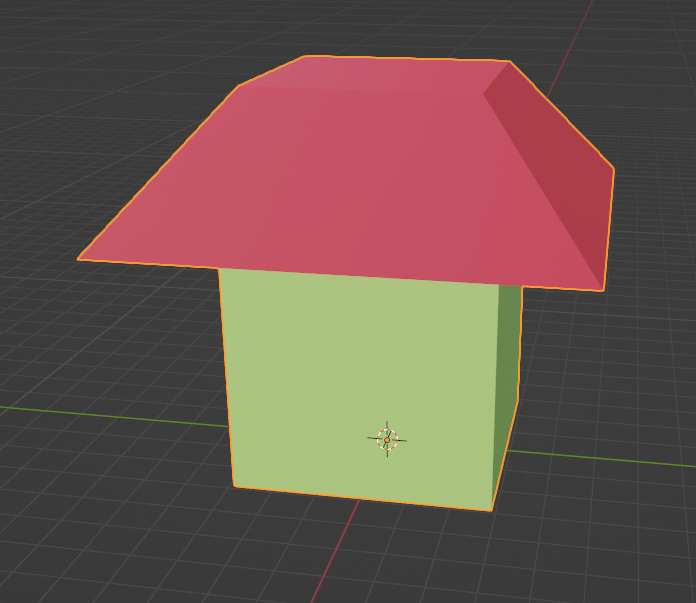
A simple house model
Next, we will create a model of a car.
This is done in a separate file.

A car model
Then, we will create roads and other objects in the layout scene, and we will link the tree, house, and car objects that we created previously.
We can apply modifiers to linked objects, so we will create an array of trees aligned to the road using the Array modifier.
An array of trees
These are the settings for the Array modifier:
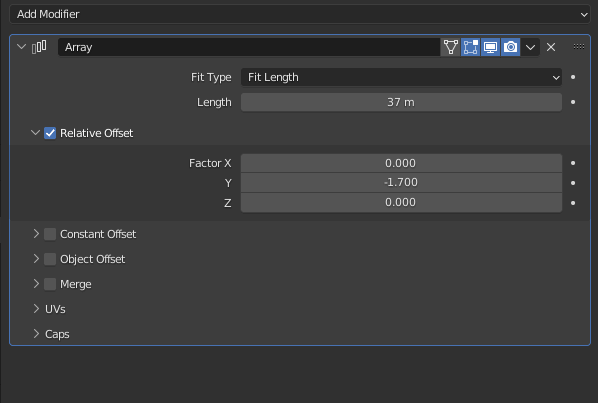
Modifier settings
We will make the cars and houses single user and change their colors.
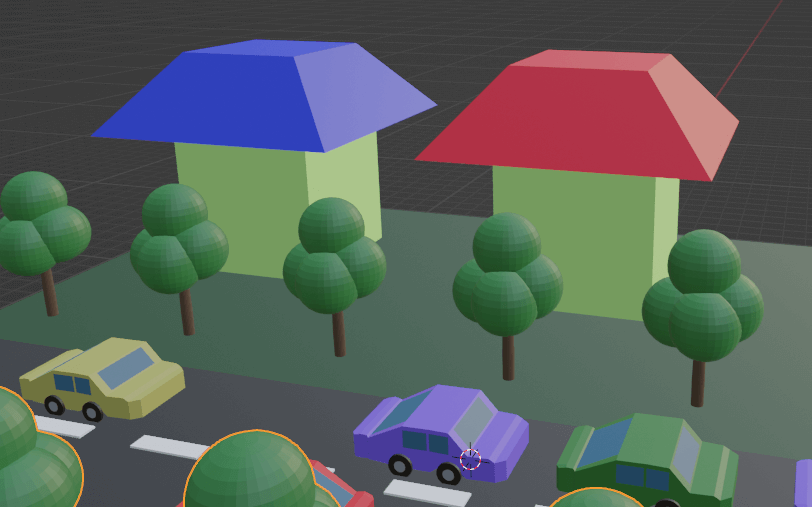
The house and car colors have been changed.
How to Upload to STYLY
Let’s try uploading the 3D model to STYLY.
Create a STYLY account
How to create an account

How to upload assets to STYLY

How to upload from Unity to STYLY

For questions about STYLY, bug reports, and improvement requests, please contact the STYLY FORUM
https://en.forum.styly.cc/support/discussions
In this article, we explained Blender’s data structure and linking features.
It can be very complicated and difficult to understand at first, but these features will allow you to model more efficiently and will make it easier to reuse models and other assets.
Certified by Shota Yoshizawa
Edited by SASAnishiki
Translated by cpnnn