- 1 Introduction
- 2 Sample projects (GitHub)
- 3 How to make it
- 3.1 Preparation: Installation of SideFX Labs (Houdini)
- 3.2 Step 01: Create a disk mesh (Houdini)
- 3.3 Step 02: Creating a basic shader
- 3.4 Step 03: Creating a material
- 3.5 Step 04: Apply a texture to the disk mesh
- 3.6 Step 02: Scroll Texture UV
- 3.7 Step 03: Applying Mask to the Texture
- 3.8 Step 04: Twist the UV
- 3.9 Step 05: Use the pow function to add strength
- 3.10 Step 06: Add strength with the smoothstep function
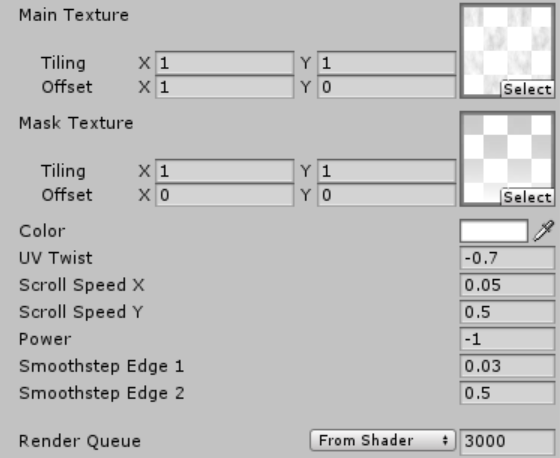
- 4 Parameter Setting Example
- 5 How to upload a prefab from Unity to STYLY
Introduction
Here we will introduce how to use a shader to create an expression that will gather energy.

Expressions that gather energy
Sample projects (GitHub)
All of the effects, models, shaders, and textures presented in this article are included in the sample project.
STYLY-Unity-Examples – TwistEffect
How to make it
This time we will use Houdini to create a 3D model.
Please refer to the following article to learn more about the introduction and basic usage of Houdini.
![[Houdini] Introduction to Procedural Modelling](https://styly.cc/wp-content/uploads/2019/05/キャプチャ-160x160.png)
Preparation: Installation of SideFX Labs (Houdini)
This time we are using the Labs Disc Generator node in Houdini, but it is not installed in the initial Houdini.
SideFX Labs needs to be installed on Houdini.
First, click on the Update Toolset on the SideFX Labs shelf at the top of the Houdini screen.

Then, click on the Update button to install SideFX Labs on Houdini.
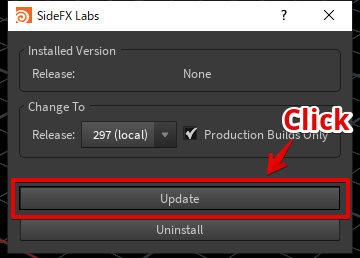
Once the installation is complete, the following dialog will be displayed.
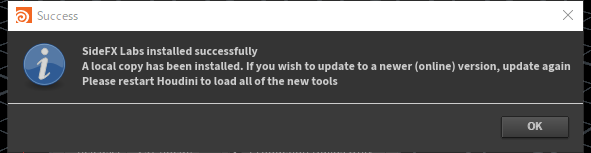
Once Houdini is restarted, the SideFX Labs toolset will be available.
Step 01: Create a disk mesh (Houdini)
Creating a disk mesh
Create a disk mesh at Houdini’s Labs Disc Generator node. It will output at ROP Geometry node as an obj file.
Labs Disc Generator is a useful node for creating UV-expanded disc meshes in a single blow.
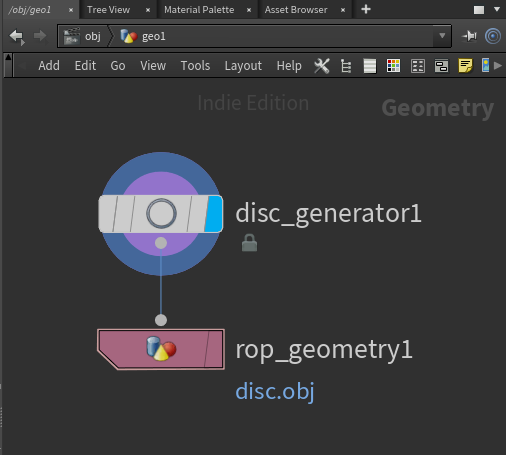
Network creating a disk mesh
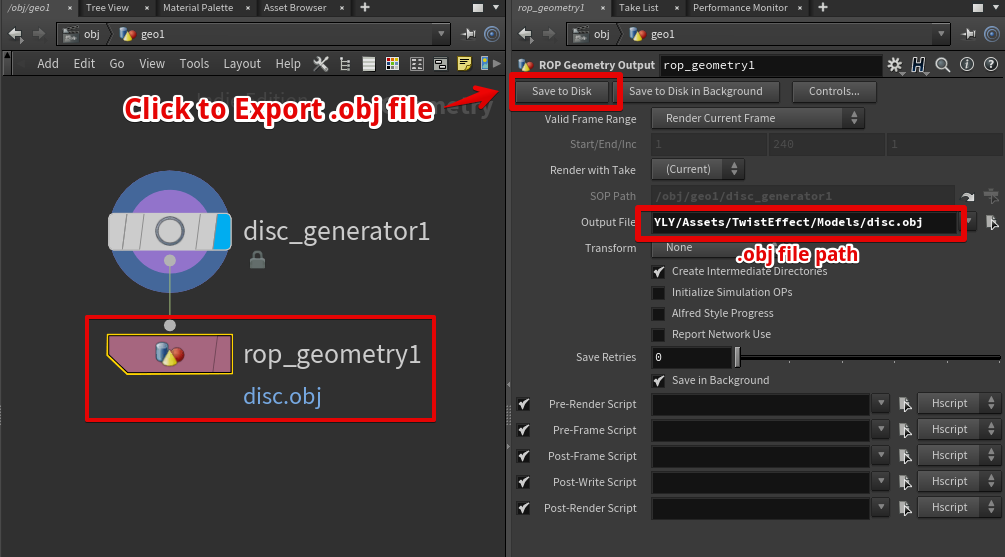
OBJ output of the disk mesh
Specify the output path of the obj file at the ROP Geometry node.
Specify the output destination of the obj file as Assets/ below in your Unity project.
Click “Save to Disk” to output the obj file.
Drag and drop the obj file to the Scene view in Unity and save it in the Scene.
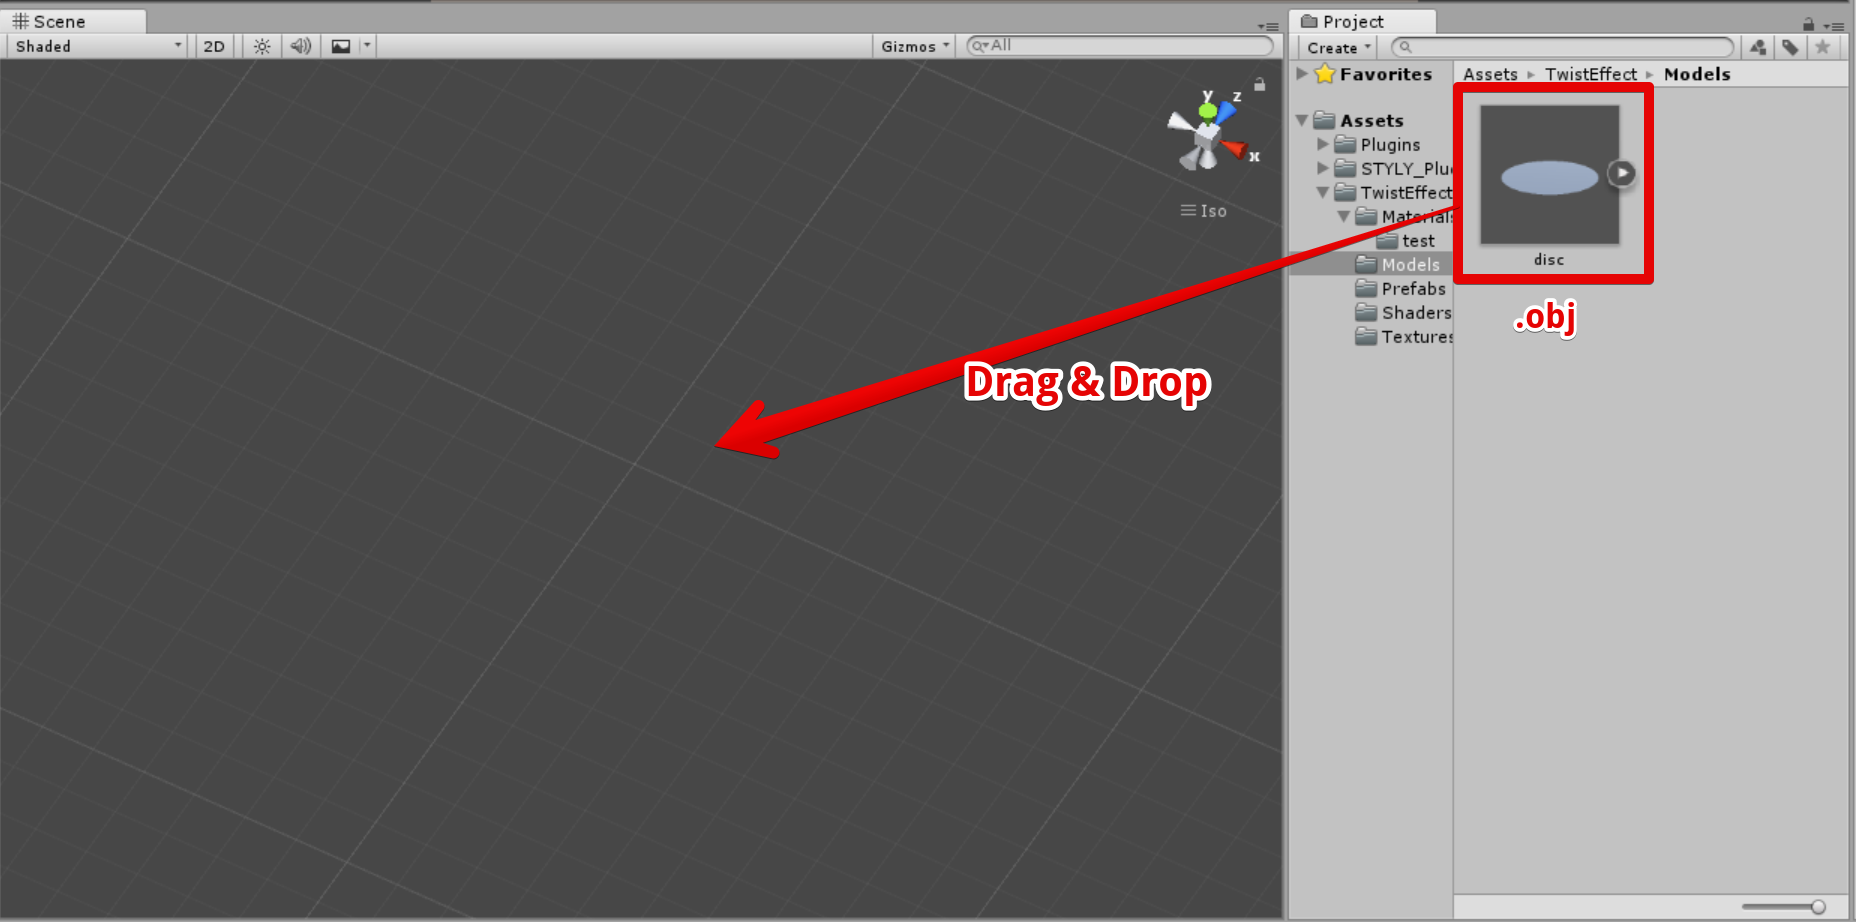
Drag and drop the .obj file to the Scene view
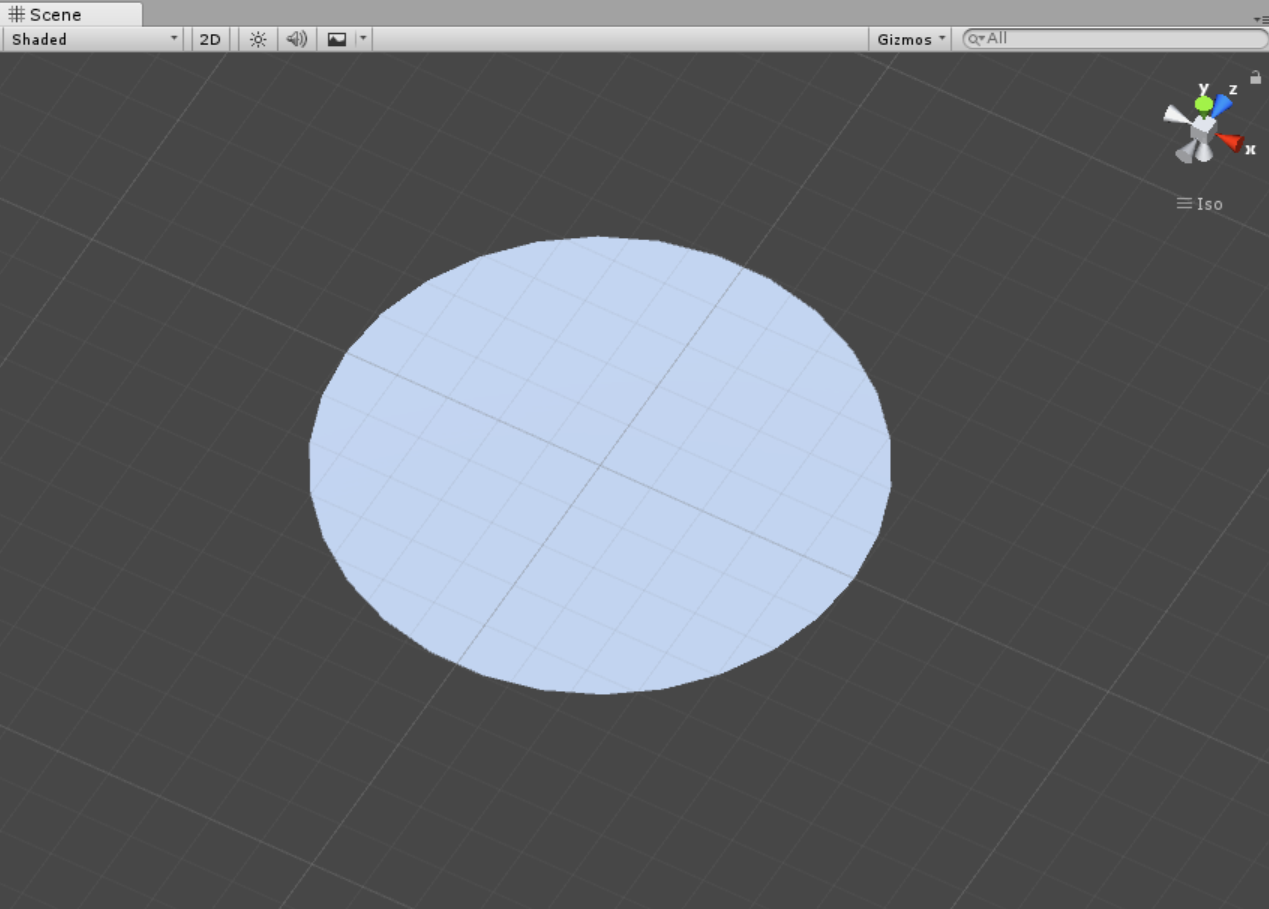
Result
Step 02: Creating a basic shader
Next, we will create a shader for the effect.
First, create a shader by selecting Create/Shader from the right-click menu on the Project window.
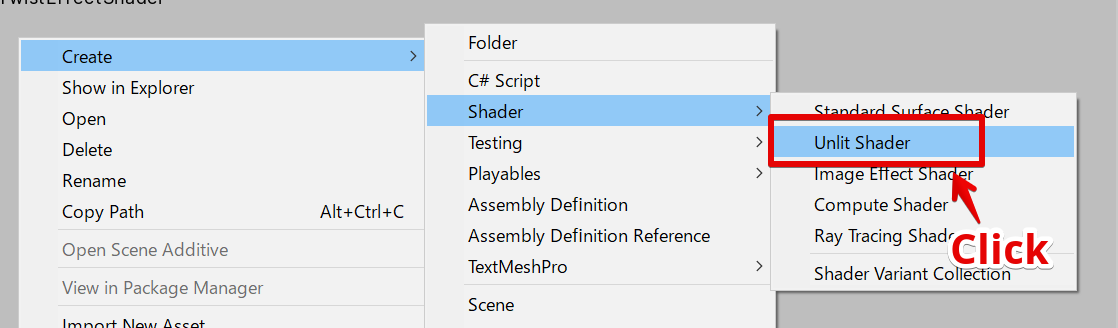
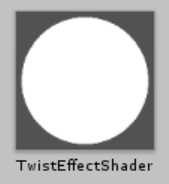
Creating a Shader
The name of the shader is TwistEffectShader.
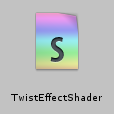
Created shader
Open the created shader and paste the following shader code.
Shader "STYLY/Examples/TwistEffectShader"
{
   Properties
   {
      _MainTex ("Main Texture", 2D) = "white" {} // main color texture
      _MaskTex ("Mask Texture", 2D) = "white" {} // mask texture
      _Color ("Color", Color) = (1, 1, 1, 1)
      _Twist ("UV Twist", Float) = 0.0 // uv twist
      _ScrollSpeedX ("Scroll Speed X", Float) = 0.0 // uv scroll speed x
      _ScrollSpeedY ("Scroll Speed Y", Float) = 0.0 // uv scroll speed y
      _Power("Power", float) = 1.0
      _SmoothstepEdge1("Smoothstep Edge 1", float) = 0.0
      _SmoothstepEdge2("Smoothstep Edge 2", float) = 1.0
   }
   SubShader
   {
        Tags { "Queue"="Transparent" "IgnoreProjector"="True" "RenderType"="Transparent" }
        LOD 100 //

        ZWrite Off
        Blend SrcAlpha One

      Pass
      {
         CGPROGRAM
         #pragma vertex vert
         #pragma fragment frag
         #pragma multi_compile_fog

         #include "UnityCG.cginc"

         struct appdata
         {
            float4 vertex : POSITION;
            float2 uv : TEXCOORD0;
         };

         struct v2f
         {
            float2 uv_main : TEXCOORD0;
            float2 uv_mask : TEXCOORD1;
            UNITY_FOG_COORDS(1)
            float4 vertex : SV_POSITION;
         };

         sampler2D _MainTex;
         sampler2D _MaskTex;
         float4 _MainTex_ST;
         float4 _MaskTex_ST;
         fixed4 _Color;
         half _ScrollSpeedX;
         half _ScrollSpeedY;
         half _Twist;
         half _Power;
         fixed _SmoothstepEdge1;
         fixed _SmoothstepEdge2;

         v2f vert (appdata v)
         {
            v2f o;
            o.vertex = UnityObjectToClipPos(v.vertex);
            o.uv_main = TRANSFORM_TEX(v.uv, _MainTex);
            o.uv_mask = TRANSFORM_TEX(v.uv, _MaskTex);
            UNITY_TRANSFER_FOG(o,o.vertex);
            return o;
         }

         fixed4 frag (v2f i) : SV_Target
         {
            // sample the texture
            float2 uv = i.uv_main;
            fixed4 col = tex2D(_MainTex, uv);

            // apply fog
            UNITY_APPLY_FOG(i.fogCoord, col);

            return col;
         }
         ENDCG
      }
   }
}
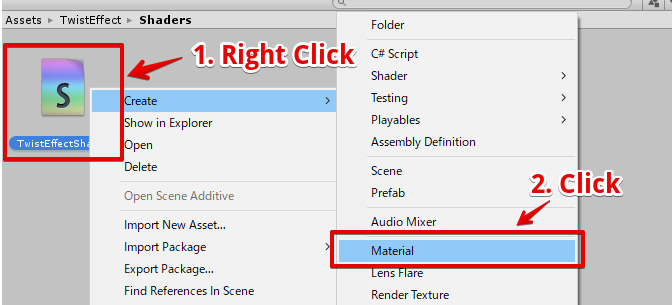
Step 03: Creating a material
Right-click on the created shader to create a material.
Created material
A disk mesh is applied to the created material.

Apply the material to the disk mesh
Step 04: Apply a texture to the disk mesh
Apply the following texture (noise01) to the disk mesh.
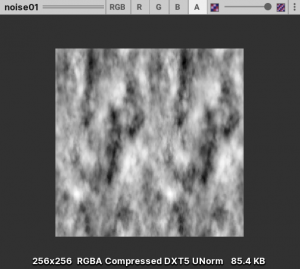
Displaying noise01 unity
Attach the above texture (noise01) to the material above.
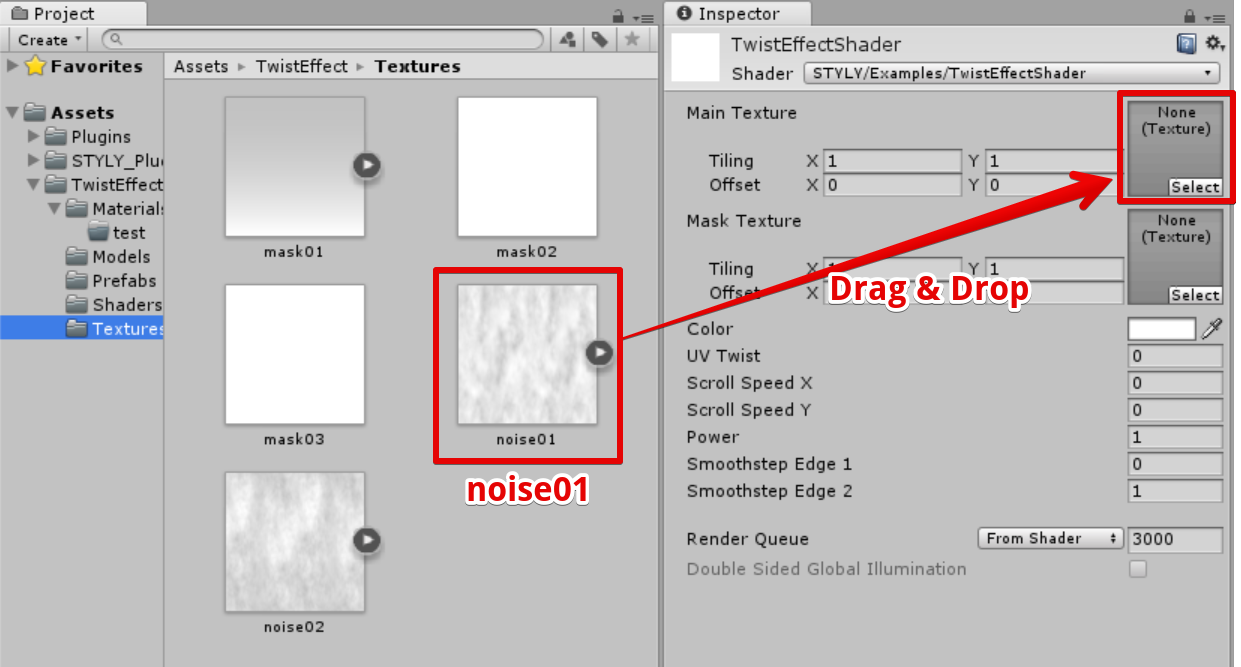
The disk mesh is displayed as follows.

Applying texture to the disk mesh
Step 02: Scroll Texture UV
Next, after time passes, shift the UVs to create the following movement.
Change the shader to the contents of the frag as follows.
fixed4 frag (v2f i) : SV_Target
{
   // sample the texture
   float2 uv = i.uv_main + float2(_Time.y * _ScrollSpeedX, _Time.y * _ScrollSpeedY);
   fixed4 col = tex2D(_MainTex, uv);

   // apply fog
   UNITY_APPLY_FOG(i.fogCoord, col);

   return col * _Color;
}
_Time.y is the time, and _ScrollSpeedX and _ScrollSpeedY are the parameters of the scrolling speed that we have defined.
Set the material’s parameter Scroll Speed Y to 0.5.
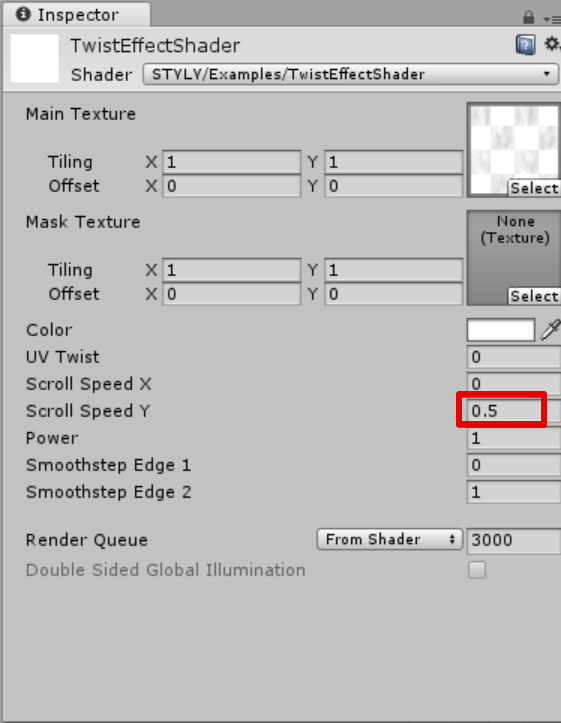
The results are as follows.
The Y component of the texture UV increases by 0.5 per second and the texture is shifted downward.

Move the UV over time
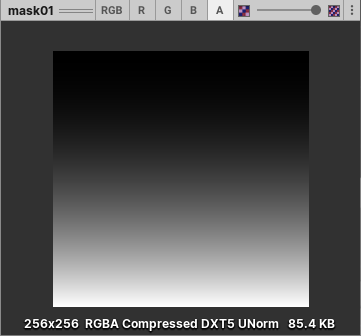
Step 03: Applying Mask to the Texture
Now, we will multiply the texture by an alpha mask like the following.
Rewrite the frag function of the shader as follows.
fixed4 frag (v2f i) : SV_Target
{
   // sample the texture
   float2 uv = i.uv_main + float2(_Time.y * _ScrollSpeedX, _Time.y * _ScrollSpeedY);
   fixed4 col = tex2D(_MainTex, uv);
   fixed4 mask = tex2D(_MaskTex, i.uv_mask);
   col = col * mask;

   // apply fog
   UNITY_APPLY_FOG(i.fogCoord, col);

   return col * _Color;
}
The COL of the texture color is multiplied by the mask color mask.
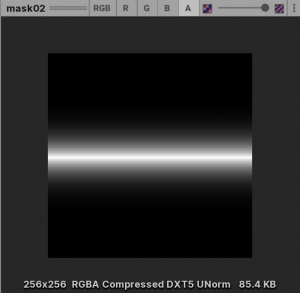
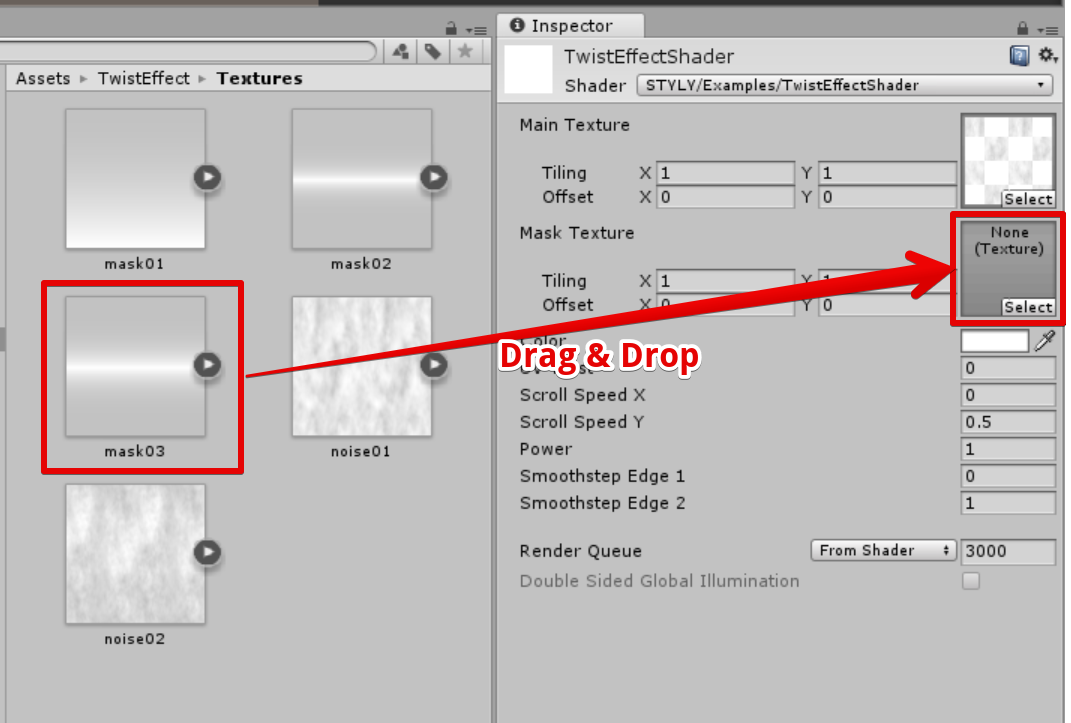
Next, we will attach a mask texture to the material.
The results are as follows.

Mask multiplication results
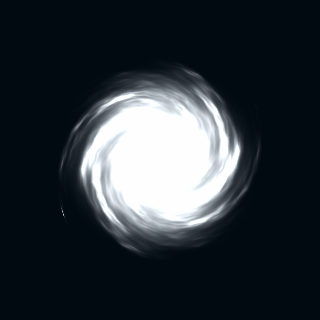
Step 04: Twist the UV
Next, the UV is shifted horizontally in proportion to y.
Specifically, the y component is added to the x component of the UV.
Rewrite the frag function of the shader as follows.
fixed4 frag (v2f i) : SV_Target
{
   // sample the texture
   float2 uv = i.uv_main + float2(_Twist * i.uv_main.y, 0.0);
   fixed4 col = tex2D(_MainTex, uv + float2(_Time.y * _ScrollSpeedX, _Time.y * _ScrollSpeedY));
   fixed4 mask = tex2D(_MaskTex, i.uv_mask);
   col = col * mask;

   // apply fog
   UNITY_APPLY_FOG(i.fogCoord, col);

   return col * _Color;
}
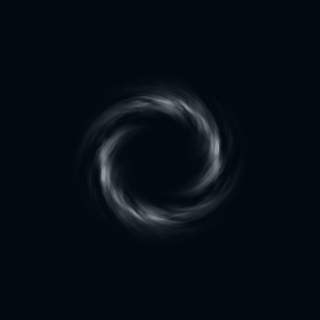
When the Y component of UV increases by 1, the X component of UV increases by _Twist.
Set the material parameter Twist to -0.7.
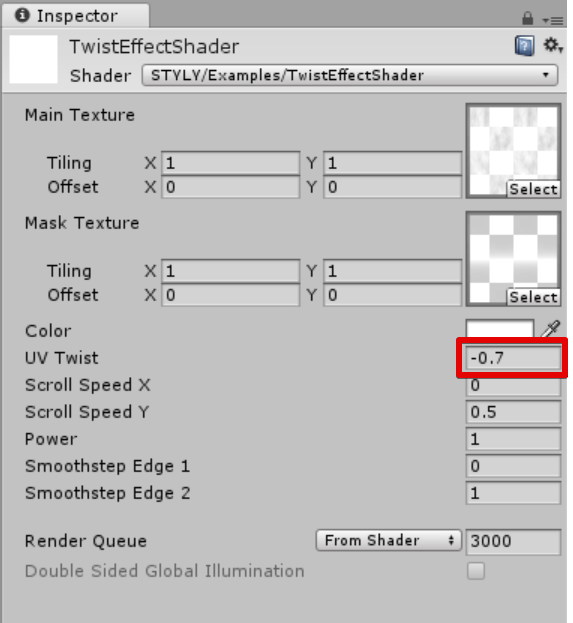
The results are as follows.

The result of twisting the UV
Step 05: Use the pow function to add strength
Now, we will apply a POW to the texture color to intensify the intensity of the color.
Rewrite the frag function of the shader as follows.
fixed4 frag (v2f i) : SV_Target
{
   // sample the texture
   float2 uv = i.uv_main + float2(_Twist * i.uv_main.y, 0.0);
   fixed4 col = tex2D(_MainTex, uv + float2(_Time.y * _ScrollSpeedX, _Time.y * _ScrollSpeedY));
             fixed4 mask = tex2D(_MaskTex, i.uv_mask);
   col = pow(col, _Power) * mask;

   // apply fog
   UNITY_APPLY_FOG(i.fogCoord, col);

   return col * _Color;
}
Set the material parameter Power to 3.
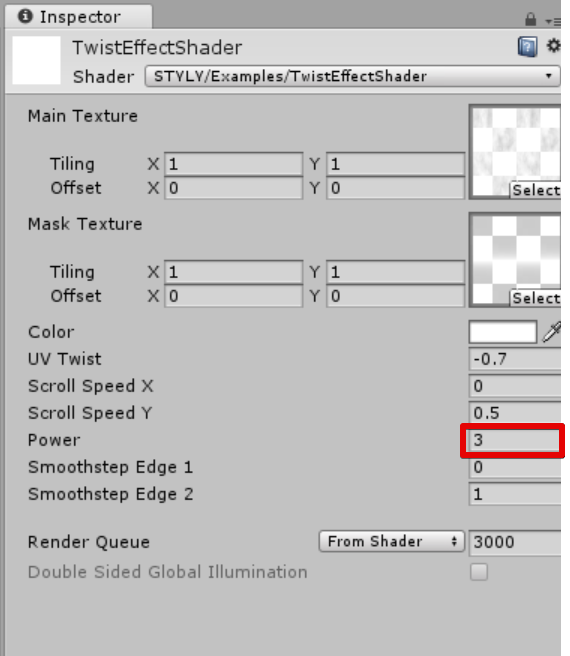
Power is set to 3
The results are as follows.
As you see, the light got stronger and there is more detail in the effects.
The result of adding strength with POW
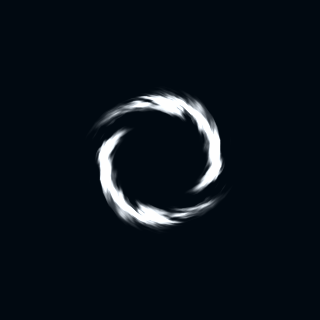
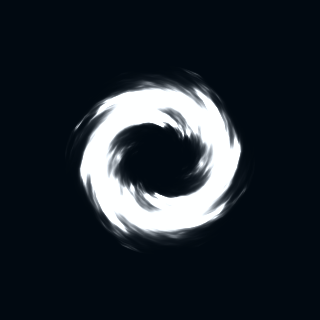
Step 06: Add strength with the smoothstep function
You can use the shader’s smoothstep function to add contrast to the colors.
It can give an effect like a tone curve in Photoshop.
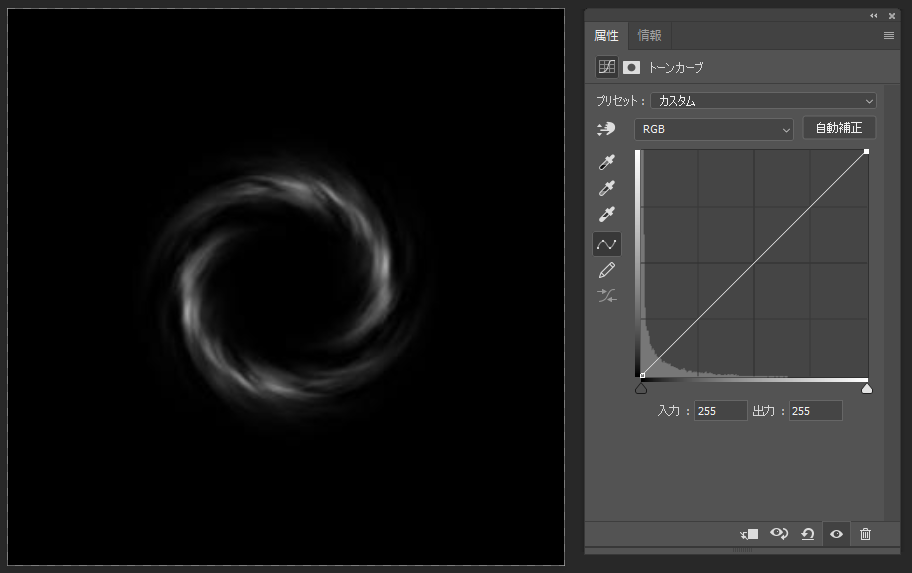
Before applying smoothstep
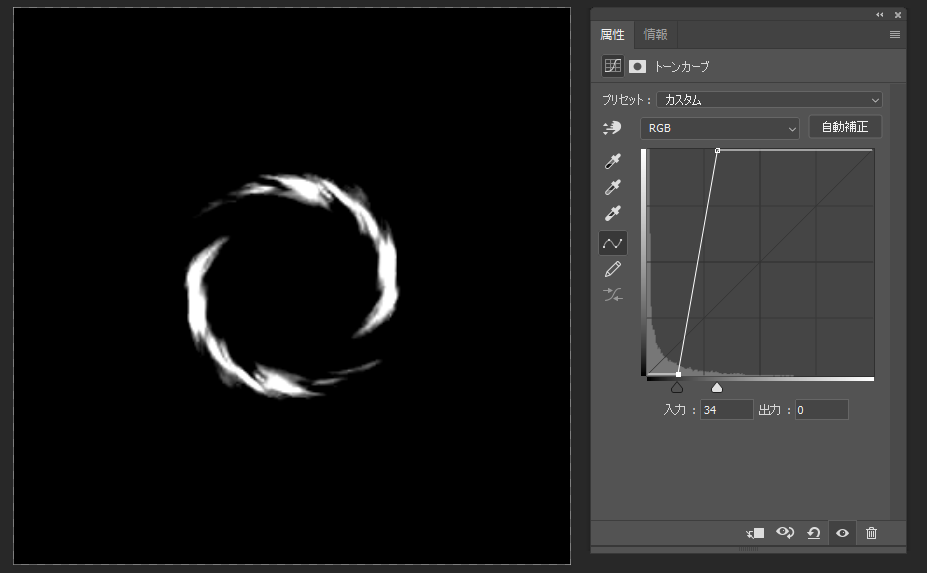
After applying smoothstep
Rewrite the frag function of the shader as follows.
fixed4 frag (v2f i) : SV_Target
{
   // sample the texture
   float2 uv = i.uv_main + float2(_Twist * i.uv_main.y, 0.0);
   fixed4 col = tex2D(_MainTex, uv + float2(_Time.y * _ScrollSpeedX, _Time.y * _ScrollSpeedY));
             fixed4 mask = tex2D(_MaskTex, i.uv_mask);
   col = pow(col, _Power) * mask;

   // apply fog
   UNITY_APPLY_FOG(i.fogCoord, col);

   col.a = smoothstep(_SmoothstepEdge1, _SmoothstepEdge2, col.a);
   return col * _Color;
}
The material parameters, Smoothstep Edge 1 and Smoothstep Edge 2, are set as follows.
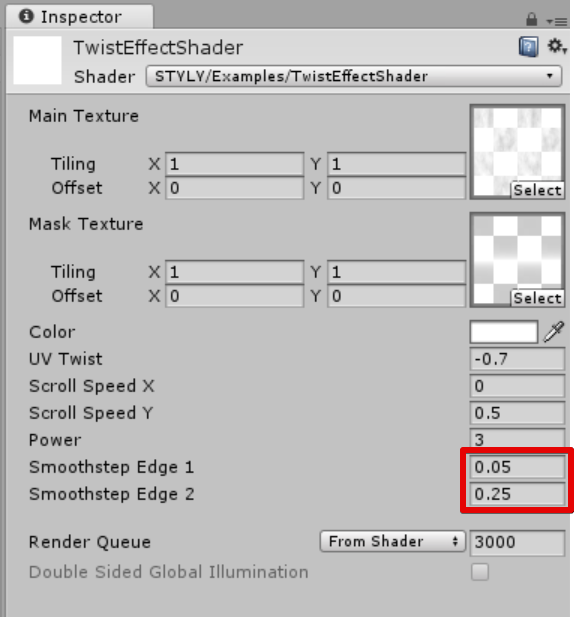
Material parameter settings
The results are as follows.
Results
This completes the shader for effects.
Parameter Setting Example
You can create a variety of expressions by changing the parameters of the effect.
Setting example 1
If you set Power to a negative value, the effect will glow.
Setting example 1
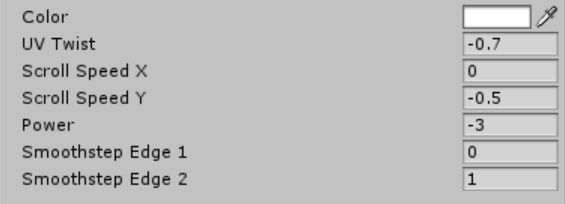
Setting example 1 Parameter
Setting example 2
You can also change the shape of the effect by changing the mask.
Setting example 2
Setting example 2 Parameters
How to upload a prefab from Unity to STYLY
Upload the object with shaders applied from Unity to STYLY.
Please refer to the following manual article on how to upload from Unity to STYLY.
