This article will explain how to create mirrors in Unity.
The first half of the article will show you how to create a mirror using Unity’s Render Texture function, while the second will show you how to use PlayMaker to improve the mirror you have created by making it more realistic.
The first half of the article does not use PlayMaker at all, so even if you do not use PlayMaker, please continue reading and take advantage of the useful tips it provides.

Mirror created without PlayMaker

Mirror created with PlayMaker
Sample scene
How to make a mirror
Create a Render Texture
Click on Assets in the tab at the top of the screen and select Create→Render Texture.
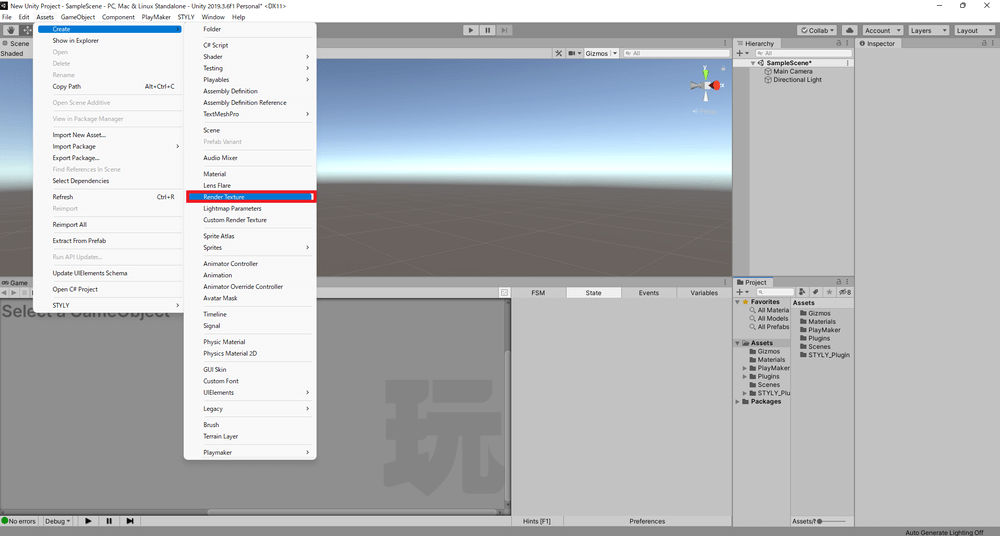
Assets→Create→Render Texture
Create and set up a camera
Next, create a camera to be used by the Render Texture function.
Click on GameObject in the tab at the top of the screen and select Camera.
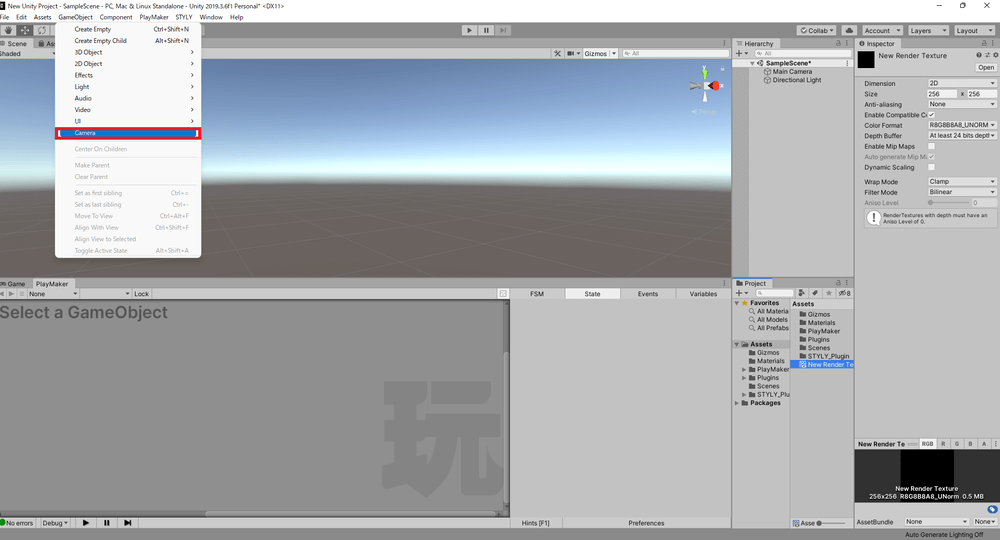
GameObject→Camera
Next, apply the Render Texture function onto the image obtained with the camera.
Click on the round icon on the right-hand side of the Target Texture field in the Inspector window of the camera you have just created and select New Render Texture.
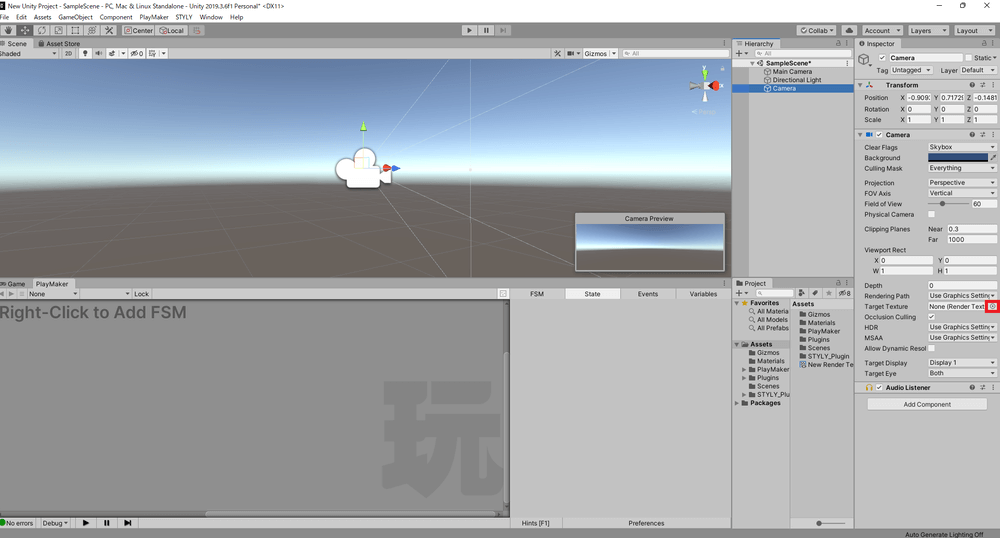
Click on the round icon in the Inspector→Target Texture field.
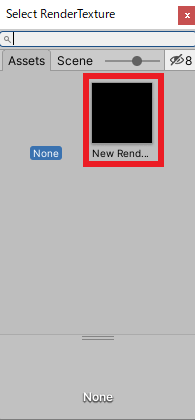
Select New Render Texture
The Render Texture function is now applied onto the image that was obtained using the camera.
Applying a Render Texture onto an object
Next, create the object onto which the Render Texture will be applied.
Click on GameObject in the tabs at the top of the screen and select 3D Object→Quad.
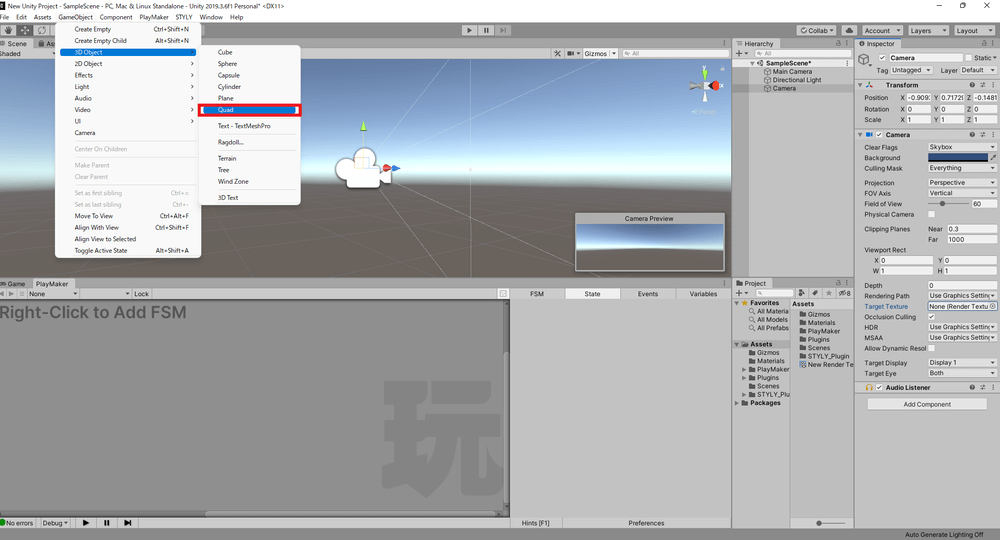
Click GameObject, then select 3D Object→Quad
For clarity, rename the Quad created as “Mirror”.
Next, drag and drop the New Render Texture from Assets in the Project window onto the mirror in the scene.
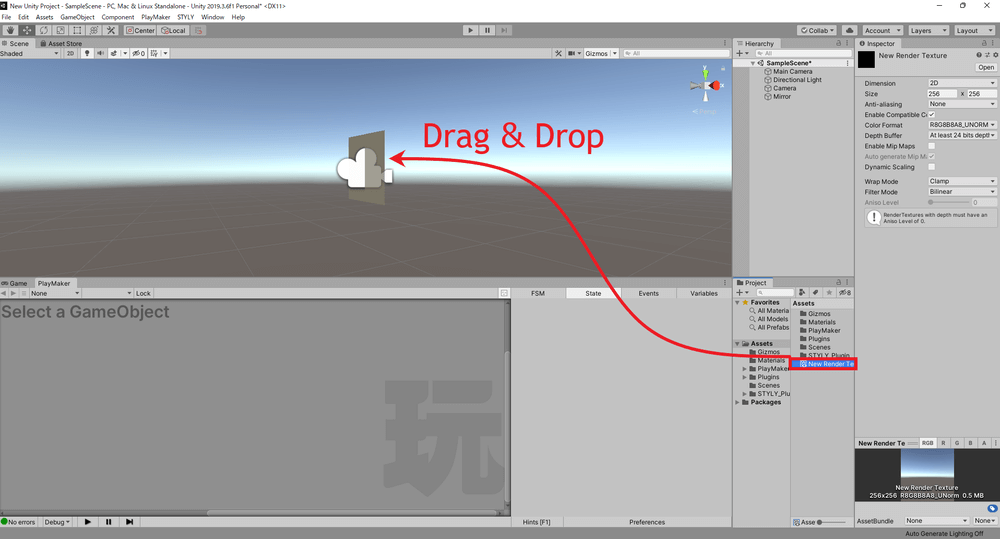
Drag and Drop New Render Texture onto the mirror in the scene
The New Render Texture is now applied onto the Quad, renamed as Mirror, in the scene.
Then, select Mirror and uncheck Receive Shadows in the Inspector window.
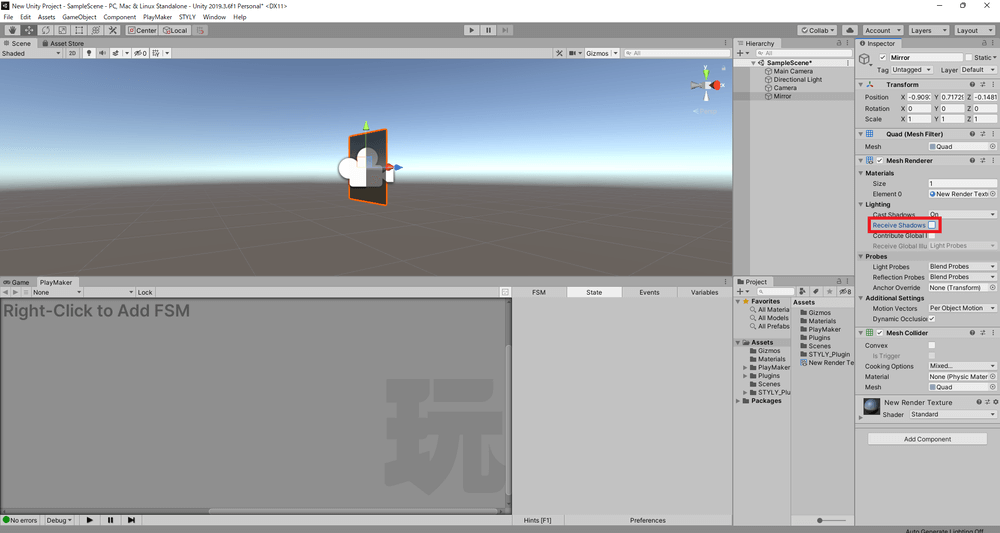
Uncheck Receive Shadows in Inspector window
Next, change the value of X in the Scale field to a value multiplied by -1.
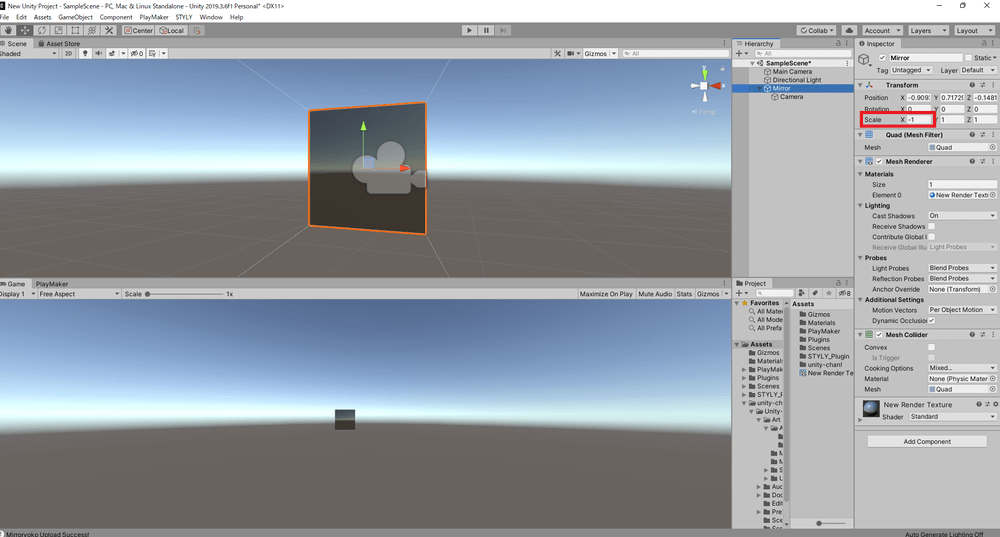
Change X value in Scale to -1
Adjusting Render Texture
Adjust the Size field of the Render Texture in the Inspector window.
Match the aspect ratio of the Size selected for the Render Texture to the aspect ratio of the Scale selected for the mirror.
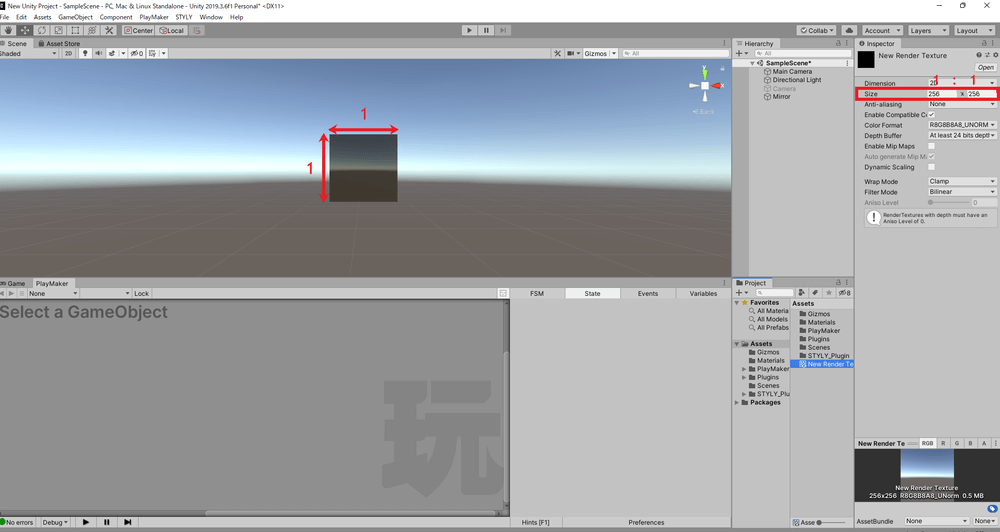
Adjust Render Texture Size
*If the Size is not adjusted, the reflection in the mirror will appear stretched.
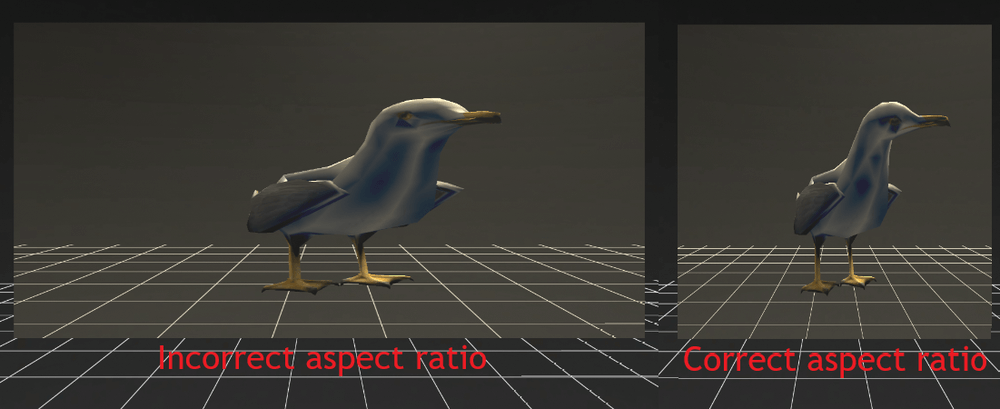
Comparison of incorrect and correct aspect ratio
Then increase the Size to make the image reflected in the mirror sharper.
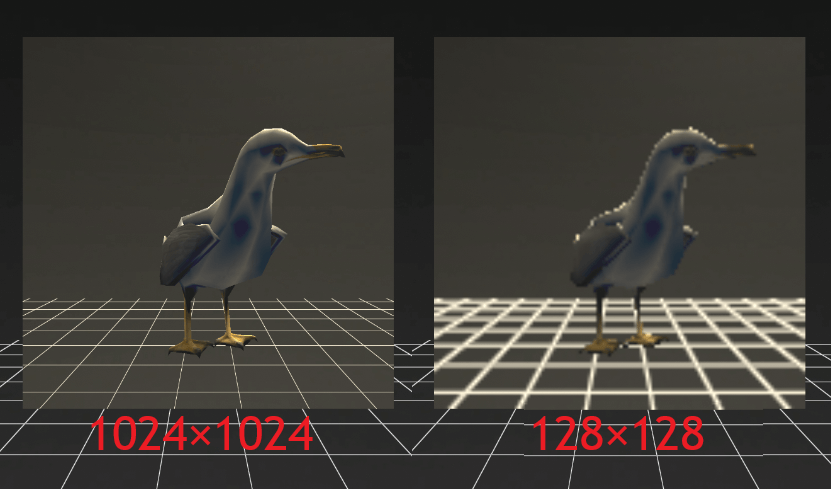
Comparison of differences in reflected image by Size
Note that the larger the size, the more detailed the reflection in the mirror will be. However, this will make the scene run more slowly.
Adjusting the camera
As shown in the image below, adjust the position and angle of the Camera so that the four white lines projected from the Camera are aligned with the corners of the Quad, while ensuring that the Camera is situated behind the mirror.
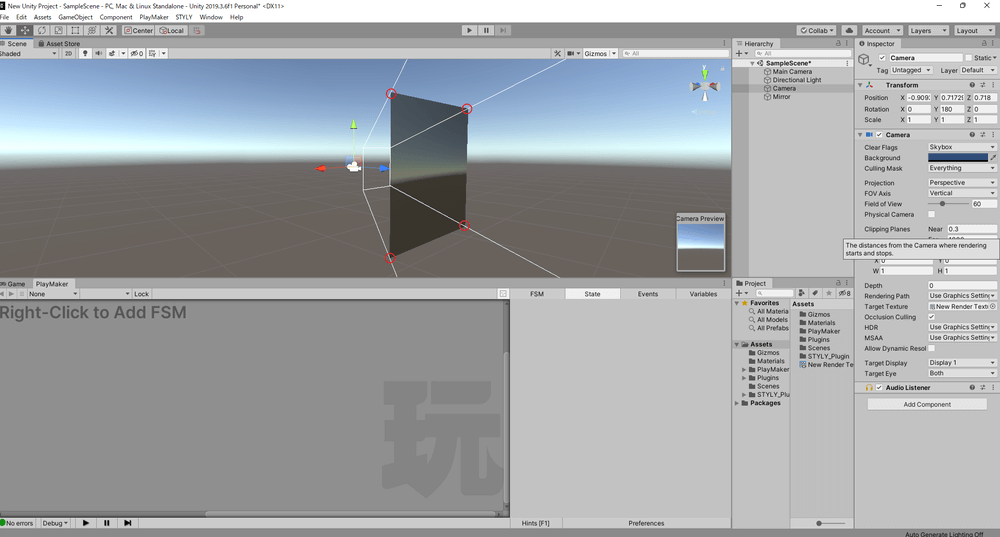
Adjust Camera position and angle
Next, adjust the Near value in the Camera’s Clipping Planes in the Inspector window in order that the cuboid comprising the white lines projected from the Camera overlaps the mirror, as shown in the image below.
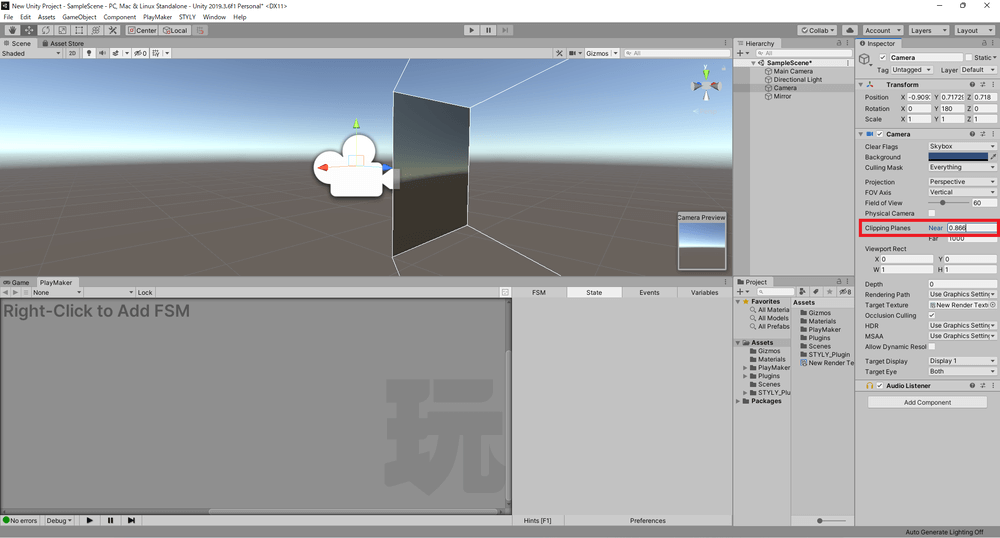
Adjust the Near value in the Clipping Planes function
Finally, drag and drop the Camera created onto Mirror in the Hierarchy window to convert it into a child object of Mirror.
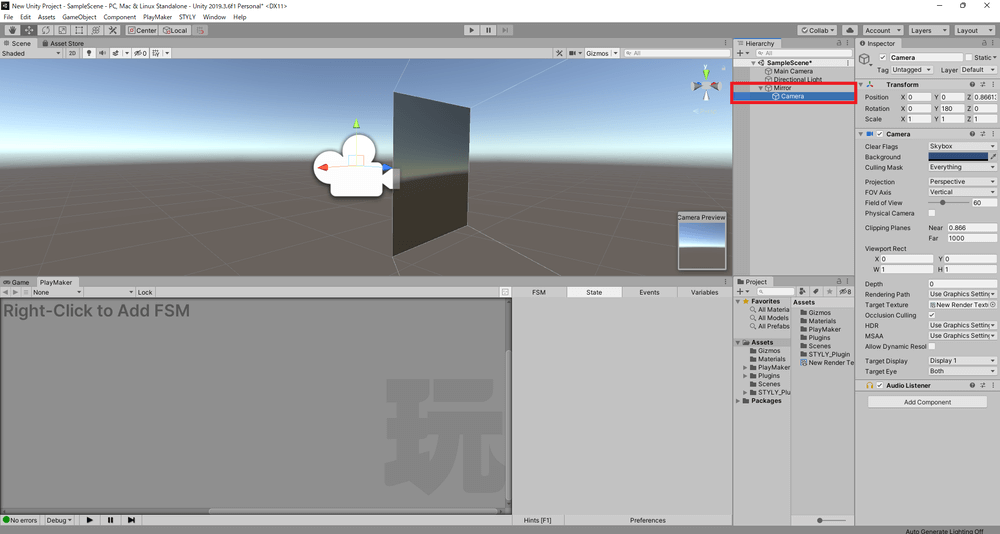
Convert Camera into a child object of Mirror
Following the steps outlined above, you can now create a mirror using only Render Texture.
A working example of the mirror created
Try your hand at creating a scene with this technique!
Using PlayMaker to make mirrors more realistic
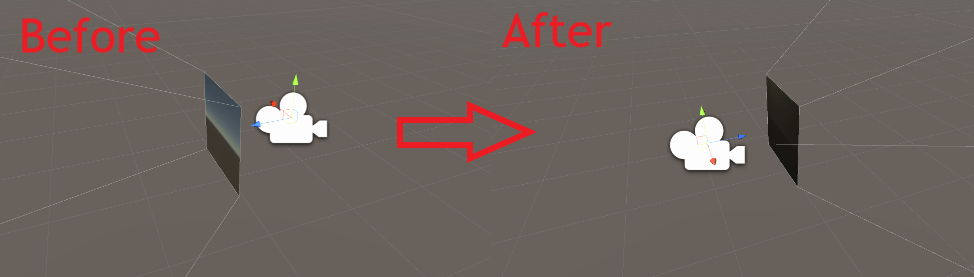
So far, the mirror created always reflects that which is directly facing it, regardless of the angle at which the mirror is viewed.

The object directly facing the mirror is always reflected, regardless of the angle.
We can use PlayMaker to improve the mirror so that what can be seen in the reflection on the mirror changes depending on the angle from which the mirror is viewed.
Preparation
In the following sections, we will use PlayMaker.
Please install PlayMaker, a Unity plug-in, before continuing.
![[Unity Tutorial] Creating a Game Using Playmaker ① From Basic Introduction to Installing](https://styly.cc/wp-content/uploads/2019/06/1200px-160x160.jpg)
If you are new to PlayMaker, please also read the following instructions for a better understanding, before continuing.
![[Unity] Starting Playmaker from Scratch](https://styly.cc/wp-content/uploads/2019/09/PlaymaerCoreConcept-160x160.png)
Adjusting the camera position
Right-click on Mirror in the Hierarchy window and select Create Empty.
Drag and drop the Camera created onto the Empty you have just created, thus making the Camera a child object of the GameObject.
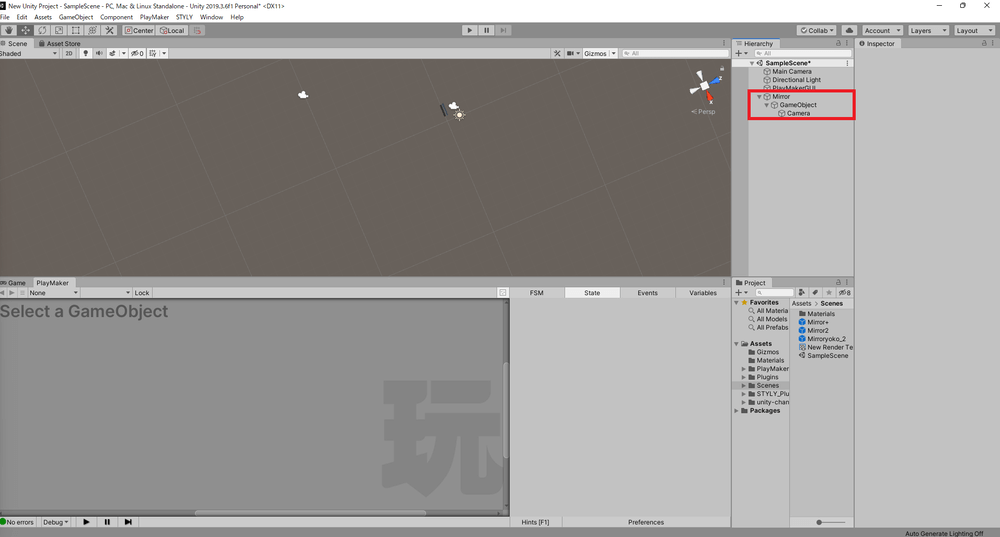
Make Camera a child object of GameObject
Move the Camera symmetrically, using the mirror as the symmetry plane, and adjust the position and angle of the Camera so that it is facing the front, namely reflective, side of the mirror.
Adjust Camera position and angle
Add PlayMaker
Right-click on Mirror in the Hierarchy window and select Create Empty.
For clarity, rename the Empty you have just created as “LookAt”.
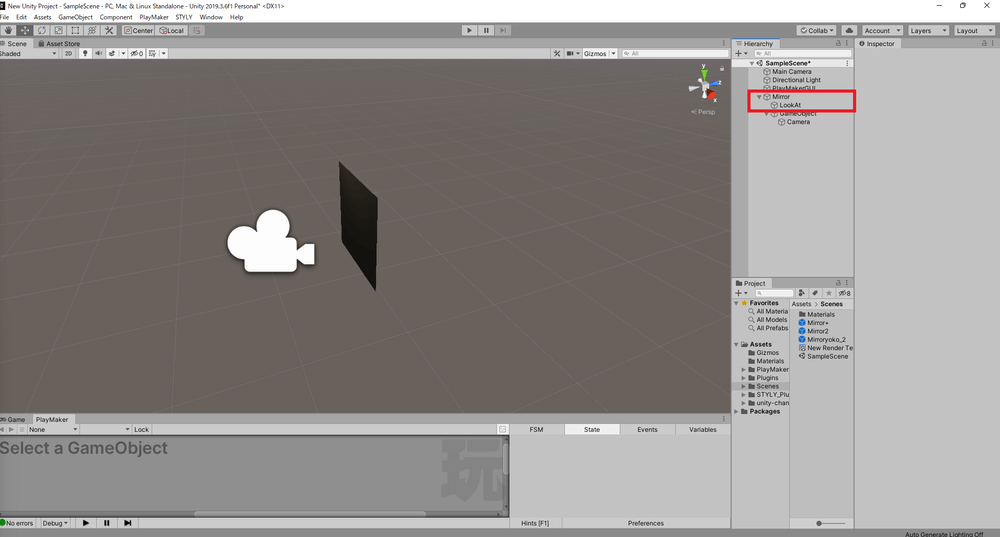
Rename the Empty created as “LookAt”
Select Mirror and click Add Component in the Inspector window to add PlayMakerFSM.
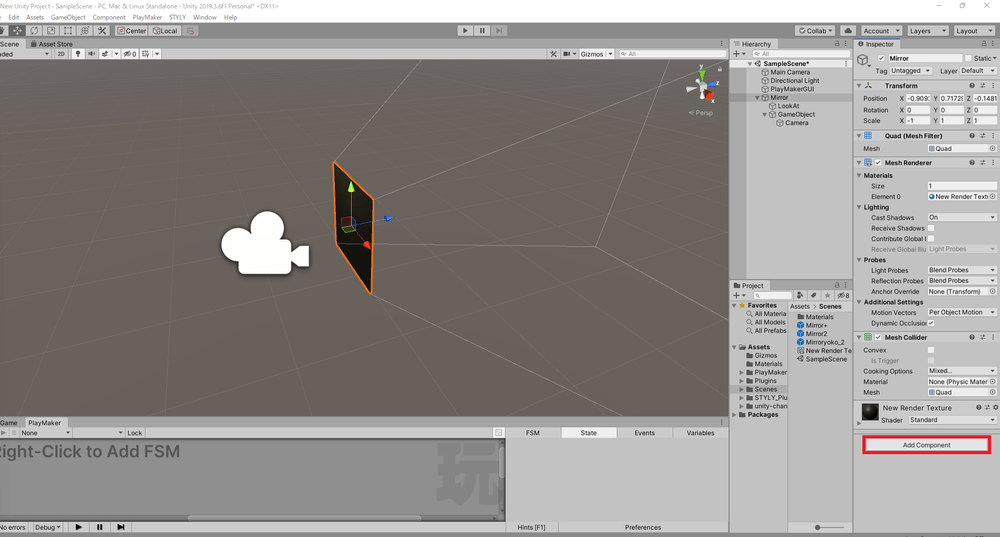
Click Add Component in the Inspector window
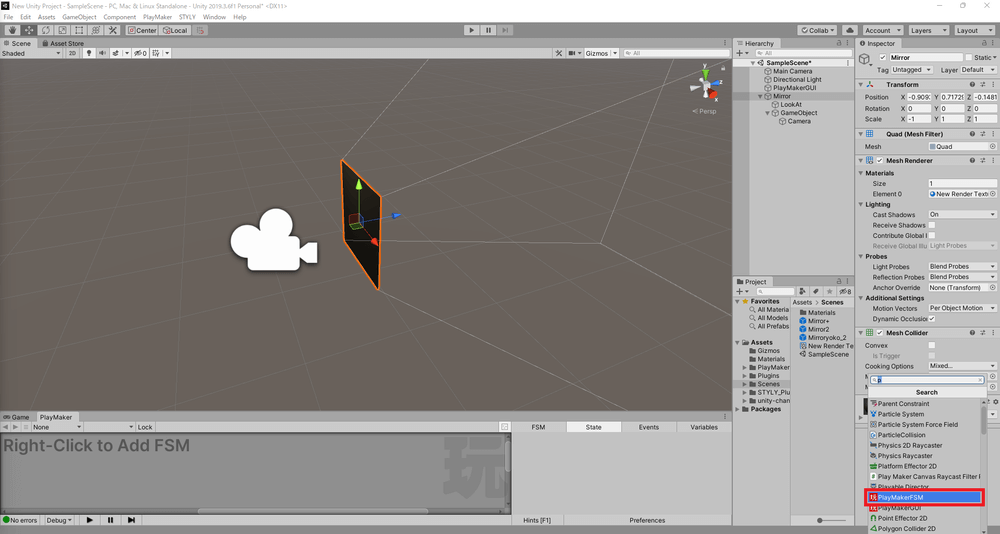
Add PlayMakerFSM
Click Edit on the PlayMakerFSM added.
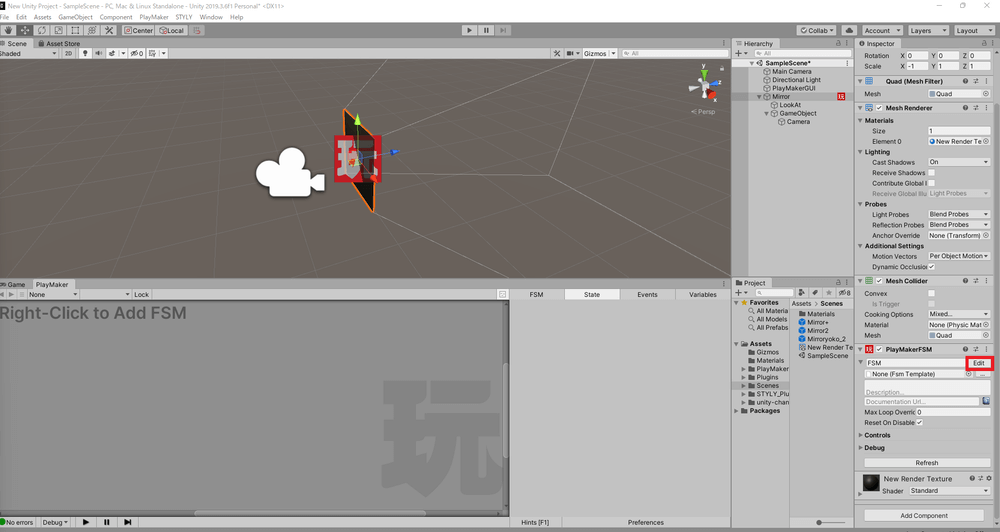
Click on Edit in PlayMakerFSM
Rename State 1 as “Get Camera”.
Then, select Get Camera, open the Action Browser, as shown in the first image presented below, and then check the two Game Object Is Null actions as well as the Find Game Object and Get Main Camera actions, as shown in the second image below.
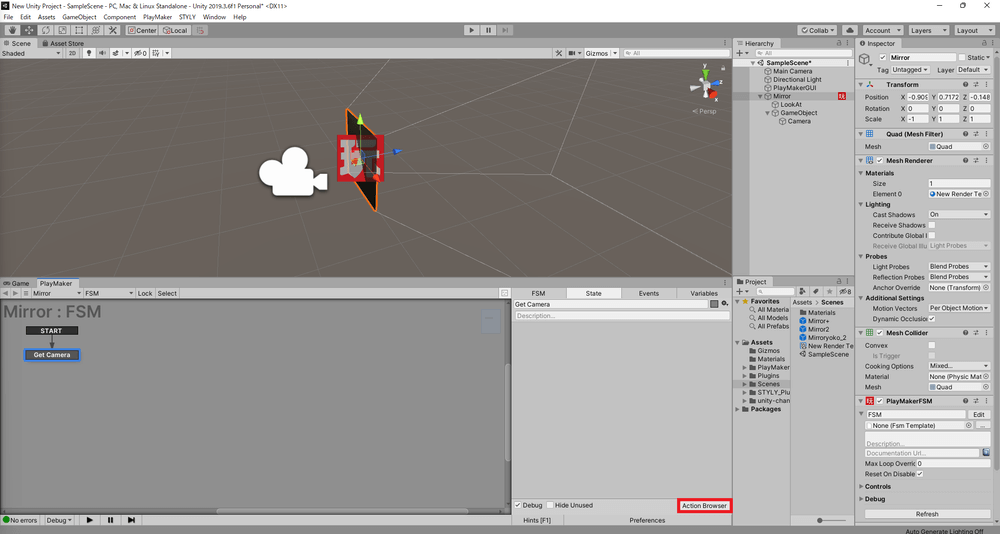
Open Action Browser

Add Actions
Enter “[VRTK]_VIVE” in the Object Name field in the Find Game Object menu.
In the Store dropdown box in the Find Game Object menu, select New Variable… and set it to MainCamera.
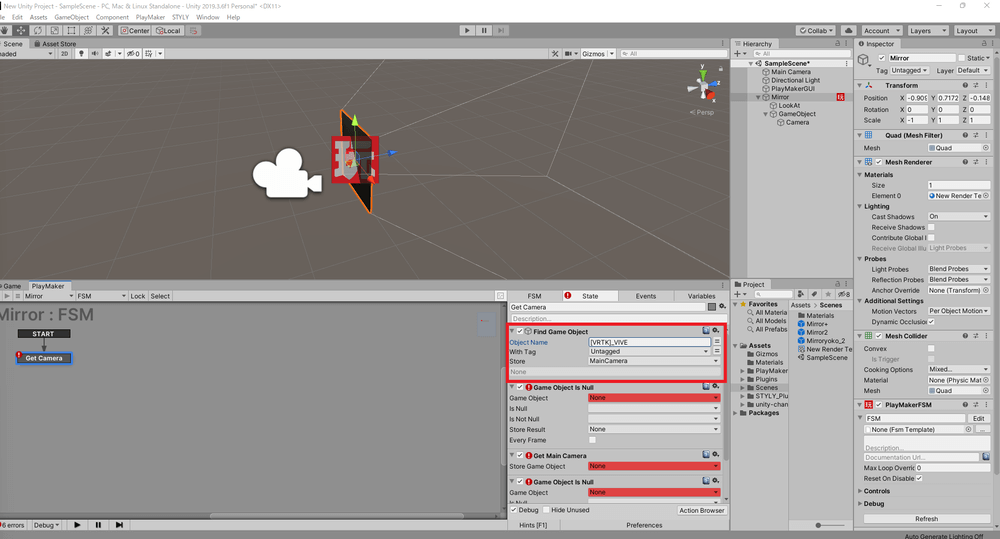
Edit Find Game Object
Select MainCamera as the Game Object in both Game Object Is Null menus.
Select New Event… in the Is Not Null dropdown box in the first Game Object Is Null menu and set it as Found.
Click on the Click to Add Transition to State option that appears in red text when Is Not Null has been set.
Select and set Found in the Is Not Null dropdown box in the second Game Object Is Null menu.
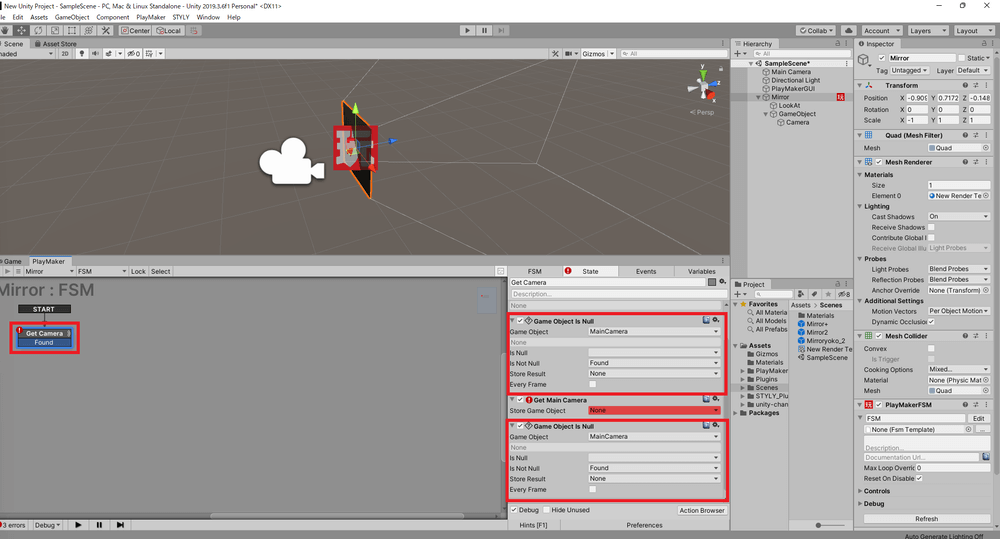
Establish Game Object Is Null settings
Select and set Main Camera in the Store Game Object dropdown box in the Get Main Camera action.
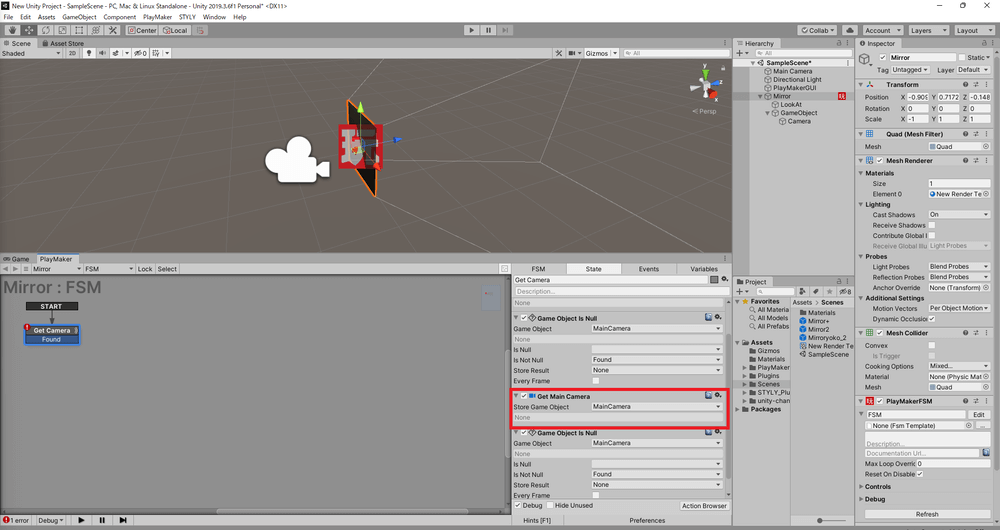
Establish Get Main Camera settings
Add a new State and then rename it as Mirror Reflection.
In the window marked Mirror : FSM, drag the arrow generated by the Found box below the Get Camera box and drop it onto the box marked Mirror Reflection.
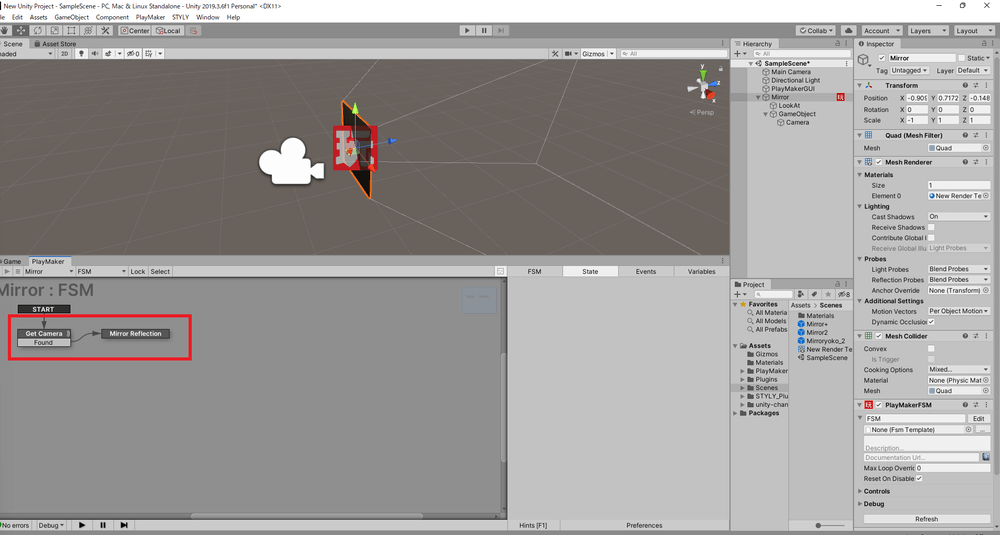
Drag the arrow from Found below Get Camera and drop it onto Mirror Reflection
Right-click on Mirror in the Hierarchy window and select Create Empty.
For clarity, rename the Empty you just created as point.
In the Inspector window, change the Z value of the Position field for point to -1.
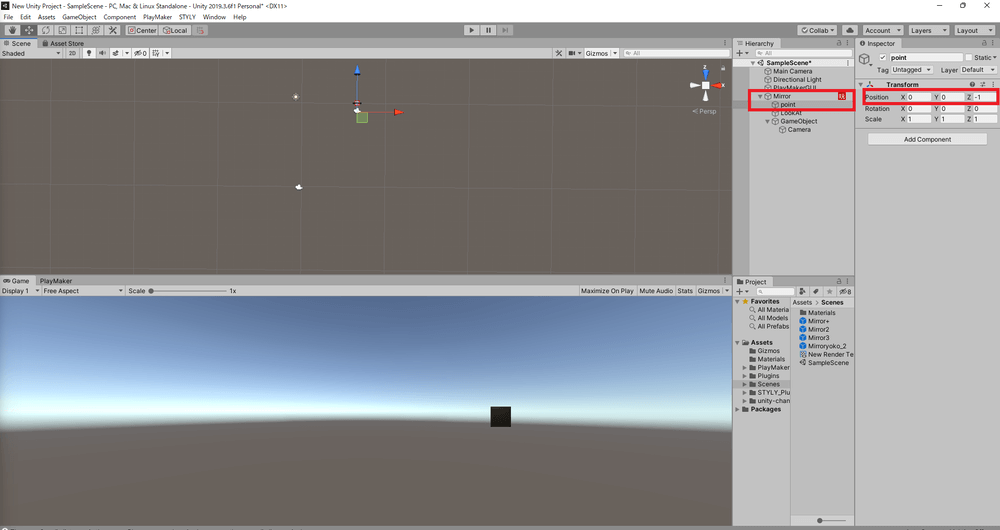
Change the Z value of the Position field for point to -1.
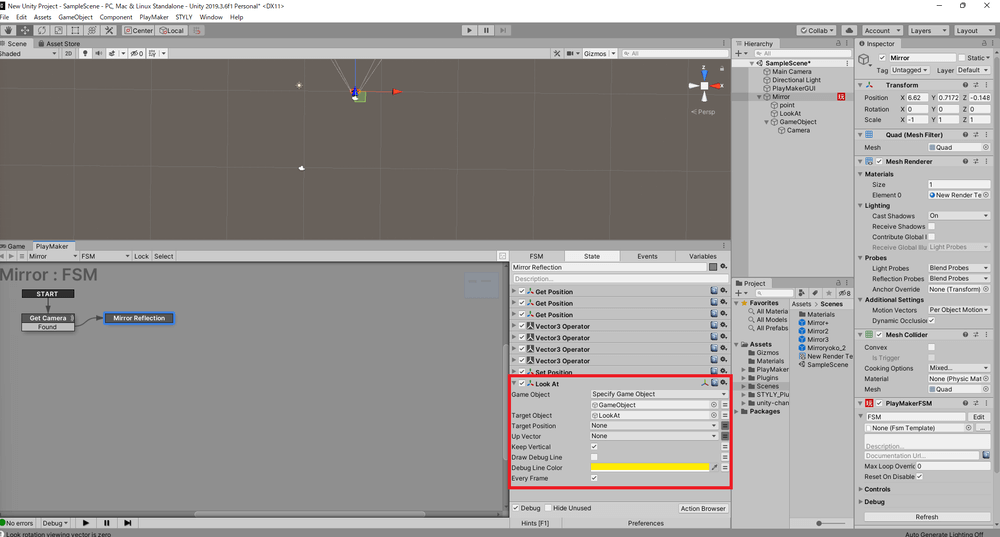
Select Mirror Reflection in the State menu in the Action Browser and add three Get Position and four Vector3 Operator Actions, as well as one Set Position and Look At Action each, in the order shown in the image below.
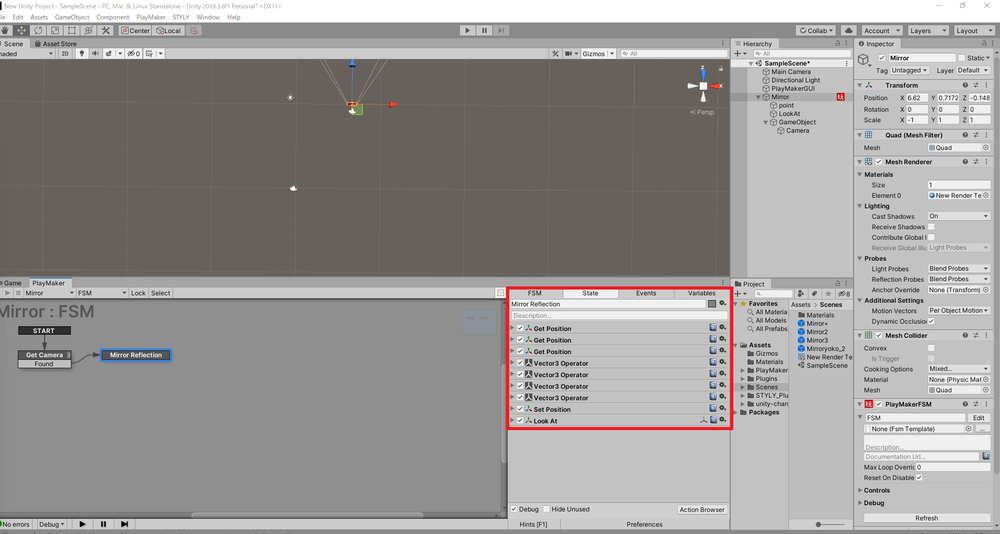
Add Actions
For the first Get Position field, select the New Variable… option for the Vector, set it as MirrorPos, and then check the box marked Every Frame.
For the second Get Position field, change the Game Object setting from Use Owner to Specify Game Object and select point as the target.
In the Vector setting, select New Variable… and set it as PointPos, then checking the box marked Every Frame.
For the third Get Position field, change the Game Object field from Use Owner to Specify Game Object and select MainCamera as the target.
In the Vector field, select New Variable… and set it as CameraPos, then checking the box marked Every Frame.

Establish Get Position settings
For the first Vector3 Operator, select MirrorPos for Vector 1 and CameraPos for Vector 2.
Select Subtract for the Operation setting.
Select CameraPos for Store Vector3 Result and check the box marked Every Frame.
For the second Vector3 Operator, select MirrorPos for Vector 1 and PointPos for Vector 2.
Select Subtract for the Operation field.
Select PointPos for Store Vector3 Result and check the box marked Every Frame.
For the third Vector3 Operator, select CameraPos for Vector 1 and PointPos for Vector 2.
Select Reflect for the Operation field.
Select CameraPos for Store Vector3 Result and check the box marked Every Frame.
For the fourth Vector3 Operator, select MirrorPos for Vector 1 and CameraPos for Vector 2.
Select Add for the Operation field.
Select CameraPos for Store Vector3 Result and check the box marked Every Frame.
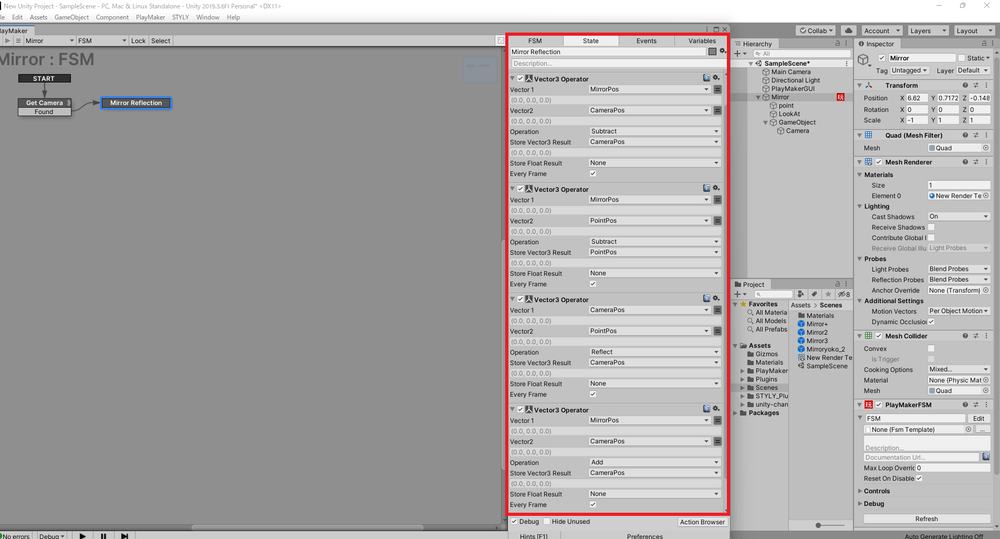
Establish Vector3 Operator settings
Change the Game Object field in Get Position from Use Owner to Specify Game Object and select LookAt as the target.
Select CameraPos in the Vector field in the Set Position menu.
Check the box marked Every Frame in the Set Position menu.

Establish Set Position settings
Change the Game Object field in the Look At menu from Use Owner to Specify Game Object and select GameObject as the target.
Set LookAt as the Target Object.
Establish Look At settings
The steps required to use PlayMaker in order to make the mirror more realistic are complete!
A working example of the mirror created
With PlayMaker, you can easily create Unity content without learning a programming language.
In addition to the ability to create mirrors presented in this article, PlayMaker can be used to carry out a variety of other functions, so we encourage everyone to try their hand at creating scenes using PlayMaker.
How to upload to STYLY
Let’s upload your 3D model to STYLY.
Sign-up guide

How to upload to STYLY

How to upload to STYLY via Unity app.

For questions about STYLY, bug reports, and requests for improvements, please contact at STYLY FORUM.
https://en.forum.styly.cc/support/discussions
Certified (QA) by Shota Shawn Yoshizawa
Edited by SASAnishiki