- 1 Introduction.
- 2 What you can do with STYLY using PlayMaker
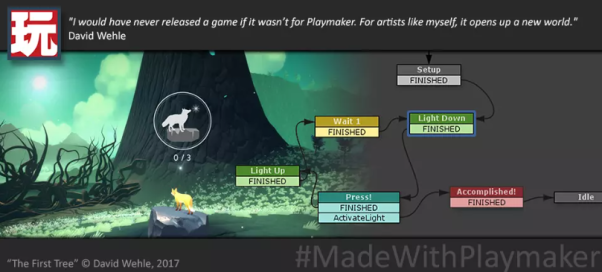
- 3 Scenes using PlayMaker
- 4 How to purchase/install PlayMaker
- 5 Basic PlayMaker Concepts
- 6 Location of the PlayMaker Editor (recommended)
- 7 Basic PlayMaker Operations
- 8 Adding a Transition
- 9 Let’s create PlayMakerFSM with the STYLY PlayMaker Lab as a reference!
- 10 Summary of frequently used actions
Introduction.
PlayMaker is a visual scripting tool for Unity that allows you to build logic without writing programming code and to create gimmicks without any programming knowledge.
(e.g. moving the camera, creating game objects that interact when touched (hereafter referred to as objects), buttons to move the player…etc.)
STYLY supports importing objects created using PlayMaker, which also allows you to create simple games in STYLY; currently STYLY supports (almost) all of Unity’s basic features and PlayMaker’s basic actions, which can be combined to create scenes.
What you can do with STYLY using PlayMaker
Unity scripts (C#) can be used to create scenes that change based on user actions and choices, but currently it is not possible to bring Unity scripts into STYLY.
Only in Unity
- Linear scenes that do not change based on user actions or choices
- STYLY cannot use Unity scripts
Combining Unity and Playmaker - Interactive scenes that change based on user actions and choices
(e.g.) something happens when you touch it
(e.g.) something happens when you approach it
(e.g.) something happens when you stare at it
(e.g.) something happens when you enter a room - Create something that is difficult to create with Unity alone, but easy to create with Logic.
|
Kind |
Unity only |
Combining Unity and PlayMaker |
|
Exhibition Space |
Just display your work |
When you approach a work, an introduction of the work pops up. |
|
Animation works |
Linear animation (fixed flow) |
Interactive animation in which the flow of the story changes according to the user’s choices |
|
Experience-based works |
(e.g.) Something happens when you touch it (e.g.) Something happens when you approach (ex.) Something happens when you stare at it (ex.) Something happens when you enter a room |
Scenes using PlayMaker
REM – moving the point of view

https://gallery.styly.cc/scene/7abd37e7-71da-11e7-af2f-fb1a918a0060
Sensor light – make a light that turns on when you approach
https://gallery.styly.cc/scene/4ae36764-3b1f-11e9-b34d-4783bb2170d0
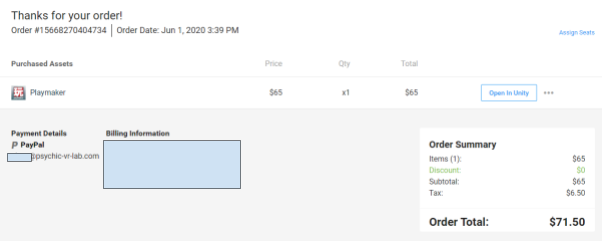
How to purchase/install PlayMaker
Purchase PlayMaker from the Unity Asset Store
PlayMaker is paid and must be purchased from the Unity Asset Store.
You can also purchase from the official website: https://hutonggames.com/store.html.
Discounted purchases are available for large sales and for students and educational institutions.
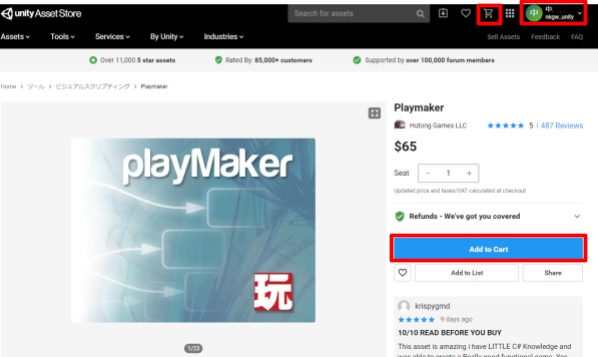
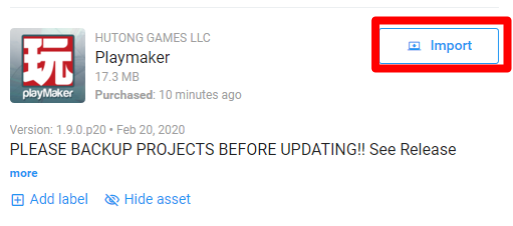
Go to the PlayMaker page on the Unity Asset Store.
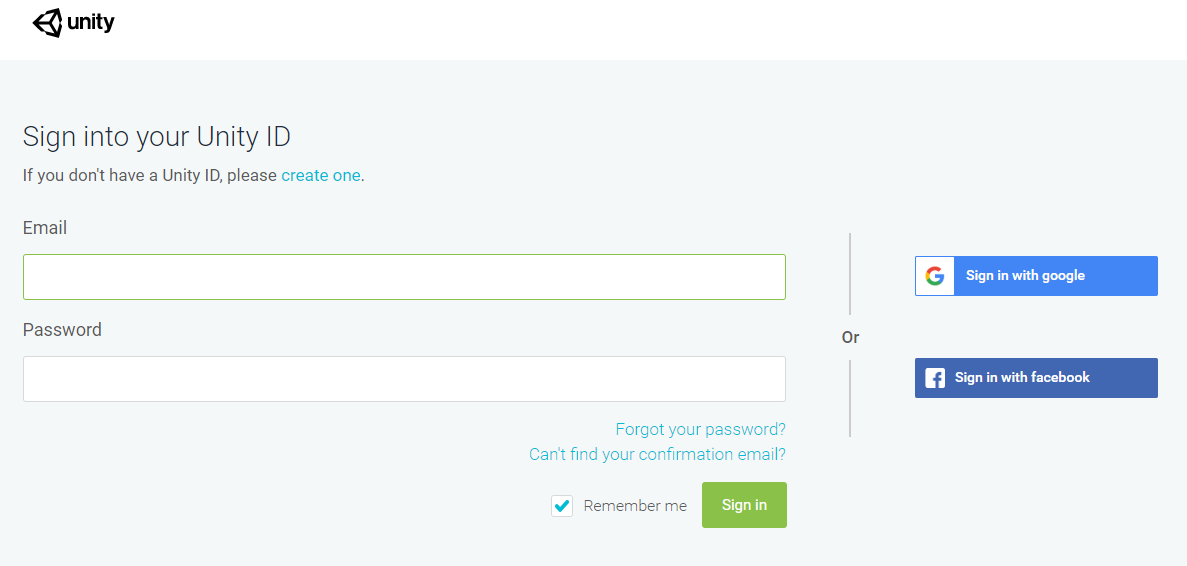
If you have not Sign In, click Sign In.
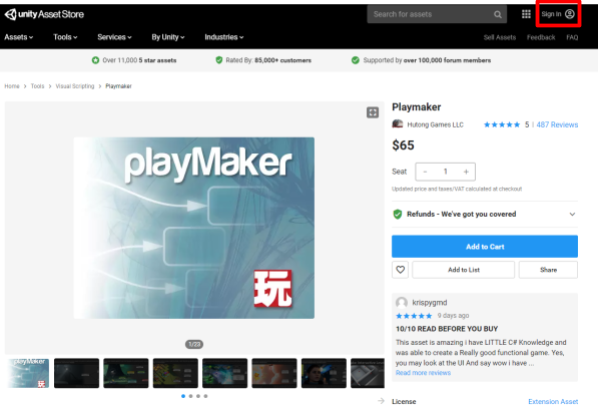
Click Sign In.
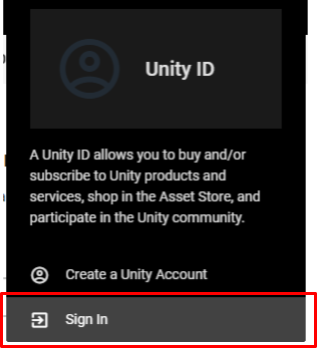
Sign in with your registered Unity account.
Once you Sign in, you will see Cart and your login information in the upper right corner.
Then click the Add to Cart button.
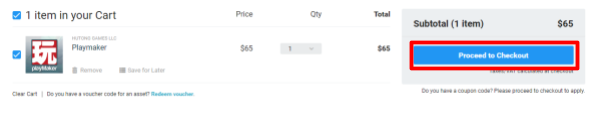
Click View Cart.

Click Proceed to Checkout.
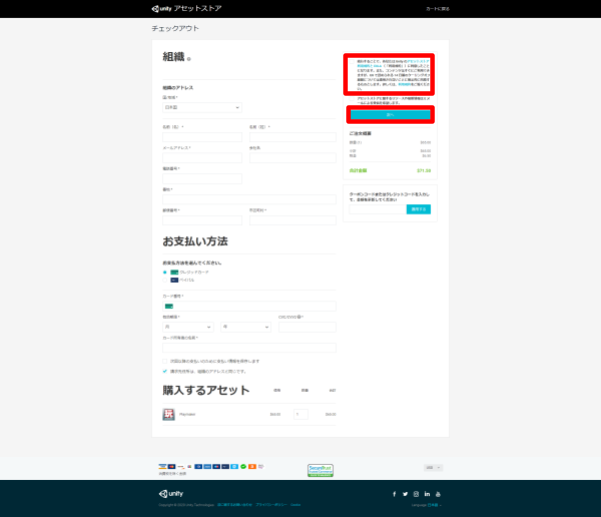
The Checkout screen will appear.
Select your country, name, email address, phone number, address, and payment method.
On the right side, there is a checkbox to agree to the Asset Store Terms of Use. Check the box to agree to the Terms of Use after reviewing the Terms of Use.
When you have finished entering all the information, click Next to proceed to the payment screen.
Your purchase is complete.
Importing PlayMaker into Unity
Create a new Unity project from Unity Hub.
From the upper left menu, click Window > Asset Store.
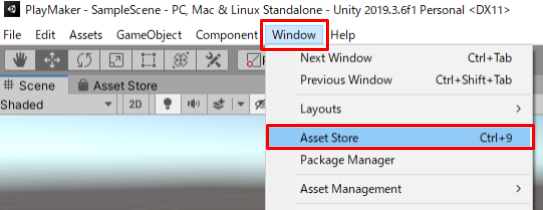
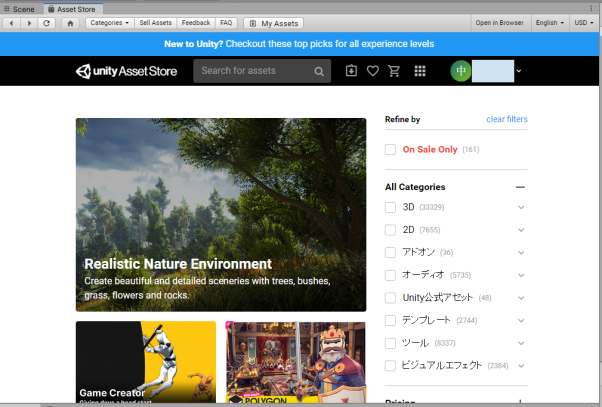
The Asset Store window will appear next to the Scene view, accessing the Unity Asset Store.
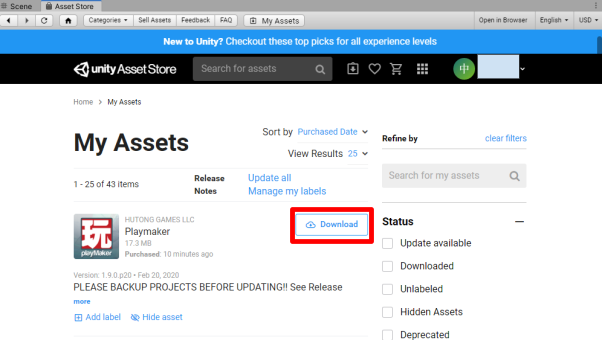
Click on the My Assets icon.

The My Assets page will appear.
The My Assets page lists all the assets you have purchased (including free assets) from the Unity Asset Store.
Click Download.
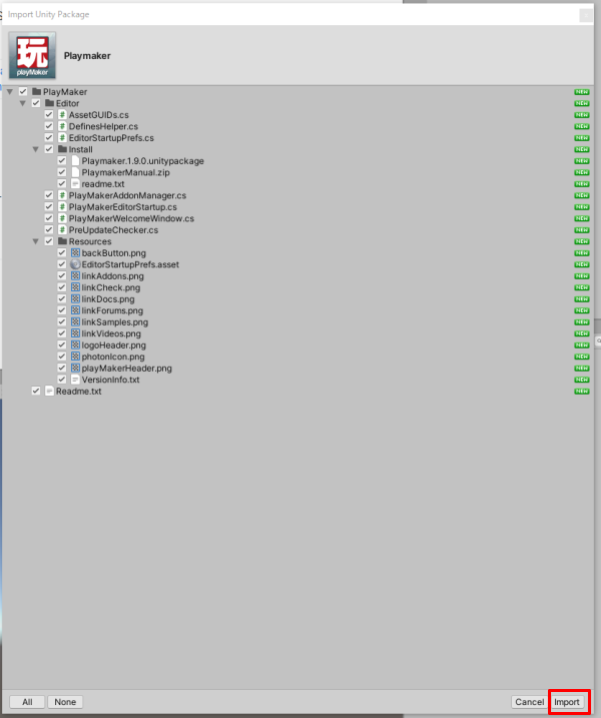
Click Import.
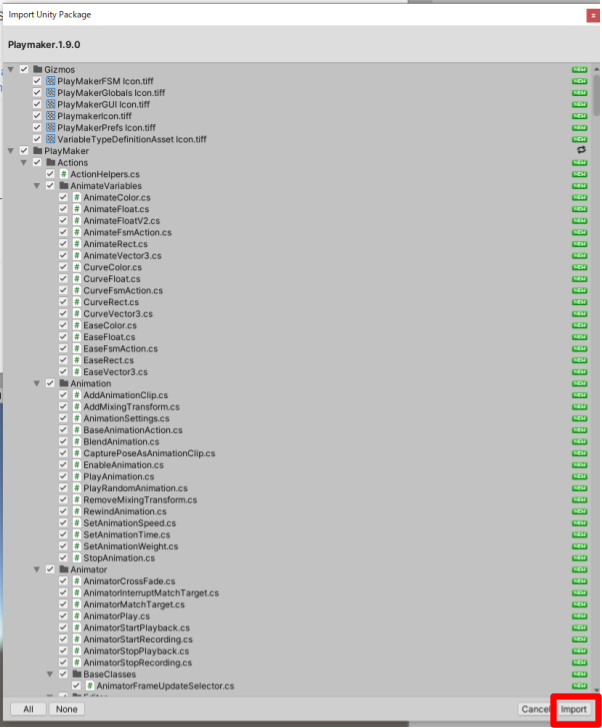
The Import Unity Package window will appear.
Click Import in the lower right corner.
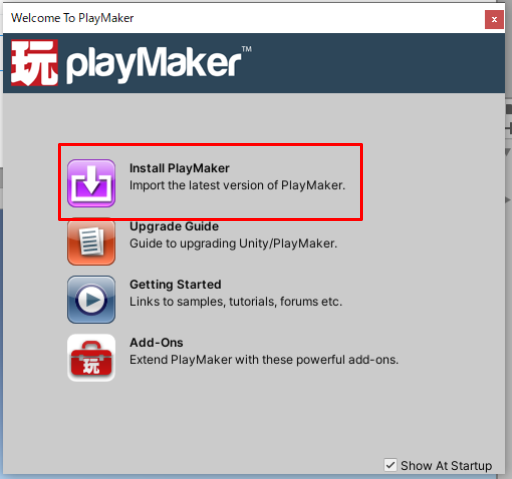
Click Install PlayMaker.
Click Install PlayMaker 1.9.5f3.
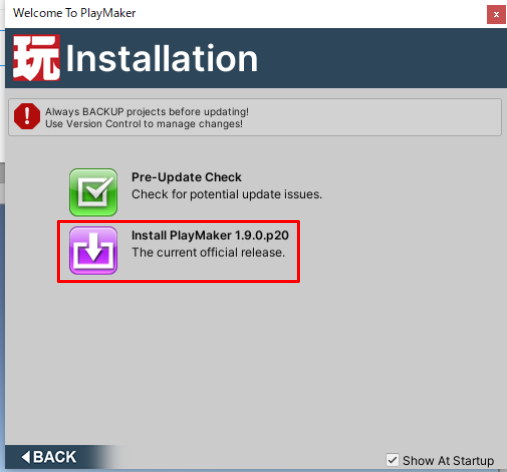
Click I Made a Backup, Go Ahead!
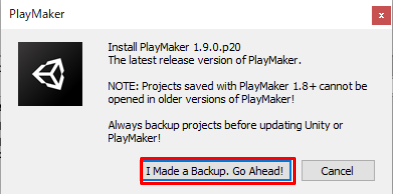
Click Import.
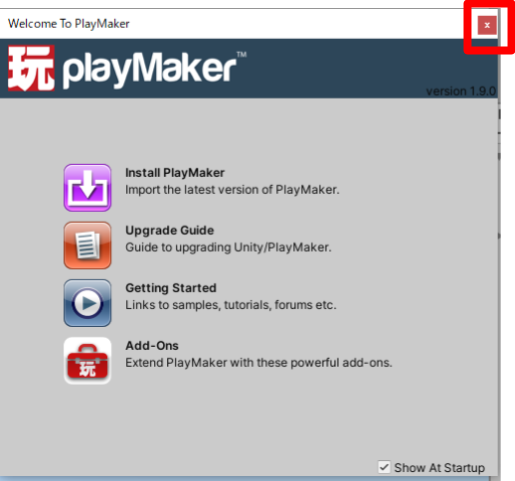
When the import is complete, click the ✕ in the upper right corner of the Welcome To PlayMaker window to close it.
Basic PlayMaker Concepts
At its core, PlayMaker is a tool for manipulating Unity by means of a Finite State Machine (FSM), which is a model of complex behavior broken down into individual states.
Since this may seem abstract and difficult to understand, let’s start with a concrete example.
What is FSM?
For example, a power button on a home appliance: even if the same action of “pressing the button” is performed, the response of the home appliance (whether it turns ON or OFF) will differ depending on the case.
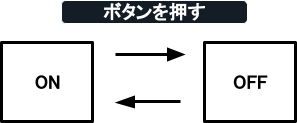
If the “event” of pressing the button occurs in the “state” of ON, it will “transition” to the “state” of OFF; conversely, if the “event” of pressing the button occurs in the “state” of OFF, it will “transition” to the “state” of ON.
With this example in mind, we can think of the FSM as a model that describes complex behavior based on the combination of several (finite) states, events, and transitions.
Let’s look at the elements of an actual PlayMaker FSM
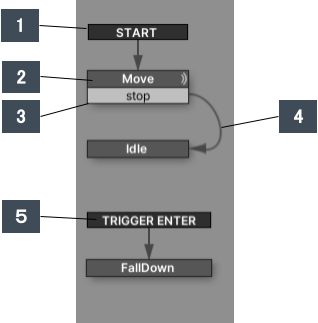
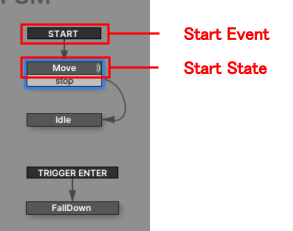
- START (event start)
- When the FSM is activated (when a Unity scene is played), a Start Event is sent, which is in place from the very beginning of the Playmaker Editor and is the event that occurs when the FSM is activated.
- State
- Only one state can be active at a time; an active state performs actions and receives events.
- Transition Event
- An event triggers a transition to another state, which can be sent from Unity (collision, trigger, mouse input, etc.) or by an action (distance checks, timeouts, game logic).
- Transitions
- Transitions are like arrows in the PlayMaker Editor: they can be easily created by dragging and dropping from one Transition Event to the next State.
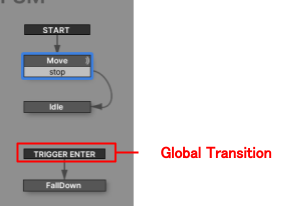
- Global Transition
- Global Transitions can be triggered at any time, regardless of the current active state.
Here is the actual PlayMaker Editor screen.
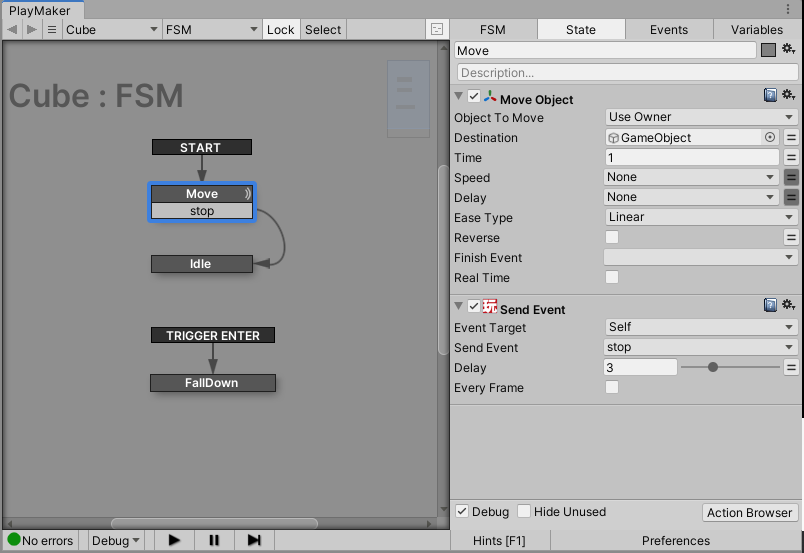
PlayMaker Editor screen
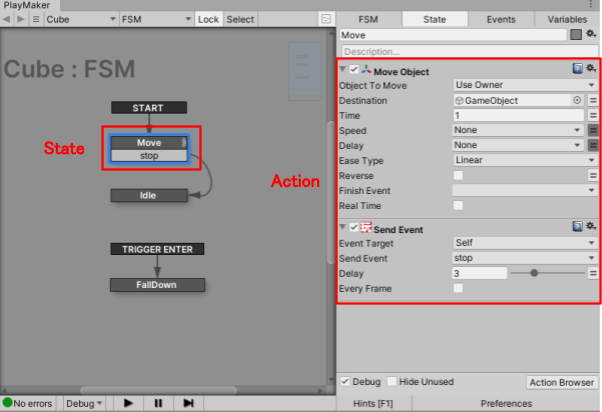
Three Important Elements
The basic concept of PlayMaker is the combination of “State,” “Event,” and “Transition.
State
In the figure below, Move, Idle, and FallDown are States, and only one State is active at any given time.

PlayMaker provides dozens of Actions, which can be combined to create a variety of logic.
Each State has an Action, which is executed when the State becomes active.
Actions are executed in order from the top, so be careful about the order.
The “Move” State has a “Move Object” Action and a “Send Event” Action.
Event
As we have already seen, the “stop” in the figure below is an Event, which triggers a state transition.
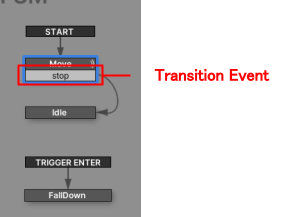
Events include those received from Unity, such as collision, trigger, and mouse input, and those triggered by actions of the active state, such as distance checks, timeouts, and game logic.
The former is easy to understand: an event is triggered by mouse input or a collider hit, while the latter can be an example of a State action that continuously compares the distance to the camera with a certain distance and triggers an event when the distance to the camera becomes smaller than a certain number.
The State that is first activated by the Start Event is called the Start State.
Transition
Transitions are the arrows in the PlayMaker Editor that can be easily created by dragging and dropping from one Transition Event to the next.
There are no complicated settings for transitions.
However, basically, a transition is made from a specific State to a specific State, but it is possible to instruct a transition from any State to a specific State by an Event without specifying the State from which the transition originates, and this is called a Global Transition.
In the example below, the event “TRIGGER ENTER” causes a transition to “FallDown” regardless of whether it is “Move” or “Idle”.
Variables
In addition to the above three elements, there is the concept of variables that should be added.
A variable is like a box with a name in which you can put a value, and by specifying a variable as a parameter of an action, you can create a dynamic mechanism.

Instead of entering “1″ for Time, a variable called “fadeInTime” is set.
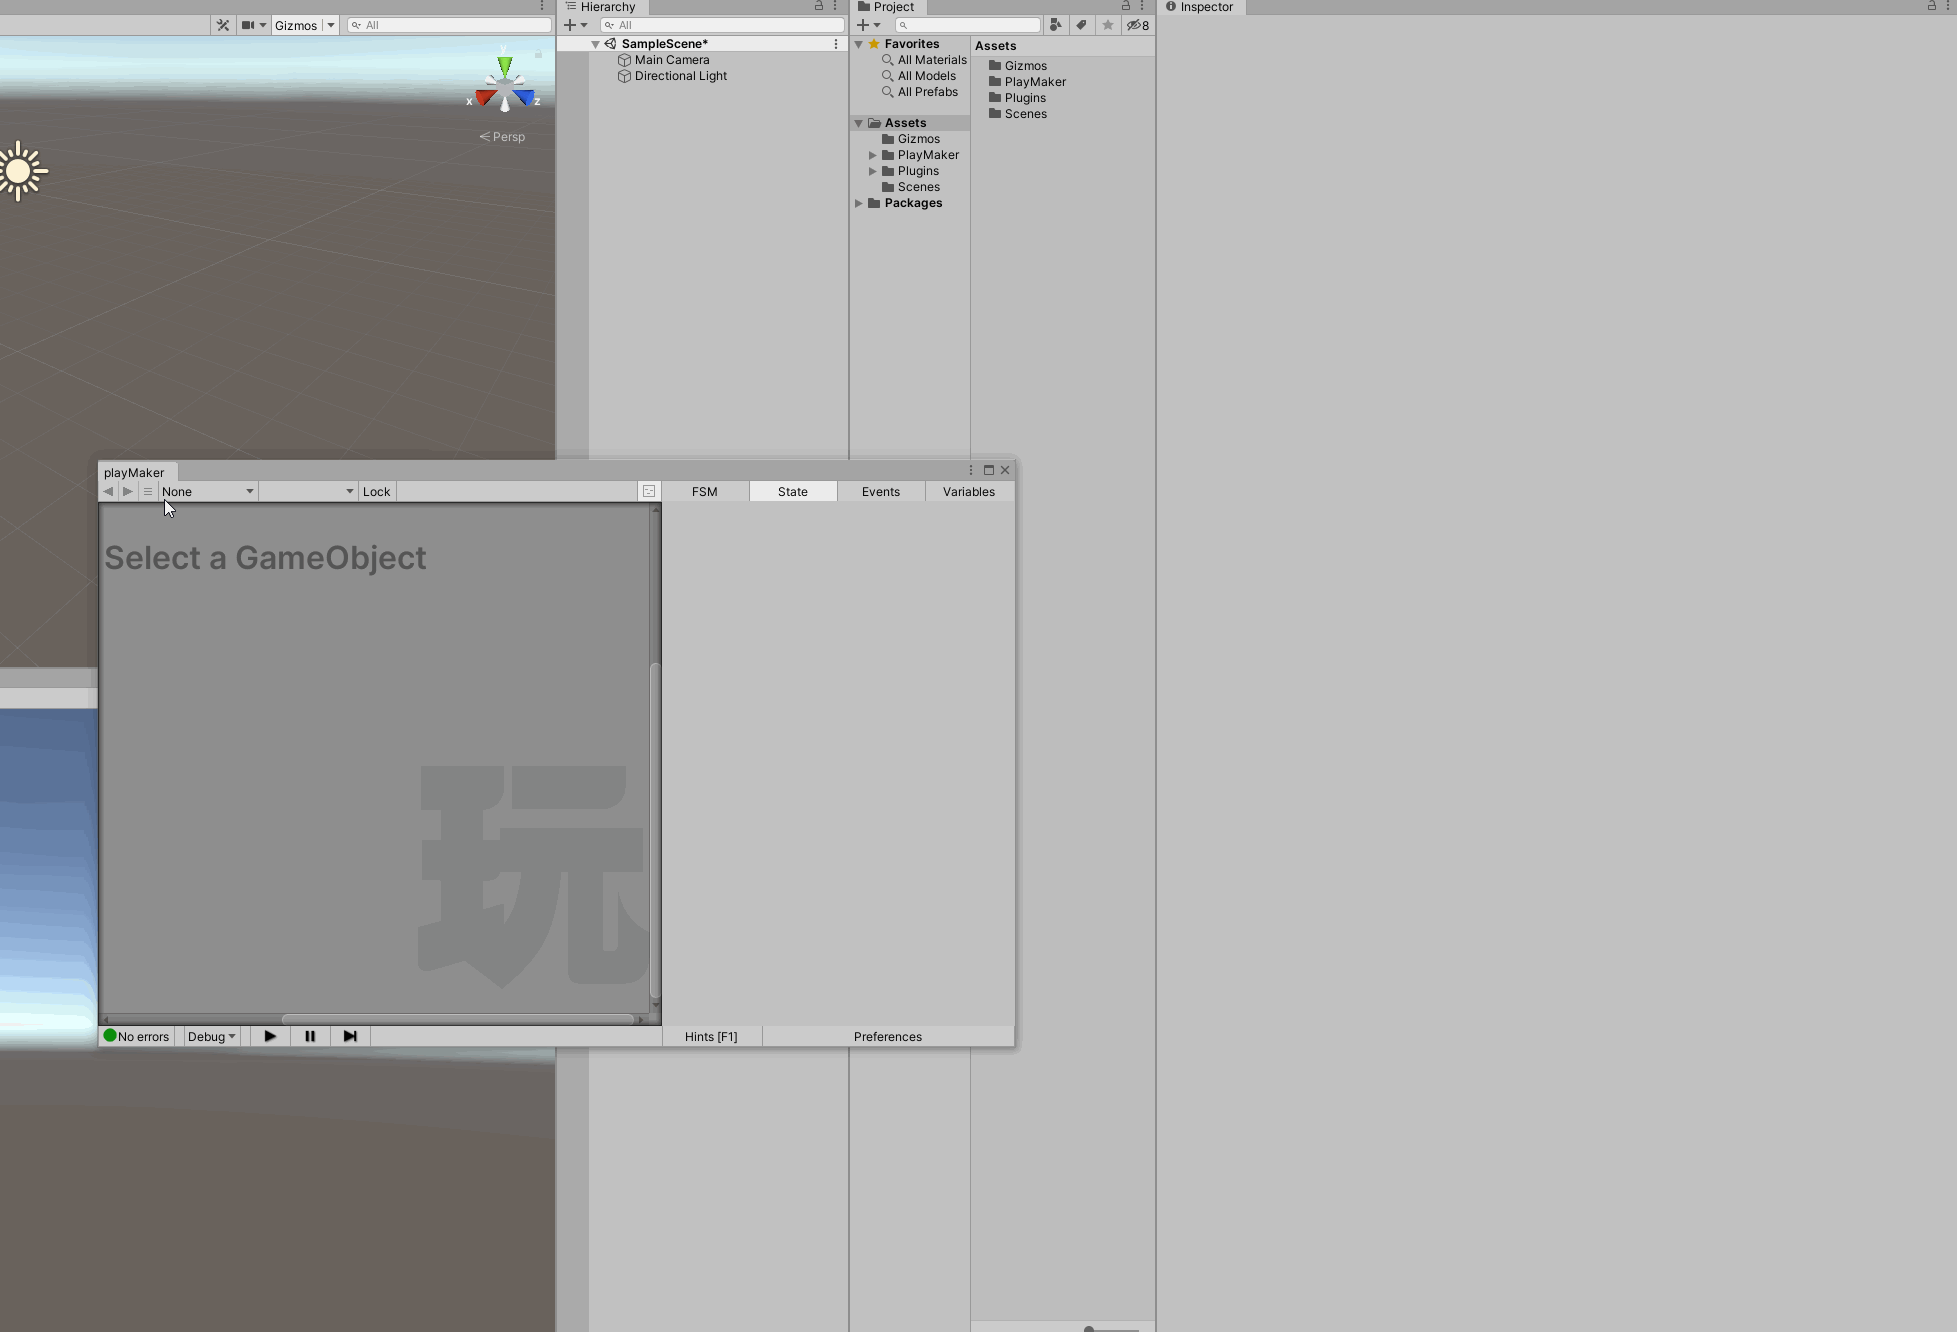
Location of the PlayMaker Editor (recommended)
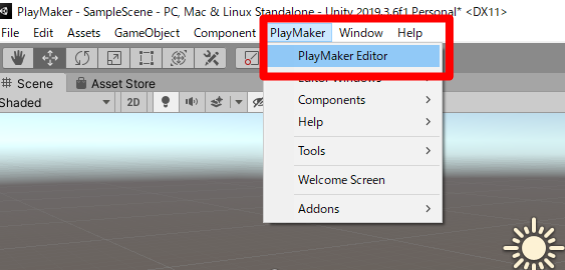
From the top left menu, click PlayMaker > PlayMaker Editor.
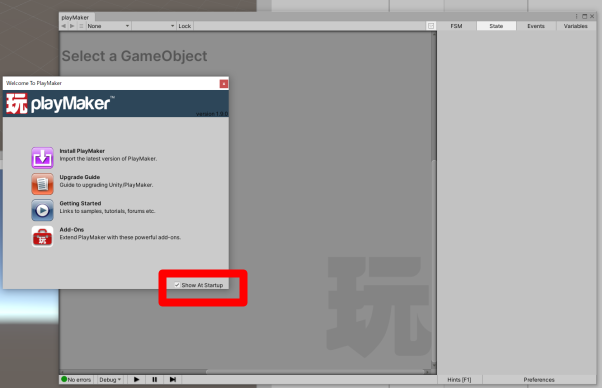
The PlayMaker Editor and Welcome To PlayMaker window will appear.
Uncheck the Show At Startup checkbox in Welcome To PlayMaker and click O to close Welcome To PlayMaker.
Drag and drop the PlayMaker Editor tab to the lower right corner.
This is the recommended placement, so drag and drop the PlayMaker Editor tab to a location that is convenient for you.
Basic PlayMaker Operations
Adding FSM
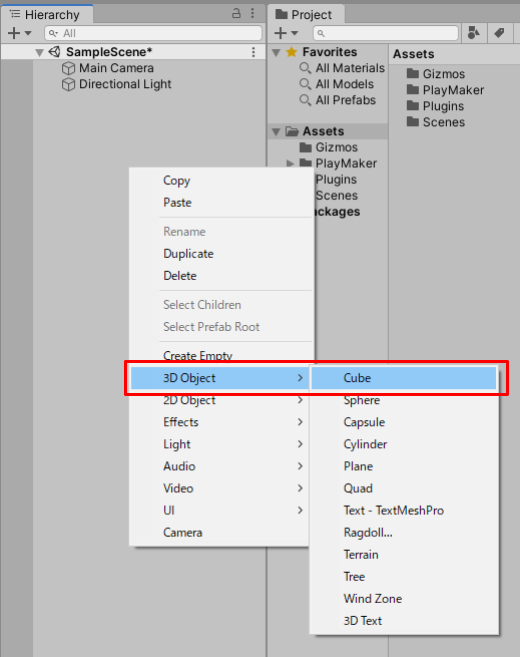
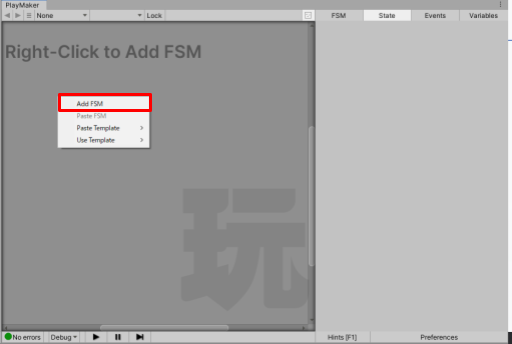
Let’s add PlayMakerFSM to an object in the Hierarchy window (hereafter referred to as Hierarchy).
Right-click on the hierarchy to open the menu.
Click on 3D Object > Cube to place the Cube.
With the Cube in the hierarchy selected, right-click on the PlayMaker Editor.
Then click Add FSM.
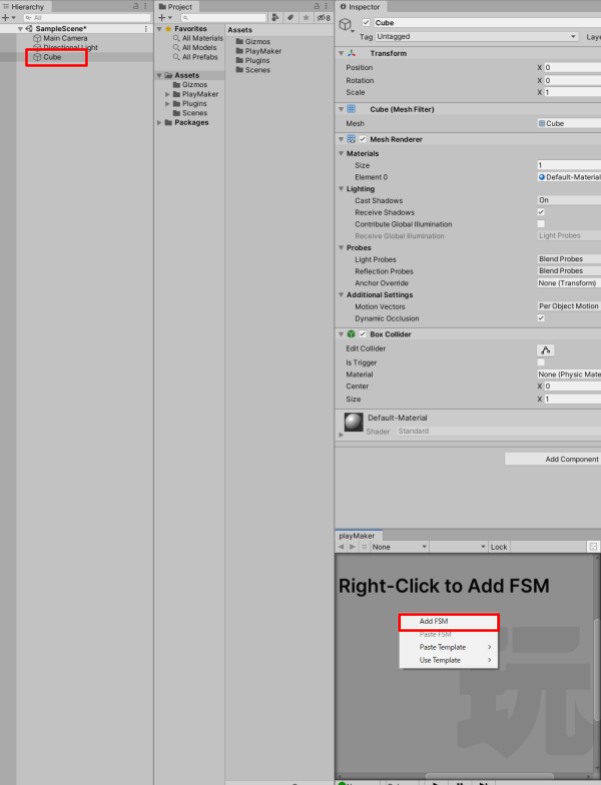
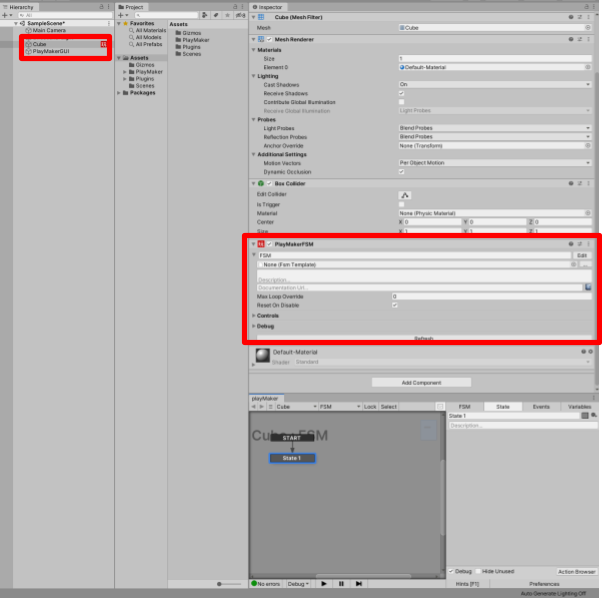
PlayMakerFSM is now added to the Cube.
Alternatively, you can also add PlayMakerFSM by Ctrl + left click (Windows) / command + click (macOS) on the PlayMaker Editor.
Once PlayMakerFSM is added, a PlayMaker icon will be added to the right side of the Cube in the hierarchy and the PlayMakerFSM component will be added to the inspector.
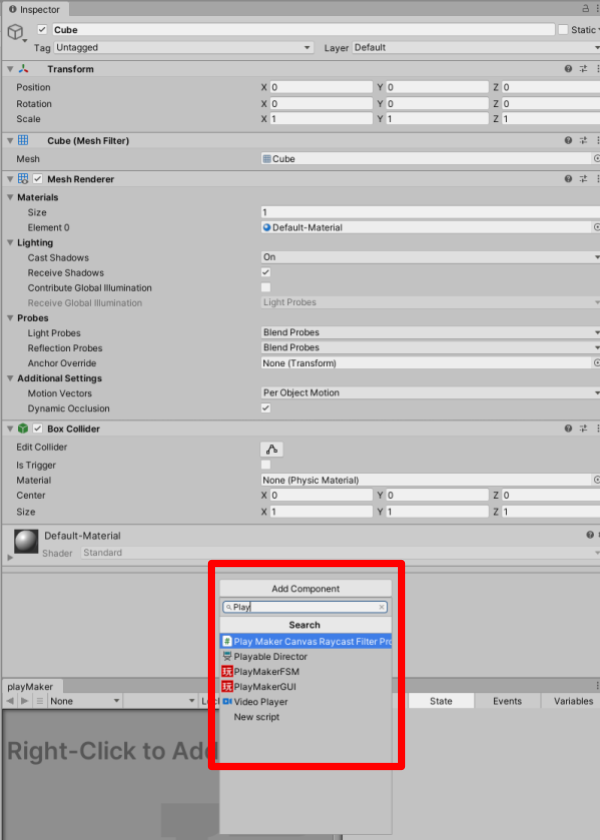
We will also show you how to add PlayMakerFSM from the inspector.
Select Cube in the Hierarchy and click Add Component in the Cube inspector, enter “Play” in the search form and PlayMakerFSM will appear in the Search results,
Click on PlayMakerFSM.
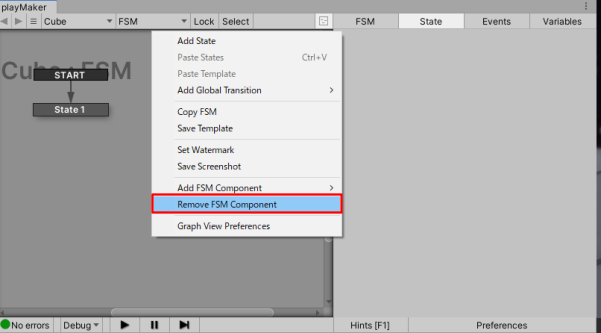
Delete FSM
Right click on the PlayMaker Editor and click Remove FSM Component to remove PlayMakerFSM from the object.
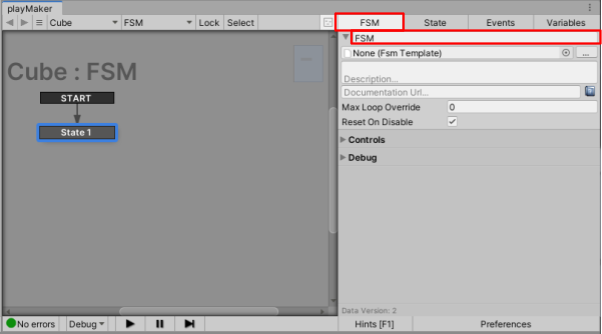
Rename FSM
You can change the name of the FSM from the Rename form by selecting the FSM tab
Changing the FSM name makes it easier to manage multiple FSMs.
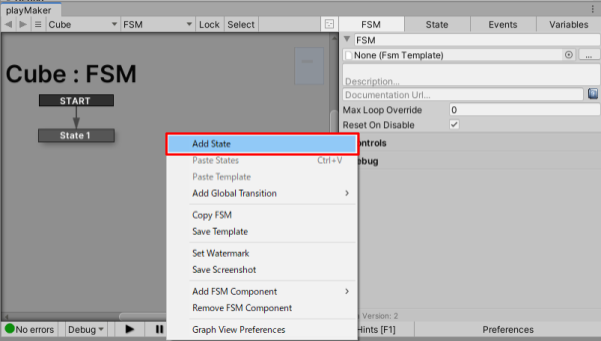
Add State
You can add a new State by right-clicking on the PlayMaker Editor and selecting Add State, or you can also add a PlayMakerFSM by Ctrl + left-clicking (Windows) / command + click (macOS) on the PlayMaker Editor.
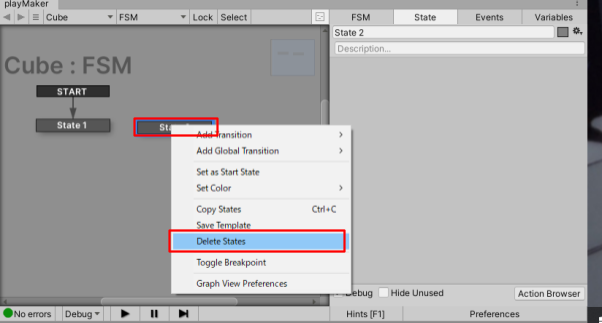
Deleting a State
You can delete a State by right-clicking on the State you wish to delete and selecting Delete States.
You can also delete a State by selecting it and clicking Delete.
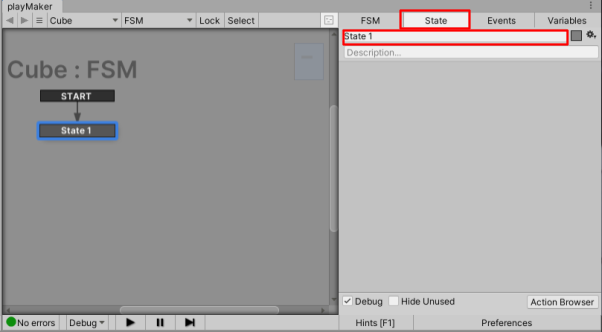
Renaming a State
Select a State and change the name entry form on the State tab.
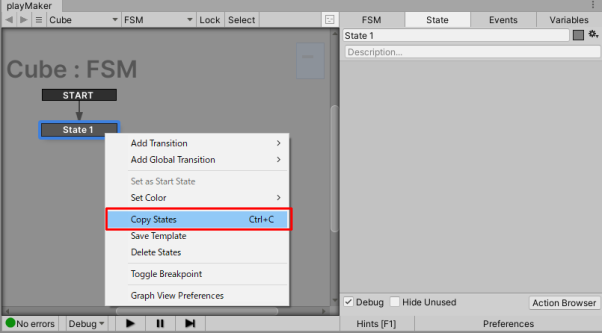
Copy/Paste State
You can copy a State by selecting it, right-clicking, and selecting Copy State.
You can also select a State and press Ctrl + C (Windows) / Commnd + C (macOS).
Right-click on the PlayMaker Editor and select Paste State to paste the copied State.
You can also select a State and paste it with Ctrl + V (Windows) / Commnd + V (macOS).
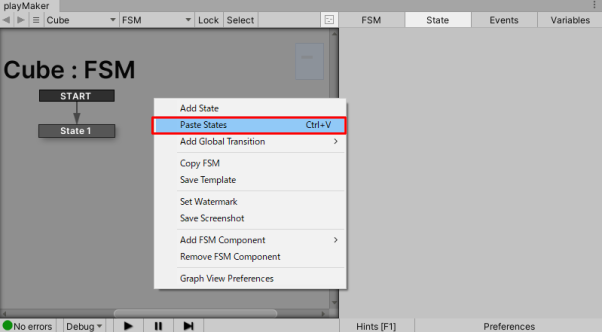
The shortcut keys for copying and pasting State are useful, so keep them in mind.
|
OS |
Copy |
Paste |
|
Windows |
Ctrl + C |
Ctrl + V |
|
macOS |
Command + C |
Command + V |
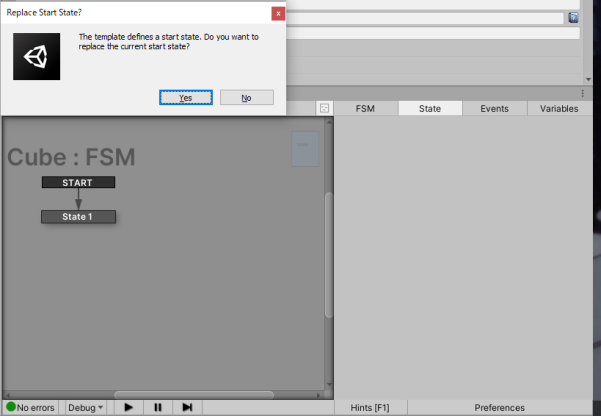
If you try to copy and paste a State that is set to Start State (see below), a message will appear asking if you want to make the pasted State the Start State.
Select “Yes” if you want to make it the Start State, or “No” if you do not want to make it the Start State.
Adding an Action
Select the State to which you want to add an Action, and click on the Action Browser in the lower right corner of the PlayMaker Editor, or double-click on the State blank area.
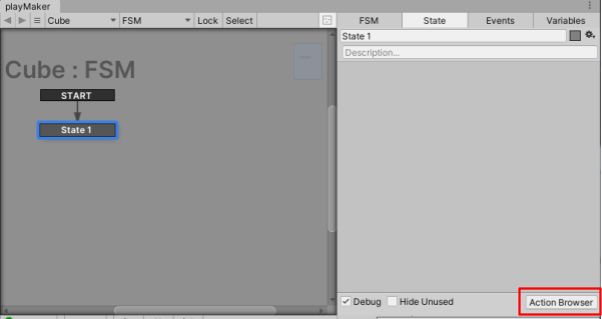
The Action Browser will appear.
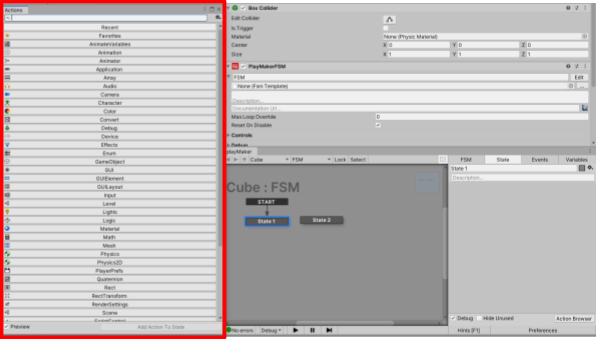
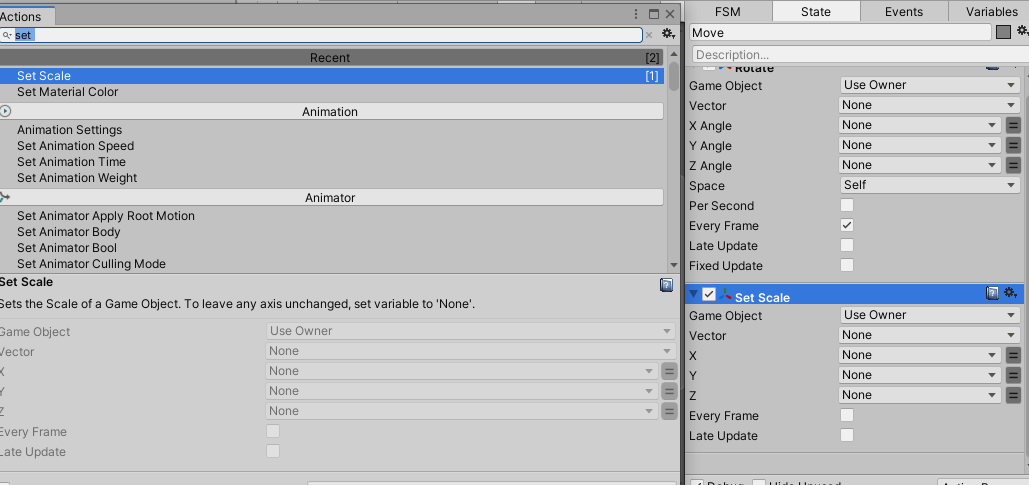
For example, if you want to add a “Rotate” Action to a Cube, enter “rotate” in the search form and double-click Rotate or drag & drop Rotate to a State, or click Add Action To State at the bottom right.
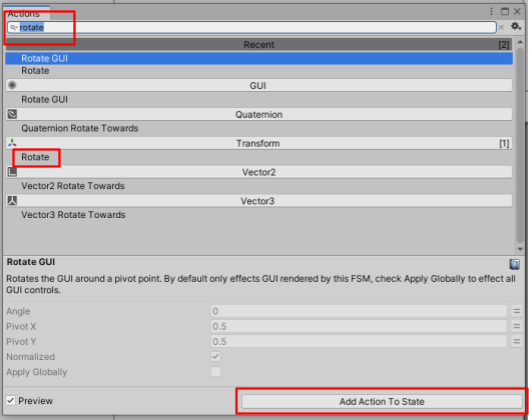
Search for Rotate in the Action Browser
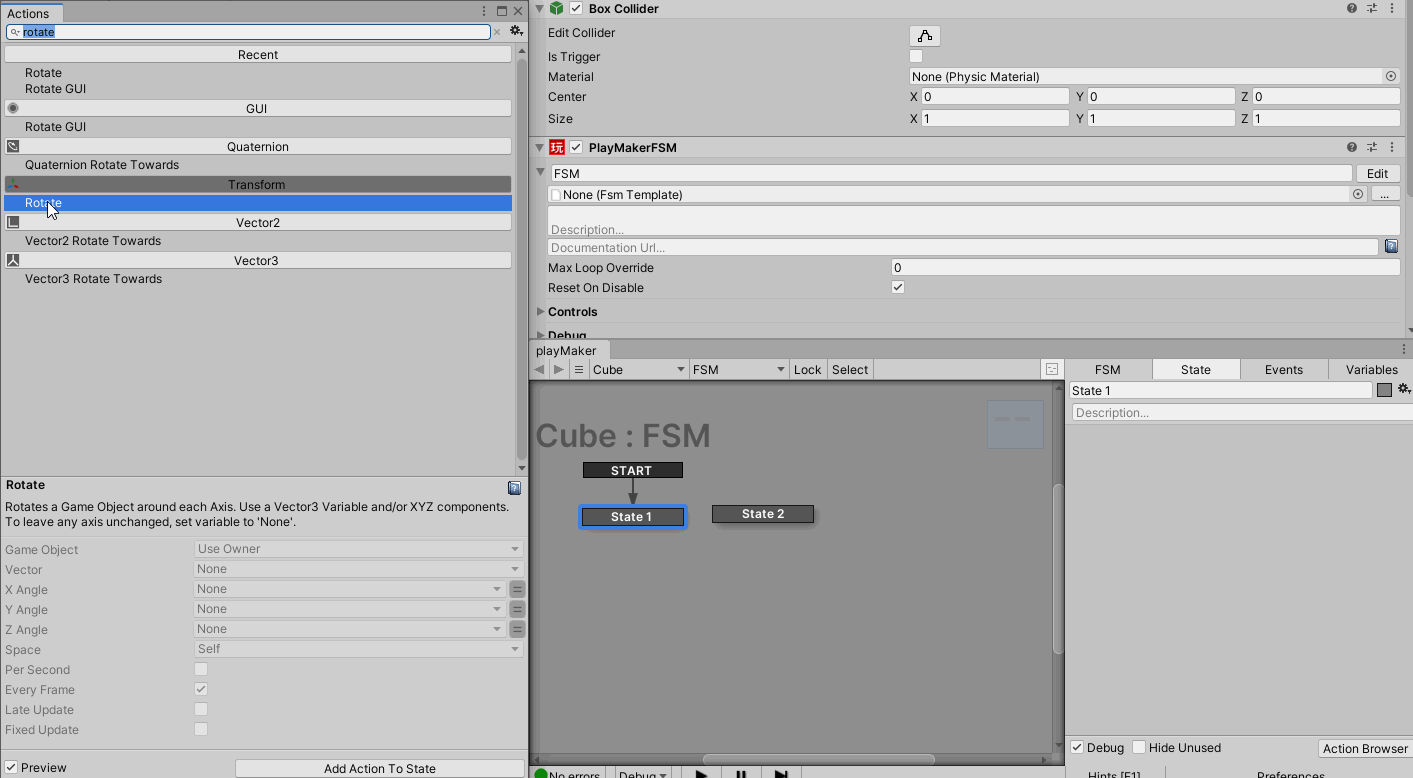
Double-click Rotate or drag & drop Rotate to State to add Rotate to State
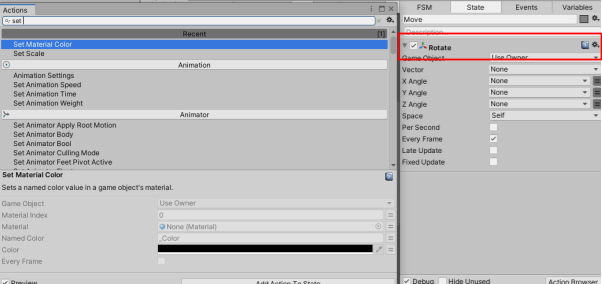
With the Action in PlayMakerFSM still selected, add the next Action from the Action Browser and it will be added on top of the selected Action.
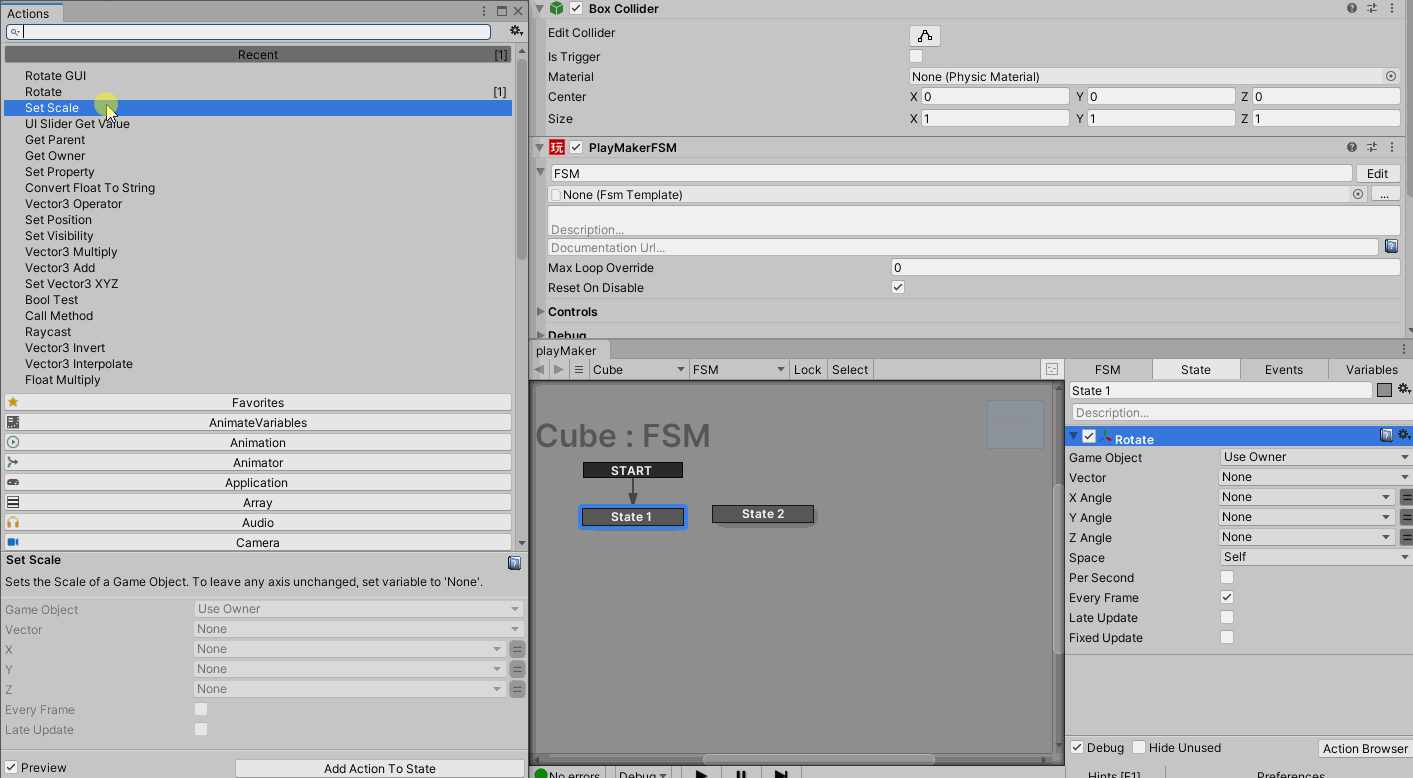
If you want to add Actions in order from the top (for example, if you want to do Set Scale next to Rotate)

Click on the space below Rotate to unselect Rotate.
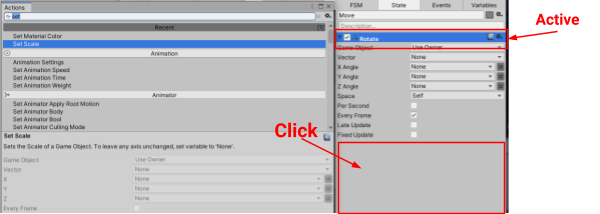
With Rotate not selected, add the Action you want to perform next.
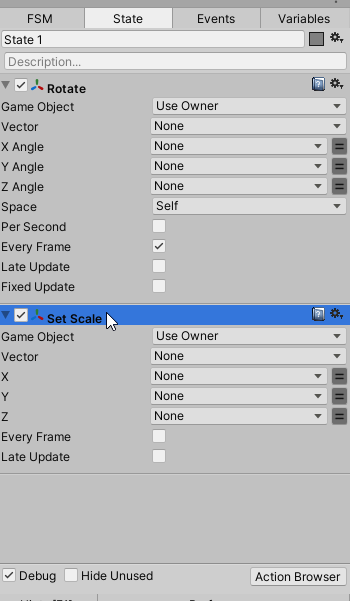
The actions are now listed in the order of Rotate → Set Scale from the top.
Actions are executed in order from the top, so be careful about the order.
Changing the Order of Actions
To change the order of Actions, right-click on an Action and Move Action To Top to move it to the top, or Move Action To Bottom to move it to the bottom.
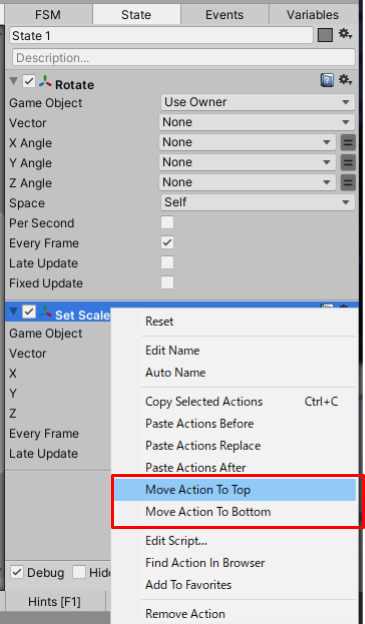
You can also move an Action to any position by dragging it or by pressing Ctrl + ↑ or ↓ to move it up or down.
Deleting Actions
If an Action is no longer needed, right-click on it and select Remove Action to delete it.
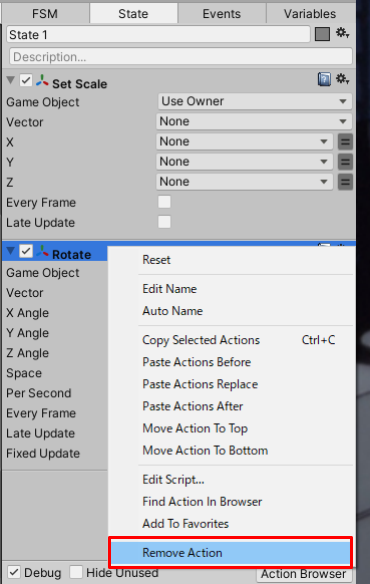
Alternatively, select the Action and press Delete (Windows) / Commnad + delete (macOS).
Deactivating an Action
Uncheck the checkbox to the left of the Action name to prevent it from functioning during scene playback.
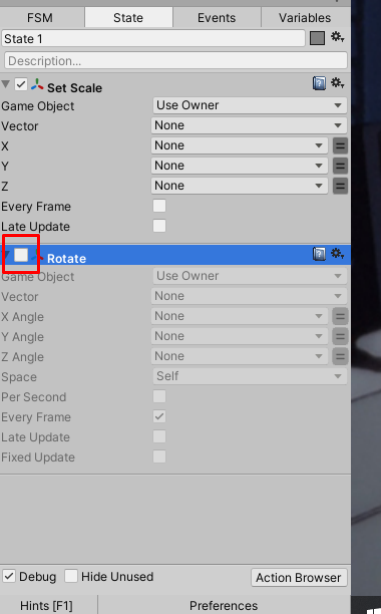
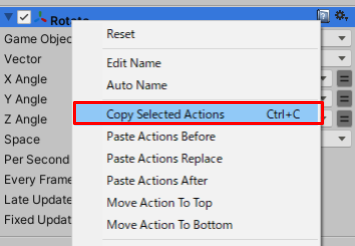
Copy/Paste Action
Right-click on an Action and select Copy Selected Actions to copy the Action.
Alternatively, Ctrl + C (Windows) / Commnd + C (macOS) can also be used to copy.
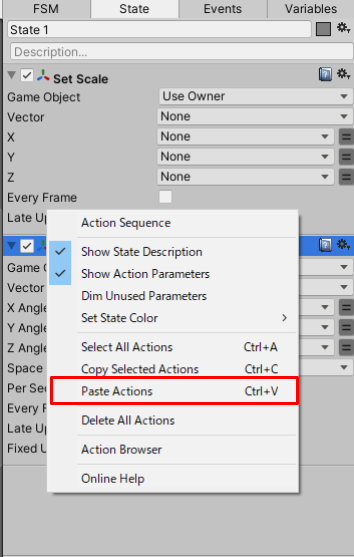
Right-click and select Paste Actions to paste an Action.
You can also use Ctrl + V (Windows) / Commnd + V (macOS) to paste.
The shortcut keys for copying and pasting Actions are useful, so keep them in mind.
|
OS |
Copy |
Paste |
|
Windows |
Ctrl + C |
Ctrl + V |
|
macOS |
Command + C |
Command + V |
Adding a Transition
Right-click on a State and select Add Transition to choose the Transition to add.
Let’s choose Add Transition > FINISHED.
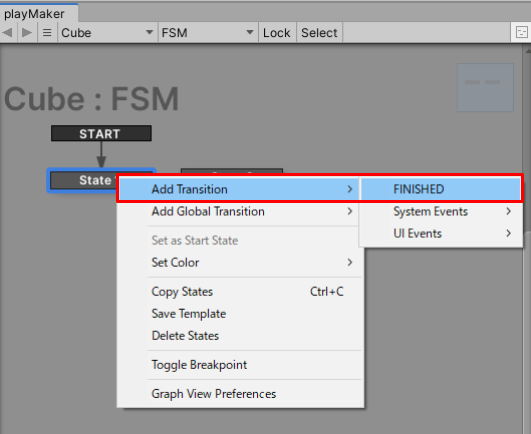
FINISHED is an Event that is fired when all Actions in a State are completed.
Deleting a Transition
If you have a Transition that you do not need, you can delete it by right-clicking on the Transition Event and selecting Delete Transition.

How to connect Transitions
You can connect Transitions by dragging from a Transition Event to another State.
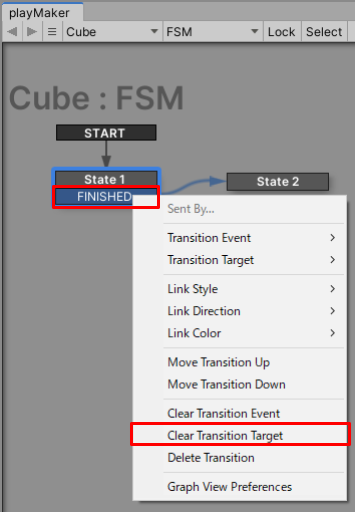
Deleting a Transition Target
Right-click on a Transition Event and select Clear Transition Target to delete it.
Error Indication
PlayMaker displays a red “!
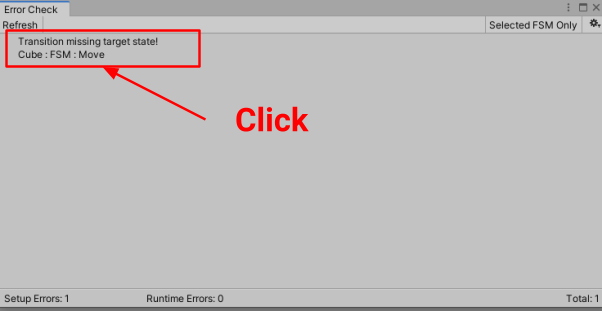
Clicking on the number of errors in the lower left corner of the PlayMaker Editor will bring up the Error Check screen.
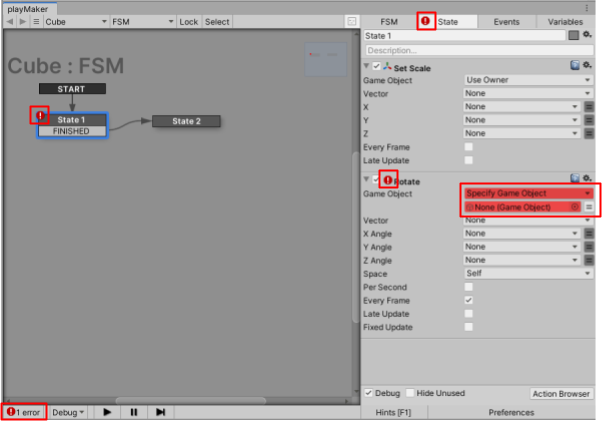
The Error Check screen displays the details of the error.
Clicking on the error details switches the PlayMaker Editor screen to the error location.
Checking FSM during scene playback
Look at the PlayMaker Editor during scene playback.
The State and Action being executed will be displayed in green.
So you can check the flow being executed.
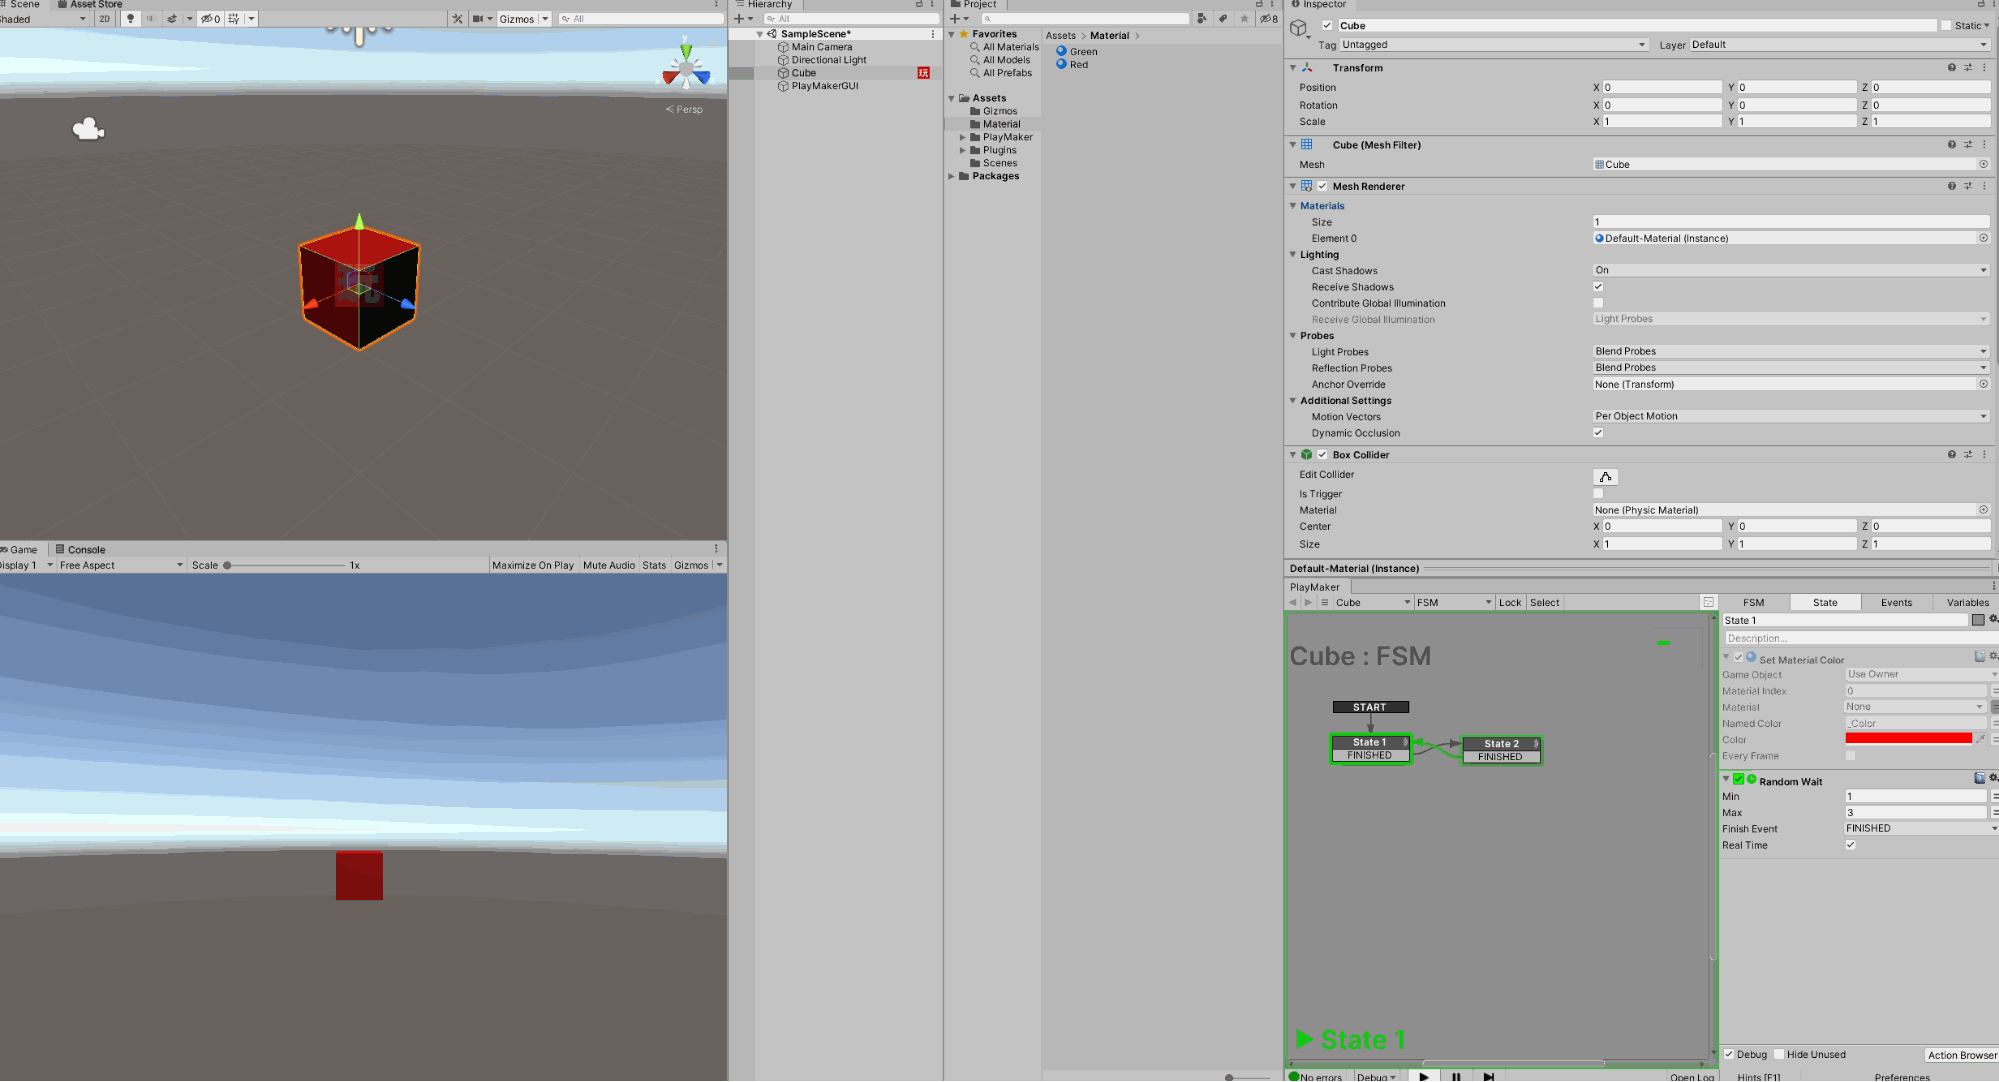
FSM Fixed Display
When you select an object in the hierarchy, the PlayMaker Editor also switches content depending on the object.

To stop the switching, click on Lock at the top of PlayMakerFSM.
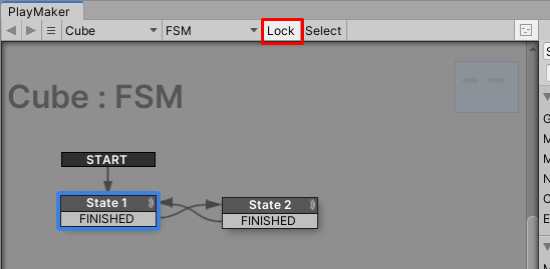
This is very useful during scene playback when you select another object in the hierarchy to move or otherwise manipulate while watching PlayMakerFSM move.
Changing the Start State
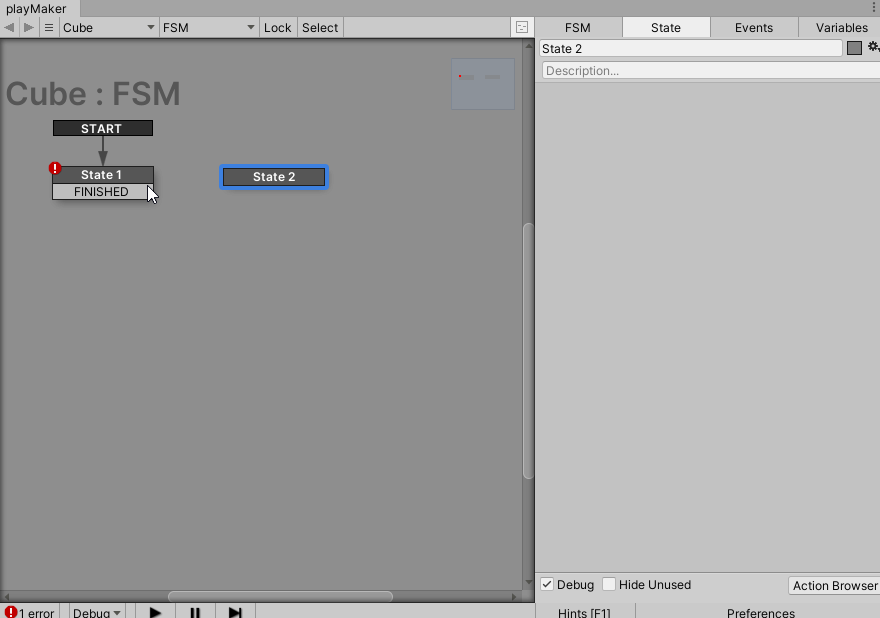
The Start State determines the first state to be executed.
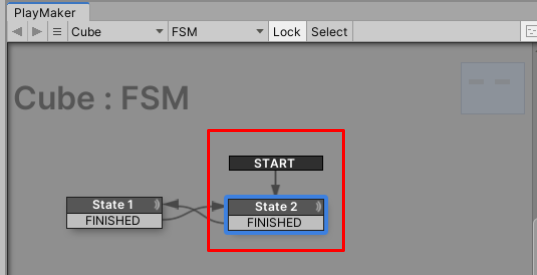
In the image below, the transition extends from START to State1. In this case, State1 is the first state to be executed when the scene is played back.
To change the Start State later, right-click on the State you want to execute first and select Set as Start state.
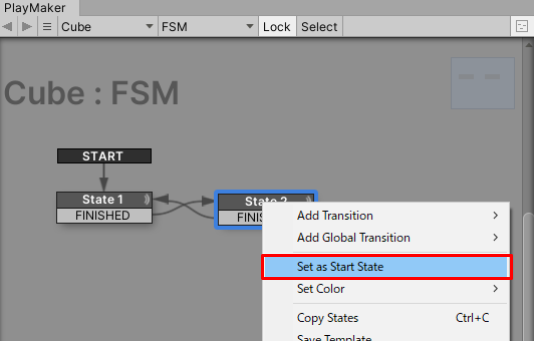
You have switched State2 to Start State.
Let’s create PlayMakerFSM with the STYLY PlayMaker Lab as a reference!
Introduction
We have prepared a sample of PlayMakerFSM, let’s see how it actually works with the combination of State, Action and Transition.

Download the sample from STYLY_PlayMaker_Lab.unitypackage.
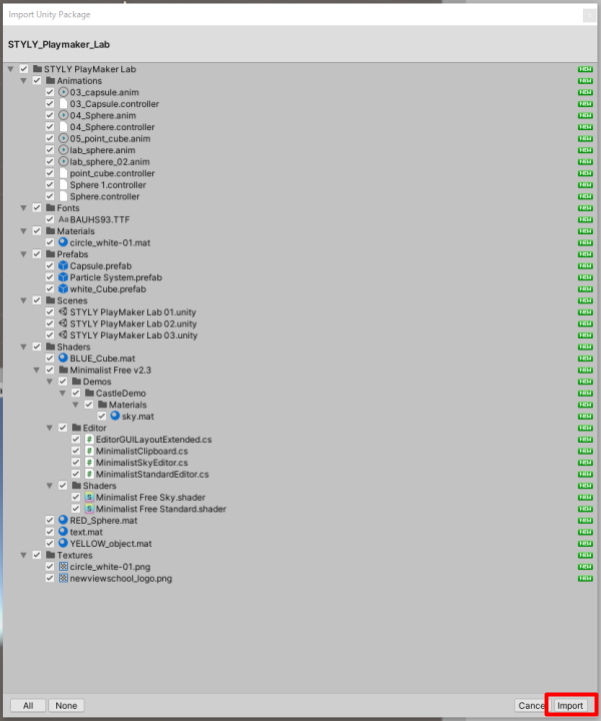
Import STYLY_PlayMaker_Lab.unitypackage into your Unity project.
You can also import STYLY_PlayMaker_Lab.unitypackage by dragging and dropping it into your project.
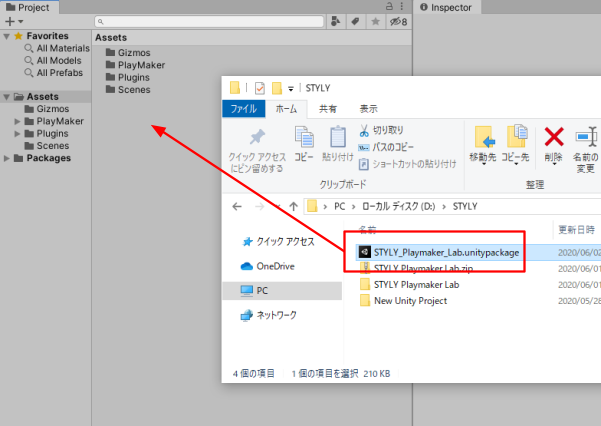
Click Import in the lower right corner.
Let’s connect the Transition.
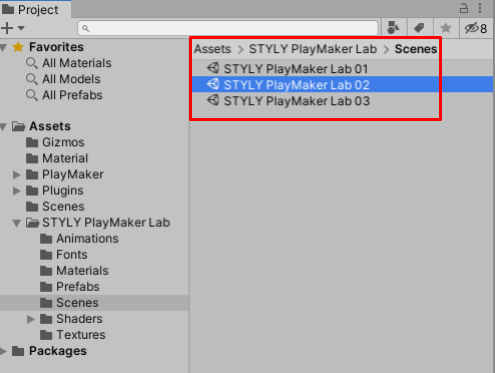
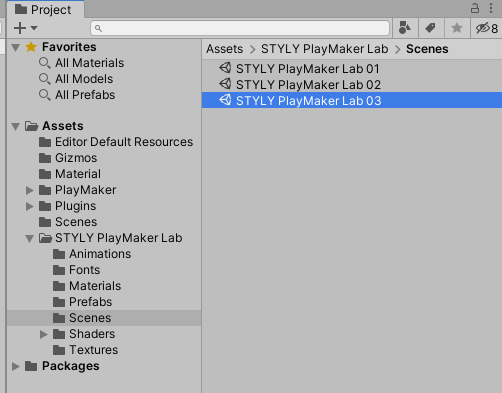
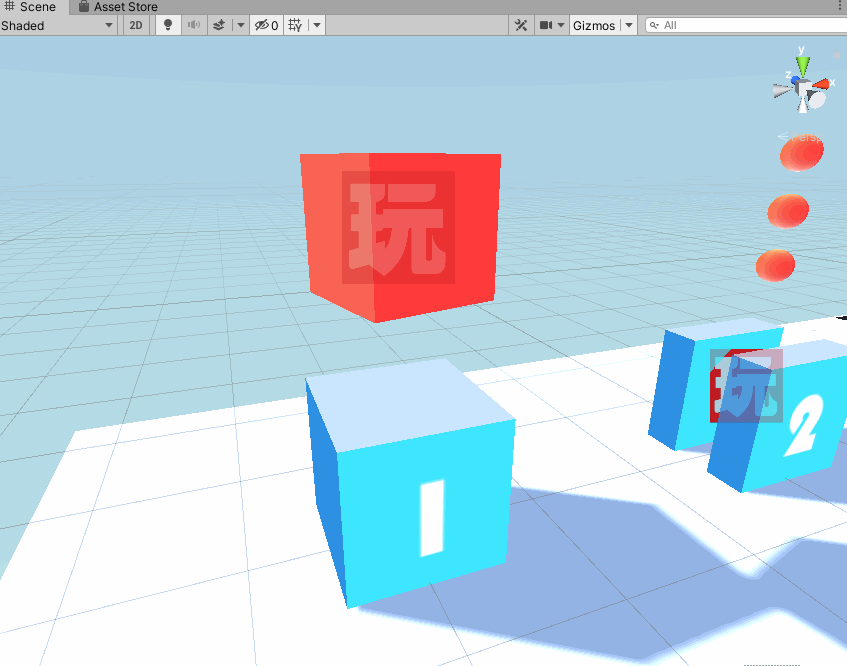
Open the scene by double-clicking STYLY PlayMaker Lab 01.Scene in the project Assets > STYLY PlayMaker Lab > Scenes.
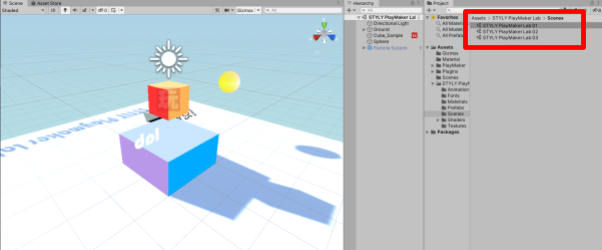
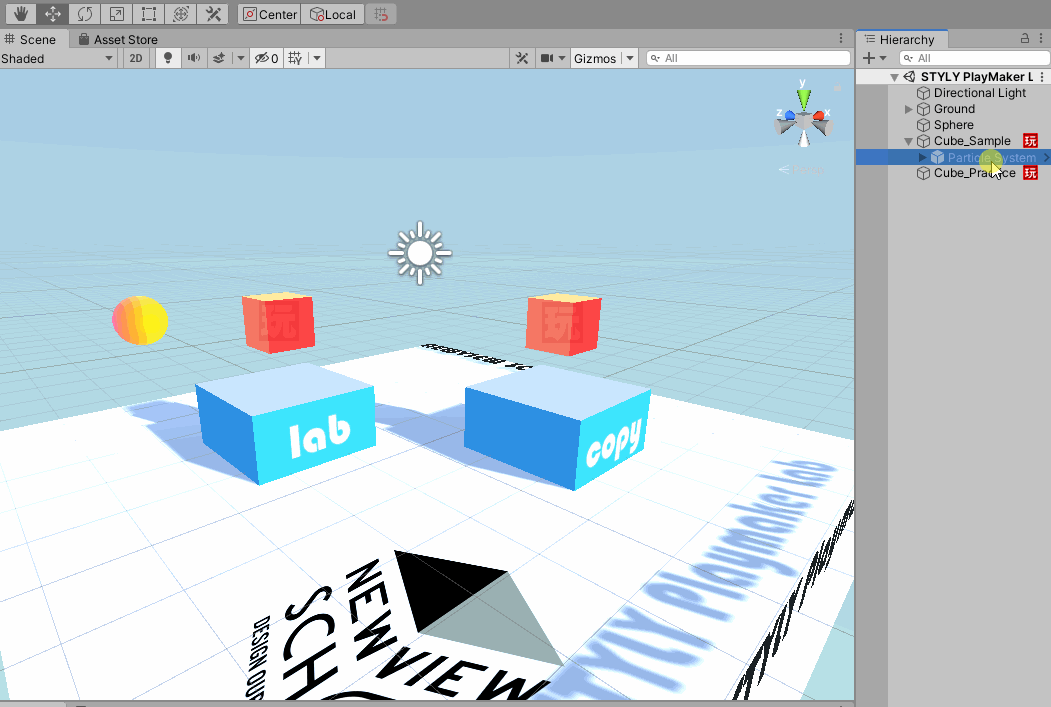
A scene with a yellow Sphere and a red Cube now appears in the scene view.
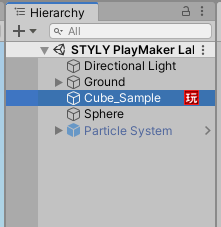
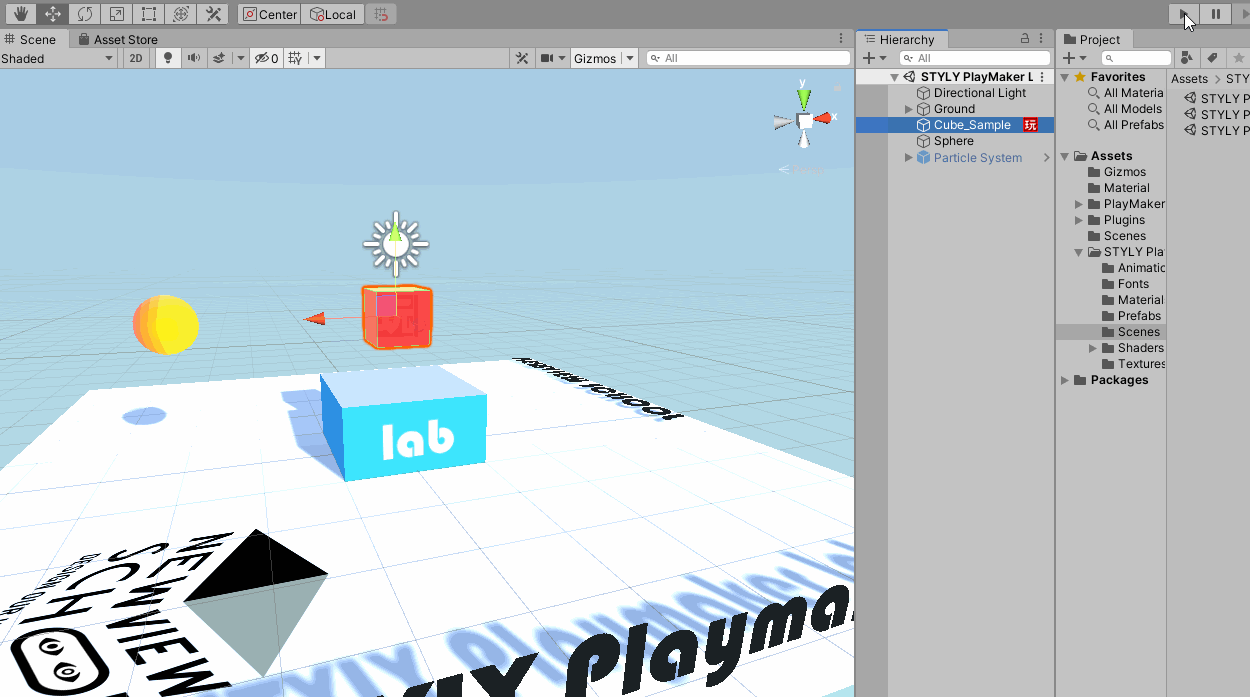
Select Cube_Sample from the hierarchy.
In the red Cube’s PlayMakerFSM, there are 9 States that can be connected by arrows to create a Transition.
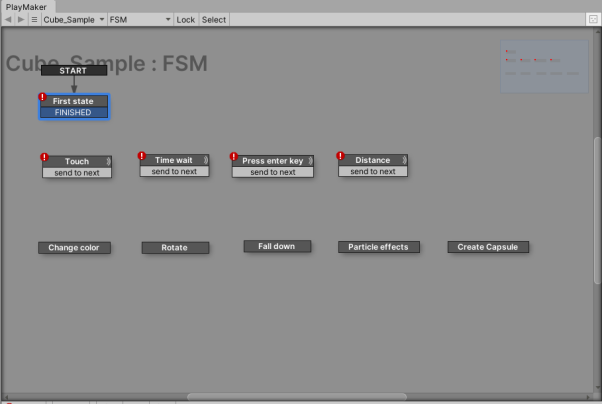
Each State has an Action.

The A group of States has an Action set as a condition.
|
State Name |
Action |
Description |
|
Touch |
Trigger Event |
Triggers an event when something is touched. |
|
Time wait |
Wait |
~Wait for ~seconds |
|
Press enter key |
Get Key Down |
Press enter (with cursor in game view) |
|
Distance |
Get Distance Float Compare |
~If the distance between ~ and Cube is less than/greater than/equal to |
The State group in B is set to the resulting Action.
|
State Name |
Action |
Description |
|
Change Color |
Set Material |
Change the material |
|
Rotate |
Rotate |
Rotate |
|
Fall down |
Set Property (isKinematic/isTrigger) |
Add collision detection and gravity |
|
Particle effects |
Activate Game Object |
Activate an object |
|
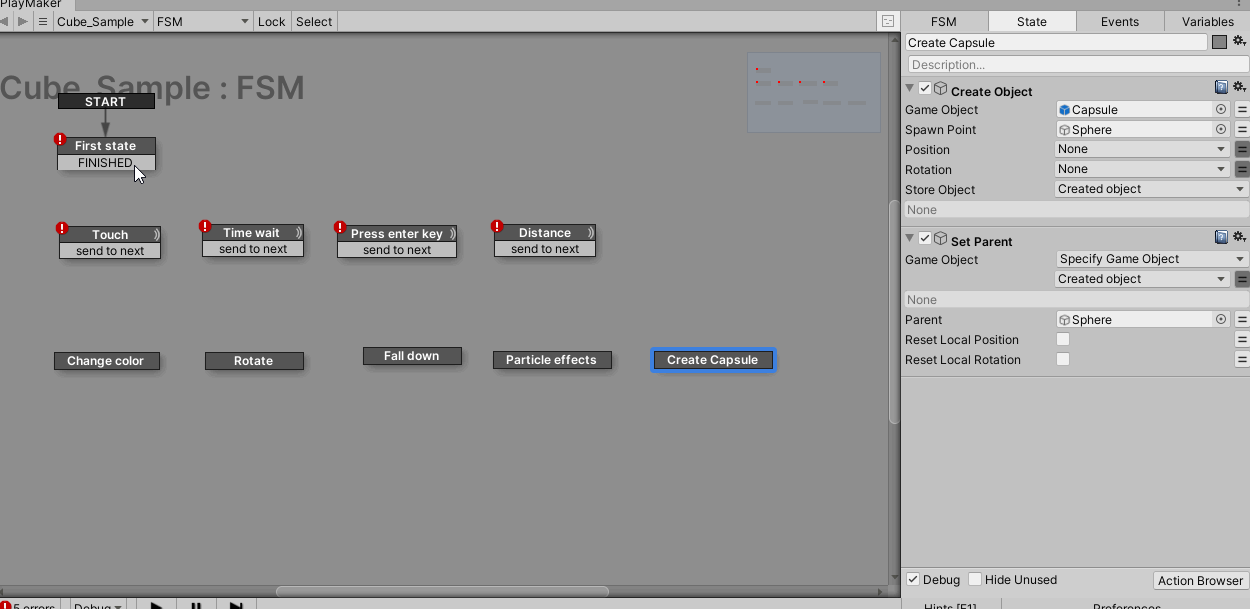
Create Capsule |
Create Object |
Create a Capsule object in the scene and make it a child of Sphere. |
Let’s try to see how it changes by connecting Transition from A to B.
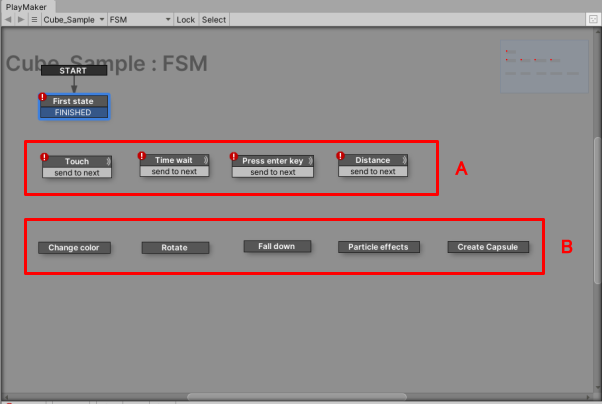
For example, connect First state → Touch → Particle effects.
Let’s play it back.
- Sphere touches Cube
- Particle effects are generated.
Try to predict how it will behave by changing the combination of Actions by yourself, and connect the Transitions together.
PlayMakerFSM is a very powerful tool to expand the range of expression.
Creating PlayMakerFSM from scratch (what is a trigger)
Double-click on STYLY PlayMaker Lab 02.Scene in the project Assets > STYLY PlayMaker Lab > Scenes to open the scene.
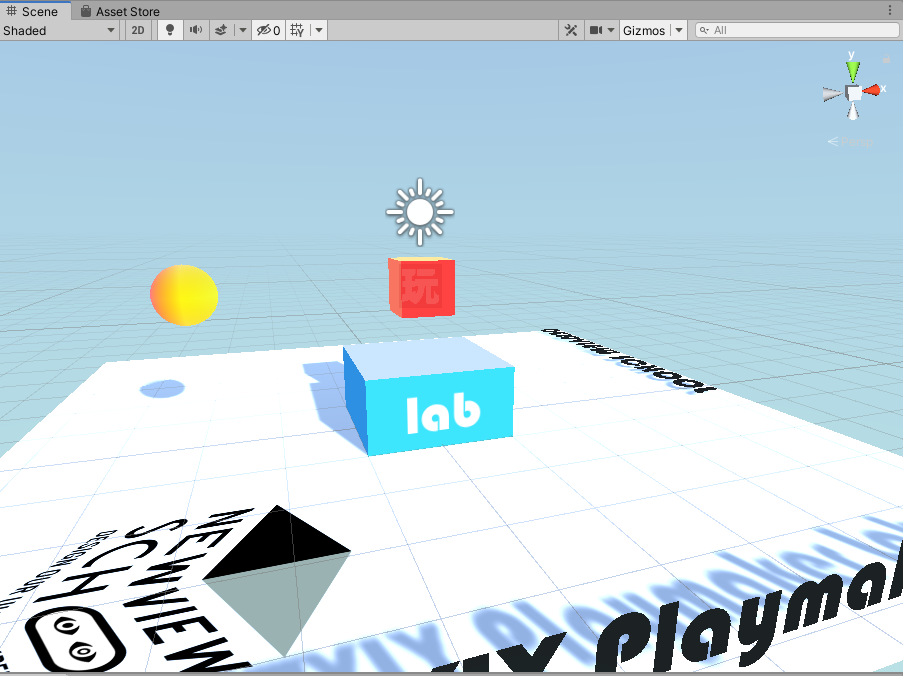
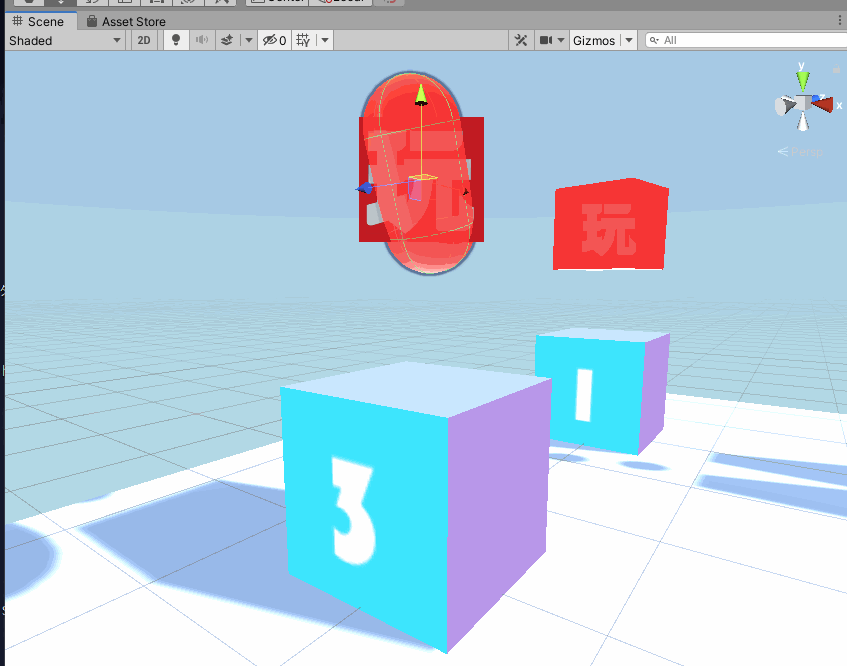
A scene with a yellow Sphere and two red Cubes appears in the scene view.
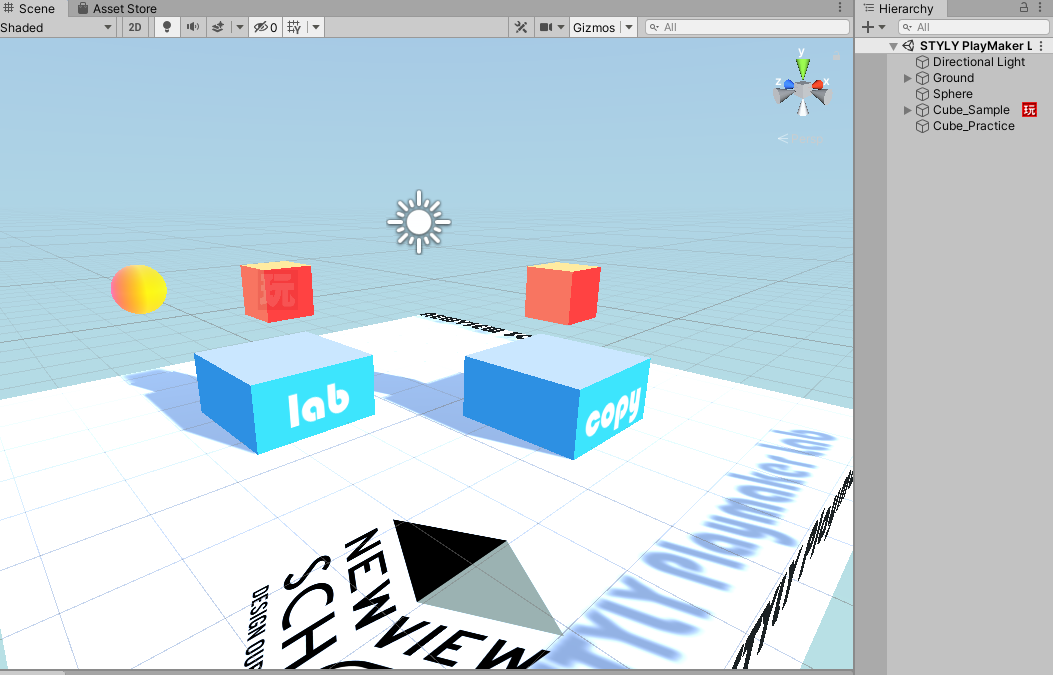
Play the scene.
The yellow Sphere passes through the two Cubes, but when it passes through the red Cube that is “on top of the blue Cube that says Lab,” a Particle is generated; however, when it passes through the red Cube that is “on top of the blue Cube that says Copy,” no Particle is generated.
Let’s create a PlayMakerFSM that will generate a Particle even when passing through a red Cube that is “on top of a blue Cube that says Copy”.

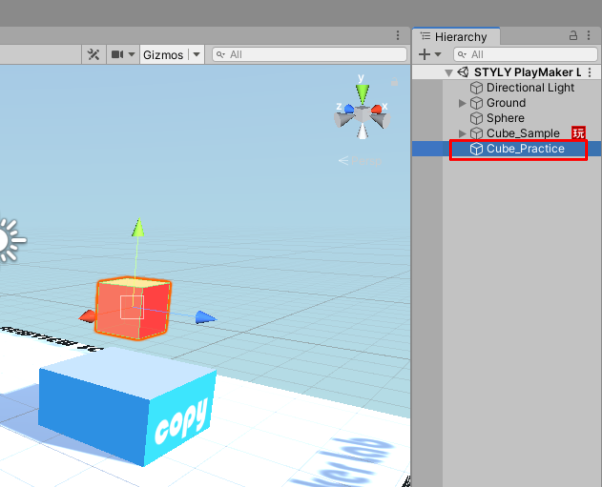
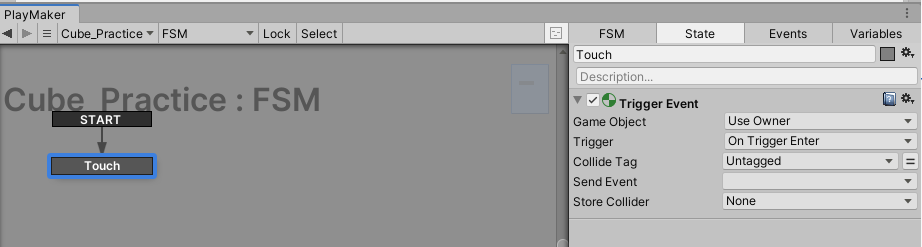
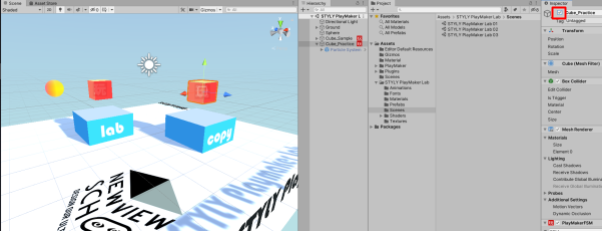
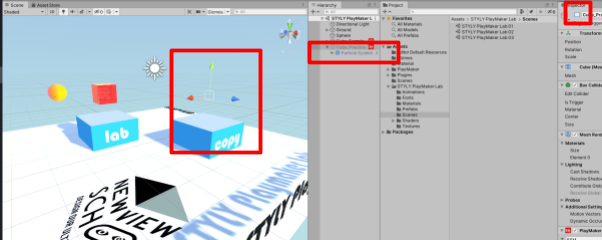
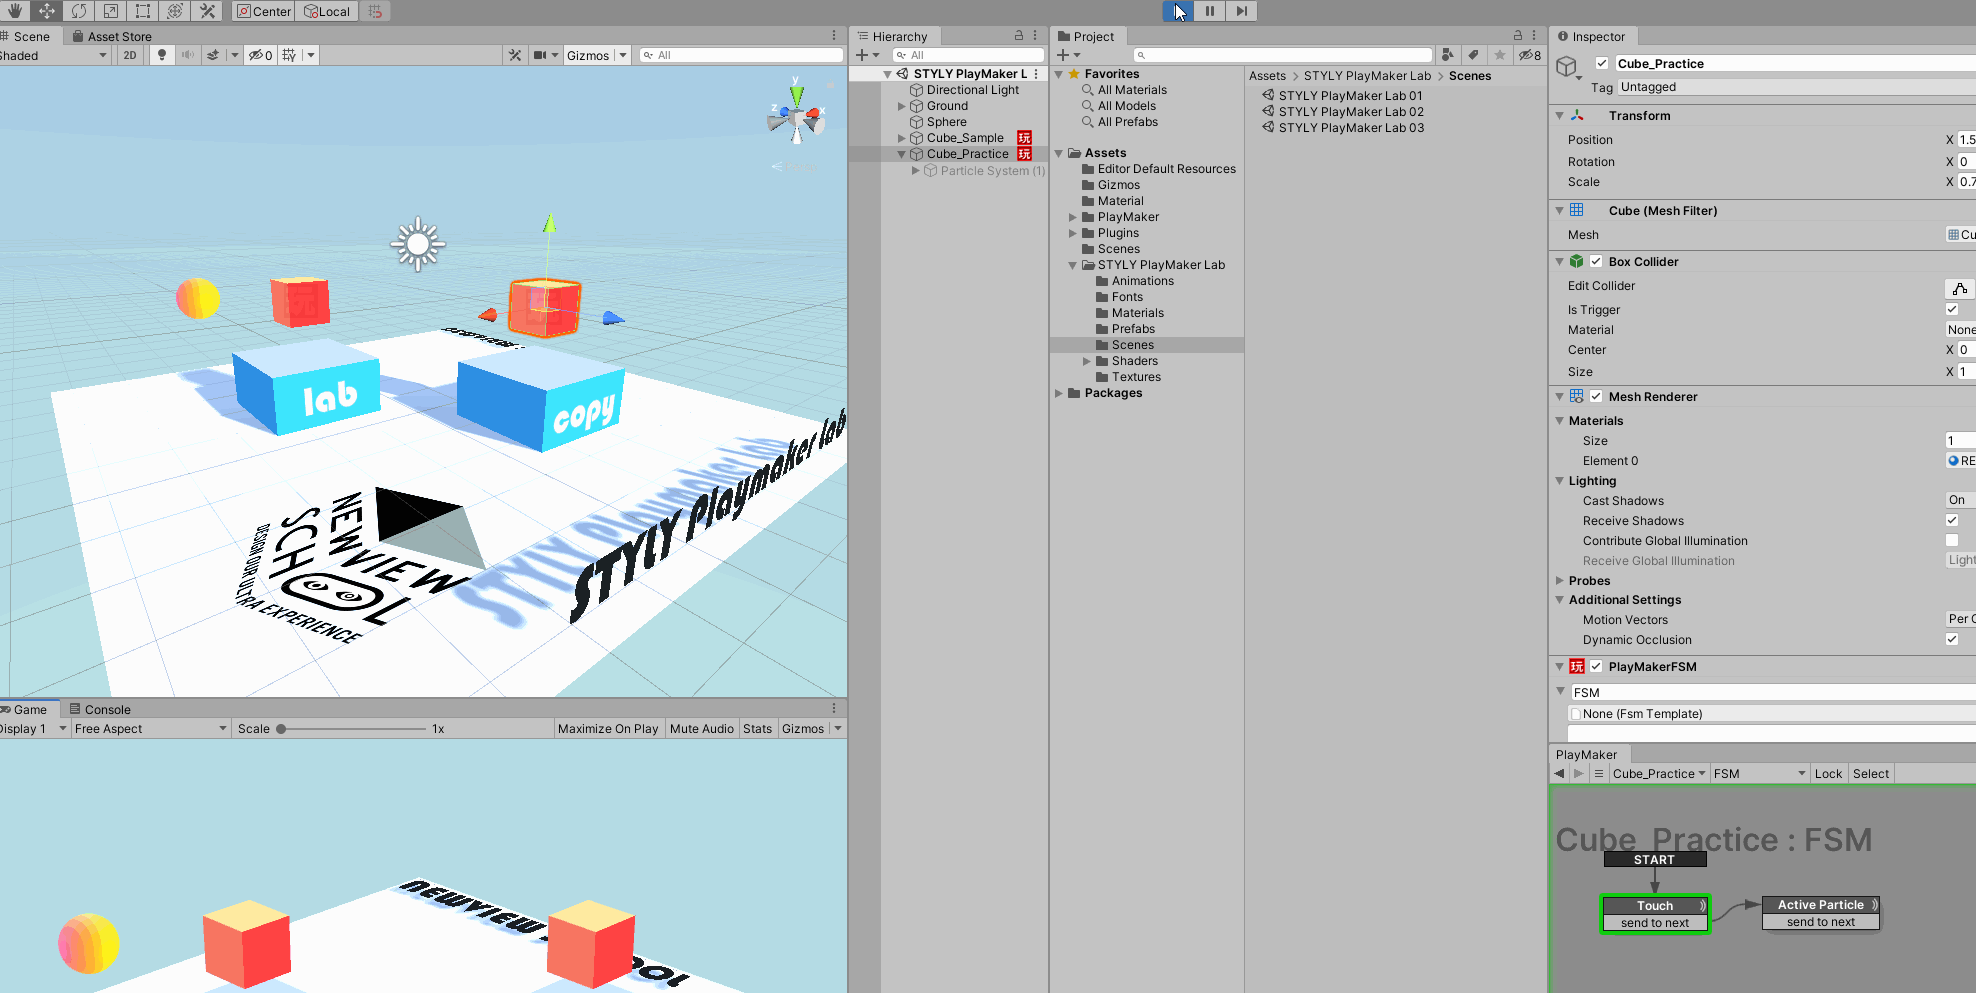
Select the Cube_Practice in the hierarchy.
Add PlayMakerFSM by right-clicking on the PlayMaker Editor and selecting Add FSM.
Copy the child object Particle System of Cube_Sample in the hierarchy.
Drag and drop the copied Particle System to Cube_Practice to create a Cube_Practice (parent) – Particle System (child) relationship.
Then move the position of Particle System so that it overlaps with Cube_Practice.
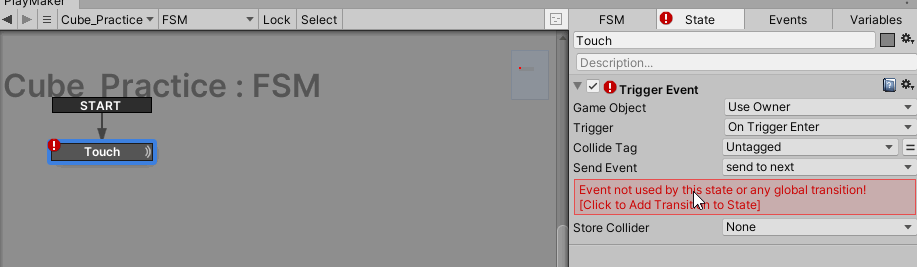
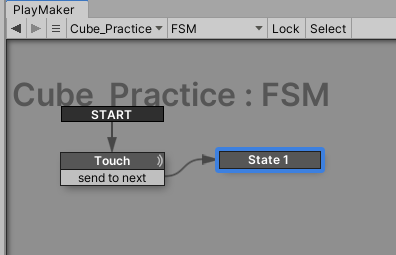
Change the name of State1 to Touch.
Add an Action that will be triggered when something touches Touch.
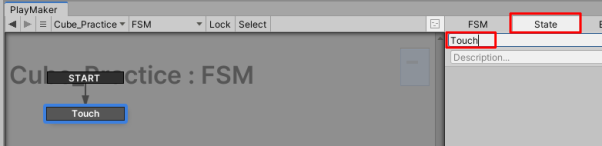
Find Trigger Event in the Action Browser and add it.
Set the parameter Trigger to On Trigger Enter.
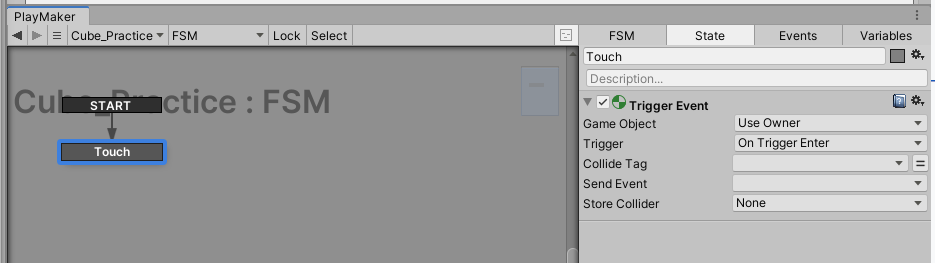
On Trigger Enter can trigger an event when a specific object contacts the collider area of a “trigger (object)” (hereinafter referred to as “trigger object”).
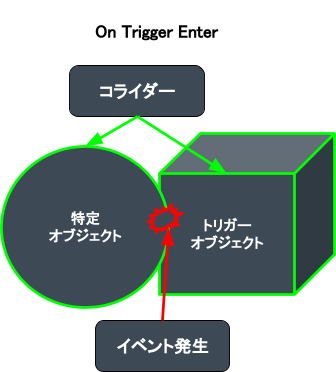
Conditions for On Trigger Enter to function
- Collider is given to both the specific object and the trigger object.
- Check Collider > Is Trigger on the object that will be the trigger
- When Is Trigger is checked, there will be no collision.
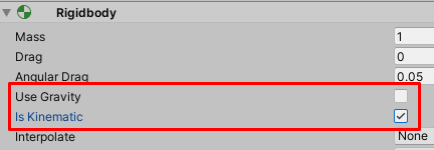
- Rigidbody component must be set on the specific object or triggering object
- Uncheck Use Gravity to disable gravity
- Check Is Kinematic to disable physics effects
The following is an explanation of “Check Is Trigger for Collider”.
First, let’s talk about colliders.
Colliders are the shapes attached to objects when they are hit or triggered, and are indicated by green lines in the scene.
When colliders make contact with each other, hit detection and triggers are triggered.
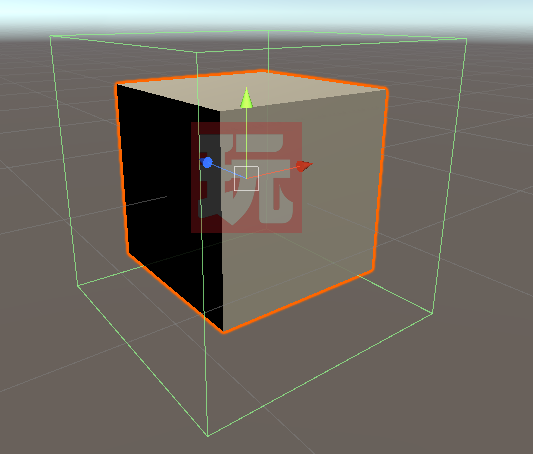
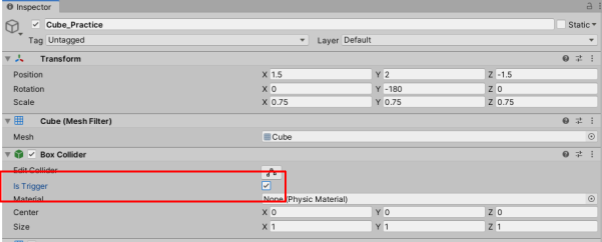
For example, the Cube inspector has a Box Collider.

The collider has an Is Trigger.
Is Trigger is one of the settings of the Collider component and is important to distinguish between a hit and a trigger.
Objects with Is Trigger checked cannot make physical contact.
If Is Trigger is not checked for the Collider on the side being hit, it will contact the Collider.
If the Is Trigger of the colliding Cllider is checked, it will not contact the collider.


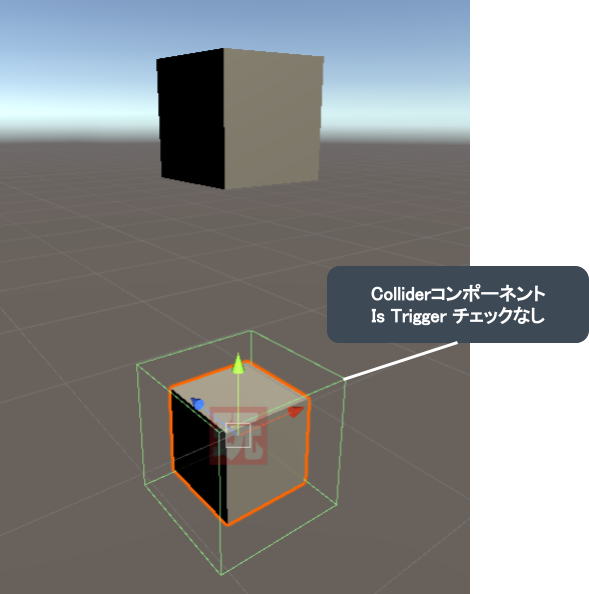
Summary of Is Trigger of Collider component
|
Is Trigger |
Behavior |
|
Unchecked |
Physical contact |
|
Checked |
No physical contact |
This time, in order to realize “I want to generate a Particle when the yellow Sphere passes through the Cube,” check the Is Trigger (Collider) checkbox on the Cube (the one being touched).
The following explains “the Rigidbody component must be set to a specific object or trigger object.
The yellow Sphere does not have a Rigidbody component, so in this case, the Cube must have a Rigidbody component.
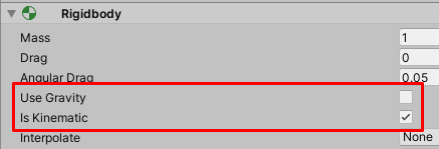
Then, do not check the Use Gravity checkbox, but check the Is Kinematic checkbox.
If Use Gravity is checked, the gravity effect will be activated.
Checking Is Kinematic will disable the effects of physics.
Finally, to summarize again,
- On Trigger Enter can trigger an event when a specific object contacts the trigger object (Is Trigger checked).
- Check Is Trigger in the Collider of the trigger object.
- When Is Trigger is checked, there will be no collision.
- Check Is Trigger in the Collider of the trigger object.
- Rigidbody component must be set on the specific object or trigger object.
- Uncheck Use Gravity to disable gravity
- Check Is Kinematic to disable physics effects
Go back to the PlayMaker Editor.
Set Trigger Event to the following
|
Parameter Name |
Parameter Description |
Parameter Value |
|
Game Object |
Object to which the Action will be applied. |
Use Owner (set by default) |
|
Trigger |
Type of trigger event |
On Trigger Enter (set by default) |
|
Collider Tag |
Tag: If used STYLY, <Any Tag> should be set to ” Untagged”. |
<Any Tag> (set by default) or Untagged |
|
Send Event |
The event to send after the action is finished. |
send to next (we will explain how to set this up in the next section) |
|
Store Collider |
Collider variable |
None (set by default) |
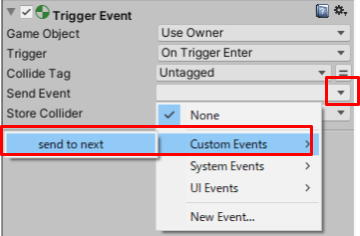
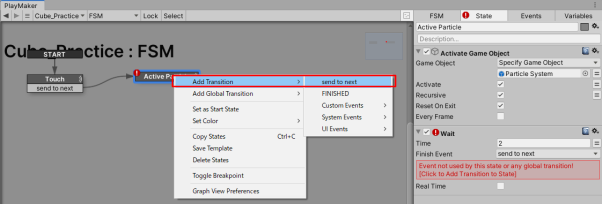
Set up the Send Event.
Click on the ▼ icon and select Custom Event > send to next.
The message “Event not used by this state or any global transition! [Click to Add Transition to State]” will appear under Send Event.
It means “Please add a Transition to State.
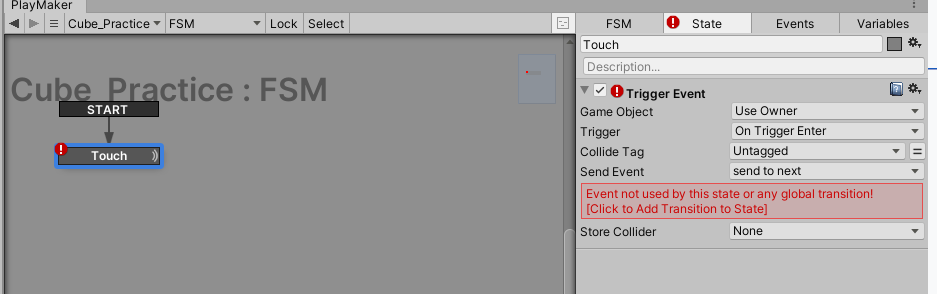
Double-click on the message to add a transition.
In the Cube_Practice inspector, check Box Collider > Is Trigger.
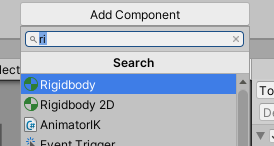
Click Add Componet at the bottom of the inspector to add a Rigidbody.
Uncheck Use Gravity for the added Rigidbosy and check Is Kinematic.
Return to the PlayMaker Editor, add a State, and connect a Transition from Touch send to next to the added State.
Now that you have done this, play the scene and check to see if the yellow Sphere makes the transition from Touch to State1 when it touches the red Cube.
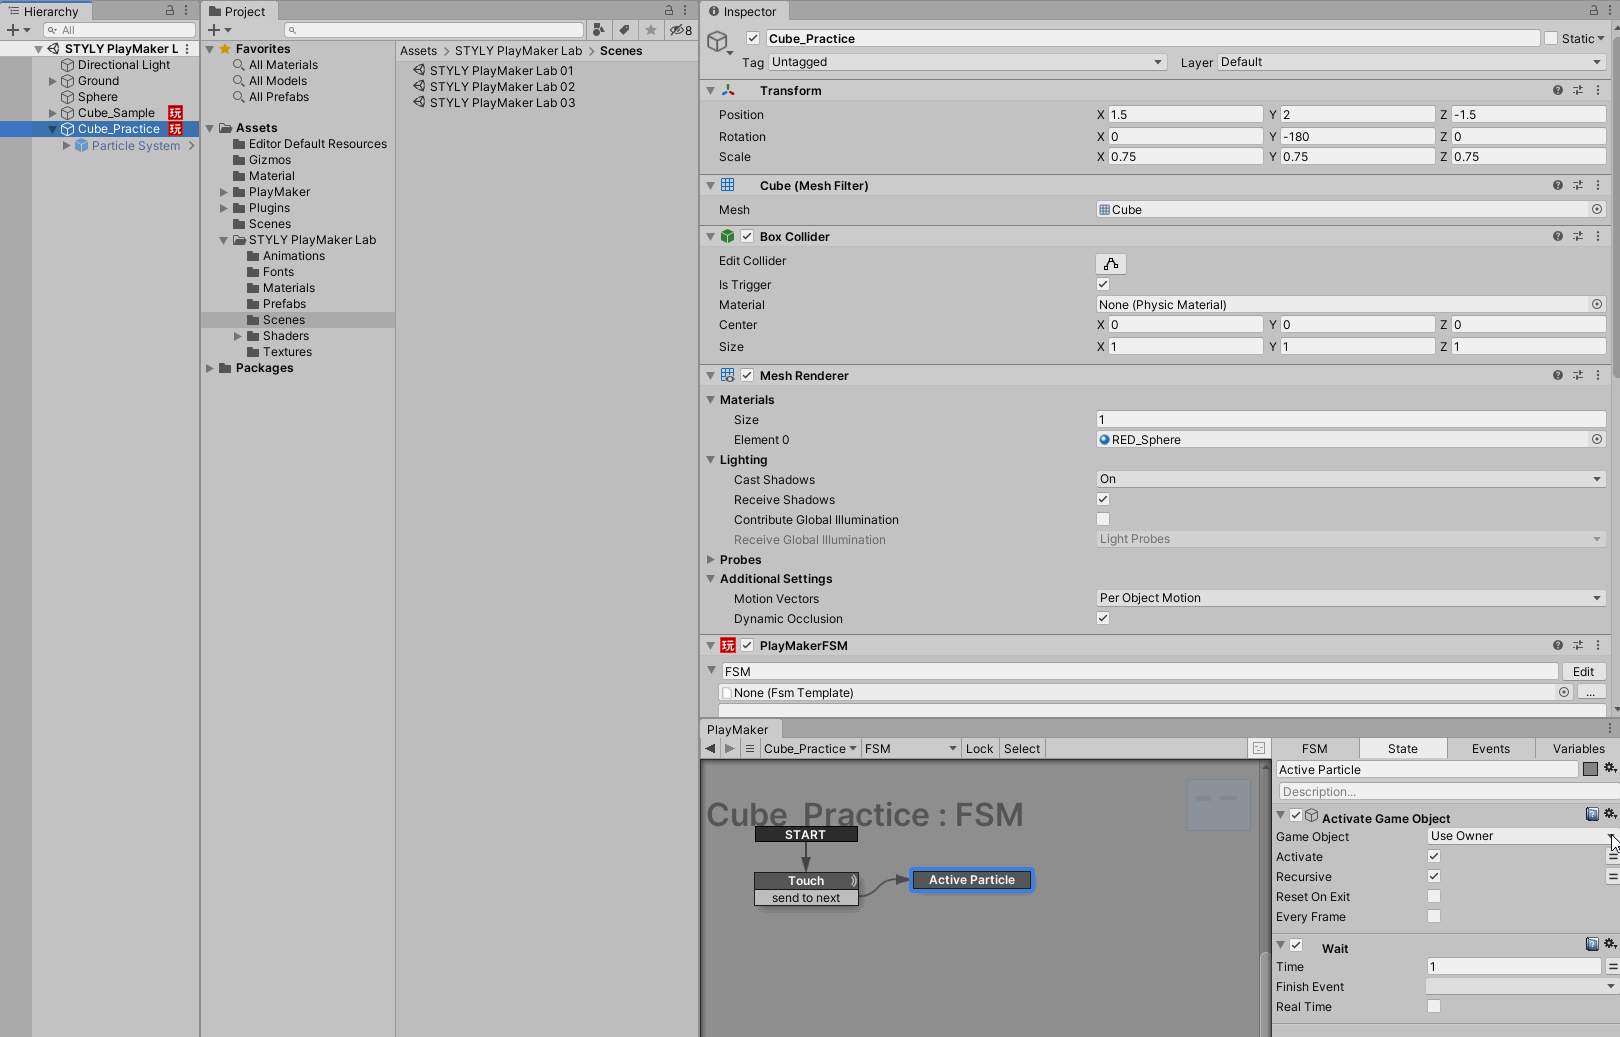
Next, let’s add an Action to generate a Particle.
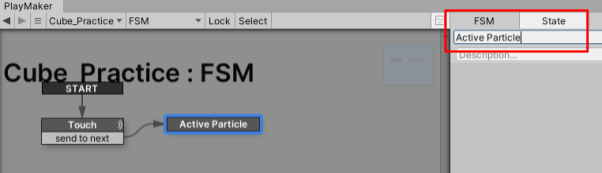
Rename State1 to Active Particle.
Add an Active Game Object and Wait to the Active Particle.
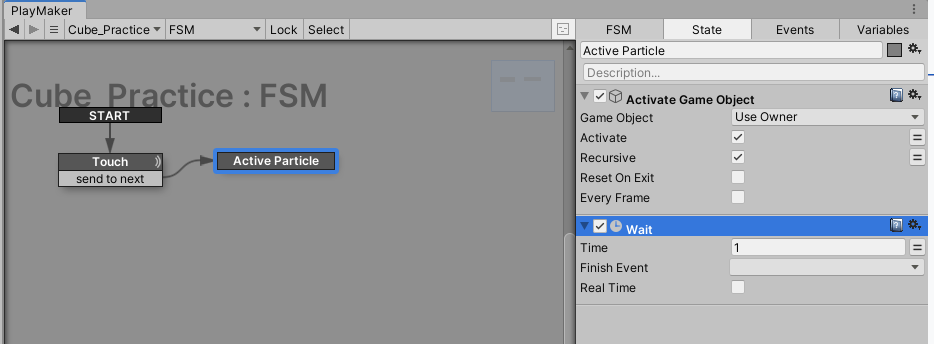
Set the Action of Active Game Object as follows.
|
Parameter Name |
Parameter Description |
Parameter Value |
|
Game Object |
Object to which the Action will be applied. |
Drag and drop a child object, Particle System (1), here (see below). |
|
Active |
Checked to make it active; unchecked to make it inactive (see below) |
Checked. |
|
Recursive |
With check, also reflected in children of objects set in Game Object. |
Checked. |
|
Reset On Exit |
Reverses the action at the end of the Action. |
Checked. To make it inactive again at the end of Action. |
|
Every Frame |
Repeat this action every frame. |
Uncheck the box. |
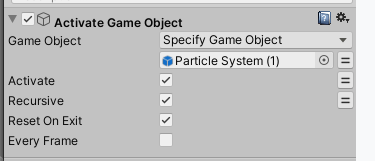
Click on the ▼ icon for the Active Game Object parameter and choose Specify Game Object.
There are two types of Game Object parameters
- Use OAwner
- Use OAwner for the object with PlayMakerFSM.
- Specify Game Object
- You can specify any object, even a prefab object.
To activate Particle System (1), a child object of Cube_Practice, drag and drop Particle System (1) from the hierarchy and set it to the form under Specify Game Object.
When you have the following settings, you are done!
Now we will explain how to activate and deactivate objects.
There is a check mark next to the name of the object in the inspector.
If this is checked, the object is active.
If it is deactivated (unchecked), the object will not be visible in the scene view and its function will not affect the scene.
In the hierarchy, the letters will fade and only the gizmo will be visible in the scene view.
By using the Active/Inactive setting, you can use the Particle when an event occurs, for example.
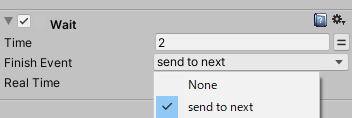
Next, let’s set the Wait parameter.
|
Parameter Name |
Parameter Description |
Parameter Value |
|
Time |
Wait time |
2 |
|
Finish Event |
Destination of event to be sent after the action is finished. |
send to next (how to set this up will be explained in the next section) |
|
Real Time |
Check this box if you do not want to be affected by TimeScale. |
Uncheck this box if you do not want to be affected by Real TimeScale. |
TimeScale: https: //docs.unity3d.com/2019.3/Documentation/ScriptReference/Time-timeScale.html
Click on the ▼ icon in the Finish Event parameter and select send to next.
You will also get a message that there is no Transition.
This time, right click on the Active Particle and select Add Transition > send to next to set the Transition.
Now let’s press the Play button once to check the operation.
Cube_Practice generates a Particle only once when a yellow Sphere collides with it, but Cube_Sample generates a Particle every time a yellow Sphere collides with it.
Please think about the last setting point and make it by yourself.
A hint is where to connect the Transition of Active Particle.
If you don’t know, take a look at PlayMakerFSM of Cube_Sample.
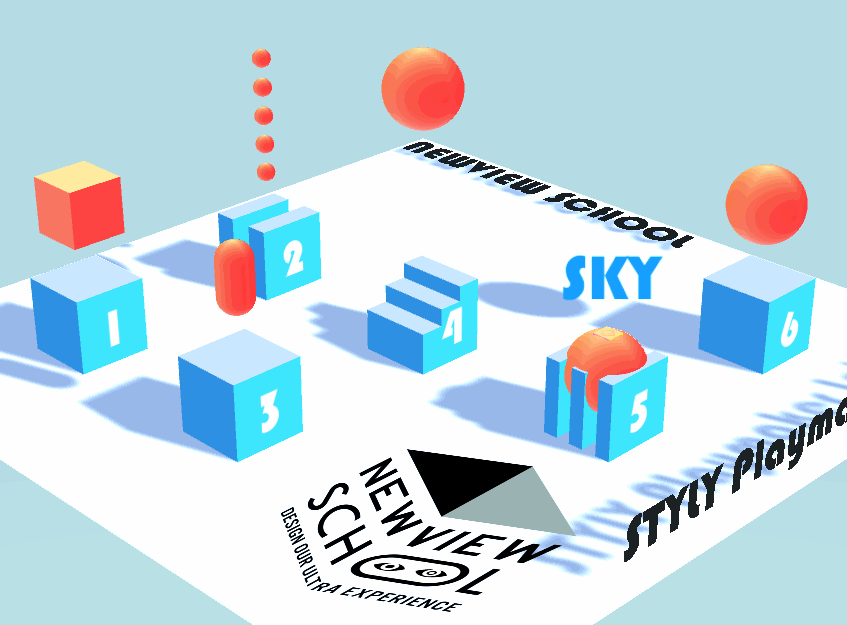
Description of the 6 samples
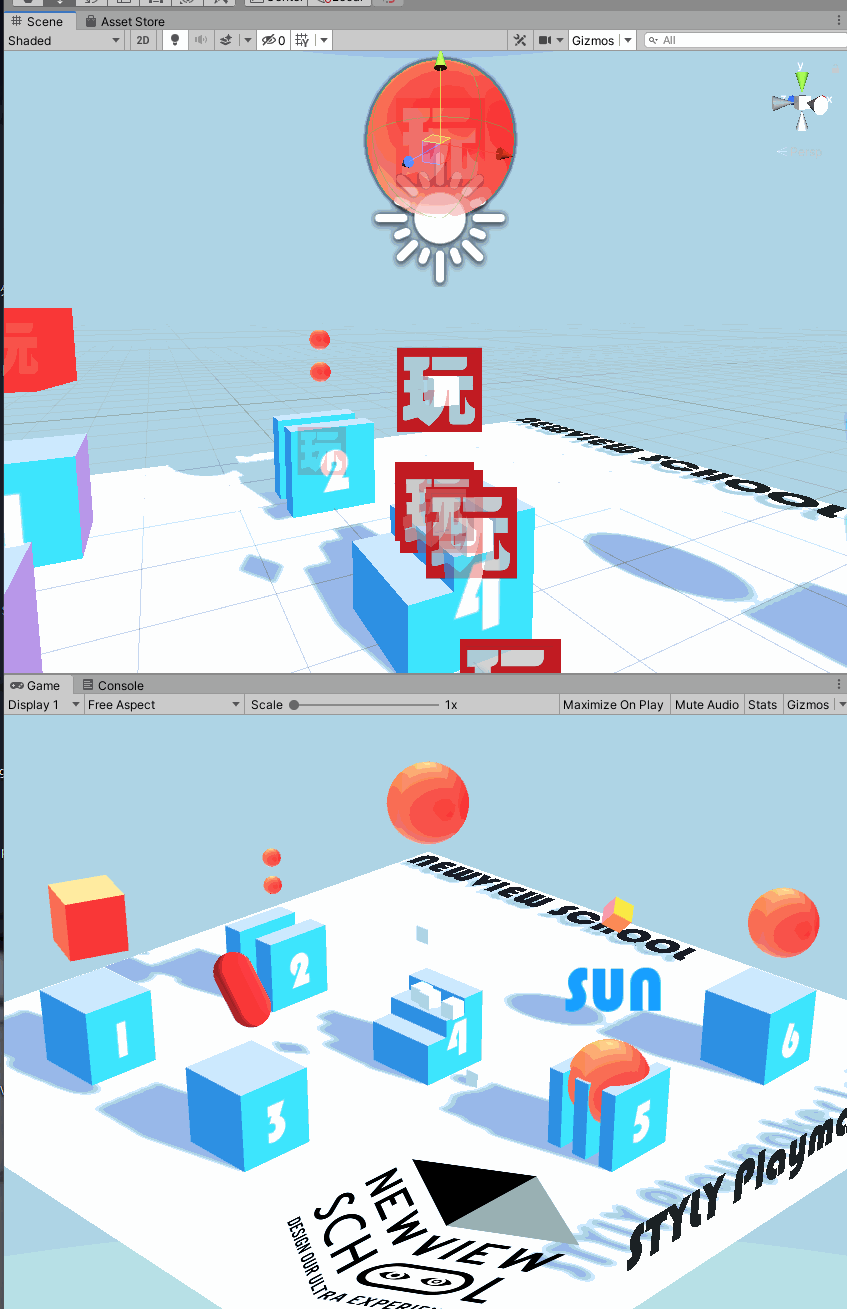
Open the scene by double-clicking on STYLY PlayMaker Lab 03.Scene in the project Assets > STYLY PlayMaker Lab > Scenes.
Let’s play it.
Six PlayMakerFSM samples are available.
Here is an explanation of each Action.
|
Object Name |
Action |
|
01_Sample |
Cube rotates |
|
02_Sample |
Sphere is deactivated every second |
|
03_Sample |
Randomly changes color |
|
04_Sample |
Creates an object |
|
05_Sample |
When a Cube collides with a Sphere, the text changes from SKY to SEA to SUN. |
|
06_Sample |
The scale is changed using four arithmetic operations based on the distance traveled. |
Rotation
Here is an Action to rotate the Cube in 01_Sample.
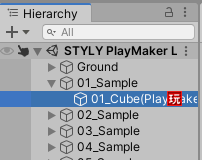
Select the (child object) 01_Cube (Playmaker) of 01_Sample in the hierarchy.
Use Rotate to rotate it.
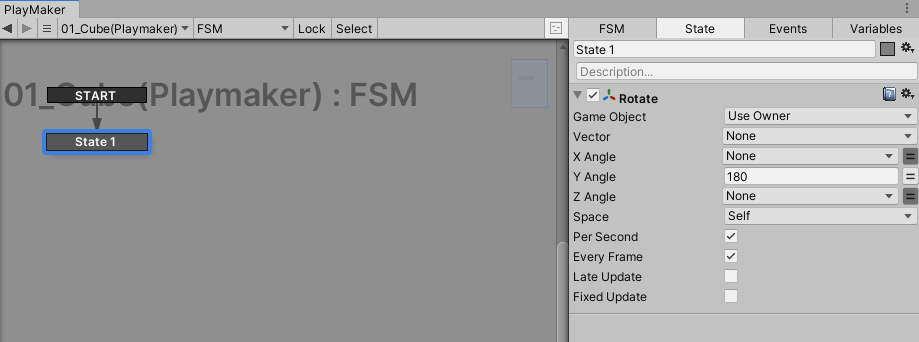
Rotate
|
Parameter Name |
Parameter Description |
|
Game Object |
Object to which the action will be applied. |
|
Vector |
Rotation vector specifying rotation around the X, Y, and Z axes Note: Individual axes can be overridden below |
|
X Angle |
Degrees of rotation about the X axis. |
|
Y Angle |
Degrees of rotation about the Y axis |
|
Z Angle |
Degrees of rotation about the Z axis |
|
Space |
World rotates based on the world coordinates. Self rotates based on the object specified in Game Object. |
|
Per Second |
Rotation is specified in degrees per second. This is the amount of rotation per second. (Check this box if you want the object to rotate continuously.) |
|
Every Frame |
Repeat every frame. |
About Space parameter
Set Rotation X of Transform to 45 and Y Angle of “Rotate” Action to 180,
Space” is set to “World”, it will rotate based on the world coordinates.
Set the Rotation X of the Transform to 45 and the Y Angle of the “Rotate” Action to 180,
Space is set to Self, the rotation is based on the coordinates of the object specified in Game Object.
Active/Inactive
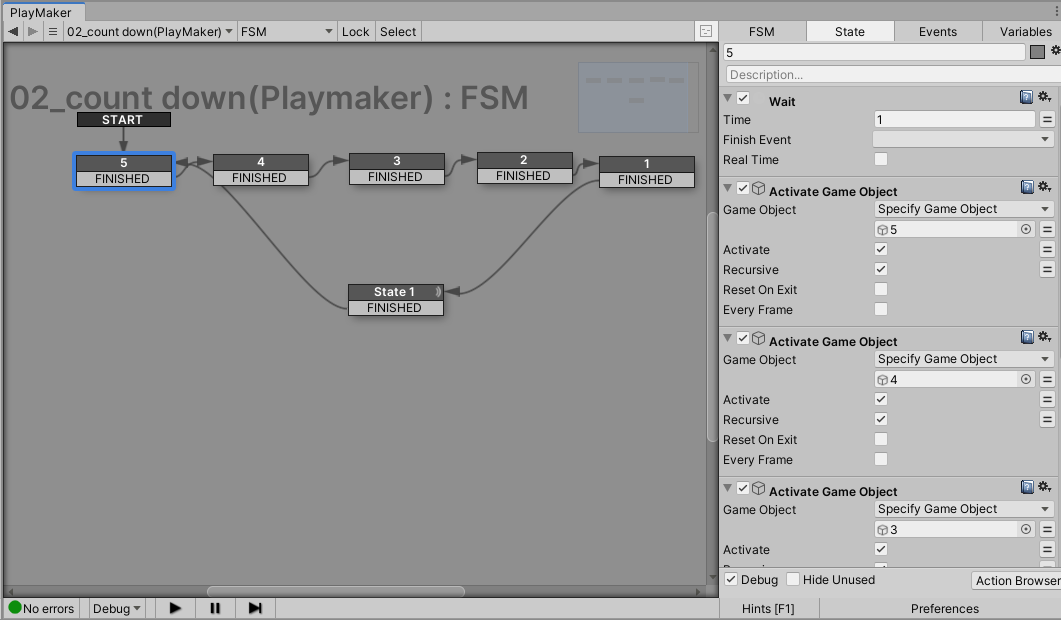
The following is an Action that deactivates the 5 Spheres of 02_Sample one by one and then activates all 5 Spheres.
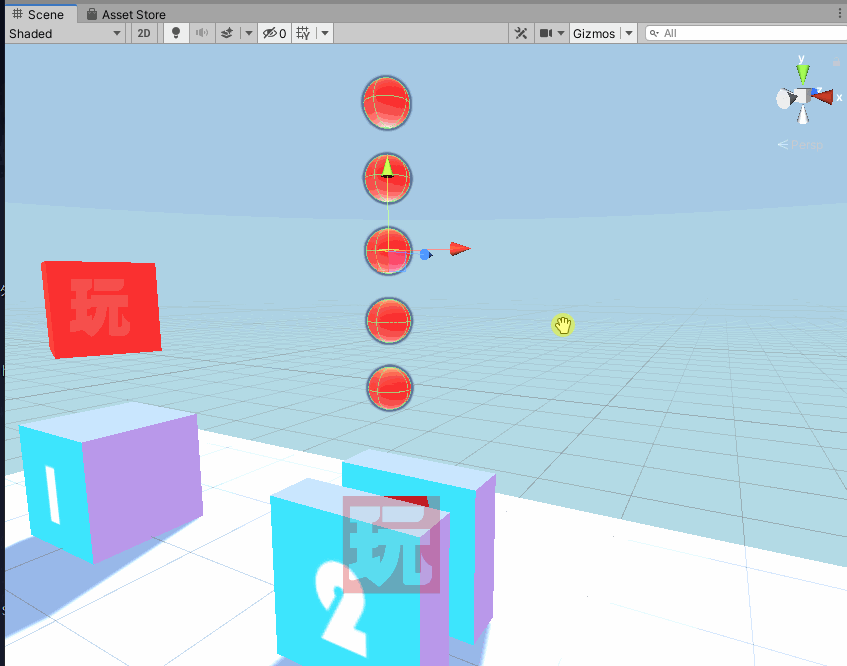
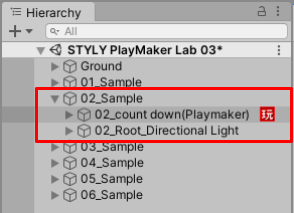
Select (child object) 02_count down (PlayMaker) of 02_Sample in the hierarchy.
This one is created using Activate Game Object and Wait, which we learned in 5.2.
Random Events
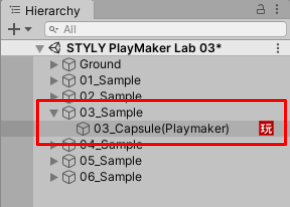
Here is an Action that randomly changes the material of the Sphere in 03_Sample.
Select (child object) 03_Capsule (PlayMaker) of 03_Sample in the hierarchy.
Use a Random Event in State1 to make a transition to one of 1/2/3.
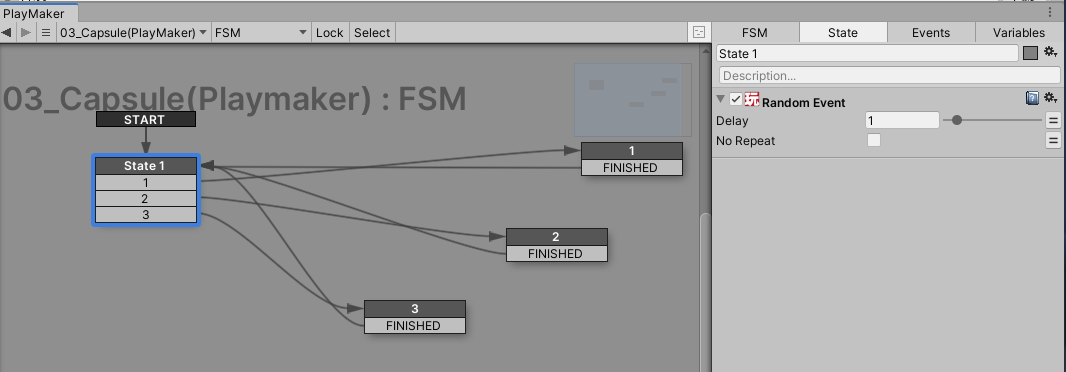
Random Event
|
Parameter Name |
Parameter Description |
|
Delay |
Specifies the time in seconds before the event is sent. |
|
No Repat |
Check this box if you do not want to repeat the same event twice in a row. |
Use Set Material in the next State to change the color.
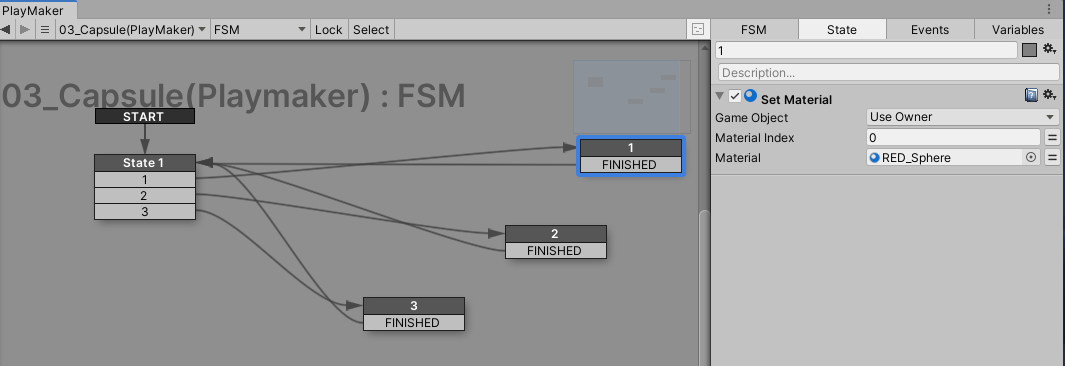
Set Material
|
Parameter Name |
Parameter Description |
|
Game Object |
Object to which the Action will be applied. |
|
Material Index |
Index of the object’s material Basically, 0 is all that is needed. |
|
Material |
Sets the material to be used for the object. Drag and drop a material from the project to set the material. |
Creating Objects
Here is the Action to create the Cube of 04_Sample in the scene.
Select the (child object) 04_Sphere (PlayMaker) of 04_Sample in the hierarchy.

Repeat Create Object to create an object in the scene and wait 1 second.
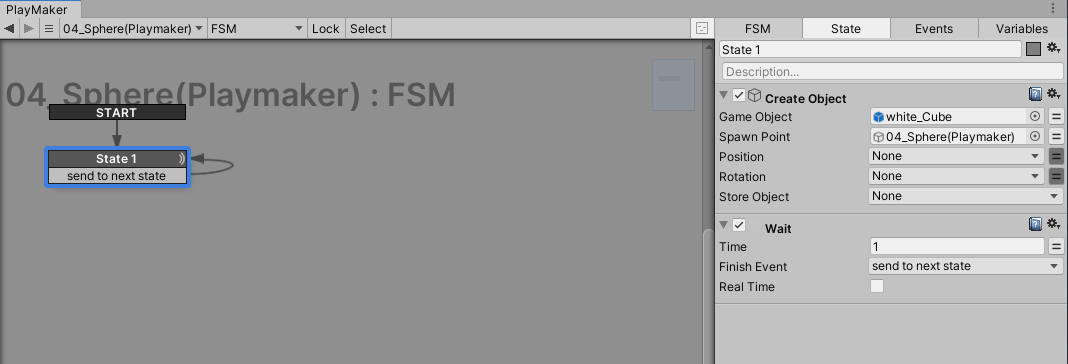
Create Object
|
Parameter Name |
Parameter Description |
|
Game Object |
Object to which the action will be applied. |
|
Spawn Point |
Location where the object will be created Can be an object in the scene |
|
Position |
Allows you to set the position |
|
Rotation |
Allows you to set the rotation |
|
Store Object |
Stores the created object in a variable |
When the scene is played back, the white_Cube created by Create Object will continue to be created in the hierarchy under the name white_Cube(Clone).
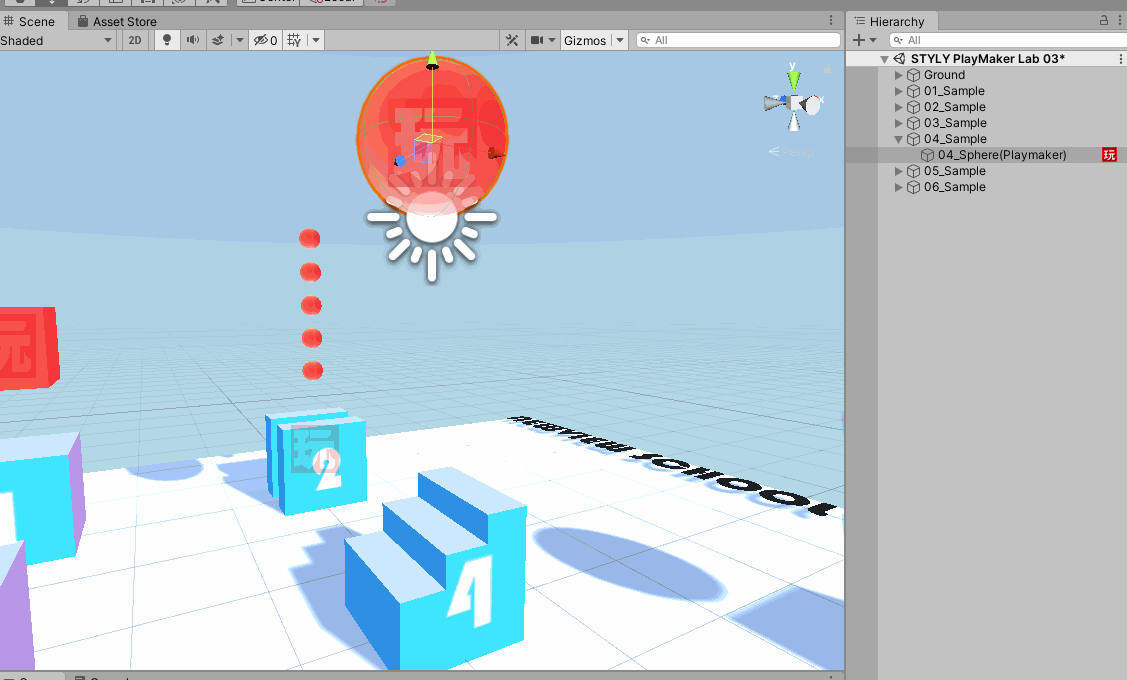
There is a caveat when using Create Object to continue creating objects.
Do not keep creating objects indefinitely.
Therefore, be sure to include an action such as “stop” when the number of objects reaches a certain level or “delete” after a few seconds.
In this white_Cube prefab, we have included an Action to delete an object after 5 seconds.
To delete an object, use Destroy Object.
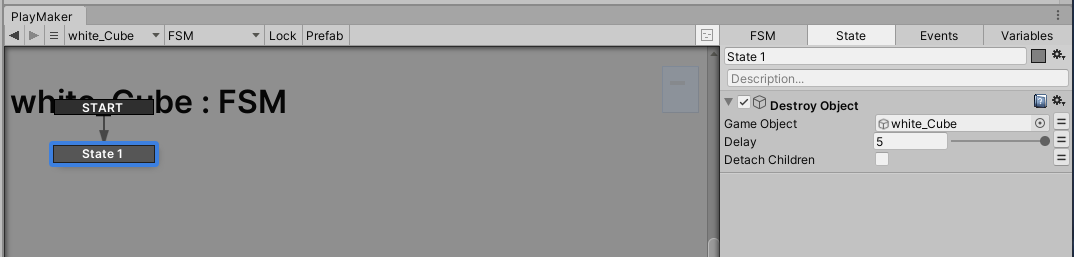
Destroy Object
|
Parameter Name |
Parameter Description |
|
Game Object |
Object to be Actioned |
|
Delay |
Time until the action is triggered |
|
Detach Childern |
Detach the child object before deleting the object |
Changing Objects by Collision
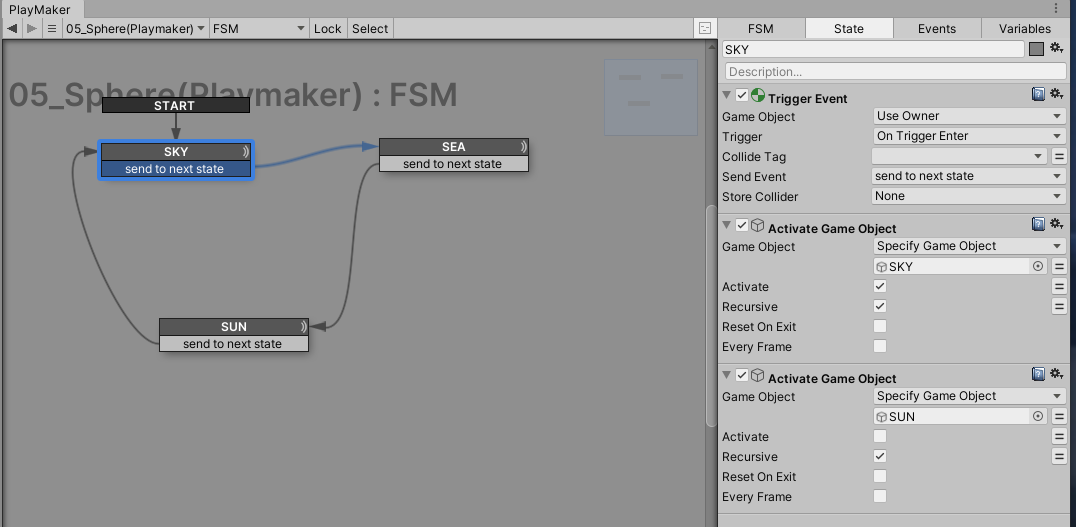
When a Cube collides with a Sphere in 05_Sample, we introduce an Action that changes the text from SKY to SEA to SUN.
Select (child object) 05_Sphere (PlayMaker) of 05_Sample in the hierarchy.
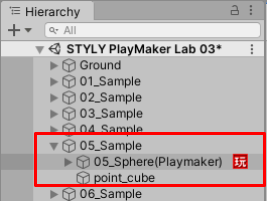
Using the Trigger Event learned in 5.2. Creating PlayMakerFSM from scratch (What is a trigger?), skip the event, deactivate the object displaying the SKY text, and activate the object displaying the SEA text repeatedly to create it.
Change the scale using the four arithmetic operations
Here is an Action that changes the size of the Sphere in 06_Sample using quadratic operations.
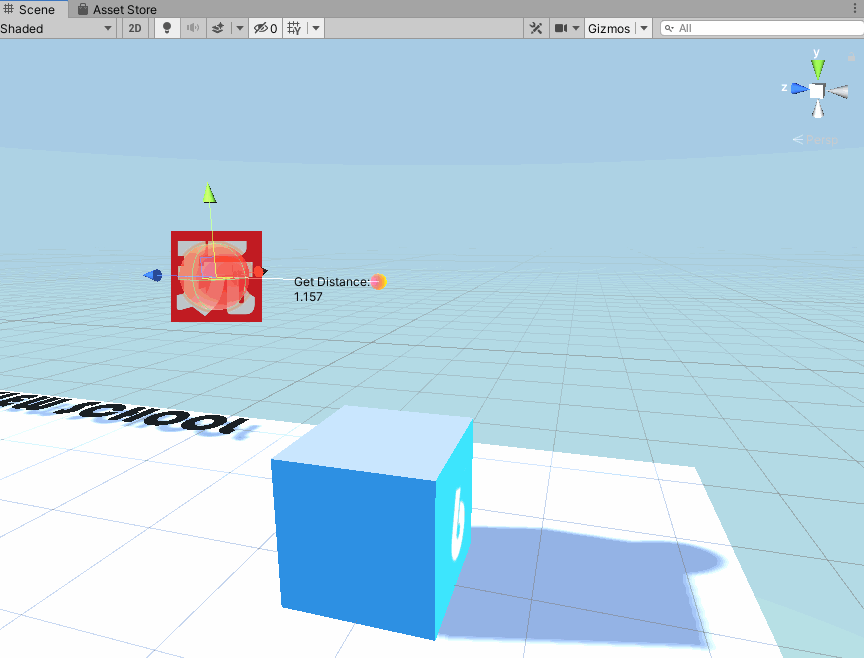
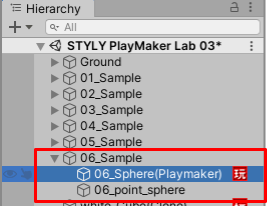
Select (child object) 06_Sphere(PlayMaker) of 06_Sample in the hierarchy.
I will explain in order from the top.
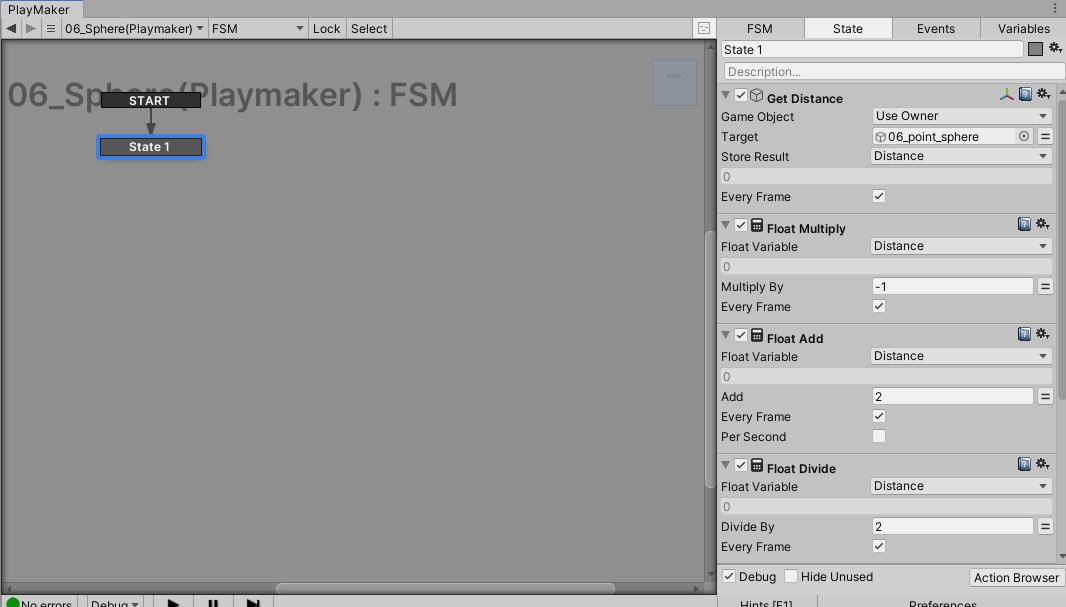
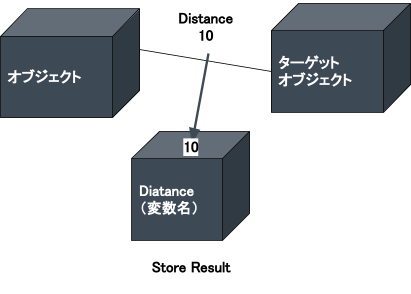
Get Distance is used to obtain the distance between the object and the target, and store the obtained value in the variable set in Store Result.
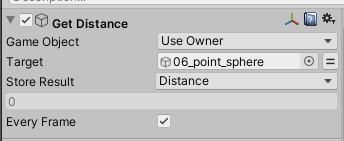
Get Distance
|
Parameter Name |
Parameter Description |
|
Game Object |
Target object of the Action |
|
Target |
The target object whose distance from the Game Object is to be measured. |
|
Store Result |
Stores the distance between the Game Object and the Target. |
|
Every Frame |
Repeat this operation for every frame. |
Store Result is a variable that stores the result; if you create a variable called Distance and put the value of the distance between the Game Object and the Target in it, you can use the value of Distance in other actions.
Using the value (Distance) obtained with Get Distance, Float Multiplay (multiply), Float Add (add), and Float Divide (divide) are applied to Distance, and finally the value of Distance is set to the Sphere scale X, Y, Z with Set Scele.
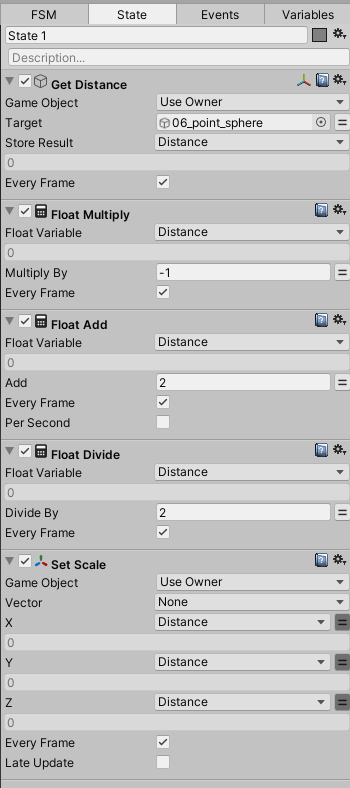
Float Multiply
|
Parameter Name |
Parameter Description |
|
Float Variable |
Variable to be multiplied |
|
Multiply By |
Multiply By |
|
Every Frame |
This operation is repeated every frame. |
Float Add
|
Parameter Name |
Parameter Description |
|
Float Variable |
Variable to be added |
|
Variable to be added |
Value to be added |
|
Every Frame |
This operation is repeated every frame. |
Float Divide
|
Parameter Name |
Parameter Description |
|
Float Variable |
Variable to be divided |
|
Divide By |
Value to be divided by |
|
Every Frame |
Repeat this operation for every frame. |
Set Scale
|
Parameter Name |
Parameter Description |
|
Game Object |
Object to which the action will be applied. |
|
Vector |
ScaleX,Y,Z can be set in the form of Vector3(X,Y,Z). However, the parameters X, Y, and Z take precedence. Vector(2,2,2), where X and Y are None and Z is 3. |
|
X |
Value to set for Scale X in Transform |
|
Y |
Value set for Scale Y of Transform |
|
Z |
Value set to Transform’s Scale Z |
|
Every Frame |
This action is repeated every frame. |
Summary of frequently used actions
|
Condition |
Trigger Event |
An action that detects when something touches the object and fires an event. |
|
Get Distance |
Action to measure the distance between an object and a target object; the measured value can be saved as Variables. |
|
|
Random Event |
An action to trigger a random event from among multiple events attached to a State. |
|
|
Wait |
An action that fires an event after a specified amount of time has elapsed. |
|
|
Float Compare |
An action that can compare a numerical value (Float). |
|
|
Result |
Activate Game Object |
An action to activate or deactivate an object. |
|
Create Object |
An action that creates an arbitrary object in the scene, and allows the user to specify the coordinates where the object will be created. |
|
|
Set Material |
Action to change the material of an object. |
|
|
Rotate |
Action to rotate an object. |
|
|
Set Position |
Action to set the coordinates of an object |
|
|
Set Rotation |
Action to set the angle of an object |
|
|
Set Scale |
Action to set the object’s scale |
|
|
Set Property |
Action to change object properties (items that can be set in the inspector). |
|
|
Animator Play |
Action to control an animator and play animation. |
|
|
Audio Play |
Action to play sound. |
|
|
Set Gravity |
Action to change the gravity. |
|
|
Add Force |
Action to add force to an object, if it has a “rigidbody” it will move under the force. |
|
|
Calculation |
Float Multiply |
Action to perform multiplication |
|
Float Add |
Actions to add. |
|
|
Float Devide |
Action that performs division |