In this article, I will explain how to use Unity’s Ray and PlayMaker to generate particles in the distance like the GIF below.
By understanding the concept of Ray, you can use it in a variety of ways, such as pseudo-eye-gaze reproduction.
We hope you will give it a try.

Functions we will create
Sample
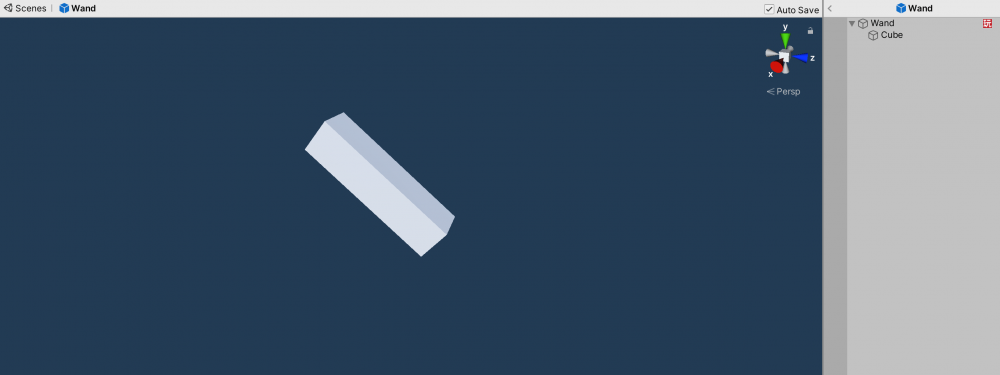
This time, we will create the wand in the scene shown here.
Let’s check it out.
When you select the wand with the right controller and pull the trigger, particles will be generated.
*This scene is compatible with VR only.
Advance preparation
Install PlayMaker, a plug-in for Unity, in advance.
In this article, we are using PlayMaker version: 1.9.1p4.
![[Unity Tutorial] Creating a Game Using Playmaker ① From Basic Introduction to Installing](https://styly.cc/wp-content/uploads/2019/06/1200px-160x160.jpg)
If you are using PlayMaker for the first time, you can deepen your understanding by reading the following article in advance.
![[Unity] Starting Playmaker from Scratch](https://styly.cc/wp-content/uploads/2019/09/PlaymaerCoreConcept-160x160.png)
Also, we use particles from this asset.
You can download them for free.
Ray Concept and Implementation Flow
First, let me briefly explain the concept of Ray.
Ray is a transparent ray of light. It is fired from specific coordinates and judged when it collides with an object.
This time, we will use this ray to
- When the trigger is pulled, Ray is fired from the equipped wand.
- When the ray collides with an object, it saves the coordinate to a variable.
- When the ray collides with an object, the coordinate is saved in a variable and a particle is generated at the location of the saved variable.
This is the order in which we will implement the functions.
Creating the wand
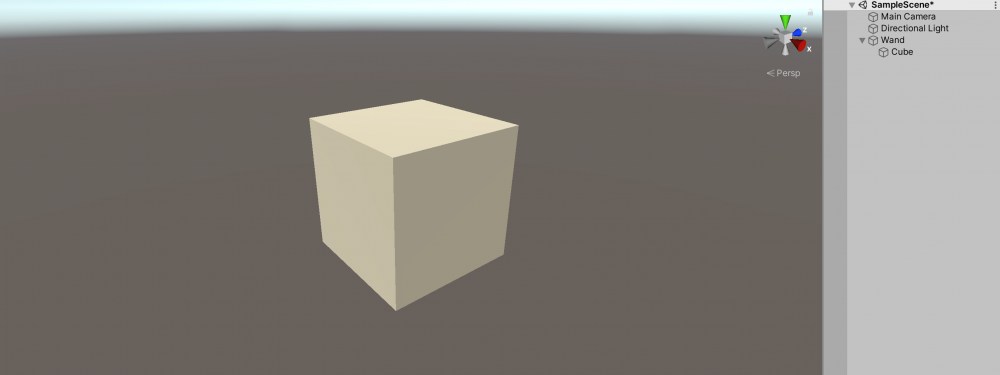
First, let’s create a 3D model of the wand.
Completed image
First, we will place a Cube in the scene. Name it “Wand”.
Then, place another Cube as a child object of the Wand.
You don’t need to change the name of this object, it’s fine.
Structure of Wand
Next, we need to adjust the size of the wand so that it looks natural when viewed in VR.
Also, adjust the position of the Wand so that it is positioned where you want the handle to be.
Set the properties of the object as shown in the following image.
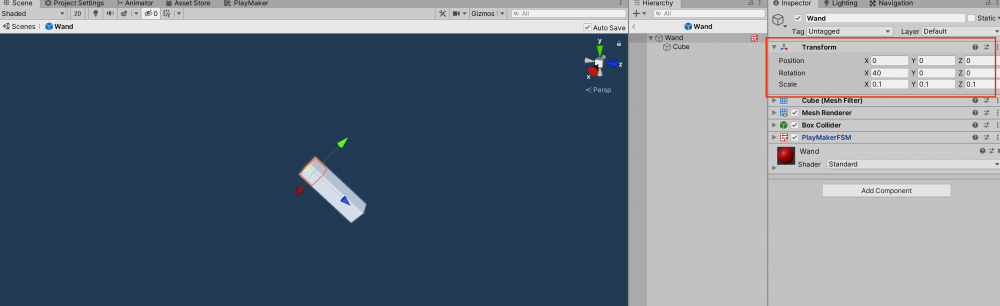
Properties of the Wand

Properties of the Cube
The reason for this structure is to set the handles at just the right position in the SetParent action described below.
I will explain it in more detail later.
The creation of the wand is now complete.
Making the wand follow the controller
The next step is to use PlayMaker to set up the wand to follow the controller.
The flow is as follows
- First, get the controller object.
- When the object is clicked, use Get Position to get the controller’s coordinates.
- Set Position to move the wand’s position to the controller’s coordinates.
- Set Parent to make the wand a child object of the controller and make it follow the controller.
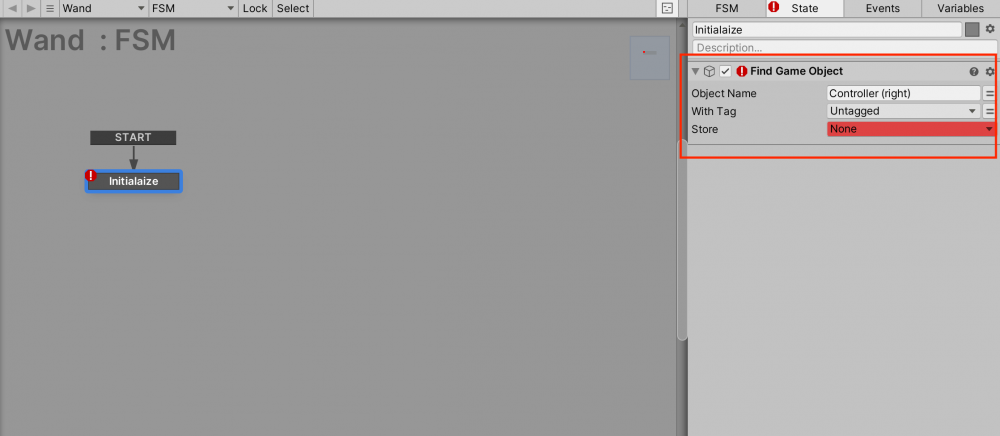
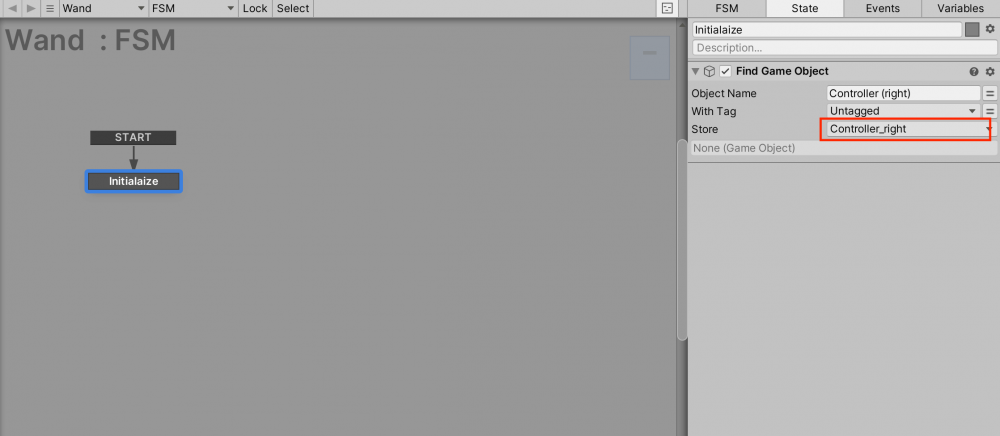
First, add the FSM to the Wand object and rename State1 to “Initialize” to avoid confusion.
Add a Find Game Object action to Initialize, and specify “Controller (right)” as the Object Name.
Note that if you get even one letter wrong, it will not work.
There must be a space between “Controller” and “(right)”.
Also, do not include any spaces after (right).
Initialize Settings_1
Then, in the Store Object section, write the name of the variable that will store the right controller.
In this case, we set it as Controller_right. This variable name can be anything you want.
Setting of initialize_2
Now you have obtained the right controller and stored it in a variable.
Next, in the FSM, left click on Add Global Transition and add UI Events > UI POINTER CLICK.
This event can be used to detect when an object is clicked.

Adding a Transition for UI POINTER CLICK
For the sake of clarity, change the State name leading from UI POINTER CLICK to “OnClick”.
We will configure the settings to follow with this State.
First, add a Get Position action to get the coordinates of the Controler_right and store them in a variable.
Change the Game Object section to Specify Game Object, and specify Controller_right.
Then, store it as a Vector3 type variable named “rightControllerPos”.
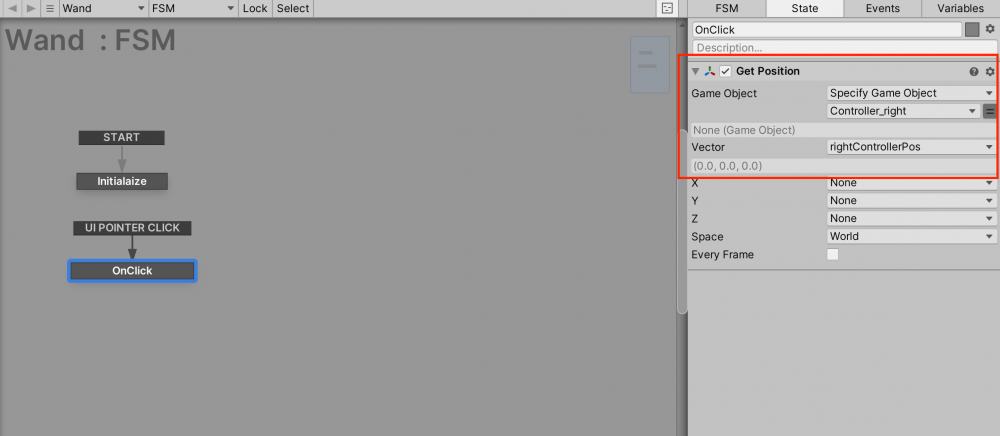
Get the coordinates of the right controller
Now, we have got the coordinates.
Next, add a Set Position action under the Get Position action, leaving the Game Object as Use Owner and specifying the previous rightControllerPos in the Vector section. This will move the wand to the controller’s position.

Set the wand to the controller’s coordinates
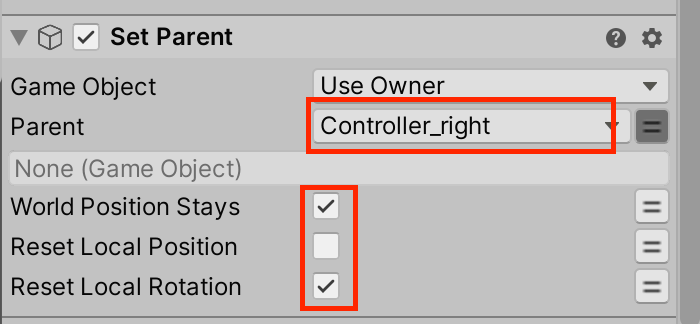
Finally, add a Set Parent action under Set Position, and specify Controller_right for Parent.
Then check the World Position Stays and Reset Local Rotation checkboxes.
Depending on which version of PlayMaker you are using, the “World Position Stays” item may not be present. In that case, only check Reset Local Rotation.
Make the wand a child object of the controller
Now, the wand will follow the right controller.
Select the wand with the right controller in the scene.

The wand will now follow the controller.
With the Set Parent action, the child object will be placed in the center of the parent object.
The handle is set to be the child object so that the center of the handle will follow the center of the wand
Sending a Ray from the Wand
Next, we will set up the PlayMaker so that the ray will fly from the end of the wand.
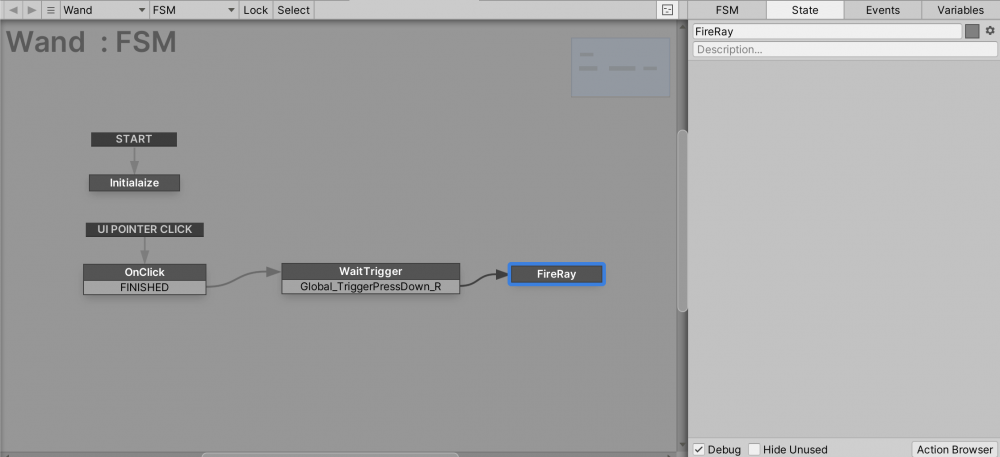
First, create a new State and set it as the transition destination for OnClick.
The Transition Event from OnClick should be set to FINISHED.
In this State, name it “WaitTrigger” to accept the controller’s trigger input.
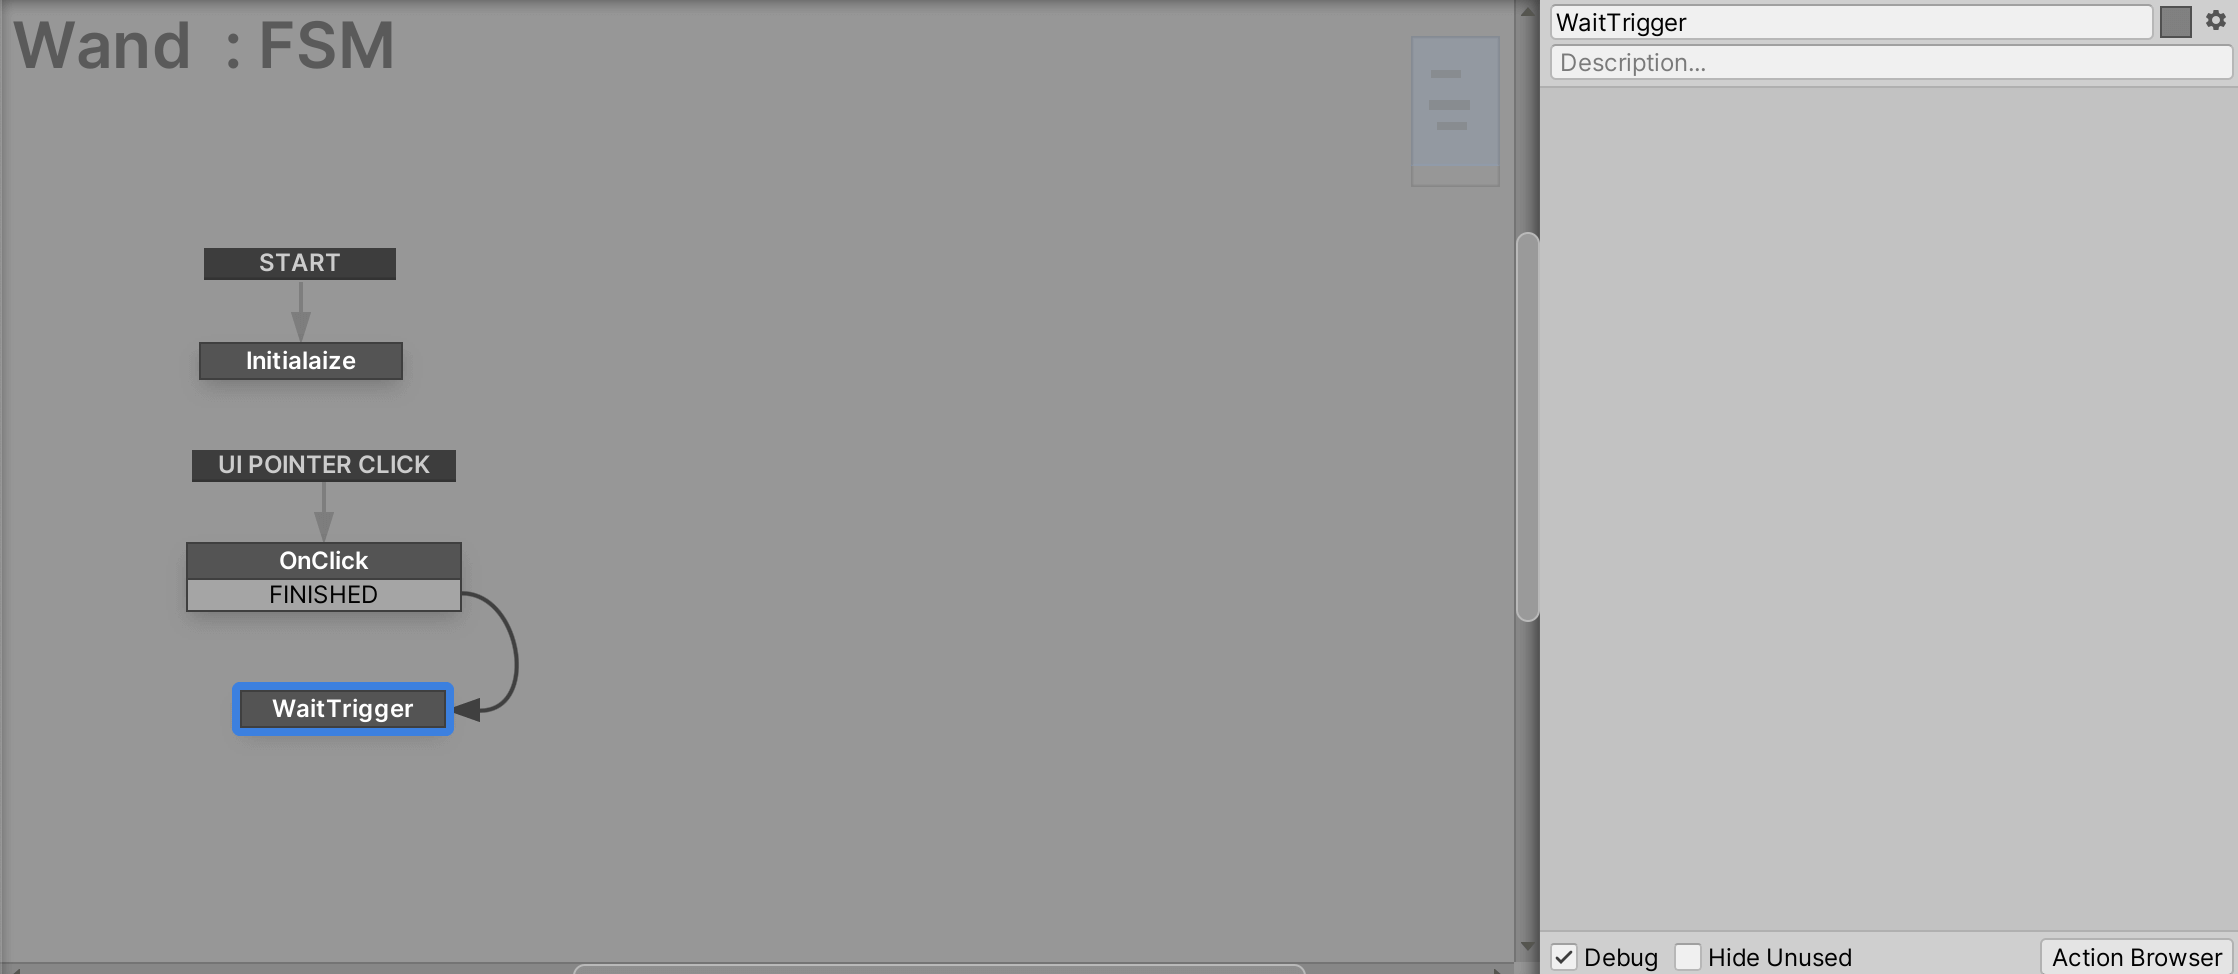
Create a State to accept trigger input
Next, we will create an event for the trigger input.
Go to the Event tab > Add Event and add an action named “Global_TriggerPressDown_R”.
If you make even a single character mistake, it will not work properly. Please be careful.

Create the Trigger Input Event
After creating the event, set Global_TriggerPressDown_R as the Transition Event, add a new State, and set it as the transition destination.
Since we will be firing a Ray in this State, name it “FireRay”.
Transition to FireRay on trigger input
From here, we will set up the FireRay.
Add an action called “RayCast”. This action will fire the ray.
In the From GameObject section, set Wand itself and Direction to Z direction.
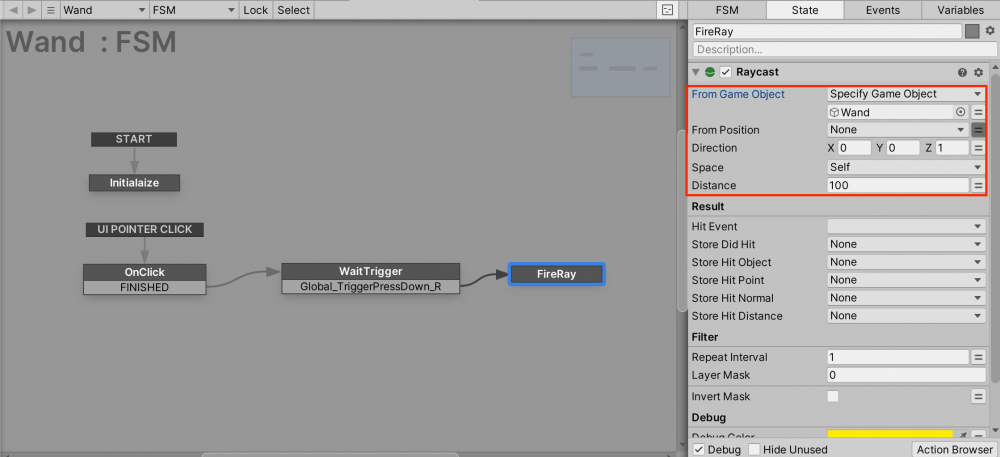
Sending a Ray from Wand to Z direction
In the HitEvent section of the Result, you can set an event for when the ray collides with the object.
Let’s create a new HitRaycast event and call it.
You can also get the coordinate data of the collision location in the StoreHitPoint section.
Create a new HitPoint variable and store the coordinate data in this variable.
If you can set up the Raycast action as shown below, you are good to go.

Edit Result
Create a particle at the position where the Ray collided
Finally, we will generate a particle based on the coordinate data stored in the HitPoint.
Set up a HitRaycast event as a Transition Event from FireRay and create a State for the transition destination.
Since we will generate particles at the transition destination, we will name the State “CreateParticle”.

Adding a CreateParticle
Add the Create Object action to CreateParticle.
Specify the object you want to create in the Game Object section of the action.
In this case, we are going to use explosion magic, so we will use the following in the prepared Effect Example
Fire & Explosion Effects > Prefabs > BigExplosion as the object to be generated.
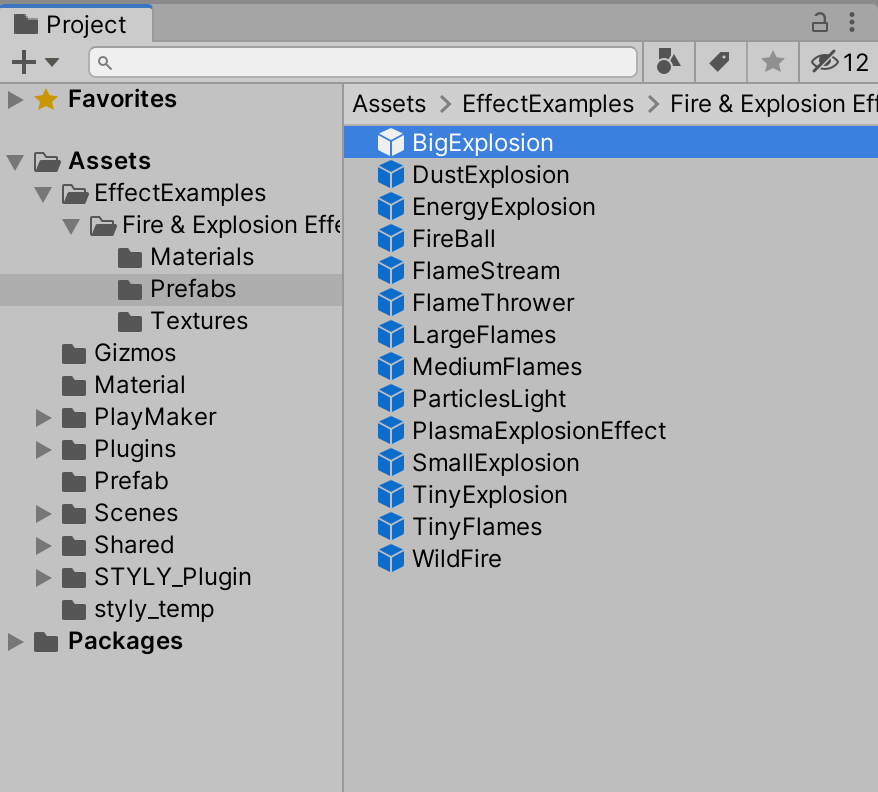
Select the particle to be generated
In Position, specify the location of the particle to be generated.
Let’s set the HitPosition we just created here.
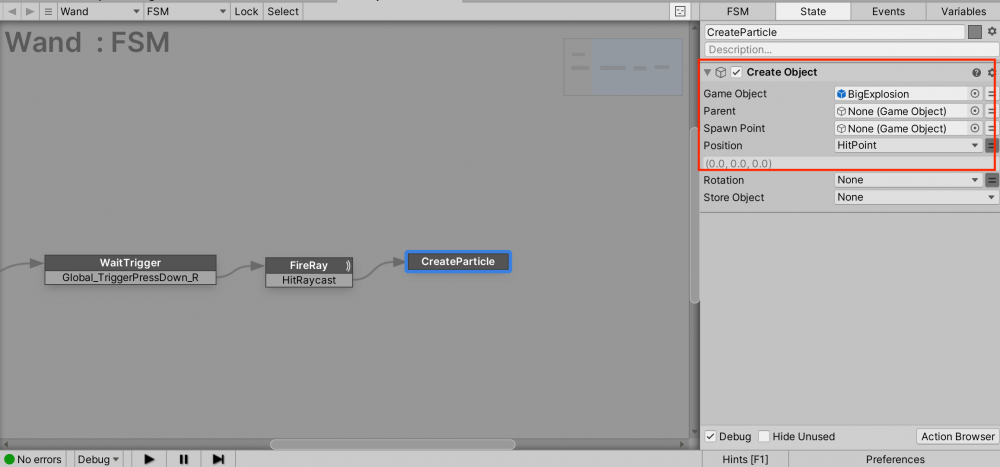
Specify the coordinates to be generated
Then, add FINISHED as the Transition Event, and specify the transition destination as WaitTrigger.
Now you can accept input again after the particle is generated.
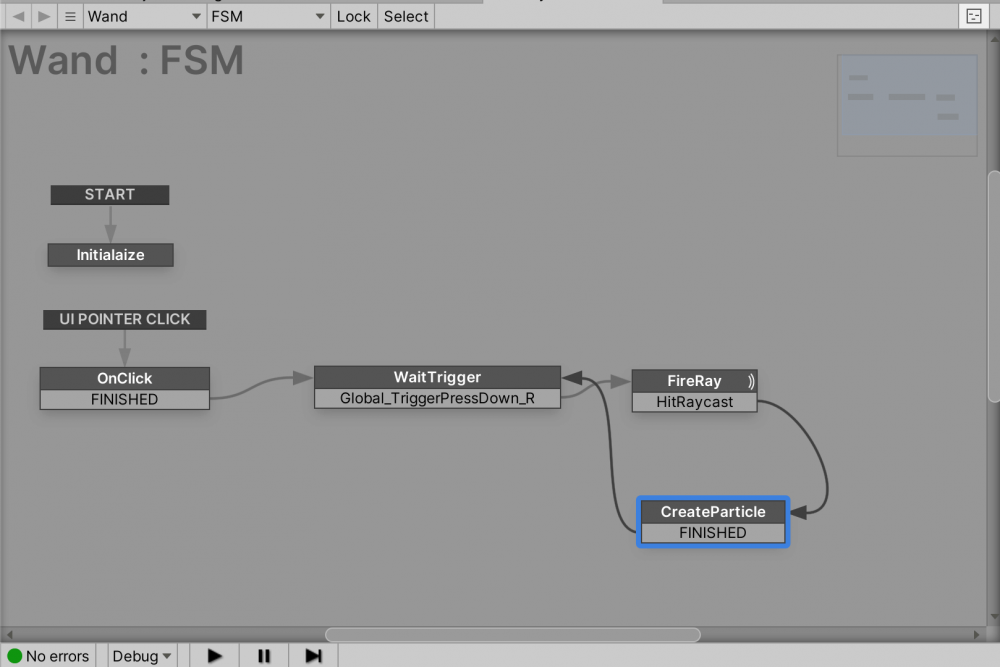
Setting the transition destination to WaitTrigger
In the default settings, the particles are looping, so we will change the settings.
Select Big Explosion and display the Particle System component.
Uncheck Looping, and set Stop Action to Destroy.
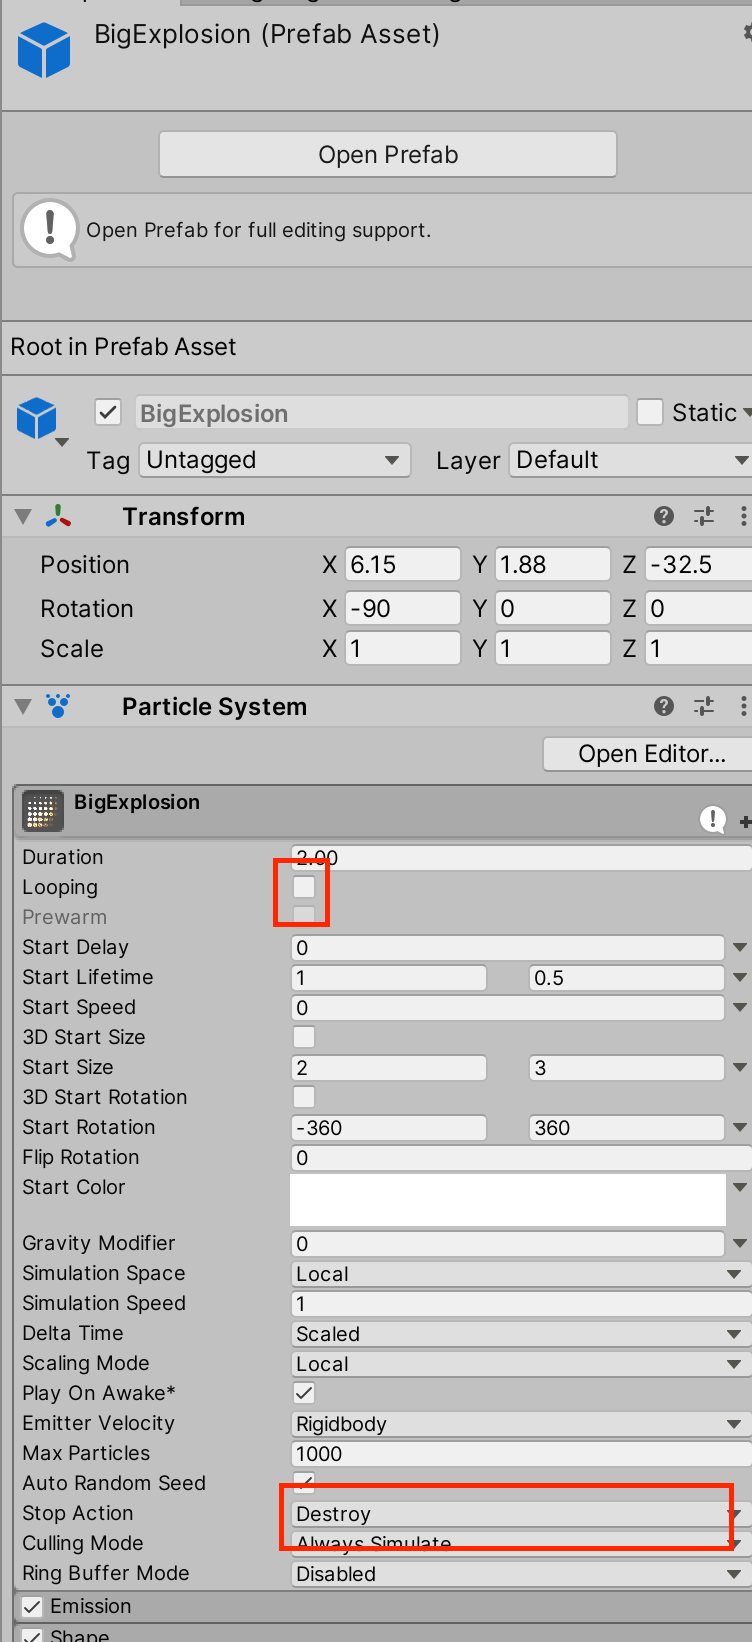
Configure the settings to prevent the Particle from repeating.
Now, when you press the trigger, the explosion particle will be generated in the distance!

Now you can generate particles!
If it doesn’t work, please check again if the controller name and trigger event names are correct.
You can also refer to the official STYLY documentation for more detailed instructions, which may help.
How to upload wand to STYLY
Upload your completed wand to STYLY as a prefab.
Create a STYLY account
How to create an account

How to upload to STYLY

How to upload from Unity to STYLY

In this article, I explained how to handle Unity’s Ray in PlayMaker.