About Location Markers
A location marker is one of the alignment features provided by STYLY that places a marker in the real-world environment to serve as the origin.
In a typical AR scene (created using the AR template), planar detection is used at scene startup to find the origin and then play the scene each time the AR scene is launched. In AR scenes using location markers, there is no need for planar detection; instead, the marker set up in the real-world environment acts as the origin. This is recommended for creating AR scenes that link to the real-world environment.

Introduction of Patterns Using Location Markers
Here are three examples of AR scenes that use location markers.
Footprint Type
Place the location marker on the ground or floor, setting it as the origin of the AR scene.

Business Card or Sticker Type
Use this when creating an AR scene linked to a business card or sticker.

Signboard Type
Place a location marker on a signboard or wall, setting it as the origin of the AR scene.

How to Create an AR Scene Using Location Markers
On the new scene creation screen, select the location marker and click the [Create Scene] button.

The Location Maker asset placed in the scene serves as the origin, so build the AR scene with the Location Maker asset as the origin.
Changing the position and orientation of the Location Maker asset will sync with the location marker’s position and orientation in the real world. However, note that the size of the Location Maker asset does not sync.

Location Maker asset set vertically, assuming a signboard. Position and orientation are synced, but the size is not, so be aware.

Place the Location Maker asset on the floor, assuming a footprint type.
Once the scene is created, click the publish button.
Click the Publish button to publish the scene.
Creating a Location ID from the Scene URL
Copy the scene URL.

Select a location.

Click the New Location button.

Enter the location name and details, paste the copied scene URL in the scene field, and click the save button after adding the scene.
Only scenes created in My Account can be added.
Only one scene can be entered.

The creation of the Location ID is complete.

Creating a Location Marker from a Location ID
You need to pre-determine the actual size of the location marker when printed. The actual size of the location marker is the length and width of the printed marker part, as shown in the image below.

Location markers need to include size information (in cm) within the QR code to be generated later (this information adjusts the scene scale in Studio based on size). For example, if you print a 30cm x 30cm marker with size information set to 10cm x 10cm, the scale in the scene will be inaccurate.
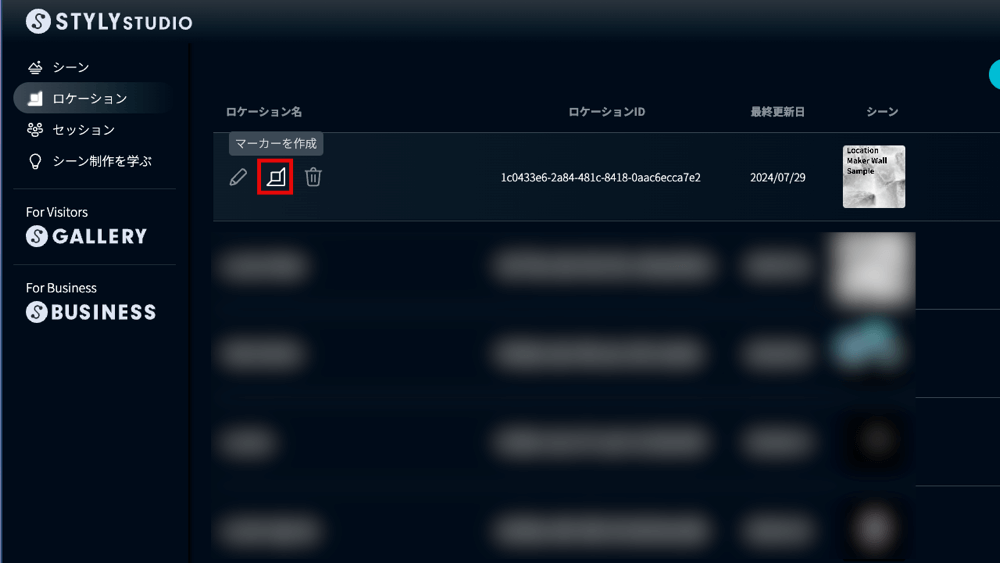
The steps to issue a location marker are as follows:
Click on the marker icon.
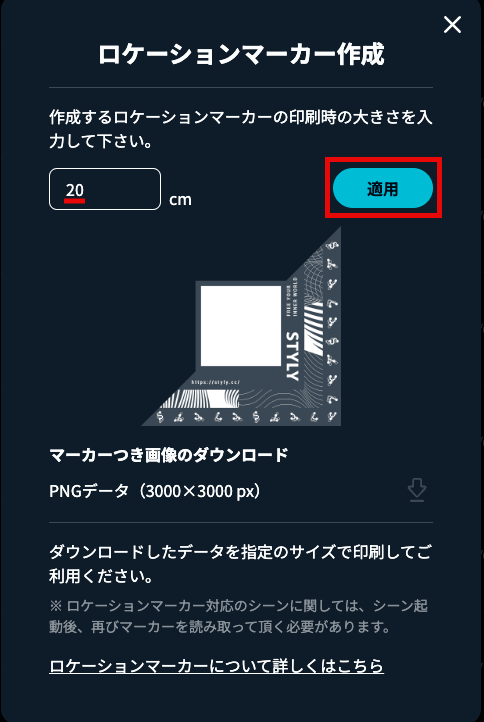
Enter the size of the printout and click the Apply button.
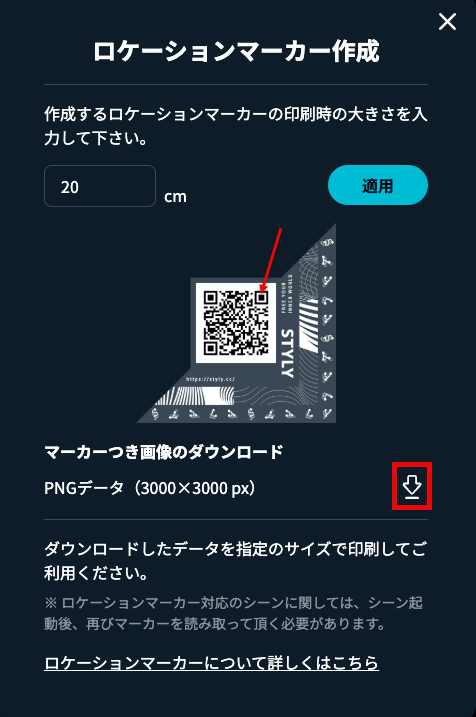
After clicking the Apply button, a QR code will appear in the center and a location marker will be issued.
Click the download icon in the lower right corner to download the image with the marker.
When combining with graphics, please refer to the STYLY marker guidelines for creation.
STYLY Marker Guidelines
https://drive.google.com/file/d/1n42VhofeRKecKskMgmT4RNu4zDkeepS8/view?usp=sharing
Steps to Experience a Location Marker AR Scene
- Tap scan on the STYLY mobile app.
- Tap “Yes” when the message “Location detected” is displayed.
- Match the displayed location frame.
- The AR scene with the location marker is created.

Frequently Asked Questions
Q: How does the location marker behave?
I’d like to use something like a signboard as a marker to visualize a 3D model at a specific location in AR. Is this achievable with location markers?
A: By using a location marker QR code signboard as the base (origin), a 3D model can be displayed in AR when that marker is scanned.
Q: Can I continue publishing scenes using location markers after canceling the Business/Enterprise plan?
A: You can continue to create, edit, and publish scenes using location markers. Please note that commercial use is not allowed and the relevant scenes will be splashed and watermarked.
Q: Can I set up multiple location markers so that a 3D model moves dynamically between them?
A: Since each location marker corresponds to one scene, sharing locations between multiple markers is not possible.
Q: Is the marker displayed after pressing the AR experience button in a published scene different from the location marker?
A: Yes, they are different.
Q: The guideline’s recommended layout states a maximum width of 50cm for the marker. If it exceeds this size, should I follow the recommended ratio in the guide?
A: Please adhere to the guidelines, as they affect marker reading accuracy during the experience.
Q: Could you share the best practices for printing and displaying location markers?
A: Important points for marker creation:
・Use a marker size of at least 200mm x 200mm if possible
・Opt for non-reflective printing
・Print the marker on a flat surface (avoid curving it)
・Place the marker either parallel or vertical to the ground
Notes on the surrounding environment where markers are placed (conditions prone to content misalignment):
・Reflective flooring
・Solid white or repeating patterns on floors or walls (few distinctive points)
If there are few (or no) distinctive points around the location marker, misalignment may occur. Please consider the above precautions.
*Distinctive points: Points in the image that stand out and can be detected. Since location estimation is based on image features, environments with solid colors or repetitive patterns on walls or floors make estimation difficult, causing misalignment.
Q: What’s the difference between city templates and location markers?
|
City Templates |
Location Markers |
|
|
Marker Presence |
Markerless |
Uses dedicated markers |
|
Plan |
Available from the Creator plan |
Available from the Creator plan |
|
Location Range |
Available only in locations with city templates |
Usable in any location with a dedicated marker |
|
Occlusion |
Occlusion with city models is possible If you want to apply occlusion to assets placed in the scene, |
If you want to apply occlusion to assets placed in the scene, |
Q: Can I use location markers on a moving train or boat?
A: Due to significant position shifts, both location markers and AR in general are not suitable. In AR, self-positioning is estimated using camera video, accelerometer, and gyroscope. If the camera captures a moving landscape, the position relative to the initially placed AR object will shift. Additionally, if the smartphone detects train acceleration, the AR object will shift accordingly. When experiencing AR content, a stable environment where the surrounding landscape does not move and you do not move significantly is required.


