In this article, as an example of the combination of STYLY and Unity’s NavMeshAgent, I will show you how to create a scene where you can play tag with AI on STYLY using NavMeshAgent.
In the first half of the article, I will explain how to create a stage using ProBuilder and how to get the player’s position using PlayMaker, and in the second half of the article, I will explain a NavMesh feature called OffMeshLink.
Advance preparation
In this article, we use PlayMaker.
Install PlayMaker, a plugin for Unity, beforehand.
![[Unity Tutorial] Creating a Game Using Playmaker ① From Basic Introduction to Installing](https://styly.cc/wp-content/uploads/2019/06/1200px-160x160.jpg)
If you are using PlayMaker for the first time, you can deepen your understanding by reading the following article beforehand.
![[Unity] Starting Playmaker from Scratch](https://styly.cc/wp-content/uploads/2019/09/PlaymaerCoreConcept-160x160.png)
Also, we will be using a feature called NavMesh in Unity.
For basic knowledge about Unity’s NavMesh, please refer to the following article.
![[Unity / NavMesh] Using AI to Create 3D Models that Move Automatically](https://styly.cc/wp-content/uploads/2020/12/スクリーンショット-2020-12-23-14.33.01-160x160.png)
Sample
Here is a sample of the scene we will create.
Let’s actually make sure that Capsule follows the player.
Create the stage
First, let’s create the stage for playing tag.
You can use Plane or Cube, but this time we will use ProBuilder to create the stage.
Using ProBuilder to create a stage
ProBuilder is a tool in Unity that allows you to create simple 3D models intuitively.
It is very useful, so if you have not used it before, please refer to the following introduction article.
![[Unity] Creating a Simple House with ProBuilder](https://styly.cc/wp-content/uploads/2019/11/アイキャッチ用-160x160.png)
First, install ProBuilder in Unity.
Open the Package Manager window from Window > Package Manager.
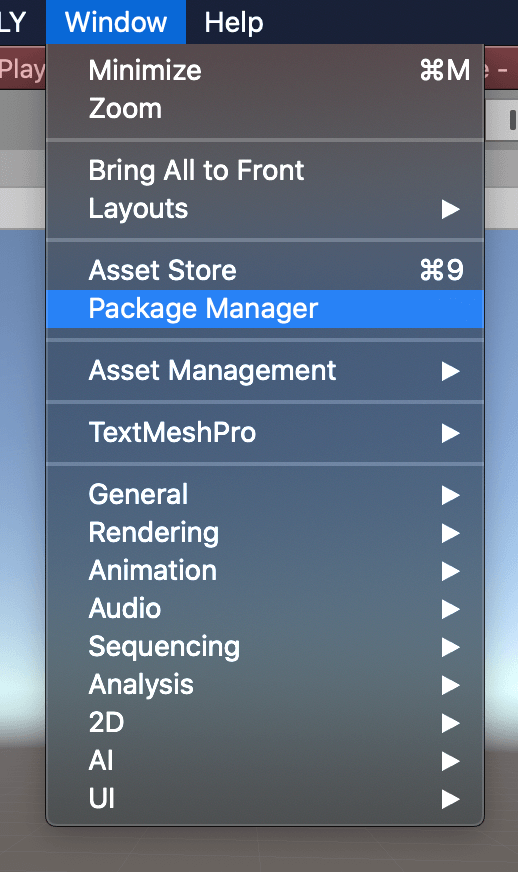
Package Manager
Search for ProBuilder in the search window in the upper right corner and click the Install button in the lower right corner to install it.
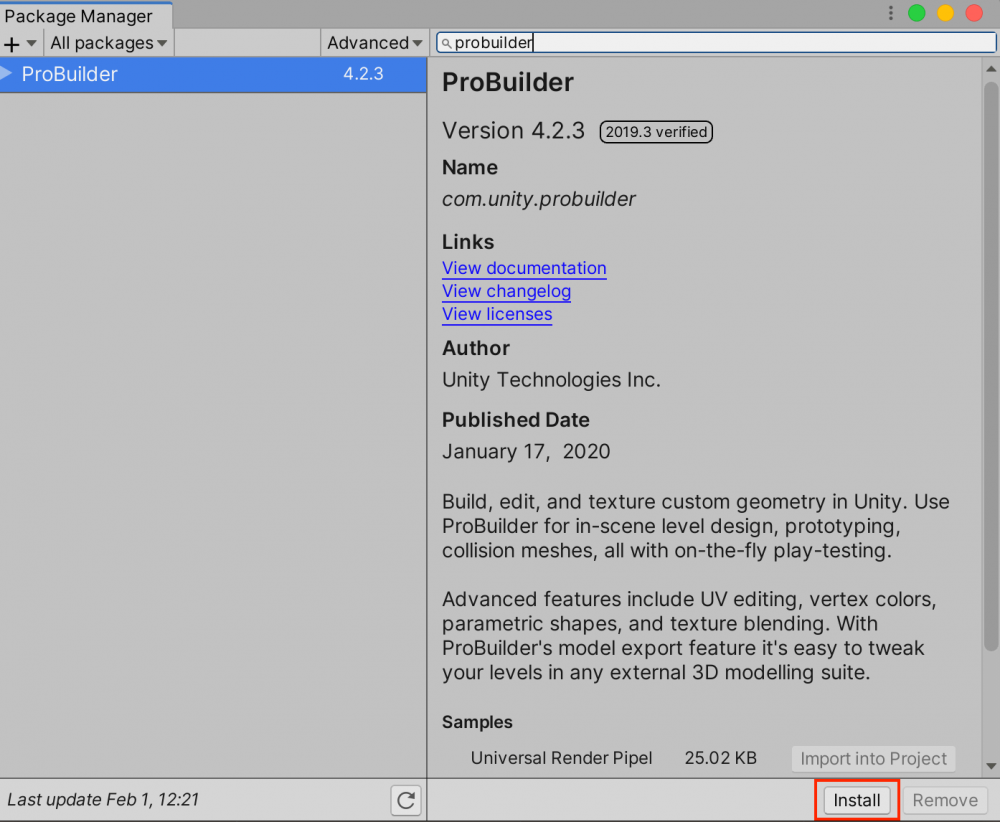
Installing ProBuilder
Now, let’s actually use ProBuilder to create a stage.
Open the ProBuilder window from Tools > ProBuilder > ProBuilder Window.
Select New Poly Shape in the ProBuilder window, and let’s create a 3D model of your favorite shape.

Creating a 3D Model
Note that you can only create a 3D model if Gizmos are displayed in the scene.
If you don’t see any, try turning on the Gizmos display.
You can also add color to the 3D model from the VertexColor item.
Select the object you want to change the color of, choose a color and press Apply to apply the color.
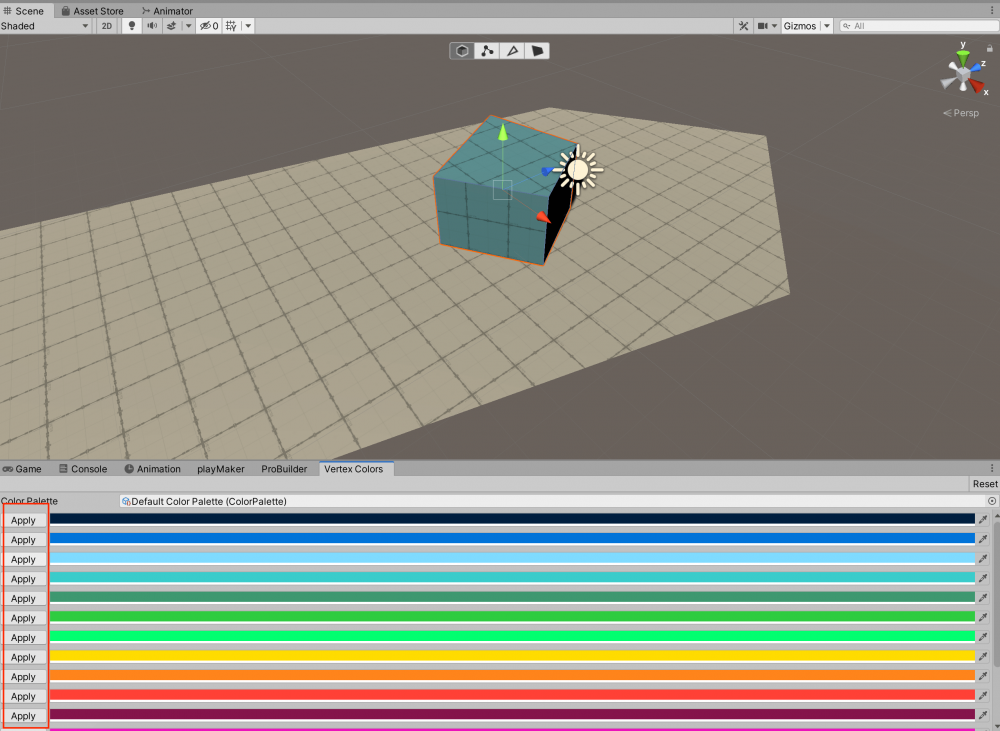
Changing the color from VertexColor
In this case, we created a stage like this.
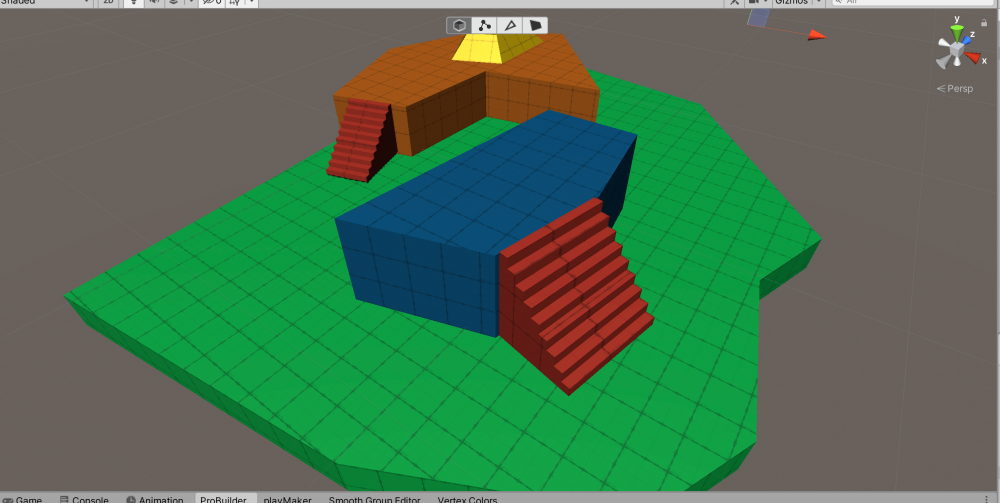
The stage we created
Open the Navigation window from Window > AI > Navigation, and click the Bake button on the Bake tab.
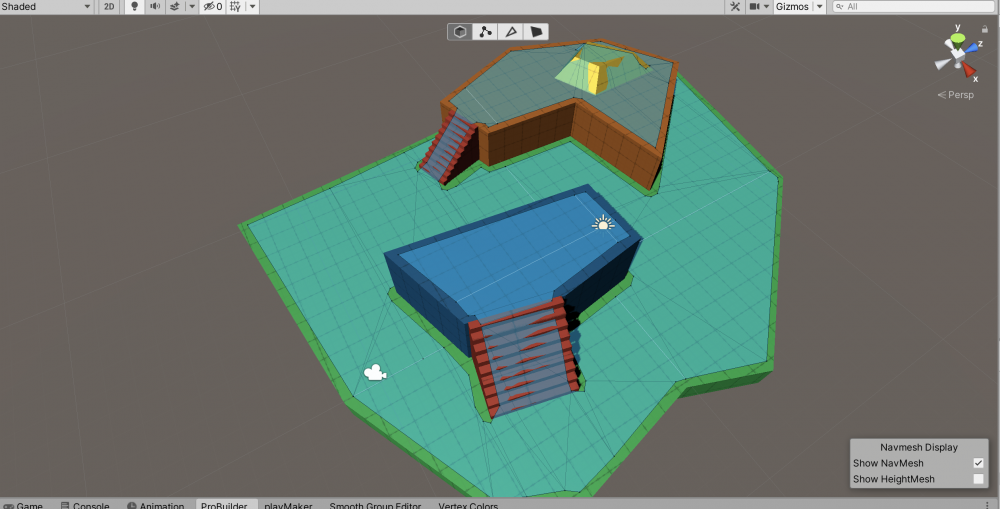
The actual baked stage
The stage is now ready!
Setting up the FSM
Next, let’s create the 3D model of the demon.
This time, we will use this Capsule as the demon.
Add the FSM to the Capsule.
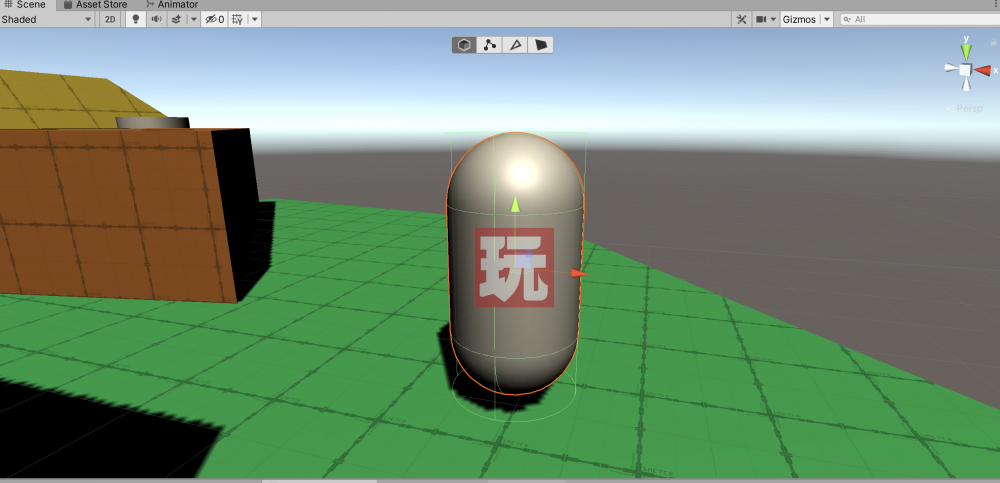
The demon this time
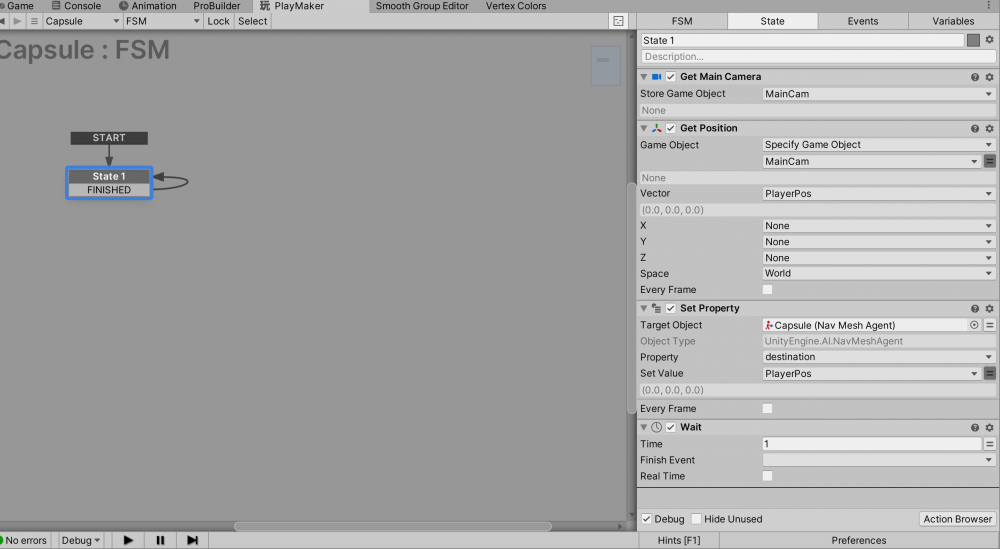
Obtain the player’s location information in the FSM.
Set up the FSM as shown below.
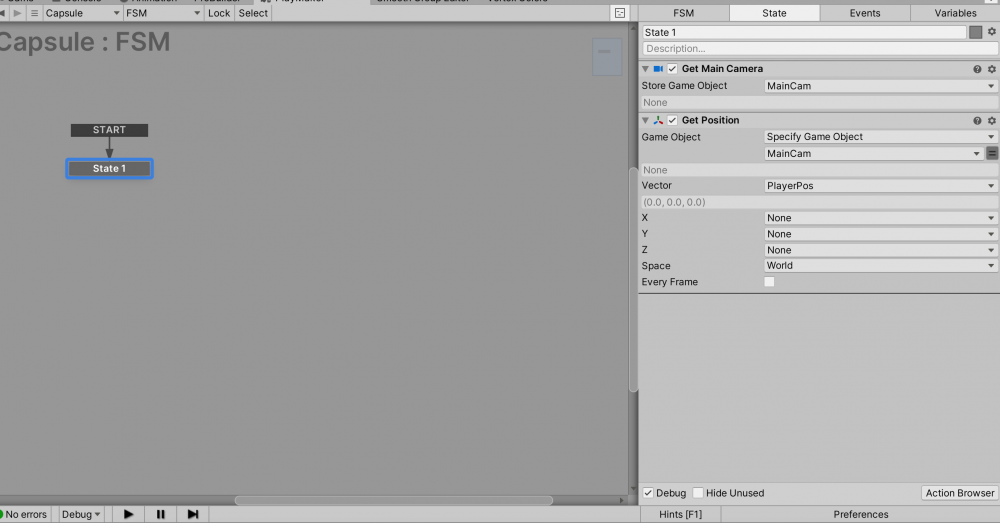
Setting up the FSM_1
Now the Player’s position will be stored in a variable called PlayerPos.
Next, specify the destination of NavMeshAgent as PlayerPos, and set the FSM as follows.
Attach the NavMeshAgent component in the Capsule, not the Capusule game object, to the target object of SetProperty.
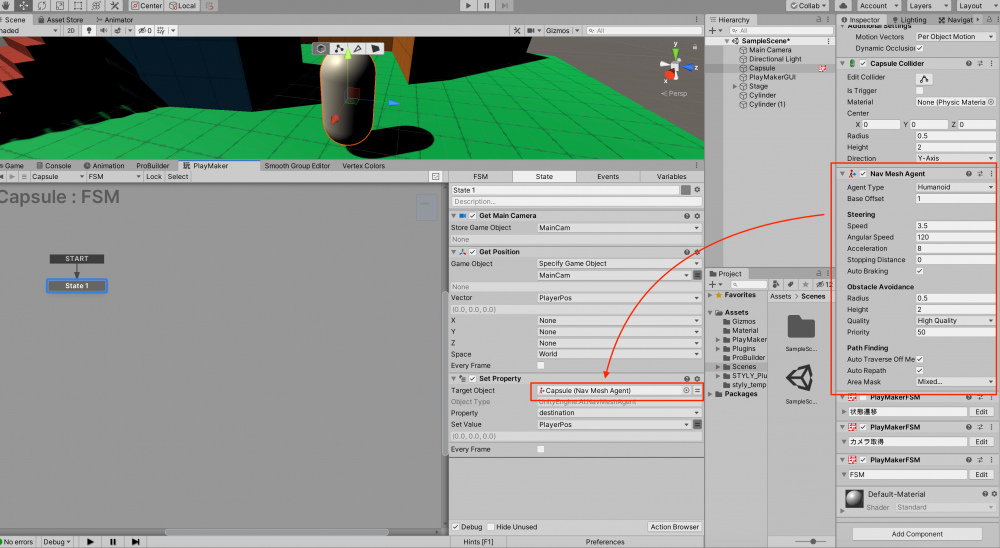
Setting the FSM_2
Finally, let’s set up the transition so that this sequence of events will continue to repeat.
Let’s make sure that it returns to State1 again after the 1-second waiting period is over.
Set the transition event to “FINISHED” and the transition target to “State1”.
FSMの設定_3
This completes the FSM settings.
If you check the scene, you will see that the demon is now chasing the player.

Demon chasing the player
Change the movement of the demon
This is a little too simple, so let’s add more variations to the demon’s movements.
Using NavMesh’s OffMeshLink, an agent (a moving 3D model) can be moved to a specified position.
Add two points to the stage and add an OffMeshLink component to both.
Specify yourself as the Start of each component, and the object to be moved as the End.
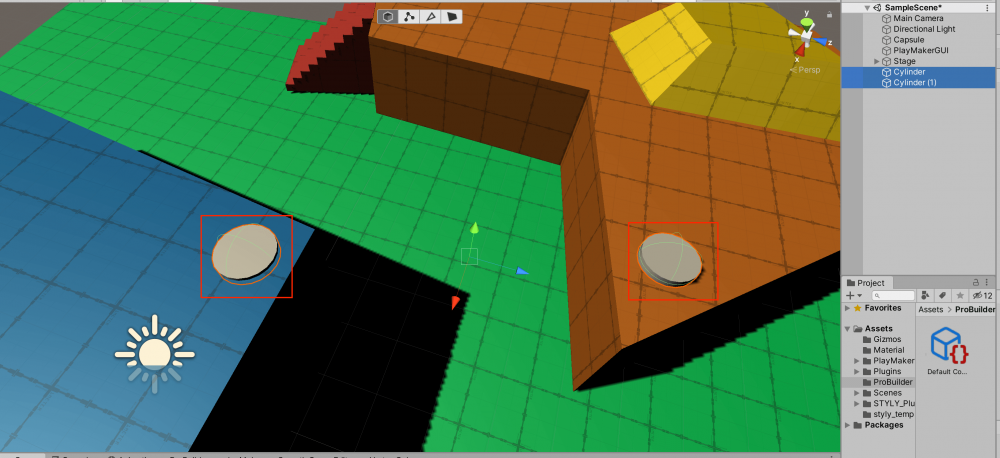
Creating OffMeshLink_1

Creating OffMeshLink_2
Now, the demon uses shortcuts when chasing the player.

The demon now uses shortcuts
This OffMeshLink can also be created automatically.
Let’s change the DropHeight of Generated Off Mesh Links in the Navigation tab to 5 and Bake.
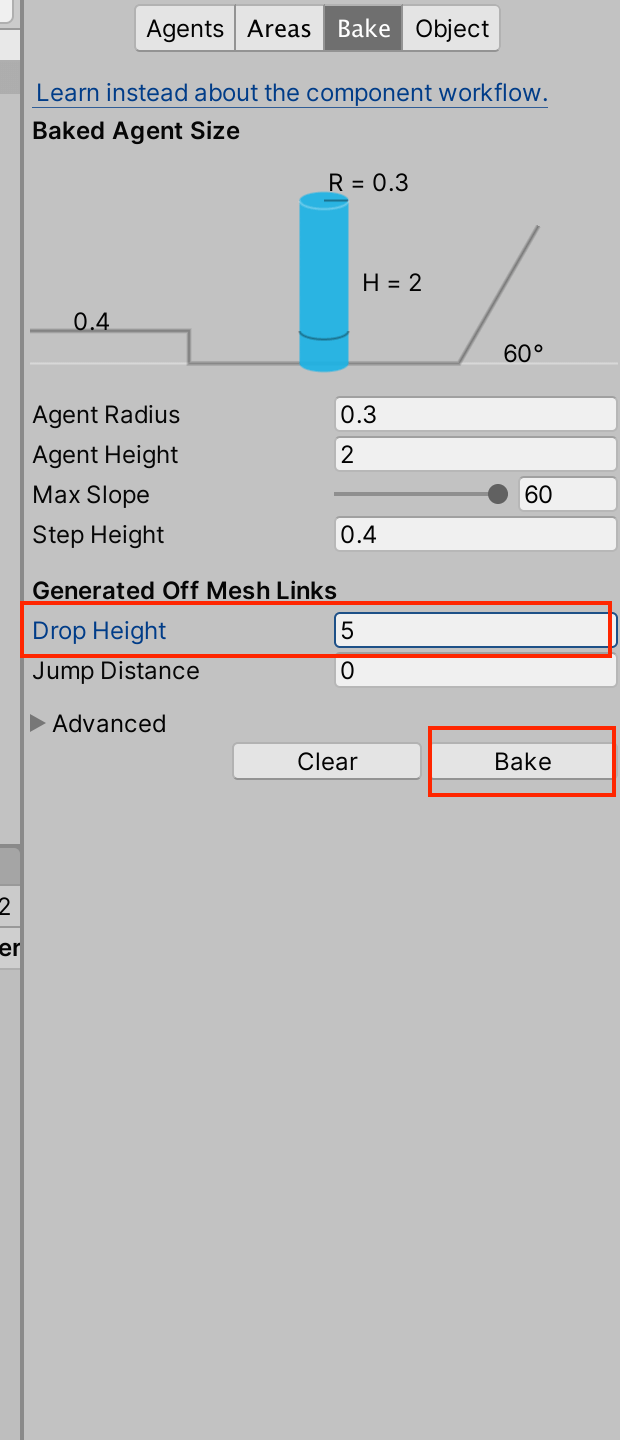
Generating OffMeshLink automatically
This will automatically create an OffMeshLink for the demon to use when it jumps.
If you change the DropHeight value, the demon will be able to jump from a higher place.
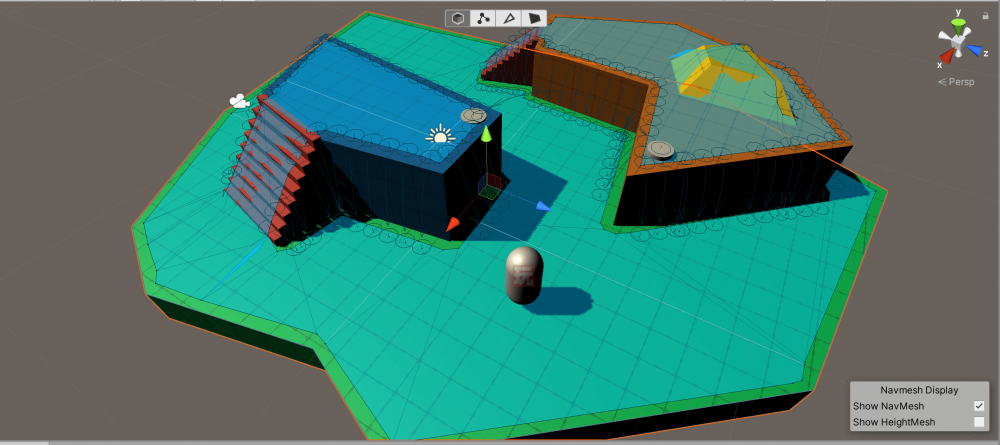
Actual creation of the OffMeshLink
If you look at the movement, you can see that the demon is jumping down the steps and chasing the player.

The demon is now jumping down the steps
Now you know that you can customize the AI movement by creating an OffMeshLink.
Uploading to STYLY
Let’s upload the completed scene to STYLY.

In this article, I have introduced a specific way to use NavMesh.
I hope you will try using NavMesh to create your own scenes.
Let’s learn VR/AR content creation with no experience
The online learning site NEWVIEW SCHOOL ONLINE is now open, where you can learn the basics of Unity and PlayMaker required for VR/AR content creation, as well as the process of creating the attractive content distributed on STYLY (production techniques will also be disclosed).
- You can create VR/AR contents without writing programming code.
- Officially supervised Unity courses are available.
- Additional elements such as photogrammetric production methods and content weight reduction are available.
- You can learn how to think about creating VR/AR content.
