The STYLY Session function allows multiple people to share a single virtual space and experience the same scene at the same time.
After reading this Session function Starter Guide, you will be able use the STYLY Session function to create and share sessions.
*The Session function is available in all STYLY plans: free (Artist plan), Pro plan, and Pro Unlimited plan.
Create a STYLY account
You need a STYLY account to use the STYLY Session function.
If you haven’t created a STYLY account yet, read the following article and start by creating an account.
Create a session
Create a new session as the session owner.
Open the Session Management screen (https://gallery.styly.cc/session) and click the NEW SESSION button.
Enter a Session Name, a description of the Session, a Scene List, and save it.
Session Name
This will appear as the name of the Session to participants on the Join screen.
*Only alphanumeric characters and symbols are allowed, no more than 80 characters.
Description
The description will be displayed to participants on the Join screen.
*Please enter less than 256 characters.
Scene List
This is a list of the scenes that you wish to show to participants in the Session.
You can specify a scene by entering the scene name, a hashtag search, or the gallery URL (or scene ID) for each scene.
Please try to enter the following three gallery URLs one by one in the list of scenes.
- https://gallery.styly.cc/scene/8f0c8cd1-c0c3-4b85-9fe8-dd14a73b6471
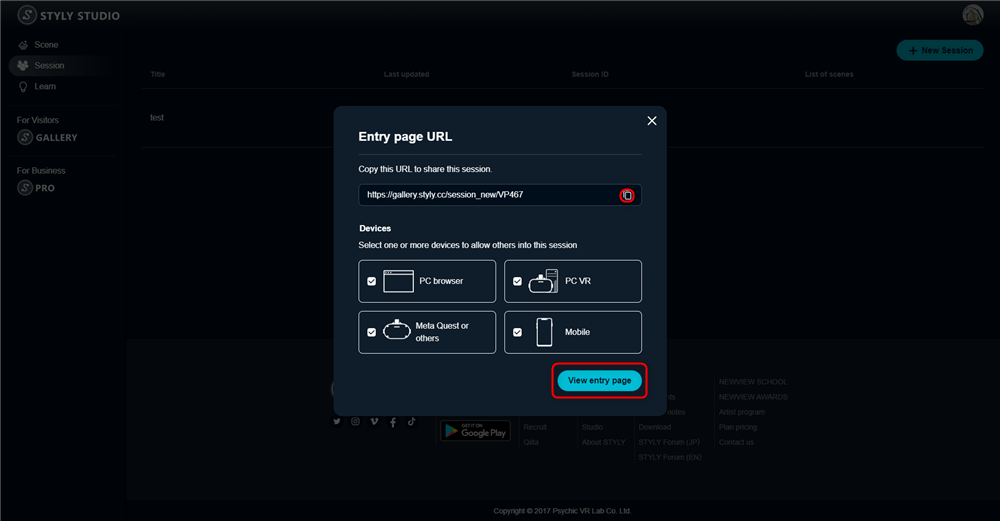
Once you have created a Session, you can use the Sharing icon to invite specific device types.
From left to right, there are icons for PC VR, PC browser, smartphone, Oculus Quest and others.
PC VR
Supported Apps:
・Steam version STYLY app
・VIVEPORT version STYLY app
PC browser
Recommended browser:
・Google Chrome
Mobile
Supported Apps:
・Smartphone version STYLY app (Android/iOS)
Quest or others
Supported Apps:
・Oculus Mobile version STYLY app
・Daydream version STYLY app
・Pico version STYLY app
・Nreal version STYLY app
*For more information about supported apps and devices, please refer to the STYLY Session Functions Manual Overview.
By clicking on each device icon, you can specify whether or not each participant can join the Session on each device type.
Also, be sure to share the URL of the Join page after specifying the devices allowed, since the URL will be automatically changed according to the device specified.
To share the join page URL (session ID) with participants, click on the Copy URL icon and make the URL known to the participants.
You can also check the session Join page by clicking the Open Entry Page icon.
Each participant can join the Session by selecting the device to be used from the Session Joining page.
If you join the Session with Oculus Quest, make sure your Session ID is known to the participants.
The alphanumeric sequence shown in the ID display area of the session join page is the Session ID.
*Notice
If the host joins with a smartphone, the host cannot perform host operations including scene selection, so the host must join with other devices.
STYLY Session Function Manual Overview
In the overview section, we introduce the Session function from the overall understanding to the specific functions.
STYLY Session Function Manual “How to Hold a Session” (for a Session Host)
In the “How to Hold a Session” section, we introduce the flow of holding a Session, how to edit the Session, and how to link VRoidHub (for using avatars).
STYLY Session Function Manual “How to Join a Session” (for Session Guests)
In the “How to Join a Session” section, we introduce the flow of joining a Session for each device and how to operate it during the Session.
You can use the STYLY FORUM to solve the problem. STYLY FORUM is a place where people can discuss a service or technical issue on STYLY, and provide bug reports on STYLY.
https://en.forum.styly.cc/support/discussions


