When using PlayMaker, you will often see the word “Vector.”
This is one type of variable that is very important when using PlayMaker.
This article introduces the vector variable and explains its application.
This is also a continuation of the following article:
![[Introduction to Unity / PlayMaker] What is a Variable? From basics to applications of commonly used variables, int and float types](https://styly.cc/wp-content/uploads/2022/03/Int_Tomo_Eye-160x160.gif)
The above article explains the basics of variables, so if you are new to using variables, it is recommended that you read the above article first.
Sample Scene
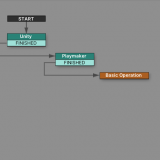
This article will help you create the following scenes using PlayMaker.
Red Cube and blue Cube at five times the scale and linked to the red Cube in terms of movement, orientation, and shape.
Red Cube and blue Cube at five times the scale and linked to the red Cube in terms of movement, orientation, and shape.
Preparation
Install PlayMaker, a Unity plug-in, before proceeding.
![[Unity Tutorial] Creating a Game Using Playmaker ① From Basic Introduction to Installing](https://styly.cc/wp-content/uploads/2019/06/1200px-160x160.jpg)
If you are using PlayMaker for the first time, please read the following article in advance for a better understanding.
![[Unity] Starting Playmaker from Scratch](https://styly.cc/wp-content/uploads/2019/09/PlaymaerCoreConcept-160x160.png)
About Vector
What is Vector?
Vector is a type of variable that represents a single value such as a coordinate, direction, or angle.
In Unity, various elements such as coordinates, directions, and angles are divided into X, Y, and Z components.
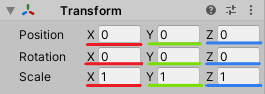
Various elements are divided into X, Y, and Z components.
It is difficult to manage each element with a Float variable, but a Vector variable can manage all of the elements together.
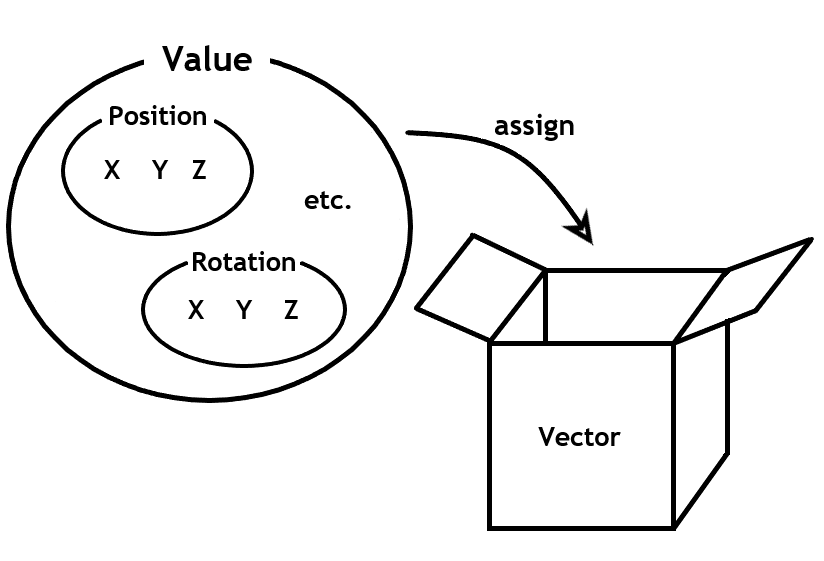
Diagram of a Vector variable
There are two types of Vectors that PlayMaker can handle: Vector2 and Vector3.
Vector2 can be assigned 2-dimensional values including X and Y components.
Vector3 can be assigned 3-dimensional values including X, Y, and Z components.
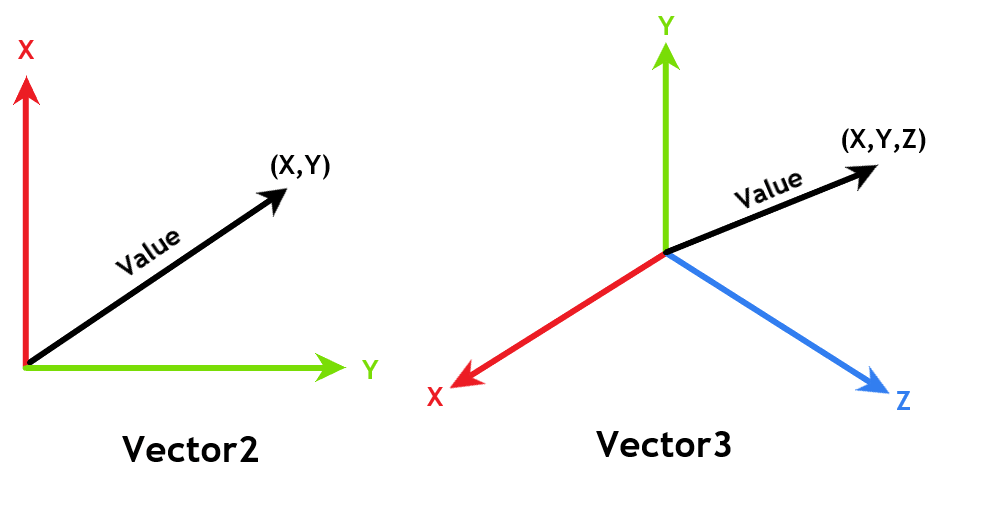
Diagram of Vector2 and Vector3
For the initial Vector Variables, set all components to 0.
Action by Vector
This section introduces some of the most important Actions that use PlayMaker’s Vector variables.
This explanation is based on the Action for Vector3, but the basic usage is the same for other Vectors.
Set Vector3 XYZ
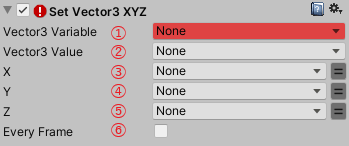
Set Vector3 XYZ
This action allows you to assign a value to a Vector3 variable.
(1) Select the variable to be assigned a value.
(2) Select the value to assign to the Vector3 variable.
(3) Enter the X component for the assigned value.
You can also select a value for this variable by pressing the equal sign to the right of the input field.
(4) Enter the Y component for the assigned value.
You can also select a value for this variable by pressing the equal sign to the right of the input field.
(5) Enter the Z component for the assigned value.
You can also select a variable for this value by pressing the equal sign to the right of the input field.
(6) Checking the box for “Every Frame” executes this Action for every frame while in this State.
Note that the values of (3), (4), and (5) have priority over the value of (3), (4), and (5). The value of (2) is substituted for the value of the place set to None in (3), (4), and (5).
If None is chosen for (2), then nothing is assigned to the None fields for (3), (4), and (5).
Get Vector3 XYZ
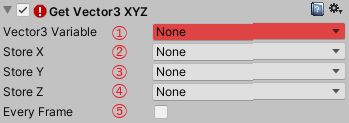
Get Vector3 XYZ
This Action allows you to assign a Vector3 value to a Float variable for X, Y, and Z components.
(1) Select the assigned value for the Vector3 variable.
(2) You can select the assigned Float variable for the X component.
(3) Select the assigned Float variable for the Y component.
(4) Select the assigned Float variable for the Z component.
(5) Checking the box for “Every Frame” executes this Action for every frame while in this State.
Vector3 Operator
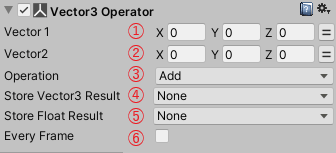
Vector3 Operator
This Action can perform various vector-to-vector calculations.
(1) Enter the vector (Vector1) for the calculation.
You can also select a vector variable by pressing the equal sign to the right of the input field.
(2) Enter the vector (Vector2) for the calculation.
You can also select a vector variable by pressing the equal sign to the right of the input field.
(3) Select: Dot Product, Cross Product, Distance, Angle, Project, Reflect, Add, Subtract, Multiply, Divide, Min, or Max.
Note that Add, Subtract, Multiply, Divide, Min, and Max are calculated separately for the X, Y, and Z components.
(4) When the result is calculated for Vector3, select the destination variable (Vector3) to save the result.
(5) If the result is returned as a Float variable, select the destination variable (Float).
(6) Checking the box for “Every Frame” executes this Action for every frame while in this State.
Reflect
Find the Reflected Vector of Vector1 on a plane that is perpendicular to Vector2.
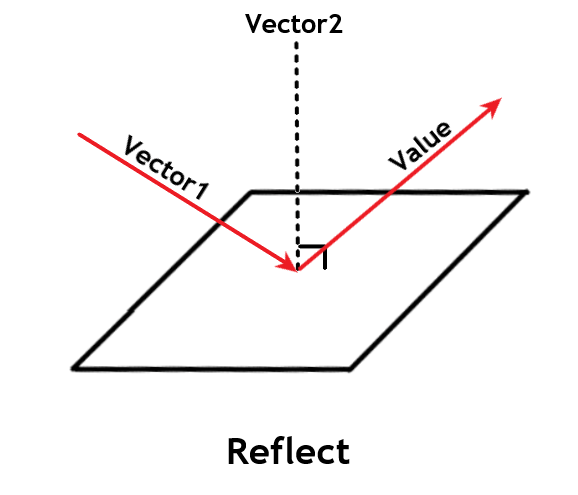
Image of Reflect
When performing *Reflect, enter a vector length of 1 into the Vector2 field.
Vector3 Multiply
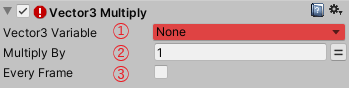
Vector3 Multiply
This Action allows you to enter a magnification factor to multiply the length of a Vector3 variable by that factor.
(1) Select the variable.
(2) Enter the magnification factor.
You can also select a variable for this value by pressing the equal sign to the right of the input field.
(3) Checking the box for “Every Frame” executes this Action for every frame while in this State.
Vector Inversion
By setting a negative multiplier, you can invert the direction of a vector.

Diagram of vector inversion
Vector3 Normalize

Vector3 Normalize
This action sets the length of a Vector3 variable to approximately 1.
(1) Select the variable.
(2) Checking the box for “Every Frame” execute this Action for every frame while in this State.
Vector3 Clamp Magnitude
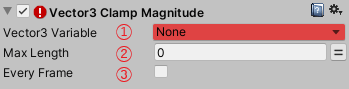
Vector3 Clamp Magnitude
This Action enters the maximum length for a vector. If the length of the Vector3 variable is greater than the maximum value, then it shortens the length of the vector to the maximum value and aligns it so that the length of the Vector3 variable is less than or equal to the maximum value.
(1) Select the Variable.
(2) Enter the maximum value for the vector length.
You can also select a variable for this value by pressing the equal sign to the right of the input field.
(3) Checking the box for “Every Frame” executes this Action for every frame while in this State.
Select Ramdom Vector3
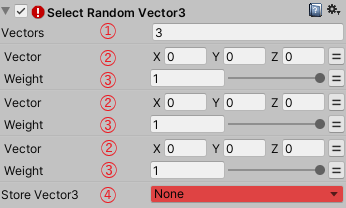
Select Random Vector3
This Action allows you to assign a randomly chosen vector to a variable. You can set up these vectors yourself.
(1) Enter the number of vectors. This number will determine the number of combinations for (2) and (3).
(2) Enter a vector.
You can also select a vector variable by pressing the equal sign to the right of the input field.
(3) For the Weight field, enter a number 0 to 1 to calculate the percentage by which the vector is weighted.
You can also select a variable for this value by pressing the equal sign to the right of the input field.
(4) Select the desired variable.
Vector3 Lerp
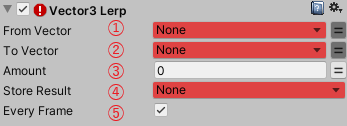
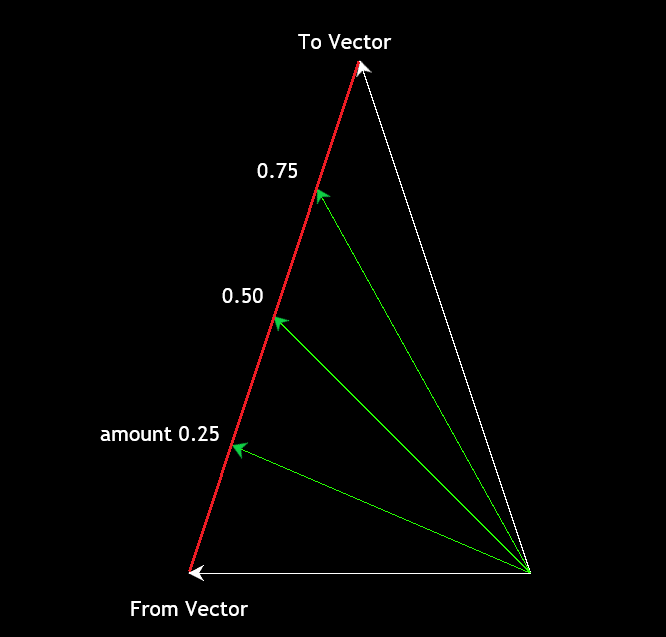
Vector3 Lerp
This Action allows you to assign a start and end point for a vector of points on a line segment. Create endpoints by selecting a start point vector and an end point vector, and then enter a value between 0 and 1 to define the distance between the start point and the end point.
Actual Operation
(1) Enter a starting point vector.
You can also select a vector variable by pressing the equal sign to the right of the input field.
(2) Enter an ending point vector.
You can also select a vector (or Float) variable by pressing the equal sign to the right of the input field.
(4) Select a variable to assign a vector to.
(5) Checking the box for “Real Time” executes this Action for every frame while in this State.
Vector3 Interpolate

Vector3 Interpolate
This Action allows you to assign a Vector3 variable to another type of Vector that will transition on a line between Vectors over time.
(1) Choose how the value transitions with respect to Time: Linear, or Ease In Out.
The difference between Linear and Ease In Out is as follows.
Actual Operation
Linear: The vector moves at the same speed from beginning to end.
Ease In Out: The first and last vectors transition at a slower speed.
(2) Enter the vector before the transition.
You can also select a vector variable by pressing the equal sign to the right of the input field.
(3) Enter the vector after the transition.
You can also select a vector variable by pressing the equal sign to the right of the input field.
(4) Enter the time it should take for the value to transition.
You can also select a Float variable for this value by pressing the equal sign to the right of the input field.
(5) Select a variable to assign a vector to.
(6) Select the event to fire when this Action is finished.
(7) If the box is checked, the length of the transition time will not be affected by the flow of time (TimeScale) in the scene.
Vector3 Rotate Towards
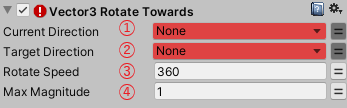
Vector3 Rotate Towards
This Action rotates the vector in the Current Direction toward the vector in the Target direction while simultaneously stretching or shrinking the length of the vector in the Current Direction to match the length of the vector in the Target Direction.
Actual Operation
(1) Enter the Current Direction vector.
You can also select a vector variable by pressing the equal sign to the right of the input field.
(2) Enter the Target Direction vector.
You can also select a vector variable by pressing the equal sign to the right of the input field.
(3) Enter Rotation speed.
You can also select a Float variable for this value by pressing the equal sign to the right of the input field.
(4) Enter the maximum value of the speed of expansion and contraction for a vector.
You can also select a Float variable for this value by pressing the equal sign to the right of the input field.
Vector Applications
By using Vector3 variables, it is possible to create gimmicks more concisely than by using only int or Float variables.
To see how much more concise a gimmick can be made with Vector3 variables, a blue Cube is created and scales five times larger than the red Cube. The blue Cube’s movement, orientation, and shape are linked to the red Cube. The same Cube is then created without Vector3 variables and compared to the first Cube to see how much simpler the gimmick is made with Vector3 variables.
First, set up two Cubes.
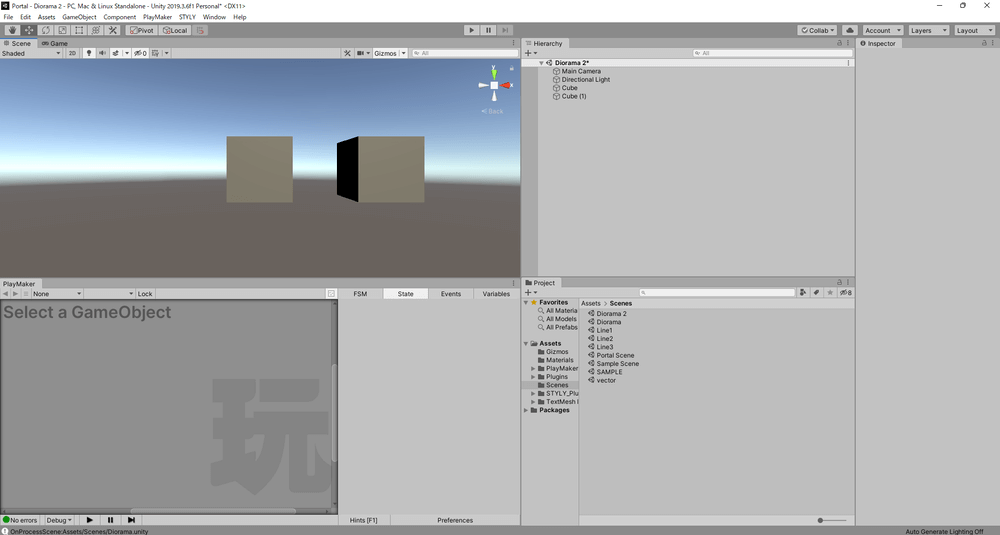
Install two Cubes
Apply red Material and blue Material to each Cube, respectively.
If the red Cube is placed at coordinates (0,0,0), it will overlap with the blue Cube when the gimmick is actually moved, making it difficult to see.
Rename the two Cubes “Red Cube” and “Blue Cube.”
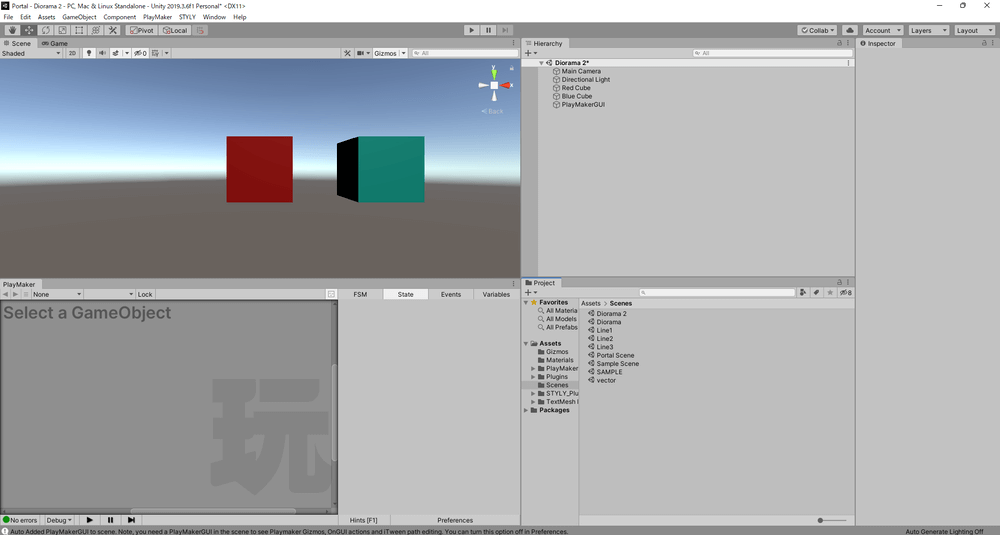
Change the name of the Cube.
Next, add PlayMakerFSM to the Red Cube.
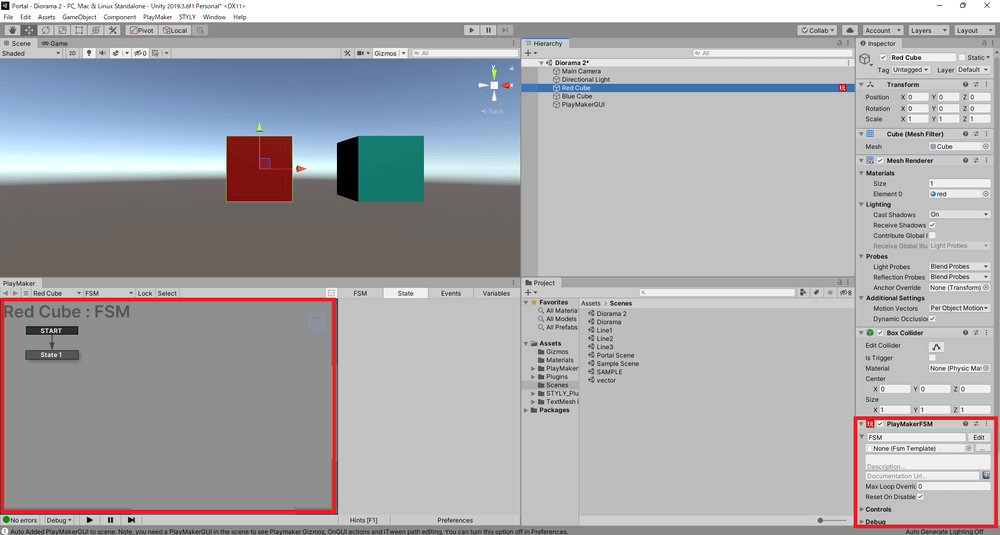
Add PlayMakerFSM to Red Cube
Open the Action Browser and add Get Position, Get Rotation, and Get Scale to State1.
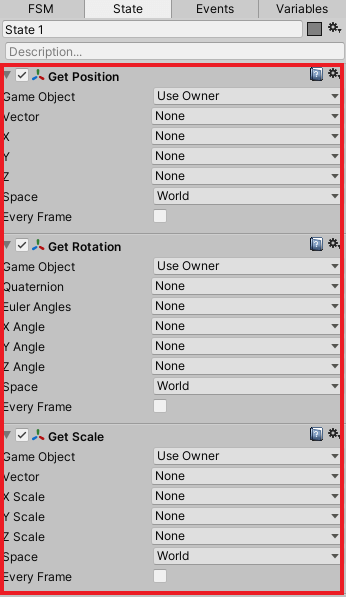
Add “Get Position”, “Get Rotation”, and “Get Scale” to State1
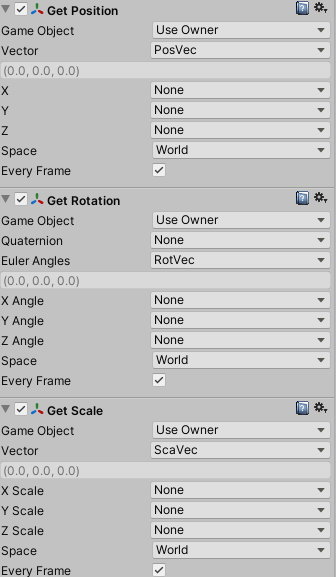
Select PosVec and ScaVec as new Vector variables in the Get Position and Get Scale boxes, respectively.
Select RotVec as the new variable for Euler Angles in the Get Rotation box.
Check “Every Frame” in the Get Position, Get Rotation, and Get Scale boxes.
Edit Action
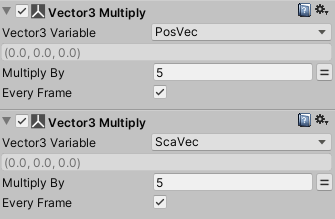
Open the Action Browser and add two“Vector3 Multiply” boxes to State1.
Since Actions are executed in order from the top, the two “Vector3 Multiply” boxes should be placed under the Get Position, Get Rotation and Get Scale boxes.
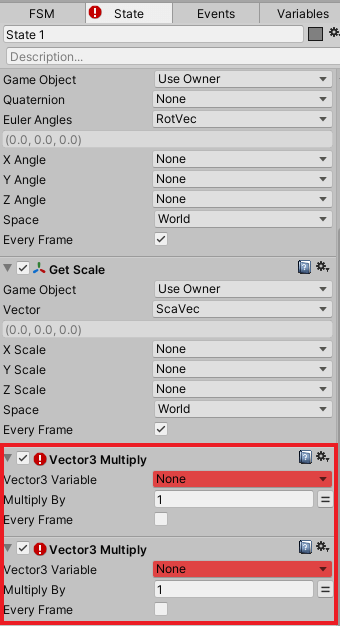
Add two “Vector3 Multiply” to State1
Select PosVec and ScaVec for the Vector3 Variable field in the two Vector3 Multiply boxes, respectively.
Enter 5 in the Multiply By field for the two Vector3 Multiply boxes and check “Every Frame.”
Edit Action
Open the Action Browser and add Set Position, Set Rotation, and Set Scale to State1.
Since Actions are executed from the top, Set Position, Set Rotation, and Set Scale should be placed under the two “Vector3 Multiply” boxes.
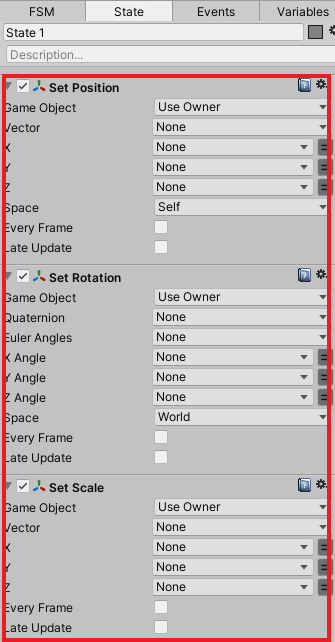
Add “Set Position”, “Set Rotation”, and “Set Scale
Change all Game Objects in Set Position, Set Rotation, and Set Scale to Specify Game Object and select Blue Cube as the target object.
Select PosVec and ScaVec for the Vector field in Set Position and Set Scale, respectively.
Select RotVec for Euler Angles in Set Rotation.
Check “Every Frame”in Set Position, Set Rotation, and Set Scale boxes.
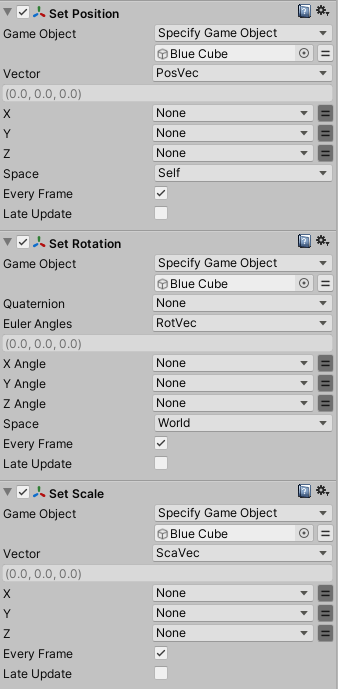
Edit Action
The final order of the *Action should be as follows.
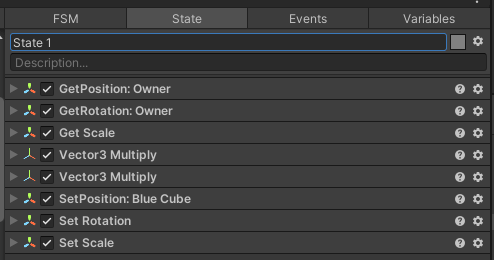
Order of Action
This completes the gimmick for interlocking the movement, orientation, and shape of the red Cube and the blue Cube, which is five times the scale of the red Cube.
Actual Operation
Actual Operation
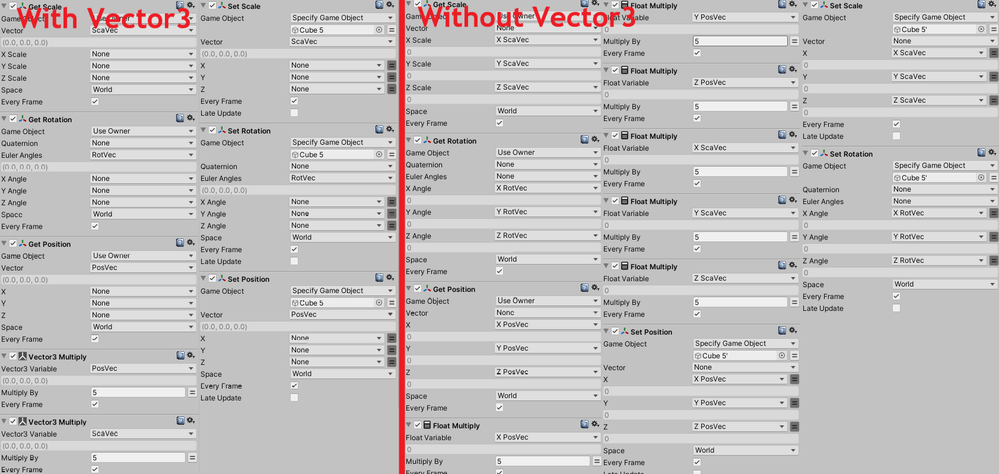
Here is an image of this gimmick comparing that created with and without a Vector3 variable.
Comparison of the number of variables of type Vector3 with and without variables
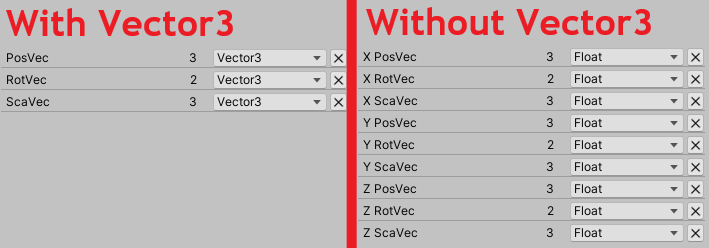
Comparison of the number of variables of type Vector3 with and without variables
The image shows that using Vector3 variables is easier to understand and manage because they require fewer Actions and variables.
Float variables are reliable because they are easier to understand intuitively, however, the more complex the gimmick being created, the more important it is to be able to use Vector3 variables. Everyone is encouraged to try using Vector3 variables.
Conclusion
This article explains the basic applications of VECTOR variables.
As introduced in this article, PlayMaker makes it easy to create Unity contents without having to learn the programming language (C#) used in Unity.
In addition to the applications introduced in this article, various things can be expressed by using variables in PlayMaker, so be encouraged to try creating scenes using PlayMaker.
How To Upload to STYLY
How to create an account:

How to upload to STYLY:

How to upload from Unity to STYLY:

If you have any questions about STYLY, bug reports, or requests for improvements, please contact the STYLY FORUM.