- 1 How Did I Make ‘Zeniarai Benten VR’
- 2 Themes in This Series
- 3 Why Did I Make This? – An Attempt at Architectural Digital Archive
- 4 Photographing
- 5 Summary
- 6 Next Article – PC System Requirement / 3DF Zephyr
How Did I Make ‘Zeniarai Benten VR’
I am Ryu lilea (Ryu Fujiwara / Pursuer of Architecture Visualization / a member of xRArchi, a community to explore the possibility of xR and architecture). In this article, I will talk about my attempt to create an architectural digital archive with wide-area photogrammetry.
On the subject of ‘Zeniarai Benten VR’, I would like to share my knowledge in a series of three articles.
↓Please visit the following to experience ‘Zeniarai Benten VR’.
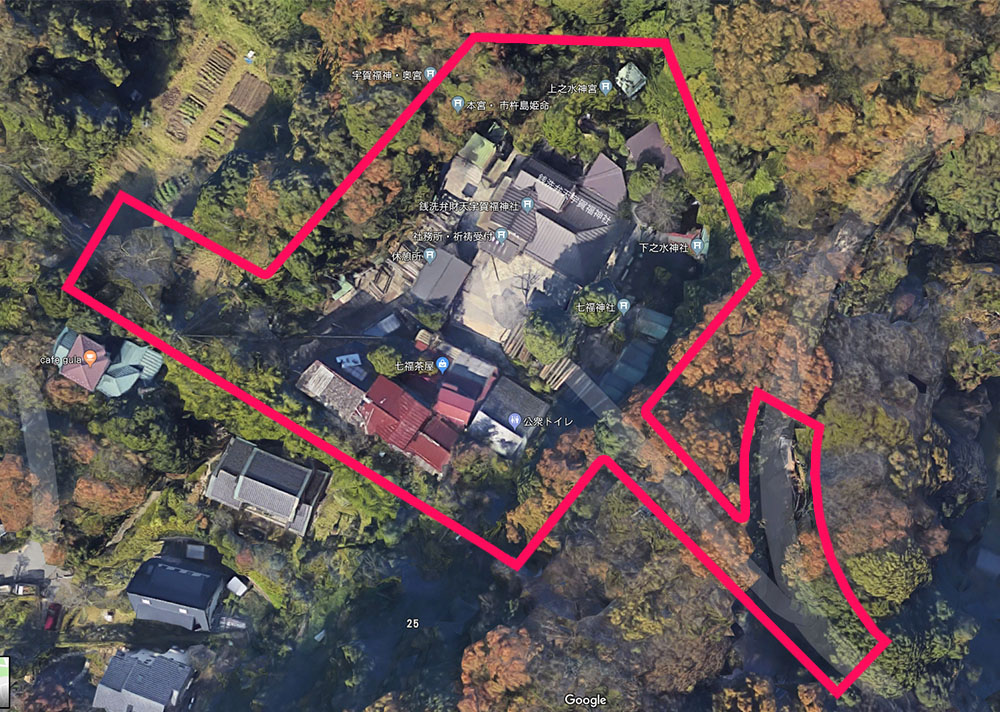
The number of photos used and the covered area by the ‘Zeniarai Benten’ photogrammetry are:
- The number of photos: 3629
- The covered area by the photogrammetry: The whole site of Zeniarai Benzaiten Ugafuku Shrine in Kamakura City Google Map
Themes in This Series
- #1 Photographing
- #2 PC system requirement / 3DF Zephyr
- #3 Post-processing / Converting into VR
Why Did I Make This? – An Attempt at Architectural Digital Archive
Before starting to explain the details, I would like to mention why I tried this kind of wide-area photogrammetry.
I am sure that you remember the recent ‘Notre-Dame de Paris fire’ where a lot of people felt devastated. Why is it so sad to see a building on fire? I could say it’s because a building is not just a ‘container’ of things but it includes and stores ‘culture’ and ‘memory’. Therefore, people have a special feeling about buildings, I think.
In my opinion, archiving a building not only records the shape, but also preserve the culture and memory in it. In other words, it preserves ‘history’.
Some say it’s just a copied space but everyone values it differently. If you were related to the building more deeply and for a longer time, you could find it not ‘just a space’.
And, in recent years, it’s getting popular to use architectural data as a ‘digital twin’. I also think that it could have something to do with ‘Common Ground’ proposed by architect Mr. Keisuke Toyoda (Please refer to this about ‘Common Ground’).
There are several ways to achieve it. The modelling by BIM could be the one. While people are looking for a suitable way, I focus on ‘Photogrammetry’ and ‘Point Cloud’. ‘Point Cloud’ requires an expensive laser scanner. On the other hand, Photogrammetry just requires a camera. This time I used a digital SLR but you can also use the camera on a Smartphone.
Doing wide-area photogrammetry is something that you can start immediately and it is practical for everyone. I wanted to try and share this knowledge. That is why I made ‘Zeniarai Benten VR’.
Well, this was a long introduction…
Starting now, I will explain about ‘how I made Zeniarai Benten VR’ step by step with actual examples.
Photographing
A camera is essential for Photogrammetry.
This time I used the following camera equipment for Photogrammetry.
Camera Equipment
- Camera body: EOS 6D
- Camera lens: SIGMA 12-24mm f4.5-5.6
- Tripod is not necessary (Monopod could be used)
1. Camera Body
Taking wide-angle images is important for Photogrammetry.
EOS 6D has a ‘full size’ CCD sensor, which allows you to take a ‘wider angle’ image even with the same lens.
I use a photogrammetry software, 3DF Zephyr (I will explain the details in the next article). In the software manual, 1/2.3 inch or larger sensor is recommended.
2. Camera Lens
I used a wide-angle lens.
In the manual for ‘3DF Zephyr’, 25 to 50mm is recommended for the full-size camera and 18 to 35mm for the APS-C camera.
When applying photogrammetry, it takes a longer time to process more photos. However, you could reduce the processing time with a wider-angle lens because it allows you to cover the site’s view with less number of photos. It’s preferable to use the widest angle lens in the recommended range above.
※Although 25 to 50mm is recommended in the manual, I used 12mm this time. It’s simply because I chose it before reading the manual carefully. Please be aware that super-wide angle lens could distort the view, so it could compromise the precision of Photogrammetry (I would like to investigate the difference of the precision between 12mm and 25mm on another occasion).
3. No Need for a Tripod
For wide-area photogrammetry, photographing takes time but you still need to complete it as quickly as possible because the photographic condition changes as time goes by.
Don’t use a tripod as there is no time to settle the camera with it. If you take photos in low light condition, it’s more practical to use a monopod, which has higher mobility.
Photographic Environment and Your Outfit
The following conditions are preferable.
- Cloudy weather
- Quiet hours
- Black clothes
1. Cloudy Weather
For Photogrammetry, A ‘neutral’ photo is easier to post-process.
Especially for conversion into VR, the photo shaded by direct sunlight will generate the VR space incorrectly, casting multiple shadows when the lighting is applied in VR.
2. Quiet Hours
In the case of a busy area such as a sight-seeing site, to prevent people from being in the generated texture, it’s recommended to take photos in the early morning when people are not around. Also, before the sun rises, you can take photos under the ‘neutral’ light condition explained earlier.
For this example, it took about four hours to take photos. Fortunately, I took photos smoothly because the weather was light rain so there are few visitors. Although I recommended cloudy weather earlier, moist cobblestones in a shrine are also picturesque. So light rain could also be a good condition.
For the areas where you don’t need to worry about having people in the view, then daytime with bright conditions is preferable.
3. Black Clothes
This is to prevent you from being reflected in the glass as much as possible.
Basically, Photogrammetry cannot process the reflective surface correctly but there are some exceptions.
- When moving, the image reflected by the glass doesn’t change > it can be processed into the surface with a constant color.
- When moving, there is no reflection on the glass at all > Photogrammetry can generate the internals.
In order to exploit those exceptions, wear black clothes that absorb the light.
In the case of white clothes, you are reflected in the glass, which cannot be processed correctly with Photogrammetry.
The Settings for Photographing
- Use ‘Pan Focus’.
- Higher ISO sensitivity can be used.
- Changing the aperture is not problematic.
1. Use ‘Pan Focus’
Low f-number makes the background blur to create a ‘depth’ effect. However, in the case of Photogrammetry, a blurred image could cause an error. So take photos with ‘Pan Focus’ (the blur-free condition with the entire view visible clearly). As a guideline, use f9 for the standard lens. For a super-wide-angle lens, use around f5.6 because excessive f-number could cause a ‘diaphragm’ blur.
2. Higher ISO Sensitivity Can Be Used
For a normal photo, I understand you want to reduce the noise as much as possible because that single photo itself becomes the artwork you create. However, in the case of Photogrammetry you don’t need to worry about it so much because the textures are generated by multiple photos.
This kind of wide-area Photogrammetry requires the larger texture size in proportion to the area of the site. But, on the other hand, the texture size is limited to 8k in Unity, so the resolution is reduced and, therefore, you cannot recognize the noise anyway.
So it’s recommended to lower the aperture (apply higher f-number) rather than lowering the ISO sensitivity.
3. Changing the Aperture is Not Problematic
When taking photos continuously, the changing of aperture is not problematic.
Whilst a sudden change disturbs the quality of the texture, Photogrammetry can correct gentle changes when photographing.
So you don’t need to be strict about keeping the aperture constant.
Tips for Photographing
When photographing a wide area, you need to plan the route to take photos across the site. The important points are:
- Set ‘one-stroke’ route
- Do not return in the same route
- Complete photographing quickly
1. Set ‘One-Stroke’ Route
Taking more photos while staying at a place can improve the precision of Photogrammetry, however it could collapse if you went far and then come back to the same place.
In particular, a height difference on the site could cause a problem. When I came back to the starting point and took the photos at a different height, Photogrammetry generated a step that doesn’t exist in reality.
Move along a ‘one-stroke’ route as much as possible and never come back to the same place to ensure a good result.
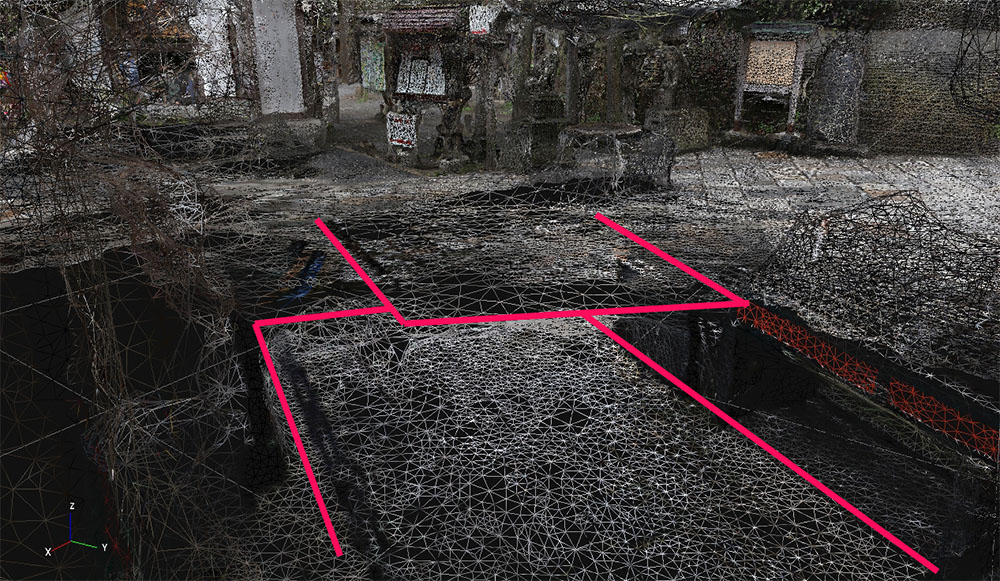
A step has been generated where the ground is level in reality.
2. Do Not Return in the Same Route
It’s similar to the ‘one-route’ technique above. Please be aware that going and returning in the same route could be problematic
When I use the photos that were taken while going and returning in the tunnel around the entrance, Photogrammetry generated an unrealistic branched shape for the tunnel due to the difference of the photos taken in the ‘going’ and the ‘returning’ trip.
3. Complete Photographing Quickly
When taking photos, the photographic environment changes every moment. The change of the photographic environment results in noise in texture, so please bear in mind the following and complete photographing as quickly as possible.
- Finish photographing before the sunlight changes
- Finish photographing before the weather changes
- Finish photographing before people show up
Record Ambient Noise
This has nothing to do with photographing but the ambient sound plays an important role in Architectural Digital Archive.
If you don’t have a microphone, a smartphone is sufficient.
Use sponge or fur on the microphone to record clear sound without wind noise.
We use this recorded sound for the BGM when creating the VR space.
Summary
- A wide-angle lens is an advantage.
- The camera with a ‘full size’ CCD is ideal.
- Take the ‘neutral’ image in cloudy weather.
- Take photos when people are not around.
- Wear black clothes if there are reflective surfaces in the scene.
- Use ‘Pan Focus’.
- Higher ISO sensitivity is acceptable.
- When you need to change the aperture, do it gently.
- Take photos quickly so that the photographic environment is not changed.
- Record the ambient sound to improve the user experience.
Next Article – PC System Requirement / 3DF Zephyr
Thank you for reading this article.
The next article will explain how to apply Photogrammetry by using 3DF Zephyr.
Written by Ryu Fujiwara ( Ryu lilea)