I summarized the articles about Photogrammetry in STYLY Magazine here.
I put together basic information about Photogrammetry, so you can start Photogrammetry right away by reading this article.
- 1 What is Photogrammetry?
- 2 Required tools for Photogrammetry
- 3 The list of photogrammetry software
- 4 Comparison of the editions of photogrammetry software
- 5 What object is suitable for photogrammetry?
- 6 Taking photos
- 7 Use video-based Photogrammetry
- 8 Automation by using the batch process
- 9 Applications to generate 3D model from photos
- 10 Upload created 3D model to STYLY
- 11 Summary
What is Photogrammetry?
Photogrammetry is a technique to analyze the photos taken from various directions with a computer and generate a 3D model from them.
By using this technique, you can create various 3D models, from a small object like a figure doll to a large object like building or city.
It’s used in the professional fields such as land surveying, topographical survey, historic preservation. But, it’s also used for video-game development in recent days.
As PC and photogrammetry software get being improved these days, this technique is getting easier for everyone to handle.
Rocca Calascio – RAWscan by Spogna on Sketchfab
Required tools for Photogrammetry
What you need for Photogrammetry are PC, camera and software for Photogrammetry, so you can start using Photogrammetry right away only with those tools.
Although it’s preferable to use a high-spec PC and camera, a laptop PC and a smartphone’s camera also work sufficiently.
I summarized what’s required for Photogrammetry into the table below.
| Requirement | Note | |
| PC | Any PC on the current market can deal with photogrammetry without problems. | The PC with higher performance would finish the analysis quicker. |
| Camera | A high-spec camera like digital SLR is preferable, but a smartphone camera has performance enough for the analysis. | You can create a 3D model with higher precision by using a high-spec camera. |
| Photogrammetry software | There are some commonly-used software, so I recommend choosing from them. | The cheapest option for popular software is around 15000 JPY. There are also free trial versions. |
The list of photogrammetry software
Several companies sell photogrammetry software.
Each software has pros and cons, but any of them should work fine when you use photogrammetry as a hobby.
If you try using photogrammetry for the first time, I recommend the free trial version of 3DF Zephyr.
I picked up some popular Photogrammetry software that is easy to use, as follows.
3DF Zephyr

Its one-off price of around 15000 JPY is low, and you can also export 3D model for free if you use 50 photos or less.
For hobby use, 50 photos are sufficient, so I recommend this for your first experience with Photogrammetry.
▼This article explains how to use 3DF Zephyr in detail.▼
Reality Capture

Compared to other photogrammetry software, it has a good reputation for having high precision. It seems to support the high-end functions as well.
It’s available with monthly subscription only (no one-off price option is set), which would be a downside.
Agisoft Metashape

The good news is that it supports MacOS.
It has been used in some academic studies, so it should offer sufficient precision.
Autodesk Recap Photo

Autodesk Recap Photo is the extension of Recap, 3D scan software, and you can use it by subscribing to Recap PRO.
Since the data is processed on the Cloud, even a low-spec PC can deal with Photogrammetry, but, as a disadvantage, it’s not so versatile or cost-effective.
Meshroom

Meshroom is a photogrammetry software that is being developed as an open source software, and its most notable feature is that anyone can use it for free.
Its functions are also being sophisticated, so I recommend it if you use Photogrammetry at low cost.
(I planned to publish the article to explain how to use Metashape in detail soon).
Comparison of the editions of photogrammetry software
| Name | Supported OS | Edition | Price | Features |
| 3DF Zephyr | Win | Lite(Trial) | Free | You can use all the functions of the Lite edition. But, it can import 50 photos or less. |
| Lite | 15,380 JPY | This edition has the functions for standard use. ※It doesn’t support the function to export of point-cloud data or merge Workspaces. |
||
| Pro/Arial | 400,000+ JPY | This edition has more advanced functions. | ||
| Agisoft Metashape | Win/Mac/Linux | 30-day free trial | Free | You can use all the functions of the Standard edition but it doesn’t allow you to save your project or export 3D model. This is just for checking the precision before purchasing. |
| Standard | Around 27,000 JPY | This edition has the functions for standard use. | ||
| Professional | Around 400,000 JPY | This edition supports more advanced functions such as analysis of aerial photos taken by drone or etc., exporting the orthophoto. | ||
| Reality Capture | Win | Free trial version | Free | It’s compatible with all the versions of Reality Capture but cannot export 3D model. This is just for checking the precision before purchasing. |
| Promo version | 3,980 JPY/month | This edition has the functions for standard use. | ||
| Advanced versions | 400,000+ JPY | Those editions have more advanced functions and there are several plans. The pricing is complicated and very expensive. | ||
| Autodesk Recap Photo |
Win | 30-day free trial | Free | You can use all the functions of Recap Pro, but it seems to have a limitation for the number of photos you can upload. |
| Recap Pro | 6,480 JPY/month | This edition has the functions for standard use. | ||
| MeshRoom | Win | – | Free | It’s an open-source application for Photogrammetry. The most notable feature is that you can use it for free. |
What object is suitable for photogrammetry?
Some objects are suitable for photogrammetry while others are not.
The object with rough texture is suitable for scanning.
On the other hand, a smooth texture or bright surface is not suitable for scanning.
In addition, a tiny object, which requires a close-up photo, or an excessively complicated shape is not suitable.
In particular, it’s almost impossible to build up a decent 3d model from an object with a reflective surface such as glass, a mirror, or a moving object such as an animal.
Firstly, prepare an object suitable for scanning so that you can generate a decent 3D model.
| Suitable for photogrammetry | Not suitable for photogrammetry |
| ・One with a rough texture ・One with a lot of patterns on the surface |
・Smooth texture such as plastic, ceramic ware. ・Bright surface ・A tiny object that requires close-up photo ・A excessively complicated shape such as tree, plant. ・A continuously-moving object such a person, a pet (Extremely difficult) ・Transparent material such as glass (Extremely difficult) ・Refective surface such as a mirror (Extremely difficult) |
Taking photos
After preparing the object to scan for photogrammetry, take photos next.
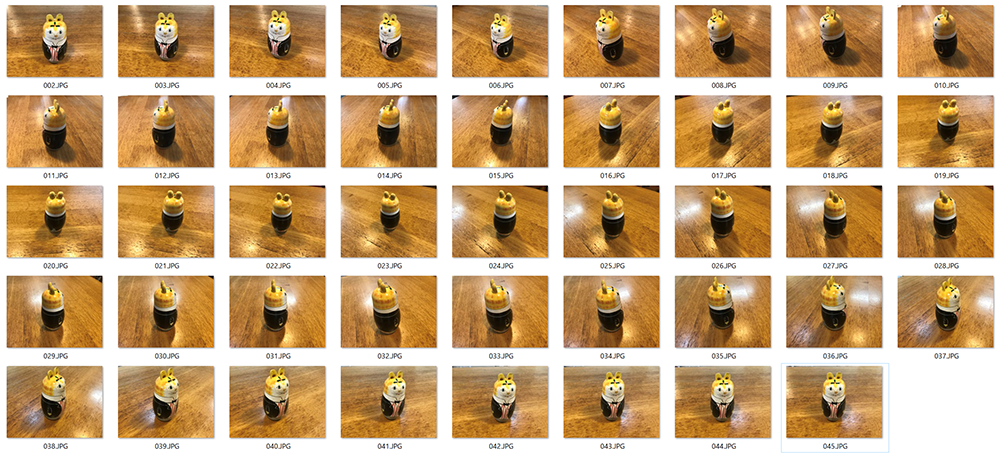
Take photos while varying the camera angle with a small step so that all surfaces of the object are covered by the photos.
In this example, I limit the number of the photos because I used the trial version of 3DF Zephyr, but you can improve the precision of the 3d model by taking more photos in the case you use the full version.

An example – how to take photos
When taking photos, please pay attention to the points shown below.
・If you place the object to scan on a base, use the base with a rough texture, which is likely to give higher precision to the 3d model compared to placing on the base with a smooth texture.
・Pay attention to the light not to take underexposed or overexposed photos.
・Unsteady shot kills photogrammetry. Please keep calm not to move the camera when taking the photos.
Use video-based Photogrammetry
All major photogrammetry software support the function to create 3D-model from a movie.
You can save time to take photos by using movie-based photogrammetry. But, on the other hand, the quality of the 3D model is compromised in some degree.
Choose photo-based photogrammetry or movie-based one according to the required quality of the 3d model.
Automation by using the batch process
Some Photogrammetry software have the functions to execute multiple tasks automatically.
By giving an instruction ‘which process should be done’ in advance, it can advance the processes automatically.
For example, if you used this function properly, you could automatically complete a lot of tasks while you are sleeping at night or make a lot of 3D models at once.
Applications to generate 3D model from photos
There are many other applications that can generate 3D model from photos.
Compared to full-scale photogrammetry, their precision is not so high but, as an advantage, they are easy to use.
Use the application suitable for the quality you want to achieve.
Qlone
Qlone is a 3D -scan application for smartphones. Place the object you want to scan on the AR marker provided and then scan it.
As the most notable advantage, you just need a smartphone to scan but the precision is compromised.
Note that it costs to export the data of the scanned 3D data.
Smoothie-3D
Smoothie-3D is a Web service that allows you to create a 3D model from a single image.
You can use it on the Web browser for free. It can export the model as an Obj file or upload it directly to Sketchfab.
Since it generates a 3D model from a single image, you can create 3D model very easily.
Upload created 3D model to STYLY
The 3D model created by photogrammetry would look better if you applied ‘Unit Shader’ before uploading it.
▼This article explains how to apply ‘Unlit Shader’ in detail.▼
Please refer to the following article to learn how to upload an asset from Unity to STYLY.
Summary
How did you find this article?
By using Photogrammetry, you can make your original 3D model easily even without 3D modelling skill.
Once you came to create 3D models by yourself, you will be able to increase the variations of your work significantly.
As some software are free, please taste Photogrammetry by yourself.