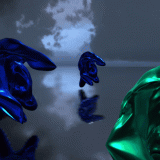
こんにちは!SensitiveCubeです!
このチュートリアルでは、ホログラムインディケーターの作成方法を解説します。
この記事では、Cinema4Dを使ったUVの編集とノーマルマップのベイク、PhotoshopとQuixelを使ってノーマルマップの編集、Unity Amplify shader Editorを使ってシェーダーの作成、Unity Playmakerを使ってノードベースでのスクリプティングを行います。.

UnityでAmplify shader editorとPlayMakerを使用する 1
Amplify Shader Editorを使用してシェーダーを作成:最初のノードを追加
まず、次のアセットをUnityへインポートしてください。
indi_indiset.fbx, indiNormal_quixel.png, screenMask.png, lineNoise.png と wagerFlag.jpg(またはお好みの画像)を5つです。
FBXファイルを選択し、Inspector > Materials から Extract Materials をクリックしてください。
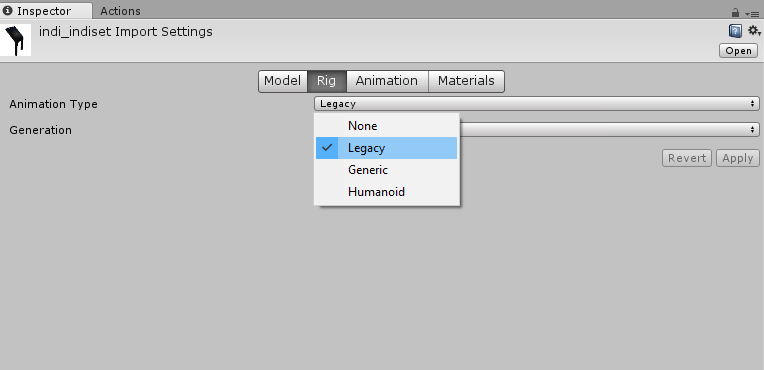
また、RigのAnimation TypeはLegacyに変更してください。
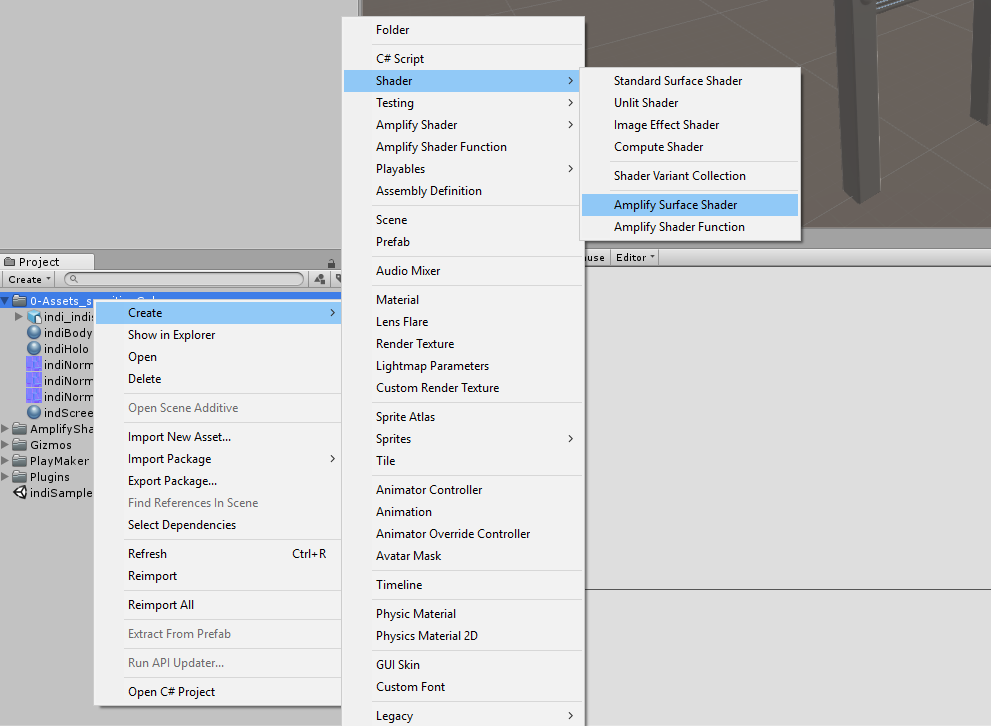
ホログラム用のシェーダーを作成しましょう。このチュートリアルでは、Amplify Shader Editorを使用します。
まずProjectパネルでAmplify Surface Shaderを作成します。
UnityでAmplify shader editorとPlayMakerを使用する 2
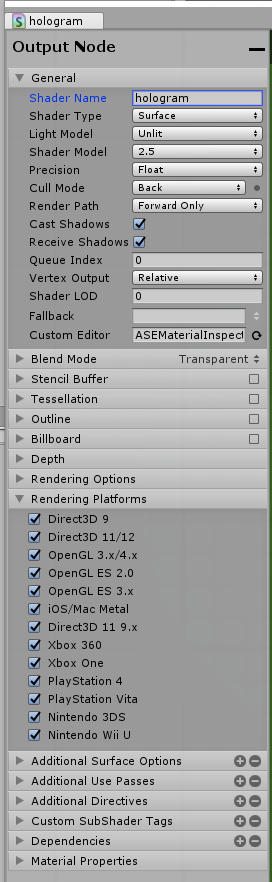
エディター編集ウィンドウが開きます。
ウィンドウの左側で、名前を”hologram”に変更してください。
そしてパラメータを変更します。Light ModeをUnlitに、Shader Modelを2.5に、Blend ModeをTransparentに変更してください。Rendering Platformsのパラメータはすべてオンにしてください。
UnityでAmplify shader editorとPlayMakerを使用する 3
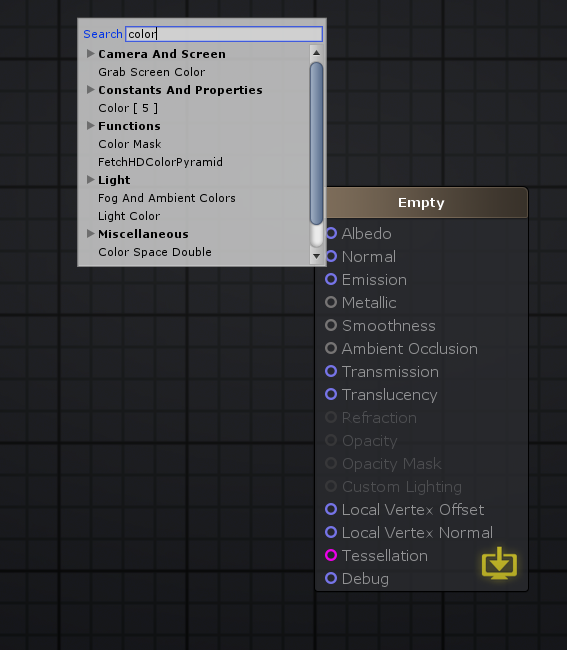
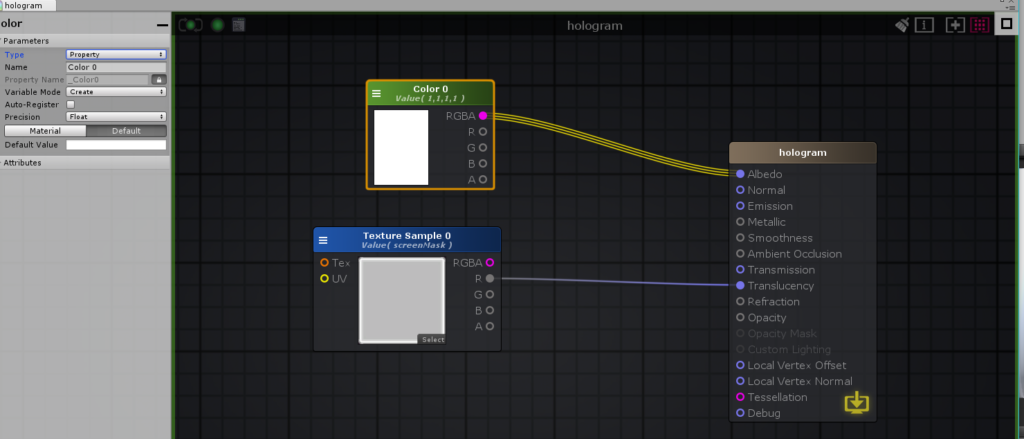
では最初のノード、Color nodeを追加します。
エディター画面で右クリックし、Colorを検索、”Color[5]”をクリックしてください。
UnityでAmplify shader editorとPlayMakerを使用する 4
TypeをPropertyに変更し、Emissionに接続してください。
Colorはwhiteに変更します。
Texture sample nodeを追加し、”ScreenMask.png”を選択、RをOpacityへ接続してください。
UnityでAmplify shader editorとPlayMakerを使用する 5
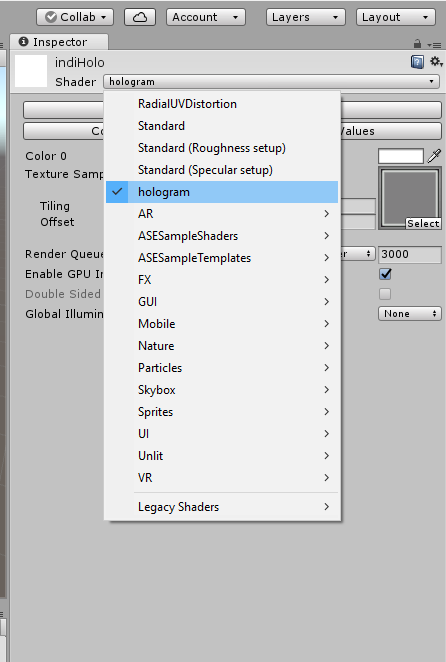
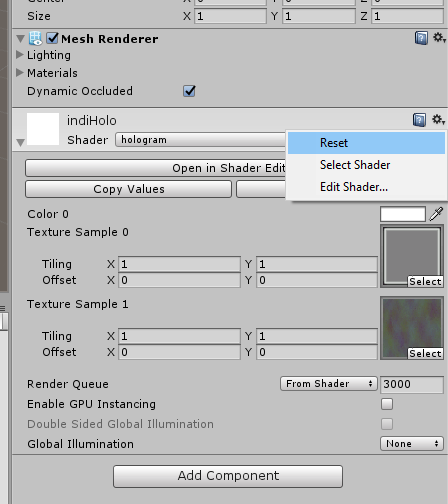
ではシェーダーを確認してみましょう。
”indiHolo”マテリアルを選択し、Shader を “hologram”に変更してください。
UnityでAmplify shader editorとPlayMakerを使用する 6
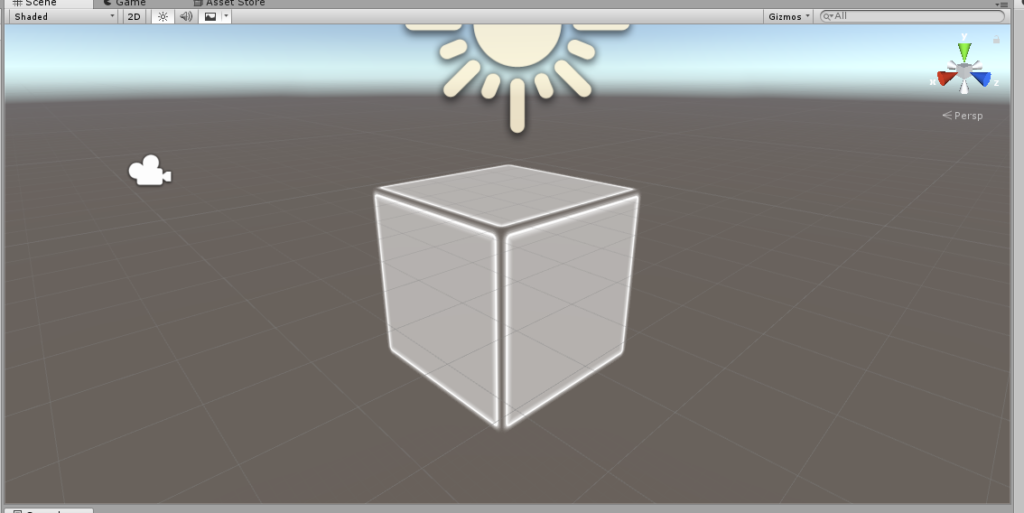
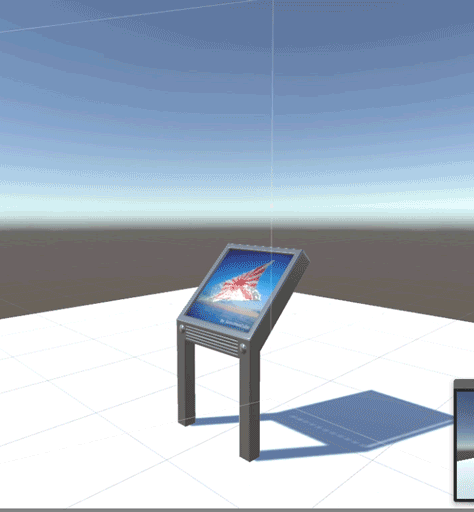
HierarchyパネルからCubeを作成し、マテリアルを適用してください。良い感じですね。
UnityでAmplify shader editorとPlayMakerを使用する 7
Amplify Shader Editorを使用してシェーダーを作成:texture animation
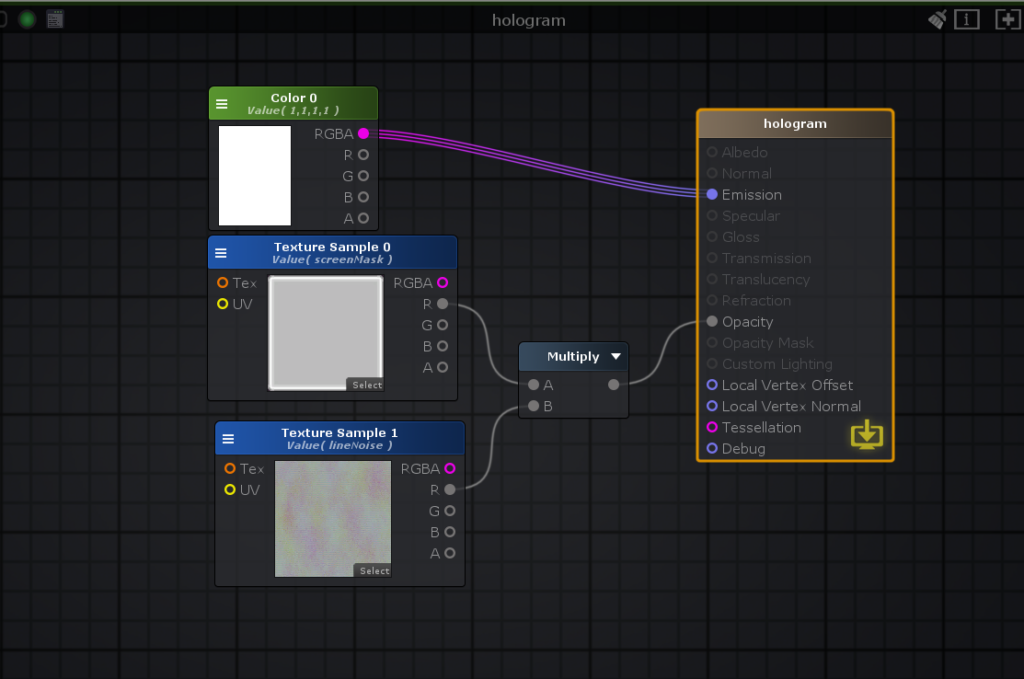
新しくTexture sampleノードを作成し、”lineNoise.png”を選択します。
そしてこれらのテクスチャを合成します。
Multiplyノードを追加し、両テクスチャの”R”をMultiplyノードへ接続してください。
そしてMultiplyは”Opacity”へ接続してください。
UnityでAmplify shader editorとPlayMakerを使用する 9
これでシェーダーを確認してみます。
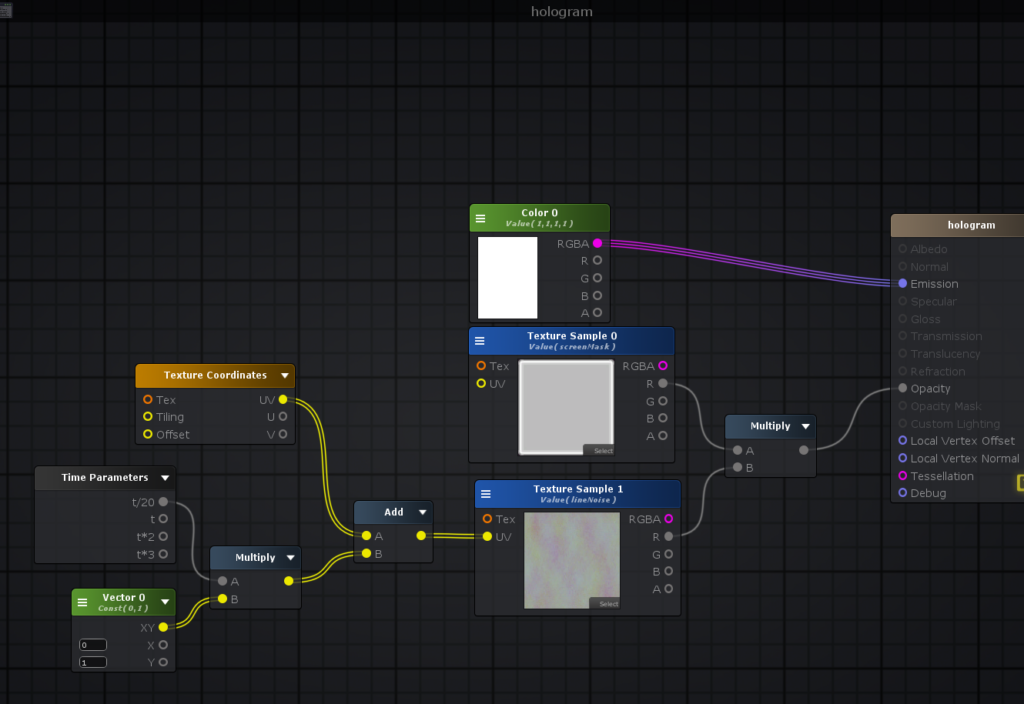
では、”lineNoise.png”へアニメーションを追加します。
5つのノードが必要となり、少し複雑なので、まず下の画像で全体図を確認してください。
UnityでAmplify shader editorとPlayMakerを使用する 10
このノードで何をしているかというと、テクスチャのUVを垂直方向に時間で変化させます。
Vector node には animation vertical を設定します。
Time Parameter ではアニメーションスピードを設定します。
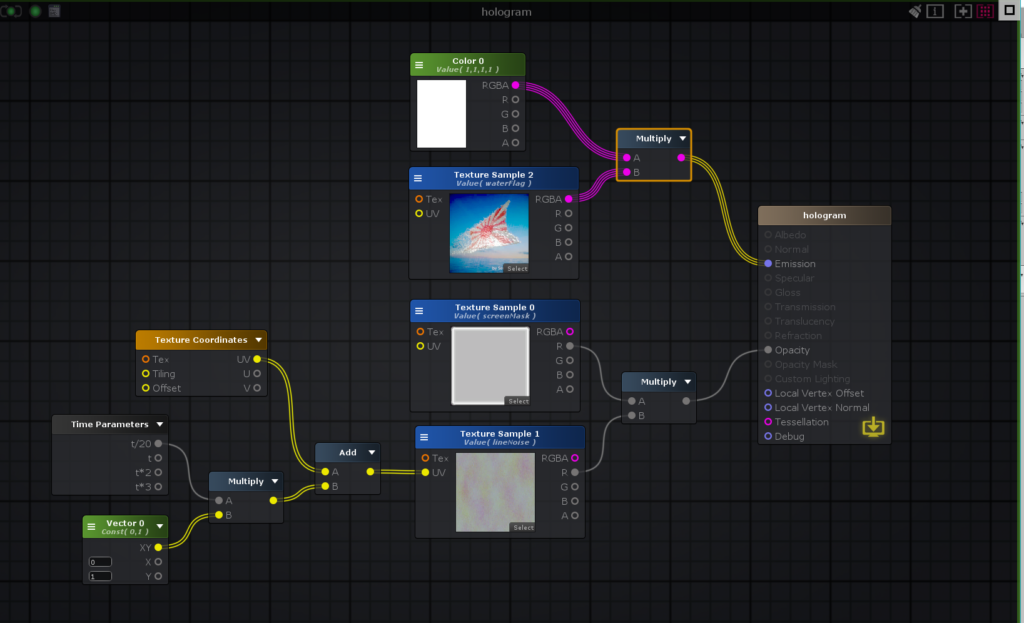
更にTexture SamplesとMultiplyのふたつのノードを追加します。
Texture Samplesには”waterFlag.jpg”を追加し、Multiplyに接続してください。
Color nodeもMultiplyに接続し、MultiplyをEmissionに接続してください。
UnityでAmplify shader editorとPlayMakerを使用する 11
Playmakerを使ってビジュアルスクリプティング:準備
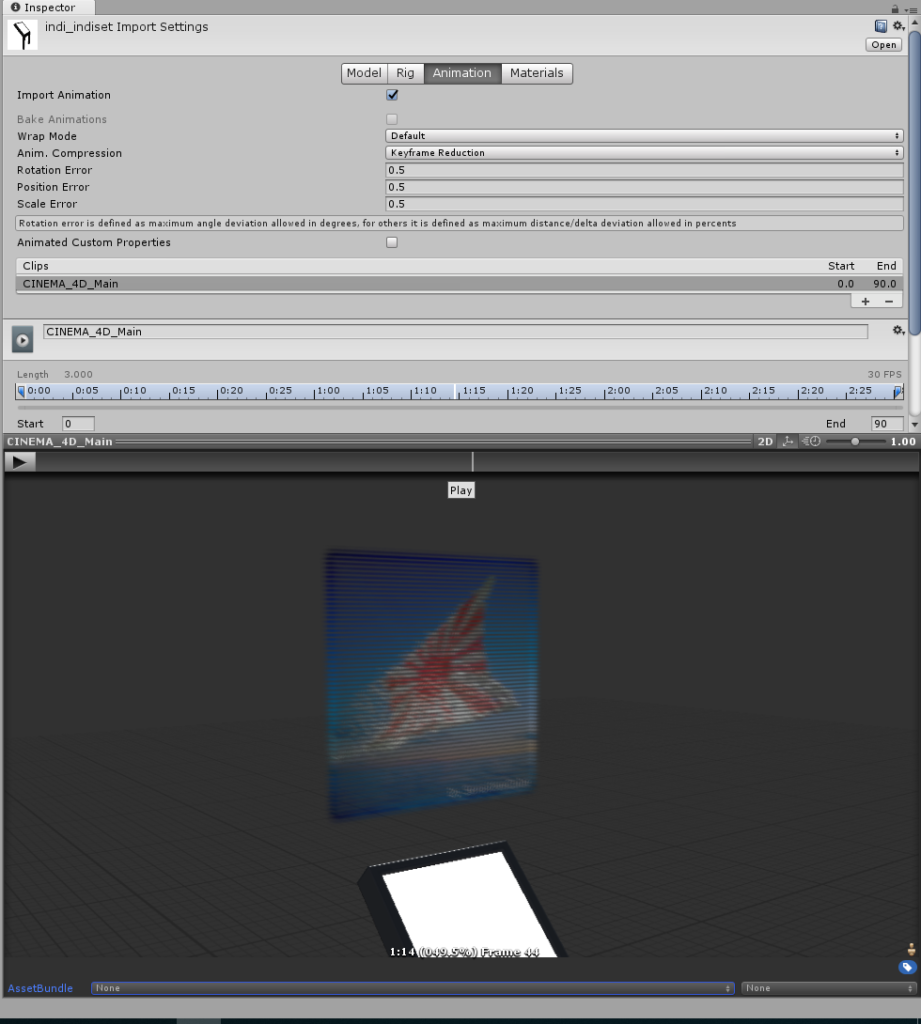
では、シェーダーが完成したのでFBXで確認してみましょう。
Projectの”indi_indiset”を選択、InspectorのAnimationをオンにし、Playボタンをクリックしてください。
UnityでAmplify shader editorとPlayMakerを使用する 12
シェーダーをアニメーション付きで確認することができます。マテリアルは以下の図のように設定してください。
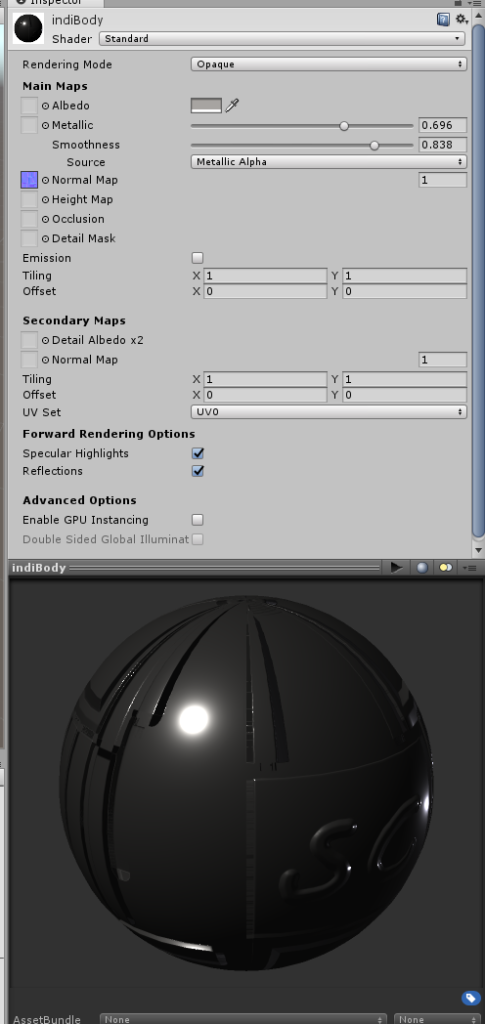
UnityでAmplify shader editorとPlayMakerを使用する 13
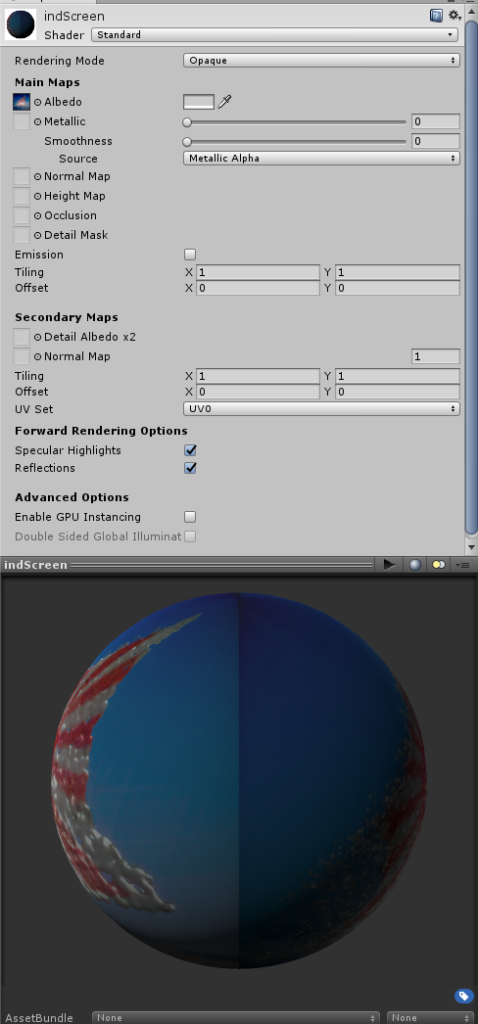
UnityでAmplify shader editorとPlayMakerを使用する 14
最後に、Playmakerでビジュアルスクリプティングを行います。
プレイヤーとの距離によってホログラムのオンオフが切り替わるよう設定します。”indi_indiset”を選択し、Inspectorを開きます。
UnityでAmplify shader editorとPlayMakerを使用する 15
UnityでAmplify shader editorとPlayMakerを使用する 16
RigのAnimation TypeはLegacyに設定します。
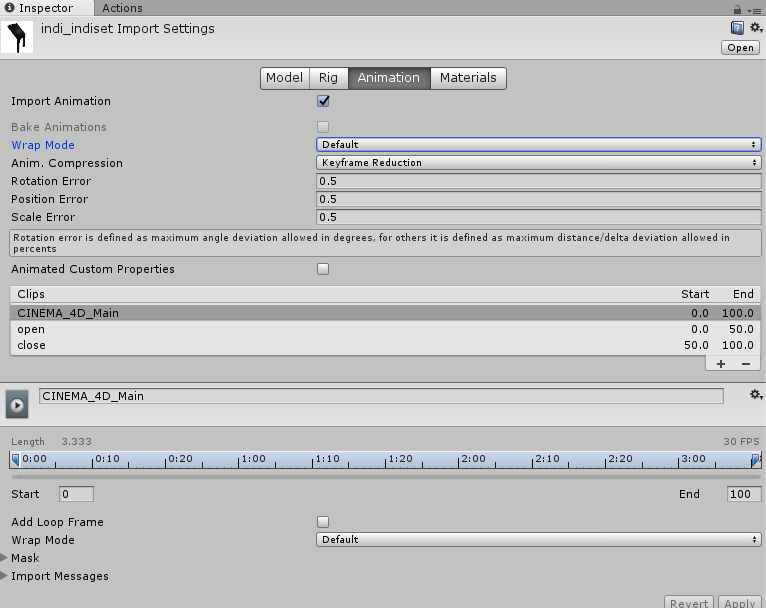
Animationでは、クリップを2つ作成しDurationを変更します。
”open”を0.0から50.0で設定し、”close”を50.0から100.0で設定します。
設定後、”indi_indiset”をHierarchyに追加してください。
Playmakerを使ってビジュアルスクリプティング:距離によって変化させる
Inspectorパネルを開き、AnimationのPlay automaticallyをオフにします。Add Componentをクリックし、PlayMakerFSMをクリックしてください。
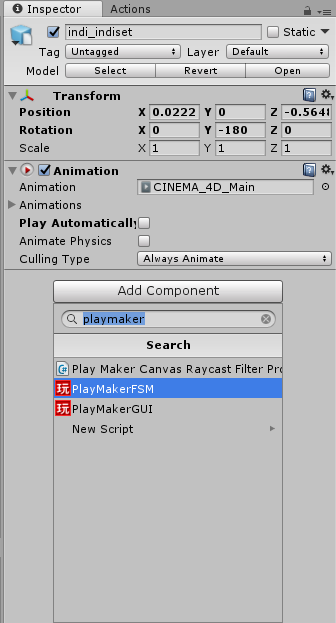
UnityでAmplify shader editorとPlayMakerを使用する 17
PlayMakerエディタを開きます。
最初にカメラ情報を取得します。取得の方法は以下の記事を参照します。
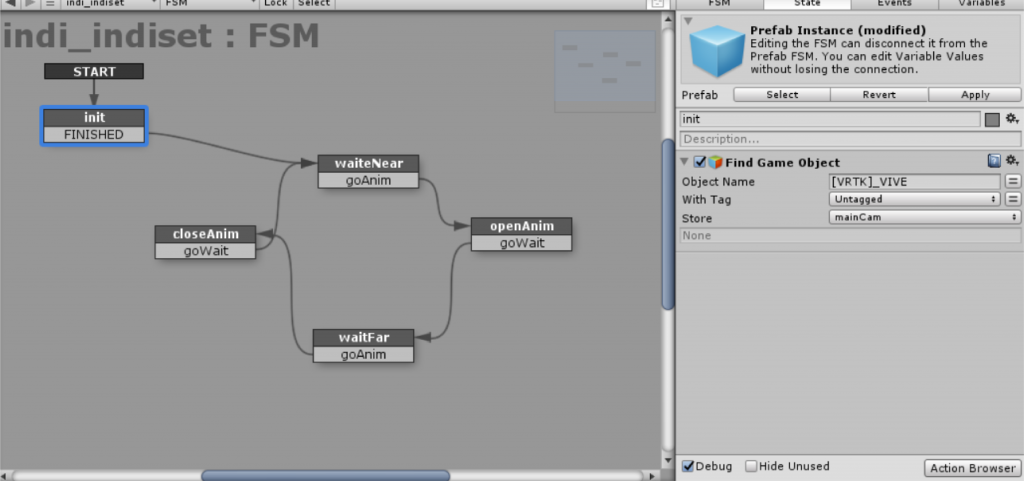
Init stateで、Fin Game Objectのアクションを挿入します。Object Nameの項目に”[VRTK]_VIVE”を入力します。
Main CameraをStore内のNew Variable…を選択し、”mainCam”変数へ保存します。
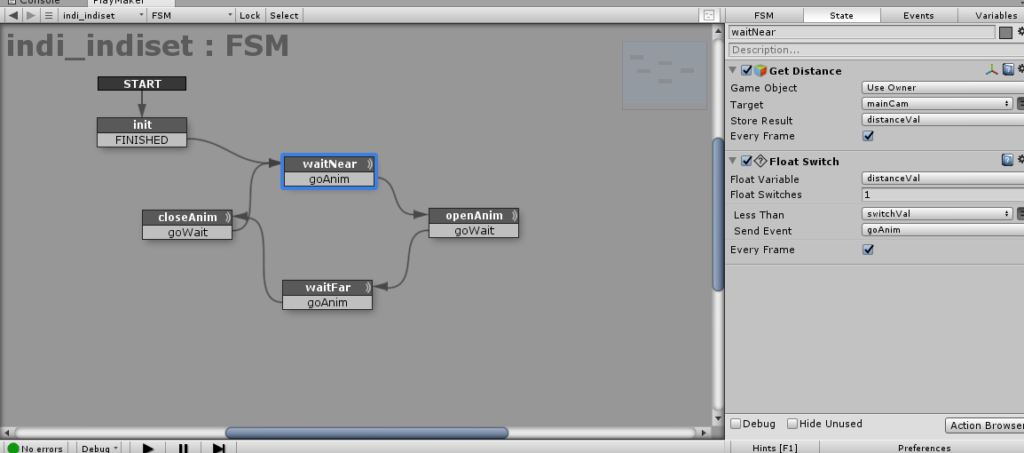
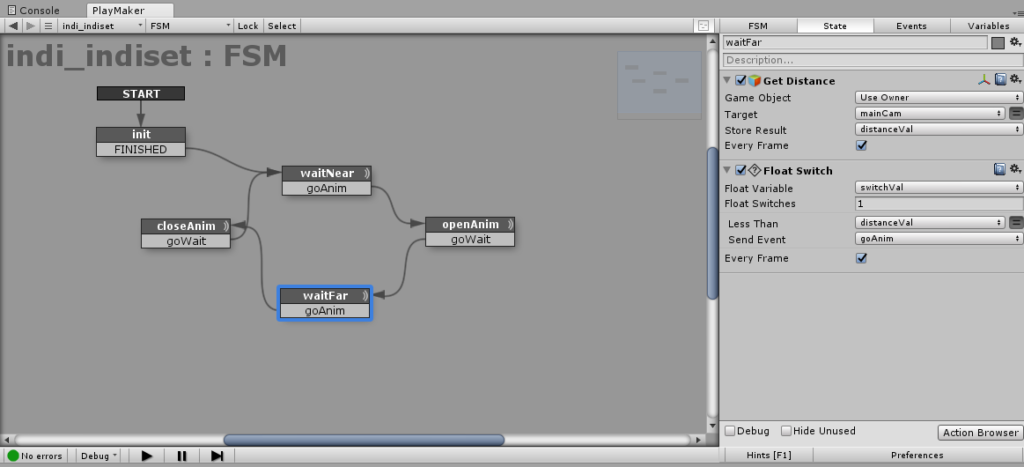
waitNearとwaitFarステートはそれぞれメインカメラ(=プレイヤー)とオブジェクト間の距離を確認します。
UnityでAmplify shader editorとPlayMakerを使用する 18
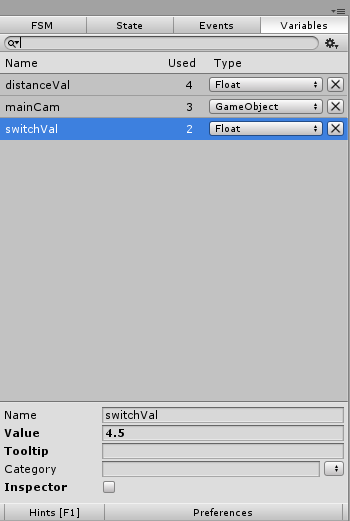
”switchVal”より距離が大きい/小さい時、openAnim/closeAnimステートに変遷します。
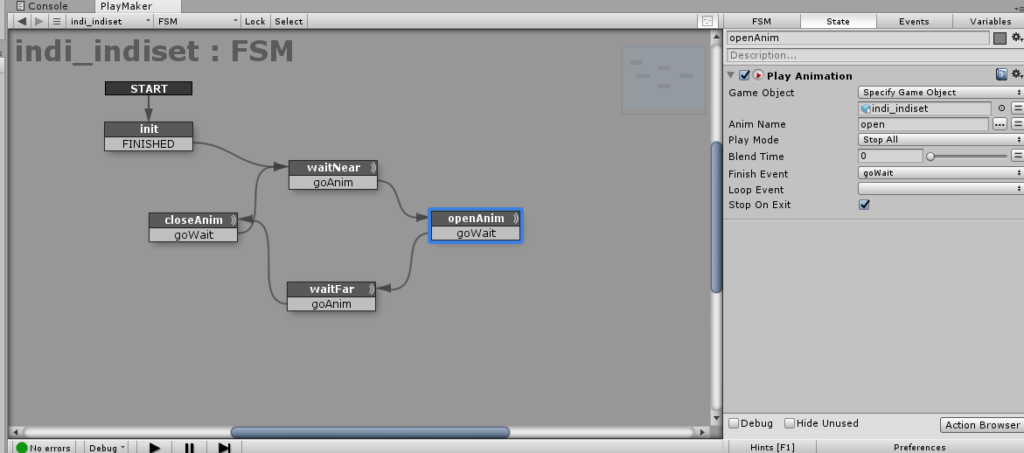
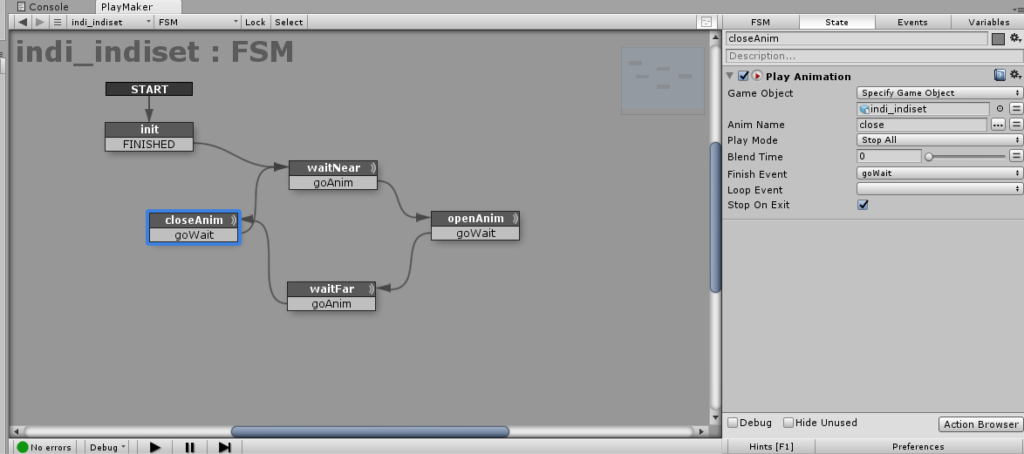
openAnimとcloseAnimステートではアニメーションが再生され、次のステートに移ります。この動きはUnityのPlayモードでMain Cameraを動かすことで確認することができます。
UnityでAmplify shader editorとPlayMakerを使用する 19
UnityでAmplify shader editorとPlayMakerを使用する 20
UnityでAmplify shader editorとPlayMakerを使用する 21
UnityでAmplify shader editorとPlayMakerを使用する 22
UnityでAmplify shader editorとPlayMakerを使用する 23
UnityでAmplify shader editorとPlayMakerを使用する 24
問題なく動くようであれば、STYLYへアップロードし完成です!お疲れ様でした!