When using PlayMaker, the word“variable”appears often.
The “string” type variable is the most commonly used variable type and is very important.
In this article, I will introduce the string-type variables necessary when using PlayMaker and demonstrate how they are used.
This is also a continuation of the following articles:
![[Introduction to Unity / PlayMaker] What is a Variable? From basics to applications of commonly used variables, int and float types](https://styly.cc/wp-content/uploads/2022/03/Int_Tomo_Eye-160x160.gif)
![[Introduction to Unity / PlayMaker] Vector: From the Basics to Applications of Commonly Used Variables](https://styly.cc/wp-content/uploads/2022/04/tomo_vec_eye-160x160.png)
I recommend reading the “What is a Variable?” article first, which explains the basics, especially if you are new to using variables in Unity/PlayMaker.
Sample Scene
This article will help you to create the following scene using PlayMaker.

Sample Scene
Advance Preparation
Install the Unity plug-in PlayMaker beforehand.
![[Unity Tutorial] Creating a Game Using Playmaker ① From Basic Introduction to Installing](https://styly.cc/wp-content/uploads/2019/06/1200px-160x160.jpg)
If you are using PlayMaker for the first time, please read the following article in advance for a better understanding.
![[Unity] Starting Playmaker from Scratch](https://styly.cc/wp-content/uploads/2019/09/PlaymaerCoreConcept-160x160.png)
String
What is a string type?
A“string” is a type of variable that can hold a string.
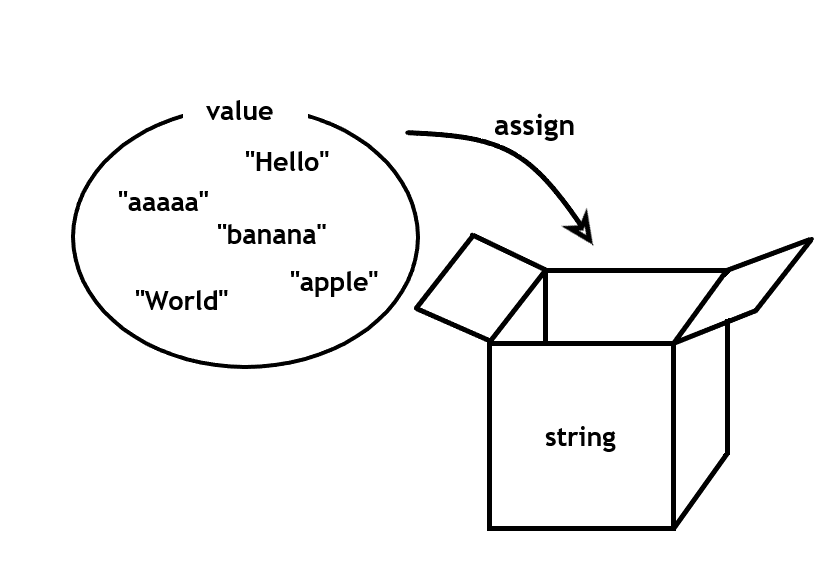
Diagram of a string type variable
You can use string-type variables to dynamically change the text placed in a scene or strings used in the internal processing of a scene.
Additionally, the initial value of a string type variable in PlayMaker is zero (null).
Action of String
The following are some of the most important actions that can be used for the string type in PlayMaker.
Set String Value
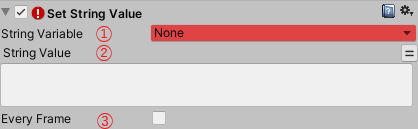
Set String Value
This action allows you to assign a value to a string type variable.
- You can select the variable to assign a value to it.
- Enter the string to be assigned. You can also select a variable for a string by pressing the equal sign to the right of the input field.
- If checked, this Action will be executed in every frame while staying in the State.
Get String Left / Get String Right

Get String Left / Get String Right
This action allows you to get the selected string from the left/right by a set number of characters.
- You can select the variable to get strings.
- Enter the number of characters that you want to obtain. You can also select a variable for a number by pressing the equal sign to the right of the input field.
- Select the variable to save the result.
- If checked, this Action will be executed in every frame while staying in the State.
Get Substring
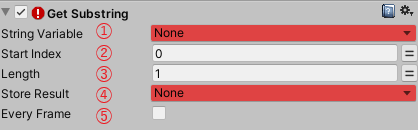
Get Substring
This action allows you to clip the selected string from a specified position using a set number of characters.

Example of“Get Substring”
Note: The character sequence is counted from left to right (0th character, 1st character, and so on) as shown in the image above.
- You can select a string variable to clip from.
- Enter the number of characters to start clipping from. You can also select a variable for a number by pressing the equal sign to the right of the input field.
- Enter the number of characters to be clipped. You can also select a variable for a number by pressing the equal sign to the right of the input field.
- Select the variable to save the result.
- If checked, this Action will be executed in every frame while staying in the State.
Build String
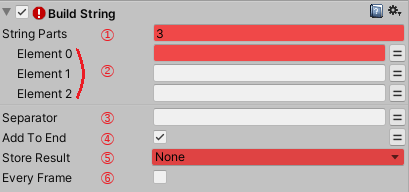
Build String
This action allows you to concatenate multiple strings. It can also insert other strings into the concatenated strings.
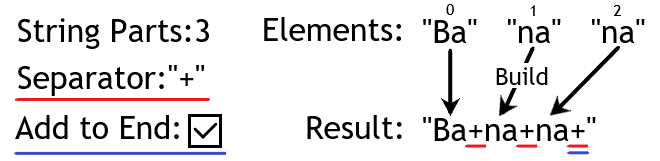
Example of “Build String”
- You can enter the number of strings to be concatenated.
- Enter a string to be concatenated. You can also select a variable for a string by pressing the equal sign to the right of the input field.
- Enter the string you want to insert in the concatenation of strings. You can also select a variable for a string by pressing the equal sign to the right of the input field.
- If checked, the string in step 3 will be added to the tail of the concatenated string.
- Select the variable to save the result.
- If checked, this Action will be executed in every frame while staying in the State.
String Append

String Append
This action allows you to concatenate a string after the selected string.
- You can select a variable to be concatenated from string variables.
- Enter a string to be concatenated at the back. You can also select a variable for a string by pressing the equal sign to the right of the input field.
String Replace
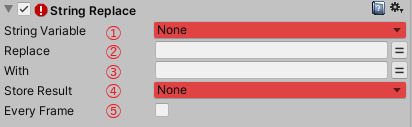
String Replace
This action allows you to replace a specific string of selected characters with another string.
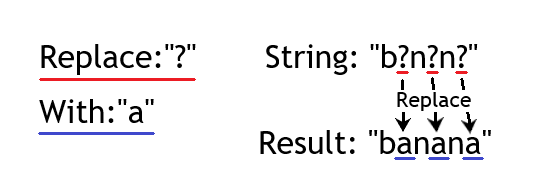
Example of “String Replace”
- You can select a string variable to be replaced by this action.
- Enter a specific string of characters that you want to replace. You can also select a variable for a string by pressing the equal sign to the right of the input field.
- Enter the string to be replaced. You can also select a variable for a string by pressing the equal sign to the right of the input field.
- Select the variable to save the result.
- If checked, this Action will be executed in every frame while staying in the State.
String Split
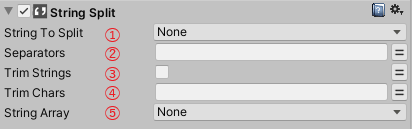
String Split
This action allows you to split a string into separate strings, one for each specified character, and store them in an array of strings.
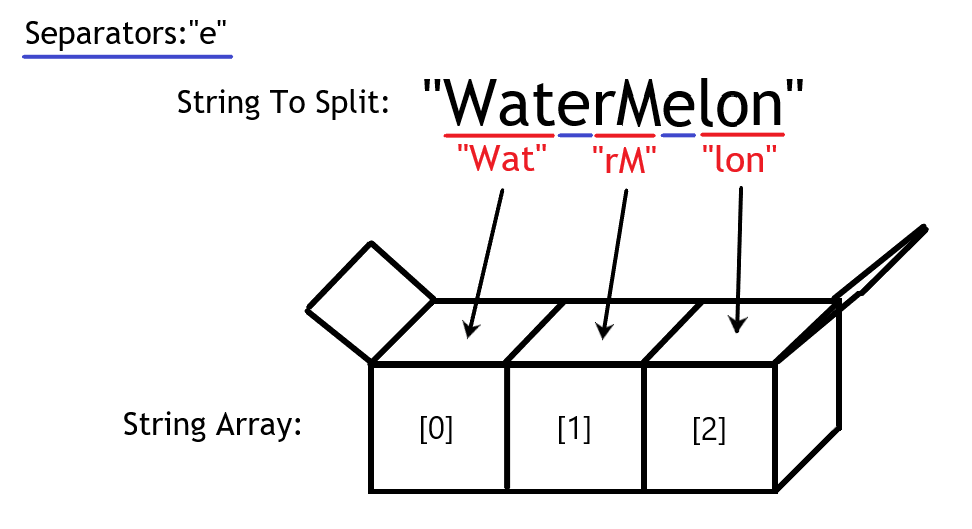
Example of “String Split”
- You can select the string you want to split by using a variable.
- Enter the character(s) with which to divide (separator).
Note: If you enter a string of two or more characters, it will be split for every character in that string. - If checked, this will remove all whitespace characters (spaces) from the beginning and end of each string after splitting.
- You can change the character to be deleted in step 3 to a non-whitespace character.
Note: If you enter a string in this section, all the characters in that string will be changed to those that should be deleted. - Select the variable to save the result.
Array Get
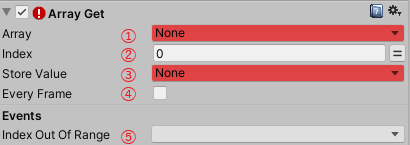
Array Get
- You can select the string you want to split by using a variable.
- Enter the character(s) with which to divide (separator).
Note: If you enter a string of two or more characters, it will be split for every character in that string. - If checked, this will remove all whitespace characters (spaces) from the beginning and end of each string after splitting.
- You can change the character to be deleted in step 3 to a non-whitespace character.
Note: If you enter a string in this section, all the characters in that string will be changed to those that should be deleted. - Select the variable to save the result.
String Join
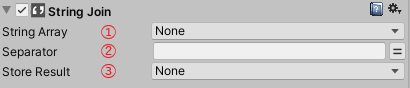
String Join
This action allows you to concatenate an array of strings into a single string variable.
It can also insert other strings into the concatenation of the concatenated strings.
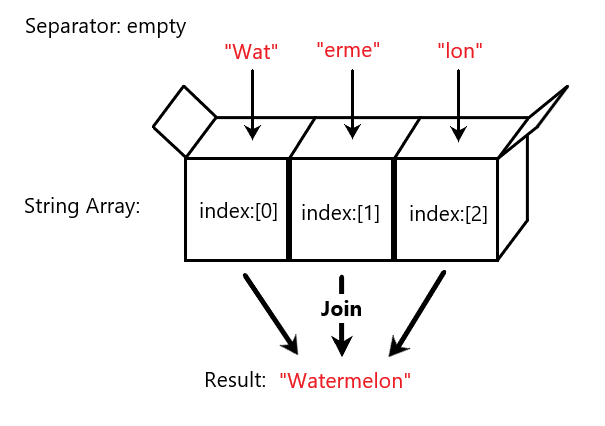
Example of “String Join”
- You can select an array of strings.
- Enter the string you want to insert in the concatenation of strings. You can also select a variable for a string by pressing the equal sign to the right of the input field.
- Select the variable to save the result.
Select Random String
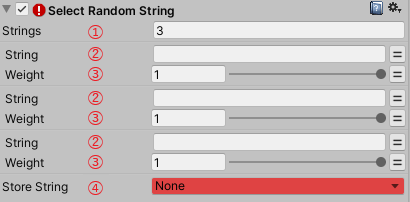
Select Random String
This action allows you to randomly assign one string to a variable from several strings that you set.
- You can enter the number of strings and Fields 2 and 3 will increase correspondingly.
- Enter the string. You can also select a variable for a string by pressing the equal sign to the right of the input field.
- The weight of the probability of that string being chosen can be adjusted in the range 0-1. You can also select a variable for the input of probability by pressing the equal sign to the right of the input field.
- Select the variable to save the result.
Application of String
You can use string type variables to create gimmicks in which the string changes dynamically.
For example, we will create a gimmick in which “BA” or “NA” is added to a string with equal probability every second, and when “BANANA” is completed in the string, a banana falls from the sky.
Create Sample Scene
First, open the 3D model of the banana in Unity and create a Prefab for it. If you do not have a 3D model of the banana, you can substitute a Prefab, such as Capsule.
Create one empty object, one Canvas, and one text on the Canvas.
Move the empty object to a position slightly above the origin coordinates (0,0,0).
From the Inspector, change the Render Mode of the created Canvas to “World Space”and adjust the size and position of the text so that it is as close to the origin coordinates (0,0,0).
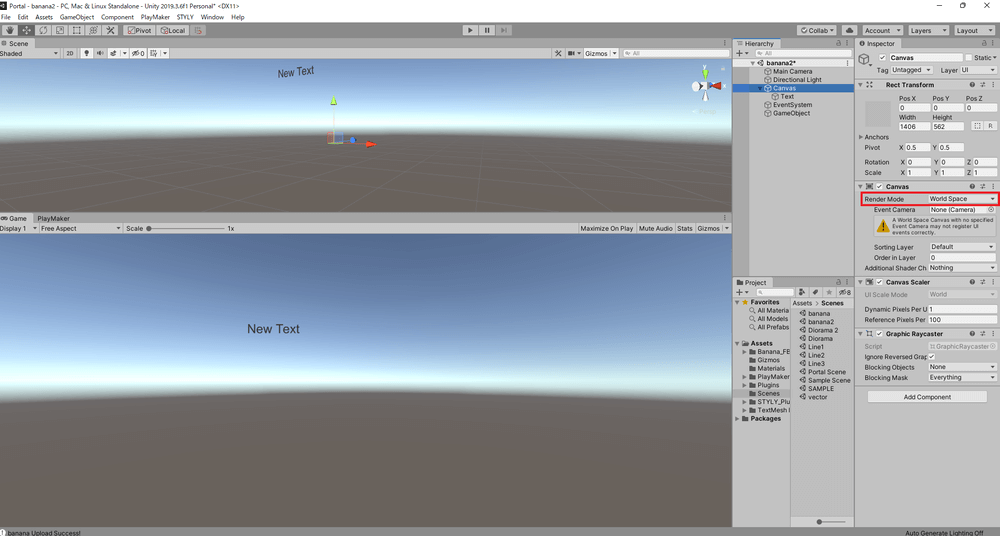
Change Render Mode of Canvas to World Space
Add PlayMakerFSM to the empty object you created.
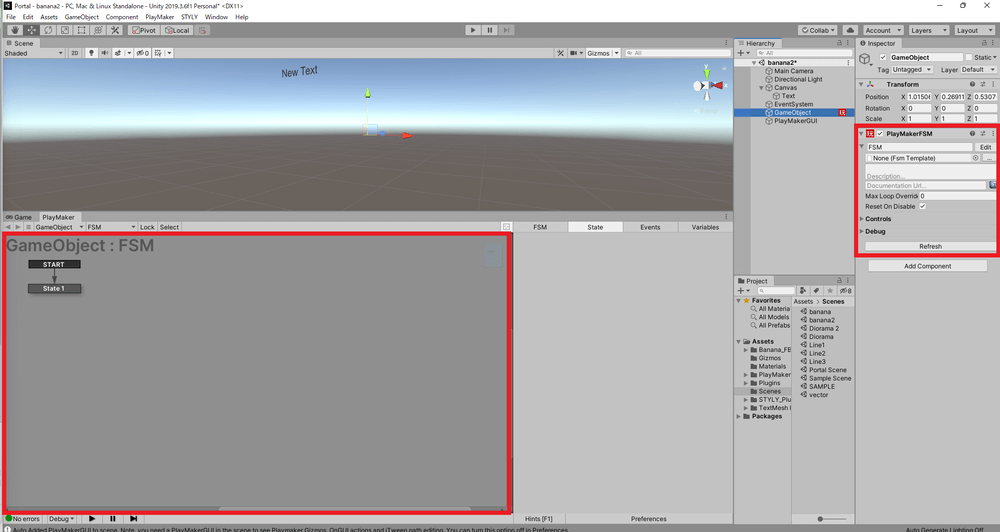
Add PlayMakerFSM to empty object
Open the Action Browser and add “Random Event”to State1.
From the Events tab > Add Event, Add “BA” and “NA” as new events.
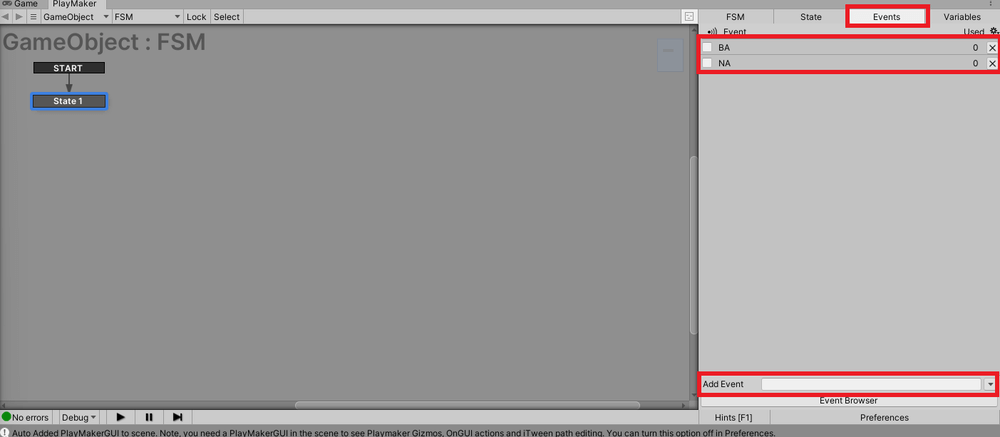
Add “BA” and “NA” as new event
Add BA and NA to Transition in State1.
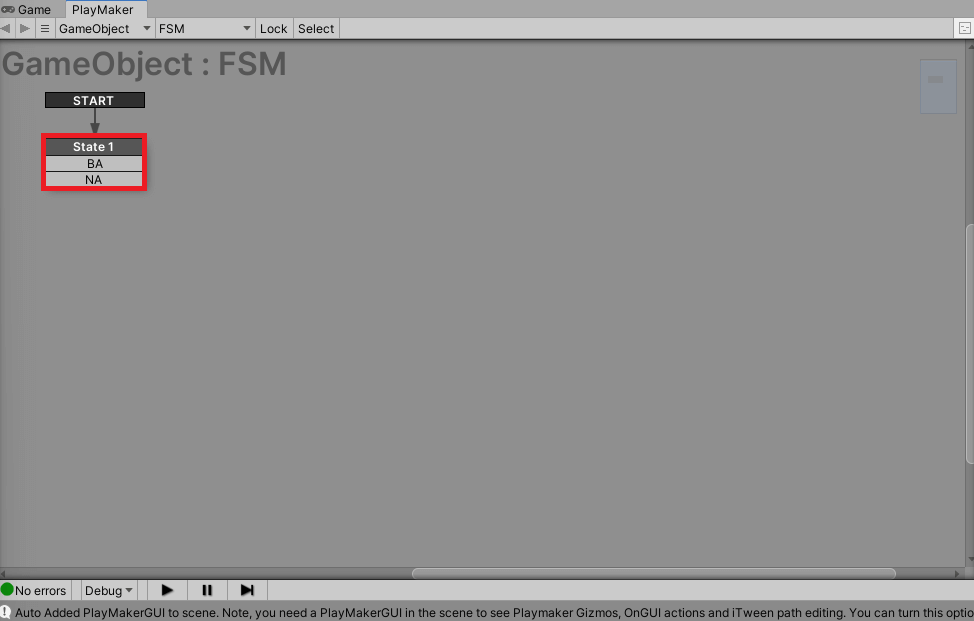
Add BA and NA to Transition in State1.
Create “BA”as a new State.
Open the Action Browser and add “Random Event,” “String Append” and “UI Text Set Text” to “BA” in the order shown in the image below.
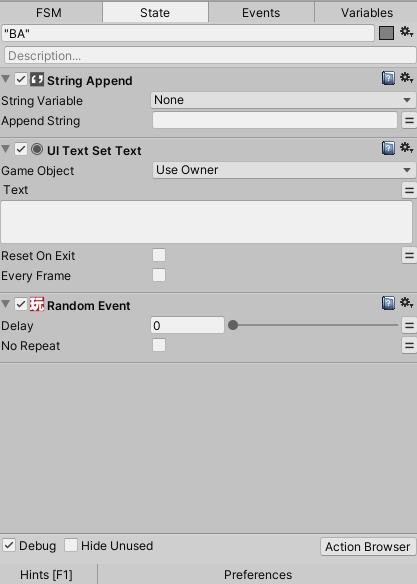
Create “BA” as a new State.
Enter “1” in the Delay of Random Event.
Create a new variable “banana” and set it to String Variable in String Append.
Change Game Object in UI Text Set Text to Specify GameObject and set Text as the target.
Set the variable “banana” to Text in UI Text Set Text.
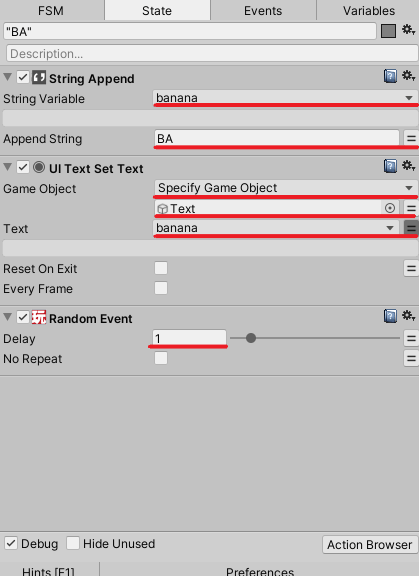
Edit action of “BA”
Add BA and NA to the “BA” Transition.
Duplicate three “BA” transitions, rename them as shown in the following image, and connect the transitions.
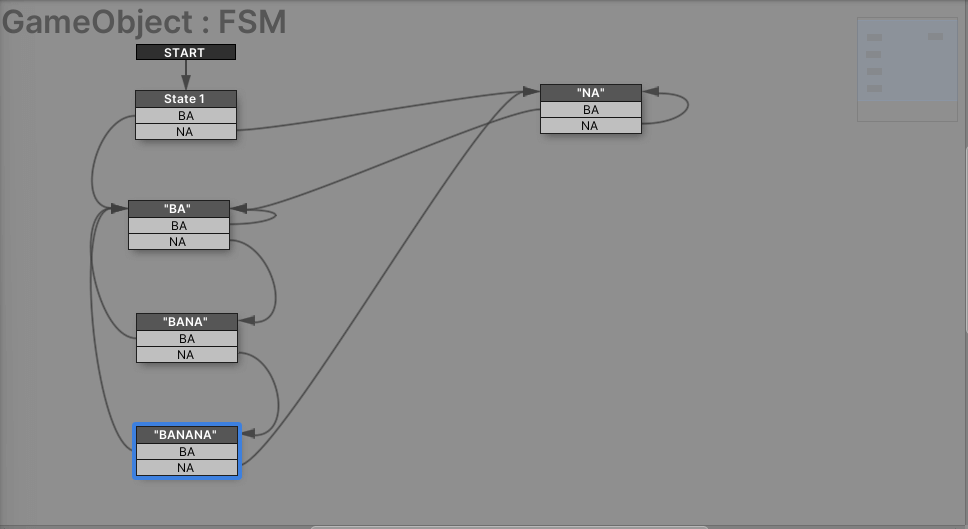
Rename (“BA” → “NA,”“BANA,”“BANANA”) + Connect Transition
Enter “BA” in the Append String of String Append for “BA.”
Enter “NA” in the Append String of String Append for “NA” and “BANA.”
Enter “NA1” in the Append String of String Append for “BANANA.”
Open the Action Browser and add “String Replace” and “Create Object” to “BANANA” in the order shown in the image below.
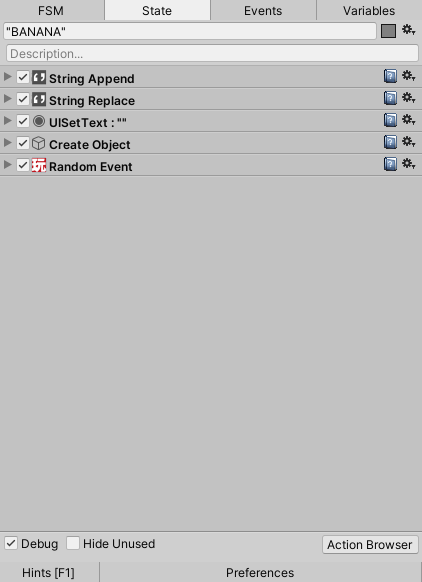
Add action to “BANANA”
Set the variable banana to String Variable and Store Result in String Replace.
Enter “BANANA1” in the Replace field of String Replace.
Enter “<color=yellow>BANANA!</color>“ in the With field of String Replace.
Set the first banana prefab to Game Object in Create Object.
Set Spawn Point in Create Object to the first empty object you created.
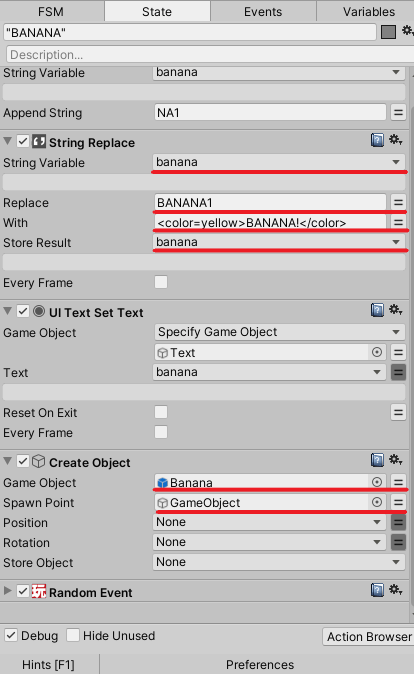
Edit “BANANA” action
Now it is ready!
The actual completed scene works like this.
Actual Motion
Conclusion
This article explained the basics and applications of the variable of type string.
As we have shown, PlayMaker makes it easy to create Unity content without having to learn the programming language (C#) used in Unity.
In addition to the applications introduced in this article, you can express various things by using variables in PlayMaker, so we encourage you to try your hand at creating scenes using PlayMaker.
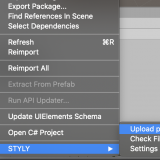
How to upload to STYLY
Upload your 3D model to STYLY.
Create a STYLY account
How to create a STYLY account

How to upload 3D models to STYLY

How to upload from Unity to STYLY
You can use STYLY FORUM to solve the problem. STYLY FORUM is a place where people can discuss a service or technical issue on STYLY, or provide bug reports on STYLY.
https://en.forum.styly.cc/support/discussions