In this article, I will introduce how to create zero-gravity state in STYLY. This article is a tutorial that explains the basic functions of Unity for beginners. I will also explain how to use PlayMaker to add Collider’s to the controllers.
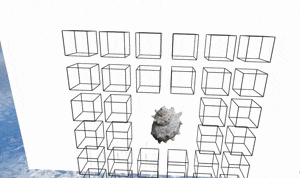
Completed Image
Sample
You can experience a sample VR scene from the STYLY GALLERY.
You can download the Unity project used in this tutorial from here. STYLY-Unity-Examples
Preparation
First, download the sample project from Github, and open it in Unity. STYLY-Unity-Examples If you want to collide the controller and objects, you must pay for an asset called PlayMaker, so buy it and import it to Unity. Unity Asset Store Playmaker If you have a prepared a 3D model you want to use, import it to the project now.
Add a Rigidbody component to the objects you want to add a zero-gravity state to
In Unity, there is a function to simulate and apply physic laws to objects. By using this function, you can apply rules such as “objects falling due to gravity”, or “objects bouncing on each other”. In this sample, we will use this function to create a zero-gravity effect. Add Rigidbody components to objects you want to apply zero-gravity to.
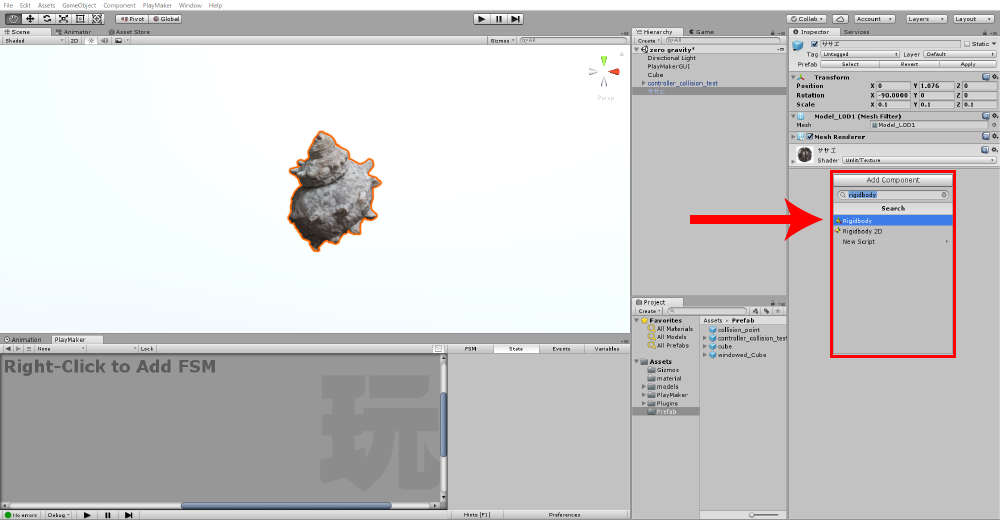
How to add Rigidbody
By adding this component, objects will move according to physic calculations. If you press the play button, you can see the object falling due to gravity. Next, change the Rigidbody settings, and uncheck the “Use Gravity” option.

Uncheck “Use Gravity”
If you press the play button now, the object will not fall and stay floating in the air. You have created an object in zero-gravity.
Adding a Collider component
You have completed applying zero-gravity to the object but let’s set it so that the object can collide into another object. In order to collide objects in Unity, setting a Rigidbody is not enough, and you have to add a Collider component. By adding this component, the object will gain a collider, and you can detect collisions. Let’s add a Collider to the object we created in the previous step.
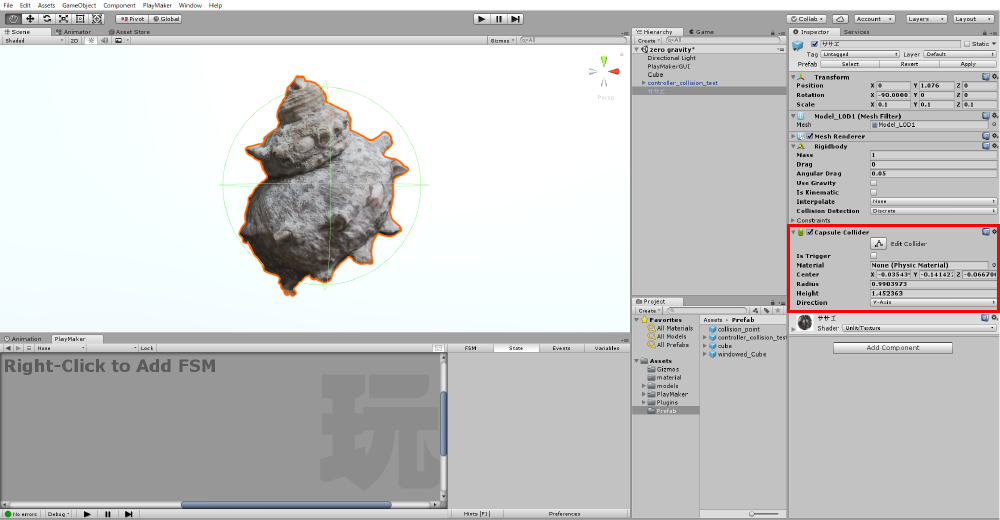
Adding a Collider
There are different kinds of Colliders, such as “Box Colliders”, and “Sphere Colliders”, so please choose the Collider that best suits the 3D model. (If in doubt, choose “Capsule Collider”)
Adding Colliders to other objects too
Using the same process, add Collider components to the other objects in the scene too. In the sample project, I made a wall.
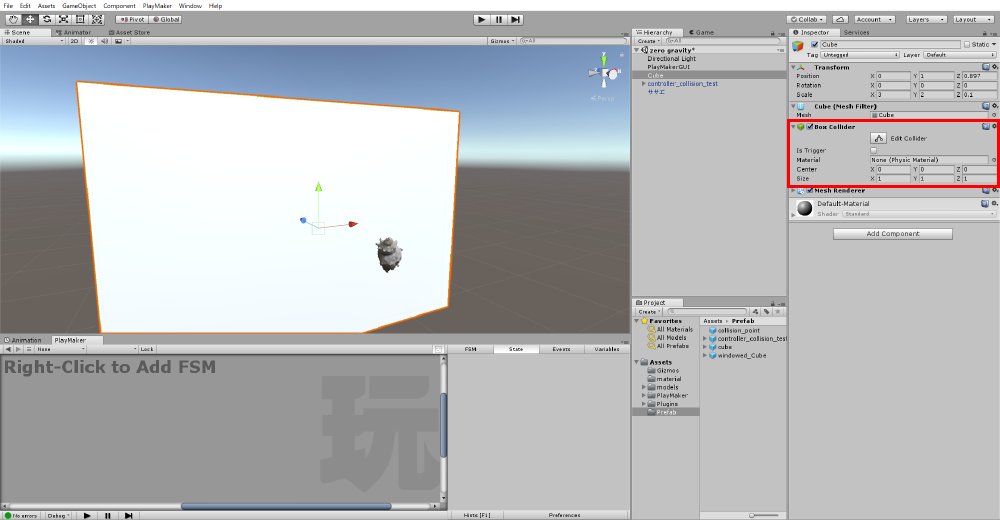
Adding Colliders to other objects in the Scene
Now, we are done preparing the zero-gravity object and can now collide with other objects.
Setting how objects bounce off each other
Next, we will set how the objects will bounce off each other when they collide. If you don’t change this setting, since the object’s default bounciness is set to 0, the object will not bounce. To set the object’s bounciness, create a Physics material, and attach it to the object.
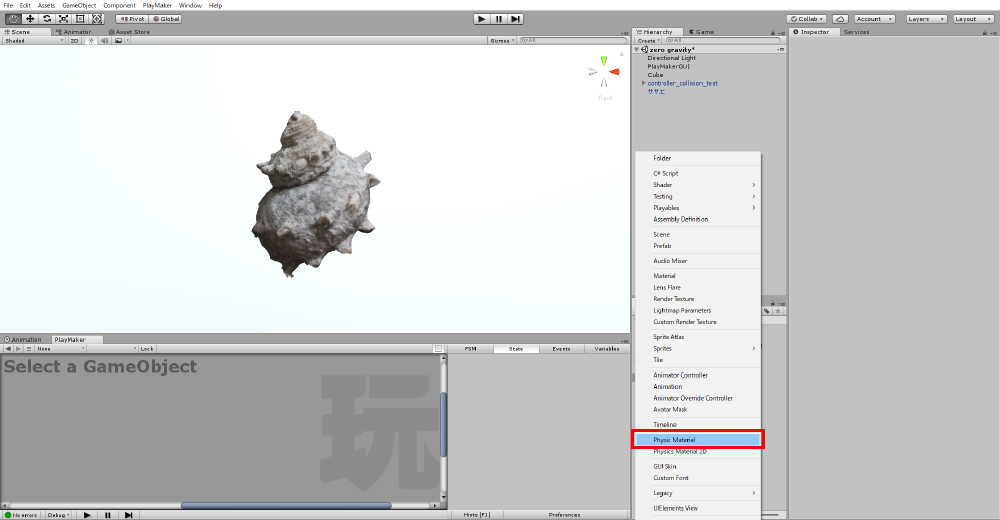
Creation of a Physic Material
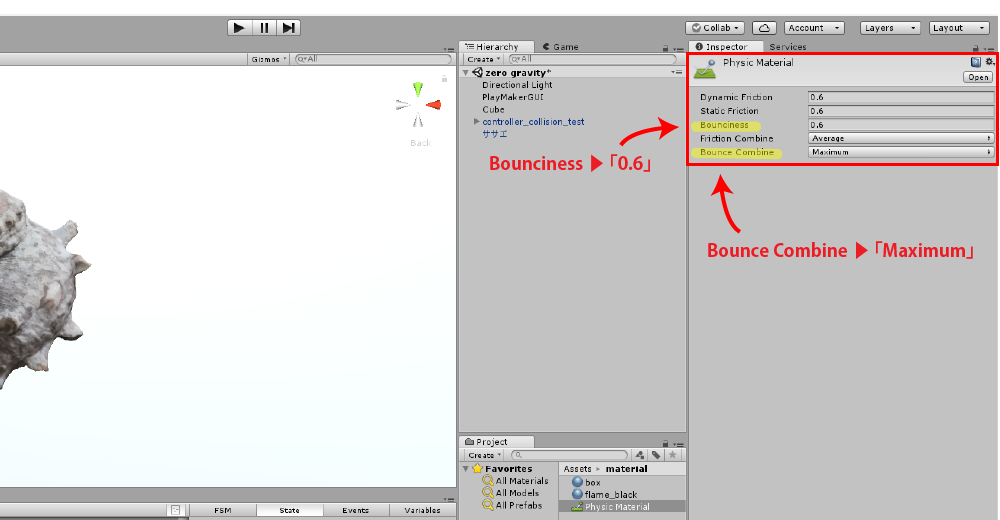
By selecting this, the settings of the Physics material will open in a new tab. Locate the “Bounciness” setting. By setting the Bounciness to a number between 0 – 1, you can change the Bounciness of the object. In this sample, I set the Bounciness to “0.6” to achieve a standard bounce effect. Then, set “Bounce Combine” to “Maximum”.
Settings of Physic Material
The Physics material settings are done now! To apply the Physics material setting to the zero-gravity object, add the Physics material to the “Material”.
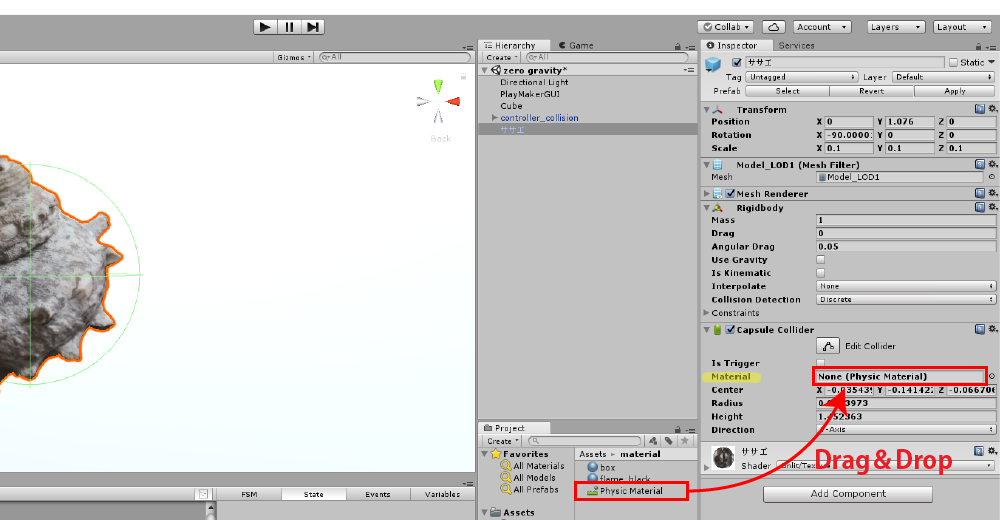
Attaching the Physic Material
Adding colliders to controllers
Finally, lets add a collider to the controller, so that we can detect collisions of the controller and objects. We need to add a collider to the scene, and make it a child of the controller. First, create the Collider to attach to the controller. Create an empty object in the Scene window, and name it “Controller Collider”. Add a sphere collider component. Set the Radius to “0.05”. Then, save it as a Prefab, and delete it from the scene.

Creating a Controller Collider
Next, click the Create button in the Hierarchy window, and create a empty object, then name it “Controller”. Create another empty object as a child of “Controller”, and name it “Controller R”. We will use Playmaker to attach the Collider to the controller. 5 steps to setup the Collider 1. Use “Find game object” to find the controller in the scene 2. Use “Get Position” to obtain the position data of the controller 3. Add the “Controller Collider” you just created to the position of the controller 4. Use “Set Parent” to set the Collider as a child of the controller Open the Playmaker window, right click in the window and select “Add FSM”.
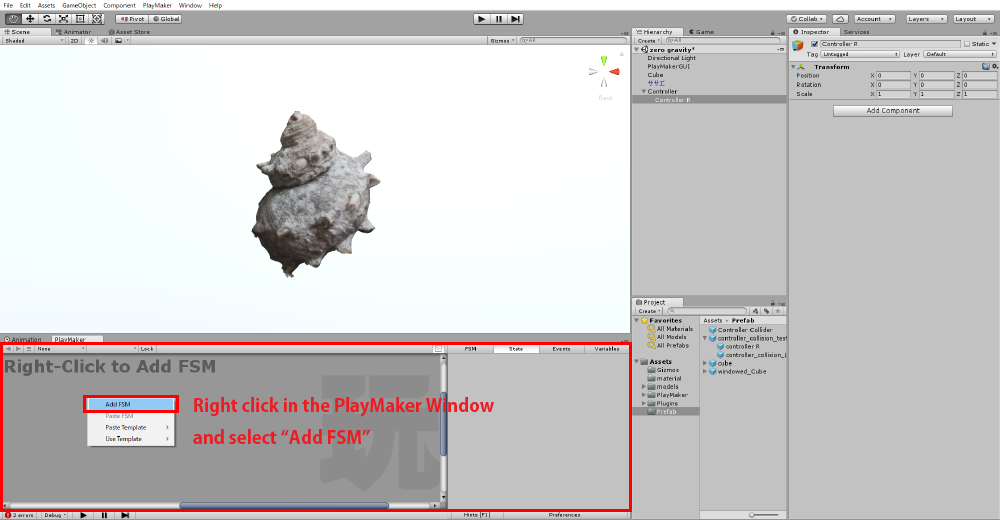
Adding a FSM
Add 4 actions “Find game object”, “Get Position”, “Create Object”, and “Set Parent” to the FSM you just created. To add actions to a FSM, use the Action Browser. Then, use the search bar and search for “Find game object”, “Get Position”, “Create Object” and “Set Parent”, then add them to the “State 1” action.
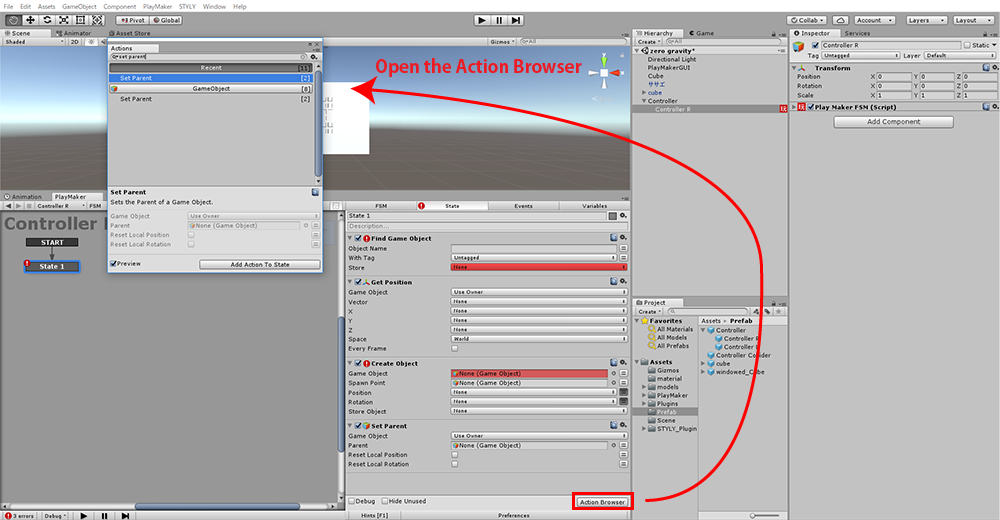
How to add Actions
First, lets setup “Find game object”. Enter “Controller(right)” for the Object Name. Click store, and select “New variable…”, then name it “Controller”.
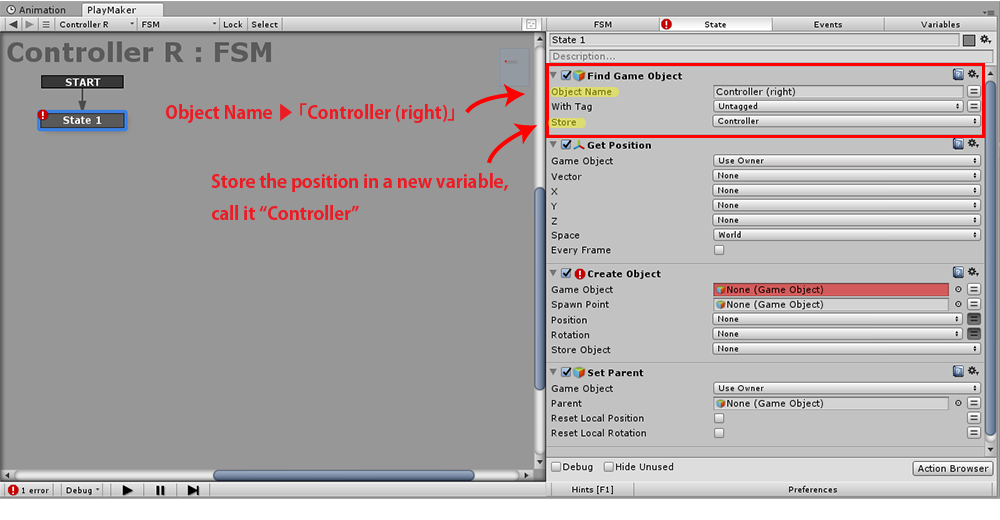
Find Game Object settings
Next, lets setup “Get Position”. Set “Specify Game Object” for Game object. Then, click the 2 bar icon that will appear on the right, and set the “Controller” as the variable. Click the Vector, select “New variable…”, and name it “Controller Position”. The position data of the controller will now be stored in the “Controller Position” variable.
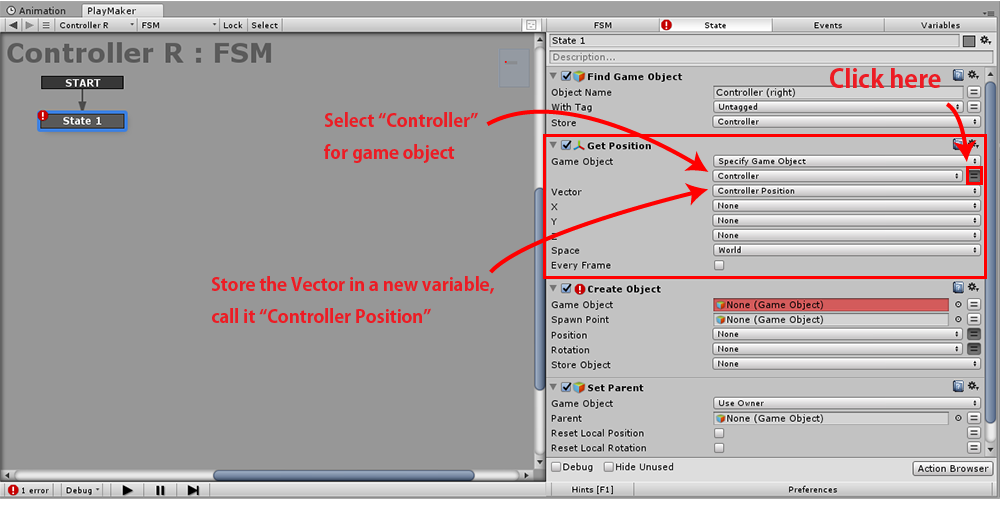
Get Position settings
Next, lets setup “Create Object”. Set the “Controller Collider” Prefab for “Game object”. For “Position”, use the “Controller Position” variable you just created. Click “New variable…”, and name it “Created Controller Collider”. The Collider will now appear at the controller position, and be stored in the “Created Controller Collider” variable.

Creare Object settings
Finally, lets setup “Set Parent”. In this Action, we will set the Collider as a child of the Controller, so it follows the Controller. First, we need to set “Created Controller Collider” for “Game Object”. Click Game Object, and select “Specify Game Object”. Set “Created Controller Collider” as the variable. Next, setting up the Parent. Click the 2 bar icon, and select “Controller”. The created Collider becomes a child of the Controller now.
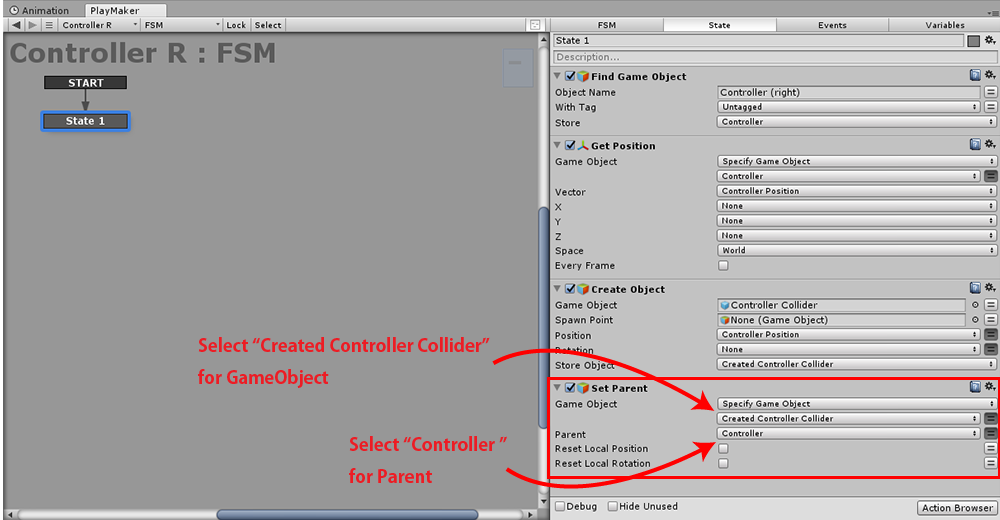
Set Parentの設定
If you need to add a Collider to the left-hand controller too, duplicate the “Controller R” object, name it “Controller L”, and change the “Find Game Object” Object Name to “Controller L”. We are done with the setting of the Collider now.
Uploading the scene to STYLY
Finally, uploading the scene to STYLY! Take note that you are not uploading Prefabs, but you are going to upload the whole scene to STYLY. STYLY adds Colliders automatically to uploaded Prefabs, so if you upload Prefabs to STYLY, there is a possibility that it will result in unexpected behaviors. If a scene is uploaded to STYLY, no Colliders are created. So, if you want to use physic simulations using Colliders and Rigidbodies, it is better to upload the whole scene to STYLY. Uploading scenes to STYLY is very easy. Make sure that there is nothing unneeded in the scene, and save it. The Main Camera is unneeded, so make sure you delete it. Once you save the scene, go to the Project window, select the scene, and click “Upload Prefab or Scene to STYLY”. To learn details of the Scene Upload Function, please read the article below. How to use the Unity Scene Upload Function Once the upload is complete, import the scene to the STYLY editor. If you touch the objects with the controller, they will float around in zero-gravity. In this article, I introduced how to apply zero-gravity to objects using the Unity physic simulation functions. You can create many other effects by using physic simulations. Please experiment!!