In this article, we will introduce how to create and manage scenes, the basic operation method of STYLY Studio, and the procedure to publish the created scene.
By reading this article, anyone can easily learn how to create a VR / AR space and publish their own VR / AR space to the whole world.
Let’s create your own VR / AR space, publish it to the world, and share it using SNS.

STYLY Studio TOP
How to create and manage new scenes
This section outlines how to create and manage scenes in STYLY Studio.
In STYLY, a “scene” refers to a virtual or augmented reality (VR/AR) environment.
Upon launching STYLY Studio, the Scene Management screen appears by default.
From this interface, users can create new scenes, rename them, duplicate them, or delete them.
If you are using STYLY Studio for the first time, you must create a new scene before proceeding.
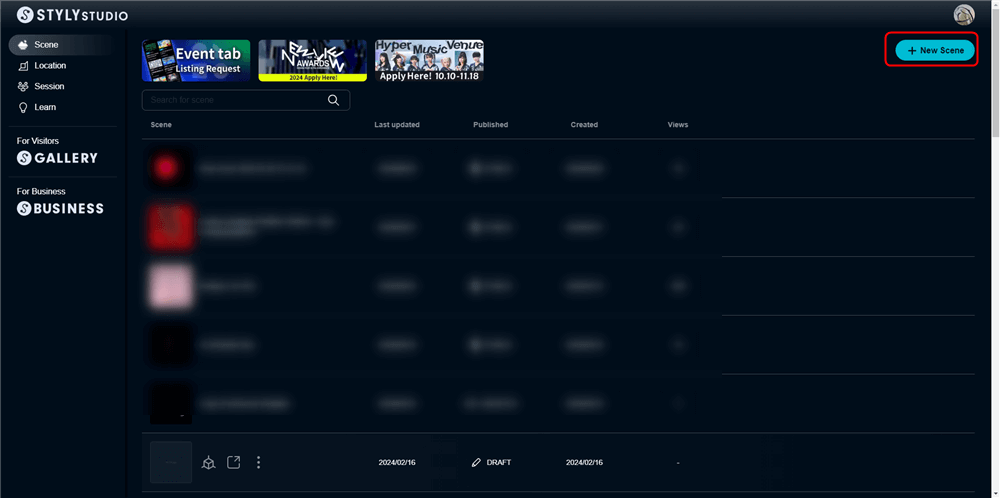
New Scene
To create a new scene, click the [+ New Scene] button in the upper right corner of the “My Scenes” screen.
Next, select either a VR Scene or an AR Scene, enter a scene title (which can be changed later), and click [Create Scene].
STYLY Studio will launch and open the scene editing screen.
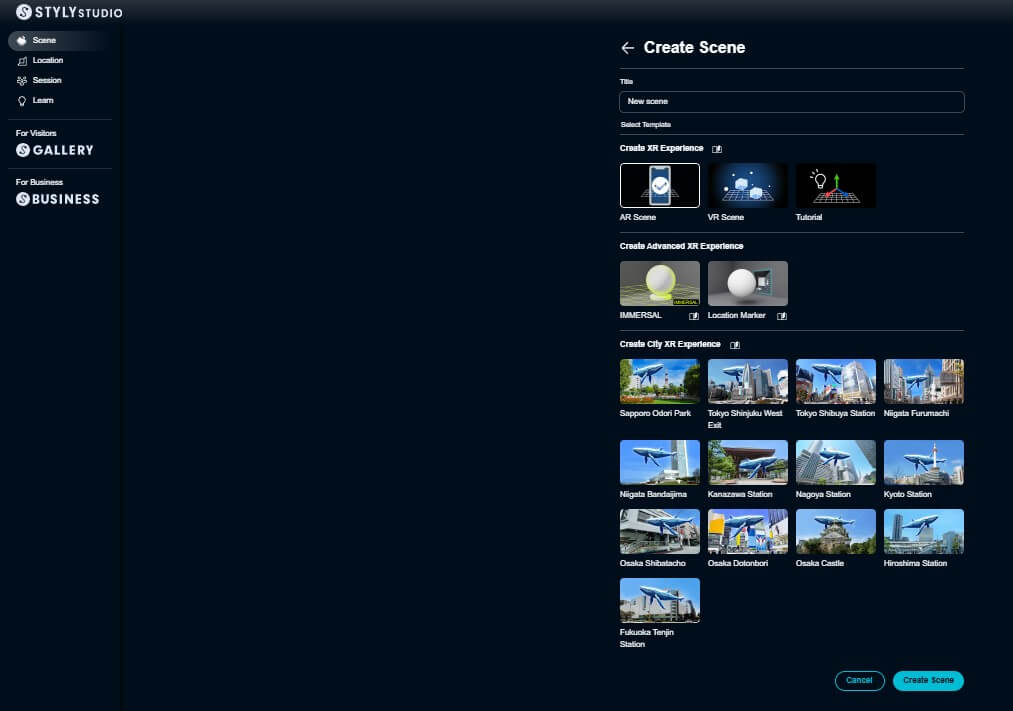
Scene creation screen Enter the title at the upper of the screen
How to use STYLY Studio
This section explains the basic functions of STYLY Studio, including how to change the editor’s camera view, the layout of the interface, how to insert assets, and how to manipulate those assets.
Zoom / move / rotate the work viewpoint
Introducing how to change the work viewpoint on the STYLY Studio screen.
Zoom in / out of the work viewpoint

Zoom in out
You can zoom in and out on the work viewpoint by operating the mouse (trackpad).。
Operation method Common to Windows / Mac
| Device used | Method of operation |
| Mouse | Mouse wheel |
| Trackpad | pinch Two-finger vertical swipe (Depending on trackpad settings) ) |
Translation of work viewpoint

move
The work viewpoint can be translated up, down, left and right.
Operation method Common to Windows / Mac
| Device used | Method of operation |
| Common to mouse / trackpad | Right click + WASDQE W: front, A: left, S: back, D: right, Q: bottom, E: top * Press the Shift key at the same time to increase the speed of moving the viewpoint. Arrow key ↑: Top, ↓: Bottom, ←: Left, →: Right * Press the Shift key at the same time to increase the speed of moving the viewpoint. |
| Mouse only | Wheel button Center click + mouse move |
Revolution of work viewpoint

Orbit
You can revolve the work viewpoint by operating the mouse (trackpad). Revolve around Your Position.
Operation method Common to Windows / Mac
| Device used | Method of operation |
| Mouse | Left click + move mouse |
| Trackpad | Left click + drag |
Rotation of work viewpoint

Rotate
You can rotate the work viewpoint by operating the mouse (trackpad).
Operation method Common to Windows / Mac
| Device used | Method of operation |
| Mouse | Right click + move mouse |
| Trackpad | Right click + drag |
What is Your Position?
Your Position is the position that will be your first point of view when you experience the VR / AR space.
It will be a viewpoint that you can see by wearing the HMD with STYLY VR APP.
Also, Your Position can be moved.

STYLY Studio screen Your Position
STYLY Studio screen description
Introducing the screen list of STYLY Studio.
There are four main menus.
Let’s take a closer look at the four menus
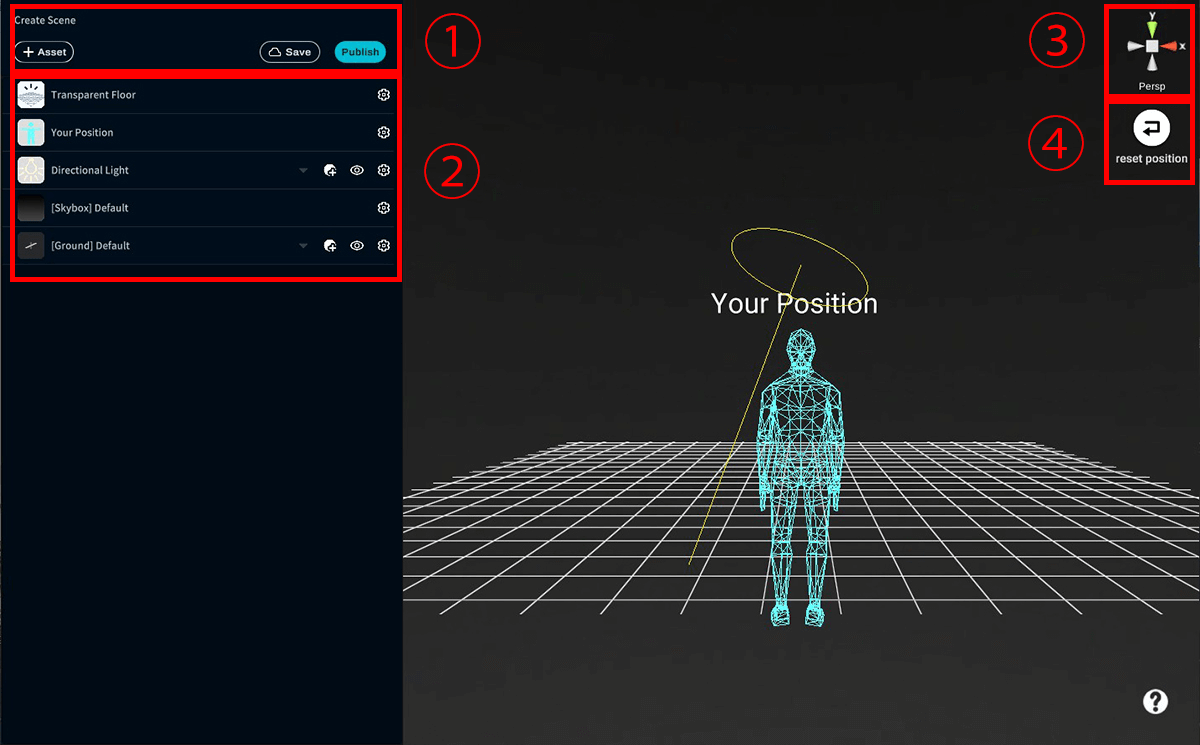
STYLY Studio screen menu explanation

STYLY Studio screen top button
Menu description
| Assets button | Opens a screen for selecting the assets to insert in the Scene. Assets include 3D models, images, music, videos and more. |
| Save button | You can save the state of the scene. Additionally, the status of autosaving is displayed. |
| Publish button | Open the Publish screen for publishing the Scene. |
Hierarchy menu is a menu that manages lights called assets, Skybox (celestial sphere), 3D models, etc.
In a newly created scene, the assets required for either a VR or AR scene are inserted by default.
Describes the assets that are inserted by default.
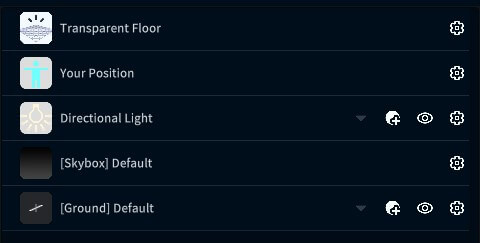
VR template hierarchy menu
- Directional Light is a light source that illuminates the entire space like the sun.
- [Ground] Default is the floor / ground.
- [Skybox] Default is a celestial sphere that covers the entire screen.
- Your Position is the position that will be your first point of view when you experience the VR / AR space.
- Transparent Floor is necessary for warp movement in VR.
It will be a viewpoint that you can see by wearing the HMD with STYLY VR APP.
Also, Your Position can be moved.
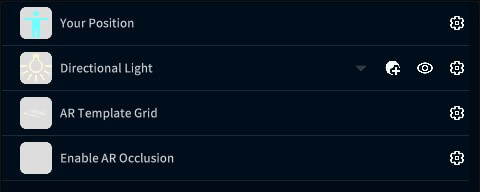
AR Template Hierarchy Menu
Additionally, in an AR scene, the following are inserted by default besides Your Position and Directional Light:
- [AR Template Grid] A grid that makes it easier to create AR scenes.
- [Enable AR Occlusion] Settings for AR occlusion.
Each asset in the hierarchy menu supports additional operations such as renaming, duplicating, and deleting.
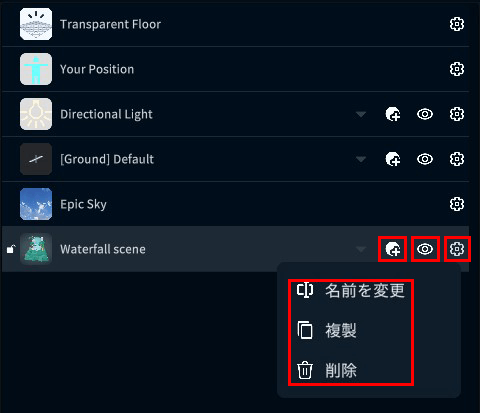
STYLY Studio screen hierarchy menu
Menu description
| Modifier button | Modifiers can be added to assets. |
| Show Buttons | You can show / hide assets on the Scene. |
| Gear icon | You can rename, duplicate, and delete assets. |
Feature Description
| Focus your work perspective on assets | Double-click an asset in the Hierarchy menu to focus your work perspective on the asset on the Scene. |
③Scene gizmo
The scene gizmo shows the direction the camera is currently heading.
You can also quickly switch the camera’s viewpoint to an angle with those directions as the front by clicking the red, green, and blue cones.
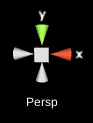
STYLY Studio screen scene gizmo
“Persp” is displayed below the scene gizmo, which means that the scene is displayed in perspective.
Click “Persp” to switch to “Iso” and display the scene in parallel projection.
If you want to restore it, you can switch to “Persp” by clicking “Iso”.
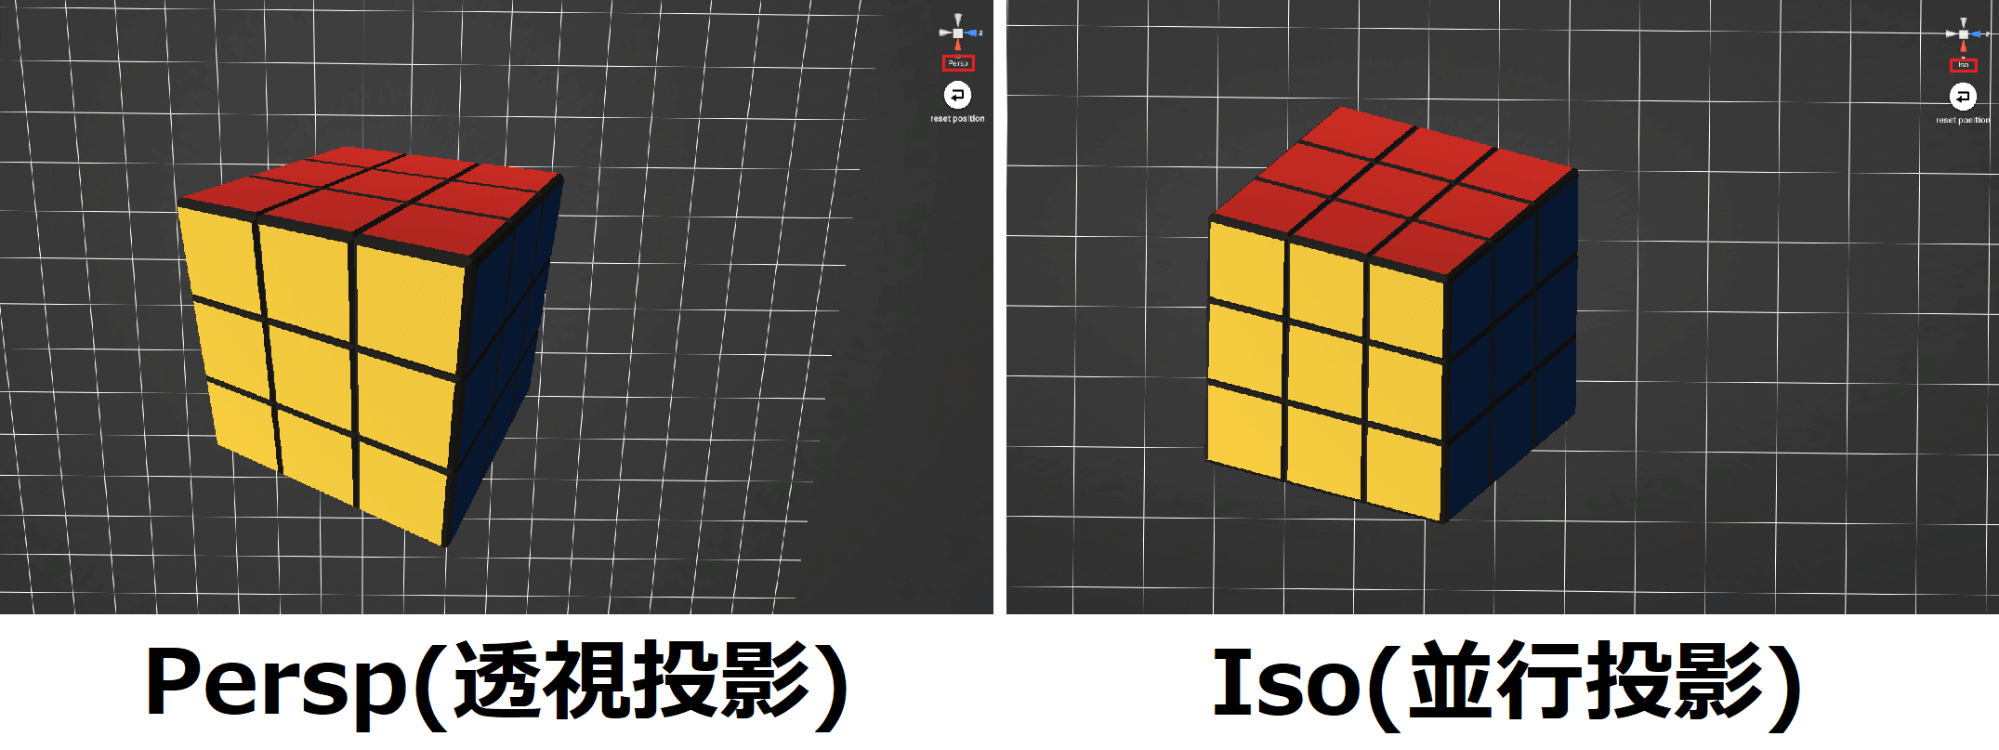
Persp / Iso
In visual projection, objects of the same size that are far from the viewpoint are drawn small, and objects that are close to the viewpoint are drawn large.
On the other hand, in parallel projection, objects of the same size are drawn in the same size regardless of the distance from the viewpoint.
STYLY Studio screen side button
Menu description
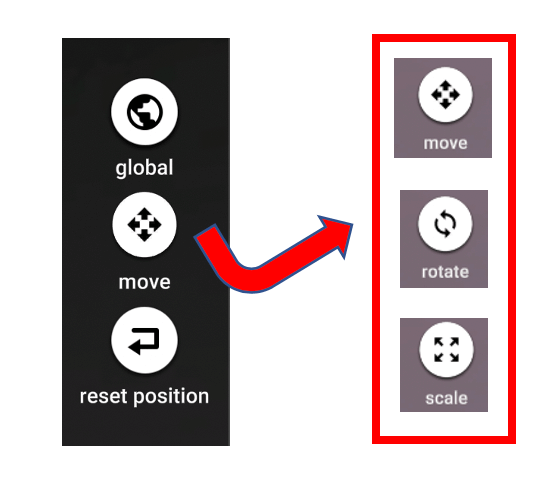
| global button * Displayed only when an asset is selected in the hierarchy menu |
The global button changes the reference axis for rotating and scaling the selected asset. When it is On, the rotation and enlargement / reduction operations are performed based on the direction of the entire scene. When Off, rotation and enlargement / reduction operations are performed around the direction in which the selected asset is heading. |
| move / rotate / scale button * Displayed only when an asset is selected in the hierarchy menu |
You can switch asset operations (move, rotate, scale). |
| reset position button | Return the camera viewpoint to Your Position. |
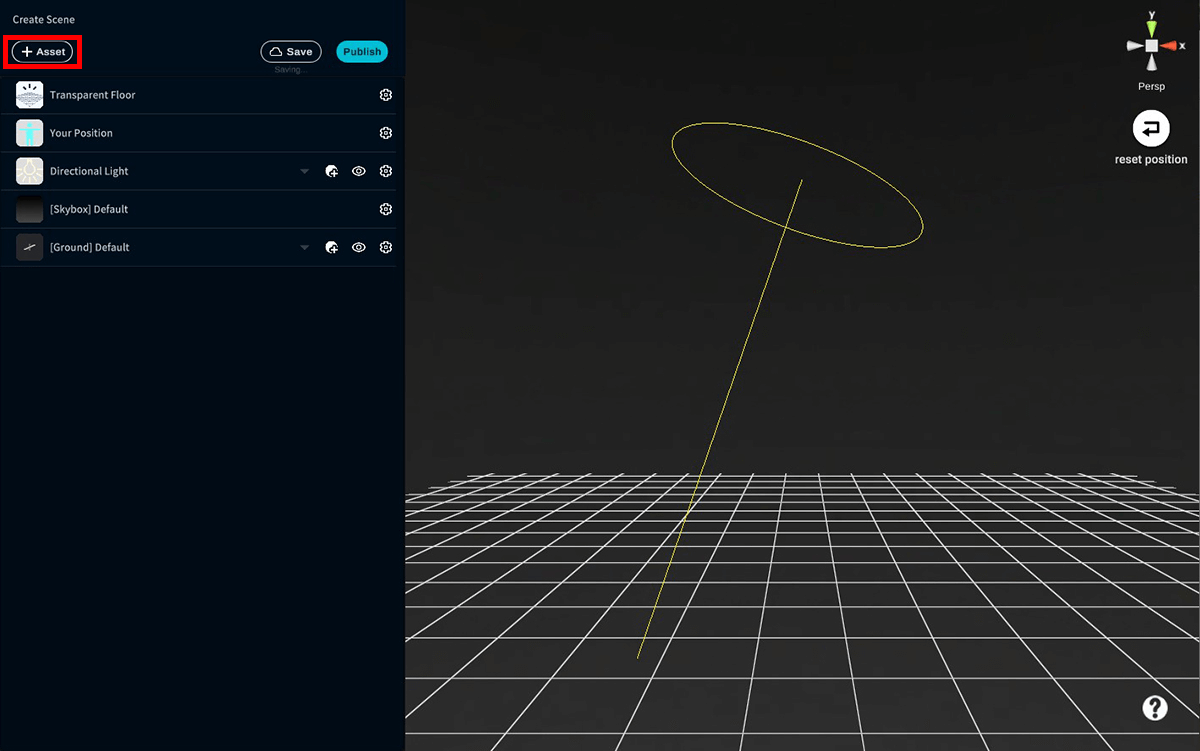
Insert asset
Insert assets into the Scene and create your own original Scene.
This chapter introduces asset types and explains how to work with assets.
Now, I would like to create a scene by following a simple procedure.
Asset type
Click the Assets button on the top button to display the asset list.
The asset list includes My upload, 3D object, 2D object, Environment, Particle, Filter, Function, External media.
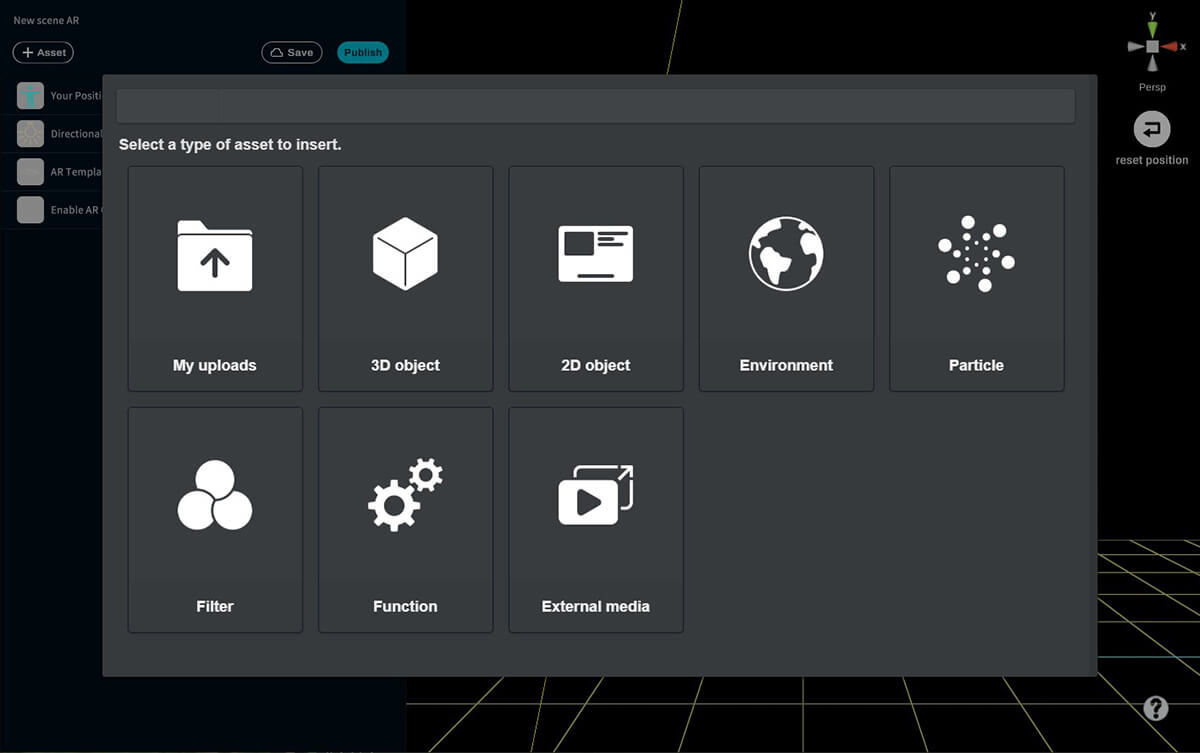
Asset lists
Menu description
| My uploads | There are items uploaded directly to STYLY by yourself or via Unity. |
| 3D object | You can choose any of the 3D objects that come standard with STYLY. |
| 2D object | There is a “2DUI Set” which is a 2D button asset for mobile and web. |
| Environment | You can choose Skybox, Floor, Light, or Scene. |
| Particle | You can use existing Particles. |
| Filter | There are filters that add visual effects to the entire scene. |
| Function | You can add functions that have an effect on the entire scene. |
| External media | YouTube and HoloStream videos can be embedded. |
Insert asset
I will show you how to insert an asset.
Select an asset from the asset list and insert it into the Scene.
This time, let’s create a simple Scene by inserting the assets of Skybox, Ground, and 3D objects into the Scene.
Change the Skybox
Introducing how to change the Skybox.
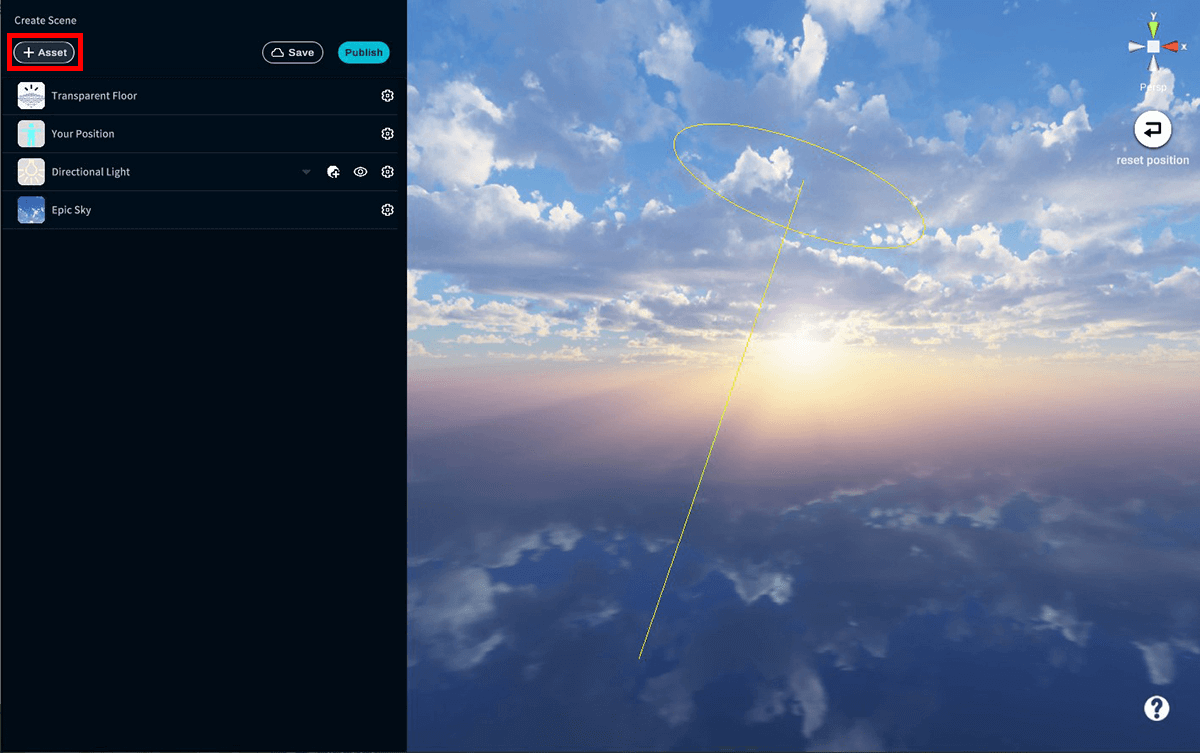
Click the Assets button.
Click the Assets button on the STYLY Studio screen
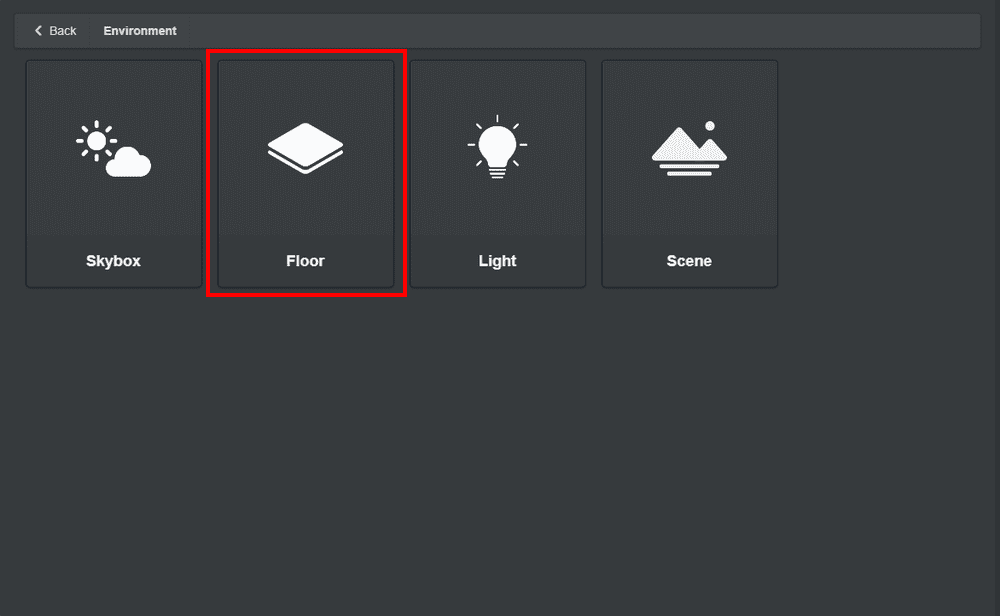
Click on Environment.

Click Enviroment
Click on Skybox.
Skybox allows you to insert celestial sphere assets into your Scene.
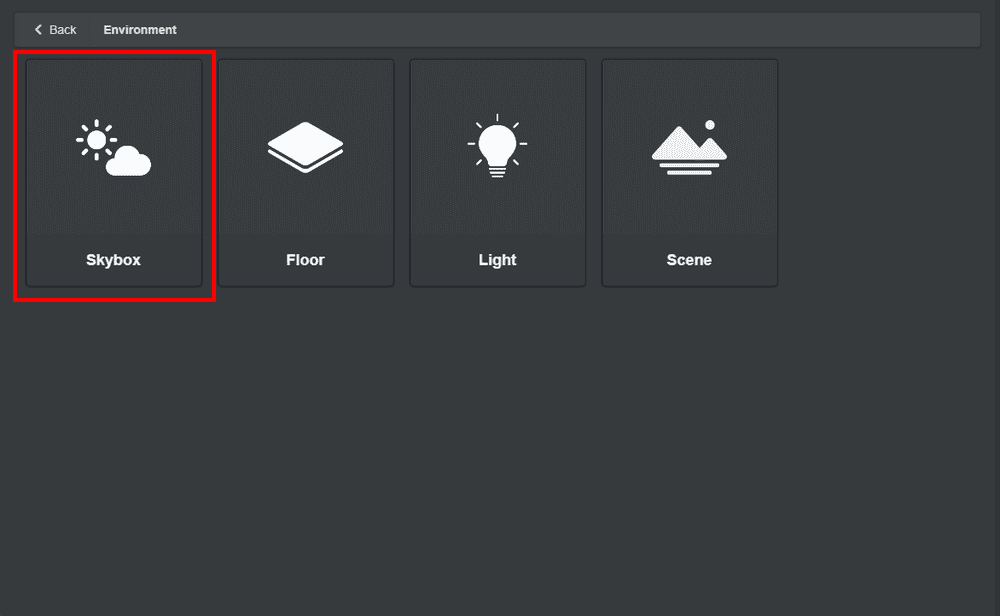
Click [Skybox]
Select your favorite [Skybox] and click it.
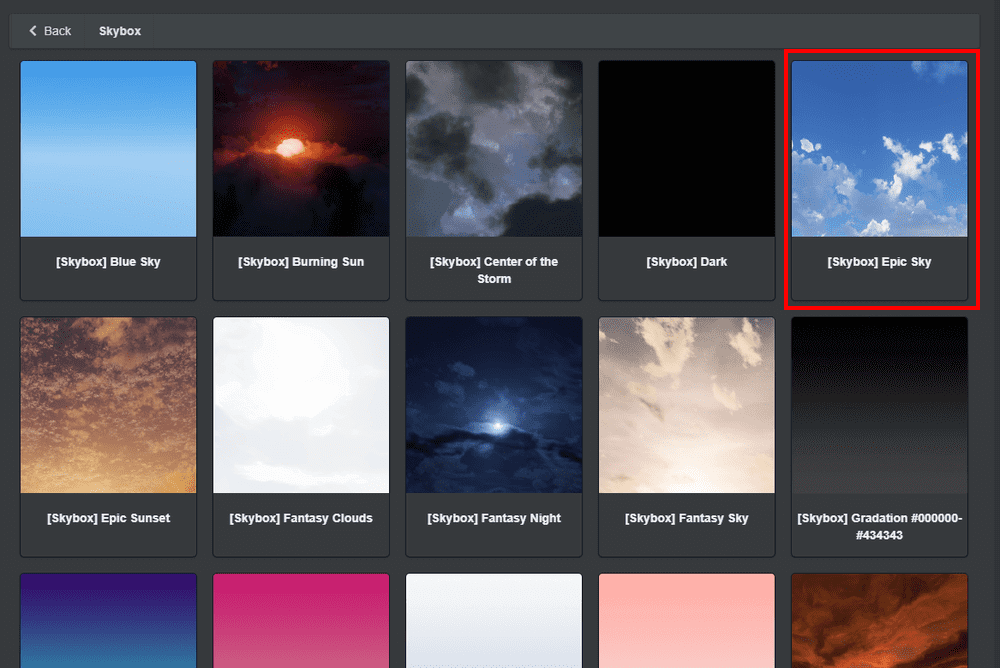
Select [Skybox]
Skybox has switched.
Since one Skybox is applied to one Scene, it has been replaced with the Skybox set by default.
Just changing the Skybox will greatly change the world view, so please try various Skyboxes.
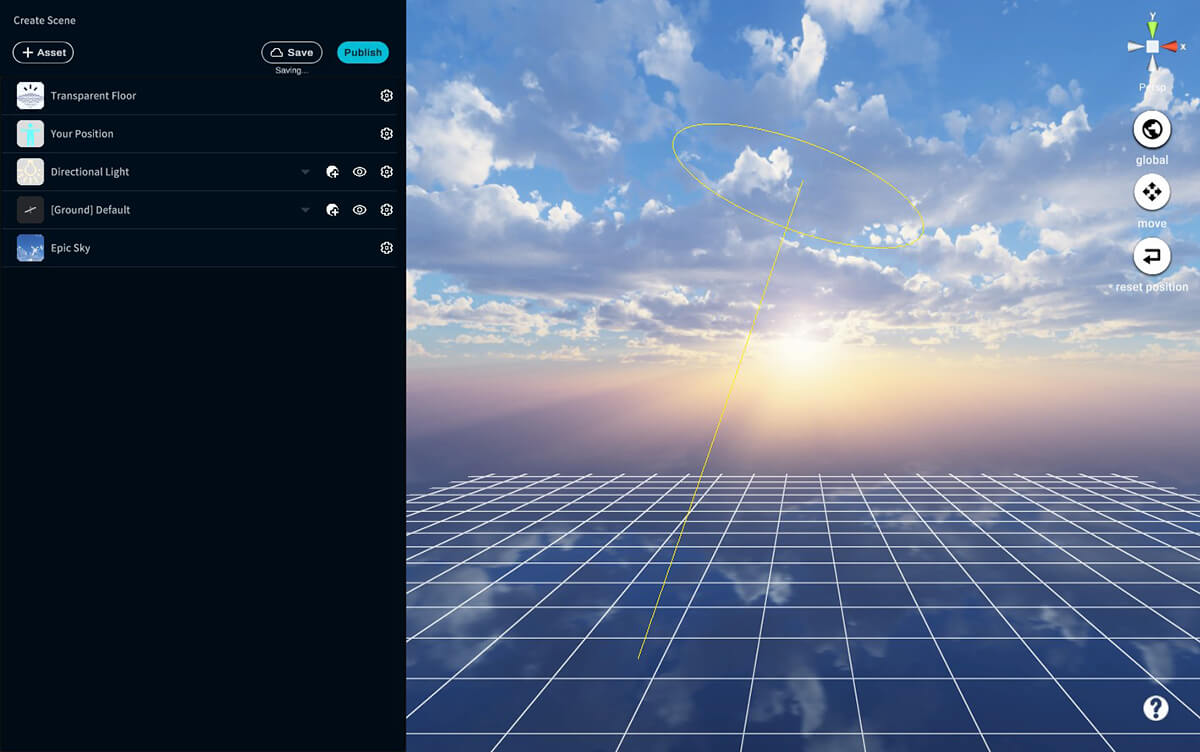
after changing Skybox
Change the Ground
Next, let’s insert a Ground in the Scene.
Deletes the ground that is inserted by default.
Delete [Ground] Default Ground in the hierarchy menu (click the trash can button).
![[Ground]Defaultを削除](https://styly.cc/wp-content/uploads/2025/04/STYLY-Studio画面-GroundDefaultを削除.png)
Delete [Ground]Default
Click the Assets button.
Click the Assets button
Click on Environment.
Click Environment
Click on Floor.
Click Floor
Scroll down to see the assets that will become Floor.
Select your favorite assets and click.
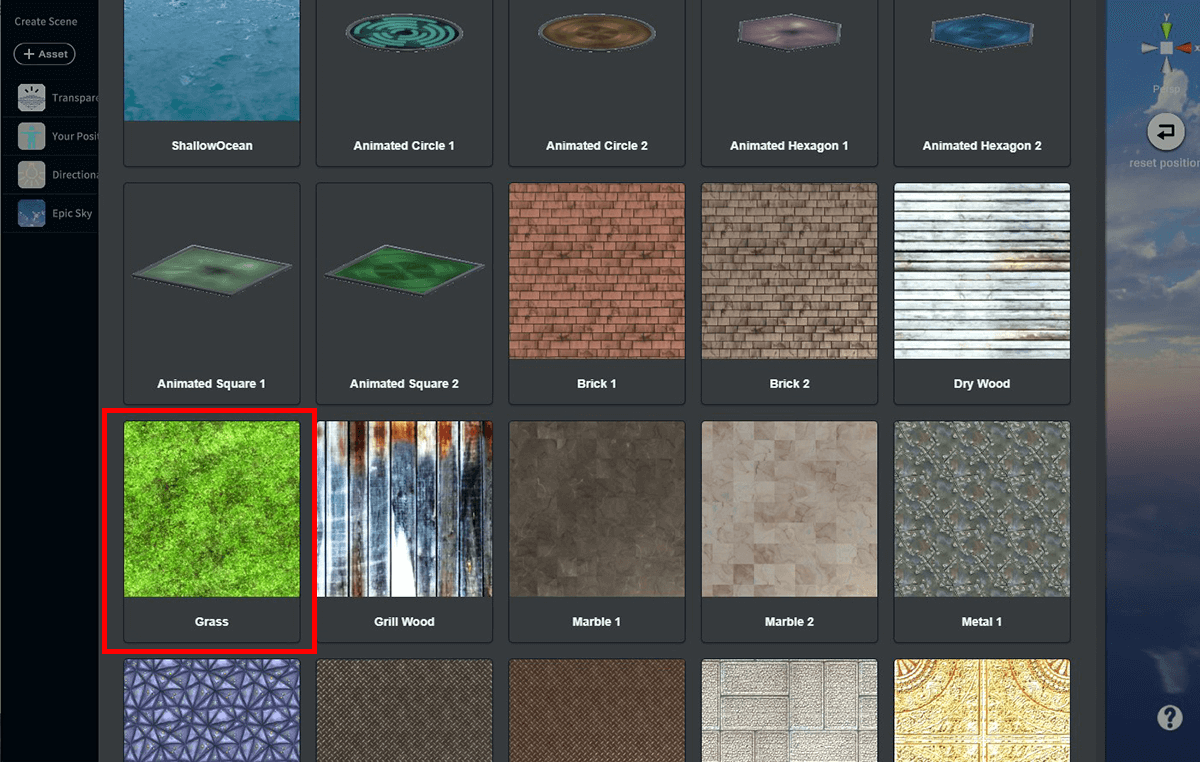
Click on any Floor
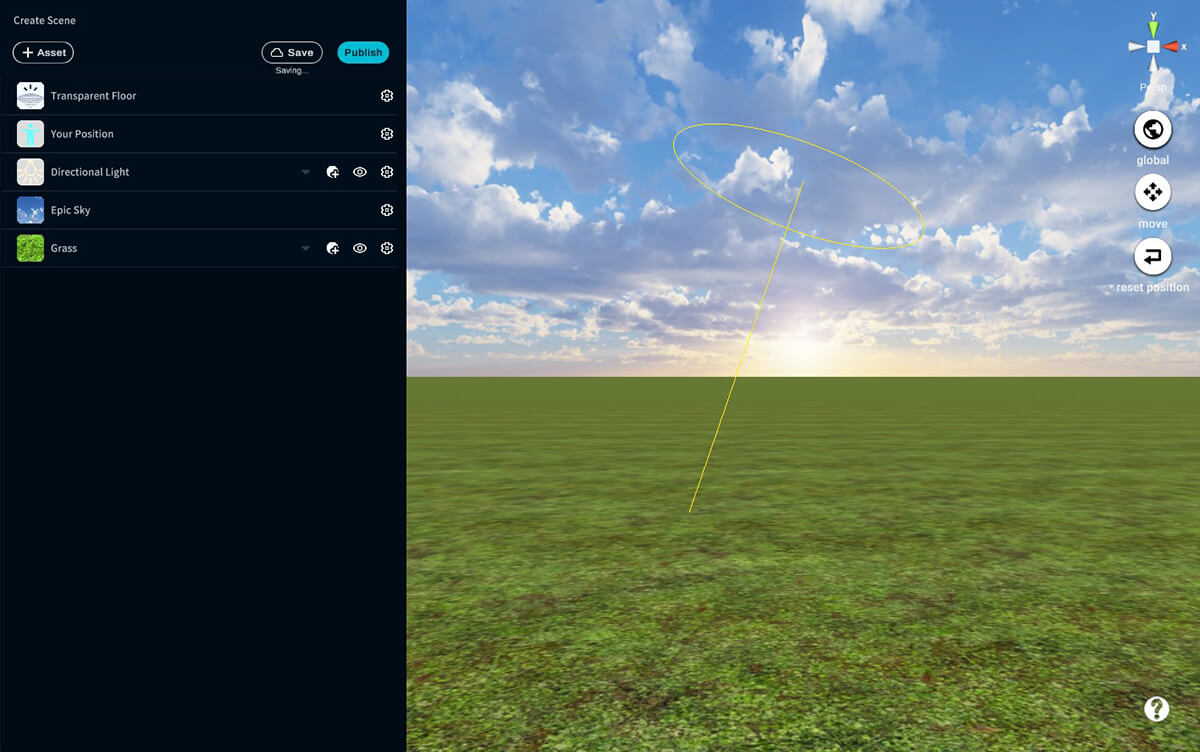
Floor has been inserted.
I was able to create the sky and the ground.
Let’s insert a 3D object here.
After Floor Setup
Insert a 3D object into a Scene
Insert 3D objects into your scene.
To begin, click on the Assets button.
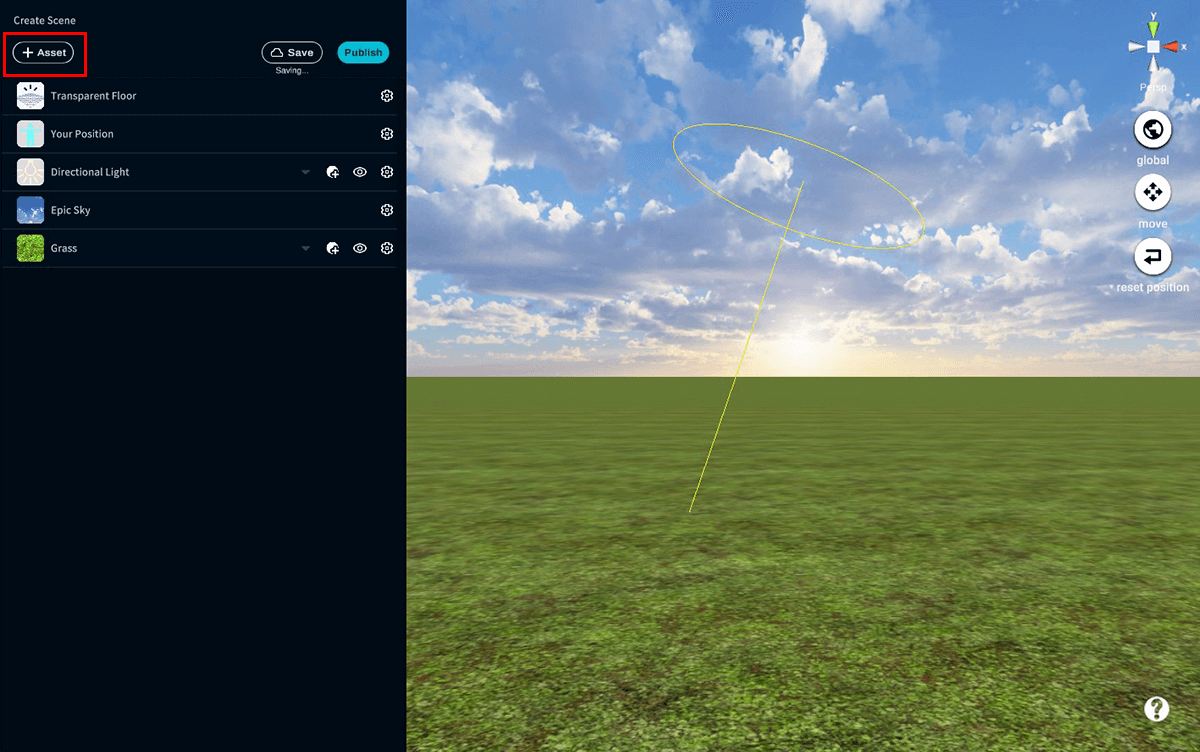
Click the Assets butto
Click on the 3D object.
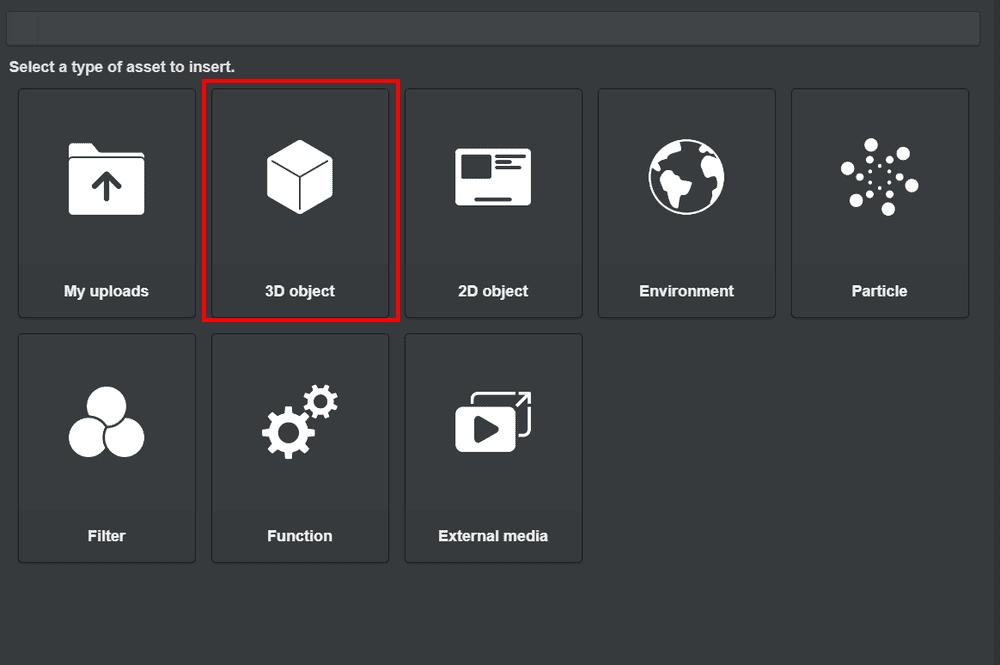
3D object
Click on Model.
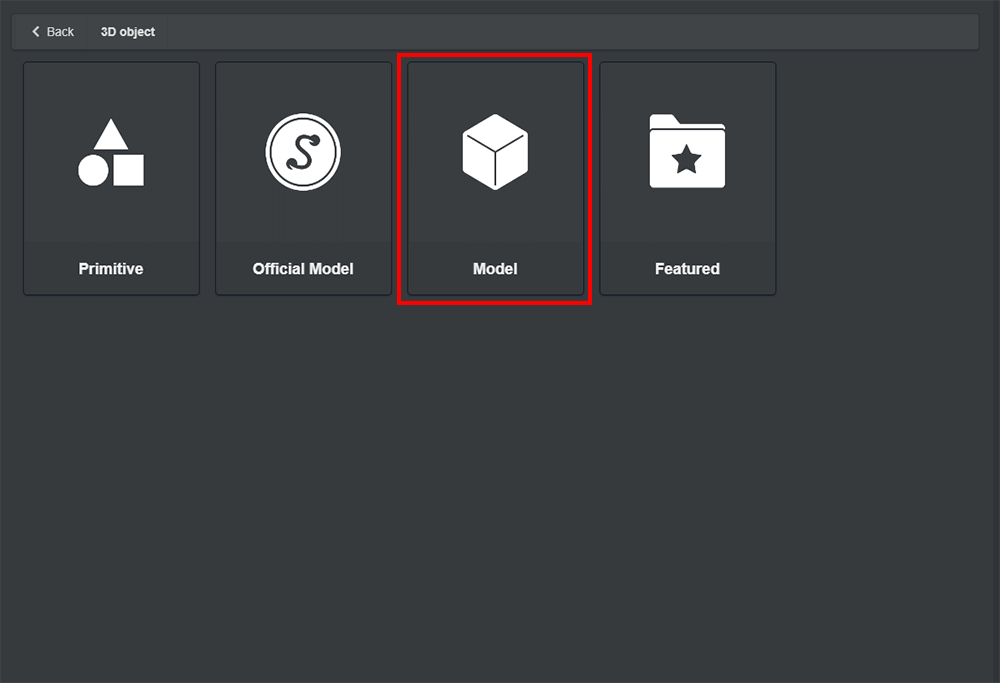
Click the Model button
You can narrow down the categories with the category button.
Also, in the search form, you can enter keywords to search and the search result screen will be updated.
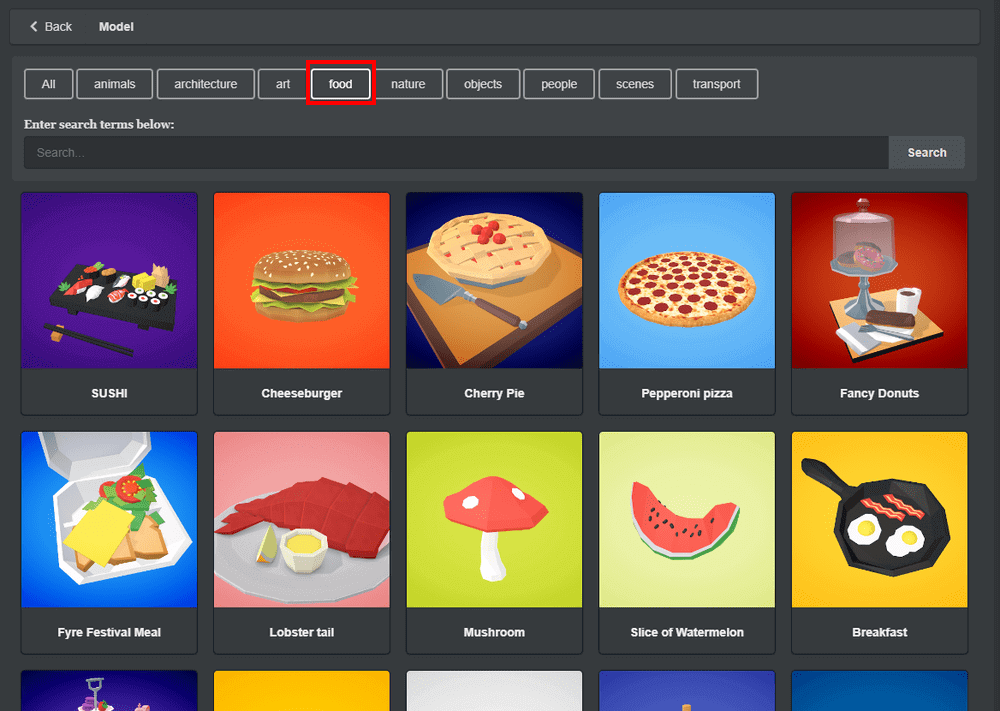
Use the category buttons to narrow down the categories.
Find your favorite 3D object and insert it into your Scene.
This time, enter “animal” in the search form and try searching.
The animal 3D object will then appear on the search results page.
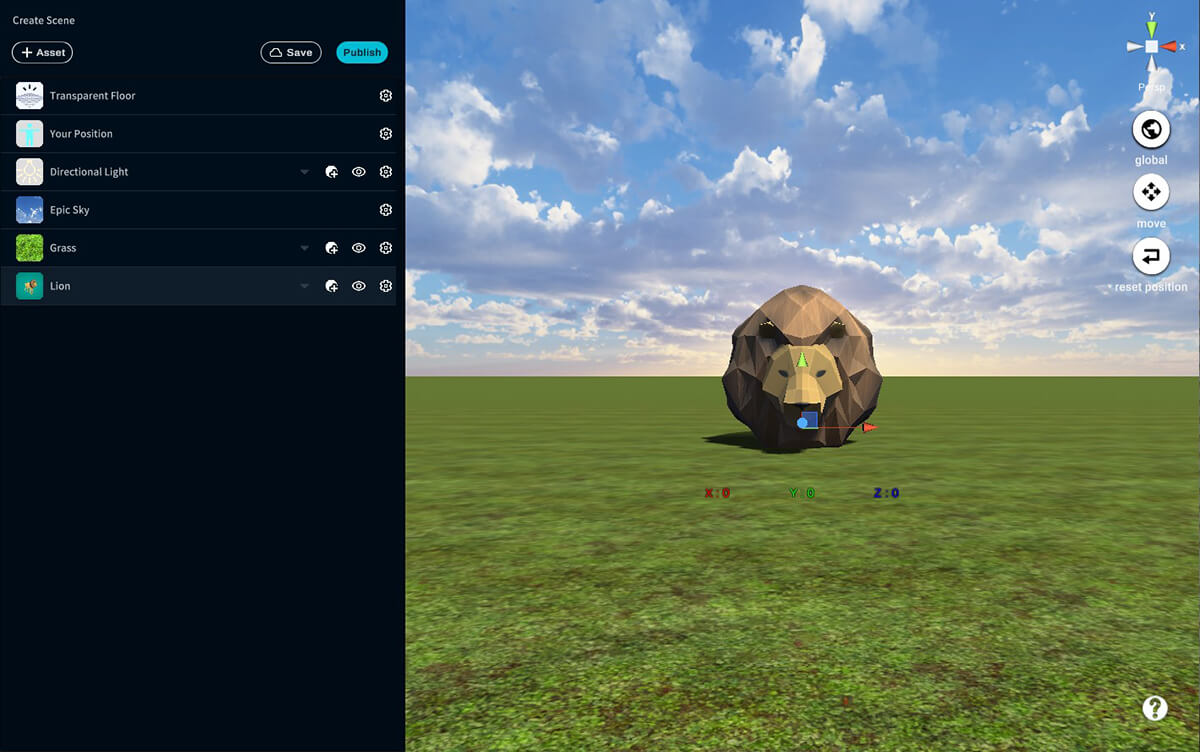
Click Lion.
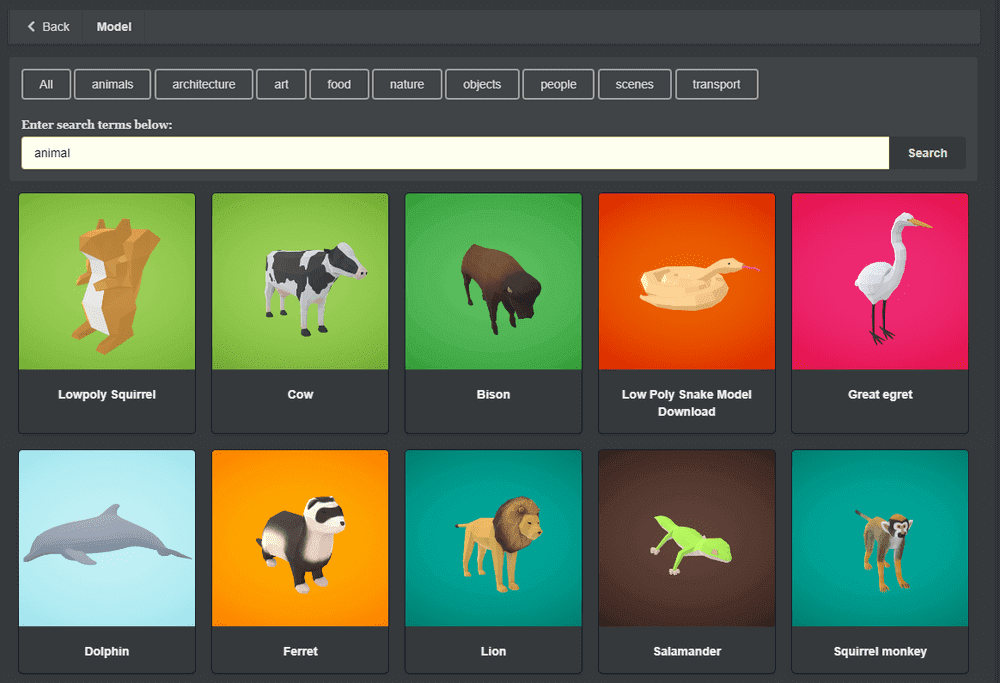
Enter your search terms in the search form and click the Search button.
Lion 3D objects have been placed in the scene.
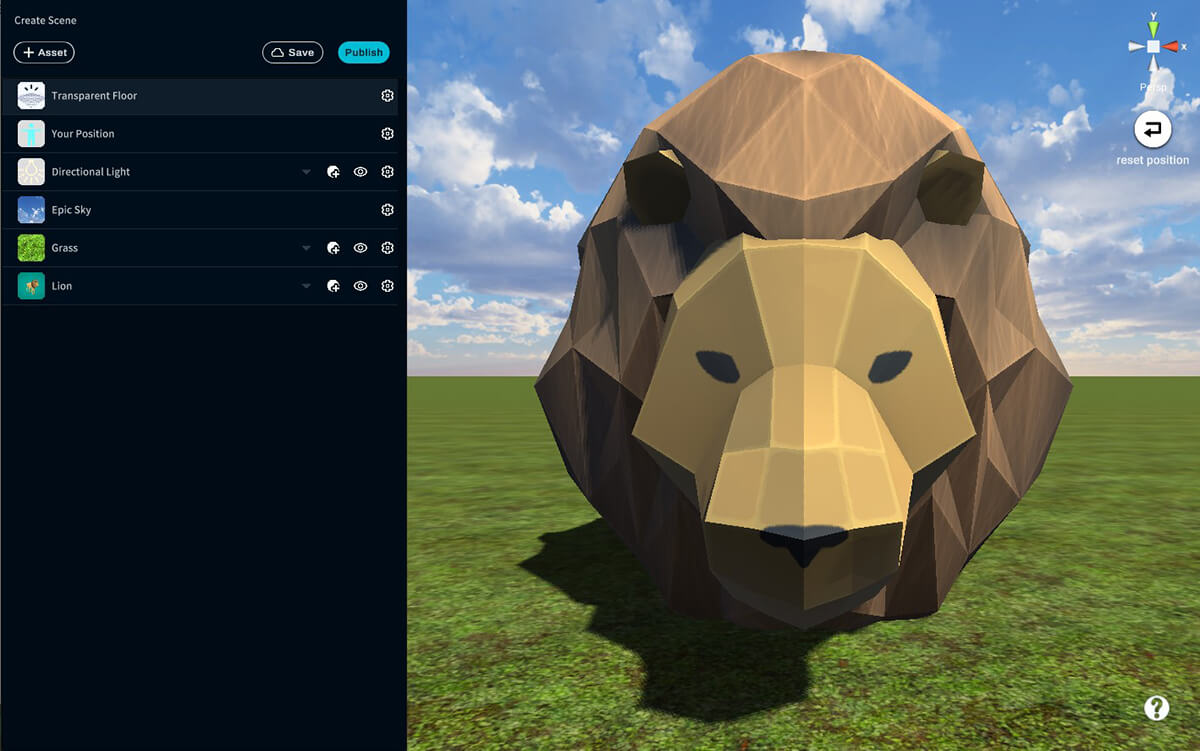
Lion is placed in the scene
Since the Lion asset is dug into the ground, you can manipulate the asset to move and rotate it to your desired position and change its size as you wish.
Next, I will introduce how to operate assets (move, rotate, scale).
How to operate assets (move / rotate / scale)
Introducing how to operate assets (move / rotate / scale) using Lion assets.
Select the asset you want to work with.
The selected asset will turn yellow.
To select an asset, click Asset in the Hierarchy menu or click Asset on Scene.
3D object operation method
When you select an asset, the asset will display a manipulator.
A manipulator is an arrow in three directions: red, green, and blue.
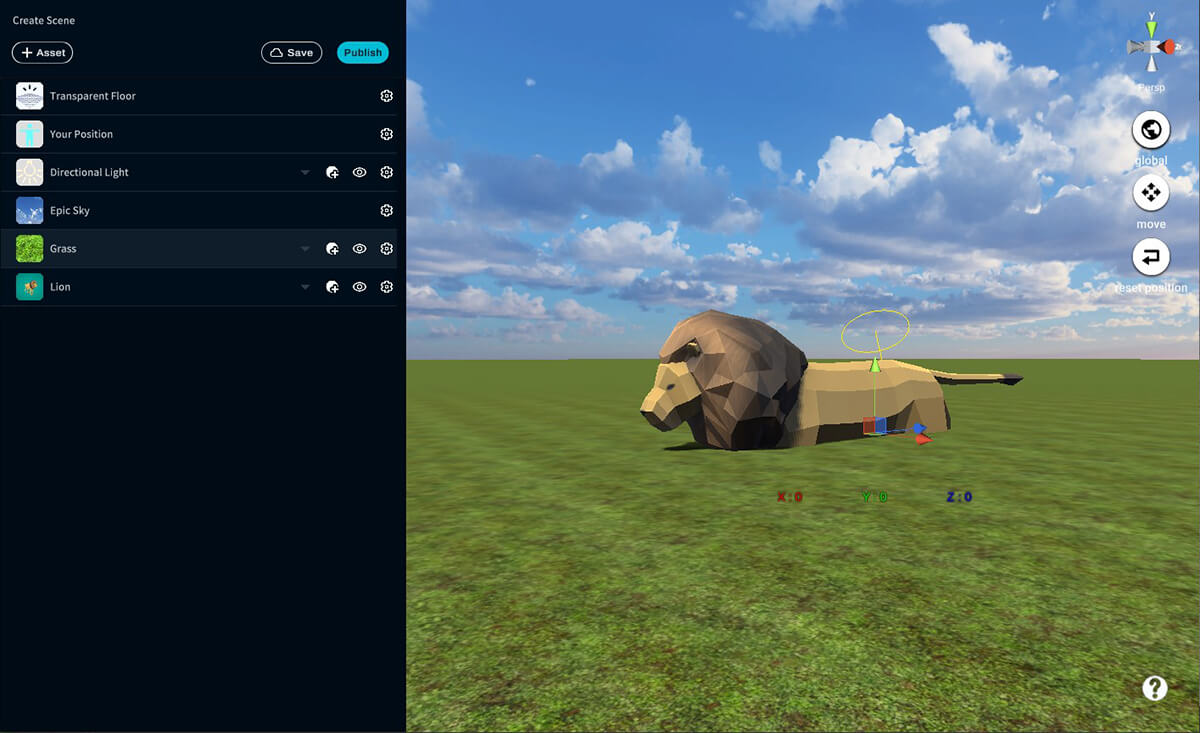
Manipulator
You can switch between move, rotate, and scale from the move / rotate / scale button on the side menu.
Alternatively, you can switch using the shortcut keys below.
- [W]key: Move
- [E]key: Rotate
- [R]key: Scale

Switching operation method
You can move assets by switching to move mode and dragging the manipulator.

Moving an asset
You can also use Ctrl + Z to return the asset to its previous state.

Undo moving assets with Ctrl + Z
You can rotate the asset by switching to rotation mode and dragging the manipulator.

Rotation
You can zoom in and out by switching to zoom mode and dragging the manipulator.
How to operate by directly entering numerical values

Scaling
You can edit the numerical value directly by clicking the numerical value part of the manipulator.
After entering the numerical value, click the [Enter] key to complete.
It supports all move / rotate / enlarge / reduce modes.

Manipulator Numerical Input
List of useful shortcut keys
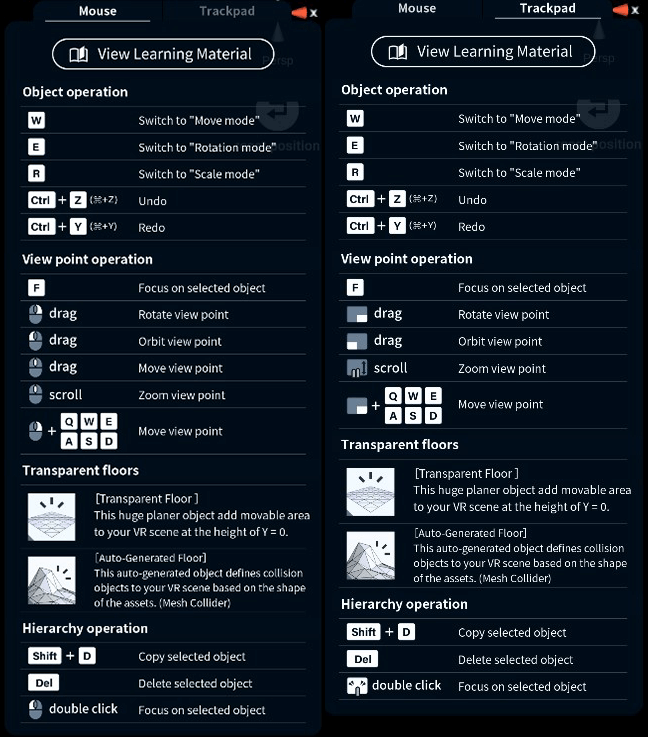
Help button
上記の操作方法を紹介します。
Asset manipulation
- [W] key: Switch the operation method of the asset to the move mode (when the asset is selected)
- [E] key: Switch the asset operation method to rotation mode (when the asset is selected)
- [R] key: Switch the operation method of the asset to the enlargement / reduction mode (when the asset is selected)
- [Ctrl] key + [Z] key: Return to the previous operation
- [Ctrl] key + [Y] key: Return to before executing Undo
Viewpoint operation
- [F] key: Focus on the target asset (when the asset is selected)
- Drag the right mouse button: Rotate view point
- Drag the left mouse button: Orbit view point
- Drag the mouse wheel: Move view point
- Scroll the mouse wheel: Zoom in/out view point
- [Q] or [W] or [E] or [A] or [S] or [D] key with dragging the right mouse button: Move view point
- [Shift] key + [D] key: Copy asset (when asset is selected)
- [Del] key: Delete asset (when asset is selected)
- Asset selection + double click: Focus on the target asset
How to publish a scene
I will show you how to publish the created Scene.
Click the Publish button to go to the Publish screen.
As a thumbnail image when publishing a scene, the work viewpoint when the Publish button is pressed is the thumbnail image.
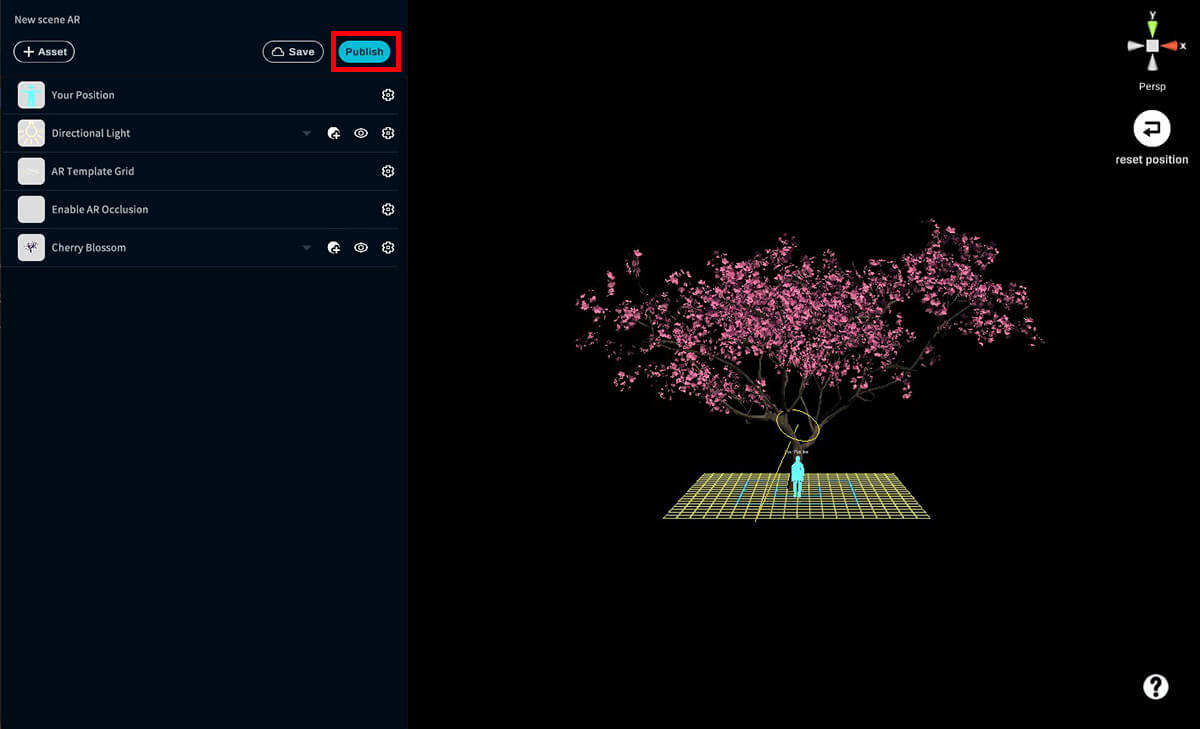
Click the Publish button
Enter a title name and description, set tags, and click the OK button.
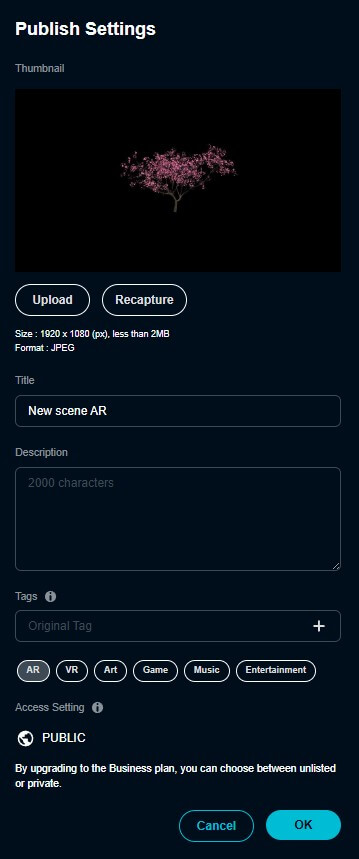
Publish screen
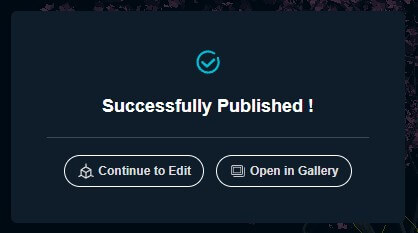
Click Open in Gallery.
The Scene you created will be published on the STYLY GALLERY site.
Publish screen After clicking the Publish button
Now, various people can see the scene.
Next, I’ll show you how to share Scene.
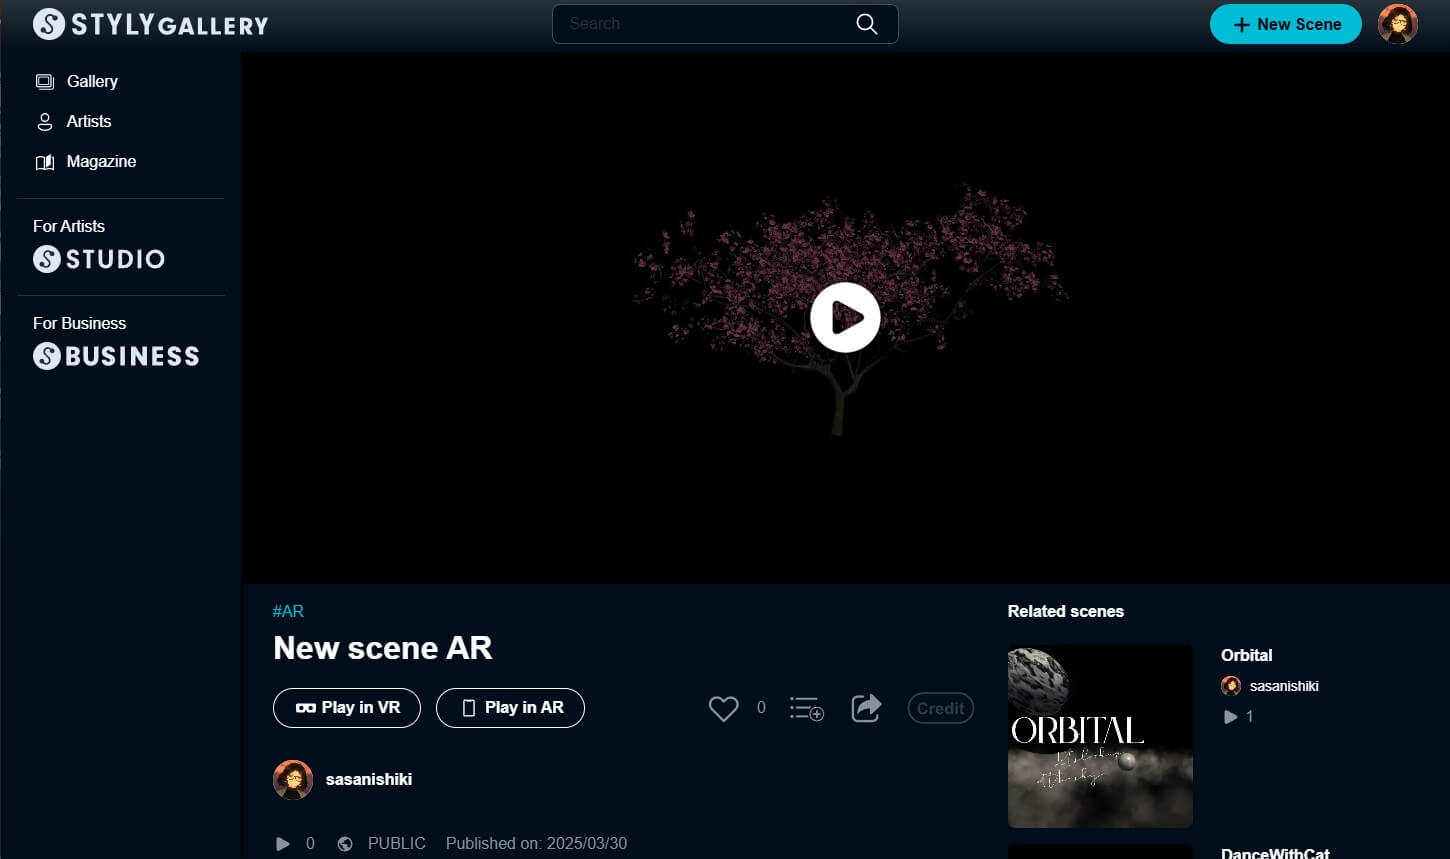
My scene public page
STYLYマーカーを表示する(AR体験向け)
Click the [View in AR] button to generate a STYLY Marker.
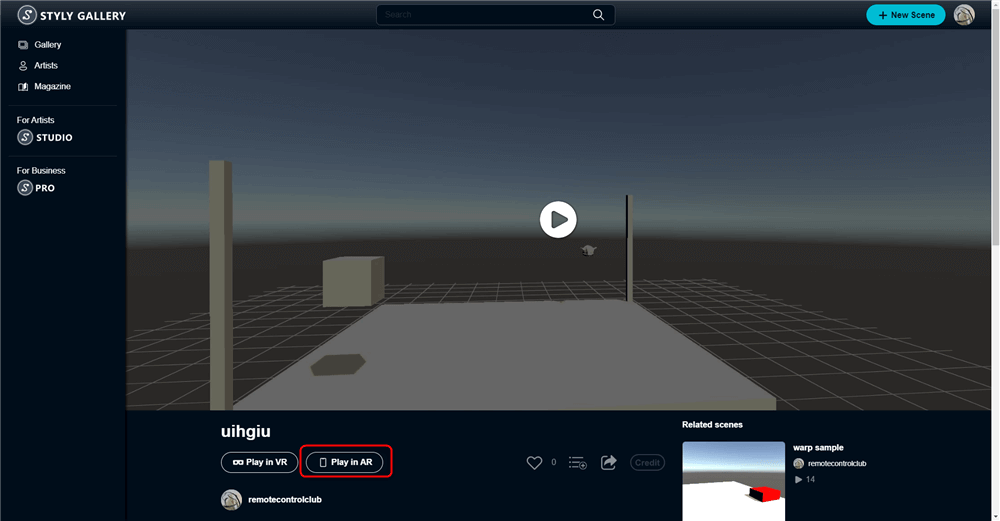
Click to experience with AR
You can scan this marker using the STYLY Mobile app to launch the scene.
To save the marker image, click the download icon in the bottom right corner.
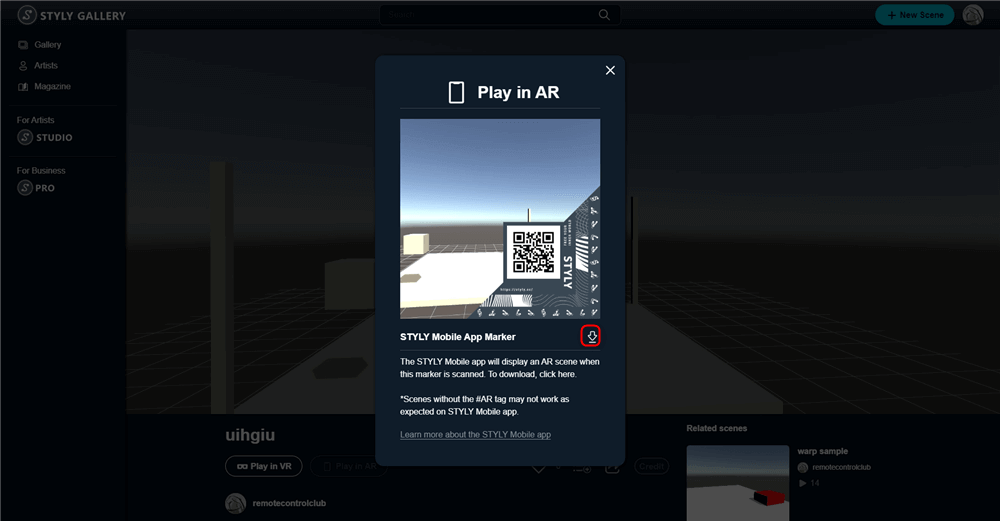
STYLY Mobile App Marker
Sharing the Scene URL
Click the [Share] button.
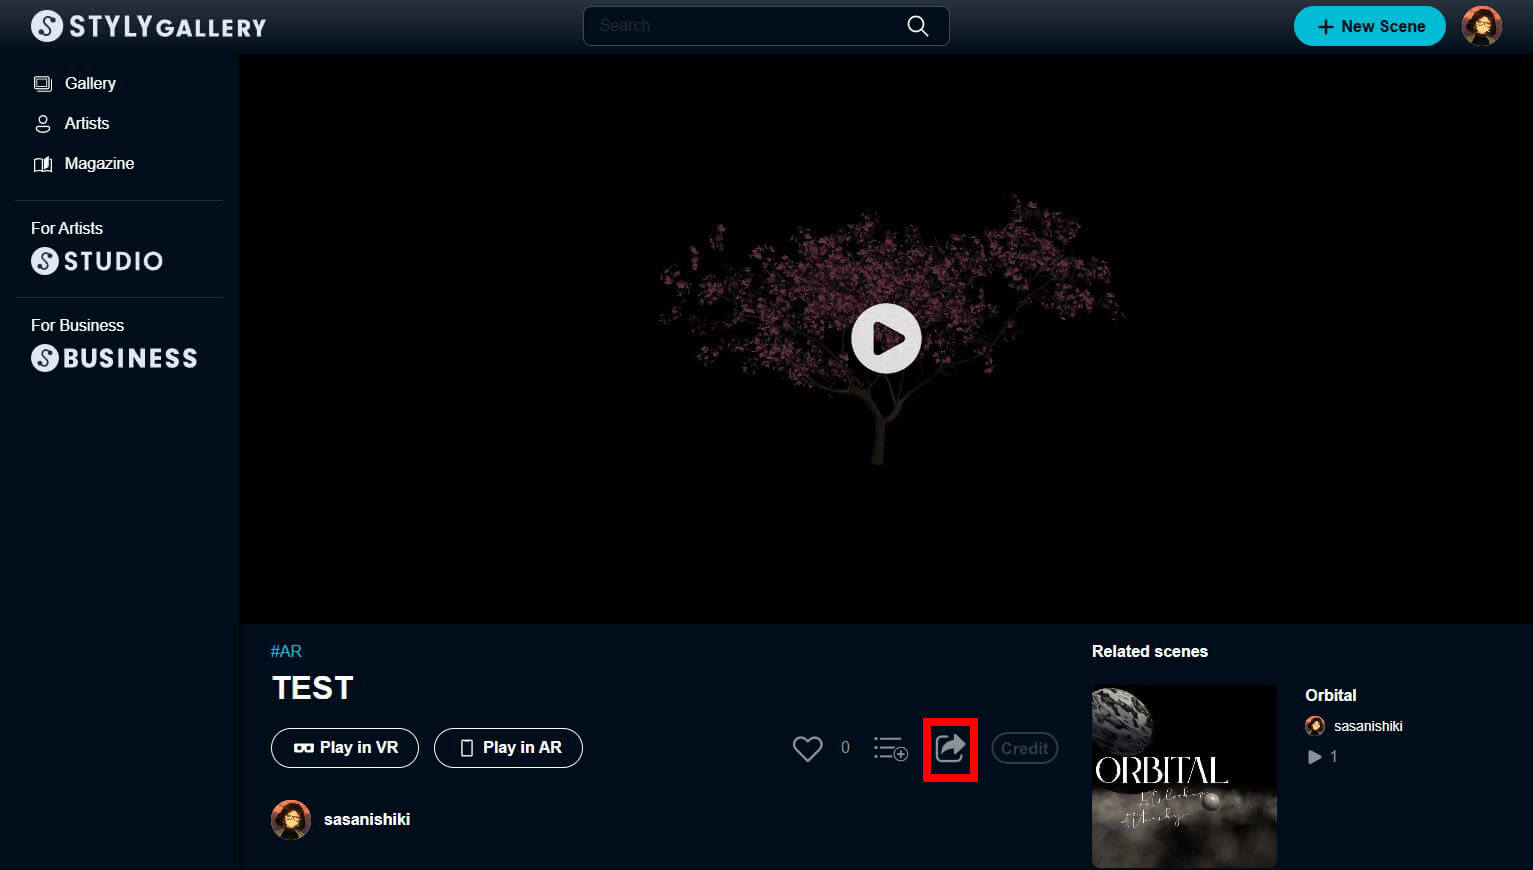
Click the Share button
Click the copy icon next to the URL to copy the link.
Click the X (formerly Twitter) or Facebook icon to post directly to those platforms
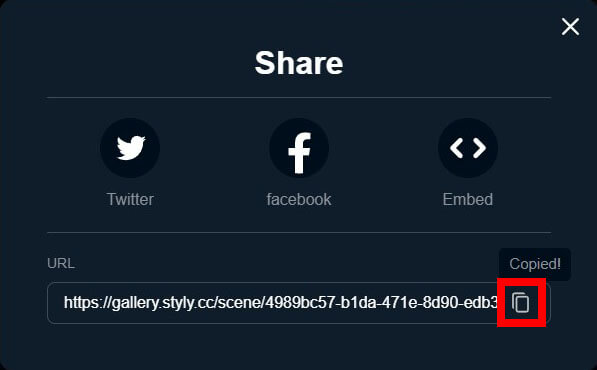
Copy the URL
How to experience Scene
There are three ways to experience Scene.
- VR (only for those who have an HMD)
- Web Player
- STYLY Mobile
Please refer to the following article for how to experience the STYLY scene.
![[Summary] How to experience STYLY scenes VR/AR(Mobile) / Web Browser Introduction by step](https://styly.cc/wp-content/uploads/2020/04/スクリーンショット-2020-04-10-12.53.04-160x160.png)
In addition, please refer to the following article for the operation method on the VR scene of STYLY Mobile.。
![[STYLY Mobile] How to move in the VR scene](https://styly.cc/wp-content/uploads/2020/08/Screenshot_20200808-160915-160x160.png)