In this article, I will introduce how to use audio filters to switch audio effects in a STYLY scene.
By linking the interaction with the filtered sound effects, you will be able to create more interactive scenes.
Note that the method described here currently only works with the Oculus Quest version of the STYLY app.
It does not work with the web or Steam version of the STYLY app.
Sample
You can experience a sample scene from the STYLY GALLERY.
You can turn on/off the respective effects by clicking on the spheres in the scene.
From left to right
- Cut Bass
- Add reverberation effect
- Add chorus effect
effect is applied.
This scene works only with the STYLY app for Oculus Quest.
Therefore, if you want to check the sound changes and the movement of the visualizer, please check the scene from the app for Oculus Quest.
Advance preparation
In this article, we use PlayMaker.
Install PlayMaker, a plugin for Unity, beforehand.
If you are using PlayMaker for the first time, you can deepen your understanding by reading the following article beforehand.
Also, we use Unity’s audio system in combination with PlayMaker to create a scene.
Therefore, as a prerequisite knowledge, an understanding of Unity’s audio system will help you create a scene smooth.
The basic knowledge of the audio system is explained in the following article.
If you want to know more about the basic audio components such as Audio Source, Audio Listener, etc., please refer to the following article.
Movement to be implemented
In this article, we use PlayMaker to create a mechanism that will apply an effect to the sound that is playing when the Sphere is clicked.
In order to apply an effect to the sound in Unity, we need to add an Audio Filter component, which must be added to an object that has an Audio Listener.
However, in the Oculus Quest version of the STYLY app, the Audio Listener is not in the default camera, but in the main camera in the STYLY_Player object that is added after startup.
Therefore
- Get the position of the main camera in the scene
- When the Sphere is clicked, determine if the main camera has a filter component.
- Add a component if it does not have a filter component, and remove it if it does.
This is how we implement the target movement.
Preparing the sound source
First, let’s prepare the sound source to be used.
In this sample scene, we use the sound source from this website.
Maou Soul :https://maoudamashii.jokersounds.com/
Once the sound source is prepared, import it into your Unity project and place it in the scene.
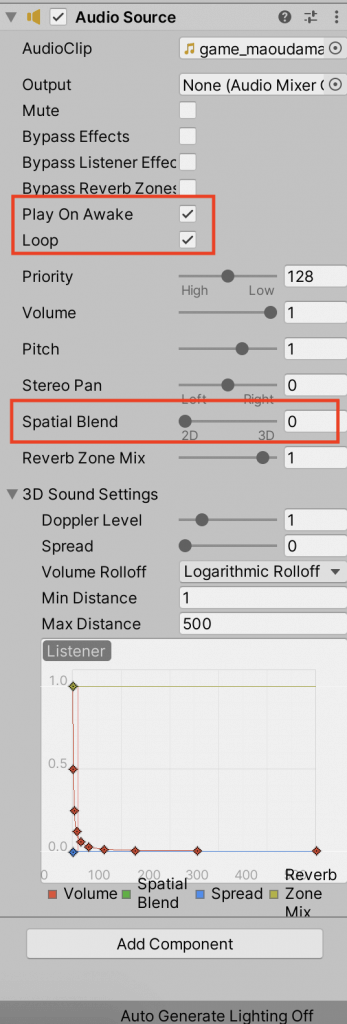
Since we will use it as background music, we turn on “Play On Awake” and “Loop”, and set “Spatial Blend” to 2D.
The audio source is now ready.
Setting up PlayMaker
Next, let’s set up the PlayMaker.
Place a Sphere and add an FSM to the Sphere.
We will set up the PlayMaker so that clicking on the Sphere will apply a Reverb Filter to the sound source.
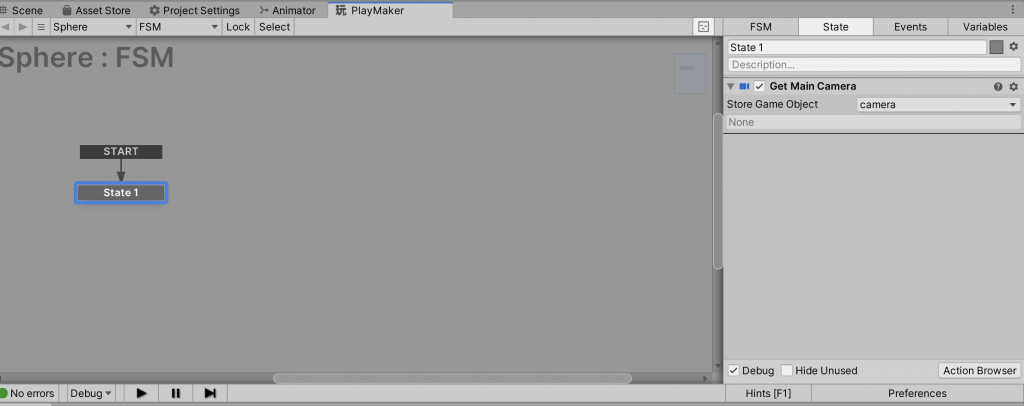
Get the camera
First, acquire the main camera and store it in the camera variable.
This will allow us to add a component to the camera variable and apply an effect.
Add a filter component
In the next State, we will add the Audio Fliter component.
Search for “Add Component” in the Action Browser and add it.
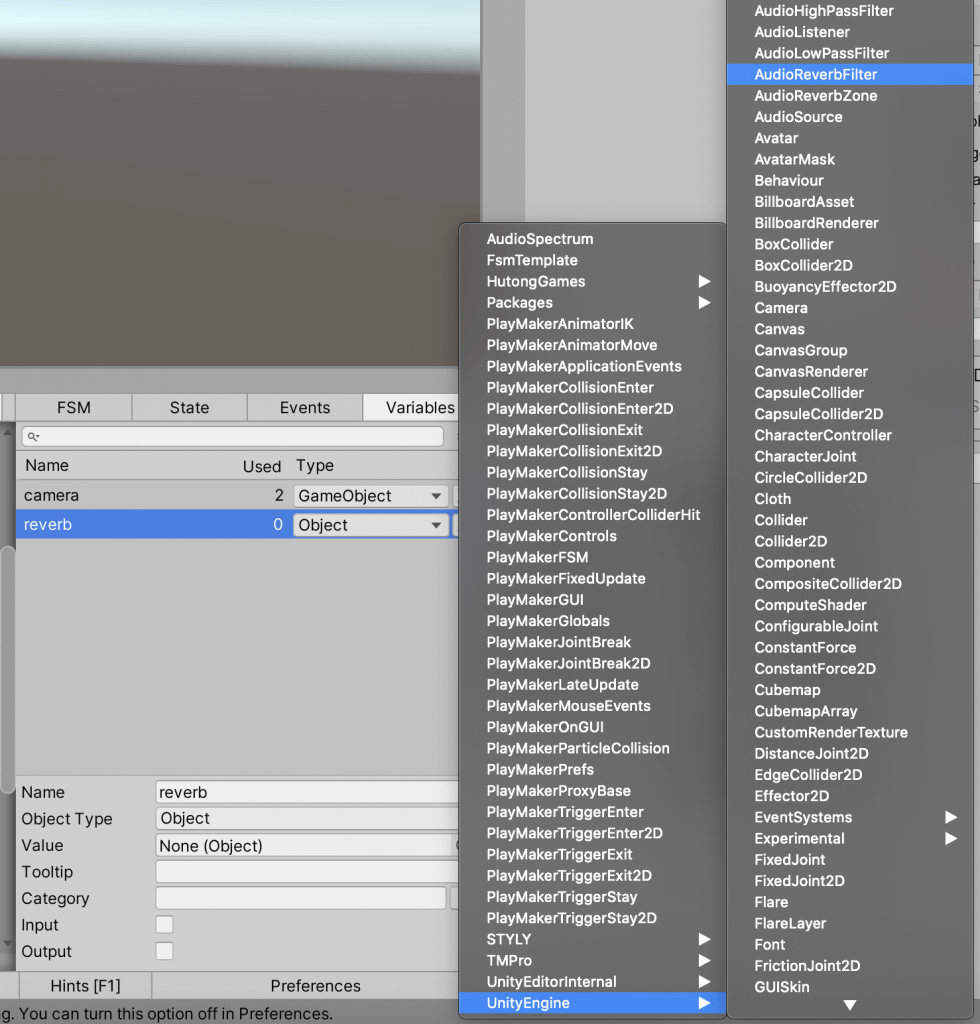
The component to add is “UnityEngine.AudioReverbFilter”.
We will also store this component in a variable so that we can change its value later.
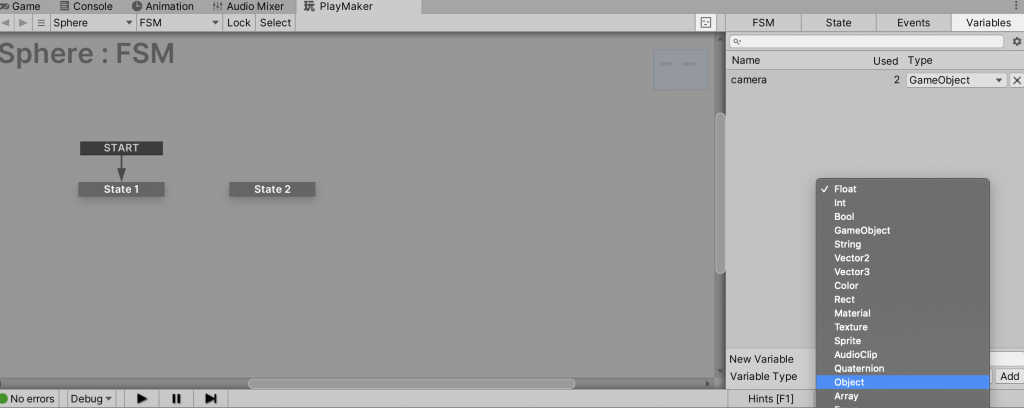
Open the Variables tab and add a variable named reverb with the Object type.
After adding the variable, change the Object Type to “UnityEngine.AudioReverbFilter”.
Go back to the Add Component action again and specify reverb as the Store Component.
Next, we will set the effect of the Reverb filter.
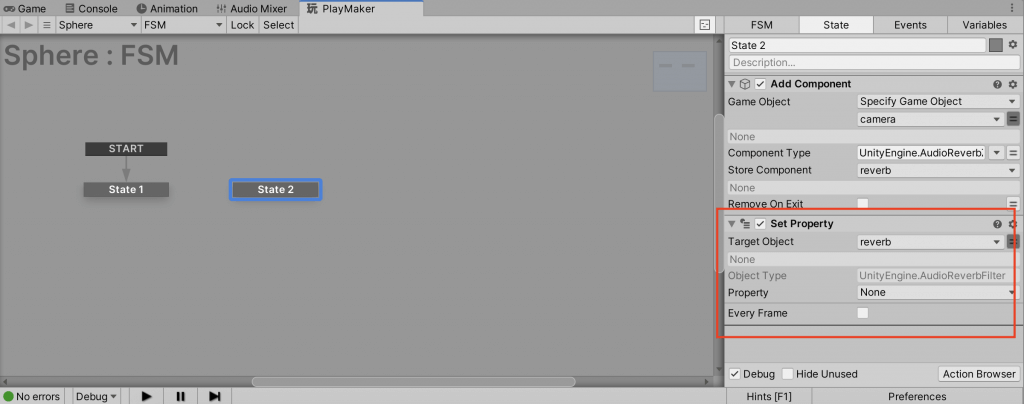
Add a Set Property action to “State” and set Target Object to “reverb”.
Now change the value of the Reverb filter property to create the effect.
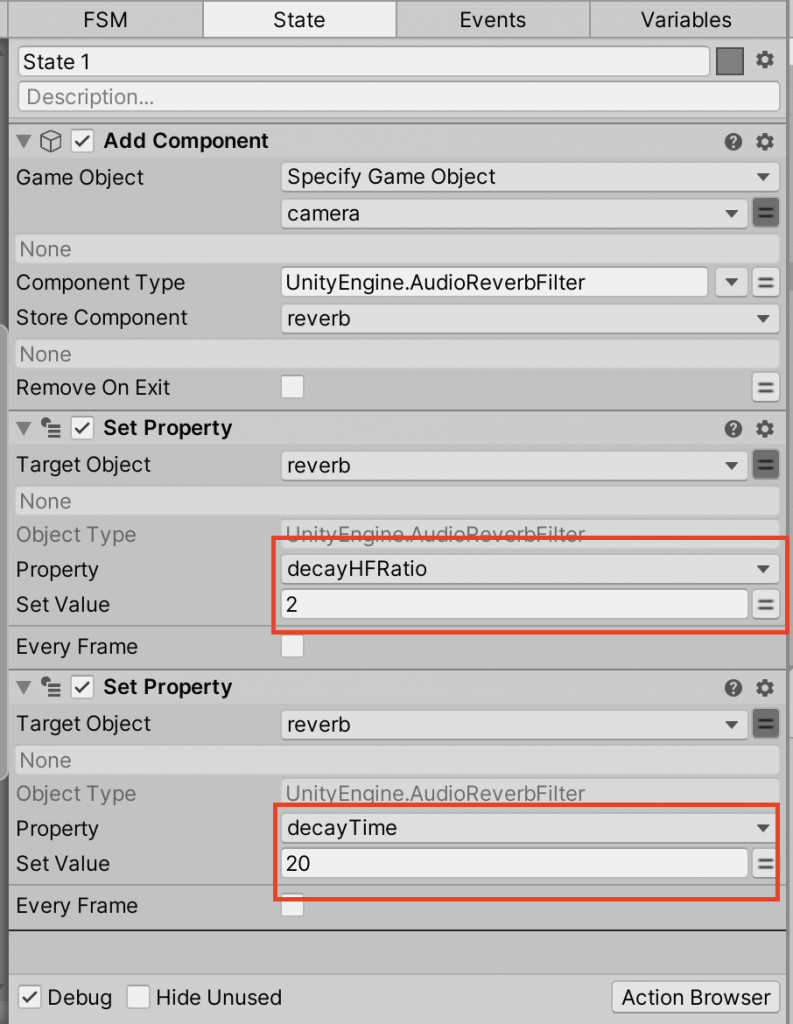
For the sake of clarity, let’s set a stronger effect.
Set Decay HF Ratio to 2 and Decay Time to 20.
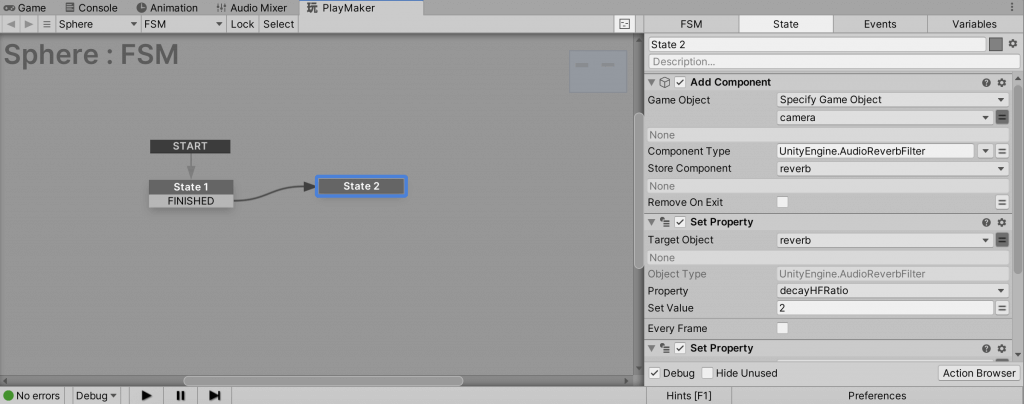
Once the properties have been set, add a FINISHED event to State1 and specify State2 as the transition destination.
If the filtered state is applied when the play button is pressed, you have succeeded.
Implementing Interaction
Next, we will implement the interaction part.
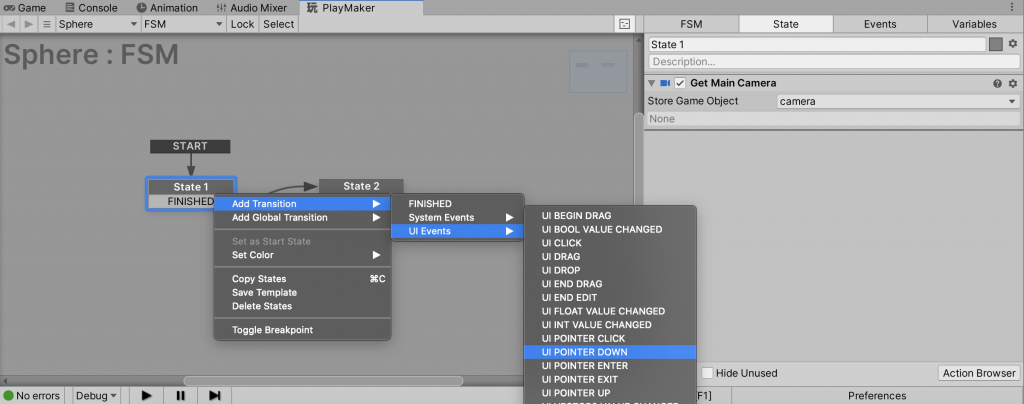
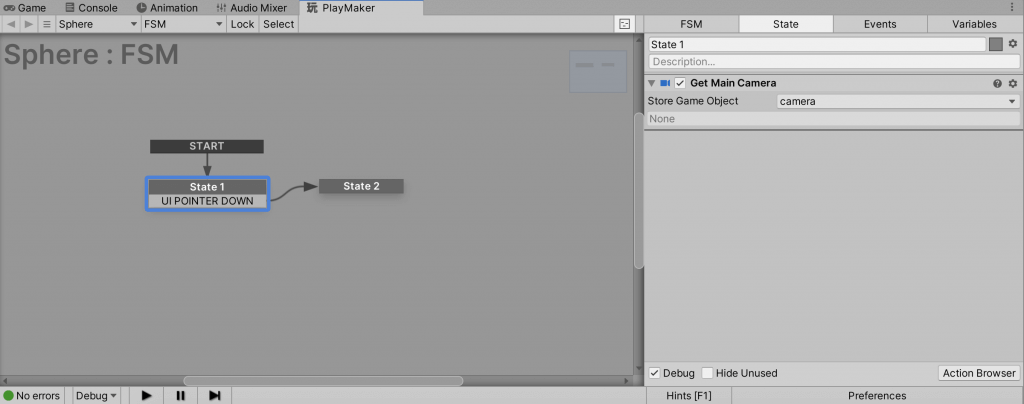
This time, we use the “UI POINTER DOWN” event to implement the click interaction.
Add the UI POINTER DOWN event to State1.
By using this event, the State can be shifted when clicked.
After adding the event, delete the FINISHED event and specify State2 as the destination of UI POINTER DOWN.
You have now added a click interaction.
Let’s actually check it out in VR.
You can use STYLY’s local preview tool to check the scene in VR immediately.
You can learn how to use the local preview tool in the following article.
Launch the scene in the Local Preview Tool and if the filter is applied when you click on the Sphere, you have succeeded.
Also, if you want to check the behavior in Unity, you can set an event such as MOUSE DOWN in State using the same procedure as UI POINTER DOWN, and you can check it by clicking on the Unity game view or other actions.
Remove the filter component
Finally, let’s remove the filter component so that it can be toggled on and off when clicked while the filter is present.
First, let’s make the name of the State easier to understand.
- State1 → Initialize
- State2 → Add Filter
This time, we use the action “Has Component” to determine if the filter is applied.
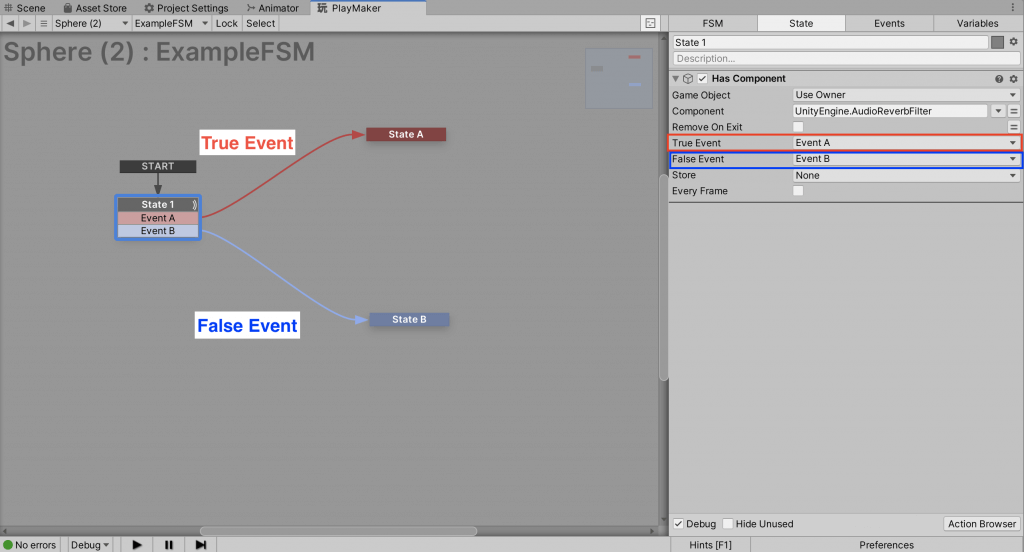
Has Component is an action that determines if an object has a specified component and calls an event specified as true if it has one, or false if it does not.
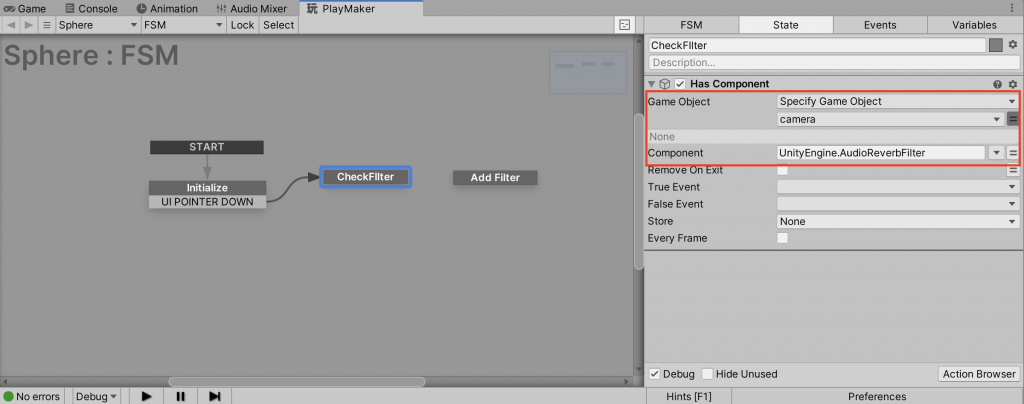
Add a new State, and change the transition destination of UI POINTER DOWN in Initialize to the added State.
In this State, determine whether the camera has a filter or not.
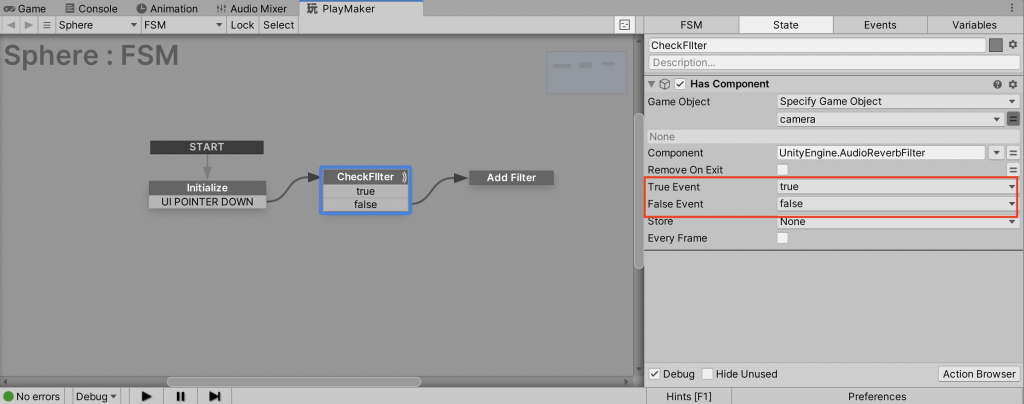
Rename the added State to “CheckFilter” and add a Has Component action.
Specify the Game Object as camera and the component to be checked as UnityEngine.AudioReverbFilter.
The next step is to set up the event to be called.
In this case, let’s simply set the event to fire the true event when it is true and the false event when it is false.
Click on each Event column and create a true event and a false event from “New Event”.
Once the events are created, right click on the State and add each event to the State from Add Transition.
Then, connect the arrows to transition to AddFilter when there is no filter, i.e., when it is false.
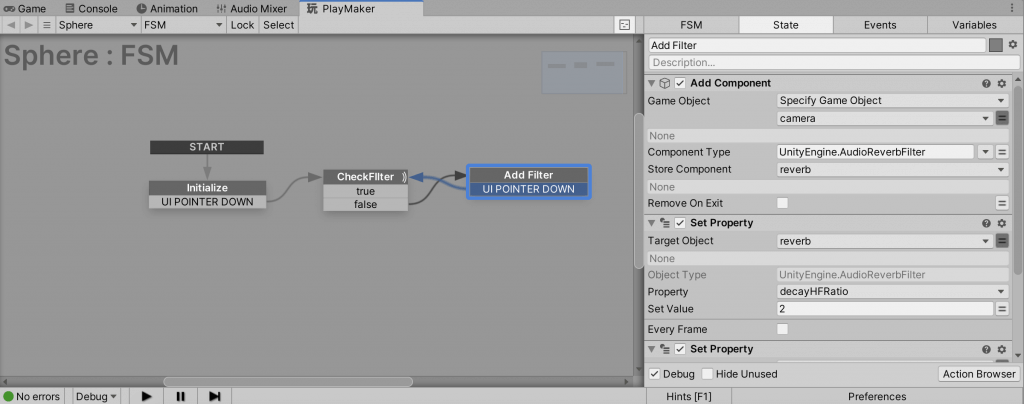
Also, add a UI POINTER DOWN event to the Add Filter so that it transitions to the CheckFilter again when the Sphere is clicked after the filter is added.
After that, set the destination of the event to CheckFilter.
Now, when the Sphere is clicked with no filter, the filter is set to turn on.
The next step is to set the filter to turn off when the Sphere is clicked with the filter in place.
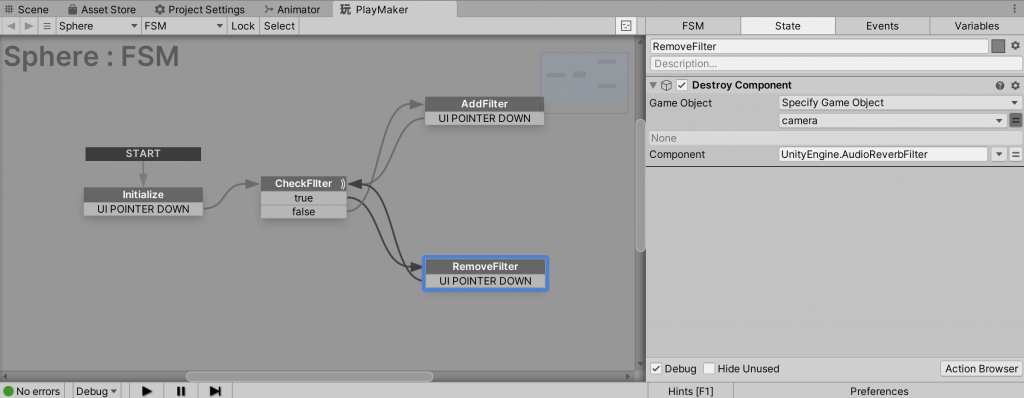
Right-click on the FSM, add a State, and rename it to RemoveFilter.
In this RemoveFilter, remove the Filter component to turn off the filter.
Specify RemoveFilter as the transition point for the true event of CheckFilter.
Use the “Destroy Component” action to delete the component.
Select camera as the Game Object and specify the component to be deleted.
In this case, we specify Audio Reverb Filter.
The filter component is now removed.
As with AddFilter, let’s add a UI POINTER DOWN event to RemoveFilter and add a transition to CheckFilter.
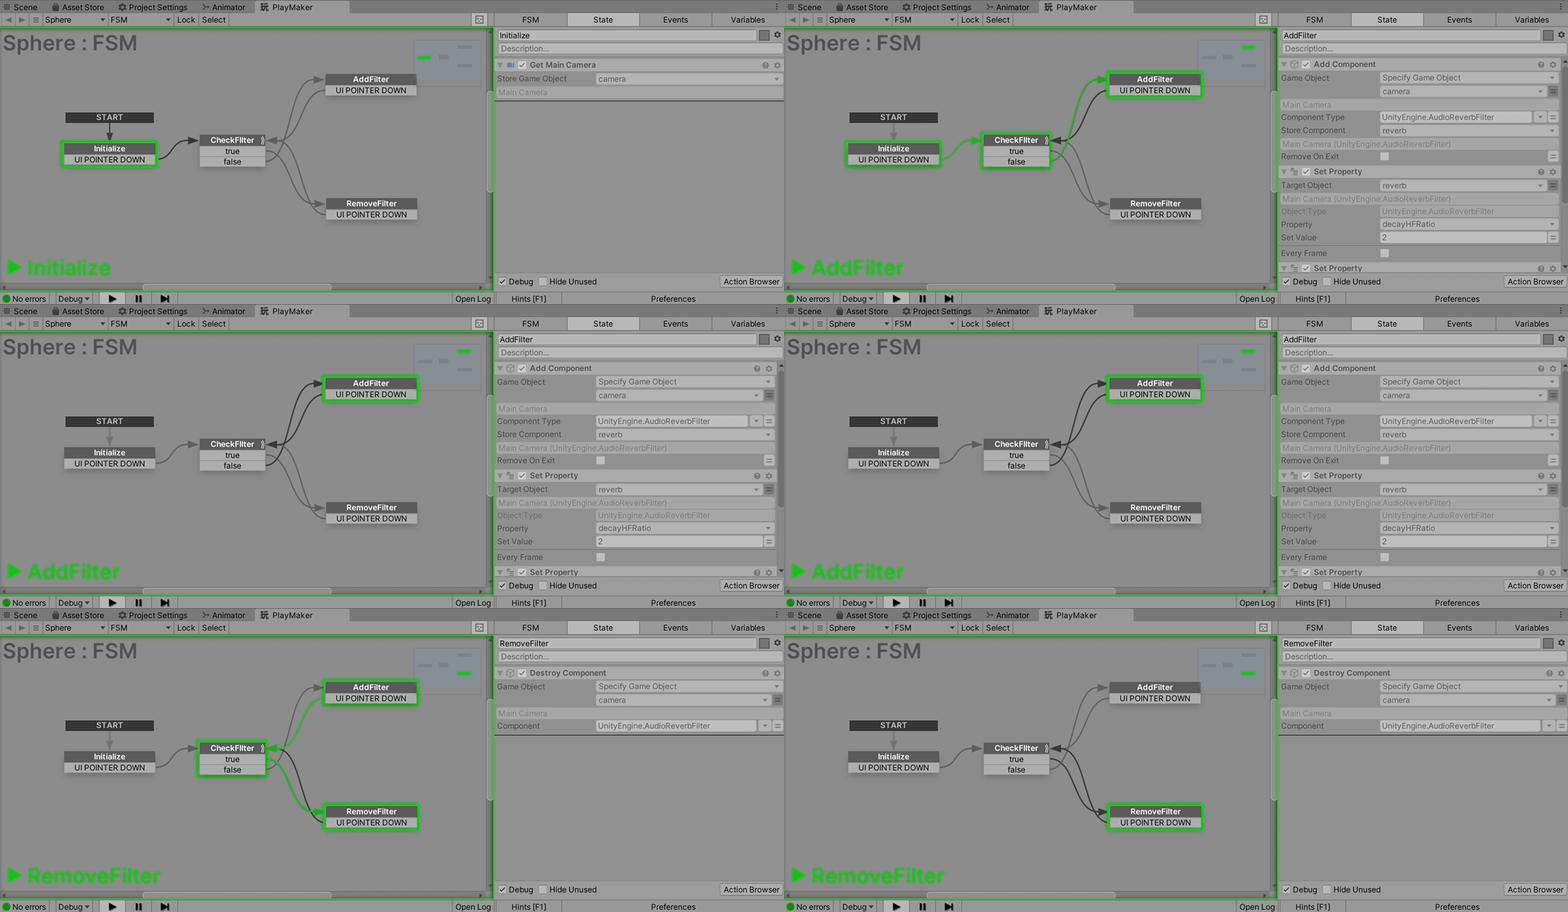
Launch the local preview tool and if the filter changes every time you click on the Sphere, you have succeeded.
Adding different effects
Let’s add a Sphere that has a different filter.
Duplicate the sphere you just created and place them side by side.
Creating a Chorus Filter
The first step is to set up the chorus filter so that it can be switched.
Open the Variables tab in the FSM of the newly added Sphere.
Make the following changes
- Rename the “reverb” variable to “chorus”.
- Change the “Object Type” of the chorus variable to “Audio Chorus Filter”.
- Change the component used for judgment in the Has Component action in CheckFilter to Audio Chorus Filter.
- Changed the component to be added by AddFilter to Audio Chorus Filter.
- Change the component to be removed by RemoveFilter to Audio Chorus Filter.
In the case of chorus filters, the process is a little more complicated.
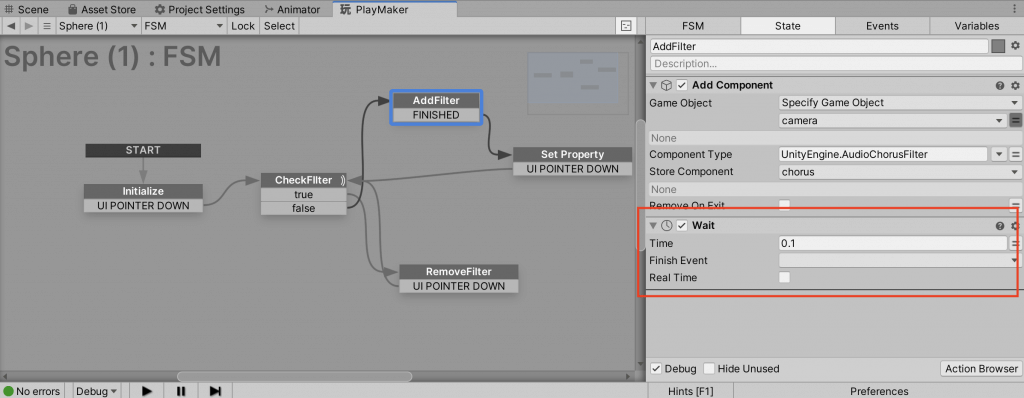
After adding a component to the Audio Chorus Filter, you need to wait for the property changes to take effect.
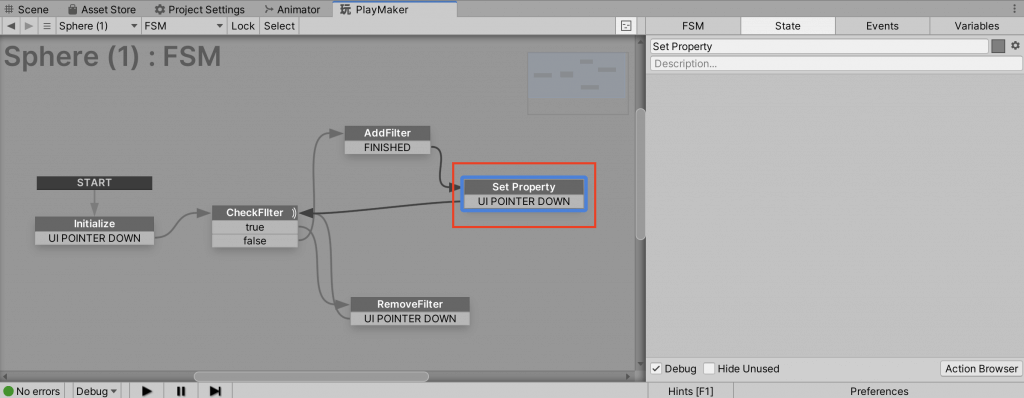
Therefore, after adding the Audio Chorus Filter in AddFilter, create a new State called “Set Property”.
Change the UI POINTER DOWN event of the Add Filter to a FINISHED event, and change the transition destination to Set Property.
Then add a UI POINTER DOWN event to Set Property and set the transition destination to CheckFilter.
To create a wait time, add a “Wait” action to the end of the Add Filter and set it as follows.
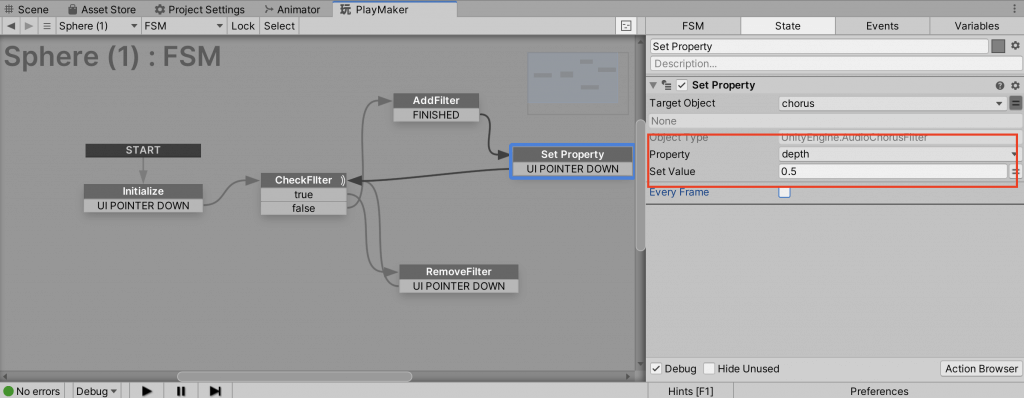
In the Set Property, set the properties as shown below.
Play the scene and click on the Sphere to switch the filter, and you have succeeded.
Creating a High Pass Filter
Duplicate the Sphere to add the Reverb filter again.
Change the variable names and components as in the chorus filter.
Change them as follows
- Rename the variable reverb to “highPass”
- Change the Object Type of the variable pass to “Audio High Pass Filter”.
- Change the component used for judgment in the Has Component action in CheckFilter to “Audio High Pass Filter”.
- Changed the component to be added by Add Filter to “Audio High Pass Filter”.
- Changed the component to be removed by Remove Filter to “Audio High Pass Filter”.
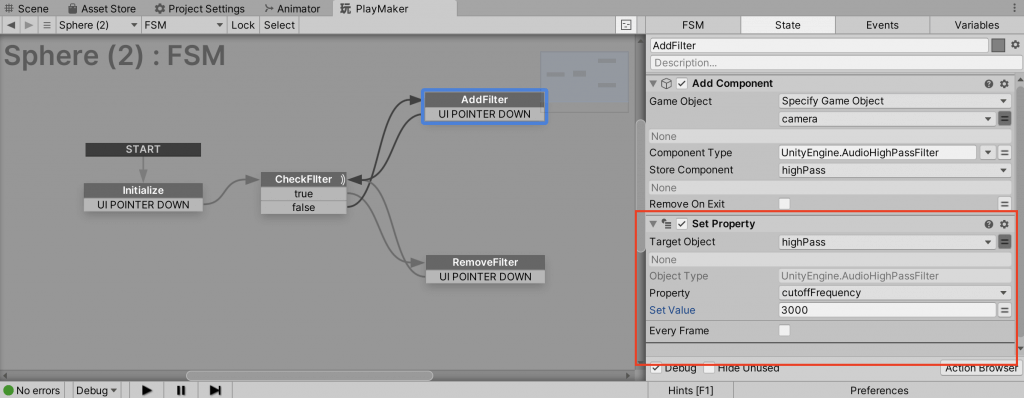
Like Reverb Filter, High Pass Filter can set its properties in AddFilter.
Let’s set it up as follows.
Play the scene, and if the filter is switched, you have succeeded.
Adding an Audio Visualizer
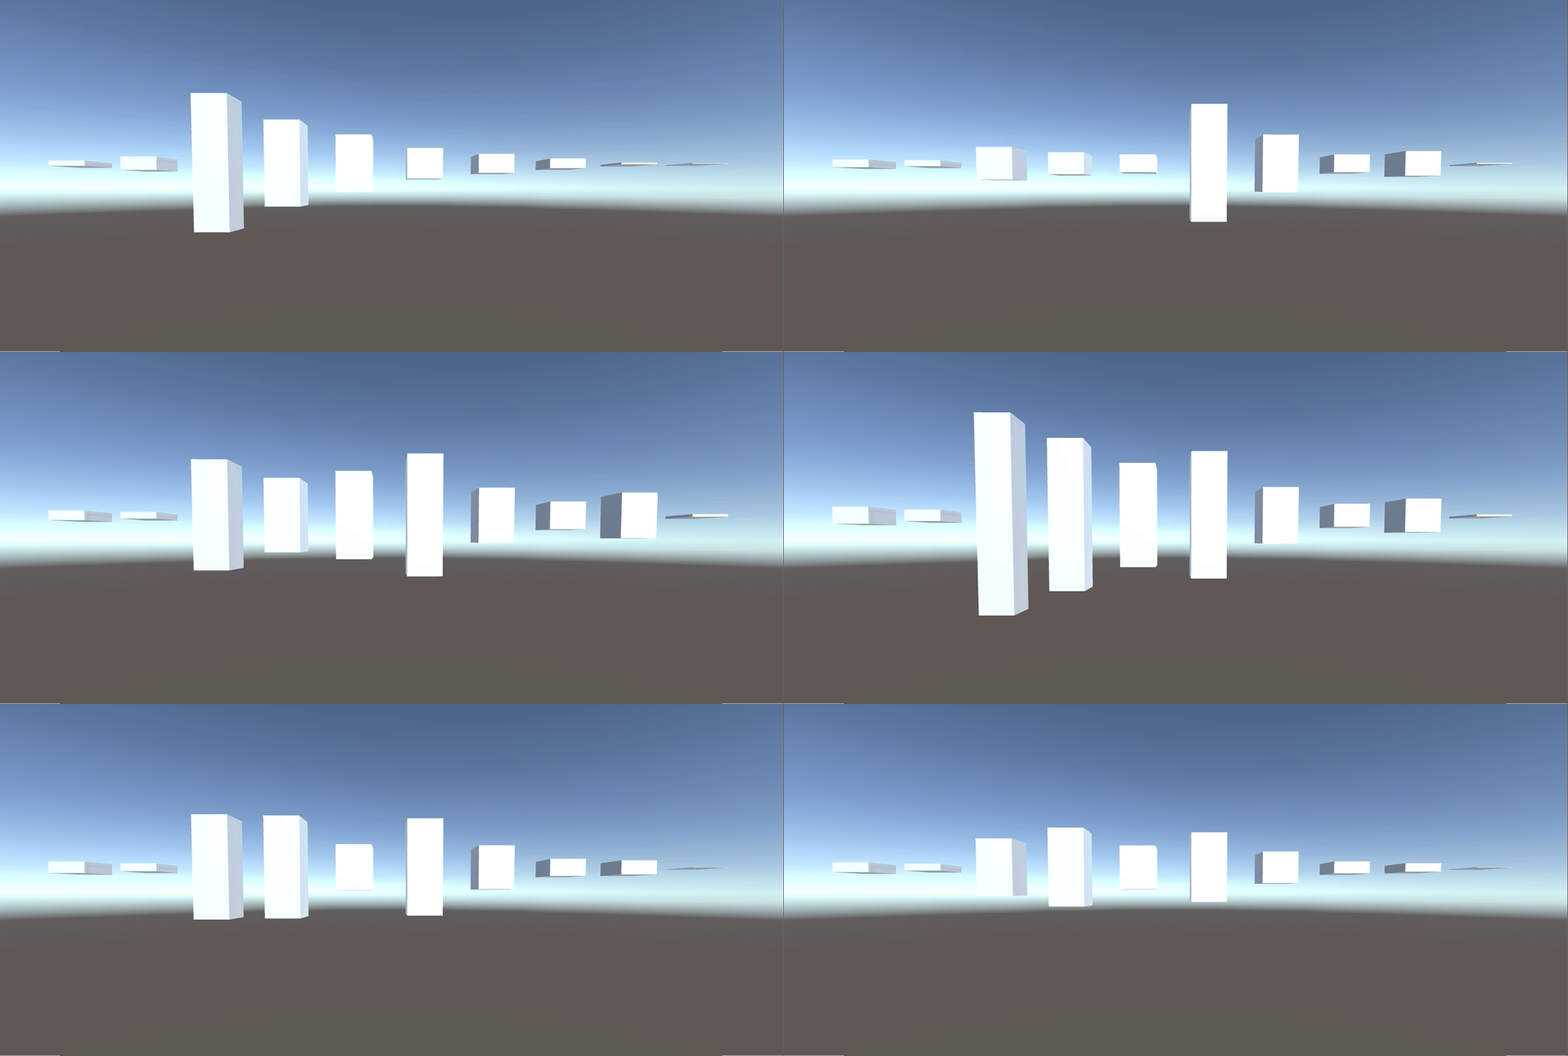
To add movement to the scene, let’s add an audio visualizer like the one in the sample.
This is very easy to implement using PlayMaker.
Create an empty Game Object and rename it to SpectrumInitializer.
Use this Game Object to get the frequency spectrum of the sound.
Add an FSM to the SpectrumInitializer and add an “Init Audio Spectrum” action.
The settings in the action should be set as follows.
Next, we will place an object that will change with the sound.
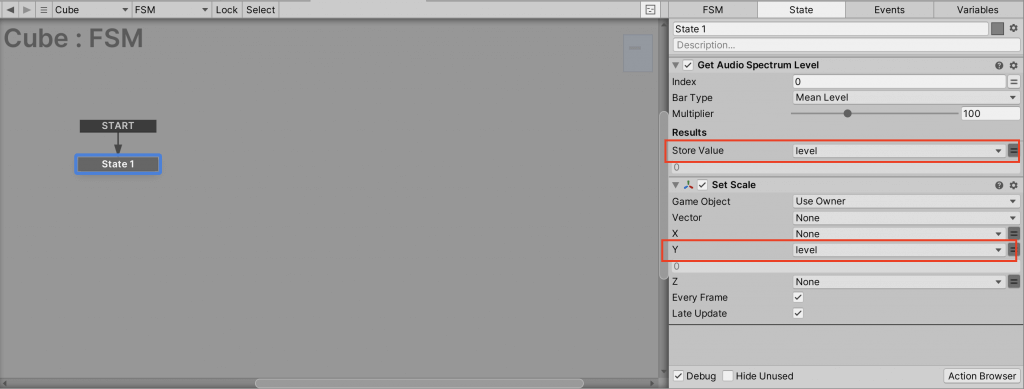
Create a Cube and add an FSM.
Add the “Get Audio Spectrum” action and the “Set Scale” action to the FSM and set them as shown in the image below.
Duplicate the completed Cube and shift the Index of Get Audio Spectrum by 1 and place them side by side.
Let’s play the sound in this state.
The height of the cube should now change in time with the sound.
It is a little difficult to understand because it is a GIF image, but you can see that clicking on the sphere applies an effect and the movement of the visualizer also changes.
A detailed explanation of the action items used is given in the following article.
If you are interested in audio visualizers, please refer to this article.
How to upload to STYLY
Once you have completed your scene, it is time to upload your 3D model to STYLY.
Create a STYLY account
How to create STYLY account
How to upload 3D model to STYLY
How to upload to STYLY from Unity
In this article, we’ve shown you how to use audio filters to switch between effects in a scene.
There are many ways to use them, such as adding effects to sounds based on the player’s actions.
I hope this article will help you in your creative process.

![[Unity Tutorial] Creating a Game Using Playmaker ① From Basic Introduction to Installing](https://styly.cc/wp-content/uploads/2019/06/1200px-160x160.jpg)
![[Unity] Starting Playmaker from Scratch](https://styly.cc/wp-content/uploads/2019/09/PlaymaerCoreConcept-160x160.png)
![[Unity / Audio] Introduction to Audio System](https://styly.cc/wp-content/uploads/2021/02/画面収録-2021-02-22-17.32.47-160x160.gif)






![[Unity/Playmaker] How to Create an Audio Visualizer](https://styly.cc/wp-content/uploads/2019/08/download-160x160.gif)


