Today, I will introduce how to open a VR solo exhibition in STYLY using the 3DCG software “Blender”.
Holding an exhibition in VR means you have no restriction for display space, and it will be accessible for everyone from anywhere.
These advantages make VR exhibitions an attractive choice for a portfolio.
Even if you are a 3DCG beginner, you will learn how to build an exhibition site from scratch by following this tutorial.
I hope you all build and decorate your very own custom exhibition!
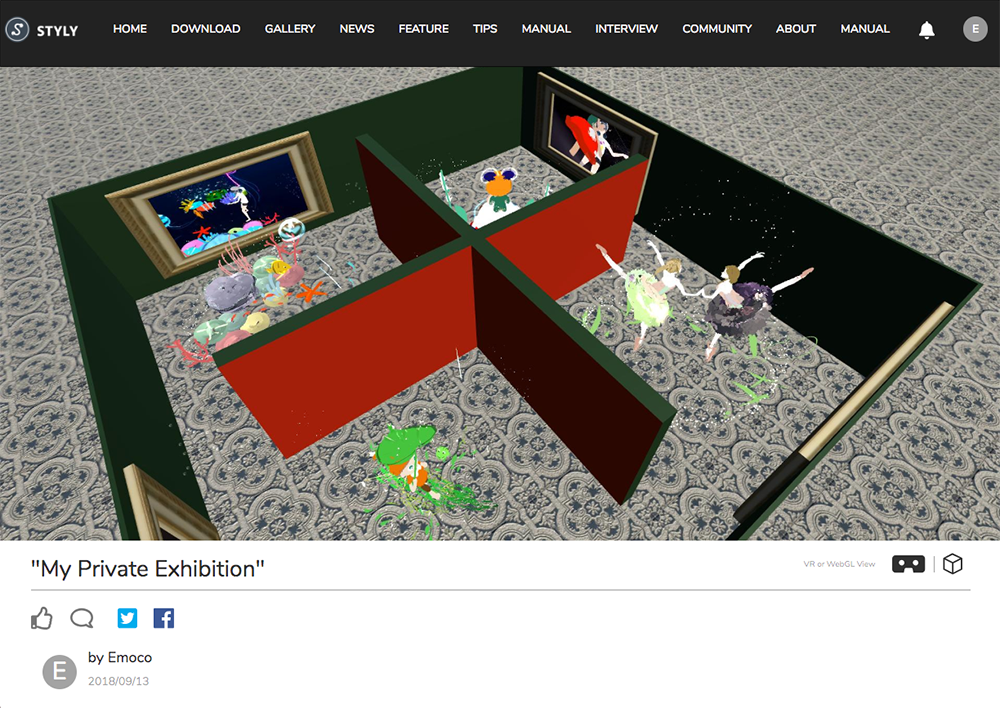
Completed image
For those who want to learn how to draw a illustration in VR, please read this article.
→Draw VR illustrations by Tilt Brush – for beginners
Designing your exhibition site
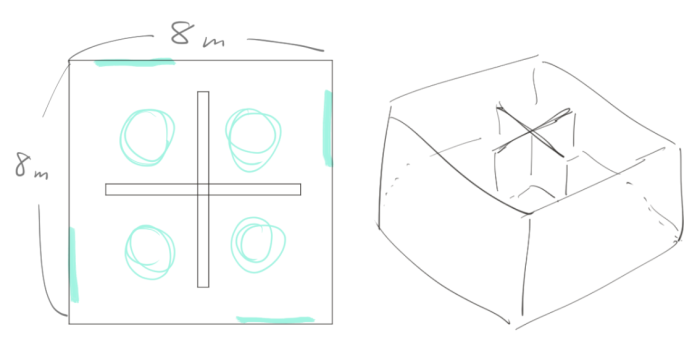
So, lets start by making a floor-plan for your exhibition site.
Don’t forget to think about how and where you want to display your artworks.
You could also refer to real buildings and real exhibitions, to get ideas for your exhibition site.
Designing your exhibition site
One important point is to be careful that the visitors don’t get lost.
If the space is too huge, or if the route is hard to find, people won’t be able to look at all your artworks.
To prevent such matters, you could place direction signs around, or control where people look next, with moving objects.
Creating your exhibition site with Blender
First, go to the official site for Blender(https://www.blender.org) and click “Download Blender”, then install it to your computer.
※ In this article, I will be using Blender v2.79.
Initial settings for Blender
▼ Set Meters as your unit
Click the ①”Scene” icon on your right, and change the unit from Unit Presets to ②Meters.
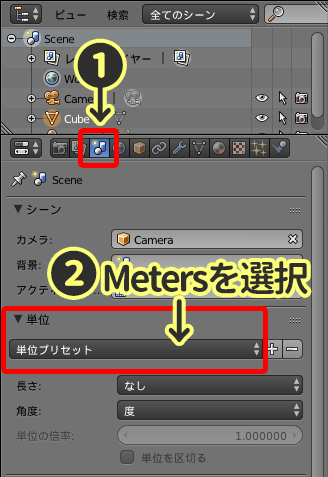
Set Meters as your unit
Create walls for your exhibition site
Next, we will build the walls for your building.
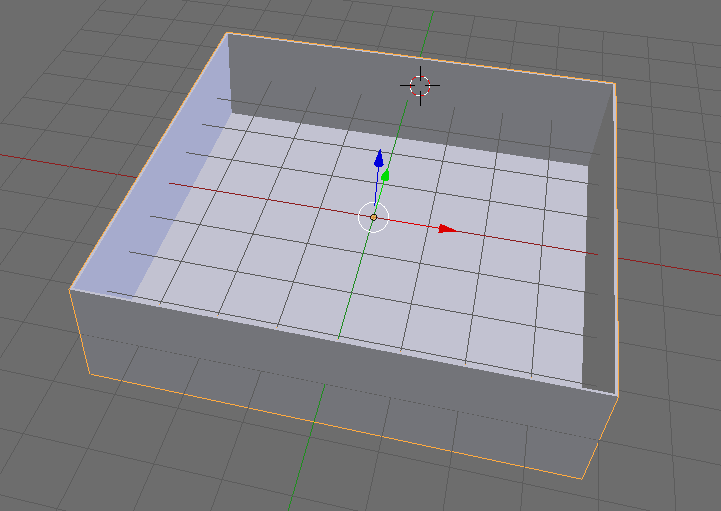
Completed image
▼ Change the size of the cube
Right click the cube in the center of your screen, so that the cube edges become highlighted in orange.
Click the ①“+ icon”, or press the “N” key to show the properties tab of the selected cube.
▼ Change the X and Y value of ②”Dimensions” in “Transform” to 8 meters (or the value you decided for your exhibition site).
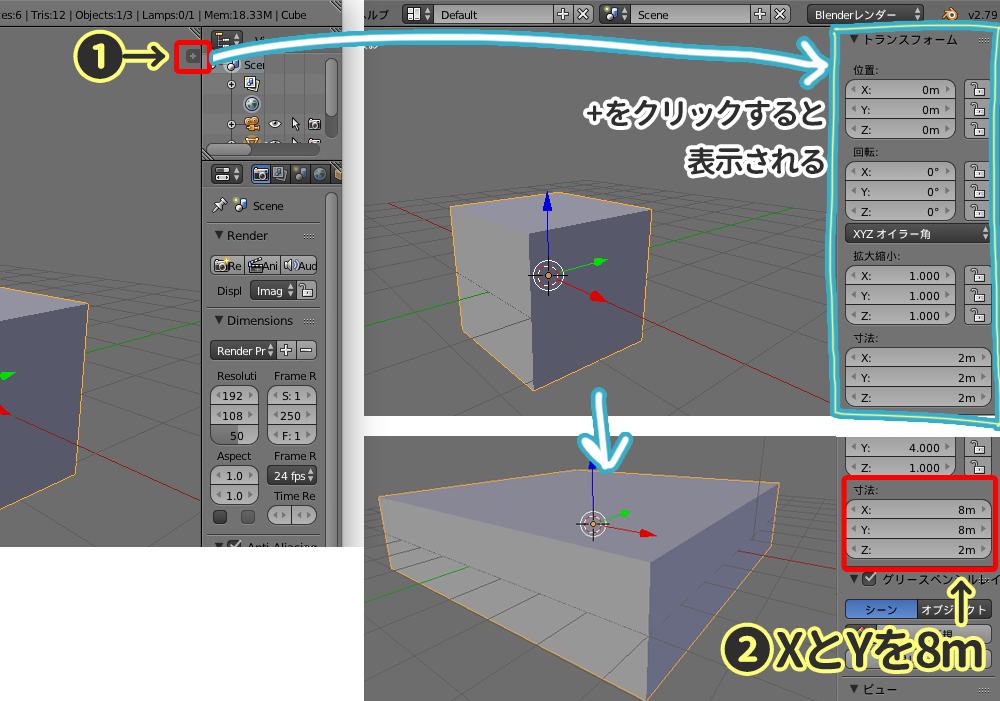
Change the size of the cube
▼ Switch to Edit mode from Object mode
Click the pull-down menu on the bottom of your screen, and choose “Edit mode”.
You can also switch between Edit mode and Object mode by pressing the “Tab” key.
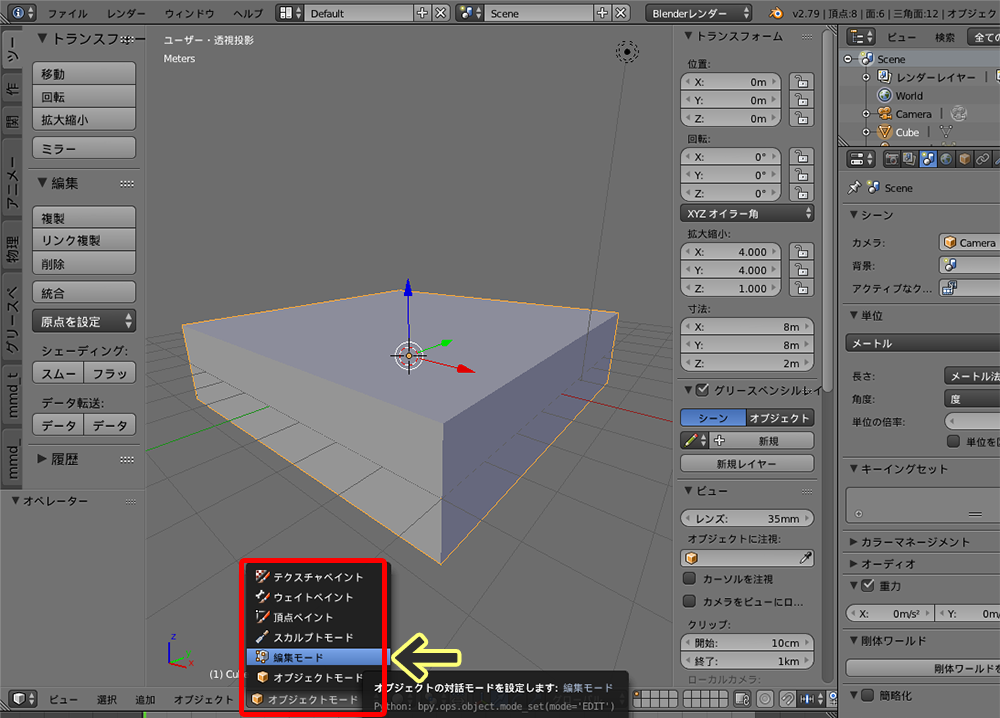
Switch to Edit mode
▼ Deselect
When you switch to Edit mode, the object will become highlighted in orange, as in the picture below.
By pressing the “A” key you can select, or deselect the current object, so please “deselect” for now.
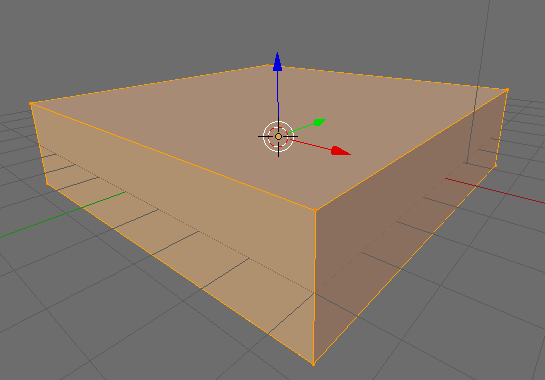
Object selected in Edit mode
▼ Face select
Click the ①”Face select” icon, ②right click the top face of the object, ③click “Delete” (or press the “X” key), and choose “Faces” to delete the top face of the object.
※ There is ground in STYLY too, so you could delete the bottom face too if you want.
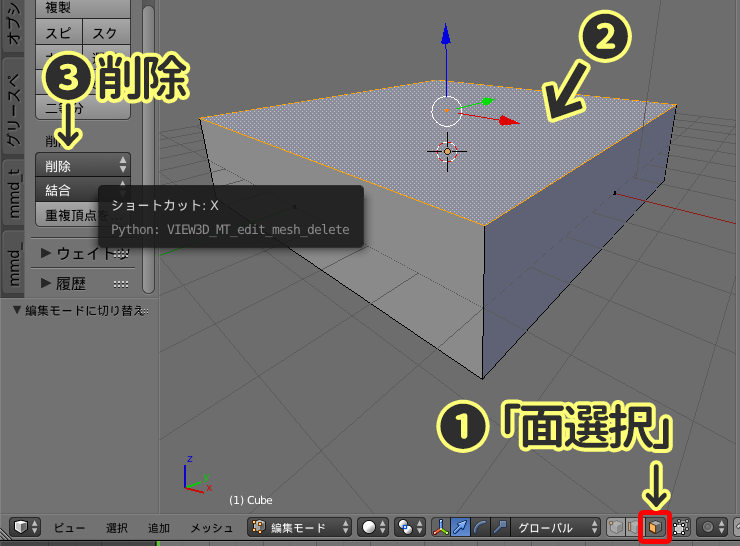
Select the top face of the object
▼ Solidify the object
Press the “A” key to select the object, then click ①Mesh >> ②Faces >> ③ Solidify to solidify your walls.
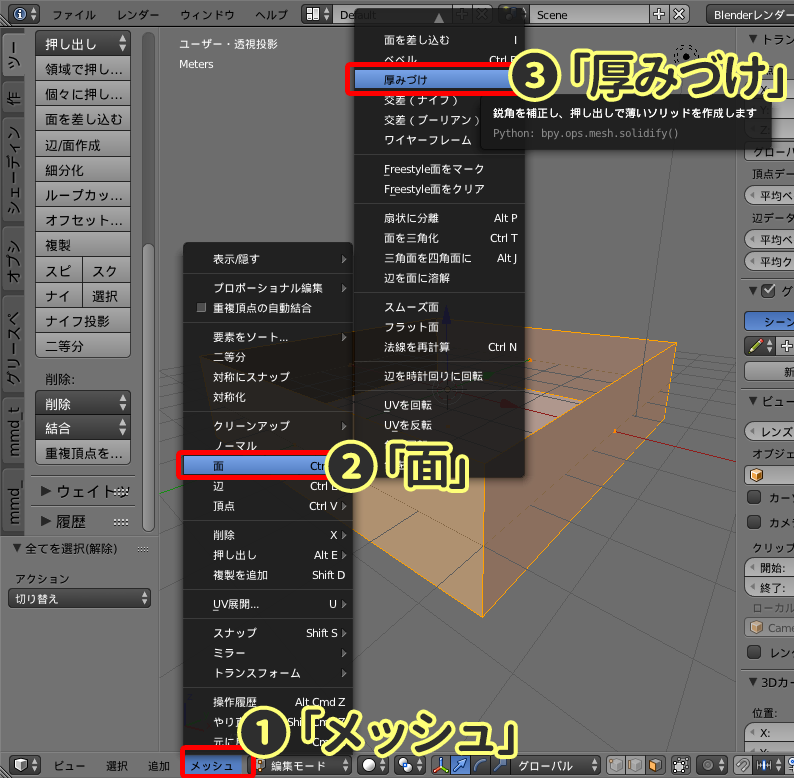
Solidify the object
Create inner walls to separate your space
Next, we will create some walls to separate the space in the room.
Press the “Shift” key and “S” key, and choose “Cursor to Center”.
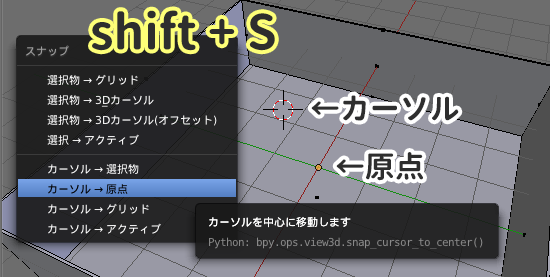
Cursor to Center
▼ Create walls
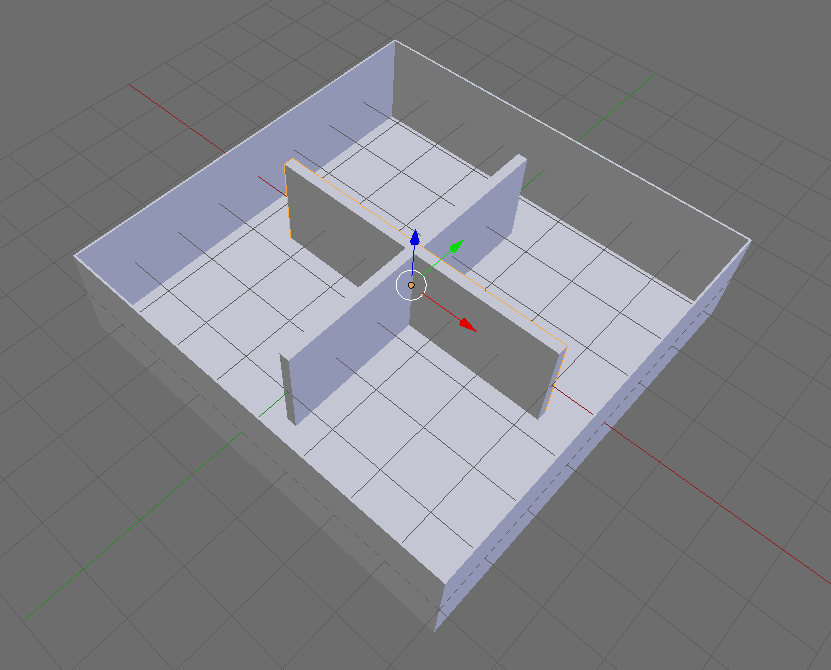
Completed image of walls
Switch to “Object mode”, click the ①”Create” tab, and click ②”Cube”.
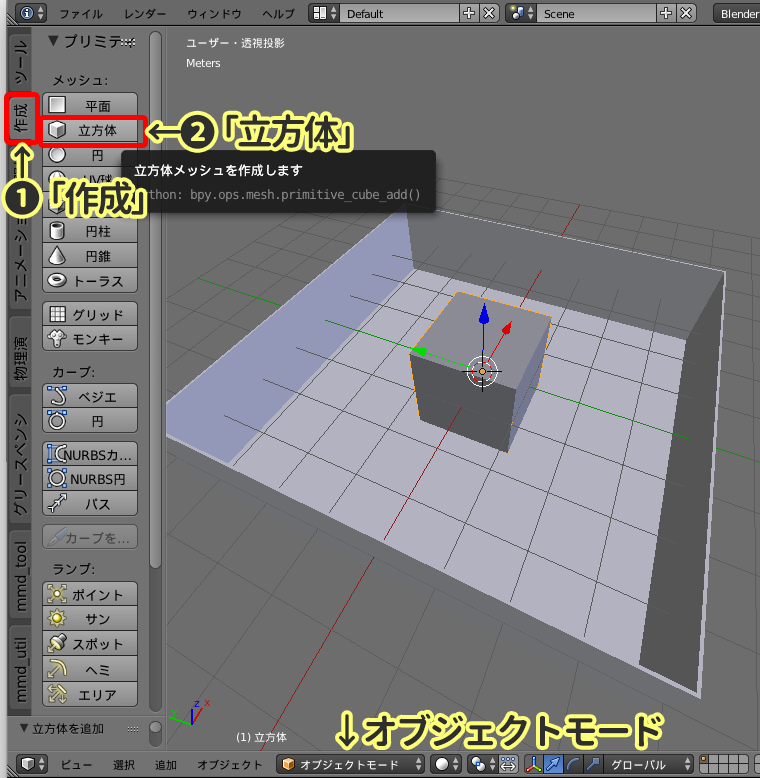
Create a Cube
Transform the cube into a thin rectangular.
Change the ▼ Transform “Dimensions” to X value = 20cm and Y value = 6m.
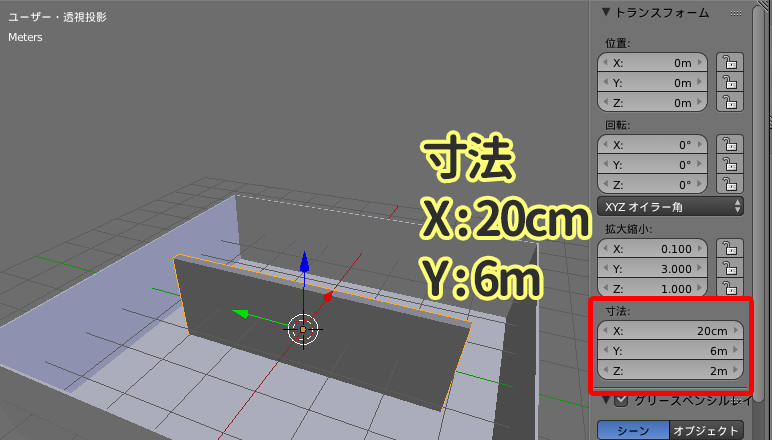
Transform the cube
▼ Duplicate the wall
Right click the object, click the ①”Tools” tab, click ②”Duplicate” (or press the “Shift” key and “D” key) to duplicate the object.
After you click “Duplicate”, do not move the cursor and press “Enter” immediately.
(The object will move somewhere else if you move the cursor before setting the position)
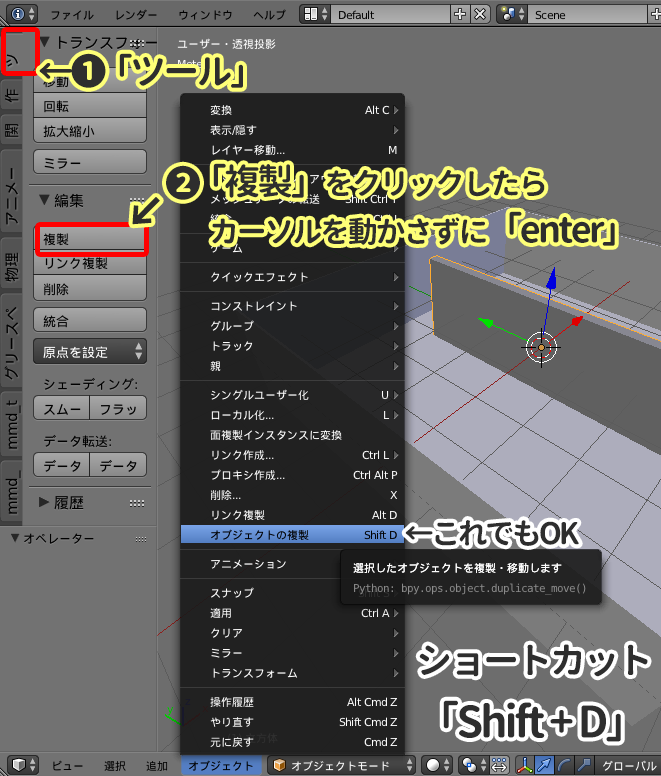
Duplicate the object
▼ Rotate the wall
Click the ①”Tools” tab, click ②”Rotate” twice, select the ③”Z” axis, and ④set the angle to 90° to rotate the wall.
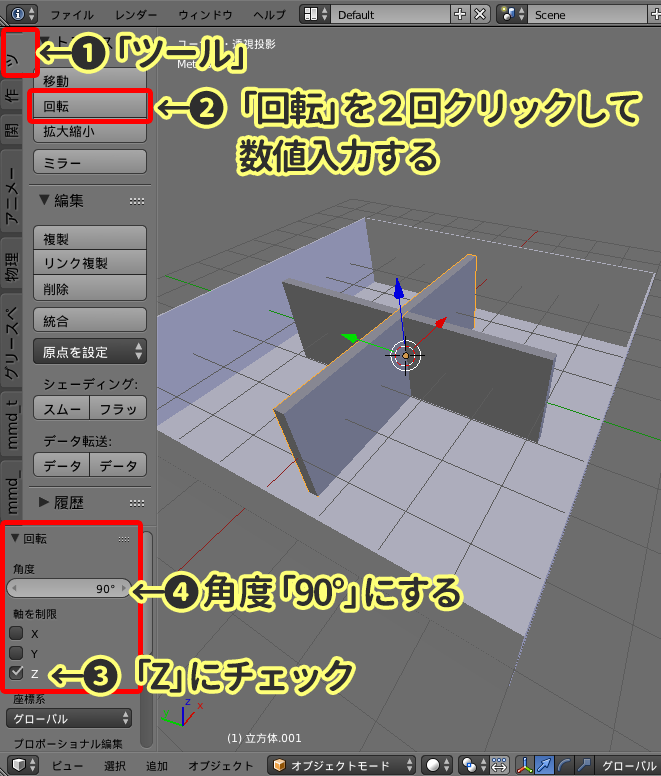
Rotate the duplicated object
▼ Change the color
Switch to “Object mode”, and right click the object you want to change the color of.
Switch to Object mode
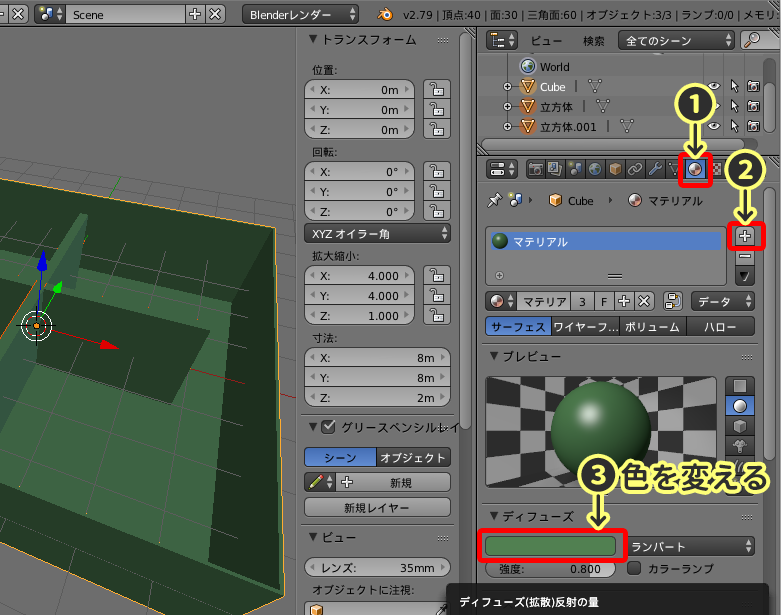
Change the color of the whole object
Click the ①”Material Icon”, click the ②”+ icon” to add a new material slot, and change the color of ③”▼ Diffuse”.
▼ Changing color partially
When you want to change the color partially, switch to “Edit mode”.
Switch to Edit mode
Click the ①”+ icon” to add a new material slot, and change the color of ③”▼ Diffuse”.
Select the face you want to change the color of, and click ③”Assign” to assign the color.
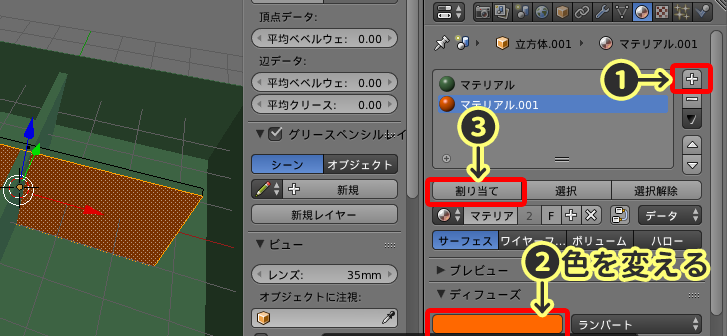
Changing color partially
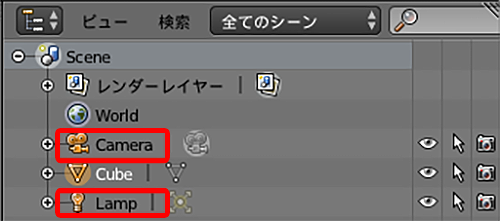
▼ Finish up
If there are objects such as “Camera” or “Lamp”, you don’t need them so right click and choose “Delete”.
Delete the Camera and Lamp
Finally, select “File” from the upper left, and choose “Save”(in .blend format) to save your exhibition site.
Importing your exhibition site to STYLY
Access STYLY(https://styly.cc/) from a browser (Google Chrome is recommended) and login or register as a new user.
Launch STYLY Editor, select the “Create Scene” tab, enter the name of your work in the “Title” bar, and click “Create”.
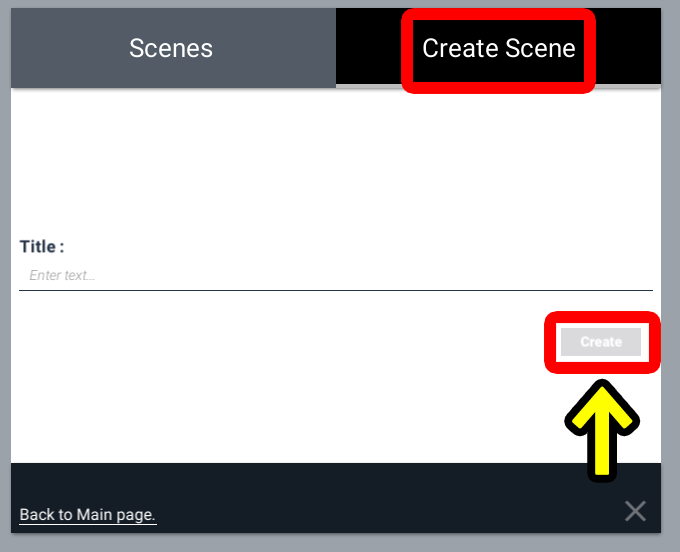
Create a new scene
Once the new scene gets created, click the “photo icon”(Assets) located in the upper left corner of your screen.
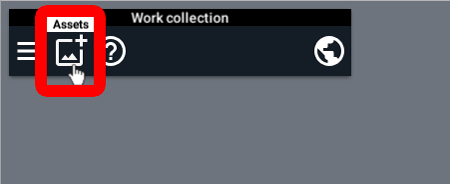
Select Assets
Next, click the “3D Model” icon.
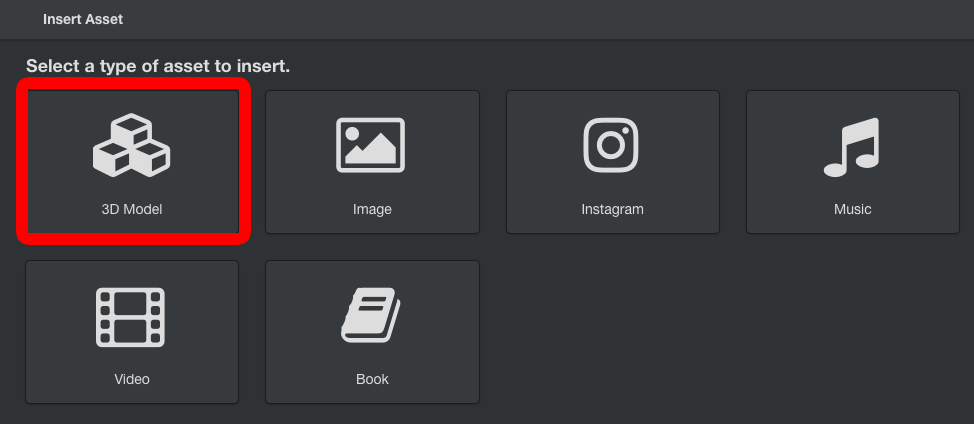
Select 3D Model
Select the ①”Upload” tab, click ②”Select..”, add the Blender 3D data file you just made, and click the blue ③”Upload” button.
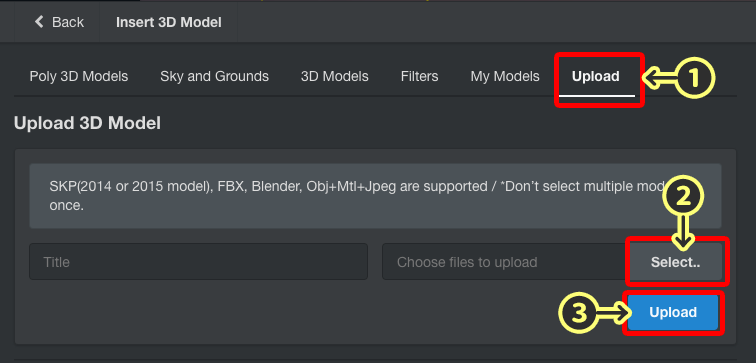
Uploading your exhibition site to STYLY
After a short wait, the object will show up in the “My Models” tab, so click it.
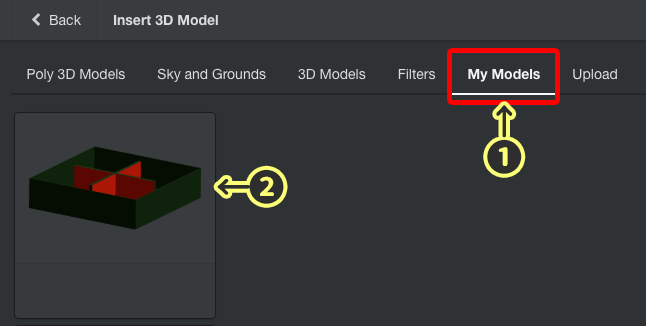
Select the 3D object you uploaded
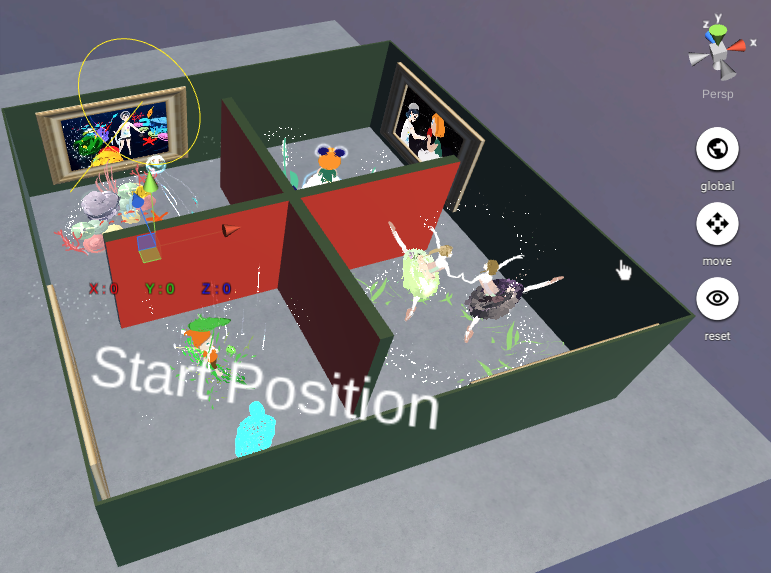
Move the exhibition site with the Start Position(where the user will first be standing) in mind.
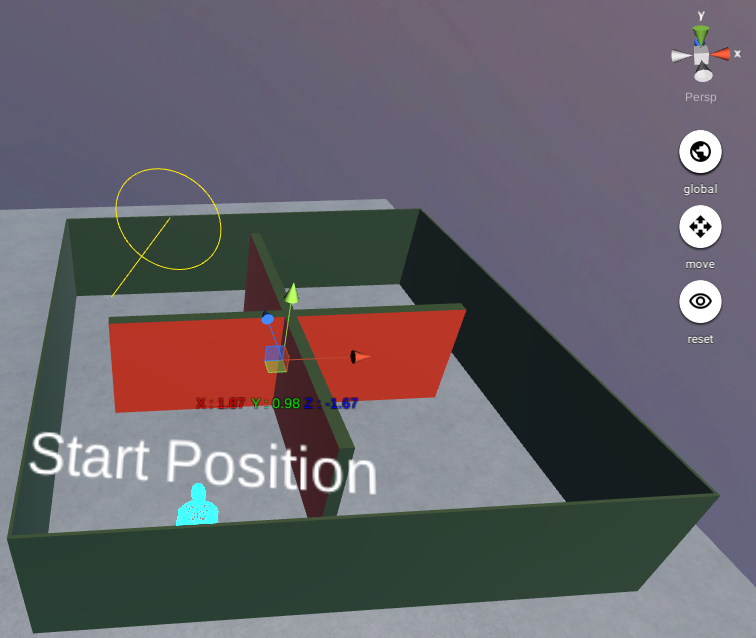
Adjusting the position of the exhibition site
Read this article to learn how to “move, rotate, change scale” assets in the STYLY Editor.
→how to “move, rotate, change scale”
Displaying your artworks
Lets start decorating your exhibition site with your artworks.
You can display not only 3D models, but also illustrations or even videos in STYLY.
To find out the details for each, refer to the articles below.
→Displaying a VR illustration
→Displaying a 3D Model
→Displaying a picture
→Displaying a YouTube video
Displaying your artwork
Change the sky and the ground
You can change the sky and ground to match your artwork and fashion.

Change the sky and ground
First, click the “photo icon”(Assets).
Click Assets
Next, click the “3D Model” icon.
Select 3D Model
Select the “Sky and Grounds”tab, and choose the sky and ground that best matches your exhibition site.
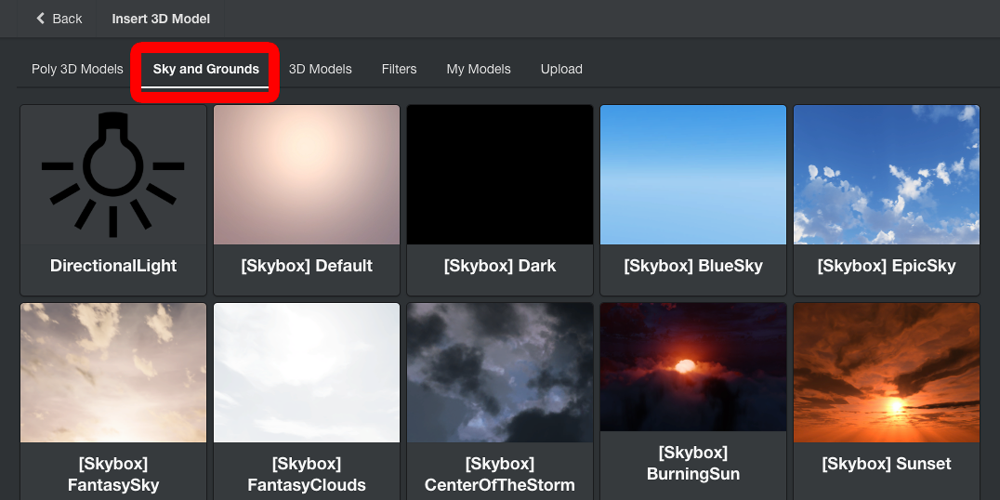
Sky and Grounds tab
Play music
Playing melodic music will create a great atmosphere for your exhibition.
First, click the “photo icon”(Assets).
Click Assets
Next, click the “Music” icon.

Select Music
▼ Upload data from your computer
Select the ①”Upload” tab, click ②”Select..” and choose a MP3 file from you computer, and click the blue ③”Upload” button.
※ Make sure to use music you created, or copyright free music.
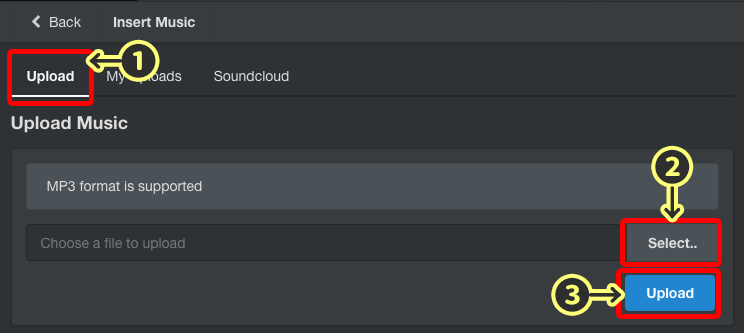
Uploading music to STYLY
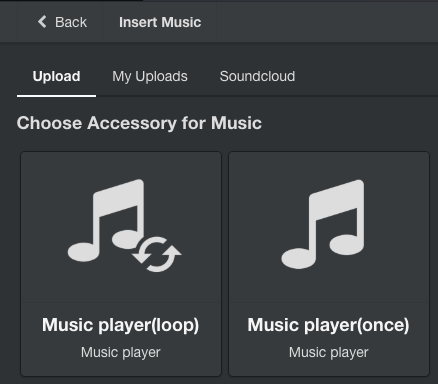
The uploaded MP3 data will show up in the “My Uploads” tab, so click it.

Select the uploaded music file
Choose either “Loop play”, or “Play only once”.
Then, a Music player will be added to the scene and music will start playing.
Play options
▼ Using “Soundcloud” music
If you don’t have any music files, you can get music from “Soundcloud”.
Click the ①”Soundcloud” tab, enter a ②”Keyword”, and click ④”Play” to listen to a sample.
Find a song you like, and click ⑤”Insert this track” to add it to your scene.
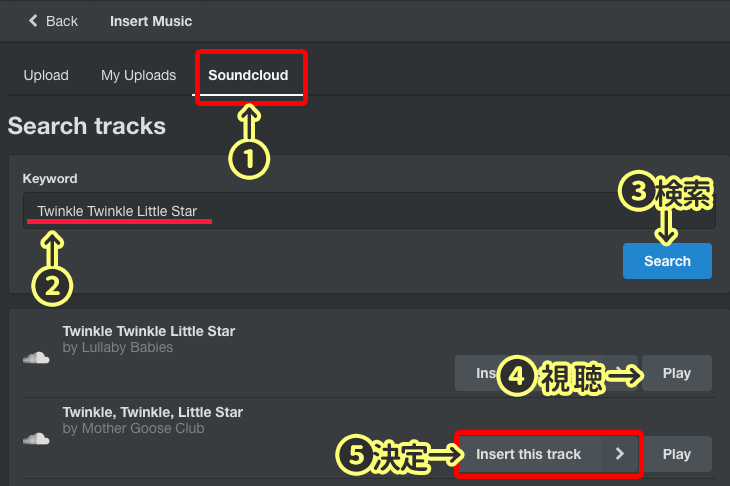
Use music from Soundcloud
Choose either “Loop play”, or “Play only once” to add a Music player to the scene.
Play options
Publishing and sharing
Finally, look at the whole scene and arrange your assets so they look best.
For those who have a VR HMD, download STYLY from Steam, and check how your scene looks in VR.
Launch STYLY, and click “My Scenes” to find the scene you created.
You will be able to see and check your scene from your VR HMD, so adjust anything you find the need for.
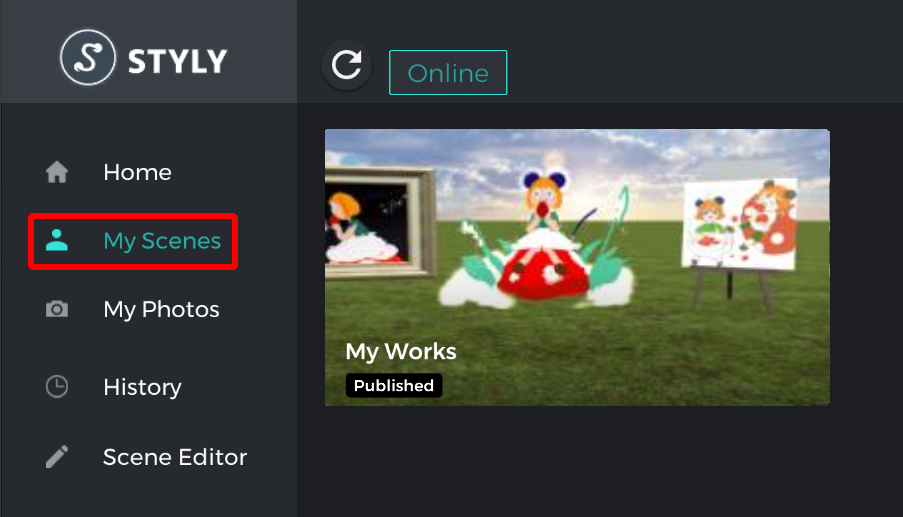
Checking your scene with a VR HMD
When you’re done with the scene, the final step is publishing it.
Click the “Earth icon”(Publish) in the upper left of your screen.
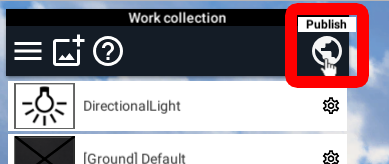
Publish Button
Enter the title of your work and description, and click the “Earth icon”(Publish) on the bottom right to publish.
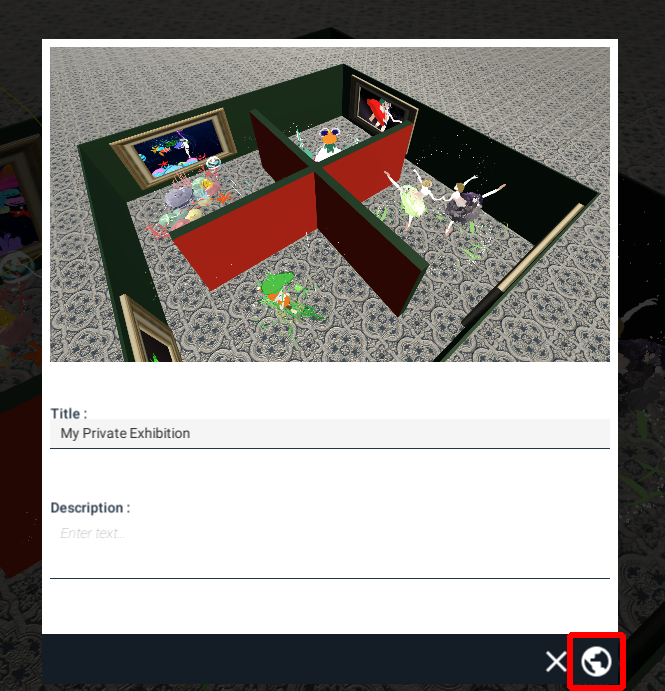
Enter the title/description and publish
Once the scene is published, a page of your scene will show up, so share your work from SNS services.
Even if a user doesn’t have a VR HMD, STYLY scenes can be accessed from a web browser too, so you can show your creation to anyone!
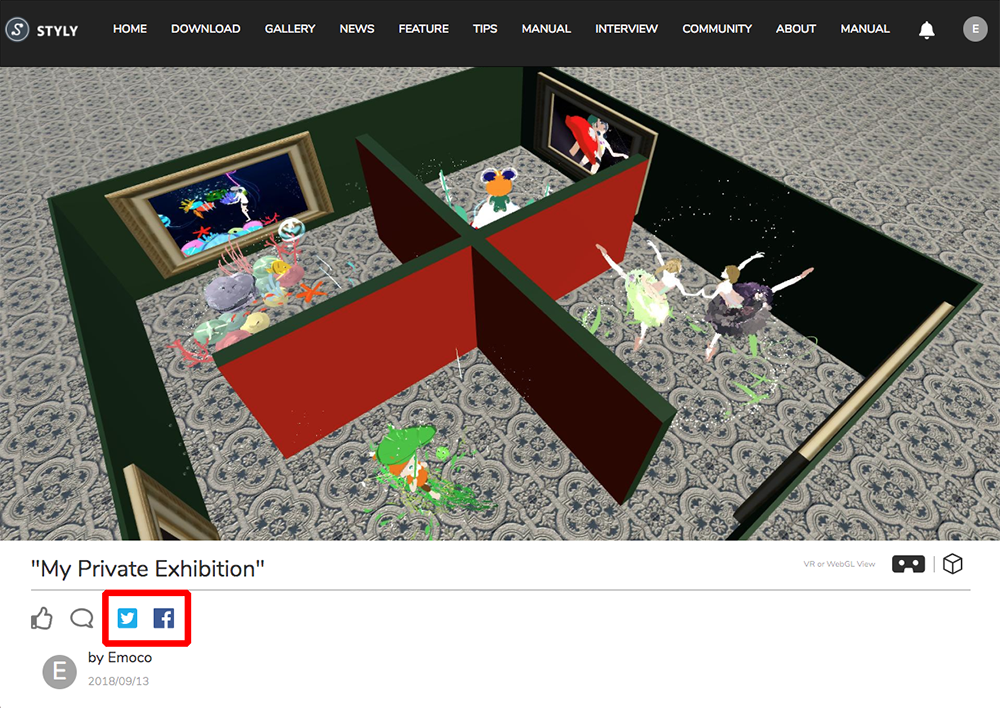
Sharing using SNS
Today, I introduced how to create an art gallery using Blender, and opening a VR solo exhibition in STYLY.
In real life, holding a solo exhibition has many difficulties, but in virtual reality, you can not only hold it throughout the year without any costs, you can also invite anyone in the world.
I’m hoping and am looking forward to seeing VR solo exhibitions held by you folks!