This article is a sequel to the previous article.
![[Unity / Post Processing] Reproducing Solarization Part 1](https://styly.cc/wp-content/uploads/2022/05/スクリーンショット-2022-05-21-15.44.20-160x160.png)
In Part 1 of our series, I explained how to reproduce solarization by focusing only on how to adjust the settings in Unity. I did not explain the specific relationship between the curves and images, so you may not have been successful in creating the desired effect.
But not to worry! In this article, I will provide a rough explanation about the relationship between these images and curves. From this basic understanding of how the shape of the tone curve can affect the image, you will be able to edit the image intuitively.
Sample Image
Sample Image
Histograms and Tone Curves
Let’s begin with the basics of the digital image. A digital image is made up of a set of pixel data and other data. A pixel is a grid of points arranged in two dimensions on a digital image.
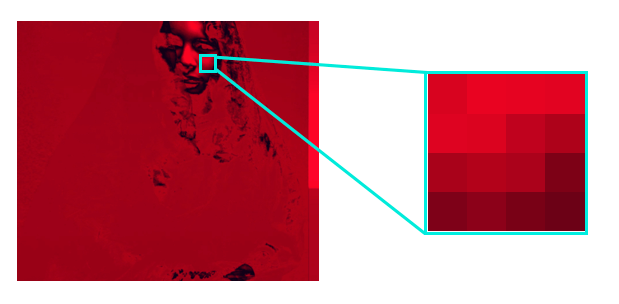
A Pixel Array
Above is an enlarged section of the sample image. You can see that the squares line up like this. Each pixel has three parameters (channels): R (Red), G (Green), and B (Blue). For each pixel, the ratio of each RGB value can be adjusted and controls the appearance of the digital image.
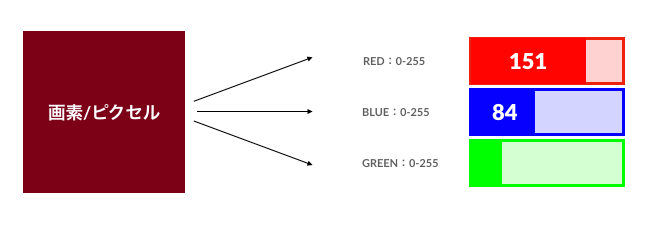
Relationship Between Pixels and RGB Data
In addition to RGB, there are similar settings for data, such as Saturation/Chroma and Value/Brightness.
As you can see, each pixel stores different information for hue, saturation, brightness, lightness, and so on.
About Histograms
A histogram is a graphical representation of the pixel data of a single image. What do I mean by “graphical representation”?
Let’s look at the following black-and-white image as an example.
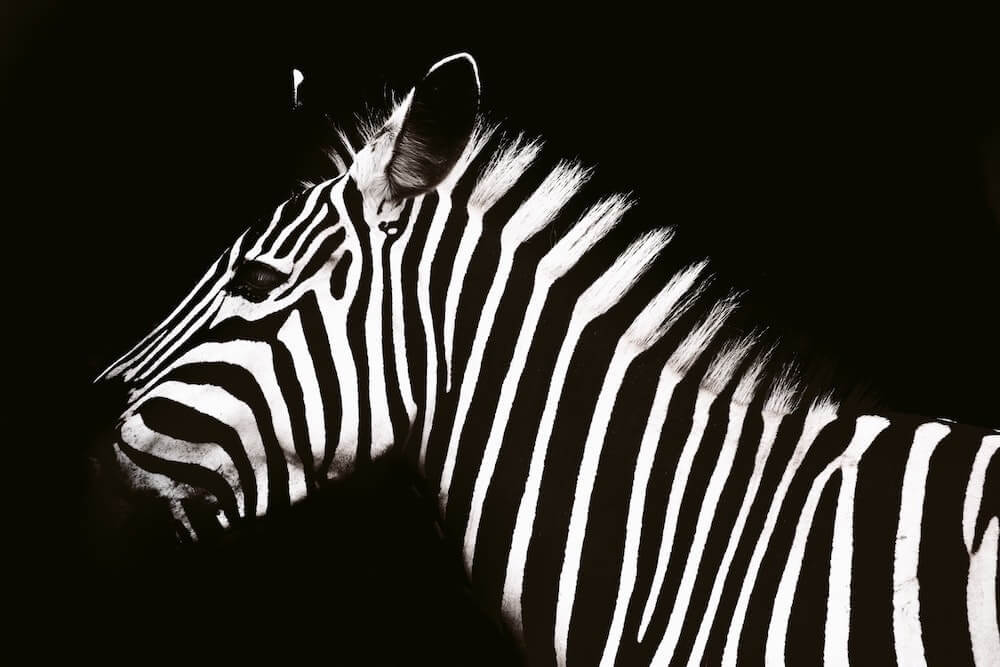
Example: A Black-and-White Image of a Zebra
In this black-and-white image, we will focus on the black-and-white gradation with Luminance as the axis. Luminance considers the difference in brightness by color, with a value ranging between “0” and “255.” In other words, this image of a zebra is a collection of pixels with each having a luminance value.
A luminance of “0” means the pixel is black, while a luminance of “255” means the pixel is white. Further, the more pixels near “0” the darker the image, and the more pixels near “255” the whiter the image. In the image above, most of the pitch-black area around the zebra is made up of pixels with a luminance of “0”; only the white lines of the zebra’s skin pattern have a value of “255.”
This zebra example can be organized in two different perspectives:
- The value of each pixel between “0” and “255”
- The number of pixels at each value
In a histogram for a digital image, these two perspectives are applied to the x- and y-axis.
A histogram of a zebra image would look something like this with two peaks:

A Histogram of the Zebra Image
If the image is darker with almost no white areas, the graph will have a higher peak near “0” on the left; the areas near “255” on the right will have a lower peak because the image is mostly black.
About Tone Curves
Next, I will explain the tone curve. The tone curve is a tool used to adjust an image.
In Part 1, we saw how an image changes by adjusting the curve. Further, by manipulating this curve, you can adjust the brightness and contrast.
Adjusting the Tone Curve (from Part 1)
A tone curve is a function that takes a pixel value input and determines the pixel value output. Thus, the way the image data is output depends on the shape of the curve. In this article, we will discuss only tone curves for solarization, but there are many different types of tone curves.
First, we will review how to use the tone curve UI.
Tone Curve UI in Unity
The image above is the tone curve UI in Unity. The bar at the top has three sections: Master, Override, and Reset.

The First Three Items to Adjust
Before making any adjustments, make sure to check the setting of “Master.” The default setting is “Hue vs. Hue.”
|
Master |
You can assign where to apply the tone curve. The default setting is “Hue vs Hue.” You can determine the input and output values from the image data. In this example, “Master” is selected to manipulate the Luminance. Other tone curve values include Hue and Saturation. |
| Override |
When selected, you can edit the tone curve. |
| Reset | When selected, all adjustments of the tone curve are reset. |
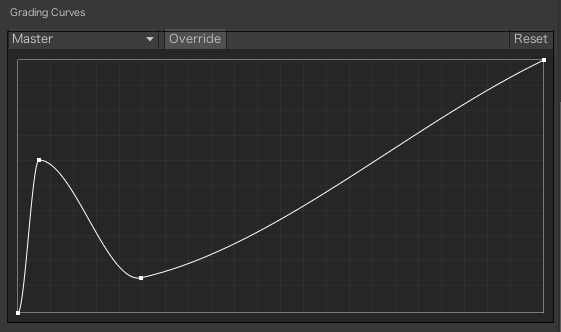
The tone curve can be divided roughly into three parts, as shown below.
The upper-right side are the highlights, the lower-left side are the shadows, and the middle are the midtones of the (whole) image.
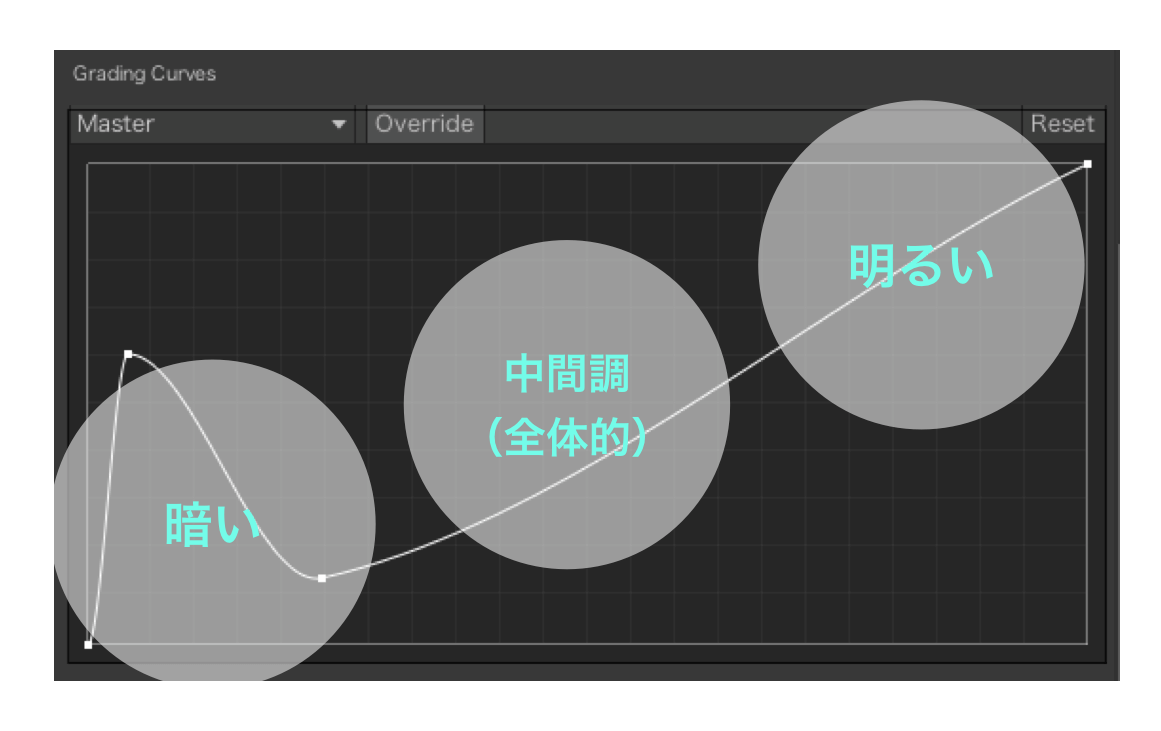
Tone Curve Tips: Fig.1
It is very important to understand why the right side has the highlights and the left side has the shadows, so let’s dig deeper into the relationship of these three areas of the curve.
These three areas—the highlights, shadows, and midtones—are similar to the zebra image histogram that we discussed before.
Although omitted in Unity, the histogram below also has something resembling an x-y axis (see Fig.2). In general, the bottom axis (x-axis) is the input value, and the left axis (y-axis) is the output value.
There are two things to keep in mind: the location of the value you want to edit on the lower axis (x-axis), and how the tone curve will change that value.
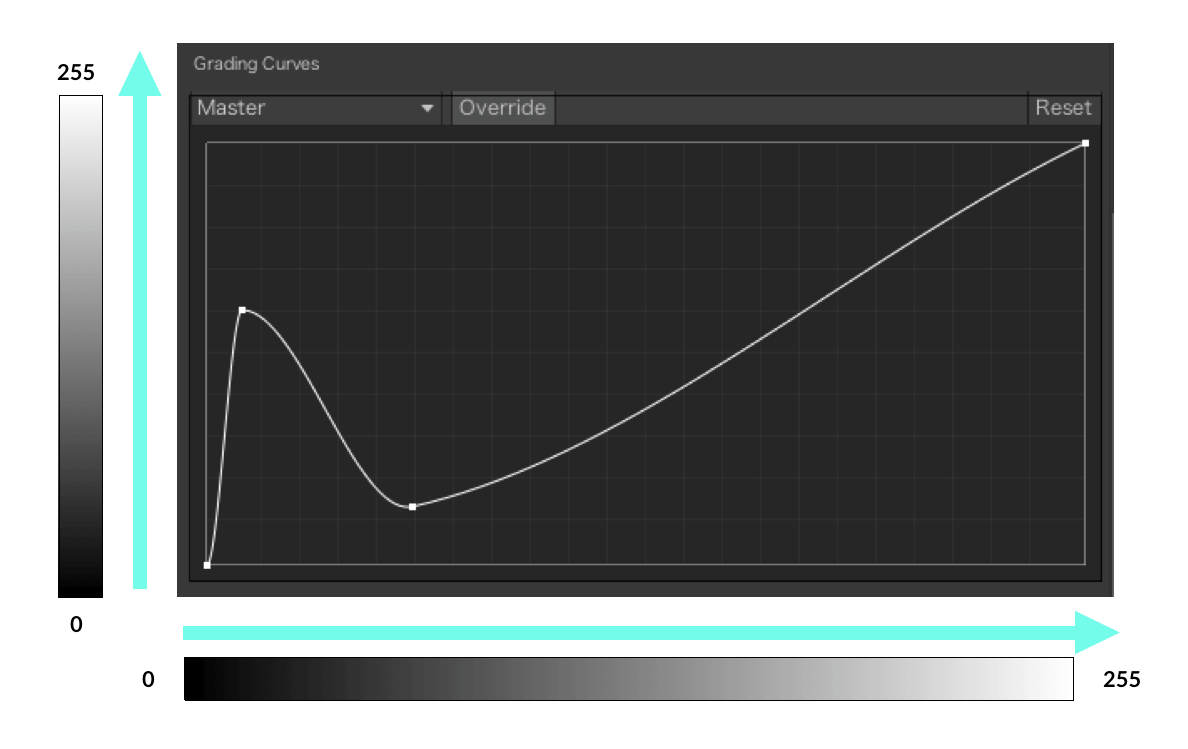
Tone Curve Tips: Fig.2
For example, with a tone curve like the one above, you would convert image data with a luminance of “20” to a luminance of around “135” and leave the luminance of “200” unchanged.
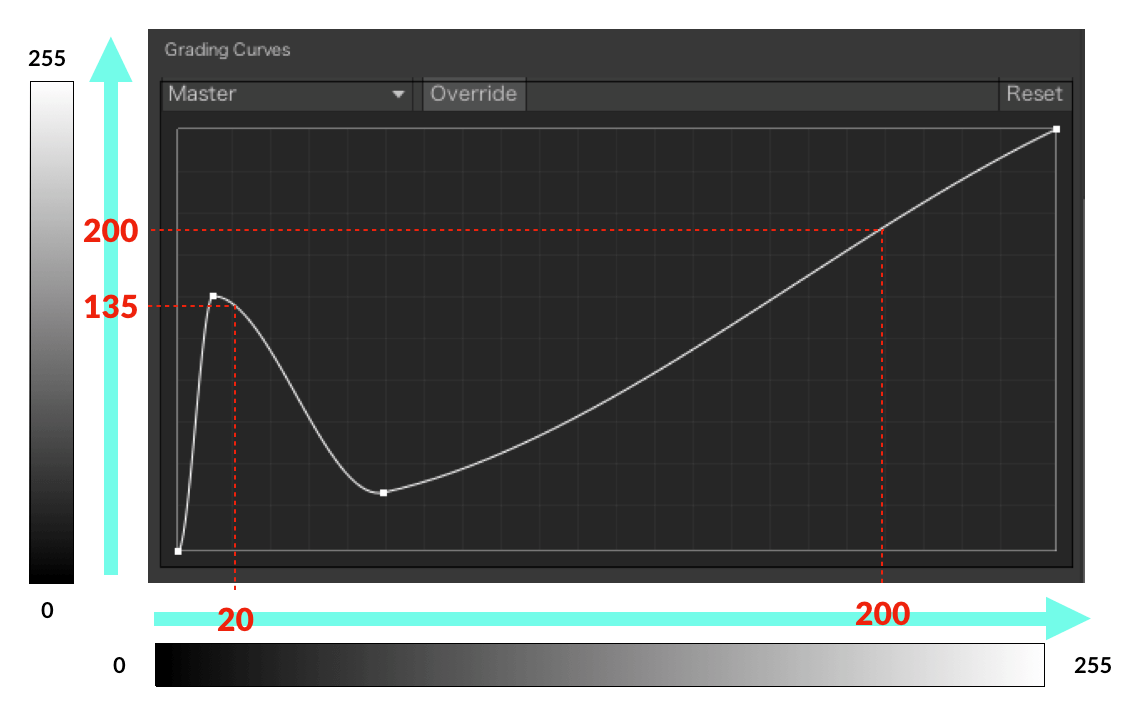
The Input Value Change of a Tone Curve (Output Value)
These operations are performed on each pixel to adjust the image. Since solarization is a phenomenon where a portion of the image is inverted, the curve must be partially tweaked. A downward curve, like the one shown above, means that the input values for that part of the image will have the exact opposite output values.
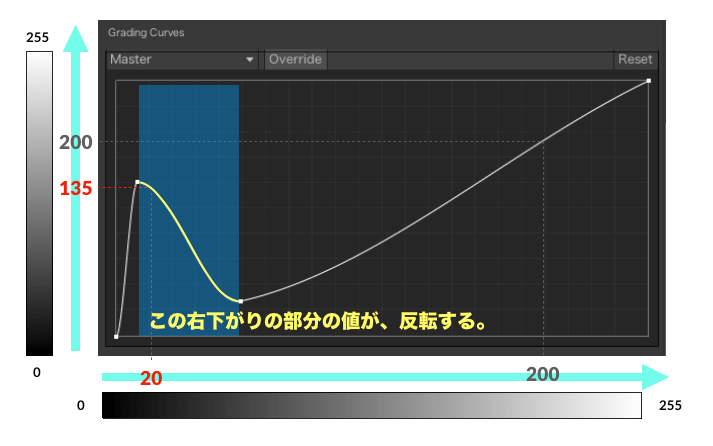
Features of a Solarization Tone Curve
About the Sample Image
In the sample image above, the tone curve is adjusted like it is above and a color filter is applied. In addition, it is possible to combine various effects along with inverting a part of the image. For example, the color filter shown in the GIF image below can be found in Unity > Color Grading > Tone > Color Filter.
Overlaying a Color Filter on the Solarization Effect
Conclusion
In Part 1 and 2, we looked at stylizing images using solarization. How has this technique been used in the past?
Solarization—originally a technique used in film photography—was eventually used in movie-editing techniques. A typical example is 2001: A Space Odyssey by Stanley Kubrick. The solarization technique is used in the scene where a being transcends beyond humanity, and in another scene where a primitive planet is born.
In this way, flat and static solarization is used in photography and video expression, and I believe it is also used in games to manipulate time and space. In other words, I think solarization can be used as an expressive effect to switch between time and space. However, if that were its only function, it could be substituted by other filters, so I think the partial reversal is what distinguishes solarization from other expressions.
In addition, it should not be overlooked that solarization is a semi-accidental and random-reversal phenomenon that exists as a physical phenomenon; yet, it is a deliberate and calculated choice in digital expression. I am sure there are many more interpretations and utilizations of this technique. In the future, what kind of effects do you think solarization can create in the imaginative environment of XR?
For questions about STYLY, bug reports, or improvement requests, please contact the STYLY FORUM: https://en.forum.styly.cc/support/discussions
Certified by:Shota Yoshizawa
Edited by:SASAnishiki
Translated by:cpnnn