Currently (as of January 11, 2023) we are investigating a problem with the operation instructions in this article.
As an alternative to the tutorial, we have a manual where you can learn the basic operations of STYLY Studio.
- Tutorial to learn how to create and publish scenes
- Understanding Assets Which You Can Import into a Scene
STYLY Studio has an onboarding function.
By completing this tutorial, you will be able to learn the basic operations of STYLY.

How to start the tutorial scene
When STYLY Studio starts, click “CREATE” in the upper right.

Select “NEW SCENE”
Select the tutorial scene on the scene template selection screen and enter the scene name to start the tutorial scene.

Select ”チュートリアル”
Complete 5 steps in the tutorial scene
There are 5 steps in total in the tutorial scene, and you can learn the basic operation of STYLY by clearing the steps one by one.
If you make a mistake and want to cancel the operation, you can cancel the previous operation by pressing Ctrl + Z (⌘ + Z).
Also, if you do not know where you are while operating, you can reset to the viewpoint when the scene is loaded by clicking the reset position button on the right edge of the screen.

Navigation
In STYLY, you use the mouse or trackpad to operate.
| Mouse | Trackpad | |
| Zoom in/out | Mouse wheel | Pinch |
| Orbit | Left click + mouse move | Left click + swipe |
| Rotate | Right click + mouse move | Right click + swipe |
| Move | Wheel button center click + mouse move |
Undo:Ctrl + Z (⌘ + Z)
Reset Position:Click the reset position button on the right edge of the screen
Help:Click the help button in the hierarchy window (displays how to operate shortcut keys, etc.)
Once you get used to the operation, follow the dotted line that says “follow this line”.
STEP01 -Move object-

toggle mode is move
Let’s move the crocodile placed in the scene to the white circle.
To move an object with STYLY, follow the steps below.
- Select the object you want to move in the Hierarchy window. (Or select an object directly in the scene)
- Make sure the edit mode of the object is “move”.
(If you are in a different mode, press the toggle button on the right side of the screen or press the W key to change the mode.) - Click the tip of the arrow to move the object.

Moving an object
If you move the crocodile to the white circle, it will be cleared and fireworks will be launched.
Let’s move on to the next step.
STEP02 -Rotate object-

Click on the giraffe eyeball symbol
If you proceed to STEP02, no animals are placed on the white circle.
Try clicking on the “giraffe” eyeball symbol in the hierarchy window.
A giraffe appears in the scene. In this way, STYLY allows you to show / hide objects by clicking the eyeball symbol in the hierarchy window.

Rotating an object
Let’s rotate the giraffe placed in the scene.
To rotate the object with STYLY, follow the steps below.
- Select the object you want to move in the Hierarchy window. (Or select an object directly in the scene)
- Make sure the edit mode of the object is “rotate”.
(If you are in a different mode, press the toggle button on the right side of the screen or press the E key to change the mode.) - Click the circle to rotate the object.
STEP03 -Enlarge / Reduce Object-

Scaling an object
As with STEP02, click the “elephant” eyeball symbol in the hierarchy window to activate the object.
Let’s change the scale of the elephants placed in the scene.
To scale an object in STYLY, follow these steps:
- Select the object you want to move in the Hierarchy window. (Or select an object directly in the scene)
- Make sure the edit mode of the object is “scale”.
(If the mode is different, press the toggle button on the right side of the screen or press the R key to change the mode.)) - Click the box to rescale the object.
STEP04 -Asset placement-

Importing default assets
In STEP04, you will learn how to add new assets to your scene.
Click the Assets button at the top of the Hierarchy window to open the Assets menu.
Then select “3D Object” and select ”Model”.
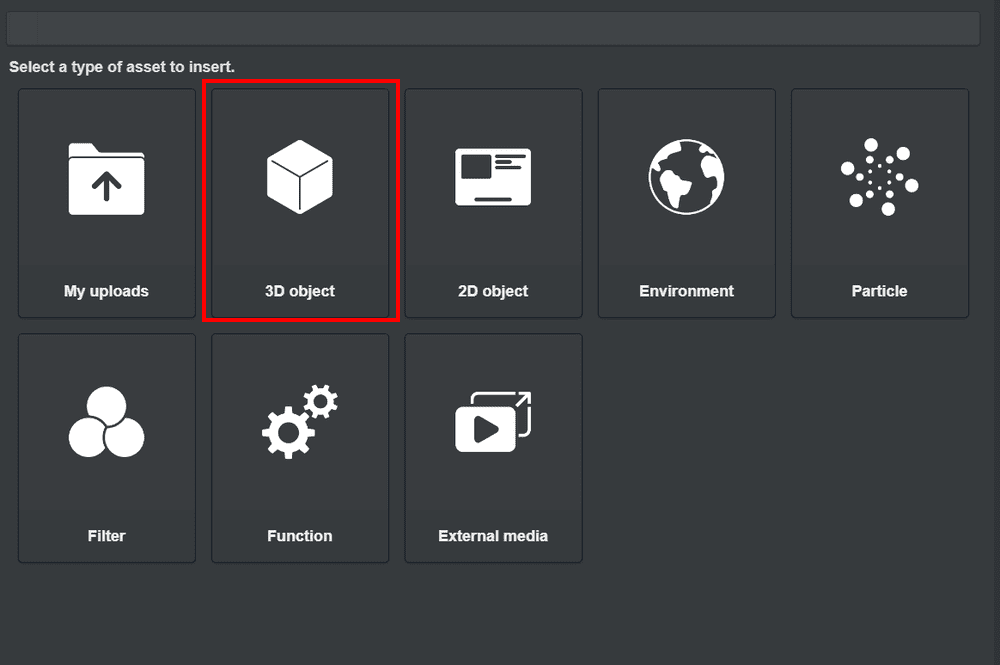
Select 3D object
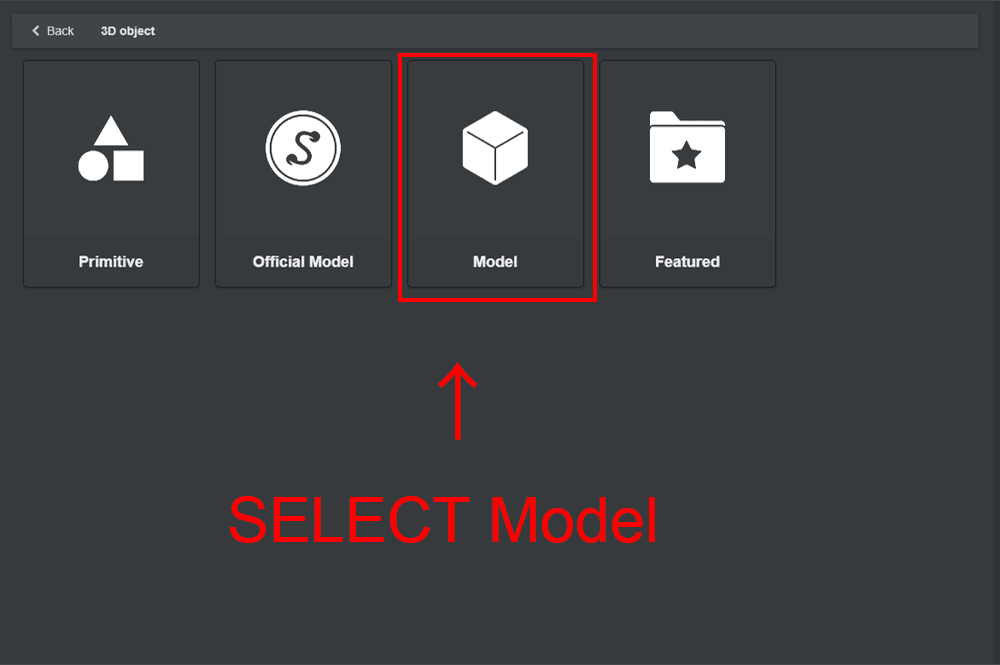
Select Model
When the 3D Model menu opens, and look for the 3D model of the lion.
If you find it, please click it. A lion is placed in the scene.
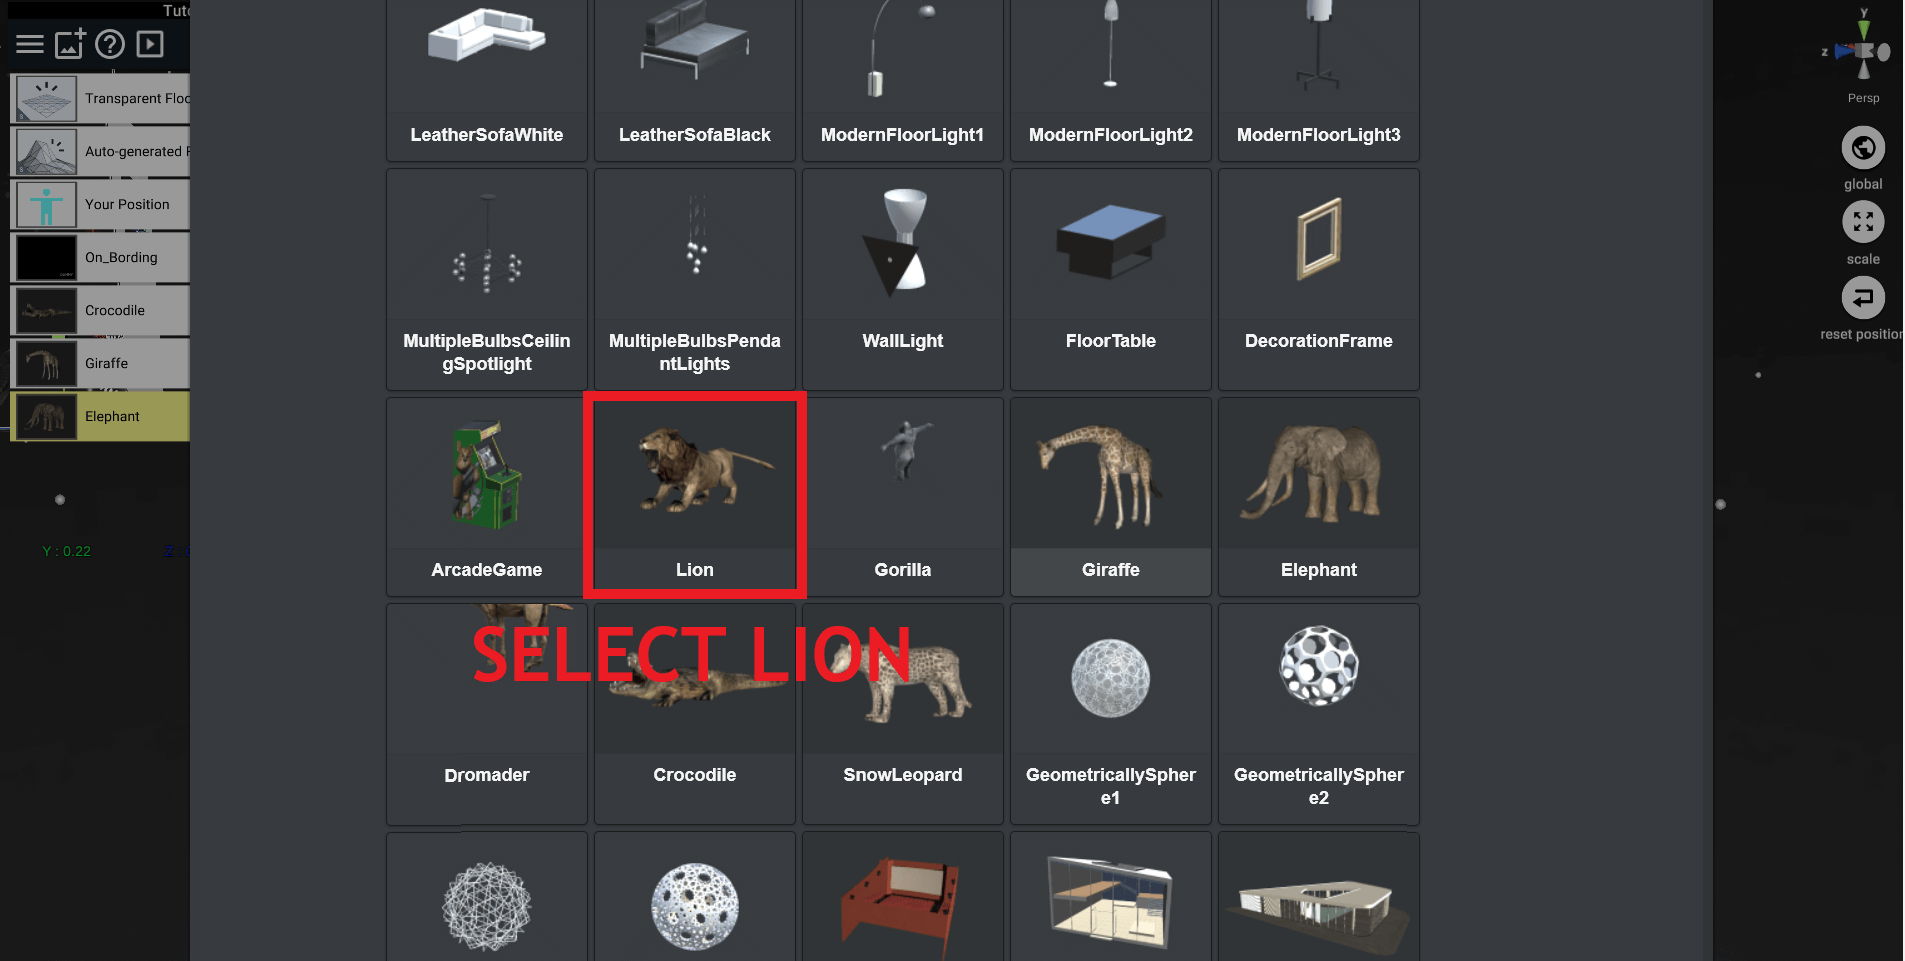
Select a lion
After that, let’s move the lion to the white circle by the same procedure as STEP01.

Move the lion to the white circle
STEP05 -Other Tips-
STEP05 introduces other tips.
When you have finished reading what is written on the board, click on the STYLY logo at the bottom of the board.
The following tips will appear.
Add various assets

Other tips -Addition of various assets-
STYLY Studio allows you to place 3D models, images, videos, etc. in your scene.
You can read more about what you can put in your STYLY scene in this article.

Camera function

Other tips -Taken with a camera-
* Currently, the camera function is no longer available.
STYLY Gallery

Other tips -STYLY Gallery-
STYLY Gallery is a gallery site where you can browse the scenes published in STYLY Studio.
VR scenes created by artists from all over the world are gathered, and there are already over 10,000 scenes.
Create a new scene

Other tips -create a new scene-
To create a new scene, click the button at the top left of the screen to open the scene menu.
Then select “Create Scene”, enter a title and press “Create” to create a new scene.
This article explains in detail how to create and publish scenes.
Congratulations !

Congratulations
After reading all the tips, the color of the sky will be reversed and the onboarding will end.
Summary
After finishing onboarding, let’s create a STYLY scene.
If you don’t know what kind of scene to make, take a look at STYLY Gallery.
In addition, STYLY Magazine has many tips for creating a VR space.
Make good use of these and try to create a STYLY scene.