In this article, I will introduce a photogrammetry software called “Metashape”, which is also compatible with Mac.
“Metashape” is a successor of “Photoscan”, and those with a license can update it for free.
There is also a trial version of “Metashape”, so I recommend Mac users to try it out.
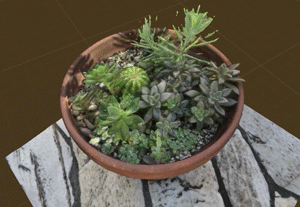
Sample 3D model created by Metashape
What is Photogrammetry?
Photogrammetry is a technology to create 3D models by analyzing photos of a object taken from various degrees.
You can create 3D models ranging from small objects such as character figures, to large objects such as buildings and cities.
Rocca Calascio – RAWscan by Spogna on Sketchfab
I wrote about the basics of photogrammetry in the article below.
I recommend reading it first if you have not yet.
What is Metashape?
Metashape is a photogrammetry software created by a company called Agisoft.
It is one of the few photogrammetry softwares that can be run on a MacOS, and even has been used by research inistitutions for surverying.
It is a successor software of Photoscan, and if you have a Photoscan license, you can update for free.
Please download or purchase from here.
There is a trial version, so you can just try it out for free first.
The different editions of Metashape
| Compatible OS | Edition | Price | Features | Download Link | |
| Agisoft Metashape |
Windows /Mac /Linux |
Trial version | Free | This version has access to the same functions as the Standard version, but you cannot save projects or export 3D models. This version is to be used for checking the functions and how accurate the photogrammetry is |
Oak Corporation |
| Standard | ¥ Around 27,000 yen | All the basic functions are included | |||
| Professional | ¥ Around 500,000 yen | Options such as analyzing aerial photographs taken by drones, and orthophoto output is included. |
※The price differs on where you buy the software from, so you should check carefully before purchasing.
How to use metashape
Next, I will talk about the steps to take in order to create a 3D model using Metashape.
Creating a Project and photo alignment
First, import the photo images to Metashape, and create a new Project.
Once you open metashape, you will find “Chunk 1” in “Workshape”. Drag and drop the photo images in here.

Importing the photo images
After you finish importing the photos, go to the menu bar, click “Workflow” > “Align Photos…”.

Select “Align Photos”
Then, a window like the one below will pop up.
Choose the appropriate settings for Accuracy. For this tutorial, I used the default “High” option.
(Accuracy is how accurate you want the photogrammetry to be, and you can choose to make it accurate but time-consuming to make, or make the model rough but quick to make. If in doubt, I recommend using the default “High” option)
After you finish editing the settings, click the “OK” button.

Choosing the Accuracy of the analyzation
After some wait, the analyzation will be complete.
A low density point group will be created, and the scanned object edges will roughly appear.
Check if the photo alignment is successful here.
In a folder named “Cameras” inside “Chunk 1”, a message like [◯◯/◯◯ aligned] should appear on the right.
The right number shows how many photos were imported, and the left number shows how many photos were successfully aligned.
In this tutorial, we were able to successfully align all 287 photo images, so it shows 287/287 aligned.
It depends on how many photos you are using, but it many not matter even if a few photos fail to align.
But when the alignment of a certain range fails continuously, problems may occur.
Like in the image below, please check the photo (The blue plane) if there is any hole from all 360 degrees.If there is a failure of alignment for a certain point, you may need to take more photos, or connect the photos manually.(I am going to explain this procedure in a different article)

Checking the photo alignment
Checking the low density point group, and setting the Region to a appropriate size
Next, let’s set up the Region. A Region is the area set for the scan.
The Region is set largely at default, but you don’t need to scan places you don’t need, so it is better to set an appropriate Region.
To change the size of the Region, use the Region edit tool.
It is located in the tool bar, and by clicking the upside down triangle icon on the right, you can choose from “Move Region”, “Resize Region”, and “Rotate Region”.

Setting an appropriate Region size
Creating a high density point group
When you’re finished with the Region box settings, the next step is creating a high density point group.
Go to the menu bar, select “Workflow” > “Build Dense Cloud…”.
Select the Quality settings and change it to appropriate settings. For this tutorial, I chose “Medium”.
(If you select “High” or higher, it takes a very long time for the creation, so think about the quality you want for the model when you choose the options here)
Click the “OK” button, and the analyzation will begin.
This step is the most time-consuming step.
If there are many photo images, it sometimes takes more than an hour, so please calmly wait.

Creating a high density point group
After the analyzation is complete, you can see that the scanned object shape is much easier to see.
The parts that are still blurry in this step will probably not improve much.

High density point group(Dence Cloud)
Creating a Mesh
Next, let’s create a mesh from the high density point group.
Go to the menu bar, select “Workflow” > “Build Mesh…”.
Select the appropriate settings for “Face Count”(number of polygons).
If you choose “Custom”, a mesh with the number of polygons you set will be created.
If there are too many polygons, the data will become large too, and if you are going to use the model in VR, the polygon number should be at least less than a few ten thousands.
If you are not going to use the model for VR, there is no limit for the face count. Please select a face count depending on the quality you want for the object.
For this tutorial, I chose “Medium”.(A 3D model with around 24,000 polygons will be created).
All you need to do now is click the “OK” button.

Creating a mesh
Creating a texture
Now, all we have left is creating the texture.
Go to the menu bar, select “Workflow” > “Build Texture…”.
Edit the “Texture size/count” settings.
If you do not need a specific size, I recommend you set it for “4096 x 1”.
(If you are going to look at the texture from VR, this is a good enough quality)
Click “OK” when you’re done.

Creating a texture
Editing the position balance of the 3D object
The completed 3D model may be out of position from the center grid point (the X point in the center). If that is the case, we need to slightly move the object back to position.
(If there is no grid showing, go to the menu bar, select “Model” > “Show/Hide items”, and click “Show Grid”).

A sample 3D model that is out of place
To edit the position of a 3D model, we use the object edit tool.
It is located in the toolbar, and by clicking the upside down triangle icon on the right, you can choose from “Move Object”, “Scale Object”, and “Rotate Object”.

Moving the 3D model to an appropriate position
As in the image below, if you successfully set the grid center to the 3D model center point, let’s export the 3D model.

A 3D model that is in place
Exporting the 3D model
Let’s export the 3D model we created.
Go to the menubar, click “File” > “Export” > “Export Model…”.

Exporting the model
The setting window will popup, so choose the file format, “Autodesk FBX(*.fbx)” or “Wavefront OBJ(*.obj)”, enter the file name, and click “Save”.

Selecting the format for the 3D model
Export settings window will pop up next.
”Cameras” option is ON by default, so please unselect it and make the option OFF.
Once you’re finished, click the “OK” button and export the 3D model.

Exporting a 3D model
【Advanced】Using the batch function to automate each process
You can record each step as a job using the “Batch Process” function of Metashape, and automate the process.
▼For details of the batch process▼
Uploading to STYLY
3D models created by photogrammetry will look better when you apply an Unlit Shader to the object using Unity.
For details applying the Unlit Shader, please refer to this article.
Please refer to the following article for the procedures to upload from Unity to STYLY.
How was my article?
Metashape is a brilliant photogrammetry software that is compatible with MacOS.
I recommend this software especially for Mac users that had to give up photogrammetry because there were no compatible softwares. I hope you all try out Metashape!