
- 1 “Ultra Multiverse” Event Overview
- 2 Downloading the STYLY App
- 3 What You Can Experience
- 4 Please Read First
- 5 How to Play the Missions
- 6 How to Enjoy the AR Photo Spots
- 7 Free “Pigmon” AR Photos (Available Anywhere in Japan)
- 8 Precautions During the Experience
- 9 How to Use the AR Notebook (Ultra Mission Gallery)
- 10 Contact
“Ultra Multiverse” Event Overview
Experience Period: Friday, June 5, 2026 – Monday, November 30, 2026
Experience Location: Around Yokohama Red Brick Warehouse (AR photo spots cover a wider area including Minatomirai and Chinatown)
Reception: Yokohama Red Brick Warehouse Building 2, 1F (next to the Information counter)
1-1-1 Shinko, Naka-ku, Yokohama, Kanagawa 231-0001
*”Pigmon,” which can be photographed anywhere, is available nationwide.
Experience Method: STYLY App (iOS/Android)
Ticket Price: ¥2,800 (tax included) / Some AR photo spots are free to experience
*Tickets can be purchased in advance or on the day (on-site payment is PayPay only)
Ticket Purchase Page (Special Website): https://styly.cc/ultra-multiverse/
Duration: Approximately 70 minutes (including travel)
*Event details are subject to change without notice.
*In case of stormy weather or rain cancellation, updates will be posted on the special website and official SNS.
Downloading the STYLY App
To experience the content, you need to download the STYLY app.
Please download from each app store.
AppStore
https://apps.apple.com/jp/app/id1477168256
GooglePlay
https://play.google.com/store/apps/details?id=com.psychicvrlab.stylymr
Notes
Data charges for app downloads and AR experiences are the customer’s responsibility.
Please note that some smartphone models may not support the experience.
*Recommended environment: iOS 15.0 or later
*Android devices that do not support Google ARCore cannot download the app.
A network connection is required for the experience.
Recommended Devices
| Status | iOS Requirements | Android Requirements |
| Recommended | iPhone 11 or later | High-end models released in 2021 or later |
| Compatible (with some limitations) Some missions and AR photo spots may not work |
iPhone 8 / X / XS | ARCore-compatible mid-range models Android 13 or earlier |
| Not supported | iPhone 7 or earlier / iOS 14 or earlier | Non-ARCore models / OS 7.x or earlier *Android: AQUOS Sense 8 or earlier series |
What You Can Experience
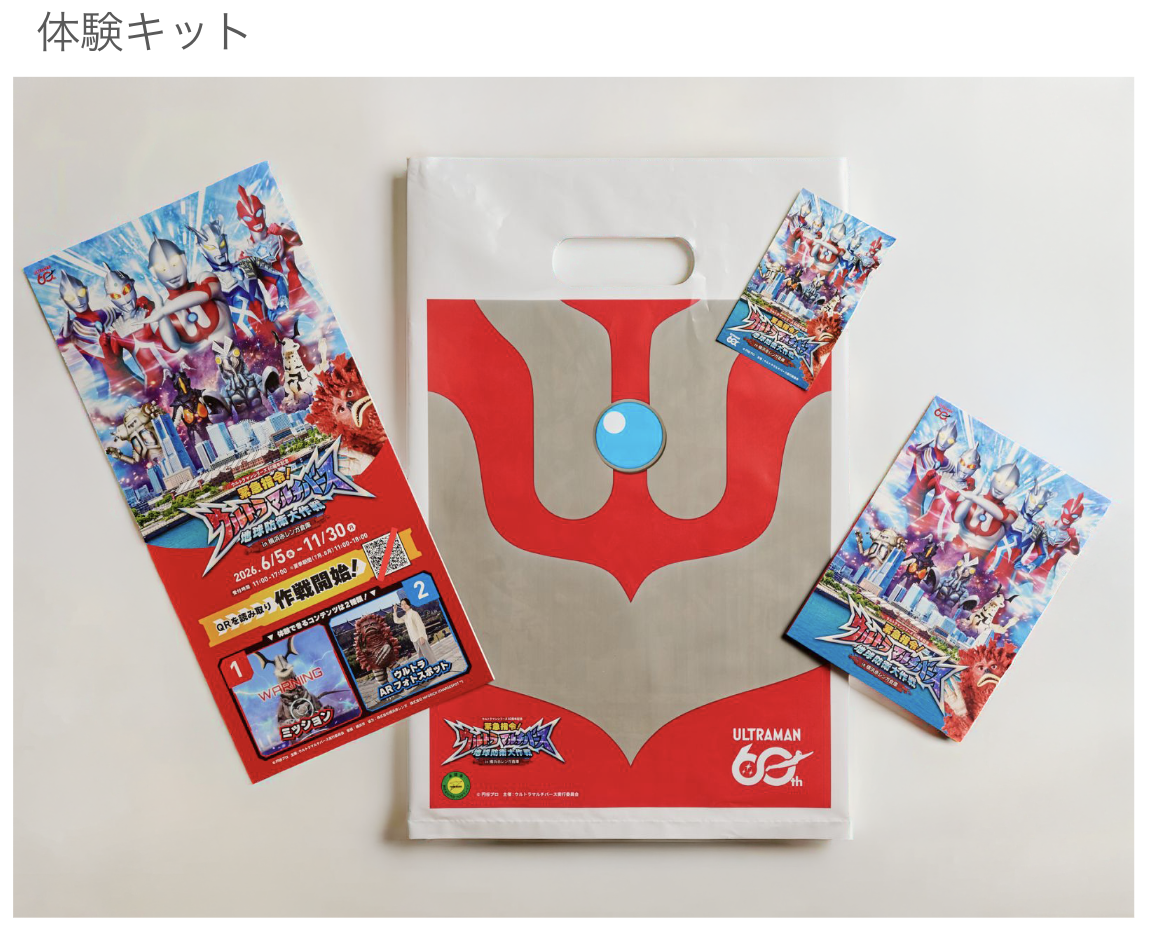
At “Ultraman Series 60th Anniversary: Emergency Command! Ultra Multiverse Earth Defense Operation in Yokohama Red Brick Warehouse,” check in at the reception at Yokohama Red Brick Warehouse and receive your experience kit, then enjoy the following two types of content.
Experience Kit: Shopper bag, MAP, notebook (with AR feature and coloring pages), stickers
“Ultra Multiverse” Missions
An original story consisting of 8 missions
Investigate and resolve anomalies caused by spacetime distortions occurring around Yokohama Red Brick Warehouse.
– The story consists of 8 missions, from Mission 1 to Mission 8
– The experience uses your smartphone’s GPS and is only available in designated areas around Yokohama Red Brick Warehouse.
“Ultra Multiverse” AR Photo Spots
Take photos with Ultraman and the kaiju monsters.
The Ultra AR photo spots also use your smartphone’s GPS and can be enjoyed around the city of Yokohama, including Yokohama Red Brick Warehouse.
“Pigmon,” which can be photographed anywhere, does not require location data and can be experienced anywhere in Japan. (It can also be used overseas)
Please Read First
The content becomes available after checking in at the reception at Yokohama Red Brick Warehouse. Please note that purchasing a ticket alone does not grant access to the experience.
For a smooth experience, please close other apps while using the STYLY app and enjoy the content in a location with a good network connection.
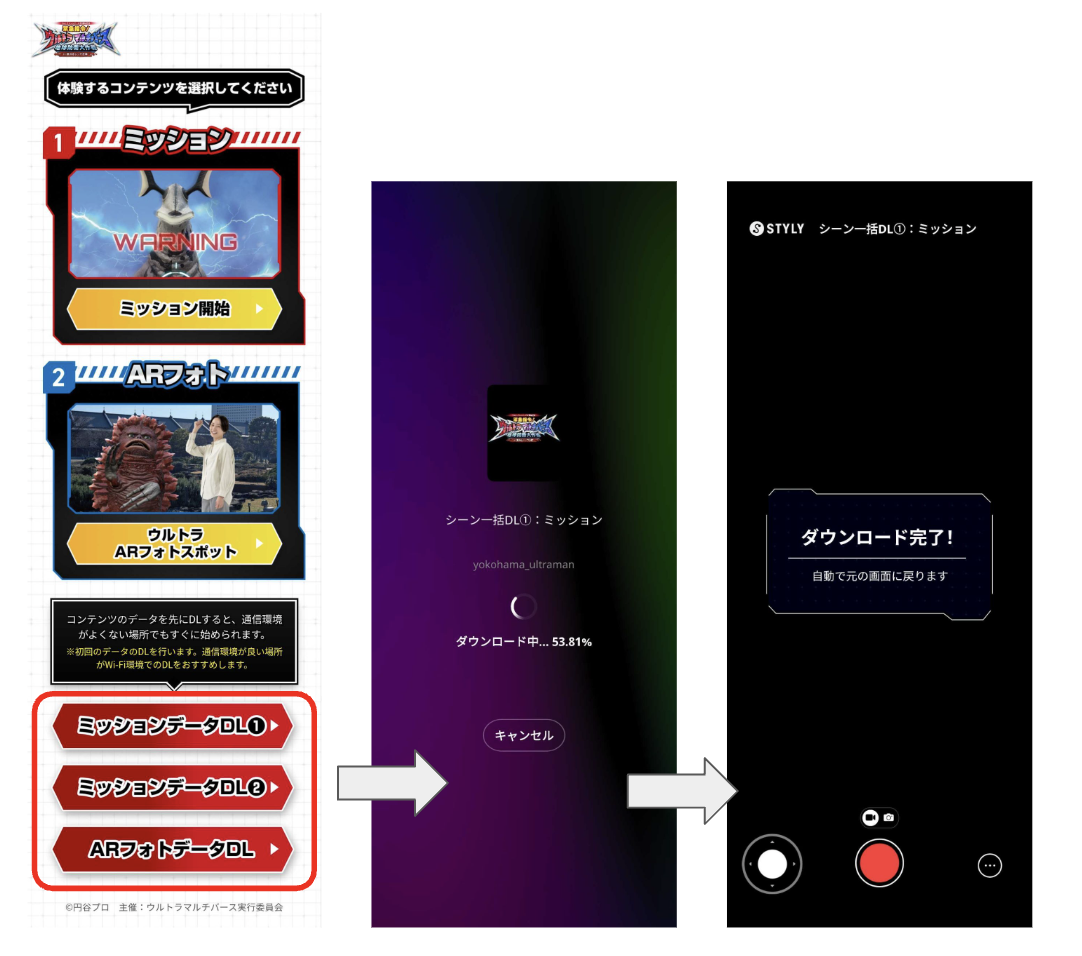
You can pre-download all content data from the content TOP page. Downloading in advance over Wi-Fi or a good network connection will make your experience smoother.
How to Download
Tap the data DL (download) button at the bottom of the content TOP page to download the data.
The screen will switch to the data download page, and once the download is complete, it will automatically return to the previous page.
Batch Scene DL (1): Missions, approx. 390MB
Batch Scene DL (2): Missions, approx. 230MB
Batch Scene DL: AR Photo Spots, approx. 380MB
For deep immersion in the story, we recommend playing with the sound on or wearing earphones or headphones.
How to Play the Missions
What Are Missions?
Missions are the main story of “Ultra Multiverse.”
Eight missions, from Mission 1 to Mission 8, are placed around Yokohama Red Brick Warehouse.
The story follows you as you investigate, one by one, the problems caused by spacetime distortions appearing around the Red Brick Warehouse.
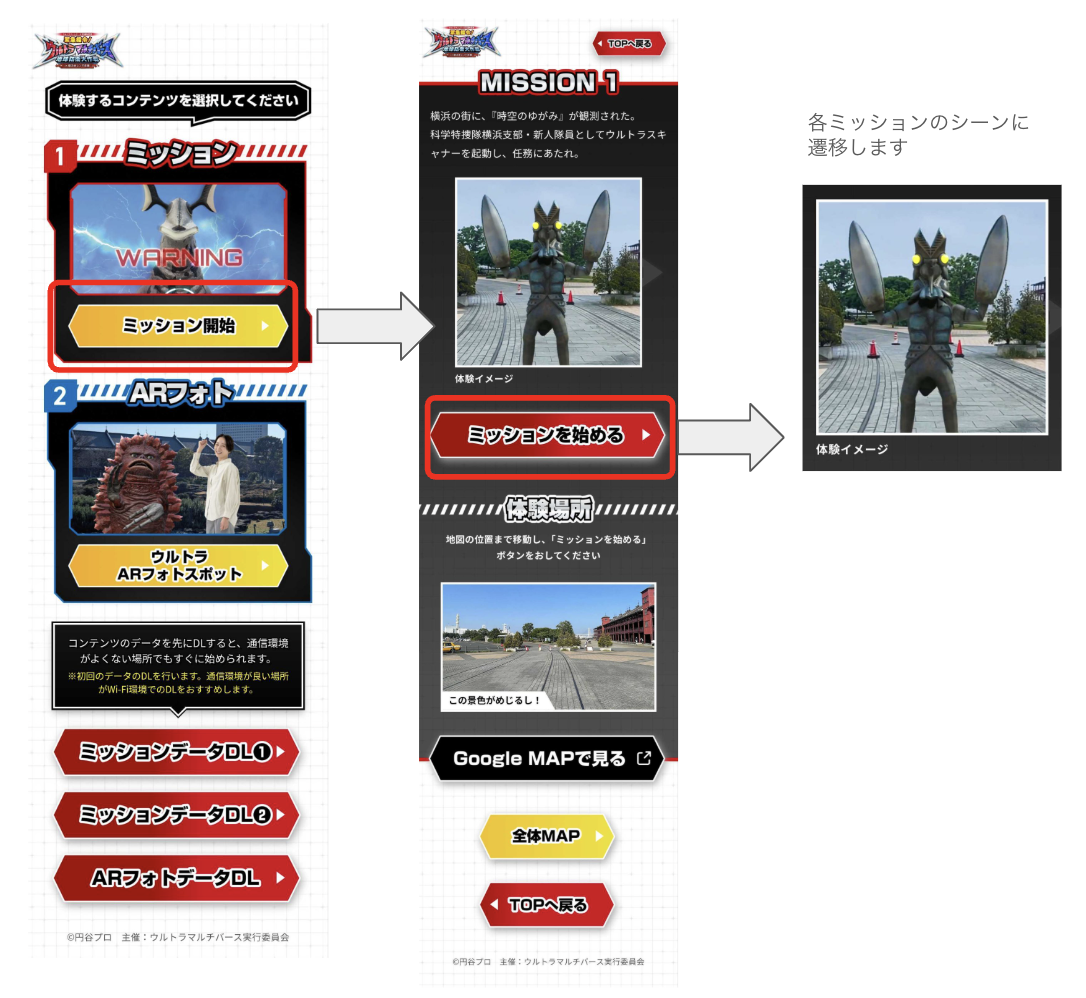
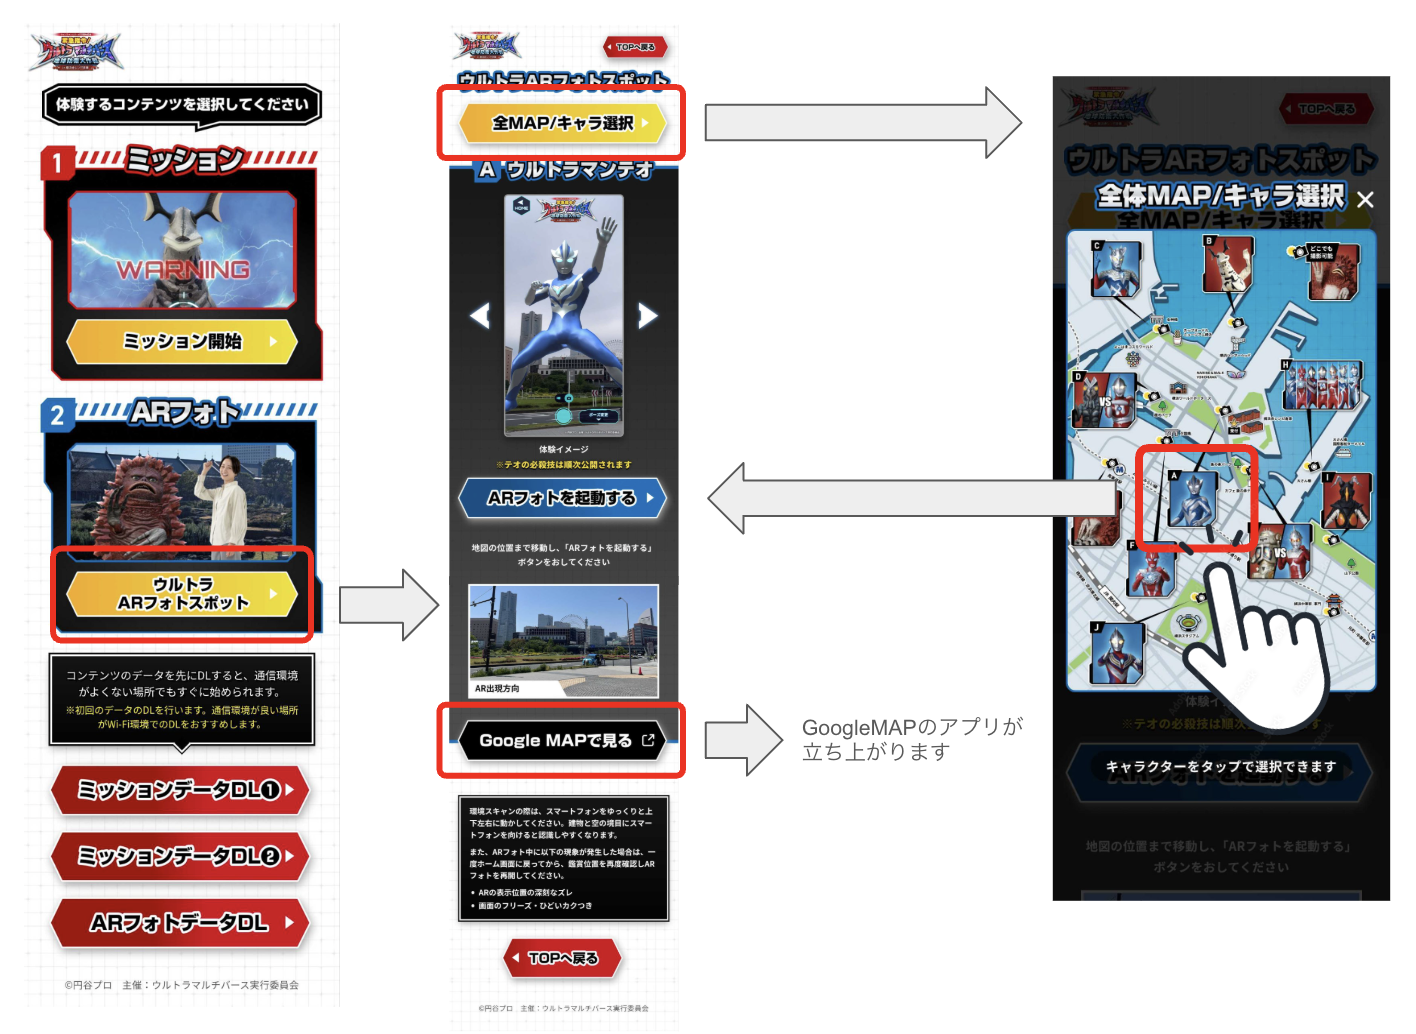
Tap the [View on Google Maps] button to see the location of each mission on Google Maps.
Tap the [Full MAP] button to display the MAP image in a pop-up.
The number of your current mission is highlighted in color.
Use this when looking for the location of your next mission.
What Is the Ultra Scanner?
A defense app that can close “spacetime distortions” and collect their enormous energy.
Collecting energy from spacetime distortions powers up the Ultra Scanner, allowing it to affect even stronger kaiju.
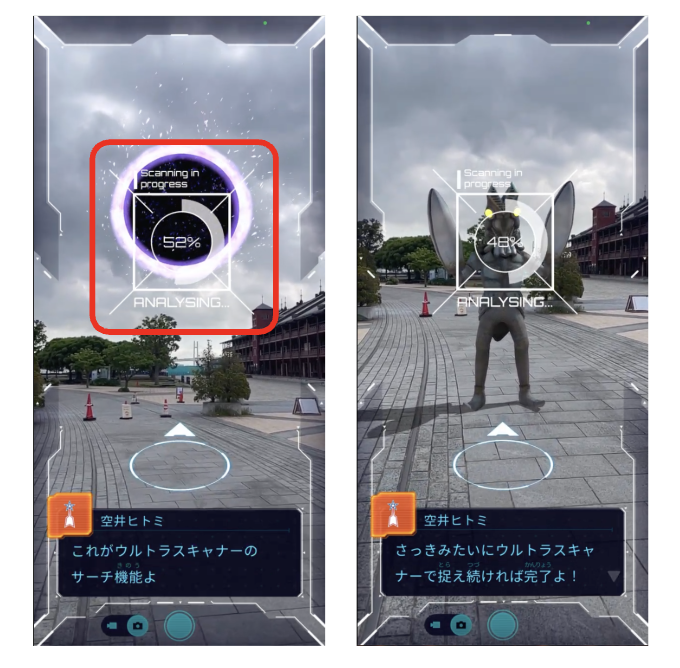
Ultra Scanner: Search Mode
While Search Mode is active, point your camera at a target to search it.
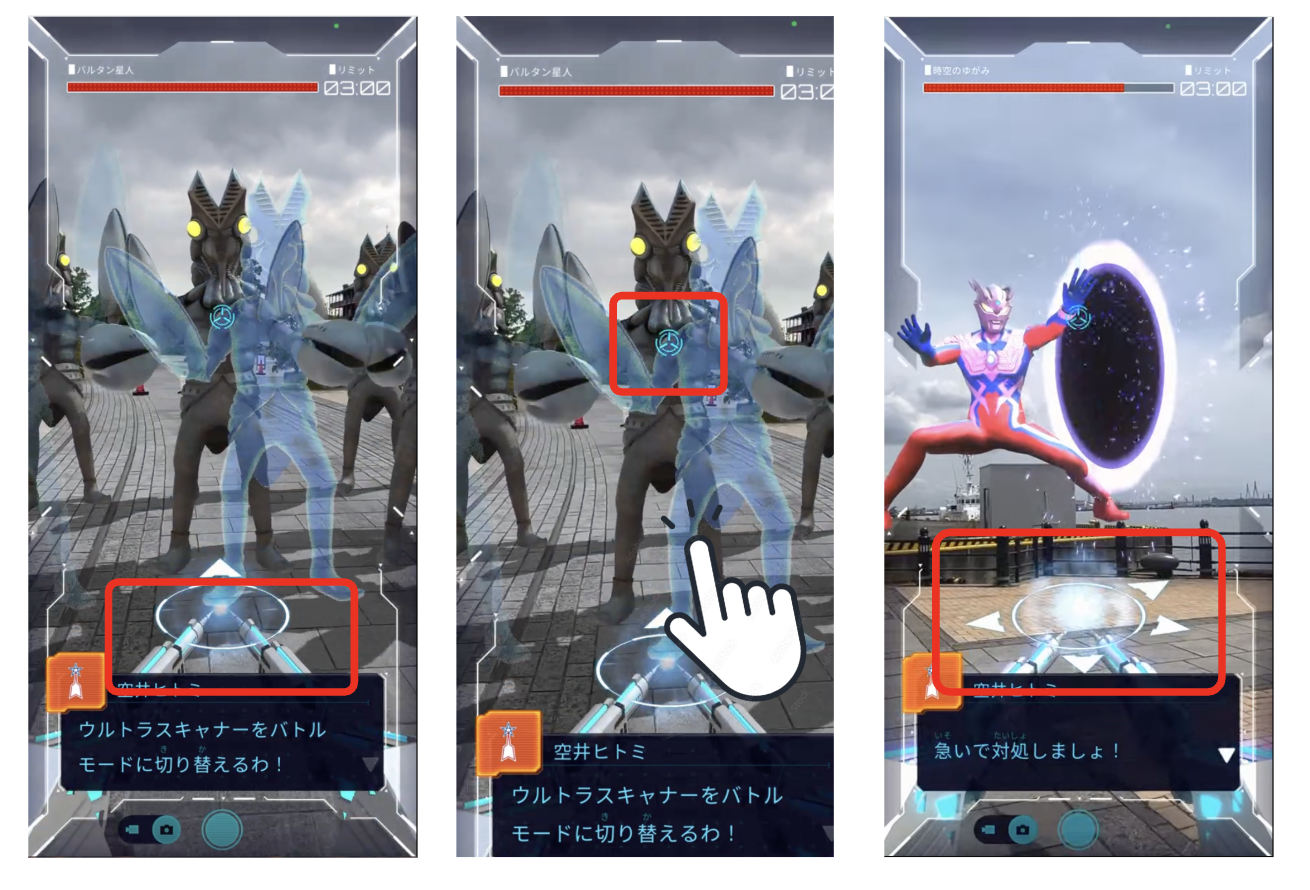
Ultra Scanner: Battle Mode
When the muzzle and reticle (aiming mark) are displayed, you are in Battle Mode.
Tap to attack.
When there are multiple targets, multiple navigation arrows will be displayed.
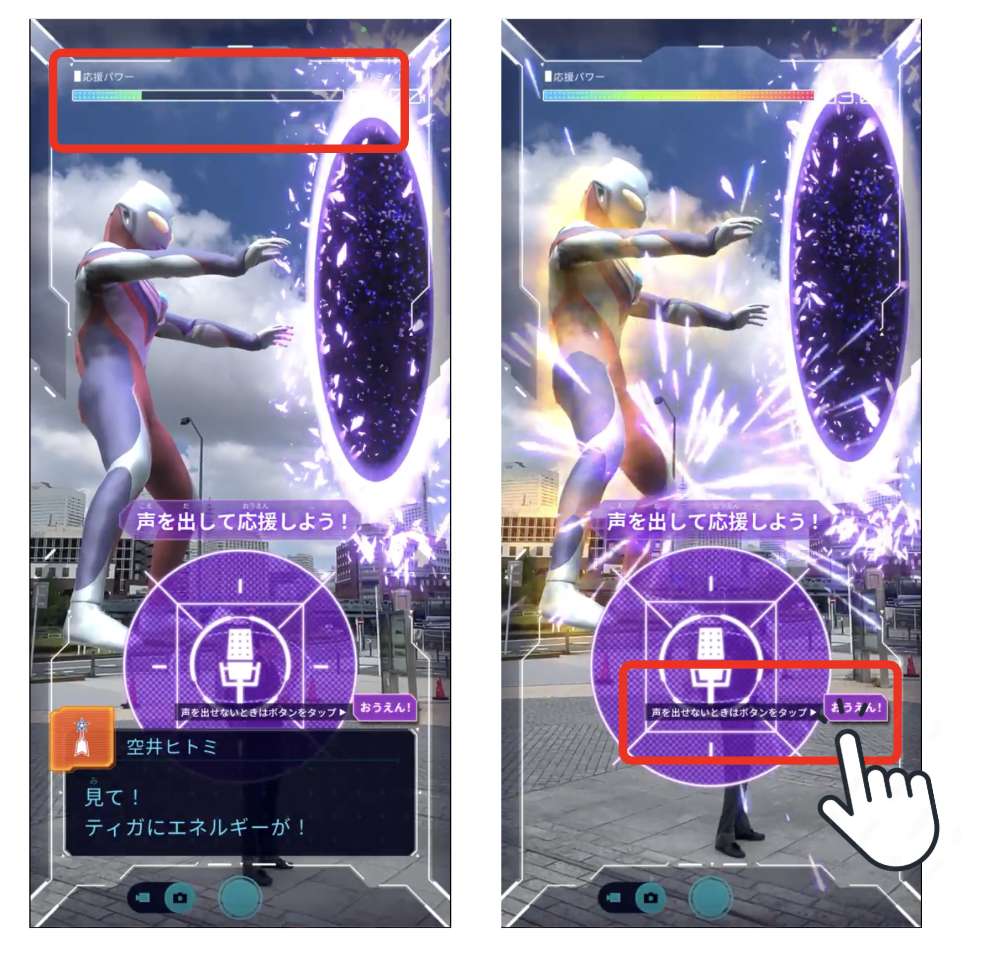
Ultra Scanner: Cheer Feature
Your voice is detected and sends cheering power to Ultraman.
*During the mission, a pop-up will appear asking for permission to use your microphone. Please allow it if you want to use the cheer feature.
Cheering “Ganbare!! (Go for it!!)” builds up power.
If you cannot speak out loud, you can send the same cheering power by tapping the button.
Keep cheering or tapping the [Cheer] button until the gauge is full.
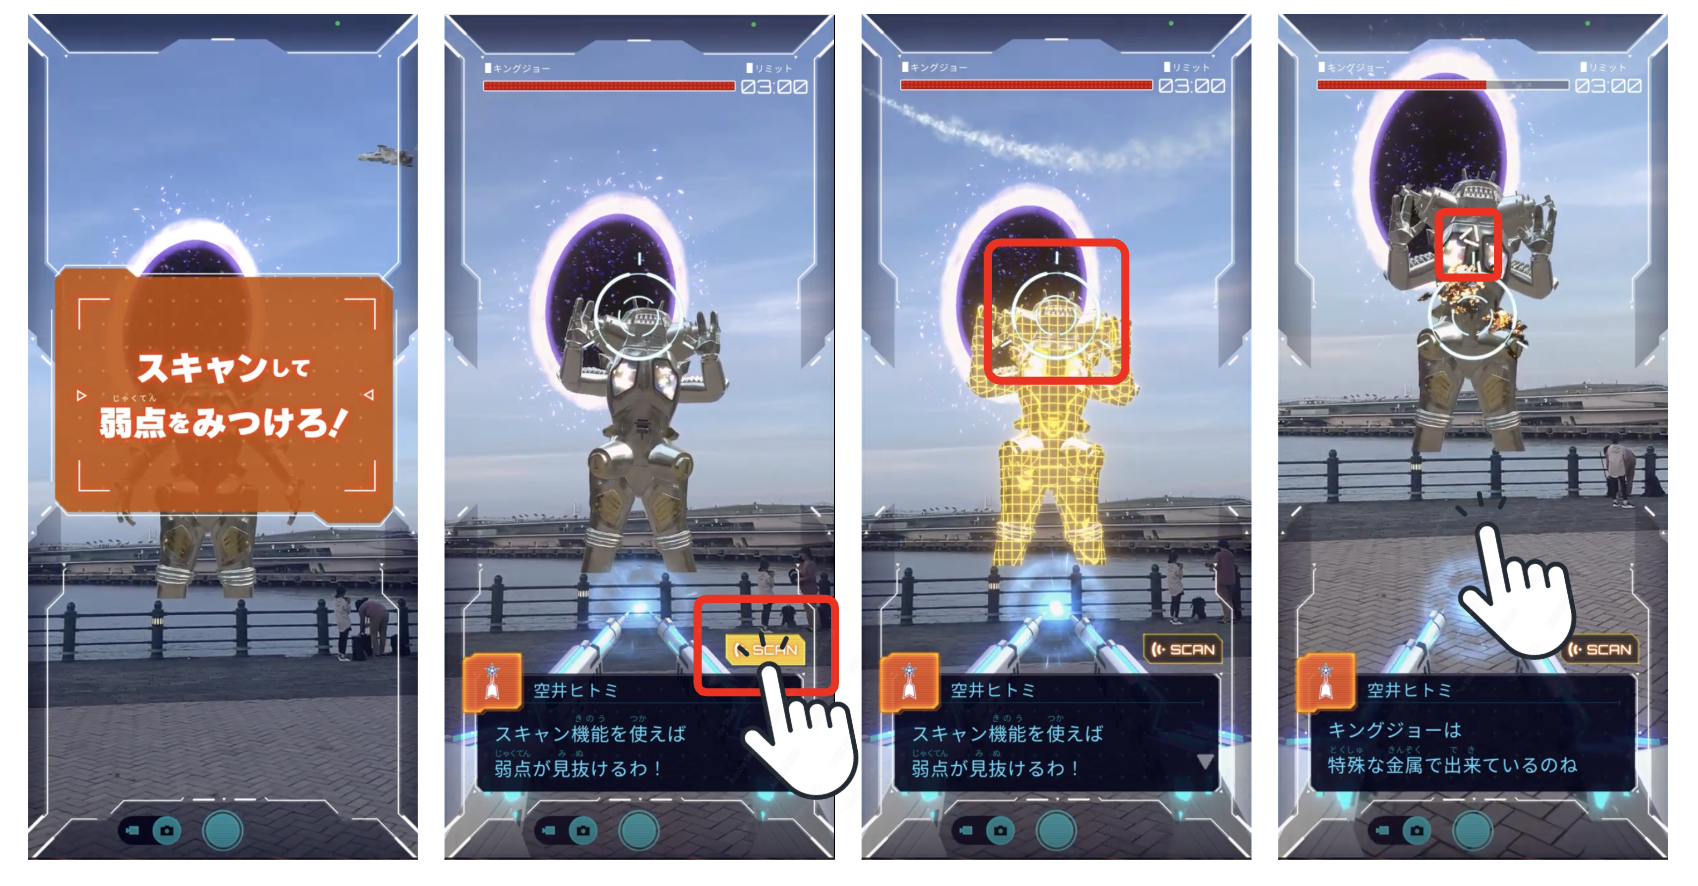
Ultra Scanner: Scan Feature
A feature that reveals the kaiju’s weak points.
Tap the [SCAN] button to reveal your opponent’s weak points. Aim for the weak point marks and attack.
The SCAN button becomes available again after a certain amount of time.
Battle Mode: Special Effects
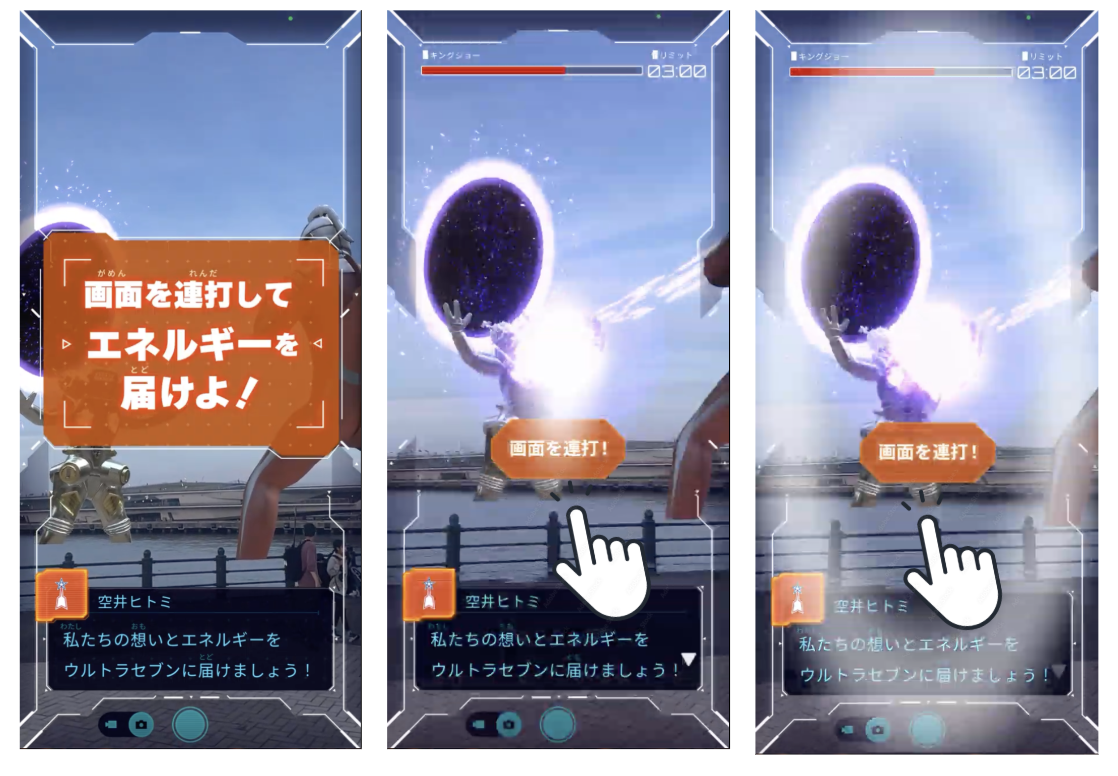
Ultra Scanner: Shield Feature
A shield feature protects you from kaiju attacks.
Available when the shield feature is activated. Tap the screen at the right moment, when the gauge reaches 100%.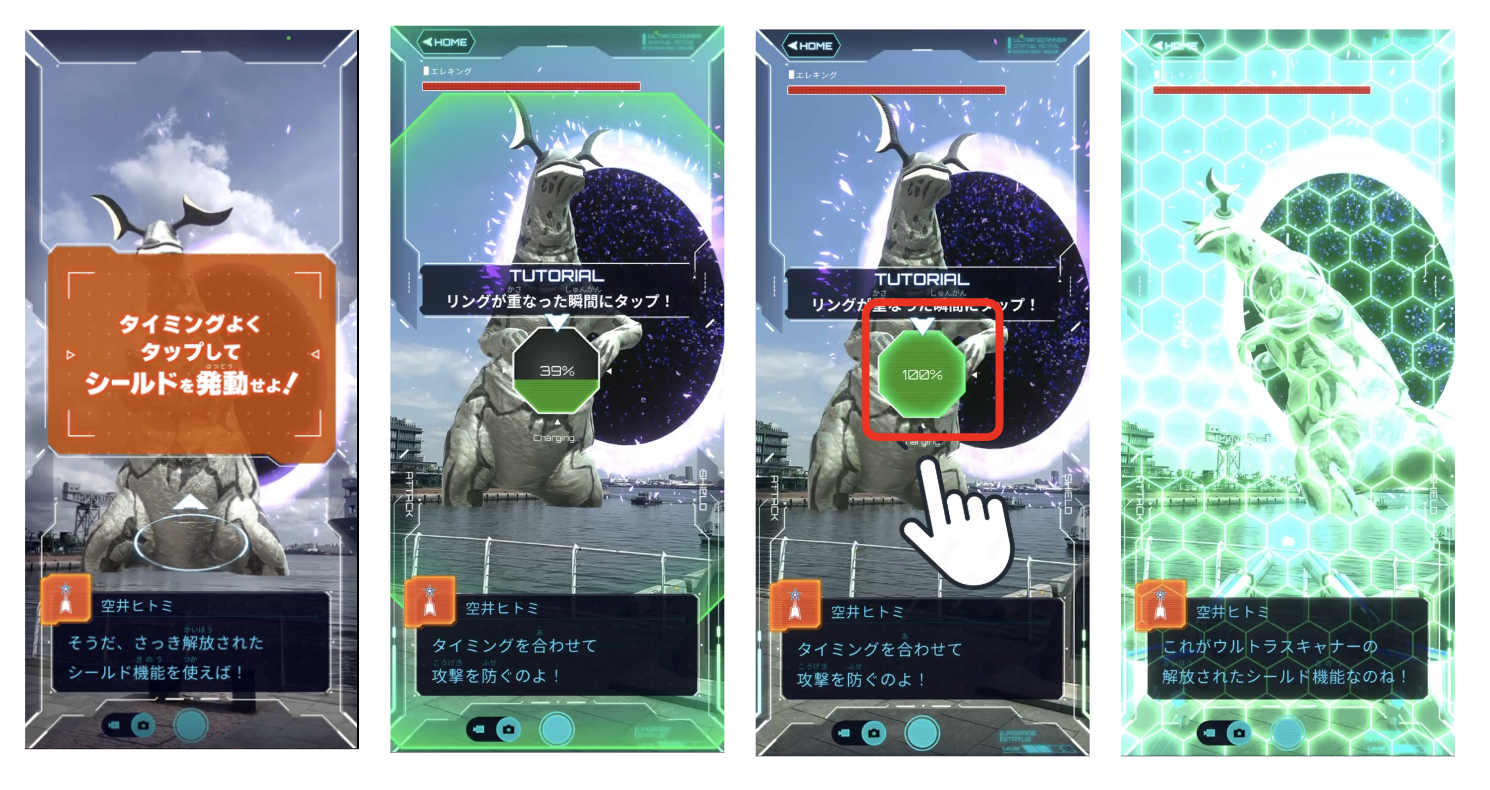
Ultra Scanner: Lock-On Feature
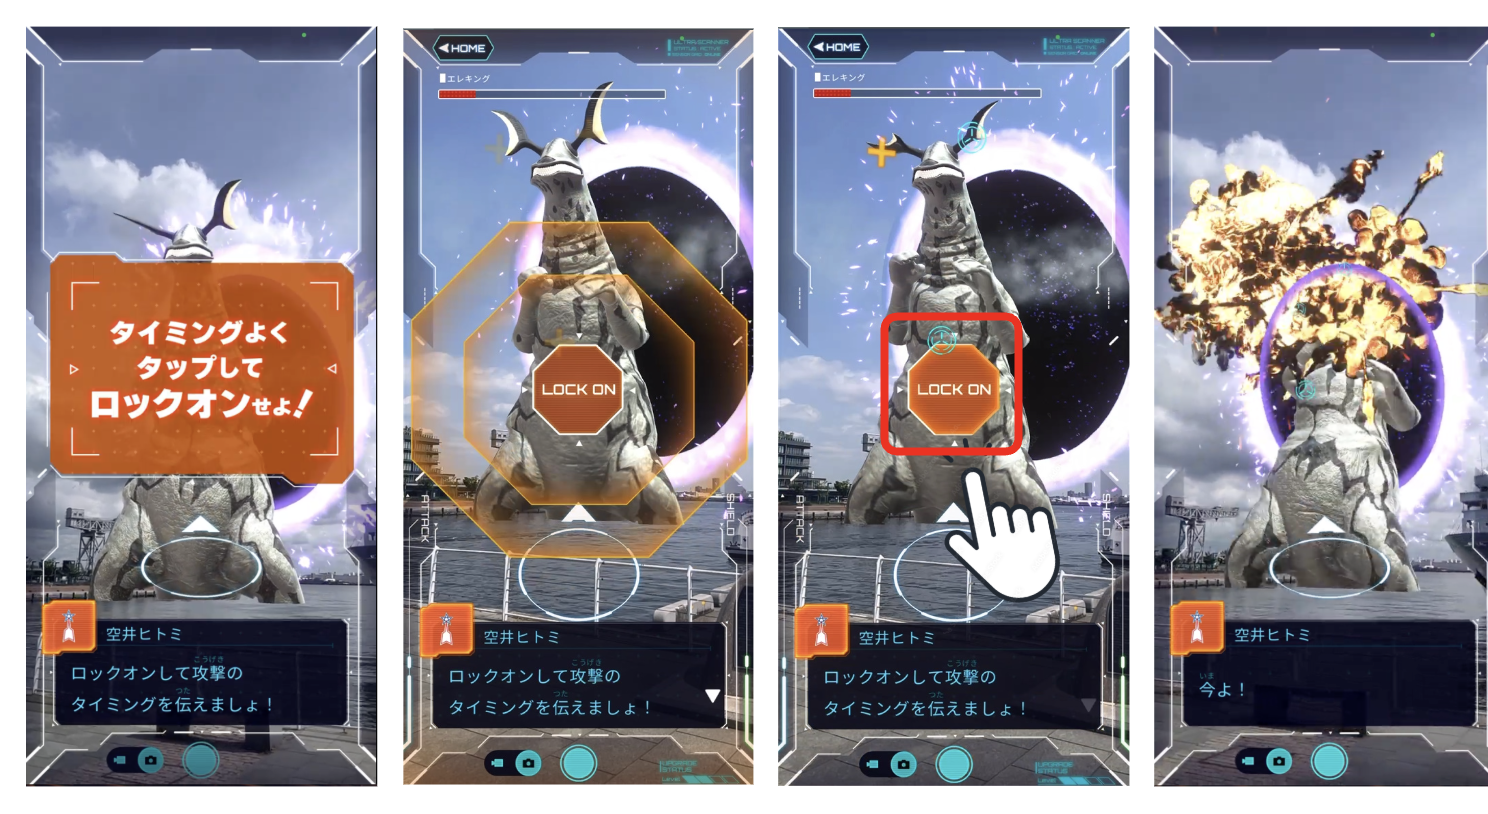
Share the missile attack position with the dedicated research aircraft.
Tap the orange lock-on button at the right moment, when the lock-on gauge reaches 100%.
How to Enjoy the AR Photo Spots
What Are AR Photo Spots?
Ultra AR photo spots let you take photos and videos using the AR feature of “Ultra Multiverse.”
*AR photo spots also use location data, so photos must be taken at designated locations. (Except “Pigmon,” which can be photographed anywhere)
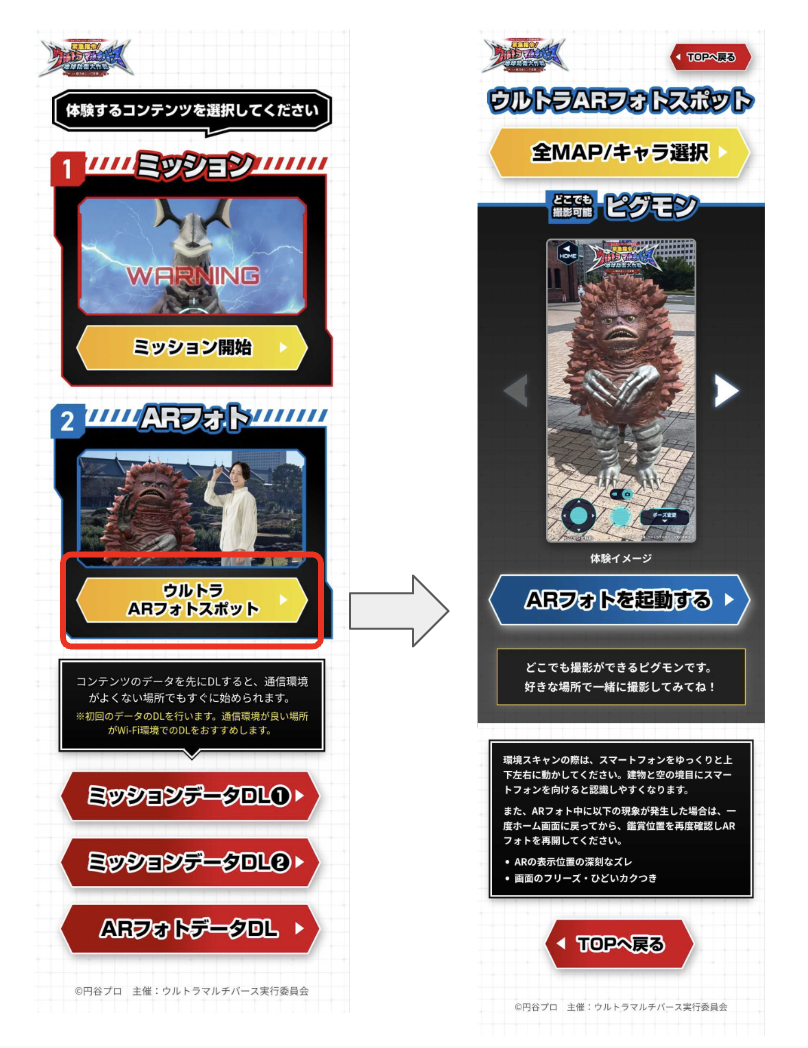
Tap the [Full MAP/Character Select] button to display the MAP image in a pop-up.
You can jump to each character’s page.
Tap the [View on Google Maps] button to see the location of each AR photo spot on Google Maps.
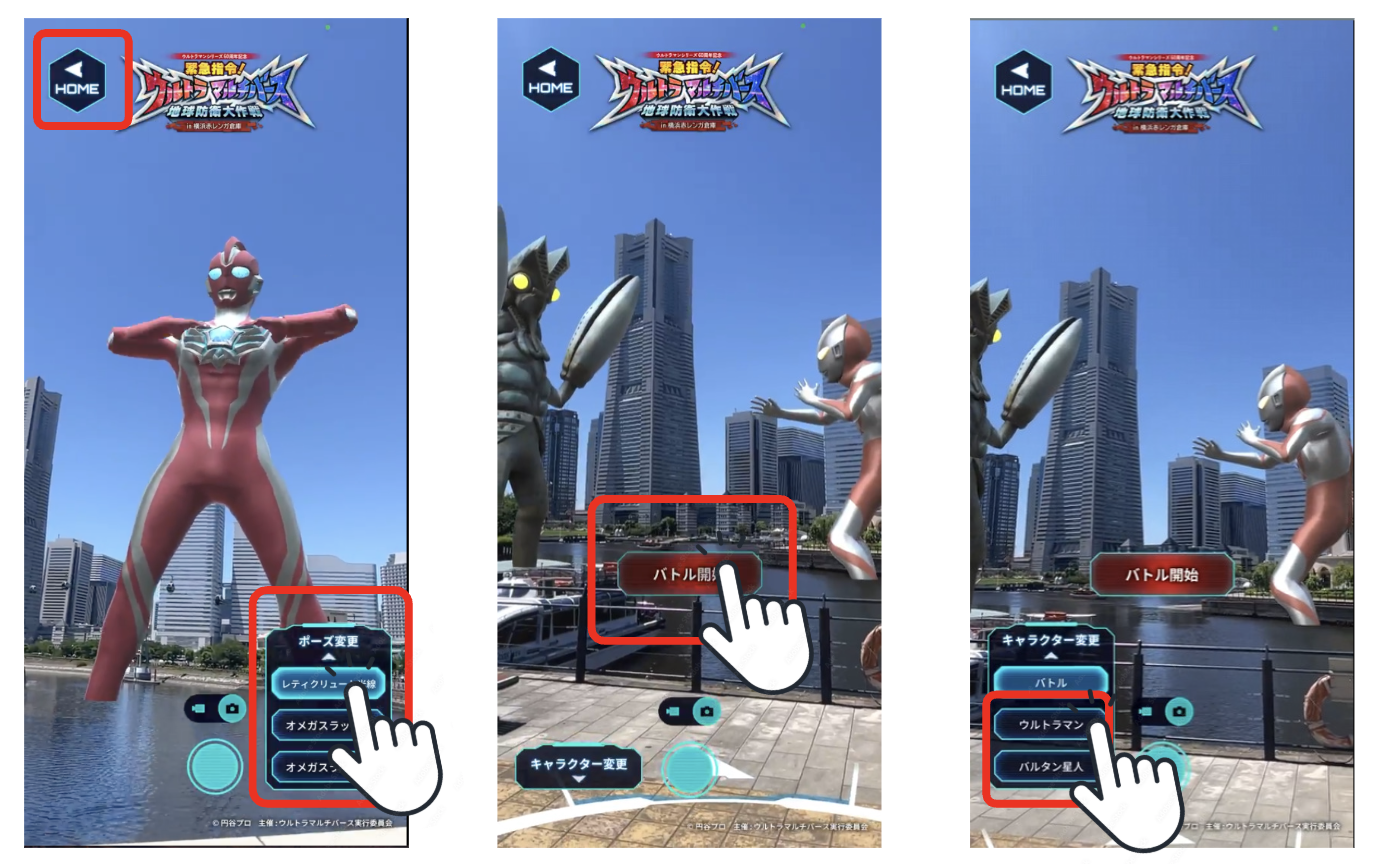
Tap the [Change Pose] button to see each character’s actions, including their signature moves.
In content featuring two characters at once, tap the [Start Battle] button to watch a battle scene.
You can also select a single character from [Change Character] to view it on its own.
To exit an AR photo spot, tap the [HOME] button.
Free “Pigmon” AR Photos (Available Anywhere in Japan)
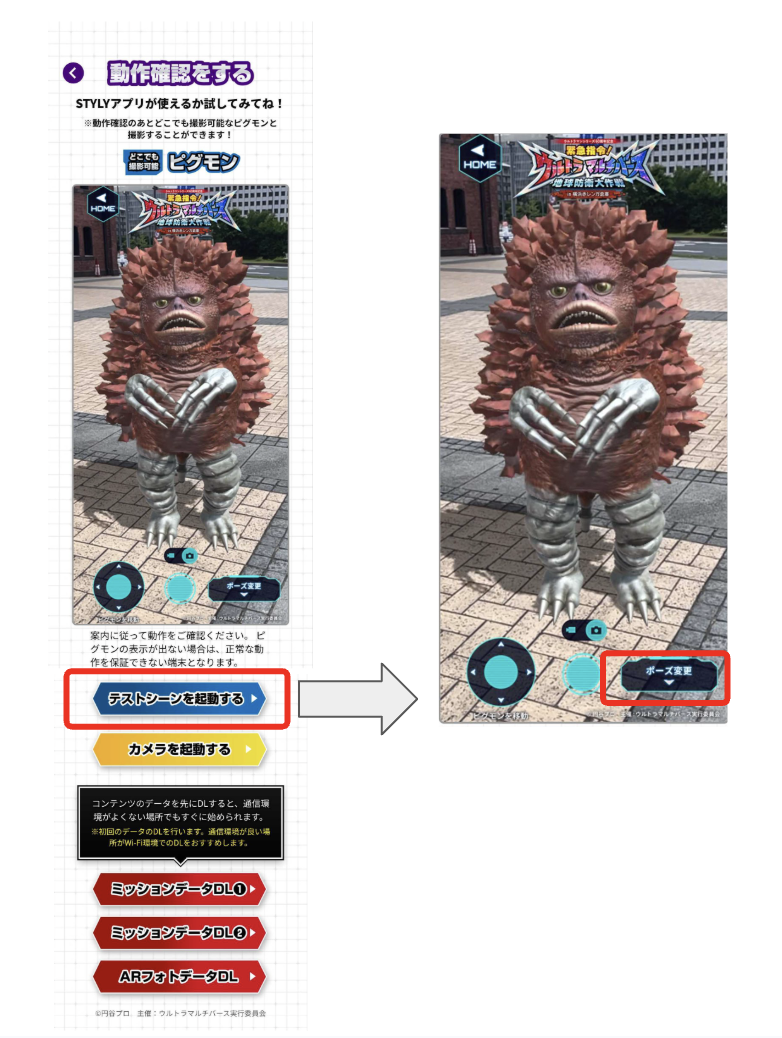
*The free version (“Pigmon,” which can be photographed anywhere) can be tried from “Experience the STYLY App” on the special website (https://styly.cc/ultra-multiverse/).
Tap the [Launch Test Scene] button.
You can change Pigmon’s movements with [Change Pose].
Precautions During the Experience
Please be careful not to obstruct other pedestrians or vehicle traffic.
Walking while looking at your phone is dangerous, so always stop in a safe location when operating the screen.
Please be mindful of steps and obstacles around you during the experience.
Photography and experiences may be restricted in some areas such as commercial facilities or private property. Please enjoy according to local rules.
How to Use the AR Notebook (Ultra Mission Gallery)
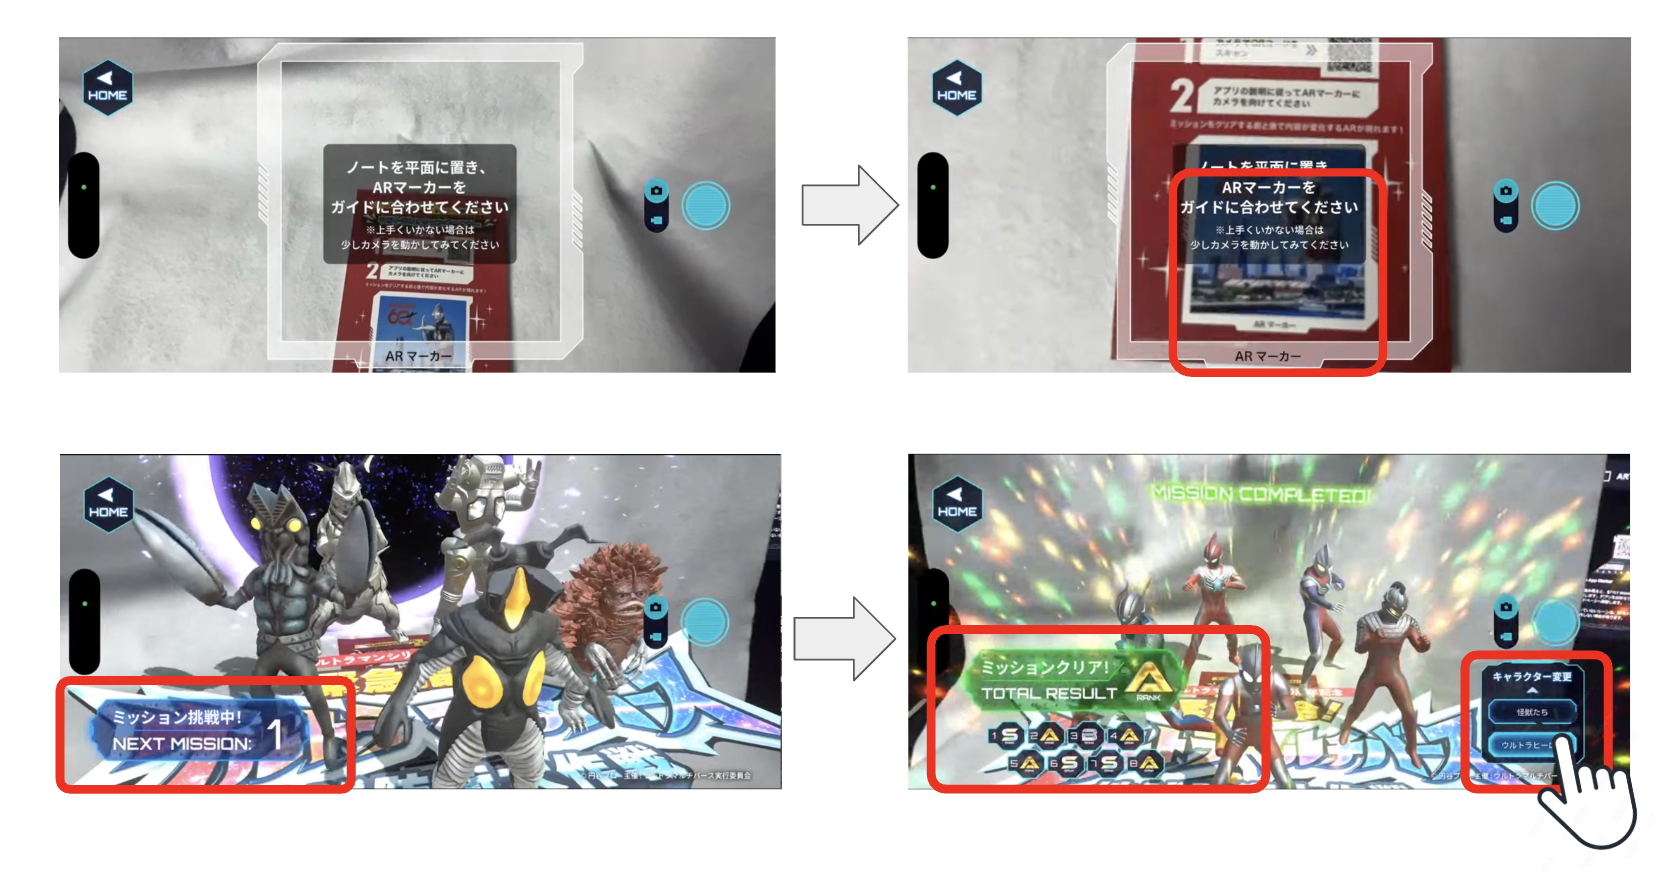
The AR notebook comes with an AR experience content called the “Ultra Mission Gallery.”
Scan the QR code on the back of the notebook to launch the camera.
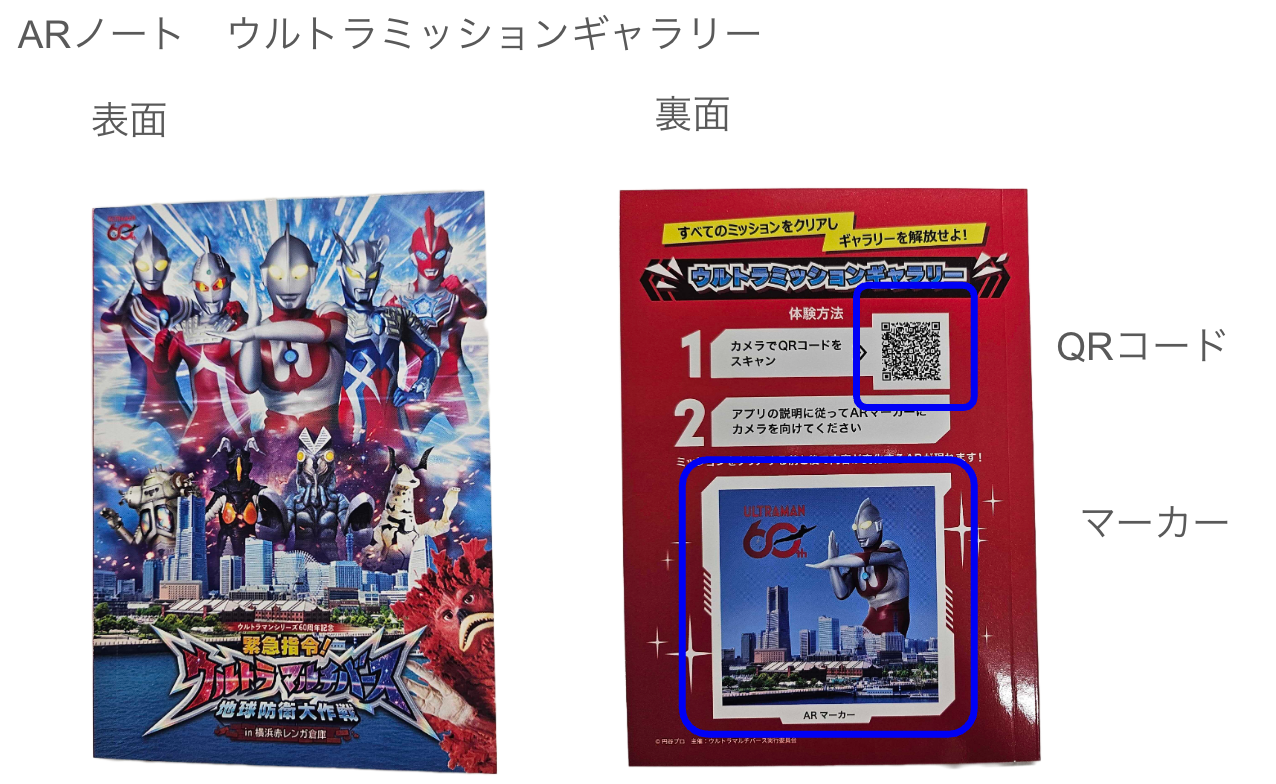
Align the AR marker with the on-screen guide to scan it and view the exclusive AR content.
The content changes before and after clearing the missions.
Contact
For inquiries, please use the form below.
Customer Support: https://forms.gle/dbhUdvHMg5v1AP8GA