This article is about using Archimesh, an architectural add-on in Blender 2.8, to easily make a house. We even introduce the process of creating it and bringing it to Unity and Styly! 🐼💫
Continuing on from the previous article, this is the second article in the “Let’s create a room” series! You can find instructions on how to make a room in “Making a Base Room”! Here ↓↓↓↓↓
![[Blender 2.8] Using Archimesh as an Add-on for Architecture (1), “Let’s make a base room.”](https://styly.cc/wp-content/uploads/2020/06/Head-160x160.png)
Let’s make a room – the big one
Cabinets, shelves, stairs, and a roof (which is outside the room) must also be created in Archimesh. You can create a room by Shift+A > Mesh > Archimesh as you did when you created the room. In the following figure, we will show you the big ones in this chapter.
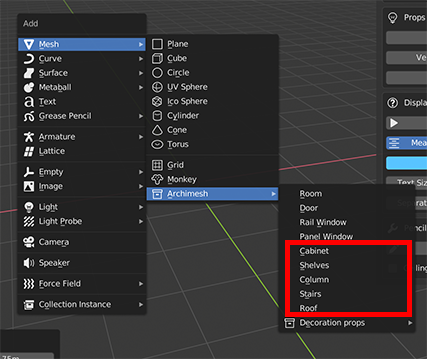
Large objects
Unlike walls and doors, these ones have an edit menu in the bottom left corner.
The menu comes up in the bottom left corner
Note that they can be made small and closed
And for some reason, once you select an unrelated part of the menu, this menu will not be available again… No, it’s a mystery how to get it out… If you erase the object and create it again because the menu doesn’t appear, the settings are still there… If you try to go back with [Command(Ctrl)+Z] while deciding on a setting, it will go back before you get the object out…
I won’t go into detail here, as there are many setting items, but I’ll try to explain them in a nutshell. Without going into the details, I will try to show you the key points.
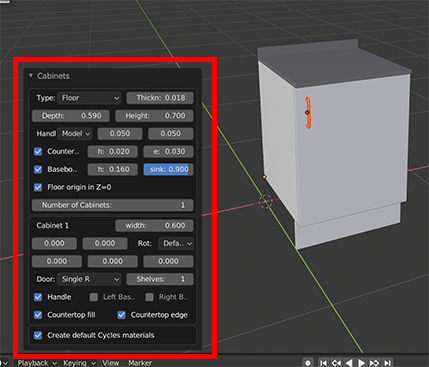
Cabinet
First, the cabinet.
Cabinet Settings
-
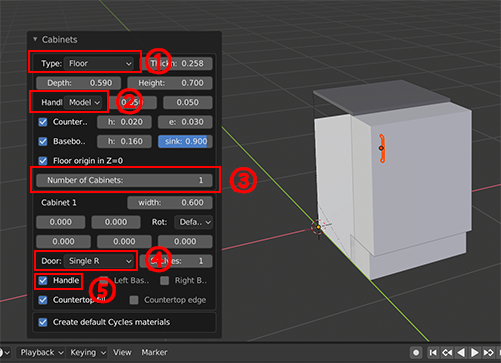
You can choose between floor or wall-mounted cabinets for the Type.
-
You can choose the type of handle by selecting the Handle.
-
You can choose the number of cabinets from the Number of Cabinets menu. The number of cabinets increases horizontally and the menu can be changed for each cabinet.
-
You can choose a type of cabinet door from the Door menu. You can select the type of cabinet door from the Door menu.
-
You can choose a handle from the Handle menu.
Shelve

Shelves configuration
Shelves.
-
You can choose the type of side you want, such as None, 4 Legs, and Full Side.
-
You can decide whether you want the sides or not. You can decide whether you want to use the sides or not, for example, for shelves that are attached to the wall only at one end.
-
You can decide the number of shelves.
Column
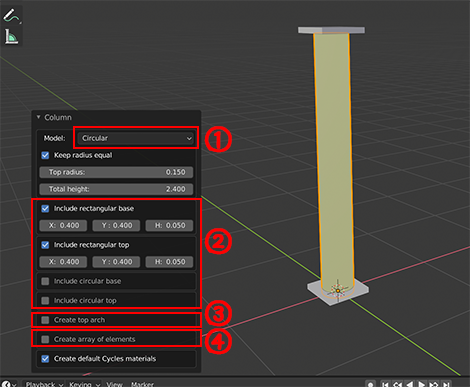
Column Settings
Pillars.
-
You can choose either round or square pillars.
-
You can choose either round or square pillars. You can choose either round or square pillars.
-
You can make an arch to connect pillars. (See below.)
-
Increase the number of columns. You can increase the number of pillars as follows. If you make an arch and increase the number of columns, the number of arches will also increase.
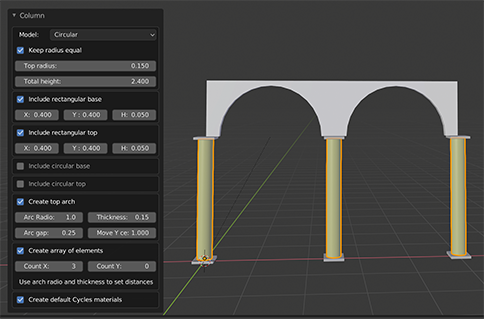
Increase Number of Columns
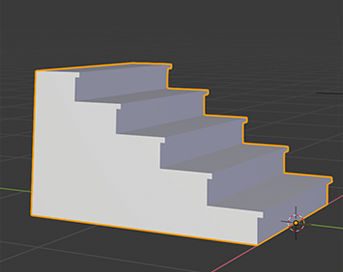
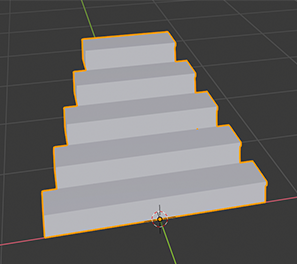
Stairs
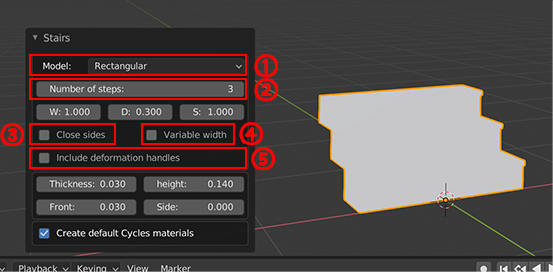
Setting up the stairs
-
You can decide on the type of model for the stairs. There are two types of stairs: rectangle and round.
-
Number of steps.
-
If you check this box, you can fill the back side of the stairs.
-
If you check this box and adjust the value that comes out at the bottom of the staircase, you can make the staircase narrower toward the top.
-
If you check here, it makes it feel a little squeaky clean. The left side is unchecked and the right side is checked.
(3)Check “Close sides”
(4)Check “Variable width”
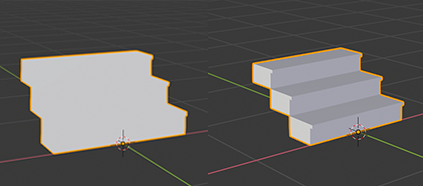
(5)Check the “Include deformation handles” checkbox.
Roof
The last part of the big one is the roof. It is a tile.
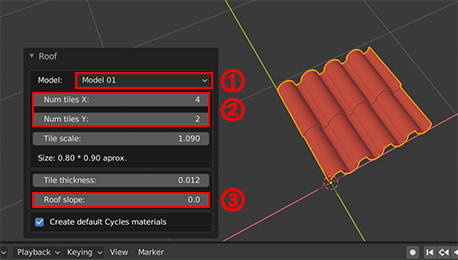
Roof settings
-
You can choose the type of tiles you want.
-
You can increase the number of tiles along the X and Y axes. It’s a good idea to increase the number of tiles according to the size of your home.
-
This is the angle of the roof. The angle of the roof.
The roof uses an array of tiles, so modifiers will be added on their own. Make sure you don’t forget to apply the modifiers at the end of the game.
Let’s make a room – small items
Now for the little things! The small items are located at the bottom of Archimesh in Decoration props.
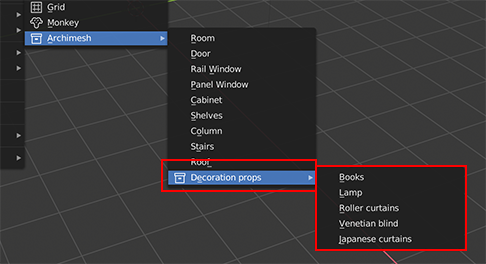
Location of the small items
book
First, the books!
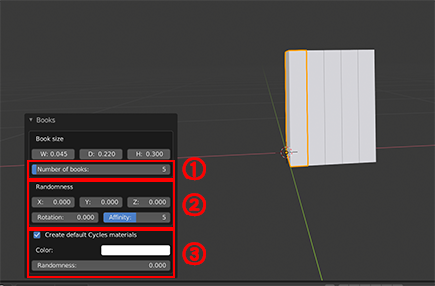
Book Settings
-
The number of books.
-
X, Y, and Z randomize the size of each axis.
Rotation randomizes the rotation of the book. It looks good.
Affinity lets you decide how many books should be tilted in the same direction. It tilts in the same direction.
-
You can also make the color random. Material is made for each book according to the degree of randomness. This is so cute!
lamp
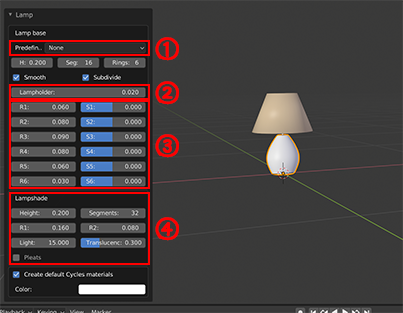
Lamp Settings
-
The shape of the lower part of the lamp can be changed. You can change the shape of the lower part of the lamp.
-
You can decide the height of the lamp. You can change the height of the lamp.
-
You can change the shape of the lower part of the lamp.
-
You can change the shape of the lamp shade. The lamp shade is pleated.
Roller curtains
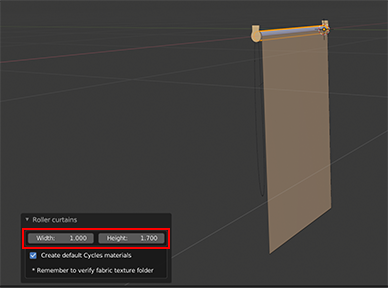
Roller Curtains Settings
There are few menus to explain, but you can decide the Width and Height.
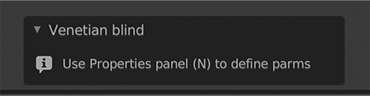
Venetian blind
Blinds. Just like when you made the wall, the edit menu will appear in the Create tab of the right side menu. In the lower left corner, it says “Use the (N) panel”
The location of the settings
And the settings are as follows
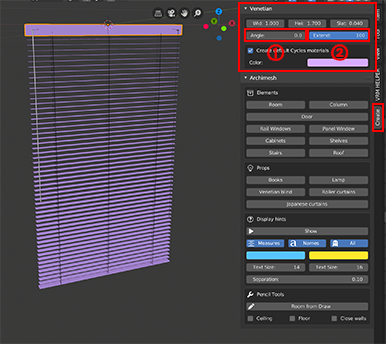
Venetian Blind Settings
-
You can change the angle of the blinds (opening?)
-
You can decide how well the blinds are folded
Japanese curtains
I don’t know what kind of curtains exist in Japan, but they are Japanese curtains.
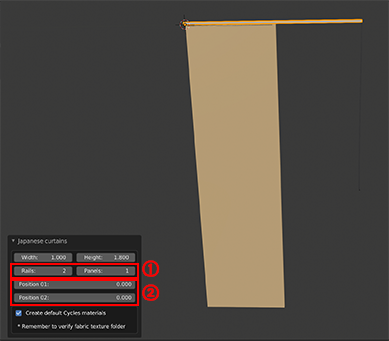
Japanese Curtains Settings
-
You can decide the number of rails and the number of panels per rail in the first step.
-
You can set the position of the panels for each rail. The more rails you add, the more rails you can add.
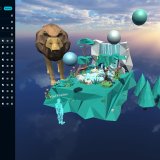
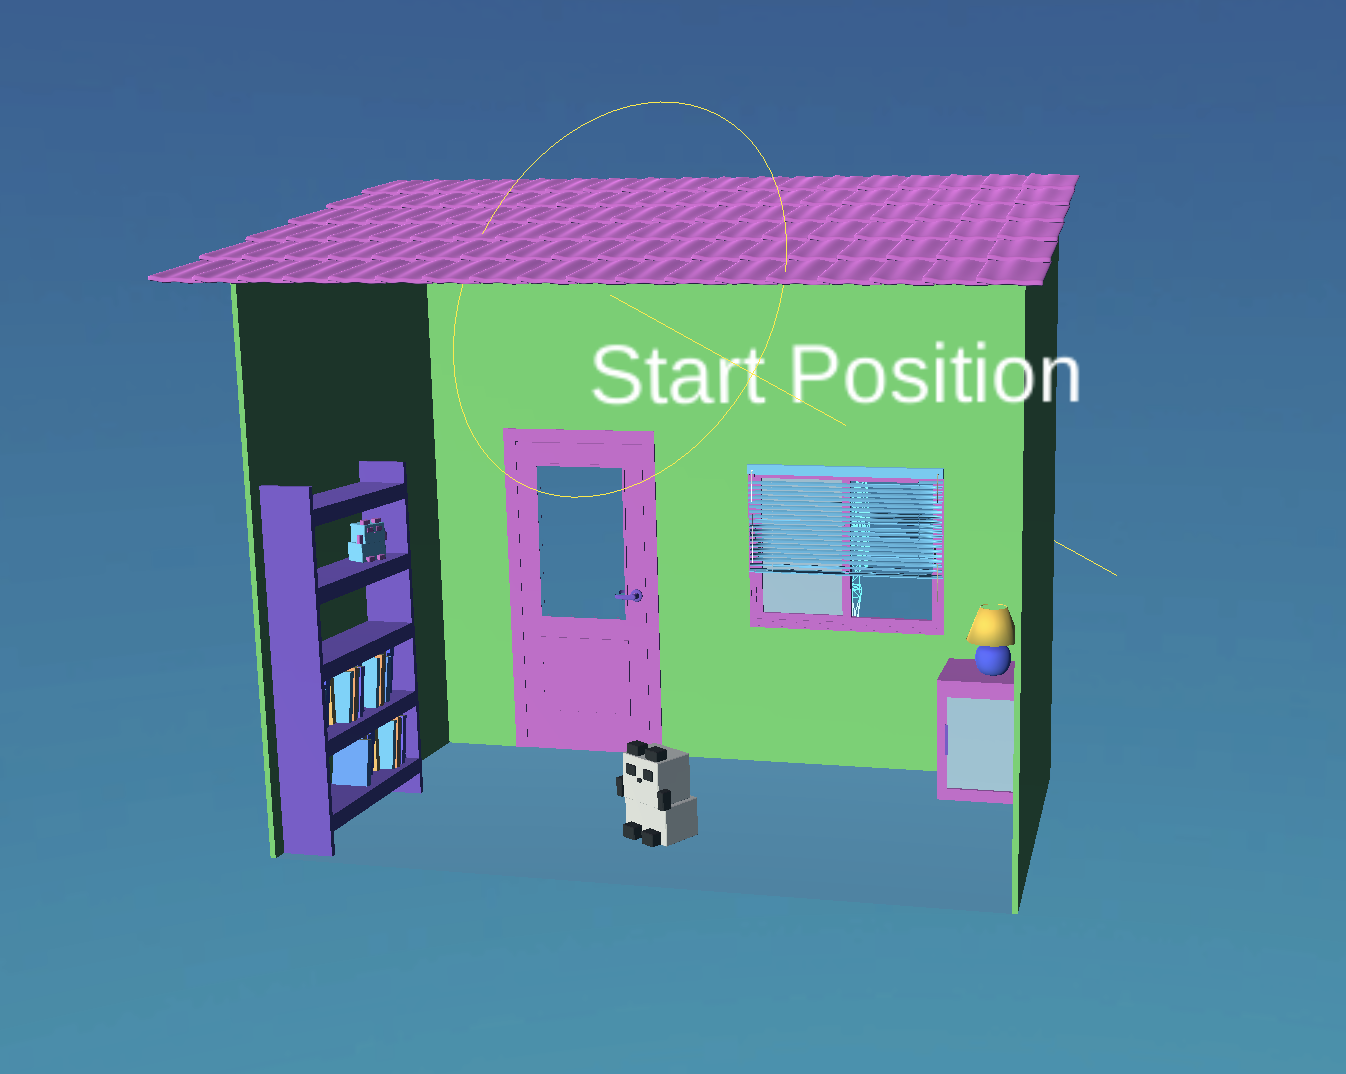
Finished!
I made something pretty like this! Export it to upload to STYLY.
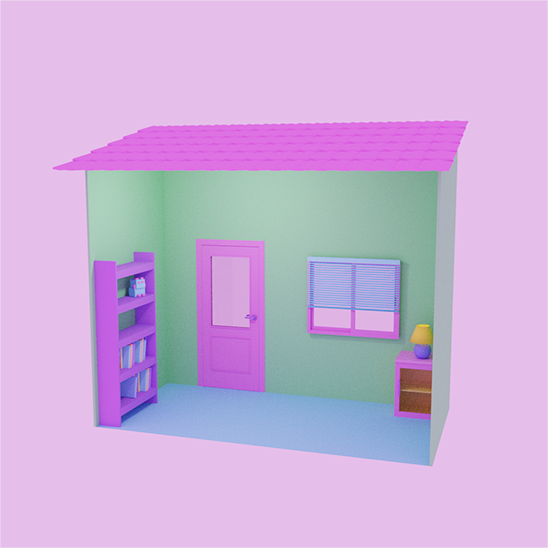
The finished home
Upload your model to STYLY!
There are two steps to upload your 3D model to STYLY.
-
Export your model
-
Upload to STYLY
Export the model
As I wrote in the door and window section, erase the boxes for the door and window booleans before writing them out! Ugh. Of course, after you’ve used Auto Holes, you have to apply all the modifiers. Then I delete the boxes for the boolean and then export. There are also various modifiers on the roof. Let’s apply them too.
Export through File > Export > glTF. Although it’s good, if you want to import it directly to STYLY, FBX won’t give you colors, so you should use glTF. Export.
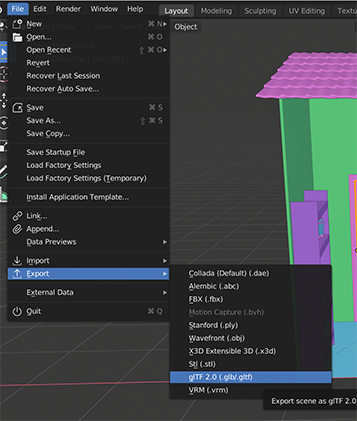
Export
-
If you check the Apply Modifiers checkbox, you will be able to see if the modifier is not applied. It is safe to do so.
- Enter a name and
- Export. The file is written out as a .glb object.

Exporting
Upload to STYLY
Go toSTYLYand launch STYLY Studio.
Click here for instructions on how to create an account.

Once STYLY Studio is up, go to Assets > 3D Model > Upload. Upload the model that you just exported. When the status of the Processing Status becomes “Completed”, you can upload the model. That’s it! The uploaded 3D character data is in My Models, so you can upload it and Click to place it in space.
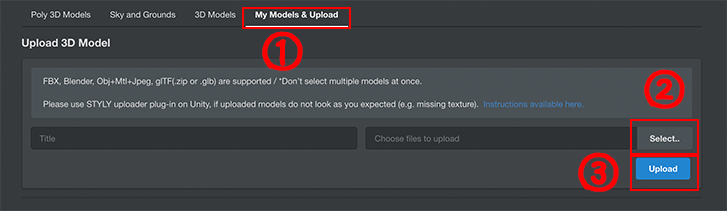
Upload
Here’s how to publish the scene
You can upload to STYLY!
I was able to successfully upload to STYLY!