In this article, I will introduce how to use a photogrammetry software, and advance multiple processes at once. With this technique, you will not need to operate the computer at each step, so it will be very convenient. I will also explain how to use a batch process to advance multiple processes at once.
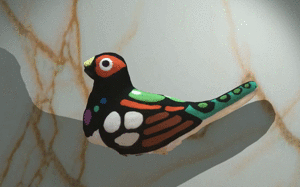
Sample 3D model created by Photogrammetry
Please read this article if you want to learn the basics of photogrammetry.
Advancing multiple processes automatically
Some photogrammetry softwares have a function to advance multiple processes automatically. Photogrammetry is mainly made from the following 4 processes. ・Aligning the photos (Analyzing which direction, which angle the photo was taken from) ・Creating high density clouds (Creating high density point groups) ・Creating meshes ・Creating textures By programming the processes beforehand, you can automatically process them. By using this function smartly, you can auto-process your work during your sleep, and create many 3D models at once.
Cautions for automatically processing photogrammetry
When you auto-process your work, you can’t check your work during each process. This may result in a fault in the final 3D model, and you might need to step backwards in order to improve your model. The balance of automation and manual is a trade-off between quality and handiness, but I recommend at least to check your work after photo alignment and setting the scan area manually. Which means that my recommended method is to… ・Importing photos ↓ ・Photo Alignment ↓ ・Checking the low density point group and setting the scan area ↓ ・Creating the high density point group, mesh, texture all at once using the batch process If you want to perform a more high quality scan, you can change the workflow as you please.
Batch process
Many photogrammetry softwares have a batch process function, which enables the user to auto-process their work. By using this function, you can auto-process multiple processes for multiple projects at once. For example, if you were photogrammetring an apple object and orange object, normally you need to operate your computer at the end of each step. You even need to do that twice, once for each object. If you use batch processing, you just create a workflow for each object, and just operate your computer at the beginning, and the process will be performed automatically. Batch processing is very helpful, but this function may be limited for expensive versions of the software. I made a table showing the prices and the availability of batch processes of major photogrammetry softwares.
Major Photogrammetry softwares
| Software name | Supported OS | Edition | Price | Batch process availability |
| 3DF Zephyr | Win | Lite (+ Trial ver) | ¥ 15,380 (Trial is free) | × (But advancing multiple processes at once is possible) |
| Pro/Arial | More than ¥400,000 | 〇 | ||
| Metashape (Formerly Photoscan) | Win/Mac/Linux | Standard | around ¥ 27,000 | 〇 |
| Professional | around ¥400,000 | 〇 | ||
| Reality Capture | Win | Promo ver | ¥ 3,980 monthly | Currently investigating |
| superior ver | more than ¥400,000 | Currently investigating |
Using the batch process function with MetaShape
I will introduce the details on how to use the batch process function using “MetaShape”, where the function is available even on the standard edition. For this tutorial, I will create 3 objects, a bird, a penguin, a cow in 3D. In Metashape, you can add multiple “Chunks” to a “Workspace” so that you can work with multiple photogrammetry projects in one workspace. Open Metashape, and right click “Workspace” that is located on the left. Next, click “Add Chunk”. Repeat this process and add as many “Chunks” as you need. For this tutorial, I will be creating 3 objects, so I created 3 chunks.
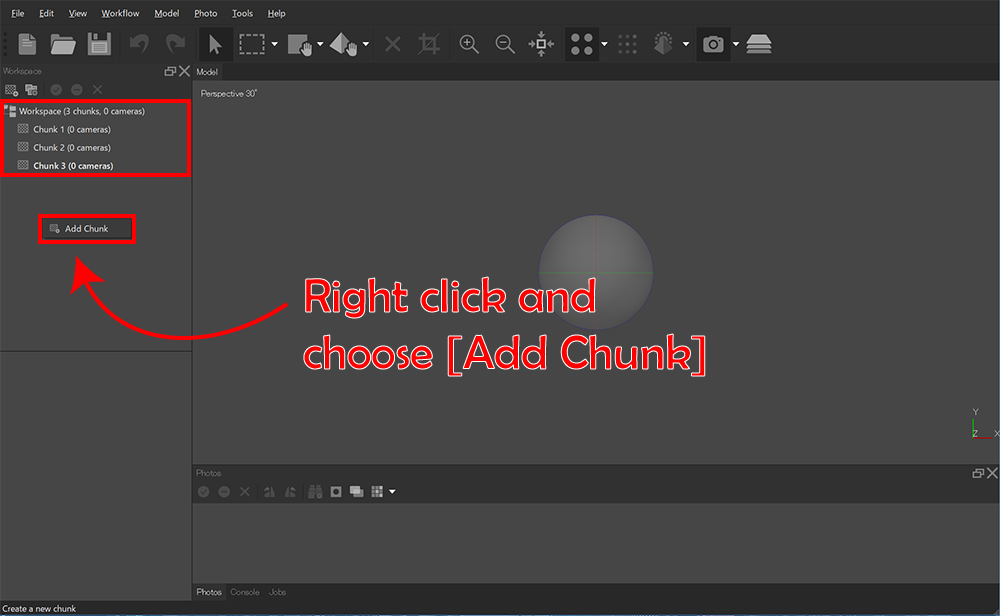
Creating multiple Chunks in the Workspace
Next, drag and drop your photos to each chunk. I imported my bird photos to “Chunk 1”, penguin photos to “Chunk 2”, and cow photos to “Chunk 3”.
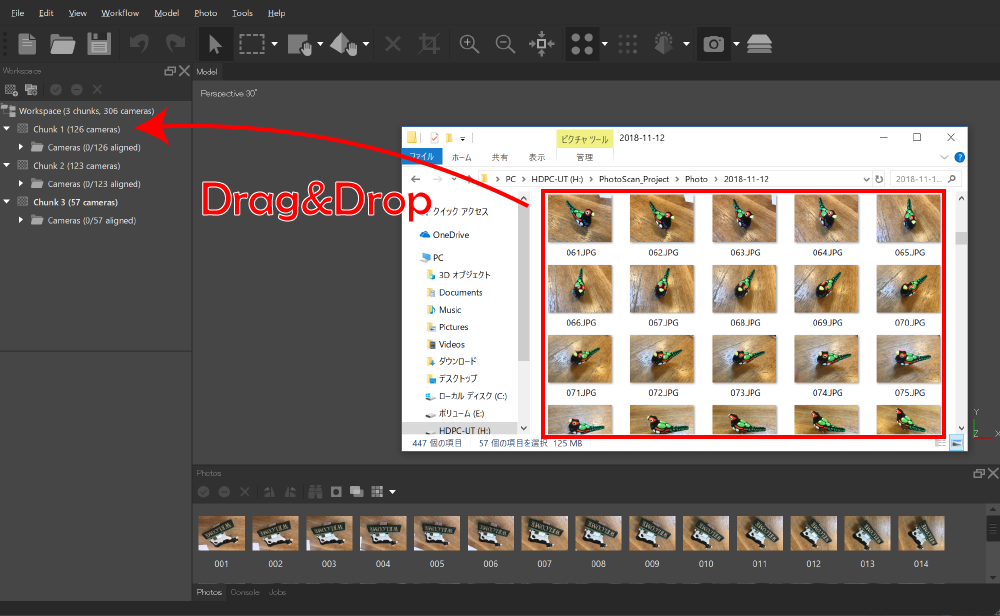
Import photos to each Chunk
Once you’re done, select “Workflow” in the menu bar, and click “Batch Process”.
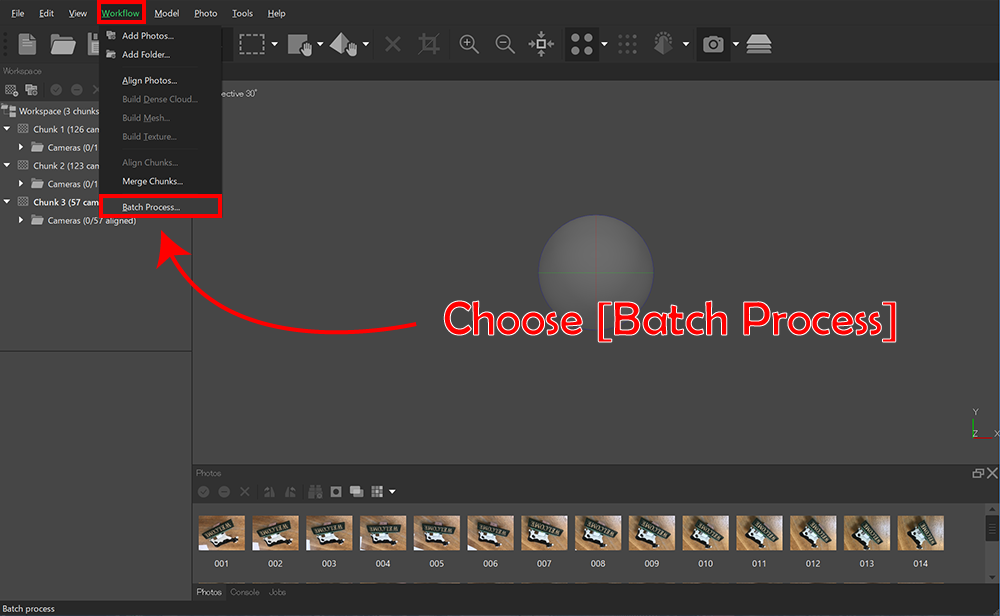
Click “Batch Process”
Then, the batch process menu will pop up. By registering jobs here, the software will auto-process them for you.。 You can just create the 3D model fully automatically here, but this time, let’s just register “Photo Alignment” since we want to check and set the scan area manually. Click the “Add” button on the bottom left.

Adding a job in the batch process
A window will appear, as in the image below. You can select the job type, and which “Chunk” you want to apply the job to. First, register “Photo Alignment” to the job. Select “Align Photos” as the Job Type, and set Apply to “All Chunks”. Change the “Settings” for your needs, and click the “OK” button.
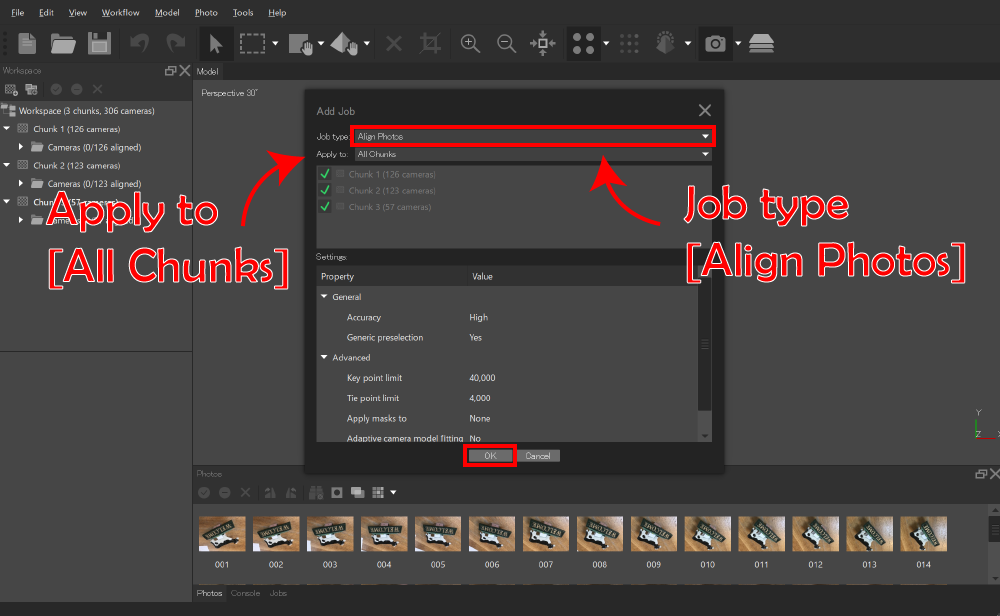
Registering “Photo Alignment”
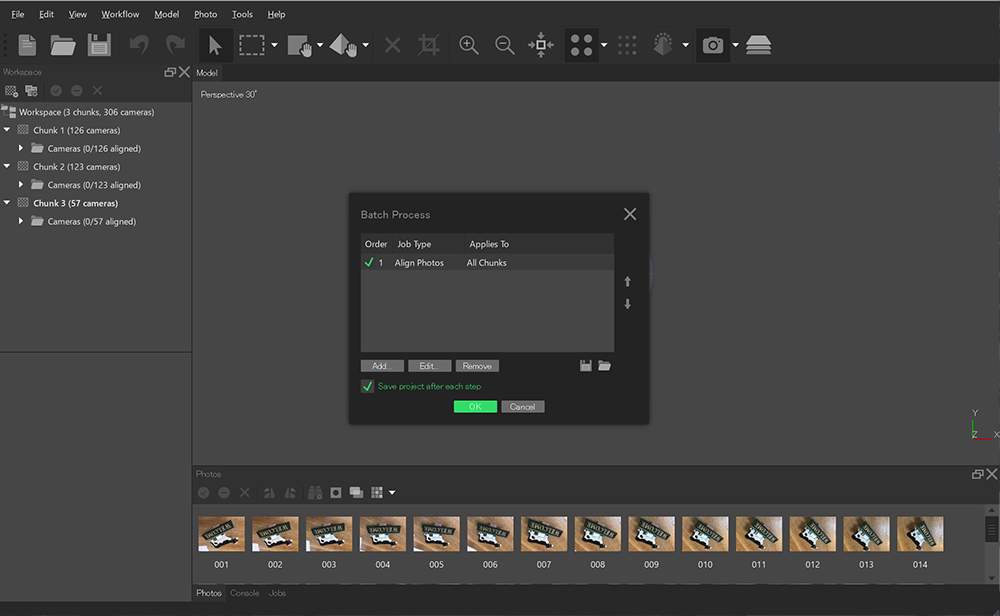
”Align Photos” is now registered to the batch process. Make sure the “Save project after each step” option is on, and click the “OK” button. (※By selecting the “Save project after each step” option, the project will be auto-saved after each step)
Running the Batch process
After some wait, all jobs will be complete. Check if the photo alignment was successful, and set the scan area.
You can learn the basics of Metashape in this article
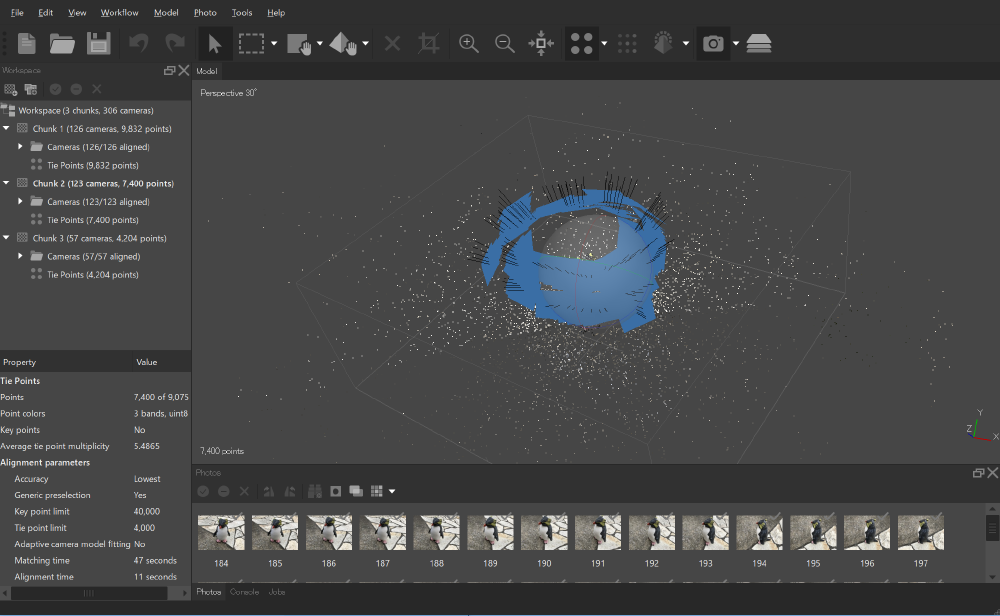
Checking the photo alignment
Once you’re done with that, let’s proceed with the rest of the processes at once. Select “Workflow” from the menu bar, click the “Batch Process” menu, and delete the “Batch Process” job you previously registered. (Select the job and click the “Remove” button)
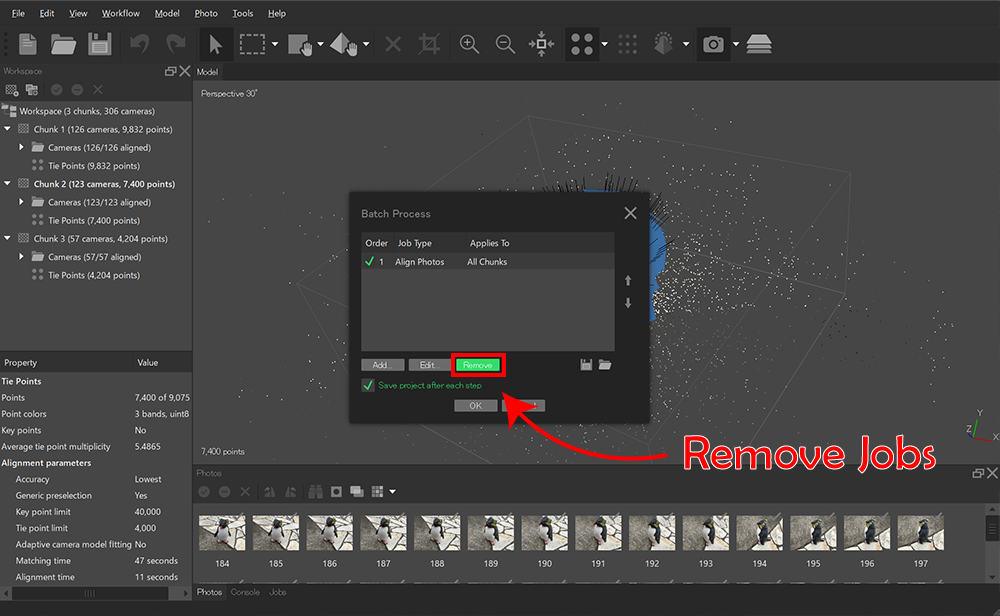
Deleting the job
Register 3 new jobs, “Build Dense Cloud”, “Build Mesh”, and “Build Texture” just like you did for the photo alignment job. (Click the “Add” button, select the “Job Type”, and click “OK”) Double-check that “Save project after each step” is on, and click the “OK” button. All 3 jobs will be processed automatically, and the 3D models will get created.
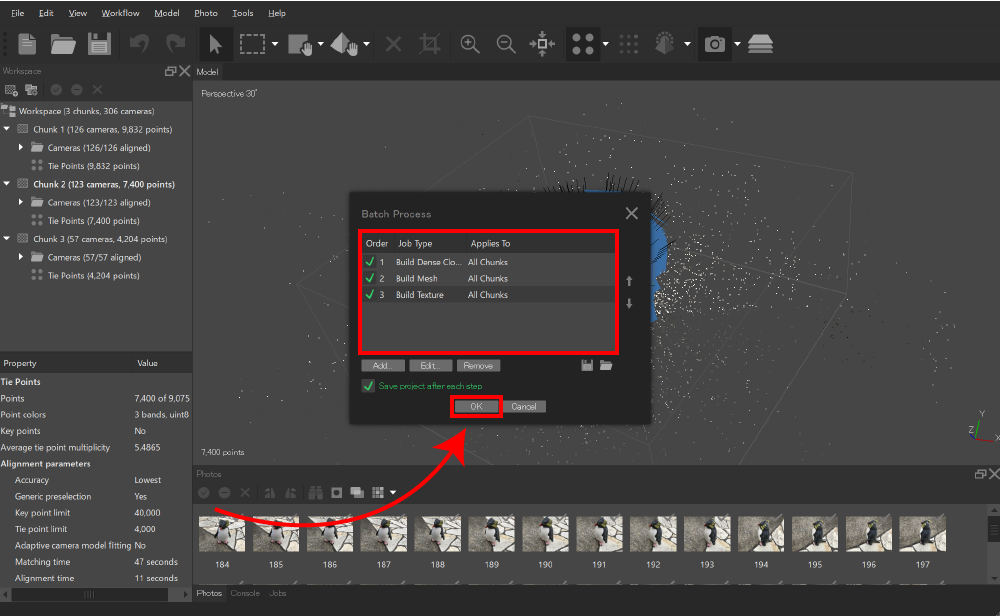
Registering jobs
Processing multiple jobs at once with the lite version of 3DF Zephyr
You cannot use a batch function when using the lite version (or the trial ver) of 3DF Zephyr, but you can process multiple jobs at once for your project. But you will not be able to check your object after the photo alignment process. Sometimes, the photo alignment fails, but the process will go on, so you have to return back a long way. We have to deal with it if we’re using the lite version. (The batch process function is available on superior versions) First, we need to import our photos to “3DF Zephyr”.

Importing photos
When you import a photo, a wizard like the image below will pop up, so check the “Compute Dense Point Cloud after cameras orientation”, “Compute Surface after Dense Point Cloud extraction”, “Compute Texture after Surface extraction” checkboxes.
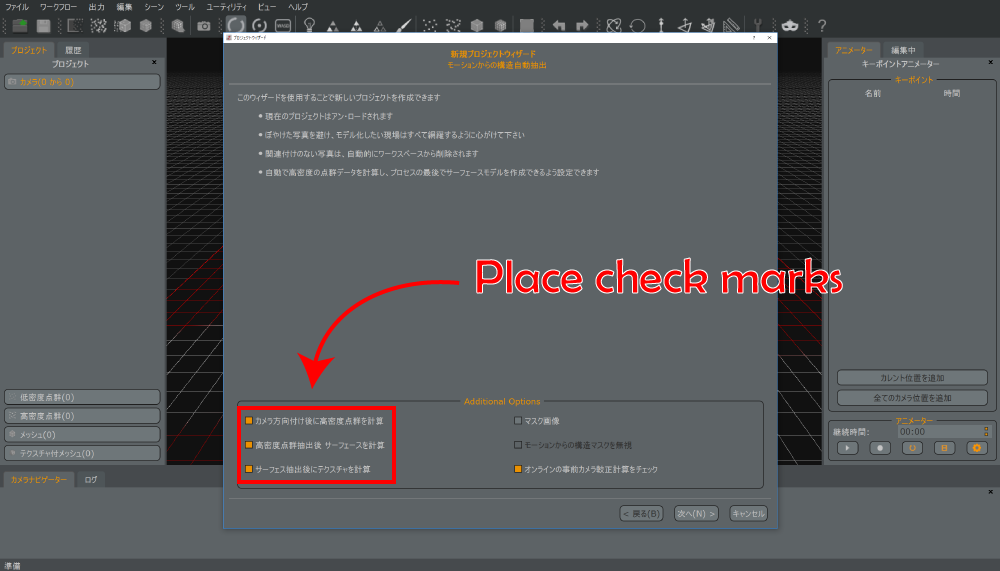
Check the checkboxes
After that, just follow the directions on the wizard, and select the appropriate settings. If you want to learn the basic operations for each wizard, please read this article.
Uploading to STYLY
The 3D model is complete, but by adding one more step and applying the Unlit Shader with Unity makes your model’s appearance much more better. This article explains how to apply the Unlit Shader to a 3D object. If you want to learn how to upload your model to STYLY from Unity, check this article. How was this tutorial? By using batch functions, photogrammetry becomes much more easier and less time-consuming. You will learn more as you try, and will be able to understand which process you should do manually in order to increase your model’s quality. I hope this article was helpful, and everyone makes more 3D models using photogrammetry.