The Interaction SDK provided by STYLY makes it easy to create interactive VR content.
In addition, a Unity editor simulator is also provided, so you can build a gimmick using the interaction SDK on Unity and simulate it on the game view.
In addition, by using the local preview tool, you can complete the operation check (debugging) in the local environment without going through the process of “place the asset in STYLY Studio and publish it”.
Furthermore, by combining the Interaction SDK and PlayMaker, it is possible to pursue further expressions.
- 1 What is Interaction SDK?
- 2 Compatibility with Unity’s Event System
- 3 Sample scene using Interaction SDK
- 4 List of scripts to be provided
- 5 How to use the interaction SDK
- 5.1 How to download the interaction SDK
- 5.2 How to import the interaction SDK into Unity
- 5.3 Let’s create a gimmick using the interaction SDK and check the operation with the Unity editor simulator.
- 5.4 STYLY_Attr_ColliderTrigger
- 5.5 STYLY_Attr_Collision
- 5.6 STYLY_Attr_Breaker / STYLY_Attr_Breakable
- 5.7 STYLY_Attr_Draggable
- 5.8 STYLY_Attr_Equipment
- 5.9 STYLY_Action_Spawner / STYLY_Action_Mover / STYLY_Action_Timer
- 6 How to link PlayMaker and Interaction SDK
- 7 How to debug
- 8 How to upload “Gimmick Asset Created by Creating Interaction SDK” to STYLY
What is Interaction SDK?
The Interaction SDK is a Unity script component that summarizes the interactive actions that can be used in STYLY.
Functions that can be used in STYLY using the interaction SDK
- Interaction basic function
- You can drag objects
- Move an object
- Detects intrusions and collisions of objects
- Destroy an object
- Create an object
- timer
- Support for STYLY’s original specifications
- You can equip the controller with an object
- You can trigger an event by pressing a button as a trigger with the controller equipped with an object.
- You can equip the controller with an object
The Interaction SDK is compatible with the STYLY web version / STYLY XR client (STYLY app for Steam, STYLY app for VIVEPORT, STYLY app for Oculus Mobile, STYLY app for Daydream, STYLY app for Pico, Nreal STYLY app) / STYLY mobile app.
You can use all functions of Interaction SDK not only in VR scene but also in AR scene.
Compatibility with Unity’s Event System
- STYLY controller operation is compatible with Event system
- Mouse cursor = Ray coming out of the controller
- Left mouse button = Trigger / Pad pressed
- Right mouse button = Controller Menu button
- uGUI can now be operated (World Space only)
- Detailed event detection with EventTrigger component
- What can be called with UnityEvent
- Public method
- Public method call with argument specification
- Public method call with dynamic arguments
Sample scene using Interaction SDK
You can download the Unity sample project of the above sample scene from the following.
※The assets included in the sample project can be freely used without credit or permission.
Download the Unity sample project and try it out.

Unity sample project
List of scripts to be provided
|
Script name |
Explanation |
|
STYLY_Attr_ColliderTrigger |
Run the OnTrigger event |
|
STYLY_Attr_Collision |
Run the OnCollision event |
|
STYLY_Attr_Breaker |
Destroy the object to which the STYLY_Attr_Breakable component has been added |
|
STYLY_Attr_Breakable |
STYLY_Attr_Breaker component is destroyed by the added object |
|
STYLY_Action_DestroyTarget |
Discard the specified GameObject |
|
STYLY_Attr_Draggable |
You will be able to grab an object with a pointer |
|
STYLY_Attr_Equipment |
Equip the controller with an object |
|
STYLY_Action_Mover |
Move an object |
|
STYLY_Action_Spawner |
Create an object from a prefab |
|
STYLY_Action_Timer |
Executes the event after the set timer expires. |
How to use the interaction SDK
How to download the interaction SDK
Go to the Download page and click STYLY Plugin for Unity DOWNLOAD to download the STYLY Plugin.
The Interaction SDK is included in the STYLY Plugin.
STYLY Plugin for Unity DOWNLOAD
How to import the interaction SDK into Unity
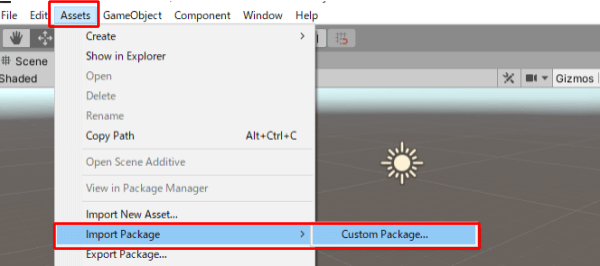
Click Assets> Import Package> Custom Package… in the upper left menu.
Select STYLY Plugin.
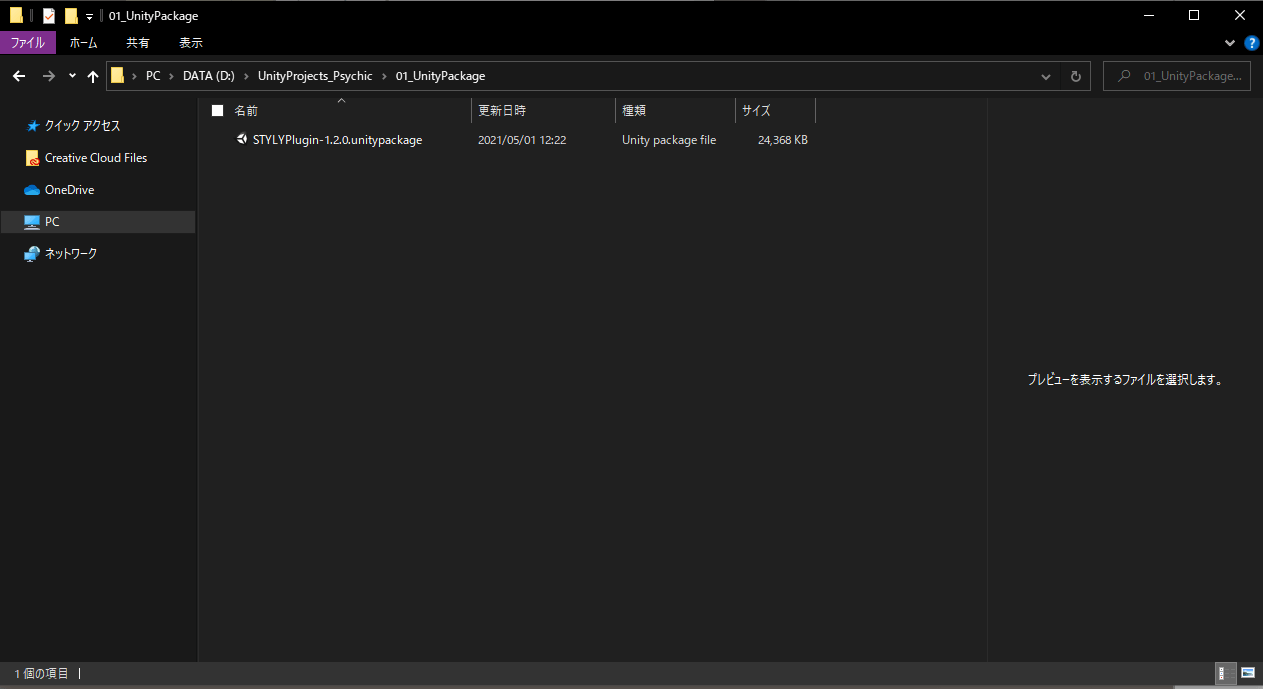
Open STYLY Plugin
Click Import.

Click Import
Let’s create a gimmick using the interaction SDK and check the operation with the Unity editor simulator.
Make it possible to grab an object with a pointer
Right-click on the hierarchy and click 3D Object> Cube.
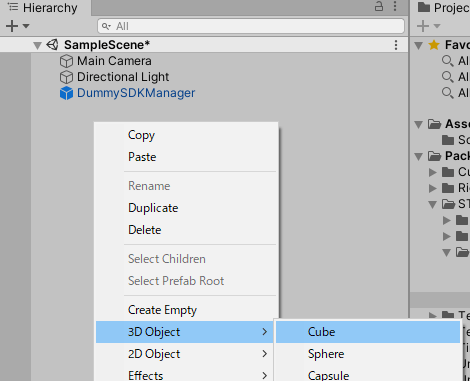
Place Cube in the hierarchy
With Cube selected in the hierarchy, click Add Component in the Inspector window (hereafter referred to as the Inspector).
Enter STYLY in the search form to see a list of interaction SDK scripts. Select STYLY_Attr_Draggable.
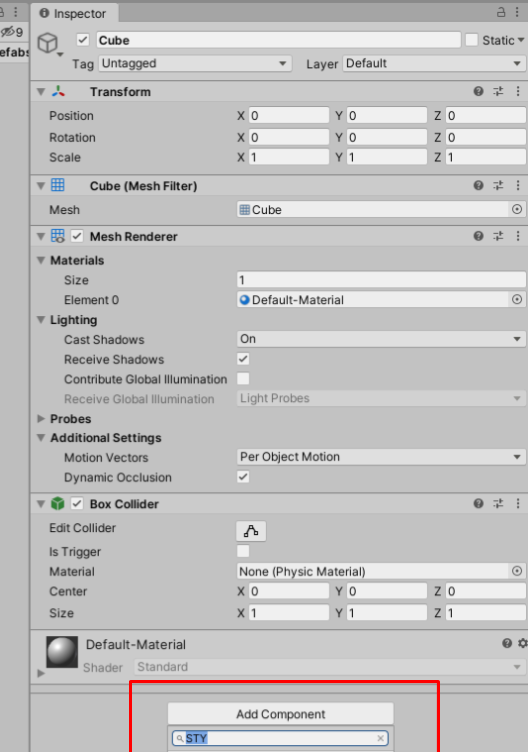
Added STYLY_Attr_Draggable
Press the play button in Unity to enter play mode.
Let’s drag the Cube displayed in the game view.
Game view
If the asset with the Interaction SDK component added is in the hierarchy, STYLY_Simulator will be automatically placed during playback and the simulator can be run in Game View.
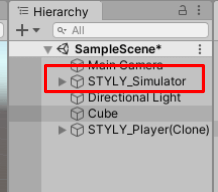
STYLY_Simulator is placed in the hierarchy during playback
STYLY_Attr_ColliderTrigger
STYLY_Attr_ColliderTrigger is a script that “executes the OnTrigger event”.
Deactivate your object if another object breaks into your object
STYLY_Attr_ColliderTrigger event table
| event name | Event content |
| On Enter() | Executed when another object breaks into its own object. |
| ON Exit() | Executed when another object escapes from its own object. |
Conditions for raising the OnTrigger event
- Please set the following for the object that executes the event
- Check Is Trigger of Coillder
- Add a Rigidbody component
- Check Is Kinematic if you don’t want to generate gravity
If you would like to know more about TRIGGER EVENT, please see the following article.
![[Unity/Playmaker] How to Trigger an Event when the Controller Touches an Object (TRIGGER EVENT)](https://styly.cc/wp-content/uploads/2020/02/Controller-69-160x160.jpg)
Let’s create a gimmick that “inactivates your object when another object invades your own object” and check the operation.
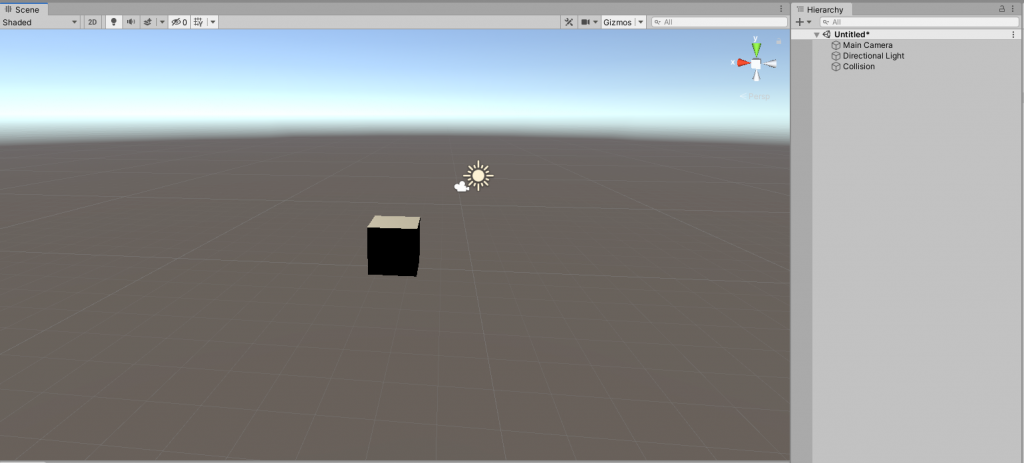
Right-click on the hierarchy and click 3D Object> Cube.
Rename the Cube to Collider Trigger.
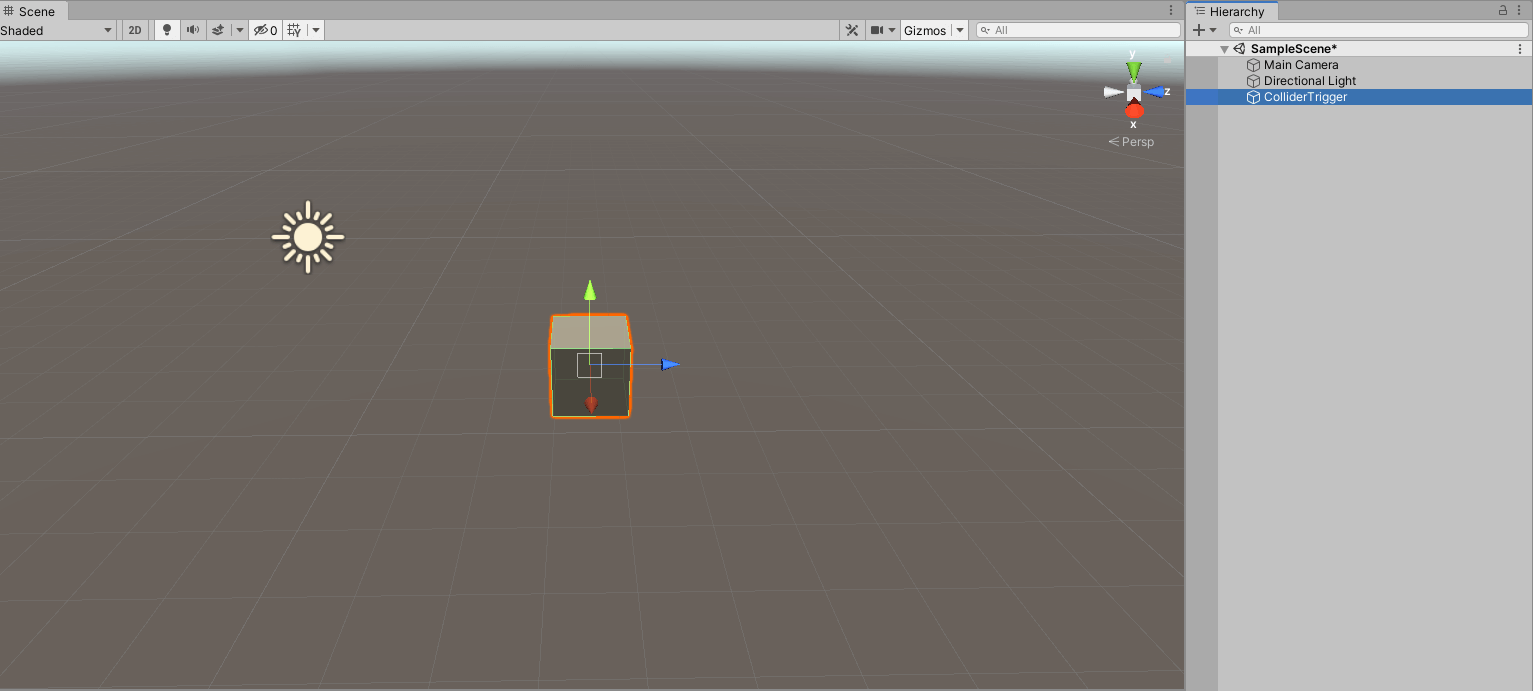
Place Cube in the hierarchy and rename it to ColliderTrigger
Add the STYLY_Attr_ColliderTrigger component to the inspector of the object “ColliderTrigger” that wants to execute the OnTrigger event.
Add and set the following components to the ColliderTrigger inspector.
- Add STYLY_Attr_Collider Trigger
- Check Is Trigger of Collider
- Add a Rigidbody component
- If you want to disable gravity, check Is Kinematic
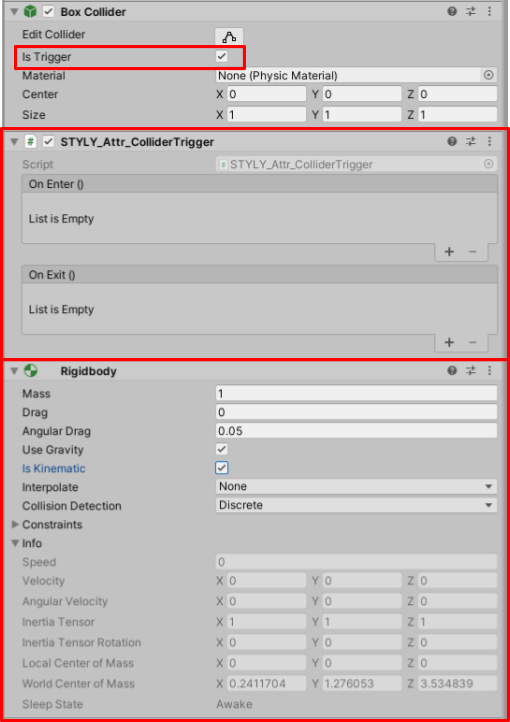
Collider Trigger Inspector
Click the “+” at the bottom right of the STYLY_Attr_Collider Trigger component.
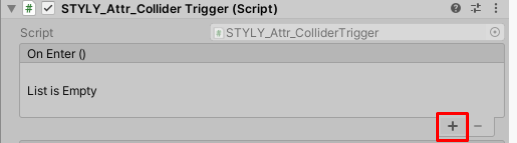
Click “+”
Drag and drop Collider Trigger from the hierarchy onto the None (Object) form.
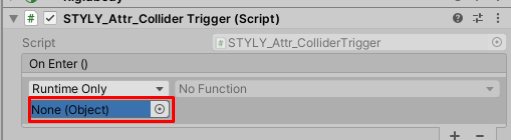
Drag and drop Collider Trigger from the hierarchy onto the None (Object) form
Function is active and ready to use.
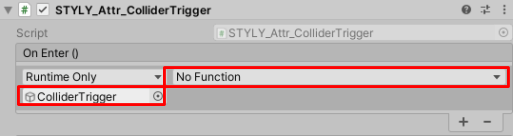
Function became active
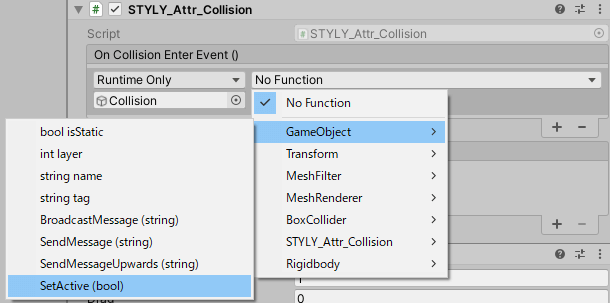
Select No Function> GameObject> SetActive (bool).
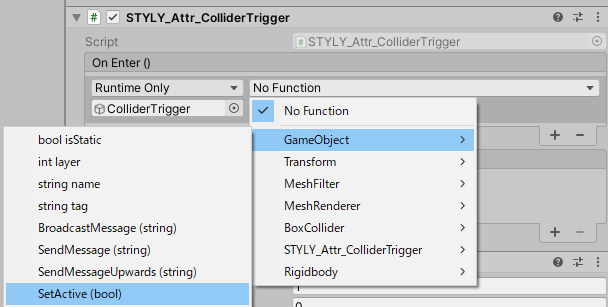
Set SetActive (bool) to function
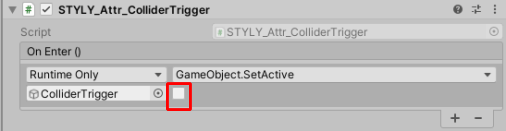
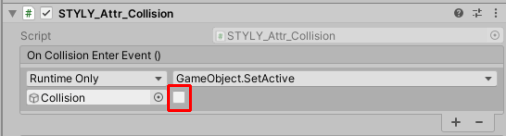
GameObject.SetActive is set in the function.
A square checkbox is displayed below the function.
Uncheck the checkbox (there is no checkbox by default).
About the checkbox of GameObject.SetActive
- If checked, the object becomes active
- If unchecked, the object will be inactive
If unchecked, the object will be inactive
Place the invading object (such as Cube) in the scene, set it to playback mode, move the invading object, and check the operation to see if ColliderTrigger becomes inactive.
Infiltrating a Cube into a Collider Trigger deactivates the Collider Trigger
STYLY_Attr_Collision
STYLY_Attr_Collision is a script that “executes the OnCollision event”.
STYLY_Attr_Collision event table
| event name | Event content |
| On Collision Enter Event() | Executed when another object collides with its own object. |
| On Collision Exit Event() | Executed when another object escapes from its own object. |
Conditions for raising the OnCollision event
Please set the following for the object that executes the event
- Add a Rigidbody component
- If you don’t want to generate gravity, uncheck Use Gravity.
- Uncheck Is Kinematic
- Add Collider component
- Collider component Is Trigger is unchecked
If you would like to know more about Collision EVENT, please see the following articles.
![[Unity / Playmaker]How to Cause an Event to Occur when the Controller Collides with an Object(COLLISION EVENT)](https://styly.cc/wp-content/uploads/2020/03/1-160x160.gif)
Let’s create a gimmick that “inactivates your object if another object collides with your own object” and check the operation.
Right-click on the hierarchy and click 3D Object> Cube. Rename the Cube to Collision.
Place the Cube in the hierarchy and rename it to Collision
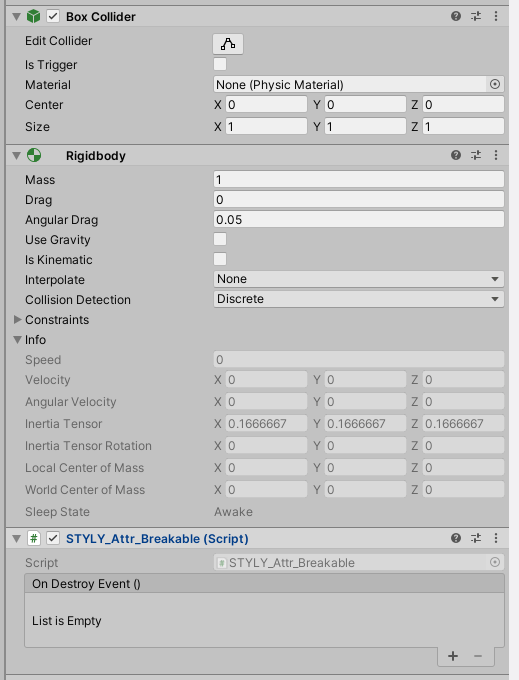
Add / set the following components to the inspector of the object for which you want to execute the event.
- Added STYLY_Attr_Collision (Script)
- Uncheck Is Trigger in Collider
- Add a Rigidbody component
- If you want to disable gravity, uncheck Use Gravity
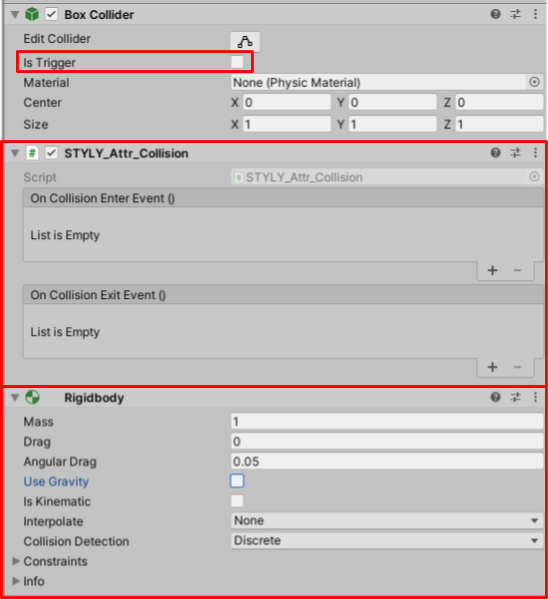
Collision Inspector
Click the “+” at the bottom right of the STYLY_Attr_Collision component.
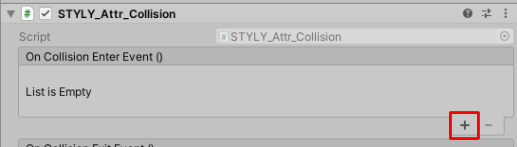
Click “+”
Drag and drop Collision from the hierarchy onto the None (Object) form.
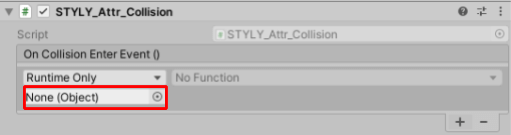
Drag and drop Collision from the hierarchy onto the None (Object) form
Function is active and ready to use.
Function became active
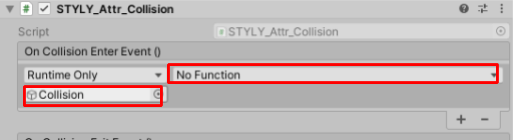
No Function > GameObject >SetActive(bool)を選択します。
Set SetActive (bool) to the function
GameObject.SetActive is set in the function. A square checkbox is displayed below the function.
Uncheck the checkbox (there is no checkbox by default).
About the checkbox of GameObject.SetActive
- If checked, the object becomes active
- If unchecked, the object will be inactive
If unchecked, the object will be inactive
Place an object to invade (such as Cube) in the scene, put it in playback mode, move the object to invade, and check the operation to see if Collision becomes inactive.
Invading a Cube into a Collision makes the Collision inactive
STYLY_Attr_Breaker / STYLY_Attr_Breakable
STYLY_Attr_Breaker is a script that “destroys the object to which the STYLY_Attr_Breakable component has been added”.
STYLY_Attr_Breakable is a script that “breaks into an object to which the STYLY_Attr_Breaker component has been added”.
STYLY_Attr_Breaker and STYLY_Attr_Breakable are used as a set.
STYLY_Attr_Breaker Event table
| event name | Event content |
| OnDestroy() | The event is executed when the object is destroyed. |
STYLY_Attr_Breakable Event table
| event name | Event content |
| OnDestroy() | The event is executed when the object is destroyed. |
STYLY_Attr_Breaker destroys the object to which the STYLY_Attr_Breakable component has been added.
Requires an element for the OnCollision or OnTrigger event.
Conditions for raising the OnCollision event
Please set the following for the object that executes the event
- Add a Rigidbody component
- If you don’t want to generate gravity, uncheck Use Gravity.
- Uncheck Is Kinematic
- Add Collider component
- Collider component Is Trigger is unchecked
If you would like to know more about Collision EVENT, please see the following articles.
Conditions for raising the OnTrigger event
Please set the following for the object that executes the event
- Check Is Trigger of Coillder
- Add a Rigidbody component
- Check Is Kinematic if you don’t want to generate gravity
If you would like to know more about TRIGGER EVENT, please see the following article.
This section describes the Breaker and Breakable settings.
First, let’s take a look at the Breakable settings.
Right-click on the hierarchy and click 3D Object> Cube to place the Cube.
Rename the Cube to Breakable.

Place Cube in the hierarchy and rename it to Breakable
With Breakable selected in the hierarchy, add the Rigidbody and STYLY_Attr_Breakable components in the Inspector.
In order to prepare the conditions for raising the OnCollision event, set each component as follows.
- Collider component
- Is Trigger unchecked
- Rigidbody component
- If you don’t want to generate gravity, uncheck Use Gravity
- Uncheck Is Kinematic
Breakable Inspector
Next, the Breaker settings are explained.
Right-click on the hierarchy and click 3D Object> Cube to place the Cube.
Rename the Cube to Breaker.

Place Cube in the hierarchy and rename it to Breaker
With the Hierarchy Breaker selected, add the STYLY_Attr_Breaker component in the Inspector.
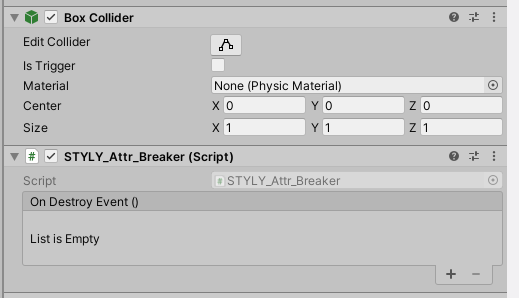
Breaker Inspector
Next, add the Rigidbody component to Breaker and check Use Gravity.
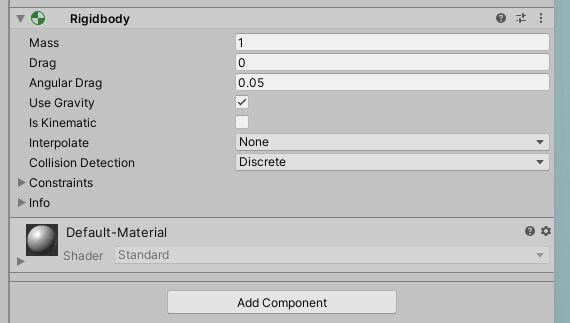
Added Rigidbody component to Breaker
Place the Breaker object directly above the Breakable object.
Put it in playback mode and let the Breaker object collide with the Breakable object in the scene view.
The Breakable object is removed from the hierarchy.
Breaker object collides with Breakable object and Breakable object disappears
STYLY_Attr_Draggable
STYLY_Attr_Draggable is a script that “makes it possible to grab an object with a pointer”.

You can grab an object by dragging
STYLY_Attr_Draggable event table
| event name | Event content |
| On Begin Dragging() | The event is executed when the object is dragged. |
| On End Dragging() | The event is executed when the object is dragged off. |
Add the STYLY_Attr_Draggable component to the object you want to grab with the pointer.
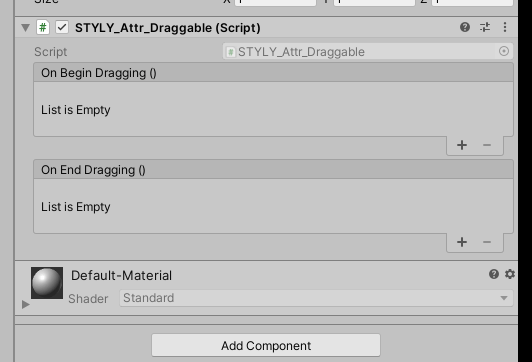
Inspector for the object you want to drag
Put it in play mode and left-click on the object with the STYLY_Attr_Draggable component added in the game view to grab it.
STYLY_Attr_Equipment
STYLY_Attr_Equipment is a script that can be “equipped with a controller”.
You can also execute an event by equipping the controller and then pressing the enter button (trigger).
You can equip the controller with an object
STYLY_Attr_Equipment event table
| event name | Event content |
| On Use() | If you press the enter button (trigger) while equipped on the controller, the event will be executed. |
| On Use End() | When the enter button (trigger) is released while equipped on the controller, an event is executed. |
| On Equip() | Once equipped on the controller, execute the event |
| On Drop() | After removing the equipment from the controller, execute the event |
Place the Cube in the hierarchy.
| Object name | Transform | X | Y | Z |
| Equipment(Cube) | Position | 2 | 0.05 | -2.5 |
| Scale | 0.5 | 0.5 |

Place Cube in the hierarchy and rename it to Equipment
Add the STYLY_Attr_Equipment component to Equipment.
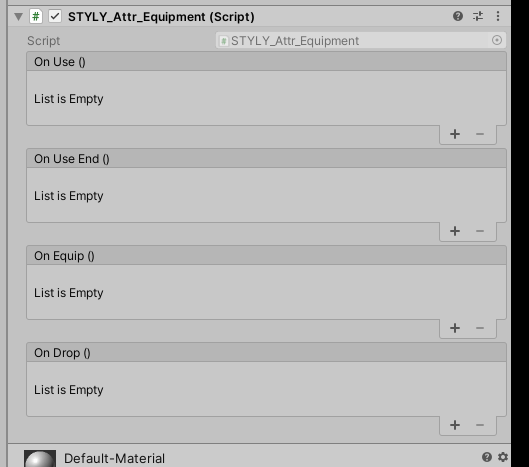
Equipment inspector
Set to playback mode.
You can equip it by right-clicking on the Equipment object in Game View.
Once equipped, you can move the Equipment object.
You can remove the Equipment object from the controller by left-clicking.
STYLY_Action_Spawner / STYLY_Action_Mover / STYLY_Action_Timer
I will explain STYLY_Action_Spawner, STYLY_Action_Mover, and STYLY_Action_Timer.
Let’s combine the three scripts to create the following gimmick.
Clicking on the Cube will generate a Sphere (STYLY_Action_Spawner), and after a certain amount of time (STYLY_Action_Timer), the Sphere will move to a specific position (STYLY_Action_Mover).
Clicking on the Cube will generate a Sphere, and after a certain amount of time, the Sphere will move to a specific position.
Right-click on the hierarchy and click 3D Object> Cube to place the Cube.
Rename the Cube to ActionSampleCube.
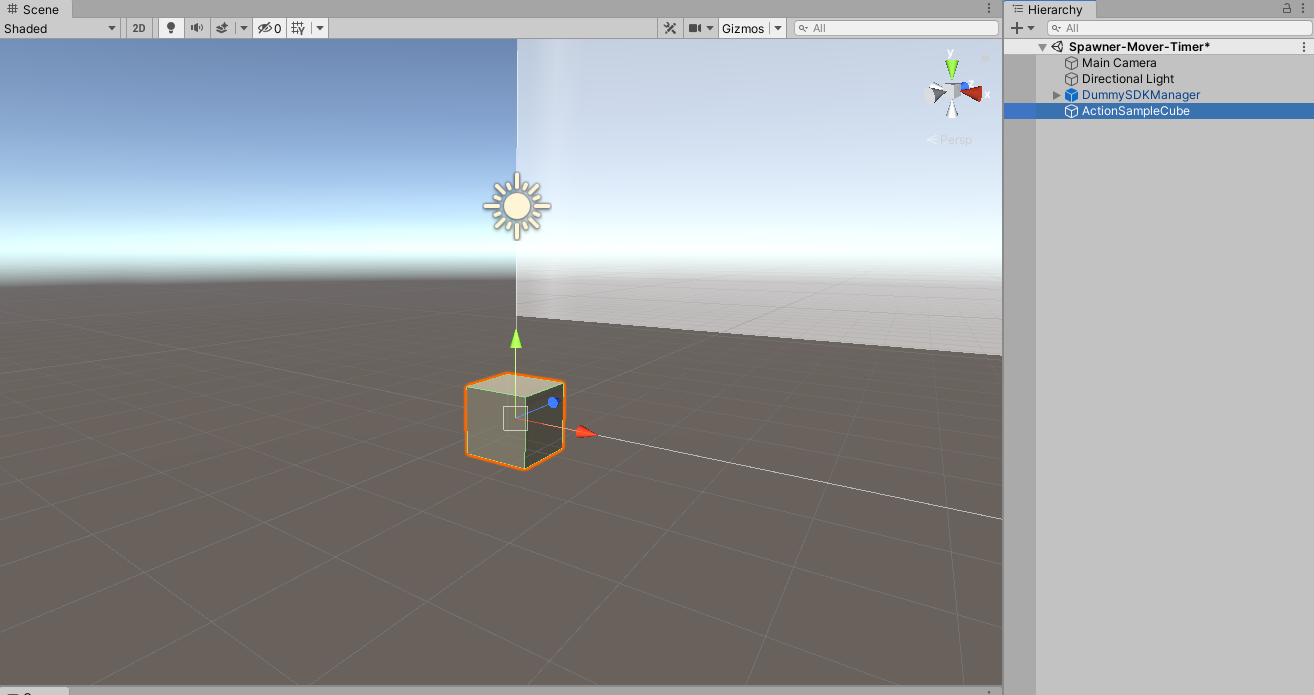
Place the Cube in the hierarchy and rename it to ActionSampleCube
Add a Button component and STYLY_Action_Spanwner to the ActionSampleCube object.
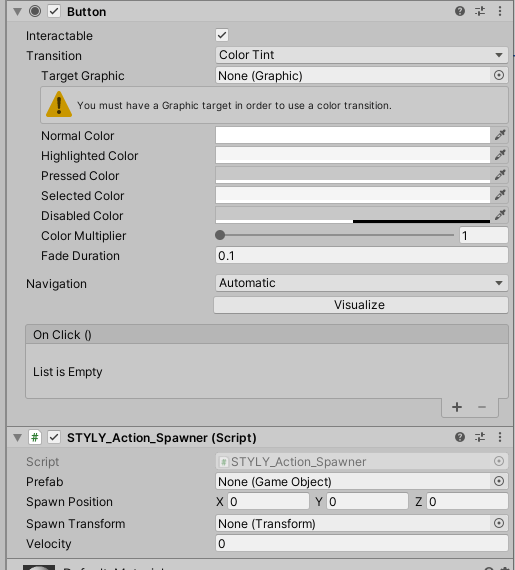
ActionSampleCube Inspector
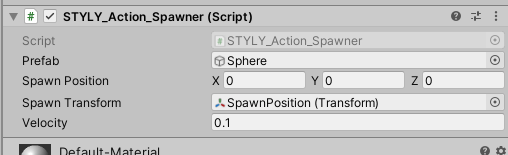
STYLY_Action_Spawner is a script that “creates an object from a prefab”.
If you want to use the STYLY_Action_Spawner component, you need to call it from another event.
STYLY_Action_Spawner Parameter table
| Parameter name | Parameter description |
| Prefab | Prefab of the object to generate |
| SpawnPosition | Relative position to create an object |
| SpawnTransform | Relative Transform that creates an object |
| Velocity | Object velocity |
On Click () Runtime Only Drag and drop the ActionSampleCube object from the hierarchy to the lower form on the Button component.
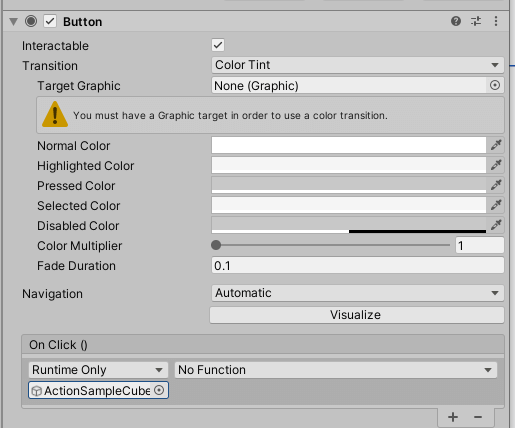
ActionSampleCube Inspector
Select STYLY_Action_Spawner> Spawn () from No Function to skip the event to the STYLY_Action_Spawner component.
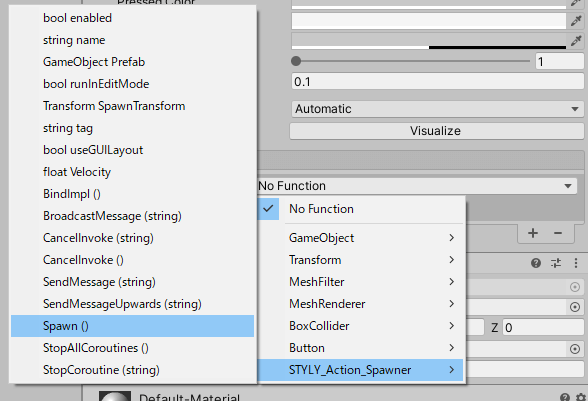
ActionSampleCube Inspector
Next, create an object created by STYLY_Action_Spawner.
Place the Sphere in the hierarchy and deactivate it.
Drag and drop Sphere to STYLY_Action_Spawner to create a STYLY_Action_Spawner (parent) -Sphere (child) relationship.
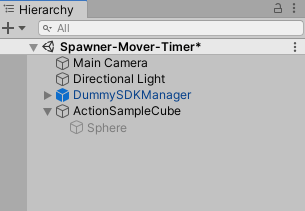
Place Sphere in the hierarchy and deactivate it
In the hierarchy, create an object with CreateEmpty, rename it to SpawnPosition, and set Position (X, Y, Z) = (0,2,0) to set the position to generate.
Drag and drop SpawnPosition to STYLY_Action_Spawner to create a STYLY_Action_Spawner (parent) -SpawnPosition (child) relationship.

Place CreateEmpty in the hierarchy and rename it to SpawnPosition
Select the ActionSampleCube object in the hierarchy and configure it in the STYLY_Action_Spawner component.
- Prefab:Drag and drop the Sphere in the hierarchy
- Spawn Transform:Drag and drop the Spawn Position in the hierarchy
ActionSampleCube Inspector
Please attach Rigidbody to Sphere.
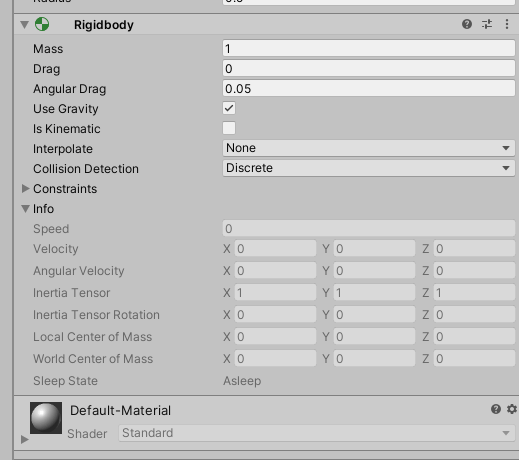
Sphere Inspector
Let’s switch to playback mode.
If you click Cube on the game view screen and a Sphere is created at the position of the SpawnPosition object, it is successful.
Clicking on the Cube will generate a Sphere at the location of the SpawnPosition object
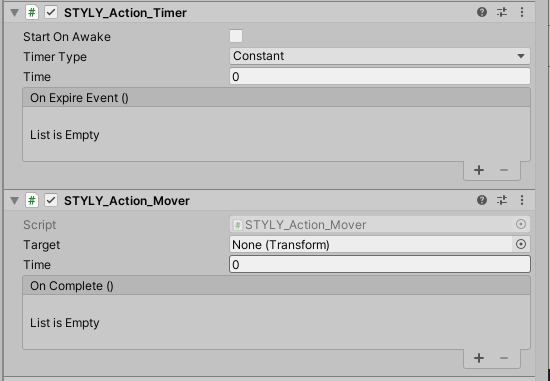
Add the STYLY_Action_Timer and STYLY_Action_Mover components to the Sphere.
Sphere Inspector
STYLY_Action_Timer is a script that “executes an event after the set timer expires”.
STYLY_Action_Timer parameter table
|
Parameter name |
Parameter description |
|
StartOnAwake |
Checked: Start Timer at the start of execution |
|
TimerType |
Constant:Constant value RandomInRange:Value specified by min-max |
|
Time |
Timer firing time |
|
Min_Time |
Random time minimum |
|
Max_Time |
Maximum random time |
STYLY_Action_Timer event table
|
event name |
Event content |
|
On Expire Event() |
Event to be executed after the timer is completed |
STYLY_Action_Mover is a “move object” script.
If you want to use the STYLY_Action_Mover component, you need to call it from another event.
STYLY_Action_Mover parameter table
|
Parameter name |
Parameter description |
|
Destination |
Destination Transform |
|
Time |
Travel time |
STYLY_Action_Mover event table
| event name |
Event content |
|
On Complete() |
Event to be executed after the move is completed |
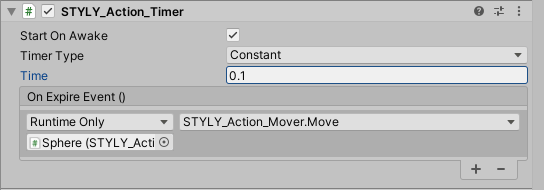
Set the STYLY_Action_Timer component to the following settings.
- Start On Awake:Put a check
- Timer Type:Constant
- Time:0.1
- On Expire Event():Drop and drop Sphere from the hierarchy
- function:STYLY_Action_Mover > Mover()
Sphere Inspector
Place the move destination set by STYLY_Action_Mover.
In the hierarchy, create an object with CreateEmpty, rename it to MoveTargetPosition, and set Position (X, Y, Z) = (-3,3,0).

Place CreateEmpty in the hierarchy and rename it to MoveTargetPosition
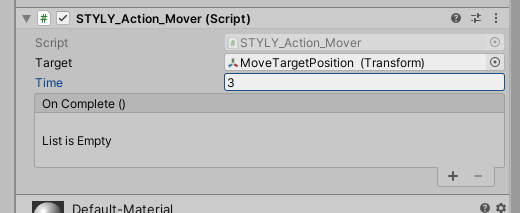
Select Sphere from the hierarchy and set the STYLY_Action_Mover component to:
- Target:Drag and drop the MoveTargetPosition object in the hierarchy
- Time:3
Sphere Inspector
Press the play button and click Cube on the game view screen to check the operation.
Success story
How to link PlayMaker and Interaction SDK
Introducing how to link the Interaction SDK and PlayMaker.
Advance preparation
If you do not have PlayMaker, please install it in advance.
![[Unity Tutorial] Creating a Game Using Playmaker ① From Basic Introduction to Installing](https://styly.cc/wp-content/uploads/2019/06/1200px-160x160.jpg)
If you are new to PlayMaker, you can deepen your understanding by reading the following articles in advance.
![[Unity] Starting Playmaker from Scratch](https://styly.cc/wp-content/uploads/2019/09/PlaymaerCoreConcept-160x160.png)
How to skip Interaction SDK events to PlayMaker
Using STYLY_Action_Timer, I will explain using the gimmick “Fly an event to PlayMaker after a few seconds” as an example.
Receive events with PlayMaker from STYLY_Action_Timer
Right-click on the hierarchy and click 3D Object> Cube to place the Cube.
Rename the Cube to PlayMaker SendEvent.
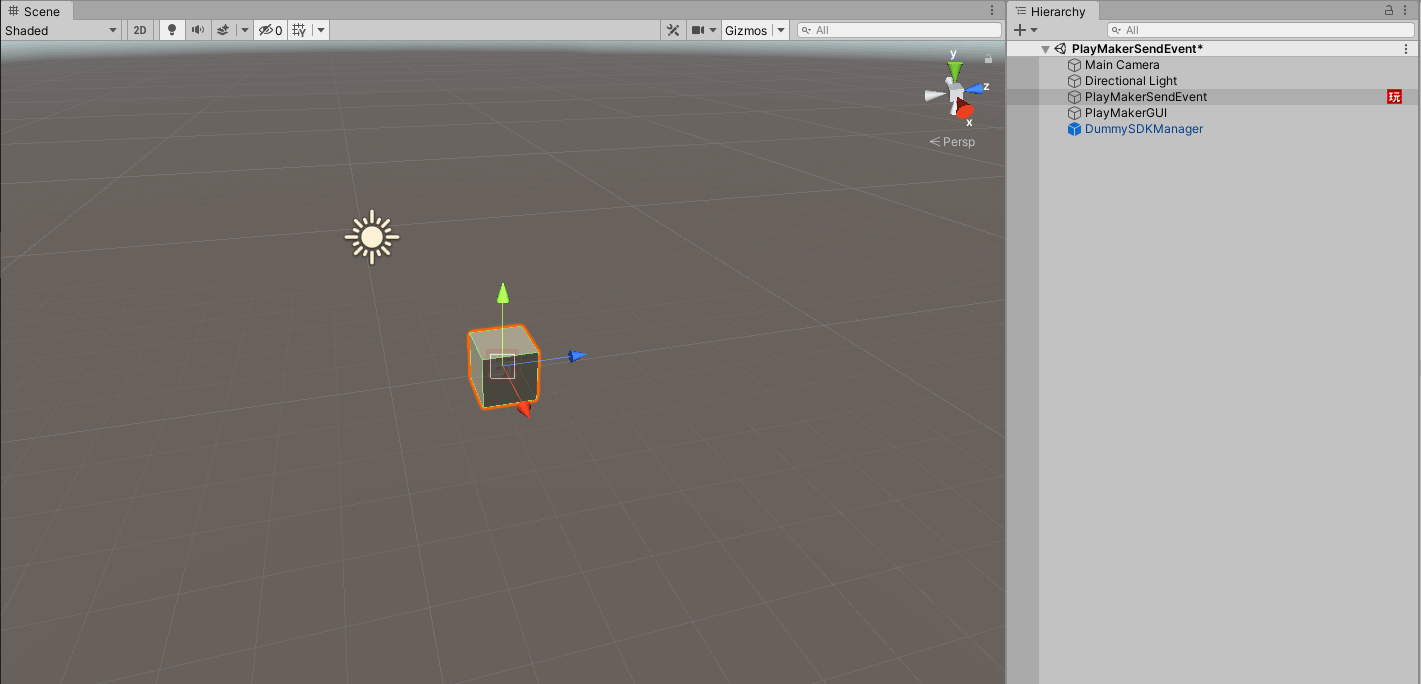
Cube the hierarchy and rename it to PlayMakerSendEvent
Add the STYLY_Action_Timer component and PlayMakerFSM from the Inspector to the PlayMakerSendEvent object.
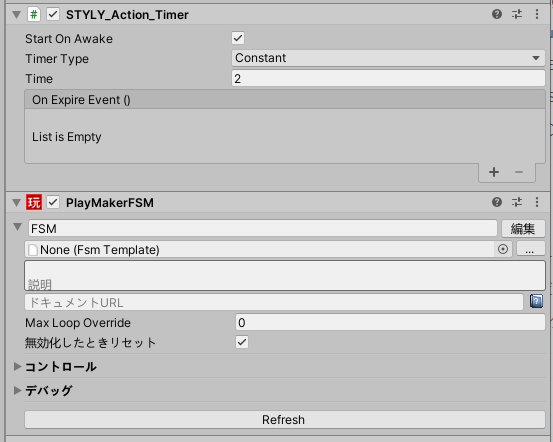
PlayMaker SendEvent Inspector
Drag and drop the PlayMakerSendEvent object into the On Expire Event () of the STYLY_Action_Timer component.
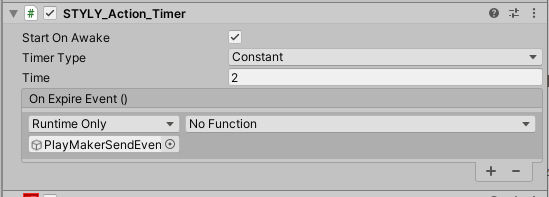
PlayMaker SendEvent Inspector
When you add an object that has PlayMakerFSM added to an event, you can select PlayMakerFSM factions for the function.
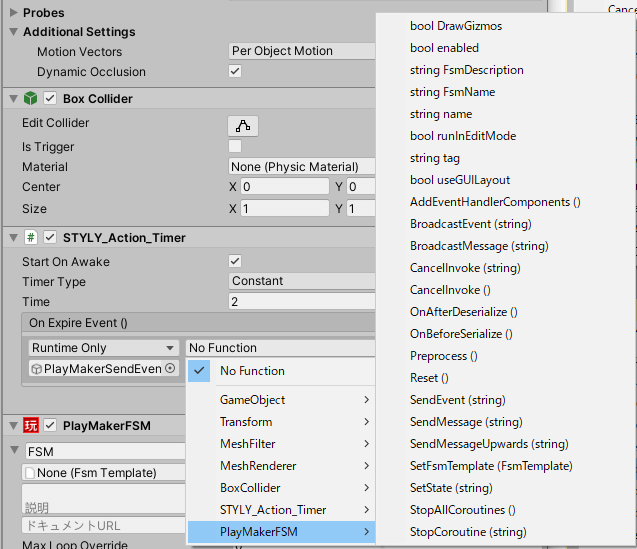
PlayMaker SendEvent Inspector
Select the function PlayMakerFSM> SendEvent (String).
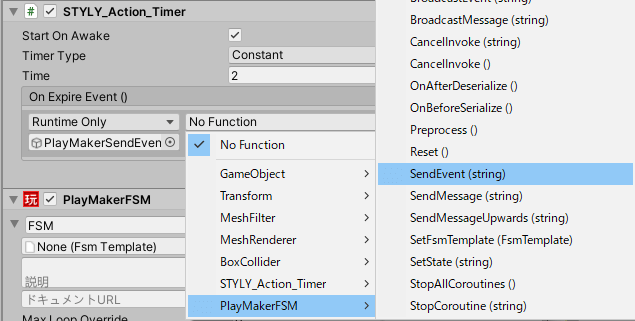
PlayMaker SendEvent Inspector
Define the event to skip in the SendEvent (String) form.
This time I typed “PlayMaker Send Event”.
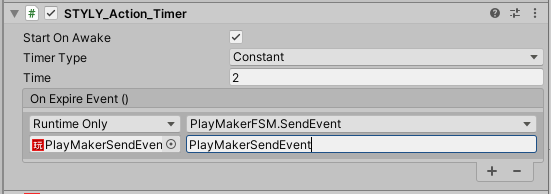
PlayMaker SendEvent Inspector
Open PlayMaker Editor and add a new State2 with Ctrl + left click (Windows) / Command + left click (macOS).
Add Rotate from Action Browser to State2 and set as follows.
- GameObject:Use Owner
- X Angle:90
- Per Second:Put a check
- Every Frame:Put a check
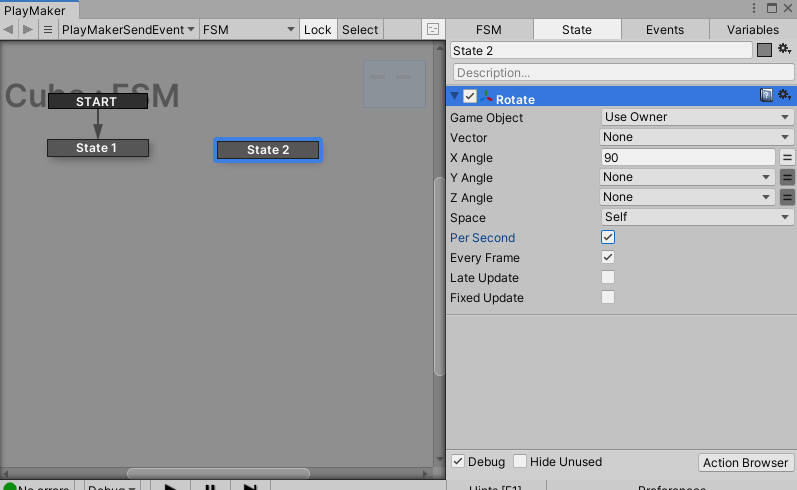
PlayMakerFSM for the PlayMakerSendEvent object
Select the Events tag in the PlayMaker Editor and add “PlayMaker SendEvent” to the Add Event.

PlayMakerFSM for the PlayMakerSendEvent object
Right-click on State2 and select Add Global Trasition> PlayMaker SendEvent.
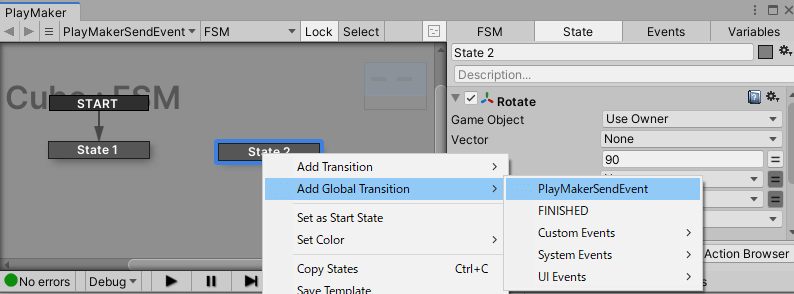
PlayMakerFSM for the PlayMakerSendEvent object
“PlayMaker SendEvent” event jumps in On Expire Event () of STYLY_Action_Timer.
On the PlayMaker side, the “PlayMaker SendEvent” event is received and State2 Rotate is executed.
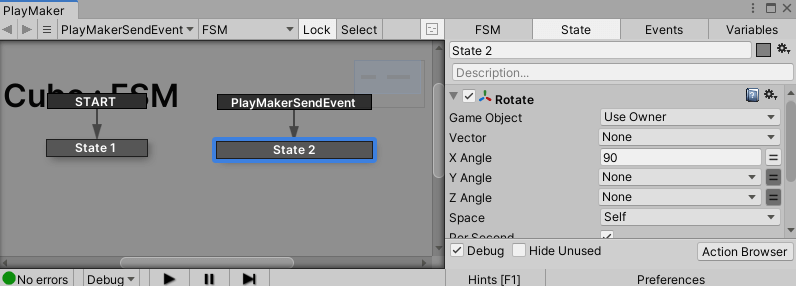
PlayMakerFSM for the PlayMakerSendEvent object
How to debug
How to check the operation using the simulator
After building a gimmick using STYLY’s Interaction SDK, let’s check and debug it using the Unity Editor Simulator.
The condition for using the Unity Editor Simulator is that “Assets with Interaction SDK components added” are placed in the hierarchy.
If it is not placed, drag and drop the STYLY_Simulator prefab into the hierarchy from Assets> STYLY_Plugin> STYLY_InteractionSDK> Simulator> Prefabs in the project window.
How to use Camera Control
| Key | Move |
| W | Advance forward |
| S | Go backwards |
| A |
Go to the left |
| D | Go to the right |
| Q | Rise |
| E | Descent |
Game view Unity editor simulator
How to use Simulate Controller
| operation | Explanation |
| Left Drag | You can move your eyes |
| Left Click | You can perform the same operation as the Trigger Button of the VR device. Draggable is attached to the Cube, so you can move the Cube by hovering the mouse cursor over the Cube and dragging it. Equipment is attached to the elongated Cube, so you can hold it by hovering the mouse cursor over the elongated Cube and clicking. |
| Right Click | You can perform the same operation as the Menu Button of the VR device. It is used to remove the elongated Cube with Equipment. |
Game view Unity editor simulator
After confirming the intended movement using the Unity Editor Simulator, let’s check the operation using the local preview tool.
How to check the operation using the local preview tool
The local preview tool is a tool that allows you to start and check the STYLY VR APP without uploading the assets created in Unity to STYLY.
Although it was released as an experimental version, the official version has been released.
The operation procedure is the same as the following article, so please refer to it.

Checking the operation with the local preview tool
How to upload “Gimmick Asset Created by Creating Interaction SDK” to STYLY
Click here for how to upload assets created in Unity to STYLY.
