In this article I introduce the ability to transition to a different scene while experiencing a scene.
This can be achieved with the custom action “Change STYLY Scene” in Unity’s PlayMaker.
What is custom action?
PlayMaker comes with a variety of functions for creating game logic and interactions.
Each of these functions is referred to as an action.
![[Playmaker Reference] Action Reverse Lookup List](https://styly.cc/wp-content/uploads/2019/09/df5ecbda-ba63-493c-9d22-5f07389e37a6-160x160.jpg)
In STYLY, multiple actions are implemented independently in order to expand the expressive power in VR / AR scenes.
These “uniquely implemented actions” are called custom actions.
Custom actions can be used by downloading the STYLY Plugin for Unity (PlayMaker is required to use custom actions).
Also, please refer to the following article for a list of custom actions available in STYLY.
![[Unity / PlayMaker] STYLY Custom Actions List](https://styly.cc/wp-content/uploads/2021/01/catch-1-160x160.png)
Sample
This is a sample scene created to reflect the content in this article.
*This scene is for VR only.

Operating platform
Change STYLY Scene” will only work in VR environment.
| Platform | Operation |
| VR | 〇 |
| Web | × |
| Mobile | × |
Preparation for using custom actions
In order to use Change STYLY Scene, you need to use Unity’s PlayMaker.
![[Unity] Starting Playmaker from Scratch](https://styly.cc/wp-content/uploads/2019/09/PlaymaerCoreConcept-160x160.png)
Use “Change STYLY Scene”, which is a PlayMaker custom action stored in the Unity Plugin for STYLY.
If you haven’t downloaded it, do so beforehand.
About Change STYLY Scene
Custom actions are stored in the “STYLY” column of PlayMaker’s Action Browser.
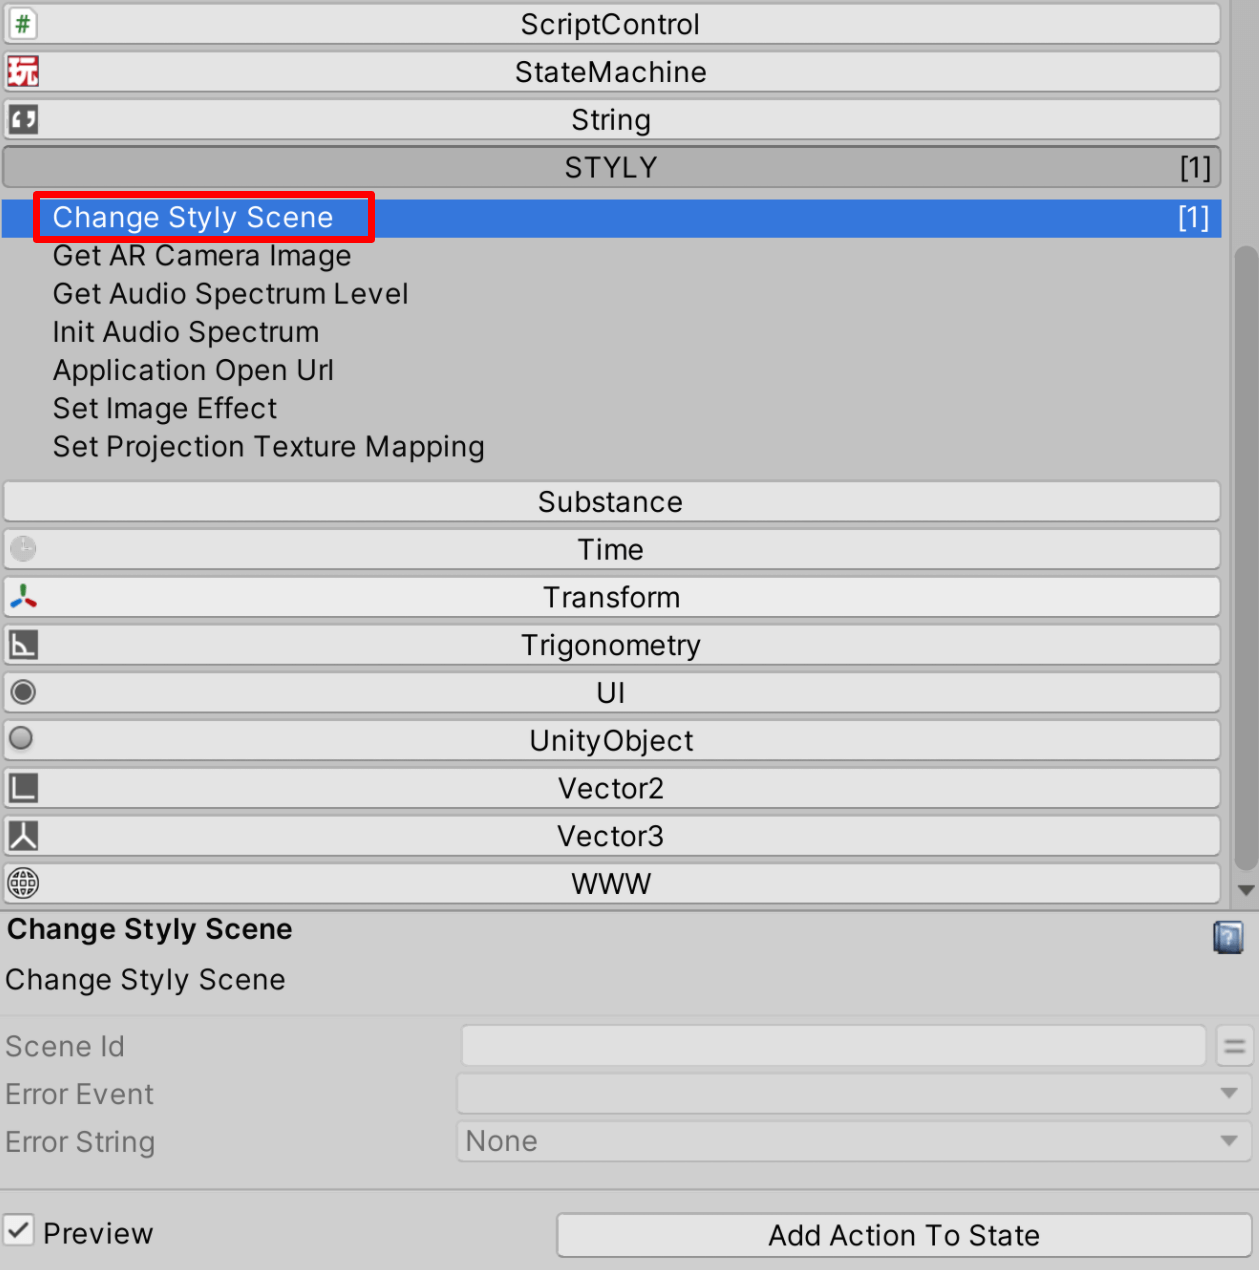
PlayMaker’s Action Browser
This action allows you to transition between scenes.
By combining it with other actions, you can transition the scene with any trigger.
Creating a Sample Scene
In this article, we will create a scene that transitions when the cube is touched with the controller.
Preparing the 3D object
First, we will create a field that will serve as the foundation.
In the Hierarchy window, right-click and select “3D Object > Plane” to create a Plane.
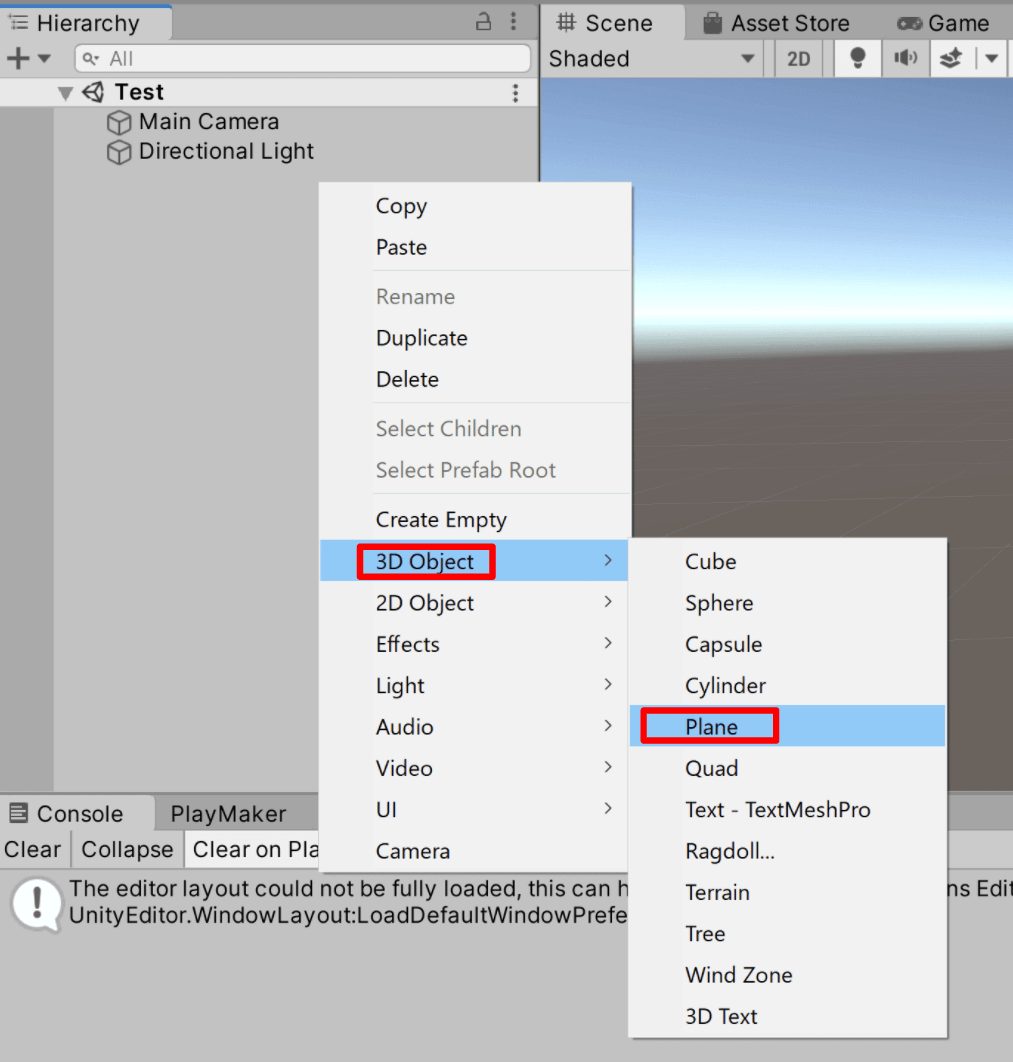
「3D Object > Plane」
Next, we will create a Cube that will be the trigger.
In the Hierarchy window, right click and select “3D Object > Cube” to create a Cube.
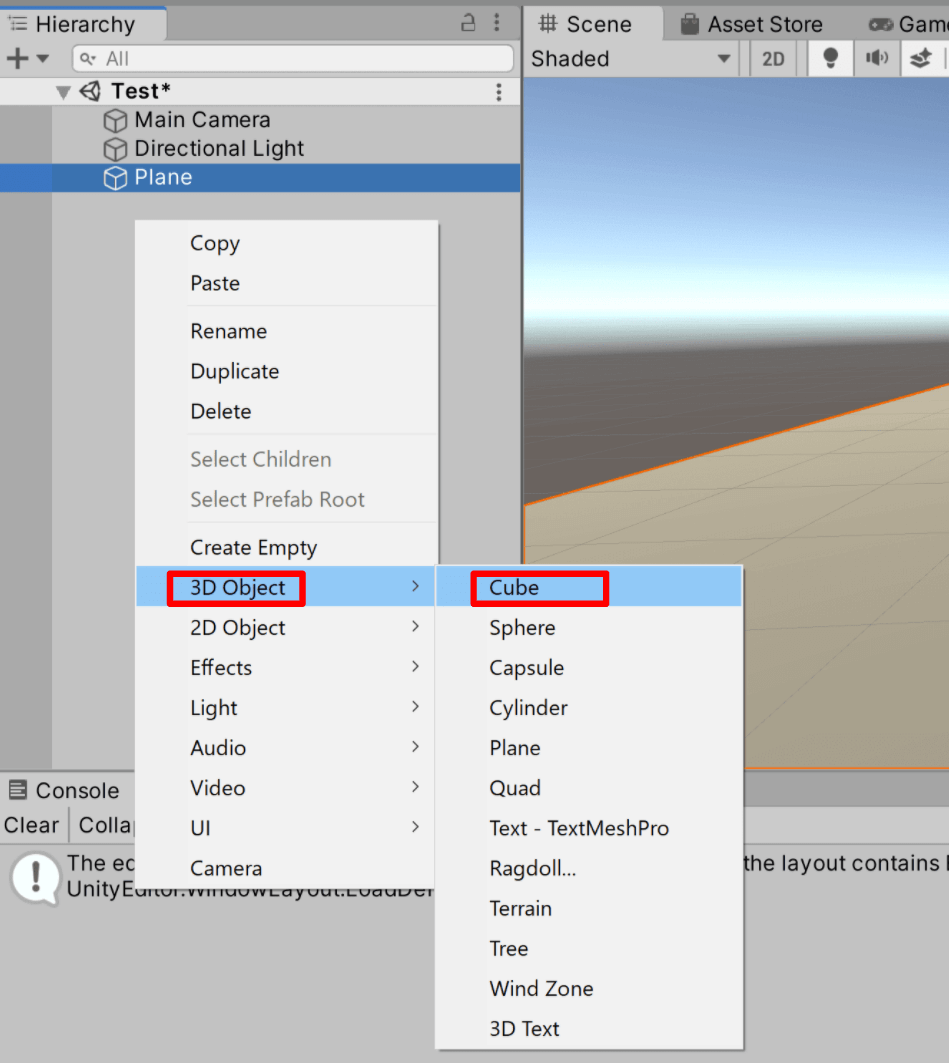
「3D Object > Cube」
Adjust the Position to X:0.0 Y:1.0 Z:2.0 because the Cube is initially buried in the Plane.
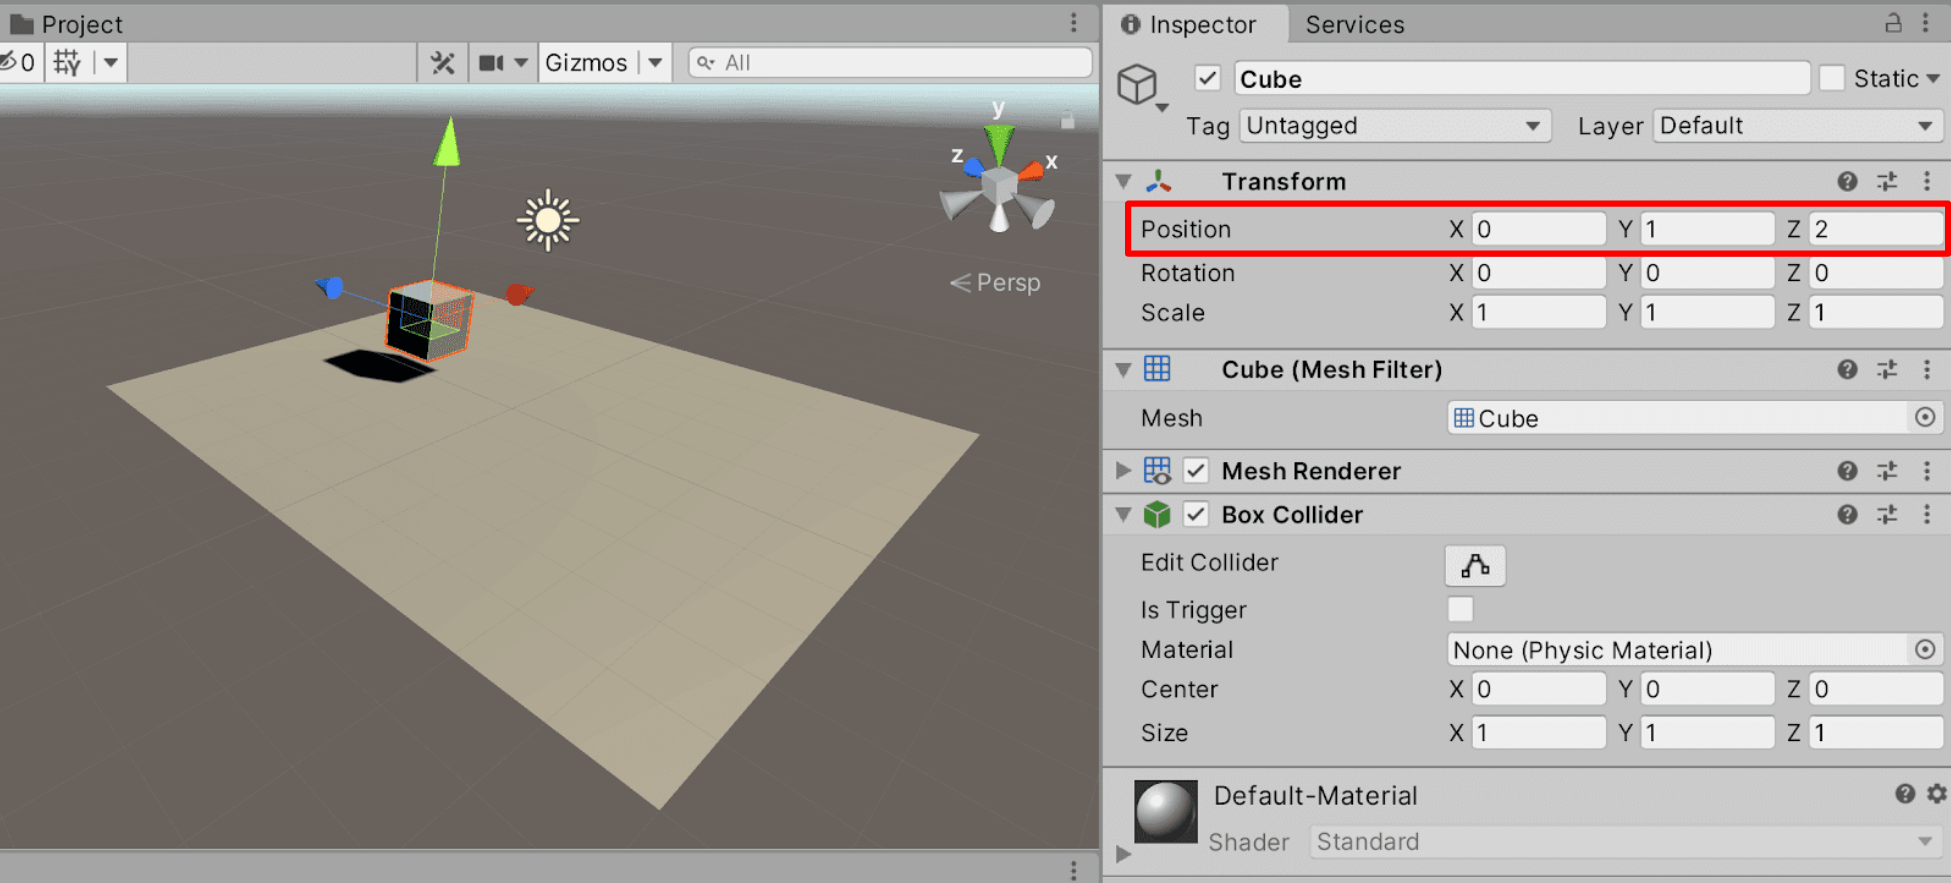
Set the Position to X:0.0 Y:1.0 Z:2.0
Set up PlayMaker
Select the Cube from the Hierarchy window.
Next, right-click on the PlayMaker Editor and select “Add FSM”.
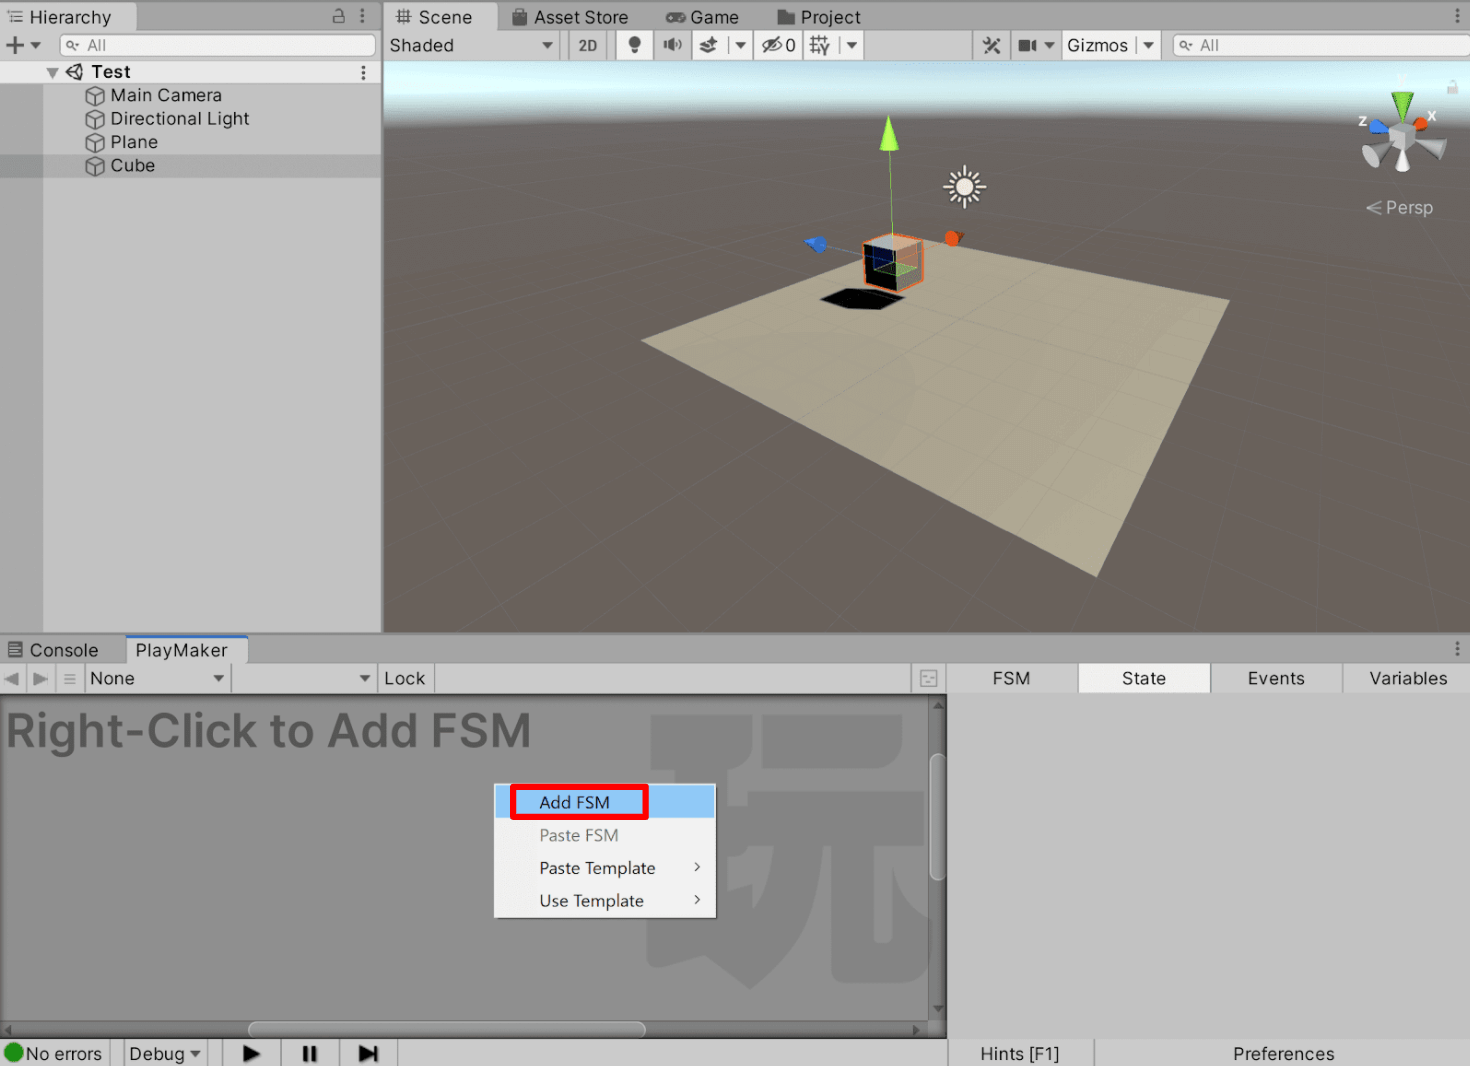
「Add FSM」
Set the action
The next step is to set up the trigger for contact with the controller.
Right-click on State1 in the PlayMaker Editor and click “Add Transition > TRIGGER ENTER”.
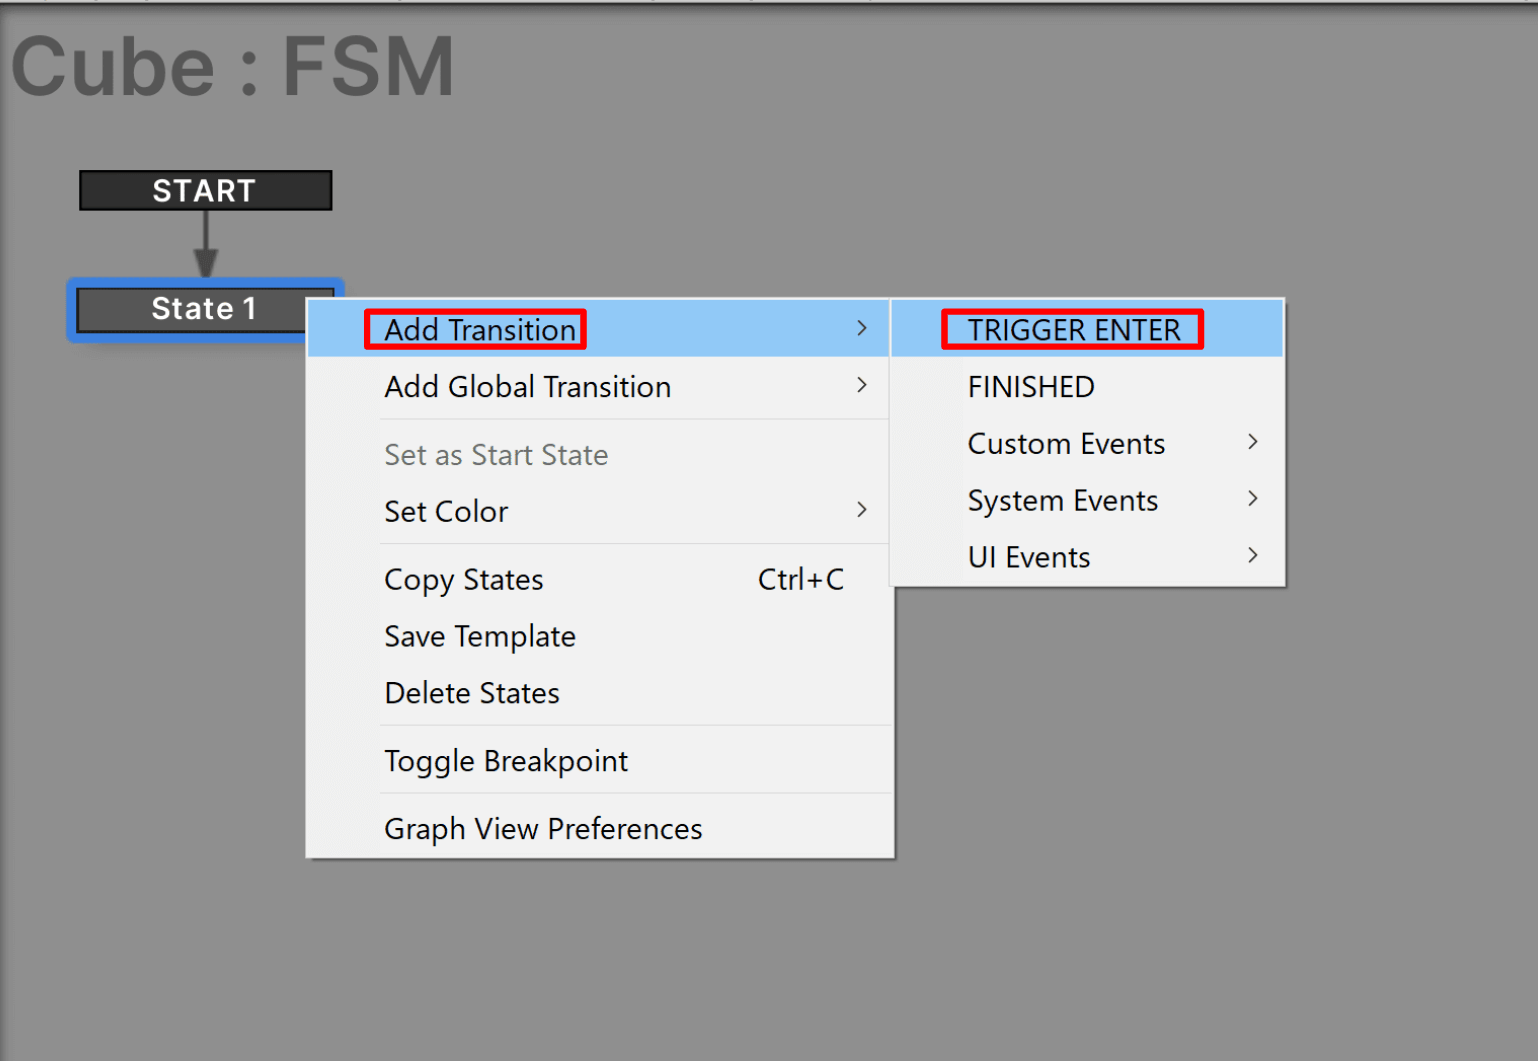
「Add Transition > TRIGGER ENTER」
Adding a State
Add a State to define the behavior of the controller when it comes into contact with the controller.
Right-click on a blank area in the PlayMaker Editor and add “Add State”.
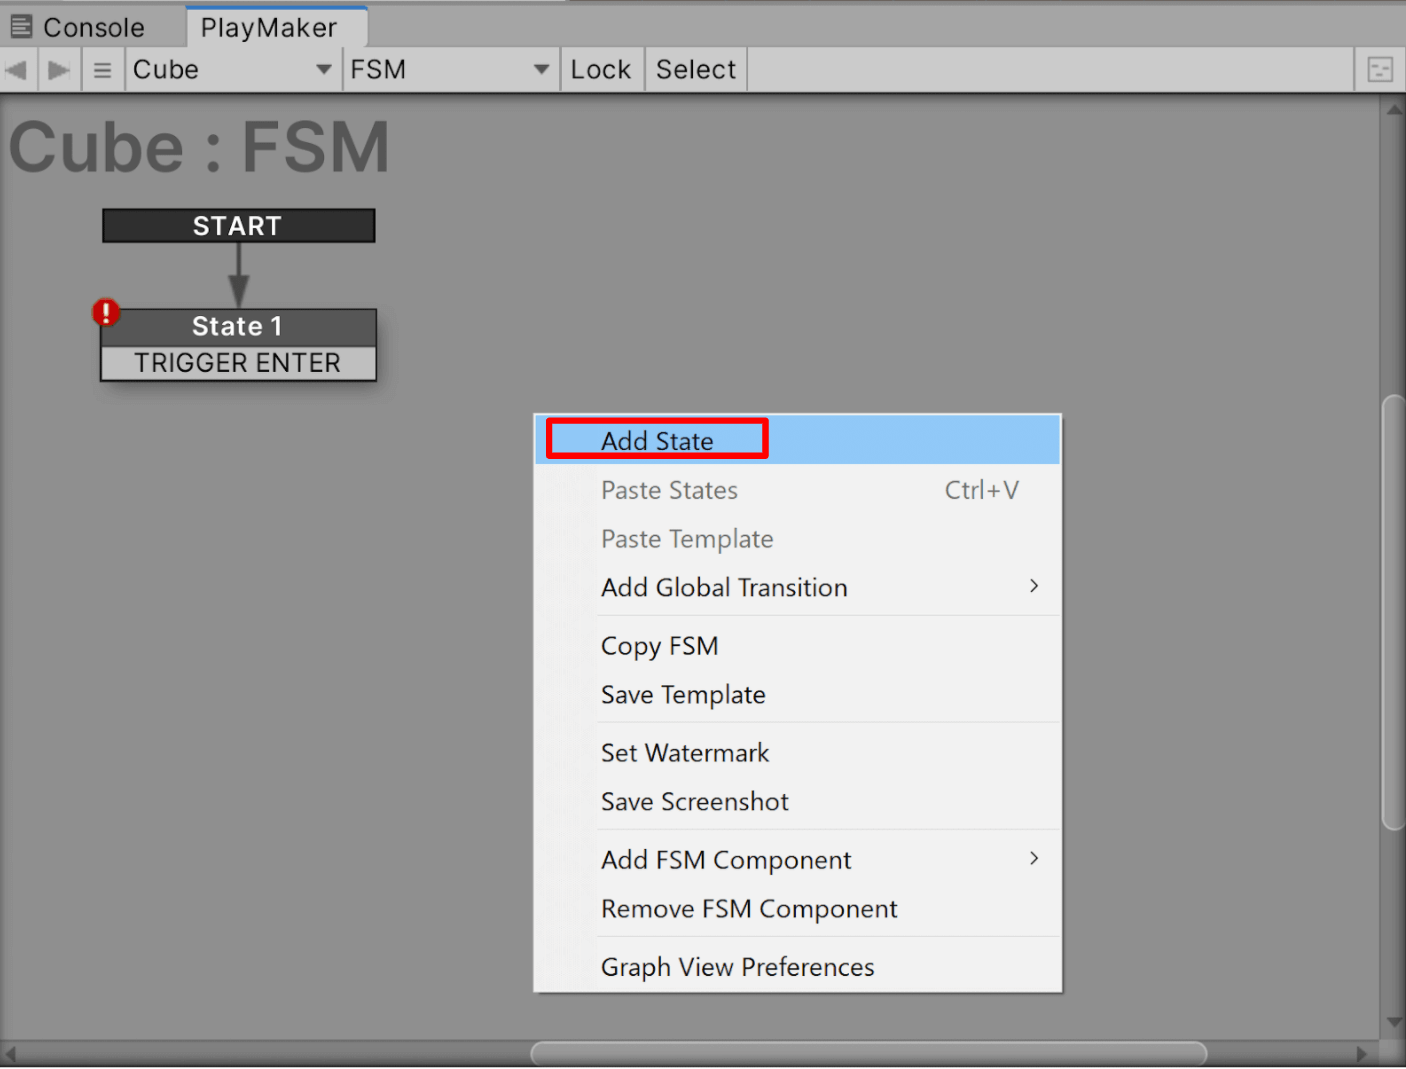
「Add State」
Linking Triggers
Configure the settings to link State1 to State1.
Click and move the part that says “TRIGGER ENTER” and a blue arrow will appear.
Move it to the location of State 1, and release the click.
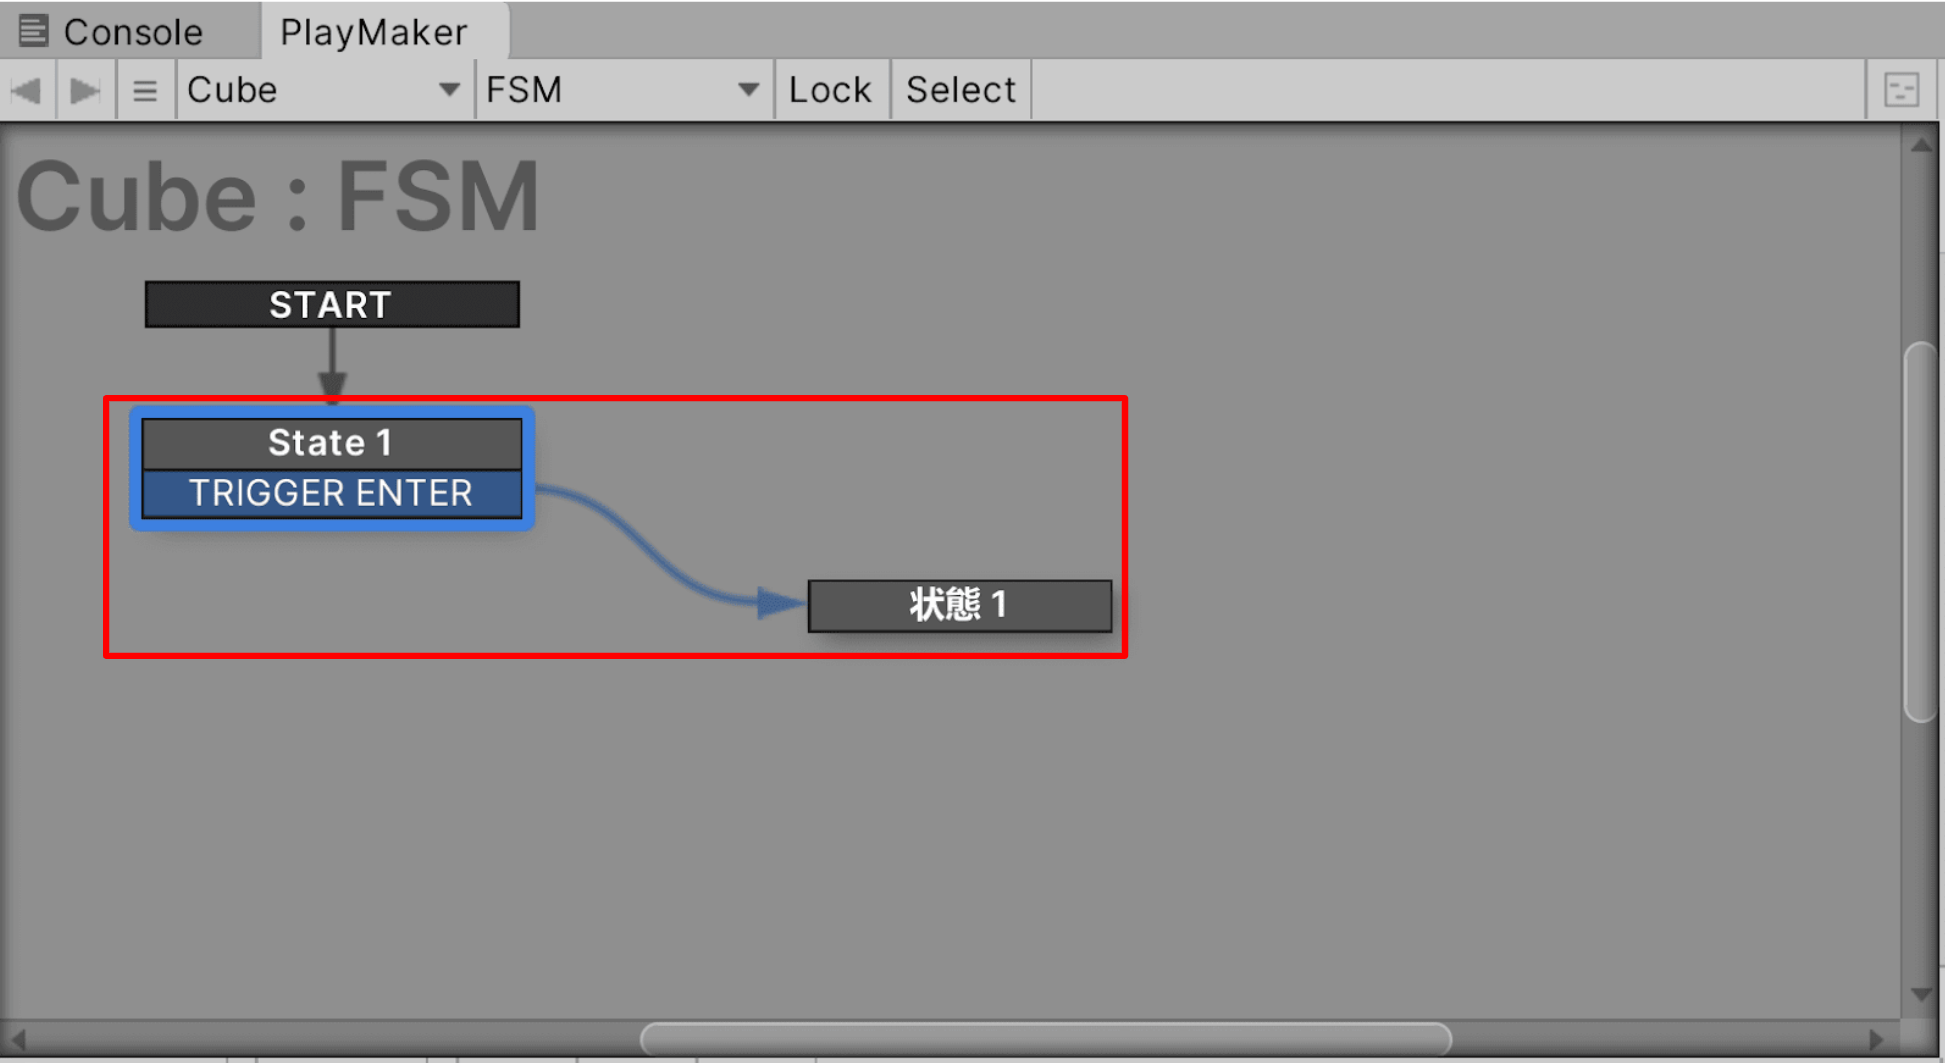
Link State 1 to State 1
Setting the Change STYLY Scene
After clicking on state 1, search for “Change STYLY Scene” in the “Action Browser” and add it to the State.
Then, enter the ID of the scene you want to transition to in Scene Id.
The scene ID is the scene URL,”https://gallery.styly.cc/scene/11e6ac82-0d04-423b-8c3a-6d18b6e2a4cd”
“11e6ac82-0d04-423b-8c3a-6d18b6e2a4cd” after “scene/” is the scene ID.
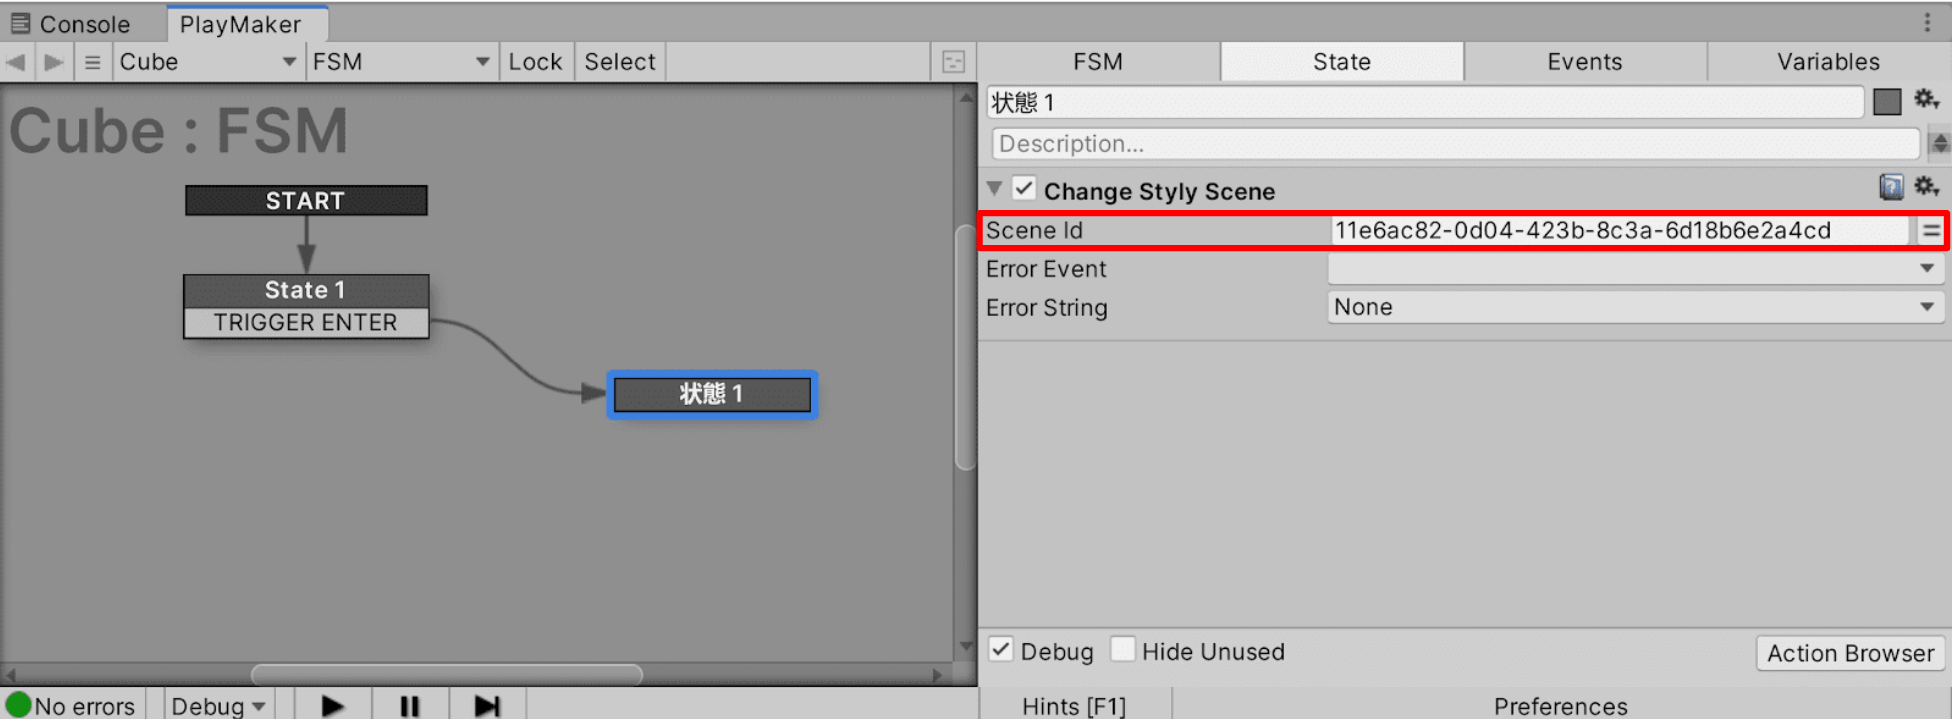
Enter “Scene Id”
Summary
In this article, we have explained the custom action of Change STYLY Scene.
As shown above, it is possible to create a scene that transitions when touched with a controller.
Applications include scenes that transition over time, or scenes that transition randomly.
It is also possible to create scenes like portals that group scenes together, as is often seen in VRChat.
Uploading to STYLY
Let’s actually upload the scene to STYLY and use it.
In this case, we will upload the Unity scene directly to STYLY, so please refer to this page.

How to create an account

Introduction to NEWVIEW SCHOOL ONLINE
NEWVIEW SCHOOL ONLINE is now open! Learn the basics of Unity and PlayMaker, necessary for creating VR/AR content, and learn the process (and creation techniques) for developing attractive content available on STYLY.
- Create VR/AR content without writing any programming code.
- Professionally supervised Unity courses available.
- Explore additional elements, such as photogrammetric production methods and content lightening.
- Learn the concept of creating VR/AR content.
