This article presents guidelines for creating a wearable “AR Human Template” in STYLY Studio for the STYLY mobile app to provide a more engaging and convenient user experience. For a detailed process of creating a wearable “AR Human Template,” please refer to the “STYLY Studio Manual – Making a Wearable AR Human Template” from the link at the end of the article.
*The AR human template referred to here is not AR that augments not only specific body parts such as the face or feet, but which enhances the space around the person (the subject). In other words, the target of the augmented experience has a range of several meters centered on the person.

Wearable AR Human Template in use
Learning Examples for the AR Human Template Work
Here are some scenarios in which the AR Human Template was used.
The common features described below are examples of works created in accordance with the guidelines (components to be considered) when creating AR Human Templates.
この投稿をInstagramで見る
この投稿をInstagramで見る
③WABI
この投稿をInstagramで見る
Use the following AR Human Template on your own smartphone. It will be easier for you to picture how it looks if you have someone else who can act as the subject for you.
Scan the QR code in the STYLY mobile app to launch the scene.
For a better AR experience, position the origin by tapping the smartphone screen parallel to the flat ground. Ideally, the origin mark should be roughly two meters away in as open a space as possible and then tap it. (The position of the origin mark indicates where the AR will appear.)

WABI
Understanding the components of the AR Human Template
When creating an AR Human Template in the STYLY Studio, the following components must be considered before creating a standard template or pattern.
The three primary components to be considered for the human experience are the subject (3D human model), the asset (3D models and 2D material, such as image), and the placement (distance and relationship between the subject and the asset).
The Subject (3D human model)
Assuming the specific situation in which you will use the AR Human Template, design the extent of the experience to be had from the starting point of the 3D human model.
Place the 3D human model at the center of the circle that represents the origin (0,0,0) in the STYLY Studio and consider the presence of the human subject.
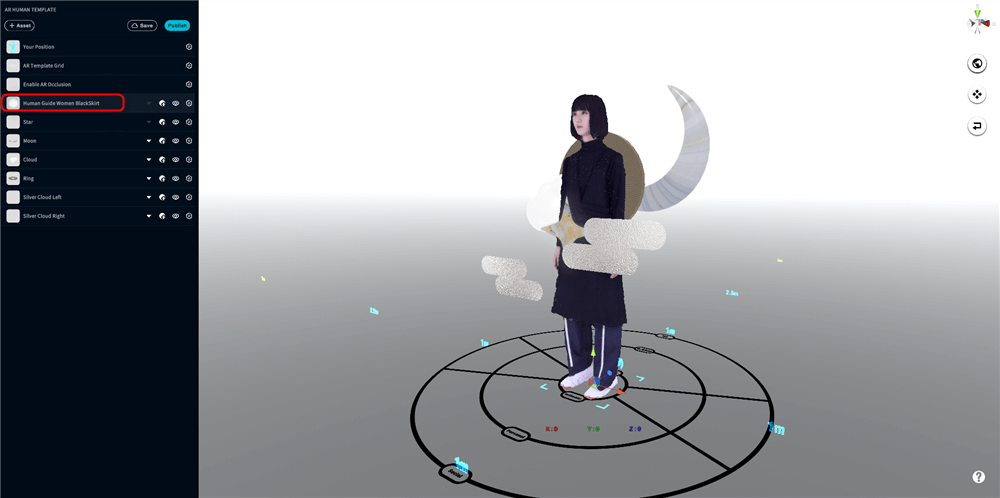
Design with the subject as the starting point
As you have experienced in the previous section, the AR model will appear from the origin mark displayed when the AR Human Template (AR scene) of the STYLY mobile app is launched.
The origin mark indicates the subject’s position at the production stage.
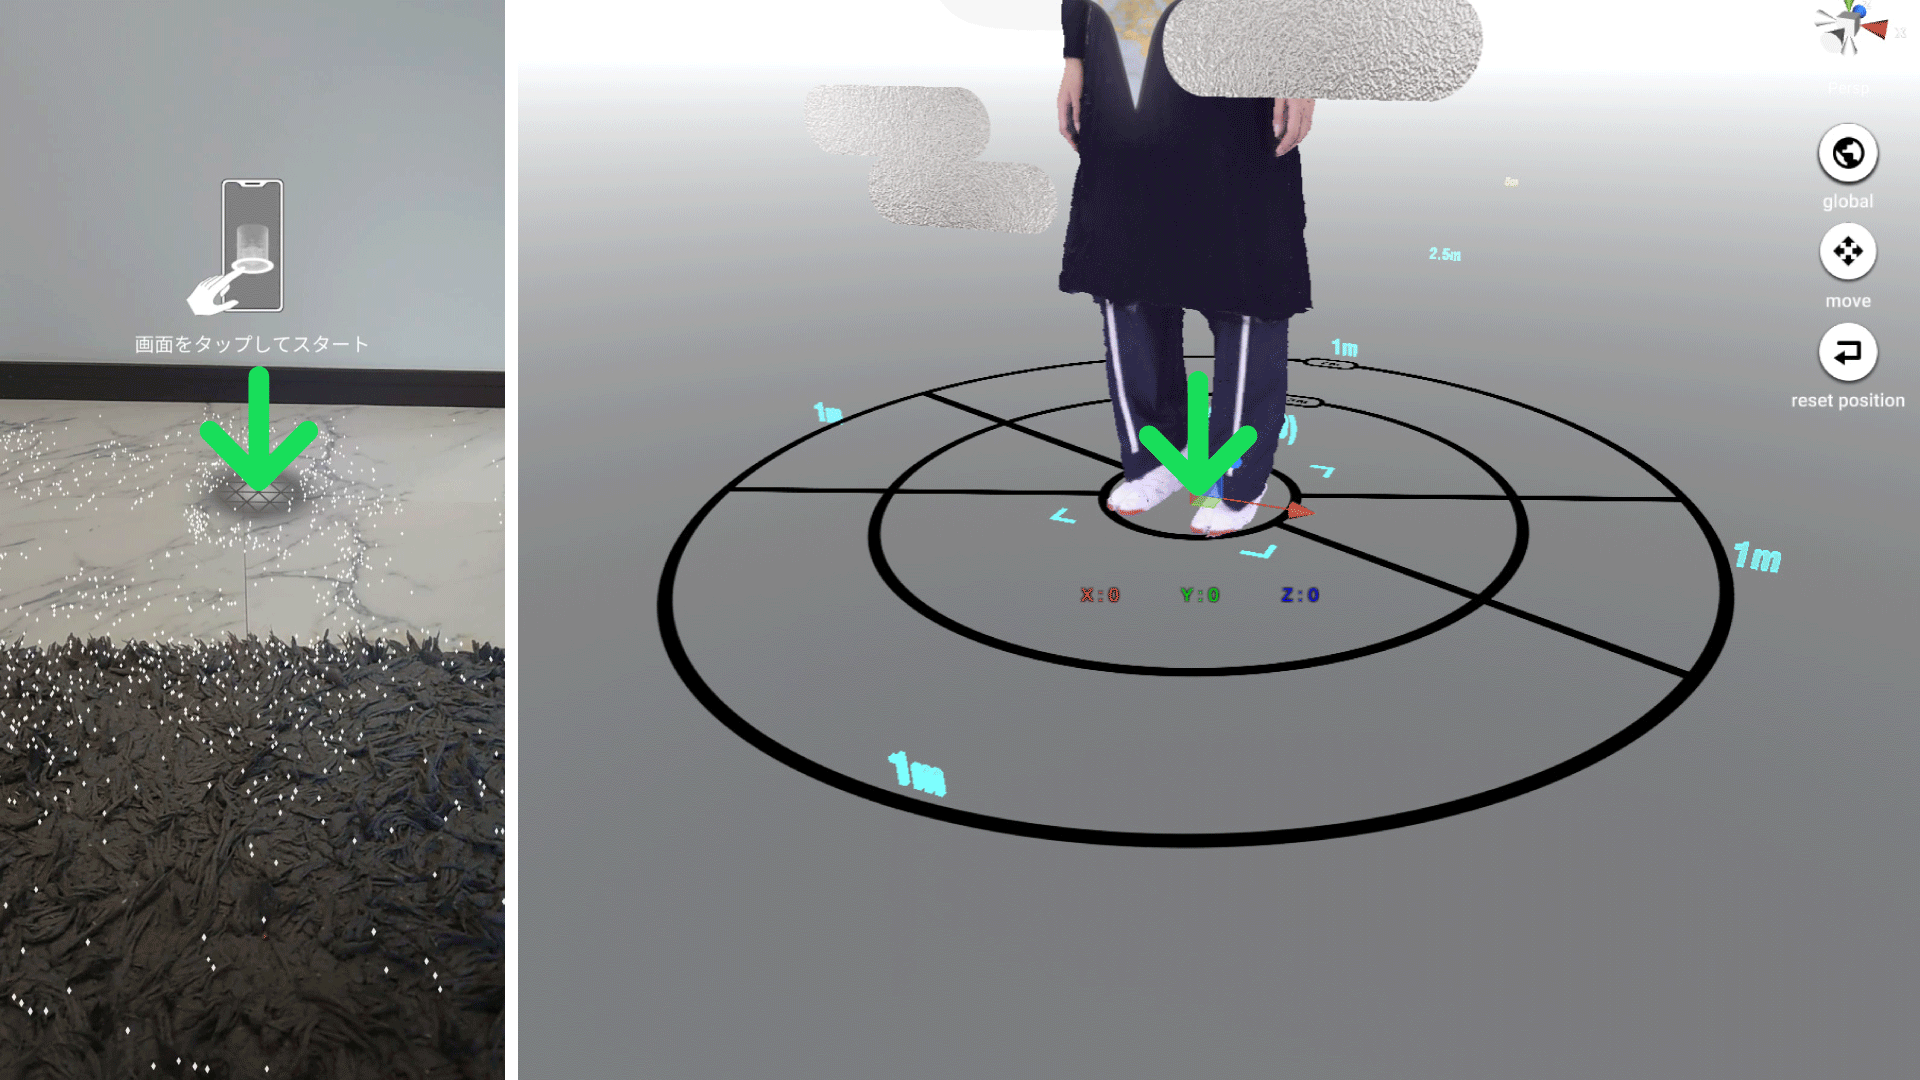
Launching the AR scene (plane surface detection)
The Asset (3D models and 2D materials, such as image)
The assets you use will contribute to the visuals of the AR Human Template and the emotional impact on those who will see it.
The goal is to reflect the kind of AR experience you want to create. The viewer will be able to clearly identify the starting point of the experience if the tone and manner of the assets are expressed in line with the theme and concept of the work.

Example of asset combination
The following three points must be considered for assets used in the Human AR Template.
- Use the“Human AR Template XX”
The Human AR Template XX is a guide to help you create wearable AR Human Templates (AR scenes) in the STYLY Studio. The template is automatically hidden when launching an AR scene in the STYLY mobile app.
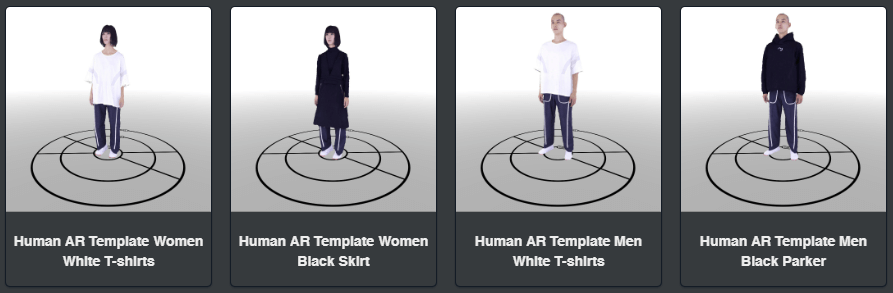
Human AR Template XX
- Do not delete the “AR Template Grid”
The AR Template Grid is a grid to facilitate the creation of AR scenes. The grid is automatically hidden when launching an AR scene in the STYLY mobile app.

AR Template Grid
- Use “Enable AR Occlusion” setting and the AR Occlusion feature.
The “Enable AR Occlusion” setting is set by default when a new AR scene is created.
Enable AR Occulusion
A thorough instruction regarding the placement (distance and relationship between the subject and the asset) is given in the next section.For further details on the AR occlusion feature, please refer to the following articles.
We have added a new feature “AR Occlusion” that integrates Reality and Virtuality in the STYLY Studio - Avoid using “Skybox”
Using Skybox will not allow you to view the real landscape.

Skybox
The Placement (distance and relationship between the subject and the asset)
Similar to how an optimal distance must exist for interpersonal communication depending on the situation, there must be a suitable distance relationship between the subject and the asset in the AR Human Template.
The following tips will help you to understand the characteristics of each space for appropriate positioning of the subject and assets.
Moreover, you must preview how these positions will appear in the real world when you experience the AR Human Template (AR scene) to evaluate whether they match the image you have in mind.
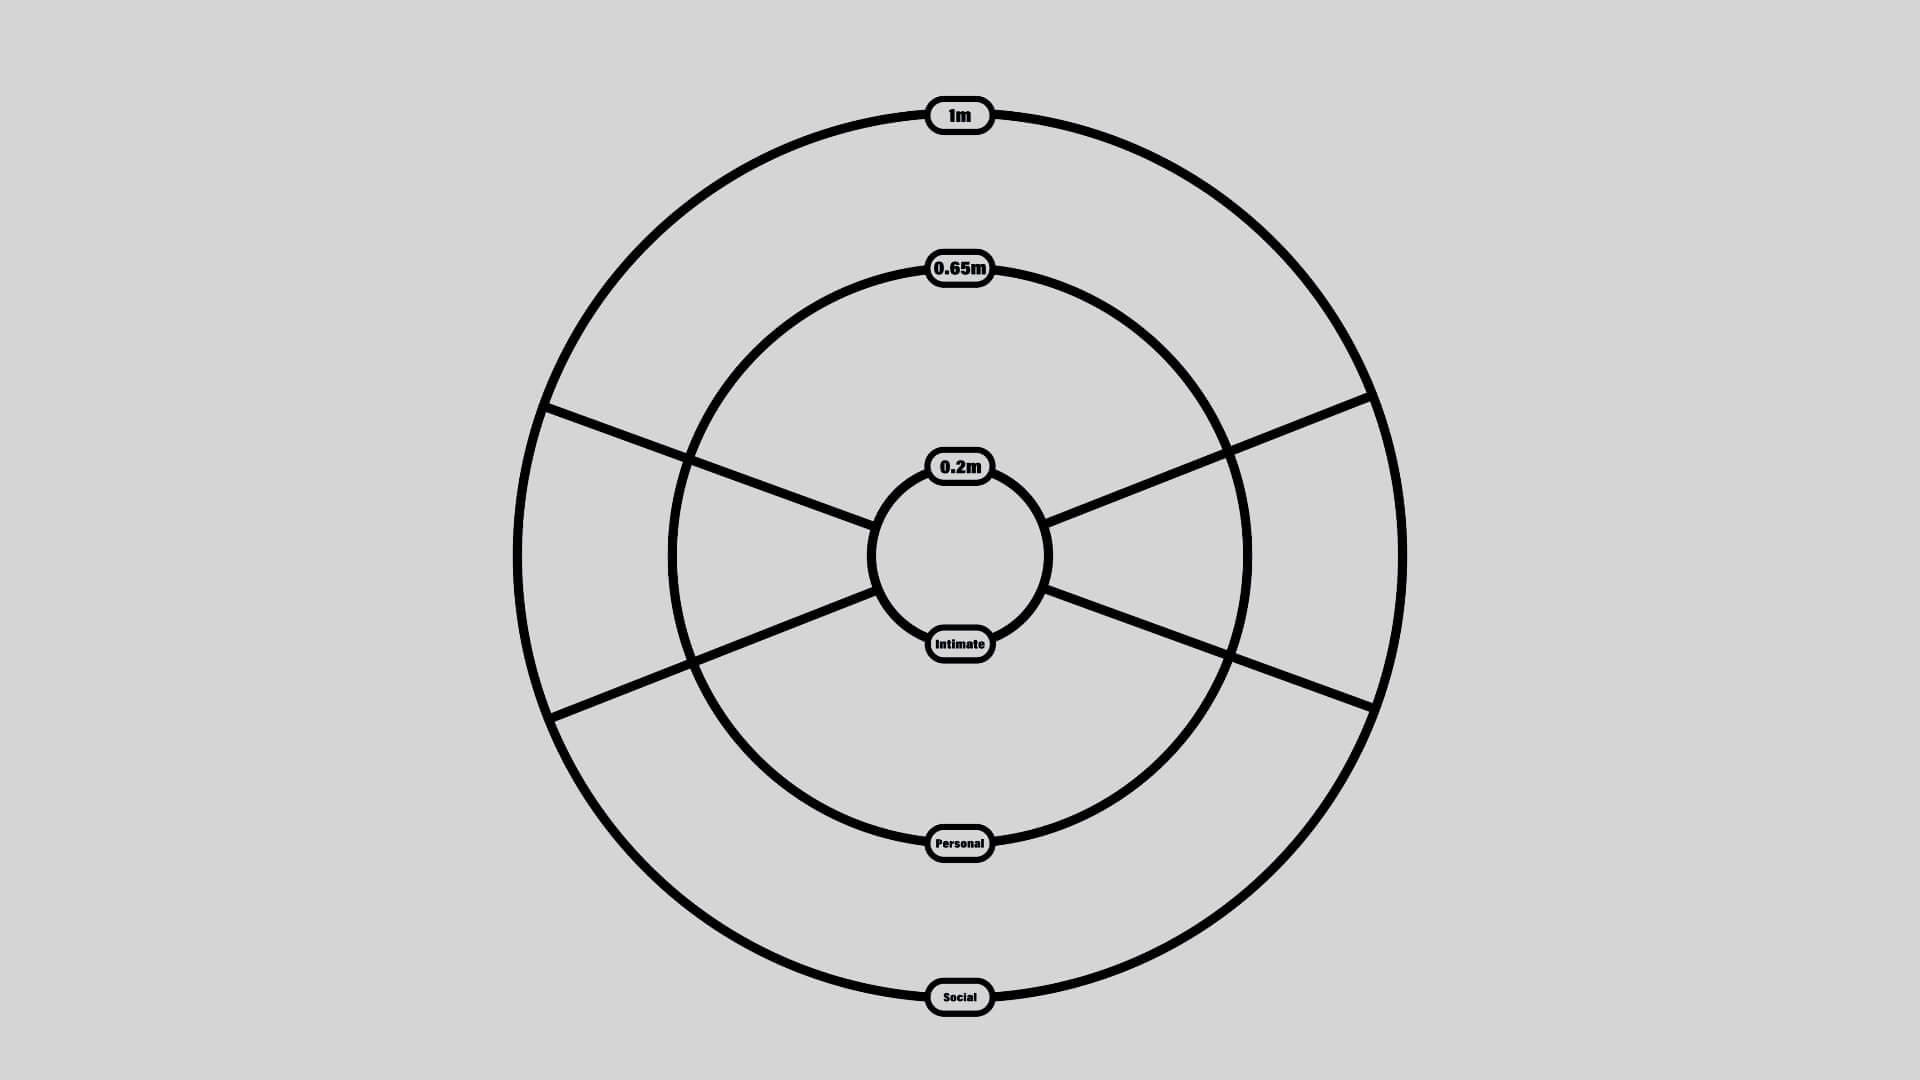
Distance Guide
The following three main guides should be considered:
- Social space inside and outside the 1m (2m diameter) notation
- Suitable range for environmental asset placement.
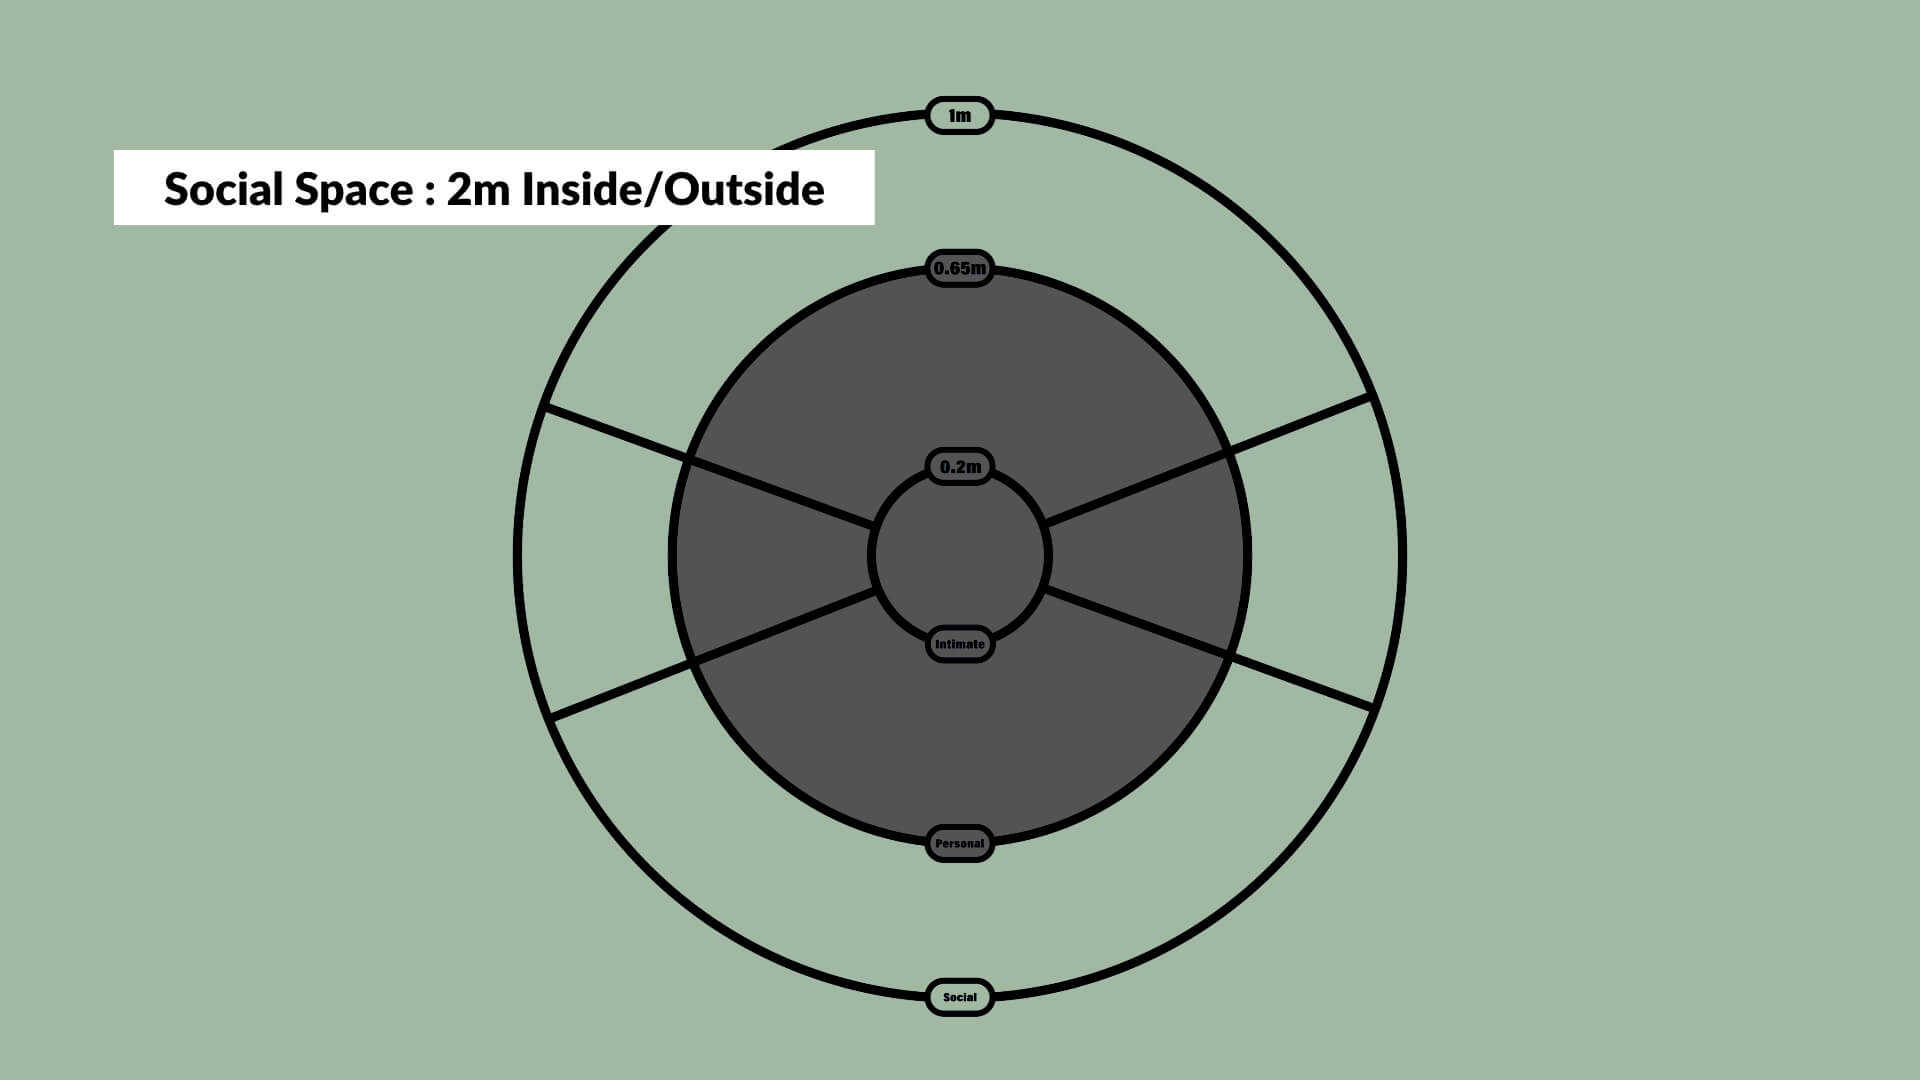
Social Space
- Personal space within 0.65m (1.3m diameter) notation
- Suitable range for person-centered asset placement.
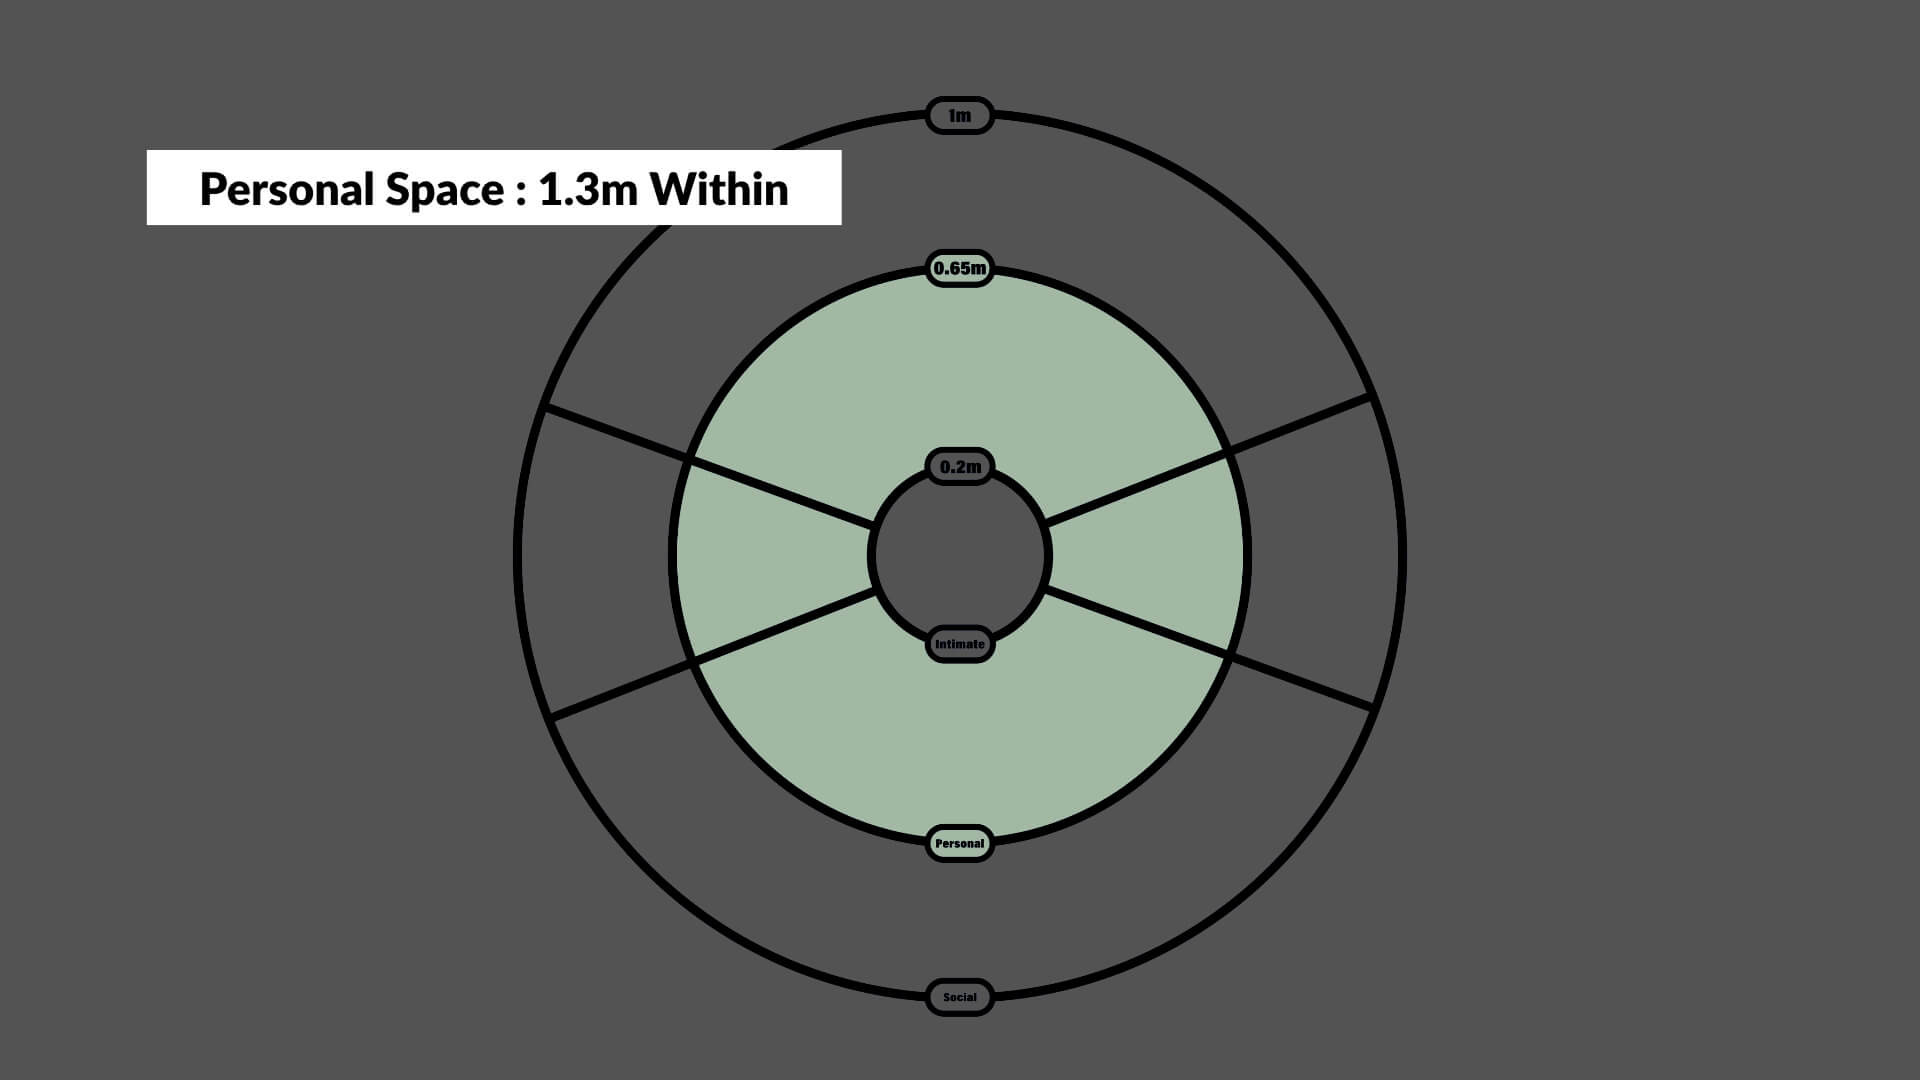
Personal Space
- Intimate space inside the 0.2m (0.4m diameter) notation
- Not a suitable area for asset placement because assets can overlap with a person.
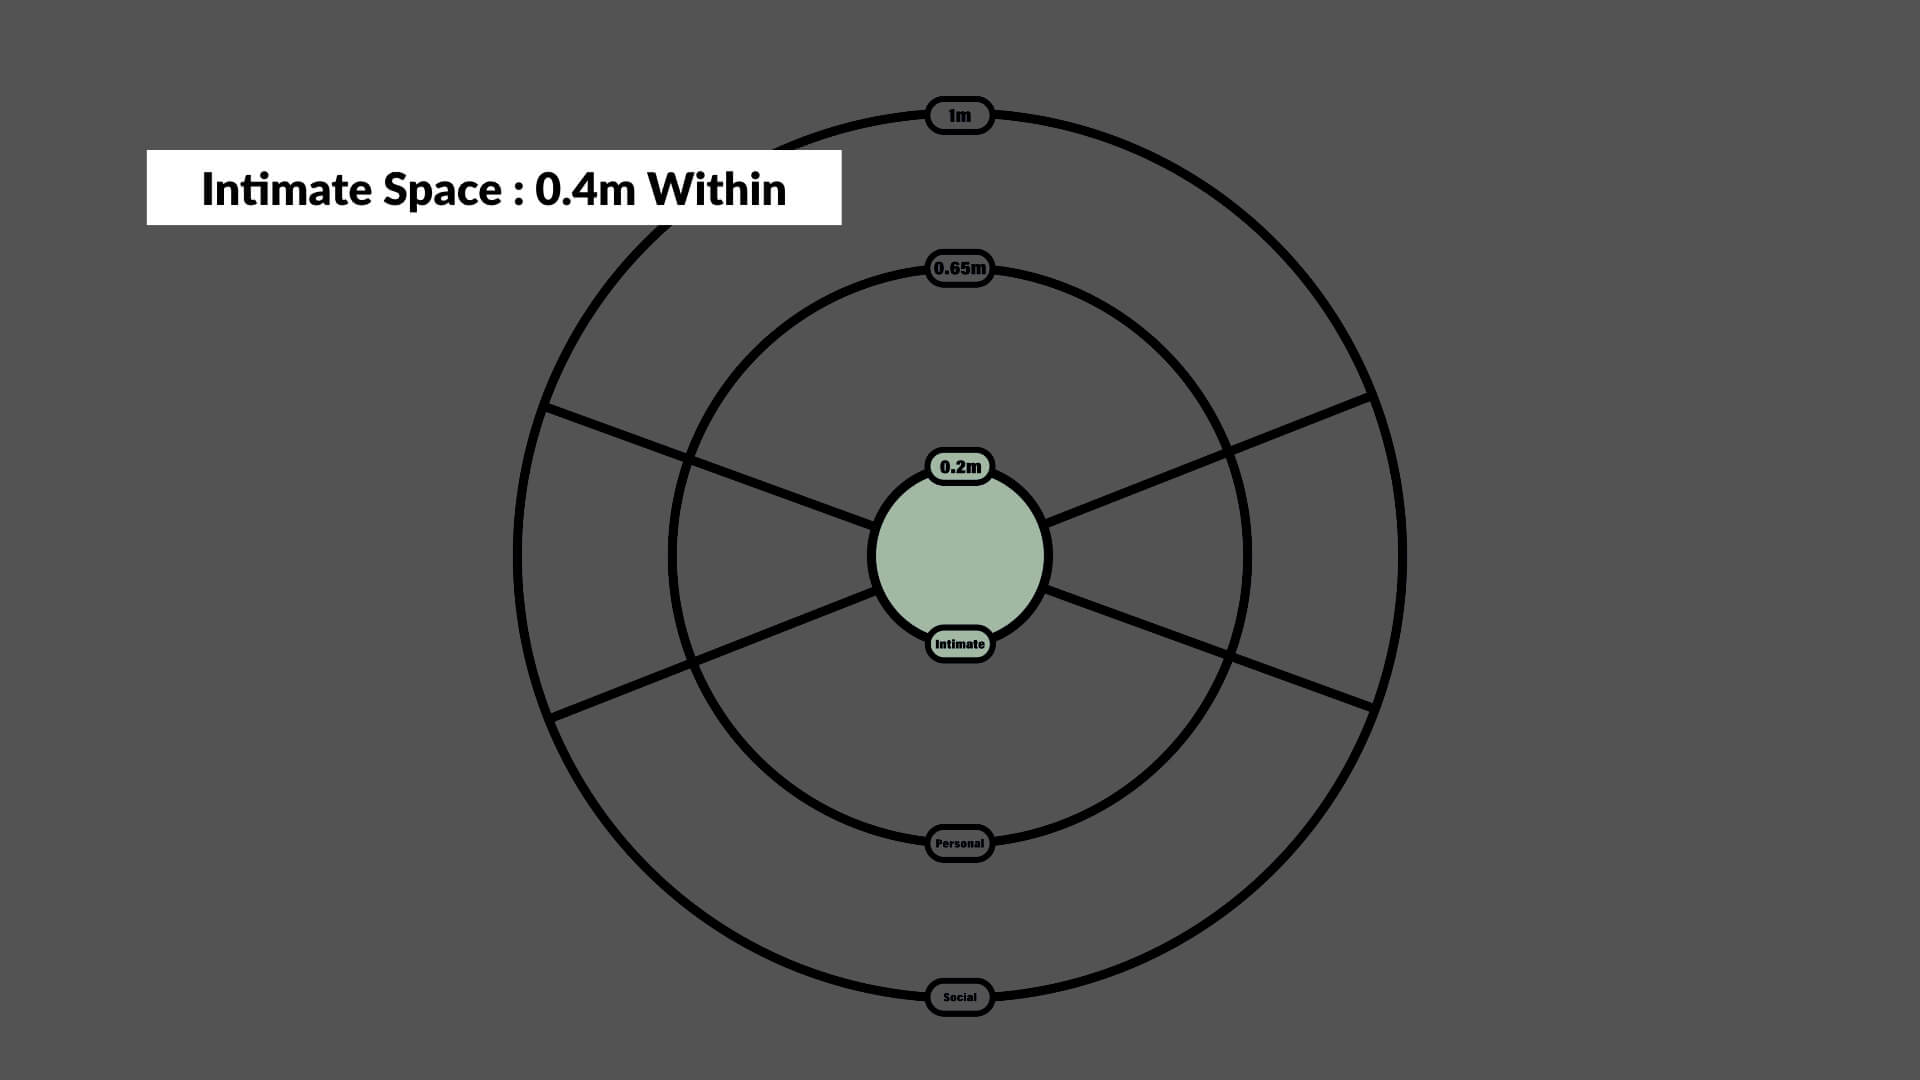
Intimate Space
This GIF animation demonstrates how to position the asset appropriately in relation to the subject.

Arrangement example
In addition, the presence or absence of the AR Occlusion feature creates the following differences in viewing and experience.
The same AR scene with/without AR occlusion is activated at the same position behind the red traffic cone.

Start the scene behind the red traffic cone.
With the AR occlusion function on the left, the subject (human 3D model) is displayed behind the red traffic cone because the positional relationship in real space is reflected.
Meanwhile, without the AR occlusion function on the right, the subject (human 3D model) is displayed in front of the red traffic cone.

Left: With AR occlusion, Right: Without AR occlusion
The AR occlusion function must be used to facilitate the natural blending of the 3DCG into reality.
Create an AR Human Template with STYLY Studio
Using previous examples of work and components as a guideline, let us create a wearable AR Human Template with a human at its center.

Also, if you are interested in learning more about the STYLY mobile app, please refer to the following article.
For questions about STYLY, bug reports, and improvement requests, please contact the STYLY FORUM
https://en.forum.styly.cc/support/discussions
Edited by SASAnishiki
Translated by passerby1